WSL2 + Ubuntu 22.04 + ROCm 7.2.1 + Conda AI 开发环境配置
环境:Windows 11 + WSL2 + AMD Radeon RX 7800 XT(Adrenalin 26.2.2)+ ROCm 7.2.1 + PyTorch 2.9.1
前置条件
| 项目 | 要求 |
|---|---|
| Windows 版本 | Windows 11(WSL2 必需) |
| AMD 显卡驱动 | Adrenalin Edition 26.2.2 |
| WSL2 | 已启用 |
| 发行版 | Ubuntu 22.04 LTS |
第1步:安装 Ubuntu 22.04 WSL
在 Windows PowerShell / Terminal 中执行:
powershell
wsl --install -d Ubuntu-22.04安装完成后设置用户名和密码,然后进入 WSL:
powershell
wsl -d Ubuntu-22.04第2步:配置 apt 清华镜像源
bash
# 备份原配置
sudo cp /etc/apt/sources.list /etc/apt/sources.list.bak.$(date +%Y%m%d)

# 写入清华镜像源
sudo tee /etc/apt/sources.list << 'EOF'
deb https://mirrors.tuna.tsinghua.edu.cn/ubuntu/ jammy main restricted universe multiverse
deb https://mirrors.tuna.tsinghua.edu.cn/ubuntu/ jammy-updates main restricted universe multiverse
deb https://mirrors.tuna.tsinghua.edu.cn/ubuntu/ jammy-backports main restricted universe multiverse
deb https://mirrors.tuna.tsinghua.edu.cn/ubuntu/ jammy-security main restricted universe multiverse
EOF

sudo apt update
第3步:安装基础依赖
bash
sudo apt install -y \
    build-essential \
    cmake \
    git \
    wget \
    curl \
    gnupg2 \
    software-properties-common \
    libjpeg-dev \
    python3-dev \
    python3-pip \
    pkg-config \
    libnuma-dev \
    libdrm-dev \
    aria2
第4步:添加 ROCm 7.2.1 仓库
bash
# 添加 AMD GPG 密钥
wget -qO - https://repo.radeon.com/rocm/rocm.gpg.key | sudo apt-key add -

# 添加 ROCm 7.2.1 仓库
echo 'deb [arch=amd64] https://repo.radeon.com/rocm/apt/7.2.1 jammy main' | sudo tee /etc/apt/sources.list.d/rocm.list

# 关键:设置 apt 优先级,强制使用 AMD 官方仓库
# (解决 Ubuntu universe 中旧版 ROCm 5.0.0 包冲突)
sudo tee /etc/apt/preferences.d/rocm-pin-1001 << 'EOF'
Package: *
Pin: origin repo.radeon.com
Pin-Priority: 1001
EOF

sudo apt update
第5步:安装 ROCm 7.2.1
bash
sudo apt install -y rocm-dev rocm-libs如果提示依赖冲突(如 rocm-cmake 5.0.0-1 冲突),使用显式版本安装:
bash
sudo apt install -y \
    rocm-cmake=0.14.0.70201-81~22.04 \
    rocm-device-libs=1.0.0.70201-81~22.04 \
    rocm-utils=7.2.1.70201-81~22.04 \
    rocm-dev \
    rocm-libs
第6步:安装 librocdxg(WSL GPU 支持核心组件)
安装预编译 deb 包:
bash
cd /tmp

# 下载预编译 deb 包
wget https://github.com/ROCm/librocdxg/releases/download/v1.1.2/rocdxg-roct_1.1.2_amd64.deb

# 安装
sudo dpkg -i rocdxg-roct_1.1.2_amd64.deb

# 修复可能的依赖
sudo apt --fix-broken install -y
第7步:配置环境变量
将以下内容追加到 ~/.bashrc:
bash
cat >> ~/.bashrc << 'EOF'

# ROCm
export PATH=/opt/rocm/bin:/opt/rocm/hip/bin:$PATH
export HSA_ENABLE_DXG_DETECTION=1
EOF

source ~/.bashrc
HSA_ENABLE_DXG_DETECTION=1是 WSL2 下 ROCm 识别 GPU 的必需变量。
第8步:验证 ROCm 安装
bash
rocminfo | grep "Marketing Name"预期输出 :能看到你的 AMD GPU 型号(如 Radeon RX 7800 XTX)。

注意 :
rocm-smi在 WSL2 下会报错Driver not initialized (amdgpu not found),这是正常现象 ,因为 WSL2 没有 Linux 内核 amdgpu 模块。GPU 状态请在 Windows 主机 上通过 Adrenalin 软件或任务管理器查看。
第9步:安装 Miniconda + 配置国内镜像
bash
# 下载 Miniconda(清华镜像)
wget https://mirrors.tuna.tsinghua.edu.cn/anaconda/miniconda/Miniconda3-latest-Linux-x86_64.sh -O miniconda.sh

# 安装
bash miniconda.sh -b -p $HOME/miniconda3

# 初始化
~/miniconda3/bin/conda init bash
source ~/.bashrc
配置 Conda 清华镜像
bash
conda config --add channels https://mirrors.tuna.tsinghua.edu.cn/anaconda/pkgs/main
conda config --add channels https://mirrors.tuna.tsinghua.edu.cn/anaconda/pkgs/free
conda config --add channels https://mirrors.tuna.tsinghua.edu.cn/anaconda/cloud/conda-forge
conda config --add channels https://mirrors.tuna.tsinghua.edu.cn/anaconda/cloud/pytorch
conda config --set show_channel_urls yes
配置 pip 清华镜像
bash
mkdir -p ~/.config/pip
cat > ~/.config/pip/pip.conf << 'EOF'
[global]
index-url = https://pypi.tuna.tsinghua.edu.cn/simple
trusted-host = pypi.tuna.tsinghua.edu.cn
EOF
第10步:创建 Conda 环境
bash
conda create -n myenv python=3.10 -y
conda activate myenv
Python 3.10 是 PyTorch 2.9.1 官方支持的版本,无需更换。
第11步:安装 PyTorch 2.9.1 for ROCm 7.2
重要 :PyPI (download.pytorch.org/whl/rocm7.2) 上没有 PyTorch 2.9.1,只有 2.11.0/2.12.0 nightly。必须从 AMD 官方仓库 下载预编译 whl。
下载 whl 包(使用 aria2c 多线程加速)
bash
mkdir -p ~/pytorch_whl && cd ~/pytorch_whl

# 下载 torch 2.9.1(约 1.6GB)
wget https://repo.radeon.com/rocm/manylinux/rocm-rel-7.2/torch-2.9.1%2Brocm7.2.0.lw.git7e1940d4-cp310-cp310-linux_x86_64.whl

# 下载 torchvision 0.24.0(约 2.9MB)
wget https://repo.radeon.com/rocm/manylinux/rocm-rel-7.2/torchvision-0.24.0%2Brocm7.2.0.gitb919bd0c-cp310-cp310-linux_x86_64.whl

# 下载 torchaudio 2.9.0(约 487KB)
wget https://repo.radeon.com/rocm/manylinux/rocm-rel-7.2/torchaudio-2.9.0%2Brocm7.2.0.gite3c6ee2b-cp310-cp310-linux_x86_64.whl

# 下载 triton(PyTorch 需要,约 287MB)
wget https://repo.radeon.com/rocm/manylinux/rocm-rel-7.2/triton-3.5.1%2Brocm7.2.0.gita272dfa8-cp310-cp310-linux_x86_64.whl
本地安装
bash
cd ~/pytorch_whl
pip install ./*.whl
版本对应关系(AMD 官方仓库)
| 包 | 版本 | 说明 |
|---|---|---|
| torch | 2.9.1 | 核心框架 |
| torchvision | 0.24.0 | 图像处理 |
| torchaudio | 2.9.0 | 音频处理 |
| triton | 3.5.1 | PyTorch 编译优化(必需) |
第12步:验证 PyTorch + GPU
bash
python -c "
import torch
print(f'PyTorch版本: {torch.__version__}')
print(f'ROCm/HIP版本: {torch.version.hip}')
print(f'GPU可用: {torch.cuda.is_available()}')
print(f'GPU数量: {torch.cuda.device_count()}')
if torch.cuda.is_available():
    print(f'GPU名称: {torch.cuda.get_device_name(0)}')
    x = torch.rand(1000, 1000).cuda()
    y = torch.rand(1000, 1000).cuda()
    z = x @ y
    print('GPU 矩阵乘法测试通过')
"预期输出:
PyTorch版本: 2.9.1+rocm7.2.0.lw.git7e1940d4
ROCm/HIP版本: 7.2.xxxx
GPU可用: True
GPU数量: 1
GPU名称: AMD Radeon RX 7900 XTX
GPU 矩阵乘法测试通过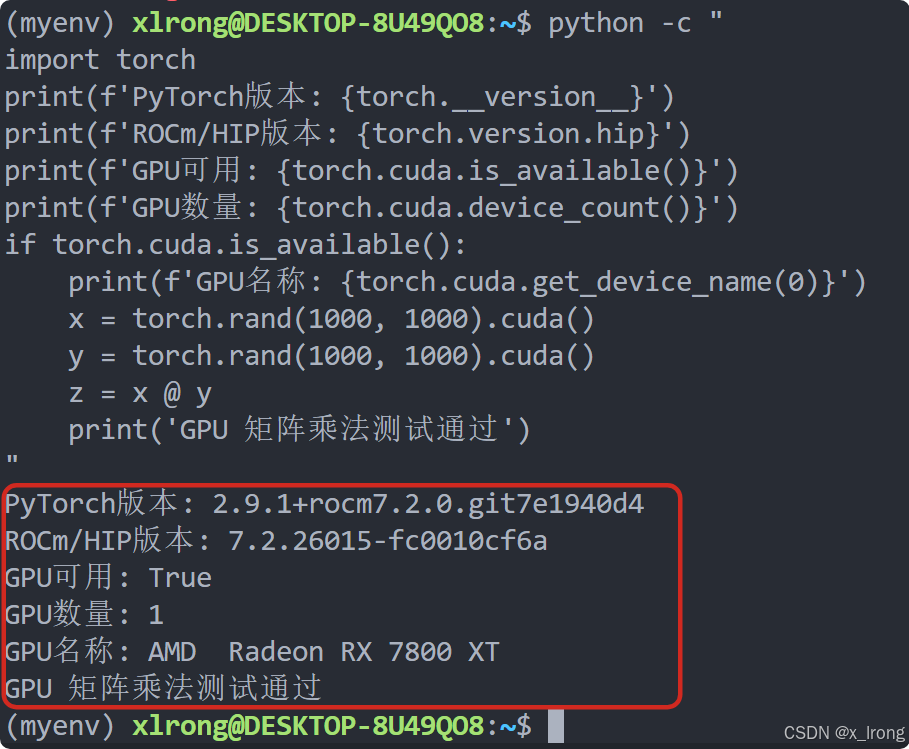
第13步:安装常用 AI 开发包(可选)
bash
pip install numpy pandas matplotlib scikit-learn \
    transformers accelerate huggingface-hub safetensors \
    pillow opencv-python sentencepiece protobuf
附录 A:WSL 环境备份与恢复
备份(导出为 tar)
powershell
# 停止 WSL(确保数据一致性)
wsl --shutdown

# 导出为 tar 文件
wsl --export Ubuntu-22.04 D:\WSL_Backups\ubuntu2204_rocm_backup.tar
恢复(从 tar 导入)
powershell
# 导入为新发行版
wsl --import Ubuntu-22.04-Restore D:\WSL\Ubuntu-22.04-Restore D:\WSL_Backups\ubuntu2204_rocm_backup.tar

# 设置默认用户(否则进入是 root)
ubuntu2204.exe config --default-user xlrong
D:\WSL\Ubuntu-22.04-Restore是新虚拟磁盘的存放目录,不是工作路径,可自定义为任意有空间的目录。
快速克隆(同一台机器)
powershell
wsl --export Ubuntu-22.04 D:\WSL_Backups\base.tar
wsl --import Ubuntu-22.04-Clone D:\WSL\Clone D:\WSL_Backups\base.tar
附录 B:常见问题速查
Q1: apt install rocm-dev 报错依赖冲突(rocm-cmake 5.0.0-1)
原因:Ubuntu 22.04 universe 仓库自带旧版 ROCm 5.0.0,与 AMD 官方 7.2.1 冲突。
解决 :添加 apt 优先级配置(见第4步),强制使用 repo.radeon.com 源。
Q2: pip install torch==2.9.1 在 PyPI 上找不到
原因 :PyPI 的 whl/rocm7.2 索引只有 2.11.0/2.12.0 nightly,没有 2.9.1。
解决:从 AMD 官方仓库下载 whl(见第11步)。
Q3: rocm-smi 报错 amdgpu not found
原因:WSL2 是虚拟机,没有 Linux amdgpu 内核模块。
解决 :这是正常的,用 rocminfo 和 PyTorch 验证 GPU 即可。