文章目录
到这一步就很好理解,记住简单的数学公式即可.
由于openISP的色彩空间转换只提供了,RGB转YUV的方法.实际上色彩空间的转换.还有RGB->HSV,RGB->YCrCb等等,感兴趣的自己问AI吧.
下面以RGB->YUV为例,一起来验证一下.
1.算法原理
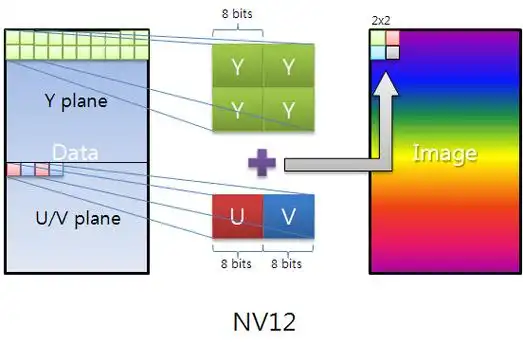
将 RGB 图像转换为 YCbCr(YUV)色彩空间。Y 分量表示亮度,Cb/Cr 表示色度差,便于后续亮度和色度的独立处理(降噪、边缘增强等)。
- Y(Luminance/Luma):代表明亮度,也就是我们常说的灰阶值。它反映了图像的明暗程度,相当于一幅灰色的图像。
- U和V(Chrominance/Chroma):代表色度分量,用于描述影像的色彩和饱和度。
BT.601 转换公式
Y  =  0.257R + 0.504G + 0.098B + 16
Cb = -0.148R - 0.291G + 0.439B + 128
Cr =  0.439R - 0.368G - 0.071B + 128
注:config.csv 中的系数已乘以 1024,实现时再除以 1024。
2.算法代码实现
实现细节
- 使用 NumPy 广播运算,高效处理全图(向量化)
- 中间类型
uint32,防止 255×1024 ≈ 261120 溢出 - 输出转
uint8,有效范围 Y∈16,235,Cb/Cr∈16,240
数学表达
这里由于下面测试代码使用的Q10的格式,每个像素都放大了1024,所以这里会除以1024,具体请看测试代码中是怎么做的.
[Y ]   [csc[0,0] csc[0,1] csc[0,2]]   [R]   [csc[0,3]]
[Cb] = [csc[1,0] csc[1,1] csc[1,2]] × [G] + [csc[1,3]]
[Cr]   [csc[2,0] csc[2,1] csc[2,2]]   [B]   [csc[2,3]]
结果 / 1024
python
class CSC:
    'Color Space Conversion'

    def __init__(self, img, csc):
        self.img = img
        self.csc = csc

    def execute(self):
        img_h = self.img.shape[0]
        img_w = self.img.shape[1]
        img_c = self.img.shape[2]
        csc_img = np.empty((img_h, img_w, img_c), np.uint32)
        # for y in range(img_h):
        #     for x in range(img_w):
        #         mulval = self.csc[:,0:3] * self.img[y,x,:]
        #         csc_img[y,x,0] = np.sum(mulval[0]) + self.csc[0,3]
        #         csc_img[y,x,1] = np.sum(mulval[1]) + self.csc[1,3]
        #         csc_img[y,x,2] = np.sum(mulval[2]) + self.csc[2,3]
        #         csc_img[y,x,:] = csc_img[y,x,:] / 1024

        csc_img[:, :, 0] = self.img[:, :, 0] * self.csc[0, 0] + self.img[:, :, 1] * self.csc[0, 1] + self.img[:, :, 2] * self.csc[0, 2] + self.csc[0, 3]
        csc_img[:, :, 1] = self.img[:, :, 0] * self.csc[1, 0] + self.img[:, :, 1] * self.csc[1, 1] + self.img[:, :, 2] * self.csc[1, 2] + self.csc[1, 3]
        csc_img[:, :, 2] = self.img[:, :, 0] * self.csc[2, 0] + self.img[:, :, 1] * self.csc[2, 1] + self.img[:, :, 2] * self.csc[2, 2] + self.csc[2, 3]
        csc_img = csc_img / 1024

        self.img = csc_img.astype(np.uint8)
        return self.img
3.测试代码
灰度图转YUV
我们知道RGB格式的灰度图各个通道分量都是一样的,所以Y分量完全可以理解为灰度值(或亮度分量)。
python
    """
    测试目标:
      1. 输出形状和 dtype 正确
      2. BT.601 标准白点(R=G=B=255)的 Y 值接近 235
      3. 纯灰(R=G=B)时 Cb 和 Cr 接近 128(色度中性)
    """

    def _bt601_csc(self):
        """返回 BT.601 CSC 矩阵(×1024)。"""
        csc = np.zeros((3, 4))
        csc[0, :] = [0.257 * 1024, 0.504 * 1024, 0.098 * 1024, 16 * 1024]
        csc[1, :] = [-0.148 * 1024, -0.291 * 1024, 0.439 * 1024, 128 * 1024]
        csc[2, :] = [0.439 * 1024, -0.368 * 1024, -0.071 * 1024, 128 * 1024]
        return csc

    def test_gray_chromacomponents_neutral(self):
        """纯灰图像(R=G=B=128)Cb/Cr 通道应接近 128(±10)。"""
        img = make_rgb(8, 8, r=128, g=128, b=128)
        csc_mat = self._bt601_csc()
        csc = CSC(img.copy(), csc_mat)
        out = csc.execute()
        cb_mean = float(out[:, :, 1].mean())
        cr_mean = float(out[:, :, 2].mean())
print(f"cb_mean:{cb_mean},cr_mean:{cr_mean}")- 测试结果
cb_mean:128.0,cr_mean:128.0
白点测试
这里同样创建一张各通道值为235的白色灰度图,经过bt601转换后,Y通道的亮度值为217,符合预期.
python
    def test_white_point_luma(self):
        """白点(R=G=B=235)的 Y 值(BT.601 范围 16-235)应在合理范围内。"""
        img = make_rgb(4, 4, r=235, g=235, b=235)
        csc_mat = self._bt601_csc()
        csc = CSC(img.copy(), csc_mat)
        out = csc.execute()
        y_val = float(out[:, :, 0].mean())
print(f"y_val:{y_val}")- 测试结果
y_val:217.0