文章目录
- [1. 项目概述](#1. 项目概述)
- [2. 环境准备](#2. 环境准备)
-
- [2.1 创建项目](#2.1 创建项目)
- [2.2 获取高德 API Key](#2.2 获取高德 API Key)
- [2.3 获取 DeepSeek API Key](#2.3 获取 DeepSeek API Key)
- [3. 添加依赖](#3. 添加依赖)
- [4. 配置文件](#4. 配置文件)
-
- [4.1 application.yaml](#4.1 application.yaml)
- [4.2 mcp-servers-config.json](#4.2 mcp-servers-config.json)
- [5. 代码实现](#5. 代码实现)
-
- [5.1 启动类](#5.1 启动类)
- [5.2 ChatController](#5.2 ChatController)
- [6. 运行与测试](#6. 运行与测试)
- [7. 架构与数据流](#7. 架构与数据流)
- [8. 自动装配流程](#8. 自动装配流程)
- [9. 扩展指南](#9. 扩展指南)
-
- [9.1 添加更多 MCP Server](#9.1 添加更多 MCP Server)
- [9.2 同时使用 STDIO + SSE](#9.2 同时使用 STDIO + SSE)
- [9.3 筛选特定工具](#9.3 筛选特定工具)
- [10. 参考资源](#10. 参考资源)
1. 项目概述
本项目演示如何用 Spring AI 框架,将 DeepSeek 大模型与高德地图 MCP Server 集成,实现一个自然语言调用地图服务的后端应用。
核心能力 :用户通过 HTTP 接口用自然语言提问(如"北京天气怎么样"),DeepSeek 自动决定调用高德 MCP 工具(天气查询、地理编码、路径规划等),获取结构化数据后生成自然语言回复。
技术栈 :Spring Boot 3.5.14 + Spring AI 1.1.7 + DeepSeek Chat + Node.js MCP Server (STDIO)
2. 环境准备
| 软件 | 版本要求 | 验证命令 |
|---|---|---|
| JDK | 17+ | java -version |
| Maven | 3.9+(或用项目自带的 mvnw) | ./mvnw --version |
| Node.js | 18+ LTS | node -version |
| 高德 API Key | 免费申请 | 见下方 |
| DeepSeek API Key | 注册获取 | https://platform.deepseek.com |
2.1 创建项目
使用 Spring Initializr(推荐)创建,源码目录如下:
bash
demo-mcp/
├── pom.xml
├── mvnw / mvnw.cmd
├── .mvn/
├── src/
│   ├── main/java/com/pearl/demomcp/
│   │   ├── DemoMcpApplication.java
│   │   └── controller/
│   │       └── ChatController.java
│   └── main/resources/
│       ├── application.yaml
│       └── mcp-servers-config.json
└── src/test/java/...
2.2 获取高德 API Key
- 打开 高德开放平台 → 支付宝登录
- 完成个人开发者认证
- 控制台 → 创建应用 → 类型选「出行」
- 添加
Key→ 勾选 Web服务 API → 复制Key
2.3 获取 DeepSeek API Key
- 访问
https://platform.deepseek.com→ 注册登录 API Keys→ 创建新的API Key→ 复制保存
3. 添加依赖
编辑 pom.xml:
xml
<?xml version="1.0" encoding="UTF-8"?>
<project xmlns="http://maven.apache.org/POM/4.0.0"
         xmlns:xsi="http://www.w3.org/2001/XMLSchema-instance"
         xsi:schemaLocation="http://maven.apache.org/POM/4.0.0
         https://maven.apache.org/xsd/maven-4.0.0.xsd">
    <modelVersion>4.0.0</modelVersion>

    <parent>
        <groupId>org.springframework.boot</groupId>
        <artifactId>spring-boot-starter-parent</artifactId>
        <version>3.5.14</version>
    </parent>

    <groupId>com.pearl</groupId>
    <artifactId>demo-mcp</artifactId>
    <version>0.0.1-SNAPSHOT</version>

    <properties>
        <java.version>17</java.version>
        <spring-ai.version>1.1.7</spring-ai.version>
    </properties>

    <dependencies>
        <!-- ① DeepSeek 模型接入 -->
        <dependency>
            <groupId>org.springframework.ai</groupId>
            <artifactId>spring-ai-starter-model-deepseek</artifactId>
        </dependency>

        <!-- ② MCP Client --- 连接外部 MCP Server(如高德地图) -->
        <dependency>
            <groupId>org.springframework.ai</groupId>
            <artifactId>spring-ai-starter-mcp-client</artifactId>
        </dependency>

        <!-- ③ Web 支持 --- 提供 REST 接口 -->
        <dependency>
            <groupId>org.springframework.boot</groupId>
            <artifactId>spring-boot-starter-web</artifactId>
        </dependency>

        <!-- ④ 测试 -->
        <dependency>
            <groupId>org.springframework.boot</groupId>
            <artifactId>spring-boot-starter-test</artifactId>
            <scope>test</scope>
        </dependency>
    </dependencies>

    <dependencyManagement>
        <dependencies>
            <dependency>
                <groupId>org.springframework.ai</groupId>
                <artifactId>spring-ai-bom</artifactId>
                <version>${spring-ai.version}</version>
                <type>pom</type>
                <scope>import</scope>
            </dependency>
        </dependencies>
    </dependencyManagement>

    <build>
        <plugins>
            <plugin>
                <groupId>org.springframework.boot</groupId>
                <artifactId>spring-boot-maven-plugin</artifactId>
            </plugin>
        </plugins>
    </build>
</project>
依赖说明:
| 依赖 | 作用 |
|---|---|
spring-ai-starter-model-deepseek |
提供 DeepSeek ChatModel 的自动配置 |
spring-ai-starter-mcp-client |
MCP Client,通过 STDIO/SSE 连接外部 MCP Server |
spring-boot-starter-web |
内嵌 Tomcat + Spring MVC REST 支持 |
关键 :
spring-ai-bom统一管理所有 Spring AI 依赖的版本,避免冲突。
4. 配置文件
4.1 application.yaml
yaml
spring:
  application:
    name: demo-mcp

  ai:
    # ─── DeepSeek 模型 ───
    deepseek:
      api-key: ${DEEPSEEK_API_KEY:sk-xxxxxxxxxxxxxxxx}  # 替换为你的 Key
      chat:
        options:
          model: deepseek-chat
          temperature: 0.7

    # ─── MCP Client ───
    mcp:
      client:
        enabled: true        # 启用 MCP Client
        type: SYNC           # 同步模式(非 WebFlux)
        request-timeout: 30s # 调用 MCP 工具的超时时间
        toolcallback:
          enabled: true      # 自动将 MCP 工具注册为 Spring AI ToolCallback
        stdio:
servers-configuration: classpath:/mcp-servers-config.json| 配置项 | 说明 |
|---|---|
DEEPSEEK_API_KEY |
支持环境变量覆盖,默认值为硬编码 key |
type: SYNC |
同步 HTTP 客户端;如果用 WebFlux 则改为 ASYNC |
toolcallback.enabled: true |
核心开关 --- 自动将远端 MCP 工具暴露给 ChatClient |
servers-configuration |
指向 Claude Desktop 格式的 JSON 配置文件 |
4.2 mcp-servers-config.json
重要提示 :请确保已安装 Node.js,并检查本地 Node.js 版本是否为 v22.14.0 或更高版本。建议下载使用 v22.14.0 及以上版本以获得最佳兼容性和性能。
json
{
  "mcpServers": {
    "amap": {
      "command": "cmd",
      "args": ["/c", "npx", "-y", "@amap/amap-maps-mcp-server"],
      "env": {
        "AMAP_MAPS_API_KEY": "fbxxxxxxxxxxxxxxxxxxxxxxxxxxxxxx"
      }
    }
  }
}| 字段 | 说明 |
|---|---|
command |
Windows 用 cmd;Linux/Mac 直接用 npx |
args |
["/c", "npx", "-y", "包名"] --- /c 让 Windows 找到 npx.cmd;-y 自动确认安装 |
env.AMAP_MAPS_API_KEY |
高德 API Key,作为环境变量注入子进程 |
为什么 Windows 用
cmd /c? Java 的ProcessBuilder在 Windows 上不会自动解析.cmd扩展名,必须通过系统 shell (cmd /c) 来调用npx.cmd。
5. 代码实现
5.1 启动类
java
package com.pearl.demomcp;

import org.springframework.boot.SpringApplication;
import org.springframework.boot.autoconfigure.SpringBootApplication;

@SpringBootApplication
public class DemoMcpApplication {
    public static void main(String[] args) {
        SpringApplication.run(DemoMcpApplication.class, args);
    }
}
标准 Spring Boot 入口,无需额外注解。
5.2 ChatController
java
package com.pearl.demomcp.controller;

import org.springframework.ai.chat.client.ChatClient;
import org.springframework.ai.tool.ToolCallbackProvider;
import org.springframework.web.bind.annotation.GetMapping;
import org.springframework.web.bind.annotation.RequestParam;
import org.springframework.web.bind.annotation.RestController;

@RestController
public class ChatController {

    private final ChatClient chatClient;

    /**
     * ToolCallbackProvider 由 McpToolCallbackAutoConfiguration 自动注入,
     * 包含高德 MCP Server 暴露的所有工具(地理编码、路径规划、天气查询等)。
     */
    public ChatController(ChatClient.Builder chatClientBuilder,
                          ToolCallbackProvider toolCallbackProvider) {
        this.chatClient = chatClientBuilder
                .defaultToolCallbacks(toolCallbackProvider)  // 关键:注册 MCP 工具
                .build();
    }

    @GetMapping("/chat")
    public String chat(@RequestParam(defaultValue = "帮我查询北京市的天气") String q) {
        return chatClient.prompt()
                .user(q)
                .call()
                .content();  // 模型可能已经调用了 N 次 MCP 工具
    }
}
6. 运行与测试
启动应用,启动日志中会看到 MCP Client 连接高德 Server 的信息:
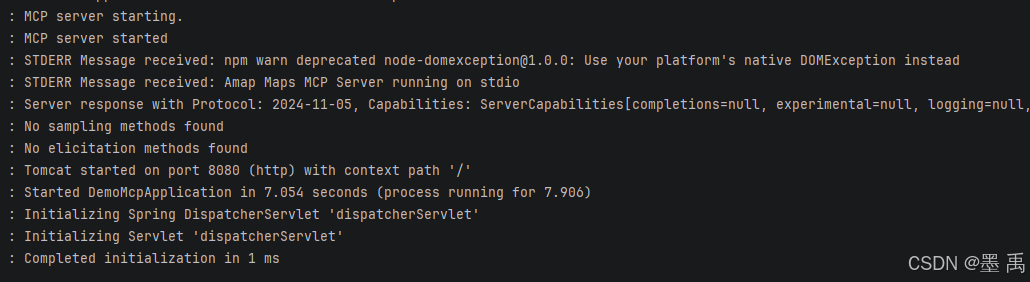
日志详细说明:
- STDIO 进程启动:
Spring AI借助ProcessBuilder拉起子进程:cmd /c npx -y @amap/amap-maps-mcp-server,标准输入输出(STDIO)通信管道创建完成。 NPM废弃包警告:该内容来自子进程标准错误输出(stderr)。提示node-domexception为废弃依赖,属于MCP服务端内部依赖问题,仅为警告,可直接忽略,不影响业务功能。MCP服务端就绪:高德地图MCP服务端启动完毕,当前基于标准I/O监听JSON-RPC协议调用请求。
最后 MCP 协议握手完成:Spring AI 的 LifecycleInitializer 向服务端发起 initialize 初始化请求,双方完成协议握手,字段说明如下:
| 字段 | 取值 | 含义 |
|---|---|---|
| Protocol | 2024-11-05 | MCP 协议版本 |
| tools | 存在 | 服务端对外开放工具调用能力,可供 AI 模型调用 |
| listChanged | null | 不支持工具列表动态变更,工具集合为静态 |
| name | mcp-server/amap-maps | MCP 服务端标识名称 |
| version | 0.1.0 | 高德 MCP 服务端版本 |
| Instructions | null | 服务端未提供额外使用说明 |
握手成功后,框架会自动调用
tools/list接口,拉取高德提供的12个工具元数据(名称、参数结构、描述等),并注册至SyncMcpToolCallbackProvider。
测试 API:
bash
# 天气查询
curl "http://localhost:8080/chat?q=北京今天天气怎么样"

# 路径规划
curl "http://localhost:8080/chat?q=帮我规划从北京站到故宫的步行路线"

# 周边搜索
curl "http://localhost:8080/chat?q=上海陆家嘴附近有什么好吃的"

# 地理编码
curl "http://localhost:8080/chat?q=天安门的经纬度是多少"
返回结果:

7. 架构与数据流
┌─────────────────────────────────────────────────────────────────┐
│                        Spring Boot 应用                          │
│                                                                   │
│  ┌──────────┐    ┌──────────────┐    ┌──────────────────────────┐│
│  │  REST    │───▶│  ChatClient  │───▶│  DeepSeek ChatModel      ││
│  │  /chat   │    │  (Spring AI) │    │  (Function Calling)      ││
│  └──────────┘    └──────┬───────┘    └───────────┬──────────────┘│
│                         │ 工具回调                │ 决策调用工具   │
│                         ▼                          ▼               │
│                ┌─────────────────────────────────────────────┐   │
│                │     ToolCallbackProvider                     │   │
│                │     = SyncMcpToolCallbackProvider            │   │
│                │     (自动发现并注册 MCP 工具)                 │   │
│                └─────────────────┬───────────────────────────┘   │
│                                  │                                │
│                                  │ STDIO (stdin/stdout)           │
│                                  │ JSON-RPC                       │
└──────────────────────────────────┼────────────────────────────────┘
                                   │
                    ┌──────────────▼──────────────────┐
                    │   ProcessBuilder 子进程          │
                    │   cmd /c npx -y                  │
                    │   @amap/amap-maps-mcp-server     │
                    │                                  │
                    │   12 大工具:                     │
                    │   • 地理编码 / 逆地理编码         │
                    │   • 关键字搜索 / 周边搜索         │
                    │   • 驾车/步行/公交/骑行路线规划   │
                    │   • 距离计算                      │
                    │   • 天气查询                      │
                    │   • 坐标转换                      │
                    │   • POI 输入提示                  │
                    └──────────────┬──────────────────┘
                                   │ HTTPS
                                   ▼
                    ┌──────────────────────────┐
                    │    高德开放平台 API       │
                    │    api.amap.com           │
                    └──────────────────────────┘
8. 自动装配流程
应用启动
  │
  ├─▶ McpClientAutoConfiguration
  │    读取 mcp-servers-config.json
  │    创建 SyncMcpClient 实例列表
  │    通过 STDIO 连接各 MCP Server
  │    listTools() → 获取工具列表
  │
  ├─▶ McpToolCallbackAutoConfiguration
  │    扫描所有 SyncMcpClient
  │    为每个工具创建 ToolCallback 代理
  │    注册为 SyncMcpToolCallbackProvider Bean
  │
  └─▶ ChatClient.Builder.defaultToolCallbacks(provider)
      注册完成后,ChatClient 可调用所有 MCP 工具
9. 扩展指南
9.1 添加更多 MCP Server
在 mcp-servers-config.json 中追加即可:
json
{
  "mcpServers": {
    "amap": {
      "command": "cmd",
      "args": ["/c", "npx", "-y", "@amap/amap-maps-mcp-server"],
      "env": { "AMAP_MAPS_API_KEY": "xxx" }
    },
    "weather": {
      "command": "cmd",
      "args": ["/c", "npx", "-y", "@anthropic/server-weather"],
      "env": { "WEATHER_API_KEY": "xxx" }
    },
    "database": {
      "command": "cmd",
      "args": ["/c", "npx", "-y", "@anthropic/server-postgres"],
      "env": { "DATABASE_URL": "postgresql://..." }
    }
  }
}
Spring AI 会自动发现所有 Server 的工具并注册到 ChatClient。
9.2 同时使用 STDIO + SSE
yaml
spring:
  ai:
    mcp:
      client:
        stdio:
          servers-configuration: classpath:/mcp-servers-config.json
        sse:
          connections:
            remote-tool:
              url: https://other-mcp.example.com
所有连接的工具会合并到同一个 ToolCallbackProvider。
9.3 筛选特定工具
如果只需要部分工具,可以自定义 Bean:
java
@Bean
public ToolCallbackProvider filteredTools(List<McpSyncClient> clients) {
    return new SyncMcpToolCallbackProvider(
        clients.stream()
            .filter(c -> c.getServerInfo().name().equals("amap"))
            .toList()
    );
}