友情提示
- 阅读本文之前,需要了解一些线性代数的知识,可以去b站搜索3blue1brown的线性代数系列视频看一下
- 本文内容不基于任何技术栈,而是一些通用理论
1. 前言
在上一章中,我们已经实现了部分Canvas类的功能,但是仅仅是实现了事件系统相关的功能,还有很多交互功能,我们并没有实现,在实现这些交互功能之前,我们需要了解一些前置知识,以帮助理解如何实现这些交互功能。本文的目的,就是让大家来了解这些前置知识。
2. 几何的角度与代数的角度
2.1 缩放画布的例子
在pixijs实现一个具有拖拽、旋转、缩放、多选、编辑的记事板这篇文章里的2.5节,我们实现了缩放画布的功能,我们的思路是这样的:
- 用wheel事件的deltaY来计算画布的新的zoom(scaleX、scaleY)
- 通过新旧两个zoom,会得到一个比例式,然后根据比例式计算出鼠标落点到新旧状态的画布左侧的距离,得出一个diff,这个diff就是画布的平移diff
得到了新的scale和新的translate,我们就得到了画布的新的状态,把这个新的状态设置给画布,就实现了画布的平移。
以上的实现方式,是从几何的角度来完成的,但是,如果从代数的角度来实现这个功能,会让过程变得更加简单一些。
2.2 从代数的角度来理解画布缩放
2.2.1 画布点和视窗点的互相转换
首先,我们要理解画布点(local)->视窗点(global)的转换逻辑。
画布的缩放,是通过scale+translate来实现的,这两个变换的叠加顺序是:先scale、再translate,所以,画布点->视窗点的转换逻辑有如下公式:
localX×scaleX+translateX=globalXlocalY×scaleY+translateY=globalY
同样,我们可以根据上述公式,从global点反推local点。
2.2.2 translate的新的计算方式
scale的计算方式还是和以前一样,用e.deltaY,而translate的计算,则有了新的方式
画布缩放时,有一个特点,就是鼠标所在的点,是不动的,也就是说:localX、localY这个点,通过了新的变换后,出现在视窗上的位置是不变的。根据这个特点,加上上面的公式,我们可以得出一个简单的方程:
localX×新scaleX+新translateX=globalXlocalY×新scaleY+新translateY=globalY
globalX、globalY是已知数,代表鼠标落点的视窗坐标,我们要求的,就是新localX、localY、新scaleX、新scaleY、新translateX、新translateY。
首先,我们根据鼠标所在点(globalX、globalY),反推出localX、localY,然后新scaleX、新scaleY用e.deltaY计算出来。剩下的未知数,就是画布的新translateX、新translateY。
把这个方程左边的已知数挪到右边,就得到了新translateX、新translateY。
最后,把新scaleX、新scaleY、新translateX、新translateY设置给画布,就完成了这一次缩放。
这里我用html实现了一个例子:
html
<!DOCTYPE html>
<html lang="en">

<head>
  <meta charset="UTF-8">
  <meta name="viewport" content="width=device-width, initial-scale=1.0">
  <title>Document</title>
  <style>
    * {
      margin: 0;
      padding: 0;
      box-sizing: border-box;
    }

    #box,
    #box2,
    #box3 {
      width: 100px;
      height: 100px;
      position: absolute;
      cursor: pointer;
    }

    #box {
      left: 100px;
      top: 200px;
      background-color: red;
    }

    #box2 {
      left: 250px;
      top: 100px;
      background-color: green;
    }

    #box3 {
      left: 400px;
      top: 300px;
      background-color: blue;
    }

    html,
    body {
      width: 100vw;
      height: 100vh;
      overflow: hidden;
    }

    #root{
      position: absolute;
      left: 0;
      top: 0;
      transform-origin: 0 0;
      touch-action: none;
      user-select: none;
    }
  </style>
</head>

<body>
  <div id="root">
    <div id="box"></div>
    <div id="box2"></div>
    <div id="box3"></div>
  </div>
</body>
<script>
  const root = document.getElementById('root');

  let scale = 1;
  let tx = 0;
  let ty = 0;

  const applyTransform = () => {
    root.style.transform = `translate(${tx}px, ${ty}px) scale(${scale})`;
  };

  document.addEventListener('wheel', (e) => {
    e.preventDefault();
    const zoom = e.deltaY < 0 ? 1.1 : 0.9; // 这里懒得用e.deltaY来算了,直接写死
    const nextScale = Math.max(0.1, Math.min(10, scale * zoom));
    const k = nextScale / scale;
    tx = e.clientX - (e.clientX - tx) * k;
    ty = e.clientY - (e.clientY - ty) * k;
    scale = nextScale;
    applyTransform();
  }, { passive: false });

  applyTransform();

</script>

</html>
2.3 线性代数
在2.2里,我们从代数的角度来实现了画布的缩放,但是这并不是我们的最终效果,因为缩放画布只是一个简单的例子:第一,画布的锚点固定在(0,0)点,第二,画布不会出现旋转的情况,基于这两个特性,我们很容易就能得出local点与global点之间的转换公式,但是,一旦加入旋转以及锚点,上面的这个公式就非常难得出了,这个时候,我们需要用更加通用的方式,来处理这种复杂的场景。
2.3.1 矩阵
矩阵包含了一个元素的所有变换属性,包括:旋转、缩放、平移、锚点,这些变化属性,都会被放到6个数字里(a、b、c、d、tx、ty)。
通过矩阵,可以得出一种通用的解决方式,让我们只需要拿着6个数字(a、b、c、d、tx、ty),而不必考虑元素的任何变换形态,就可以得出各种转换公式,来实现编辑器的各种交互效果,这种实现方式,屏蔽了大部分的几何逻辑,让我们不需要拥有很强的空间想象能力,也能完成复杂的编辑器交互。
2.3.2 通用的解决问题方式
2.2节的画布缩放的实现,是矩阵的一个特例,接下来我们将用完整的思路,再次实现一次画布的缩放。
前面我们得出了画布点(local)->视窗点(global)的转换逻辑,是一个这样的公式:
localX×scaleX+translateX=globalXlocalY×scaleY+translateY=globalY
现在,我们用矩阵来替换这个转换逻辑,它将会变成这样:
ab0cd0txty1 × localXlocalY1 = globalXglobalY1
新的实现过程,整体实现思路和2.2节差不多,都是:建立方程->逐步求出各个量并填入方程以减少未知数的数量->最后方程里只剩下一个未知数->求出最后一个未知数然后把所有值set到对象上。
具体实现方法:
先根据鼠标落点(globalX、globalY)求出localX和localY,上面的矩阵左乘一个逆矩阵,就可以得到localX和localY:
localXlocalY1 = ab0cd0txty1 −1× globalXglobalY1
在缩放画布画布后,虽然scale和translate变了,但是,我们的鼠标落点那个位置的画布,是不会动的,也就是说localX、localY经过了新的变换之后,依然会出现在globalX、globalY点,根据这一点,我们可以得出一个方程:
newAnewB0newCnewD0newTxnewTy1 × localXlocalY1 = globalXglobalY1
newA、newB、newC、newD、newTx、newTy就是我们要求的新的矩阵值
localX、localY、globalX、globalY都是已知数,newA和newD代表新的scale,可以通过e.deltaY来得出,newB和newC固定是0,所以,等式中只剩下newTx、newTy要求了,把这个等式展开来,所有已知数移到右边,我们就可以得到newTx和newTy了,至此,缩放后的新的变换矩阵的6个数字全部求出。
这里我也用html实现了一个例子:
html
<!DOCTYPE html>
<html lang="en">

<head>
  <meta charset="UTF-8">
  <meta name="viewport" content="width=device-width, initial-scale=1.0">
  <title>Document</title>
  <style>
    * {
      margin: 0;
      padding: 0;
      box-sizing: border-box;
    }

    #box,
    #box2,
    #box3 {
      width: 100px;
      height: 100px;
      position: absolute;
      cursor: pointer;
    }

    #box {
      left: 100px;
      top: 200px;
      background-color: red;
    }

    #box2 {
      left: 250px;
      top: 100px;
      background-color: green;
    }

    #box3 {
      left: 400px;
      top: 300px;
      background-color: blue;
    }

    html,
    body {
      width: 100vw;
      height: 100vh;
      overflow: hidden;
    }

    #root {
      position: absolute;
      left: 0;
      top: 0;
      transform-origin: 0 0;
      touch-action: none;
      user-select: none;
    }
  </style>
</head>

<body>
  <div id="root">
    <div id="box"></div>
    <div id="box2"></div>
    <div id="box3"></div>
  </div>
</body>
<script>
  const root = document.getElementById('root');

  let scale = 1;
  let tx = 0;
  let ty = 0;

  const applyTransform = () => {
    root.style.transform = `matrix(${scale}, 0, 0, ${scale}, ${tx}, ${ty})`;
  };

  // 获取逆矩阵
  const getInverted = (a, b, c, d, tx, ty) => {
    const det = a * d - b * c;
    if (det === 0) return null;
    const invA = d / det;
    const invB = -b / det;
    const invC = -c / det;
    const invD = a / det;
    const invTx = (c * ty - d * tx) / det;
    const invTy = (b * tx - a * ty) / det;
    return { a: invA, b: invB, c: invC, d: invD, tx: invTx, ty: invTy };
  }

  document.addEventListener('wheel', (e) => {
    e.preventDefault();
    const zoom = e.deltaY < 0 ? 1.1 : 0.9;
    const nextScale = Math.max(0.1, Math.min(10, scale * zoom));
    const inverted = getInverted(scale, 0, 0, scale, tx, ty);
    const globalX = e.clientX;
    const globalY = e.clientY;
    const localX = inverted.a * globalX + inverted.c * globalY + inverted.tx;
    const localY = inverted.b * globalX + inverted.d * globalY + inverted.ty;
    tx = globalX - localX * nextScale;
    ty = globalY - localY * nextScale;
    scale = nextScale;
    applyTransform();
  }, { passive: false });

  applyTransform();

</script>

</html>
2.4 矩阵的意义
看完2.3,很多读者肯定会觉得,2.3使用矩阵的方式,相较于2.2明显增加了复杂度,如果直接用2.2的方式来实现缩放画布,将会简单很多。
确实是这样的,因为,2.2里面的方式,只是一个特例,有很多值都已经是确定的状态了,剩余的未知数非常少,所以我们可以不用矩阵,但是不可能所有场景都像缩放画布这样,有很多值已经是固定的状态,这个时候,我们必须用矩阵来处理,当然,如果空间想象能力非常强,从纯几何的角度来实现,也不是不可以,只是用矩阵会让这个过程变得更简单一些。
3. 从线性代数的角度理解编辑器的各种操作
3.1 拖拽画布
拖拽画布可以直接用mousedown和mousemove时的鼠标落点做diff,然后给画布的x、y加上这个diff,就可以了。
拖拽画布的时候,我们似乎并没有用到什么转换操作,也没用到矩阵,这是因为,画布在将自身的各个属性叠加成一个矩阵时,是最后才处理x、y的,这意味着:矩阵的tx、ty等于元素的x、y,并且tx、ty并不会受到scale、rotate的影响。
有:
ab0cd0txty1 = 100010txty1 × ab0cd0001
如果先处理x、y,再处理其它值,得出来的结果就不相等了:
ab0cd0txty1 = ab0cd0001 × 100010txty1 = ab0cd0a×tx+c×tyb×tx+d×ty1
3.2 缩放画布
见2.3
3.3 拖拽元素
拖拽元素的时候,我们不能直接通过鼠标的视窗坐标做diff,我们还需要考虑画布的缩放带来的影响,更准确的来说,要考虑拖拽元素的父元素的缩放所带来的影响,如果父元素处于放大状态,那么直接使用鼠标的视窗坐标做diff,这个diff也会被放大,同样,如果父元素处于缩小状态,那么这个diff也会被缩小,最终所表现出来的,就是拖拽的元素不跟随鼠标,可能飘到离鼠标很远的地方去,这并不符合我们的直觉。
3.3.1 将鼠标的视窗坐标(global坐标)转换成拖拽元素的父平面坐标
我们不能直接用鼠标的视窗坐标做diff,而是先将这个视窗坐标,转换成和拖拽元素同一平面的坐标,再做diff,这样的话,算出来的diff,再经过父元素的缩放或者其他属性的叠加后,就会跟随鼠标了。
假设父元素的变化矩阵为:
ab0cd0txty1
鼠标的视窗坐标为:
globalXglobalY1
我们要求的坐标为:
localXlocalY1
那么有:
ab0cd0txty1 × localXlocalY1 = globalXglobalY1
左右两边左乘一个父元素的变换矩阵的逆矩阵:
localXlocalY1 = ab0cd0txty1 −1× globalXglobalY1
就可以得到localX和localY了
3.3.2 diff
mousedown的时候记录一个localX、localY,mousemove的时候,计算出一组新的localX、localY,然后做diff,把这个diff应用到被拖拽的元素上。
3.3.3 例子
这里是一个html实现的例子:
html
<!DOCTYPE html>
<html lang="en">

<head>
  <meta charset="UTF-8">
  <meta name="viewport" content="width=device-width, initial-scale=1.0">
  <title>Document</title>
  <style>
    * {
      margin: 0;
      padding: 0;
      box-sizing: border-box;
    }

    #box,
    #box2,
    #box3 {
      width: 100px;
      height: 100px;
      position: absolute;
      cursor: pointer;
    }

    #box {
      left: 100px;
      top: 200px;
      background-color: red;
    }

    #box2 {
      left: 250px;
      top: 100px;
      background-color: green;
    }

    #box3 {
      left: 400px;
      top: 300px;
      background-color: blue;
    }

    html,
    body {
      width: 100vw;
      height: 100vh;
      overflow: hidden;
    }

    #root {
      position: absolute;
      left: 0;
      top: 0;
      transform-origin: 0 0;
      touch-action: none;
      user-select: none;
    }
  </style>
</head>

<body>
  <div id="root">
    <div id="box"></div>
    <div id="box2"></div>
    <div id="box3"></div>
  </div>
</body>
<script>
  const root = document.getElementById('root');
  const draggableSelector = '#box, #box2, #box3';

  let scale = 1;
  let tx = 0;
  let ty = 0;
  let draggingEl = null;
  let dragStartLocalX = 0;
  let dragStartLocalY = 0;
  let dragStartLeft = 0;
  let dragStartTop = 0;

  const applyTransform = () => {
    root.style.transform = `matrix(${scale}, 0, 0, ${scale}, ${tx}, ${ty})`;
  };

  // 获取逆矩阵
  const getInverted = (a, b, c, d, tx, ty) => {
    const det = a * d - b * c;
    if (det === 0) return null;
    const invA = d / det;
    const invB = -b / det;
    const invC = -c / det;
    const invD = a / det;
    const invTx = (c * ty - d * tx) / det;
    const invTy = (b * tx - a * ty) / det;
    return { a: invA, b: invB, c: invC, d: invD, tx: invTx, ty: invTy };
  }

  const screenToLocal = (x, y) => {
    const inverted = getInverted(scale, 0, 0, scale, tx, ty);
    if (!inverted) return { x: 0, y: 0 };
    return {
      x: inverted.a * x + inverted.c * y + inverted.tx,
      y: inverted.b * x + inverted.d * y + inverted.ty,
    };
  };

  root.addEventListener('mousedown', (e) => {
    const target = e.target.closest(draggableSelector);
    if (!target) return;

    e.preventDefault();
    draggingEl = target;

    const localPoint = screenToLocal(e.clientX, e.clientY);
    dragStartLocalX = localPoint.x;
    dragStartLocalY = localPoint.y;
    dragStartLeft = draggingEl.offsetLeft;
    dragStartTop = draggingEl.offsetTop;
  });

  document.addEventListener('mousemove', (e) => {
    if (!draggingEl) return;

    const localPoint = screenToLocal(e.clientX, e.clientY);
    const dx = localPoint.x - dragStartLocalX;
    const dy = localPoint.y - dragStartLocalY;

    draggingEl.style.left = dragStartLeft + dx + 'px';
    draggingEl.style.top = dragStartTop + dy + 'px';
  });

  document.addEventListener('mouseup', () => {
    draggingEl = null;
  });

  document.addEventListener('wheel', (e) => {
    e.preventDefault();
    const zoom = e.deltaY < 0 ? 1.1 : 0.9;
    const nextScale = Math.max(0.1, Math.min(10, scale * zoom));
    const inverted = getInverted(scale, 0, 0, scale, tx, ty);
    const globalX = e.clientX;
    const globalY = e.clientY;
    const localX = inverted.a * globalX + inverted.c * globalY + inverted.tx;
    const localY = inverted.b * globalX + inverted.d * globalY + inverted.ty;
    tx = globalX - localX * nextScale;
    ty = globalY - localY * nextScale;
    scale = nextScale;
    applyTransform();
  }, { passive: false });

  applyTransform();

</script>

</html>
3.4 用控制点旋转对象
通过旋转控制点,来控制对象的旋转角度
3.4.1 向量的点积公式求旋转夹角
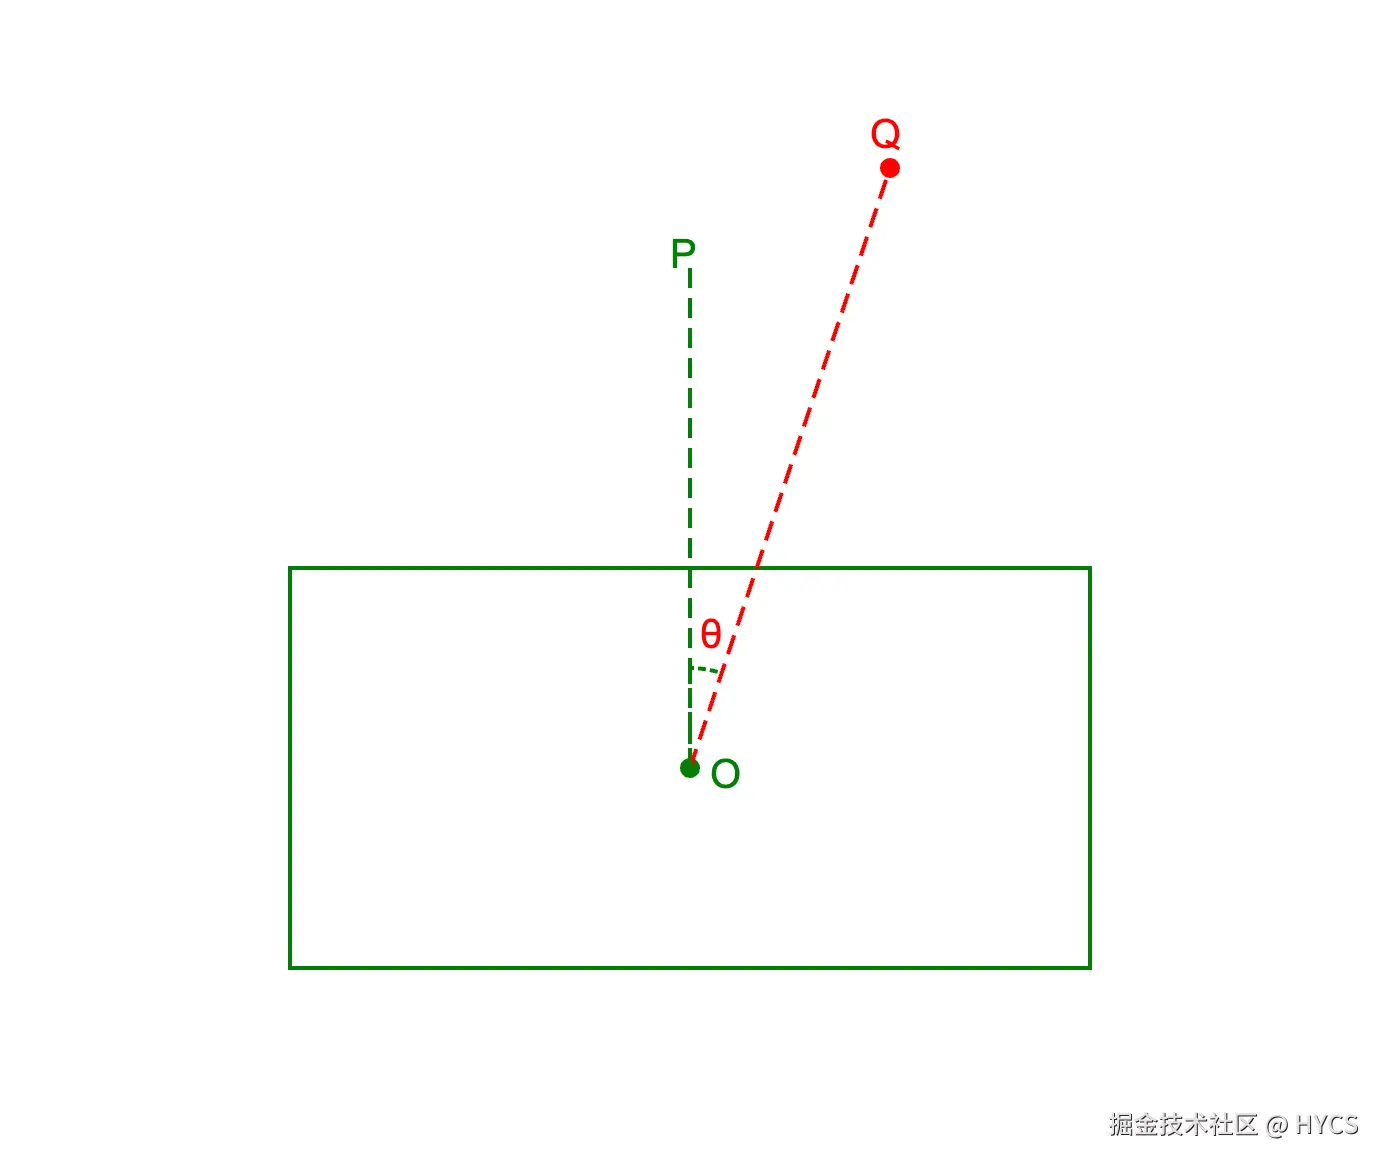
如图所示,绿色矩形是我们的旋转对象,O点是该对象的中心点,P点是该对象的旋转控制点,Q点是拖拽过程中的鼠标落点。角POQ(θ)就是我们要求的旋转夹角,P、O、Q这3个点都是已知的,所以我们可以得到2个向量:OP、OQ,然后根据向量的点积公式,求出这两个向量的夹角,有:
cosθ=∣a ∣∣b ∣a ⋅b
计算出cos θ,就可以用反三角函数计算出θ的值。
3.4.2 通过叉积来计算旋转方向
还是上面的OP、OQ向量,可以计算它们的叉积,判断它们的夹角是否在180度之内,然后判断是顺时针旋转还是逆时针旋转。
至此,我们就得到了旋转diff,也就是±θ。
3.4.3 锚点的影响
前面,虽然我们得到了旋转diff值,但是到这里并没有结束,并不是说,我们直接把这个diff值应用到旋转对象的rotation上,就OK了,因为,旋转对象的锚点,不一定是中心点,而一般编辑器的旋转对象操作,都是以对象的中心点为旋转中心点,这一点大家体验过fabric就知道了。
旋转对象操作,也需要加入平移效果,这样才能让对象的旋转看起来像围绕自身的中心点旋转。也就是说:旋转对象=旋转+平移。
3.4.4 如何计算平移?
在3.4.2中我们已经可以得到了旋转diff,但是在3.4.3中我们又遇到了新的问题,就是锚点的问题,为此,我们还需要给旋转对象加上一个平移,以消除锚点的影响,让对象的旋转中心始终为对象的内容区域的中心。
我们还是用矩阵方程来解决这个问题。
假设,经过了旋转之后,对象的新的变换矩阵为:
ab0cd0txty1
对象的内容区域的中心点的local坐标为:
centerXcenterY1
对象的内容区域的中心点的视窗坐标为:
globalXglobalY1
有:
ab0cd0txty1 × centerXcenterY1 = globalXglobalY1
接下来,就让我们逐步求出新的变换矩阵的a、b、c、d、tx、ty值。
前面我们已经求出了旋转diff值,给旧的变换矩阵叠加一个旋转矩阵(旋转角度为diff值),我们就可以求出a、b、c、d的值。
centerX、centerY代表旋转对象的内容区域的中心的坐标,这个点会受到锚点的影响,所以它并不一定等于(0,0),我们可以实现一个计算内容区域的bounds的函数,来求出这个值。
globalX和globalY可以通过centerX、centerY叠加旋转对象自身的世界矩阵来得到。
至此,上述矩阵方程中的未知数,只剩下tx、ty了,我们把方程展开,把所有已知数移到右边,就可以得出tx、ty的值了,所以新的变换矩阵的a、b、c、d、tx、ty都已经求出来了。
最后,我们把新的变换矩阵应用到旋转对象上,就完成了对象的旋转。
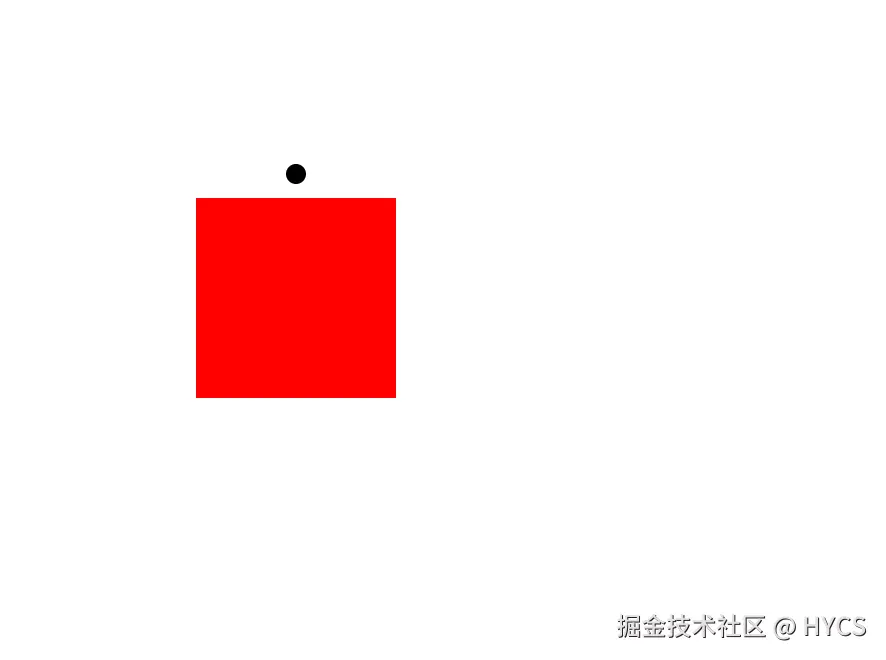
3.4.5 例子
这里用html实现了一个例子,其中,红色方块是我们的旋转对象,方块上方的黑点是旋转控制点:
代码如下:
html
<!DOCTYPE html>
<html lang="en">

<head>
  <meta charset="UTF-8">
  <meta name="viewport" content="width=device-width, initial-scale=1.0">
  <title>Document</title>
  <style>
    * {
      margin: 0;
      padding: 0;
      box-sizing: border-box;
    }

    #box {
      width: 100px;
      height: 100px;
      background-color: red;
      position: absolute;
      left: 700px;
      top: 300px;
      cursor: pointer;
      /* transform-origin: center top; */
    }
  </style>
</head>

<body>
  <div id="box"></div>
</body>
<script>
  const box = document.getElementById('box');

  const tracker = document.createElement('div');
  tracker.style.position = 'absolute';
  tracker.style.left = '50%';
  tracker.style.top = '0';
  tracker.style.width = '0';
  tracker.style.height = '0';
  tracker.style.marginTop = '-12px';
  tracker.style.pointerEvents = 'none';
  box.appendChild(tracker);

  const followDot = document.createElement('div');
  followDot.id = 'followDot';
  followDot.style.position = 'fixed';
  followDot.style.width = '10px';
  followDot.style.height = '10px';
  followDot.style.borderRadius = '50%';
  followDot.style.backgroundColor = '#000';
  followDot.style.zIndex = '9999';
  followDot.style.cursor = 'pointer';
  document.body.appendChild(followDot);

  const originalOutline = box.style.outline;

  followDot.addEventListener('mouseenter', () => {
    box.style.outline = '3px solid pink';
  });

  followDot.addEventListener('mouseleave', () => {
    box.style.outline = originalOutline;
  });

  let isRotating = false;
  let startVector = null;
  let startA = 1;
  let startB = 0;
  let startC = 0;
  let startD = 1;
  let startTx = 0;
  let startTy = 0;

  function createMatrix(a = 1, b = 0, c = 0, d = 1, tx = 0, ty = 0) {
    return { a, b, c, d, tx, ty };
  }

  function multiplyMatrix(m1, m2) {
    return {
      a: m1.a * m2.a + m1.c * m2.b,
      b: m1.b * m2.a + m1.d * m2.b,
      c: m1.a * m2.c + m1.c * m2.d,
      d: m1.b * m2.c + m1.d * m2.d,
      tx: m1.a * m2.tx + m1.c * m2.ty + m1.tx,
      ty: m1.b * m2.tx + m1.d * m2.ty + m1.ty,
    };
  }

  function translateMatrix(x, y) {
    return createMatrix(1, 0, 0, 1, x, y);
  }

  function rotateMatrix(rad) {
    const cos = Math.cos(rad);
    const sin = Math.sin(rad);
    return createMatrix(cos, sin, -sin, cos, 0, 0);
  }

  function applyMatrix(m, point) {
    return {
      x: m.a * point.x + m.c * point.y + m.tx,
      y: m.b * point.x + m.d * point.y + m.ty,
    };
  }

  function matrixToCss(m) {
    return `matrix(${m.a}, ${m.b}, ${m.c}, ${m.d}, ${m.tx}, ${m.ty})`;
  }

  function parseMatrix(transform) {
    if (!transform || transform === 'none') return createMatrix();

    const match = transform.match(/^matrix\((.+)\)$/);
    if (!match) return createMatrix();

    const [a, b, c, d, tx, ty] = match[1].split(',').map(Number);
    return createMatrix(a, b, c, d, tx, ty);
  }

  function getTransformOrigin() {
    const [x, y] = getComputedStyle(box).transformOrigin.split(' ').map(parseFloat);
    return { x, y };
  }

  function getContentCenter() {
    return {
      x: box.offsetWidth / 2,
      y: box.offsetHeight / 2,
    };
  }

  function getEffectiveMatrix(matrix) {
    const origin = getTransformOrigin();
    return multiplyMatrix(
      multiplyMatrix(translateMatrix(origin.x, origin.y), matrix),
      translateMatrix(-origin.x, -origin.y)
    );
  }

  function getStyleMatrixFromEffectiveMatrix(effectiveMatrix) {
    const origin = getTransformOrigin();
    return multiplyMatrix(
      multiplyMatrix(translateMatrix(-origin.x, -origin.y), effectiveMatrix),
      translateMatrix(origin.x, origin.y)
    );
  }

  function getBoxCenter() {
    const matrix = parseMatrix(getComputedStyle(box).transform);
    const center = applyMatrix(getEffectiveMatrix(matrix), getContentCenter());

    return {
      x: box.offsetLeft + center.x,
      y: box.offsetTop + center.y,
    };
  }

  followDot.addEventListener('mousedown', (e) => {
    e.preventDefault();
    const center = getBoxCenter();
    startVector = {
      x: e.clientX - center.x,
      y: e.clientY - center.y,
    };
    const matrix = parseMatrix(getComputedStyle(box).transform);
    startA = matrix.a;
    startB = matrix.b;
    startC = matrix.c;
    startD = matrix.d;
    startTx = matrix.tx;
    startTy = matrix.ty;
    isRotating = true;
  });

  window.addEventListener('mousemove', (e) => {
    if (!isRotating || !startVector) return;

    const center = getBoxCenter();
    const currentVector = {
      x: e.clientX - center.x,
      y: e.clientY - center.y,
    };

    const len1 = Math.sqrt(startVector.x * startVector.x + startVector.y * startVector.y);
    const len2 = Math.sqrt(currentVector.x * currentVector.x + currentVector.y * currentVector.y);
    if (!len1 || !len2) return;

    const dot = startVector.x * currentVector.x + startVector.y * currentVector.y;
    const cos = dot / (len1 * len2);
    const angle = Math.acos(Math.min(1, Math.max(-1, cos)));
    const cross = startVector.x * currentVector.y - startVector.y * currentVector.x;
    const direction = cross >= 0 ? 1 : -1;
    const diffRotate = direction * angle;

    const startMatrix = createMatrix(startA, startB, startC, startD, startTx, startTy);
    const startEffectiveMatrix = getEffectiveMatrix(startMatrix);
    const centerPoint = applyMatrix(startEffectiveMatrix, getContentCenter());
    const nextEffectiveMatrix = multiplyMatrix(
      multiplyMatrix(
        multiplyMatrix(translateMatrix(centerPoint.x, centerPoint.y), rotateMatrix(diffRotate)),
        translateMatrix(-centerPoint.x, -centerPoint.y)
      ),
      startEffectiveMatrix
    );

    box.style.transform = matrixToCss(getStyleMatrixFromEffectiveMatrix(nextEffectiveMatrix));
  });

  window.addEventListener('mouseup', () => {
    isRotating = false;
    startVector = null;
  });

  function updateDotPosition() {
    const rect = tracker.getBoundingClientRect();
    const x = rect.left + rect.width / 2;
    const y = rect.top + rect.height / 2;

    followDot.style.left = `${x - 5}px`;
    followDot.style.top = `${y - 5}px`;

    requestAnimationFrame(updateDotPosition);
  }

  requestAnimationFrame(updateDotPosition);
</script>

</html>
3.5 用控制点缩放对象
通过控制点,来修改对象的scale,缩放时,对角线上的控制点保持不动,这一点大家体验过了fabric就知道是什么效果了。
3.5.1 计算新的scale
拖拽控制点的时候,需要不断计算出最新的scale,那么这个最新的scale是根据什么得出的呢?
这里以右下角控制点为例:
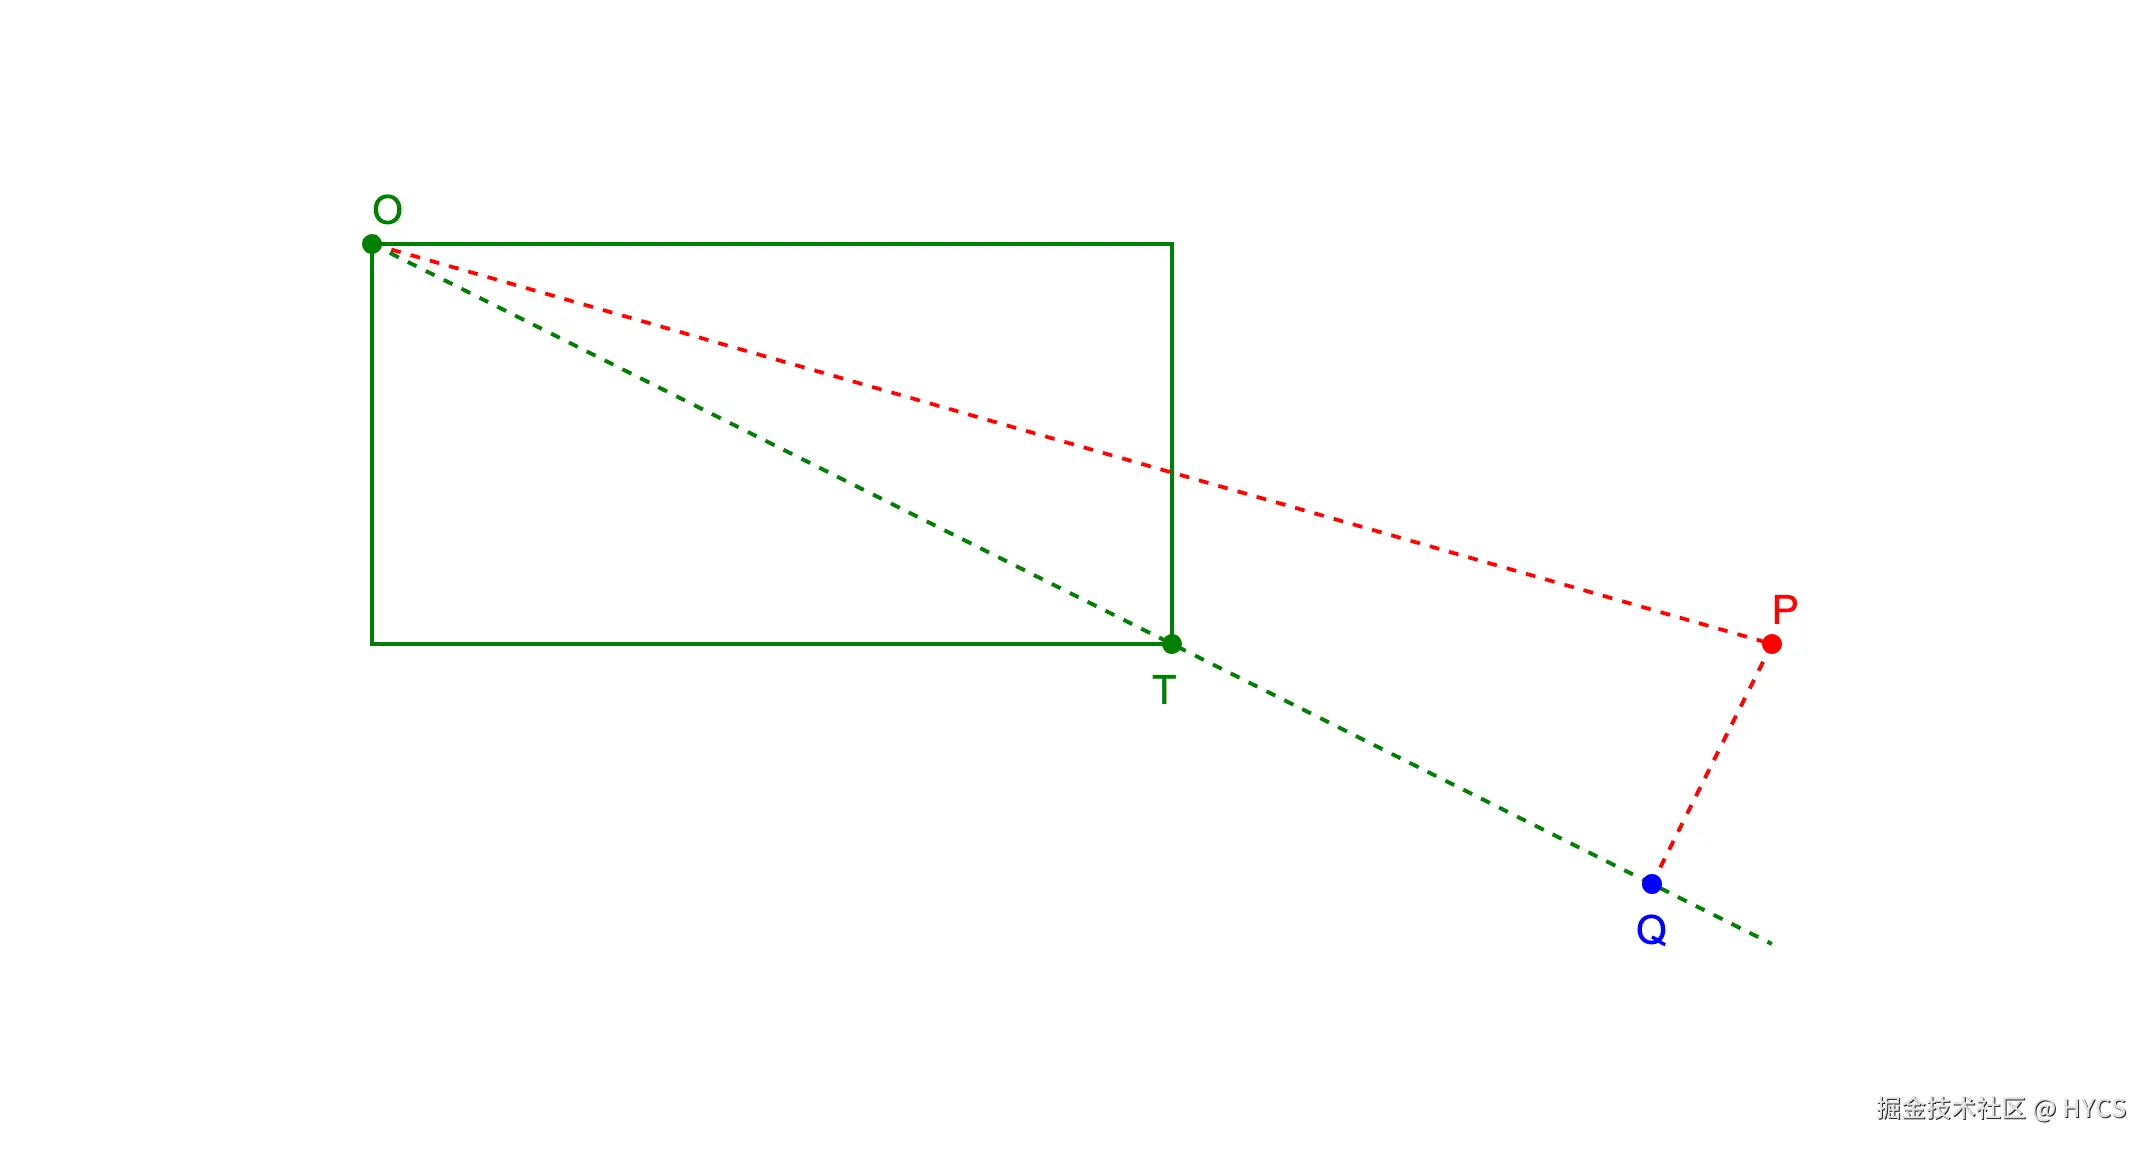
上图中,绿色矩形,是我们的缩放对象,O点是矩形左上方顶点,T点是矩形右下方顶点(也是右下角控制点所在位置),P点是鼠标落点,从P点出发,向线段OT所在直线作垂线,这条垂线与OT所在直线的交点,就是Q点。
我们得出新的scale的方式,就是计算线段OQ与OT的长度的比例,用这个比例乘以初始scale,就得到了新的scale。
假设线段OQ与OT的长度的比例为factor,那么有:
newScale=factor×oldScale
3.5.2 新问题
目前,我们已经得到了新的scale,但是,正如本小节开头提到的,在拖拽缩放控制点时,对角线上的控制点应该是固定不动的,如果我们仅仅只是把这个新的scale设置给控制对象,那么你将会发现,新scale影响了控制对象的bounds,导致对角线上的控制点的位置发生了更改,这并不是我们要的效果。
到了这里,结合3.4中的内容,我们其实也可以得出,用控制点来缩放对象,不仅仅需要给控制对象设置一个新的scale,还需要给控制对象加上一段平移,让它的左上角保持不动。
3.5.3 矩阵方程
从3.5.2中我们又一次发现了一个不变的量,那就是控制对象左上角的坐标,根据这个不变的量,我们又可以得出一个矩阵方程。
假设控制对象经过一次缩放后,其新的变换矩阵为:
ab0cd0txty1
控制对象的左上角local坐标为:
ltXltY1
控制对象的左上角的视窗坐标为:
globalXglobalY1
那么有:
ab0cd0txty1 × ltXltY1 = globalXglobalY1
我们来逐步求出新的变换矩阵的a、b、c、d、tx、ty。
a、b、c、d可以通过在旧的变换矩阵上叠加一个scale矩阵来求出,scale我们已经算出来了。
ltX和ltY就是对象的左上角坐标,但是我们并不能直接用-width/2,-height/2来代表这个坐标,因为锚点不一定在中心点,我们可以实现一个求内容区域bounds的函数,来得到这个坐标。
globalX、globalY可以通过ltX、ltY叠加旧的变换矩阵来求出。
至此,矩阵方程中的未知数,只有tx、ty,我们将方程展开,已知数全挪到右侧,就可以得到tx、ty,所以新的变换矩阵的a、b、c、d、tx、ty都求出来了。
3.5.4 例子
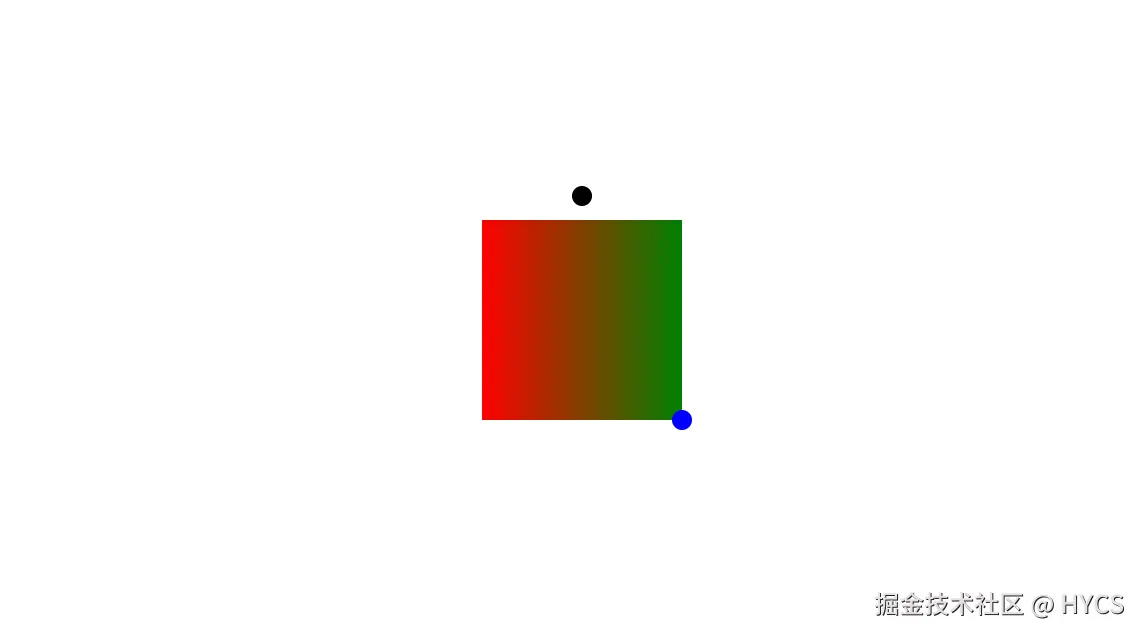
下面用html实现了一个缩放控制点的例子,在这个例子里,红绿渐变色的矩形是我们的控制对象,上方黑色点是旋转控制点,右下方蓝色点是缩放控制点
代码:
html
<!DOCTYPE html>
<html lang="en">

<head>
  <meta charset="UTF-8">
  <meta name="viewport" content="width=device-width, initial-scale=1.0">
  <title>Document</title>
  <style>
    * {
      margin: 0;
      padding: 0;
      box-sizing: border-box;
    }

    #box {
      width: 100px;
      height: 100px;
      background: linear-gradient(to right, red, green);
      position: absolute;
      left: 700px;
      top: 300px;
      cursor: pointer;
      /* transform-origin: center top; */
    }
  </style>
</head>

<body>
  <div id="box"></div>
</body>
<script>
  const box = document.getElementById('box');

  const tracker = document.createElement('div');
  tracker.style.position = 'absolute';
  tracker.style.left = '50%';
  tracker.style.top = '0';
  tracker.style.width = '0';
  tracker.style.height = '0';
  tracker.style.marginTop = '-12px';
  tracker.style.pointerEvents = 'none';
  box.appendChild(tracker);

  const followDot = document.createElement('div');
  followDot.id = 'followDot';
  followDot.style.position = 'fixed';
  followDot.style.width = '10px';
  followDot.style.height = '10px';
  followDot.style.borderRadius = '50%';
  followDot.style.backgroundColor = '#000';
  followDot.style.zIndex = '9999';
  followDot.style.cursor = 'pointer';
  document.body.appendChild(followDot);

  const scaleTracker = document.createElement('div');
  scaleTracker.style.position = 'absolute';
  scaleTracker.style.left = '100%';
  scaleTracker.style.top = '100%';
  scaleTracker.style.width = '0';
  scaleTracker.style.height = '0';
  scaleTracker.style.pointerEvents = 'none';
  box.appendChild(scaleTracker);

  const scaleDot = document.createElement('div');
  scaleDot.id = 'scaleDot';
  scaleDot.style.position = 'fixed';
  scaleDot.style.width = '10px';
  scaleDot.style.height = '10px';
  scaleDot.style.borderRadius = '50%';
  scaleDot.style.backgroundColor = 'blue';
  scaleDot.style.zIndex = '9999';
  scaleDot.style.cursor = 'nwse-resize';
  document.body.appendChild(scaleDot);

  const originalOutline = box.style.outline;

  followDot.addEventListener('mouseenter', () => {
    box.style.outline = '3px solid pink';
  });

  followDot.addEventListener('mouseleave', () => {
    box.style.outline = originalOutline;
  });

  scaleDot.addEventListener('mouseenter', () => {
    box.style.outline = '3px solid pink';
  });

  scaleDot.addEventListener('mouseleave', () => {
    box.style.outline = originalOutline;
  });

  let isRotating = false;
  let startVector = null;
  let startA = 1;
  let startB = 0;
  let startC = 0;
  let startD = 1;
  let startTx = 0;
  let startTy = 0;

  let isScaling = false;
  let scaleStartA = 1;
  let scaleStartB = 0;
  let scaleStartC = 0;
  let scaleStartD = 1;
  let scaleStartTx = 0;
  let scaleStartTy = 0;
  let scaleStartPoint = null;
  let scaleEndPoint = null;

  function createMatrix(a = 1, b = 0, c = 0, d = 1, tx = 0, ty = 0) {
    return { a, b, c, d, tx, ty };
  }

  function multiplyMatrix(m1, m2) {
    return {
      a: m1.a * m2.a + m1.c * m2.b,
      b: m1.b * m2.a + m1.d * m2.b,
      c: m1.a * m2.c + m1.c * m2.d,
      d: m1.b * m2.c + m1.d * m2.d,
      tx: m1.a * m2.tx + m1.c * m2.ty + m1.tx,
      ty: m1.b * m2.tx + m1.d * m2.ty + m1.ty,
    };
  }

  function translateMatrix(x, y) {
    return createMatrix(1, 0, 0, 1, x, y);
  }

  function rotateMatrix(rad) {
    const cos = Math.cos(rad);
    const sin = Math.sin(rad);
    return createMatrix(cos, sin, -sin, cos, 0, 0);
  }

  function scaleMatrix(scale) {
    return createMatrix(scale, 0, 0, scale, 0, 0);
  }

  function applyMatrix(m, point) {
    return {
      x: m.a * point.x + m.c * point.y + m.tx,
      y: m.b * point.x + m.d * point.y + m.ty,
    };
  }

  function matrixToCss(m) {
    return `matrix(${m.a}, ${m.b}, ${m.c}, ${m.d}, ${m.tx}, ${m.ty})`;
  }

  function parseMatrix(transform) {
    if (!transform || transform === 'none') return createMatrix();

    const match = transform.match(/^matrix\((.+)\)$/);
    if (!match) return createMatrix();

    const [a, b, c, d, tx, ty] = match[1].split(',').map(Number);
    return createMatrix(a, b, c, d, tx, ty);
  }

  function getTransformOrigin() {
    const [x, y] = getComputedStyle(box).transformOrigin.split(' ').map(parseFloat);
    return { x, y };
  }

  function getContentCenter() {
    return {
      x: box.offsetWidth / 2,
      y: box.offsetHeight / 2,
    };
  }

  function getEffectiveMatrix(matrix) {
    const origin = getTransformOrigin();
    return multiplyMatrix(
      multiplyMatrix(translateMatrix(origin.x, origin.y), matrix),
      translateMatrix(-origin.x, -origin.y)
    );
  }

  function getStyleMatrixFromEffectiveMatrix(effectiveMatrix) {
    const origin = getTransformOrigin();
    return multiplyMatrix(
      multiplyMatrix(translateMatrix(-origin.x, -origin.y), effectiveMatrix),
      translateMatrix(origin.x, origin.y)
    );
  }

  function getBoxCenter() {
    const matrix = parseMatrix(getComputedStyle(box).transform);
    const center = applyMatrix(getEffectiveMatrix(matrix), getContentCenter());

    return {
      x: box.offsetLeft + center.x,
      y: box.offsetTop + center.y,
    };
  }

  followDot.addEventListener('mousedown', (e) => {
    e.preventDefault();
    const center = getBoxCenter();
    startVector = {
      x: e.clientX - center.x,
      y: e.clientY - center.y,
    };
    const matrix = parseMatrix(getComputedStyle(box).transform);
    startA = matrix.a;
    startB = matrix.b;
    startC = matrix.c;
    startD = matrix.d;
    startTx = matrix.tx;
    startTy = matrix.ty;
    isRotating = true;
  });

  window.addEventListener('mousemove', (e) => {
    if (!isRotating || !startVector) return;

    const center = getBoxCenter();
    const currentVector = {
      x: e.clientX - center.x,
      y: e.clientY - center.y,
    };

    const len1 = Math.sqrt(startVector.x * startVector.x + startVector.y * startVector.y);
    const len2 = Math.sqrt(currentVector.x * currentVector.x + currentVector.y * currentVector.y);
    if (!len1 || !len2) return;

    const dot = startVector.x * currentVector.x + startVector.y * currentVector.y;
    const cos = dot / (len1 * len2);
    const angle = Math.acos(Math.min(1, Math.max(-1, cos)));
    const cross = startVector.x * currentVector.y - startVector.y * currentVector.x;
    const direction = cross >= 0 ? 1 : -1;
    const diffRotate = direction * angle;

    const startMatrix = createMatrix(startA, startB, startC, startD, startTx, startTy);
    const startEffectiveMatrix = getEffectiveMatrix(startMatrix);
    const centerPoint = applyMatrix(startEffectiveMatrix, getContentCenter());
    const nextEffectiveMatrix = multiplyMatrix(
      multiplyMatrix(
        multiplyMatrix(translateMatrix(centerPoint.x, centerPoint.y), rotateMatrix(diffRotate)),
        translateMatrix(-centerPoint.x, -centerPoint.y)
      ),
      startEffectiveMatrix
    );

    box.style.transform = matrixToCss(getStyleMatrixFromEffectiveMatrix(nextEffectiveMatrix));
  });

  scaleDot.addEventListener('mousedown', (e) => {
    e.preventDefault();
    const matrix = parseMatrix(getComputedStyle(box).transform);
    const effectiveMatrix = getEffectiveMatrix(matrix);
    scaleStartA = matrix.a;
    scaleStartB = matrix.b;
    scaleStartC = matrix.c;
    scaleStartD = matrix.d;
    scaleStartTx = matrix.tx;
    scaleStartTy = matrix.ty;
    scaleStartPoint = applyMatrix(effectiveMatrix, { x: 0, y: 0 });
    scaleEndPoint = applyMatrix(effectiveMatrix, { x: box.offsetWidth, y: box.offsetHeight });
    isScaling = true;
  });

  window.addEventListener('mousemove', (e) => {
    if (!isScaling || !scaleStartPoint || !scaleEndPoint) return;

    const ot = {
      x: scaleEndPoint.x - scaleStartPoint.x,
      y: scaleEndPoint.y - scaleStartPoint.y,
    };
    const op = {
      x: e.clientX - box.offsetLeft - scaleStartPoint.x,
      y: e.clientY - box.offsetTop - scaleStartPoint.y,
    };
    const otLenSquare = ot.x * ot.x + ot.y * ot.y;
    if (!otLenSquare) return;

    const scale = (op.x * ot.x + op.y * ot.y) / otLenSquare;
    const nextA = scaleStartA * scale;
    const nextB = scaleStartB * scale;
    const nextC = scaleStartC * scale;
    const nextD = scaleStartD * scale;
    const origin = getTransformOrigin();
    const fixedLocalPoint = { x: 0, y: 0 };
    const fixedPoint = scaleStartPoint;

    // fixedPoint = origin + matrix * (fixedLocalPoint - origin) + translate
    const nextTx = fixedPoint.x - origin.x - nextA * (fixedLocalPoint.x - origin.x) - nextC * (fixedLocalPoint.y - origin.y);
    const nextTy = fixedPoint.y - origin.y - nextB * (fixedLocalPoint.x - origin.x) - nextD * (fixedLocalPoint.y - origin.y);

    box.style.transform = matrixToCss(createMatrix(nextA, nextB, nextC, nextD, nextTx, nextTy));
  });

  window.addEventListener('mouseup', () => {
    isRotating = false;
    startVector = null;
    isScaling = false;
    scaleStartPoint = null;
    scaleEndPoint = null;
  });

  function updateDotPosition() {
    const rect = tracker.getBoundingClientRect();
    const x = rect.left + rect.width / 2;
    const y = rect.top + rect.height / 2;

    followDot.style.left = `${x - 5}px`;
    followDot.style.top = `${y - 5}px`;

    const scaleRect = scaleTracker.getBoundingClientRect();
    scaleDot.style.left = `${scaleRect.left + scaleRect.width / 2 - 5}px`;
    scaleDot.style.top = `${scaleRect.top + scaleRect.height / 2 - 5}px`;

    requestAnimationFrame(updateDotPosition);
  }

  requestAnimationFrame(updateDotPosition);
</script>

</html>
4. 总结
用解矩阵方程的方式,可以解决很多编辑器交互的问题,具体思路就是:找出某些量之间的关系,得出一个等式,接下来,慢慢求出这个等式里的值,就可以得到新的变换矩阵,最终解决了问题。
这种方式,在遇到多种状态综合时,非常有效,我们可以不用操心锚点、旋转等状态带来的影响,而专注于某些比较容易求出的值,然后通过代数的方式,求出一些不好求的值。
但是,在某些情况比如缩放画布里,大多数状态是固定的,我们没有必要用矩阵方程的形式来计算新的变换矩阵,只需要用一些简单的换算公式就能解决问题了,所以,要不要用矩阵方程也需要看情况,有的时候可用可不用。