原生的微信小程序是不支持自定义标题背景色的,因此需要自己封装一个标题组件;
需求描述
微信小程序标题默认透明,底色为整体视口的背景色,当页面超出视口长度滚动时标题背景色由透明色变为白色,实现效果大致如下所示:
| 滚动前 | 滚动后 |
|---|---|
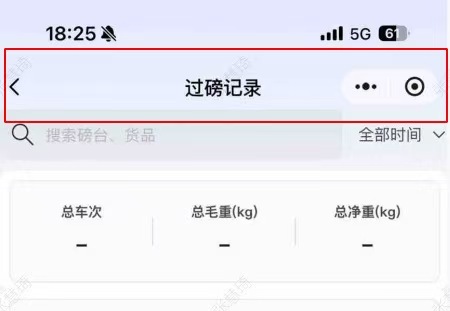 |
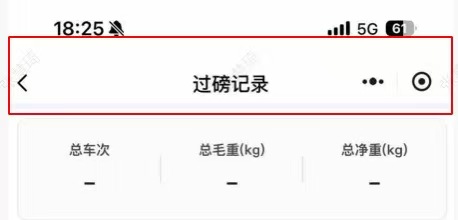 |
代码模块
组件代码
javascript
<template>
  <view class="custom-nav-bar" wx:style="{{ { top: searchTop + 'px' } }}">
    <van-icon size="40rpx" bind:tap="onTap" class="arrow" name="{{iconName}}" />
    <text class="nav-title">{{title}}</text>
  </view>
  <!-- 向上滚动后,展示白的的导航栏 -->
  <view
    class="nav-bar-white"
    wx:style="{{ { opacity: whiteBgOpacity, paddingTop: searchTop + 'px' } }}"
  >
    <van-icon size="40rpx" bind:tap="onTap" class="arrow" name="{{iconName}}" />
    <text class="nav-title">{{title}}</text>
  </view>
</template>
<script type="application/json">
  {
    "usingComponents": {
      "van-icon": "@vant/weapp/dist/icon/index",
    },
    "navigationStyle": "custom"
  }
</script>
<script>
  import { createComponent } from '@mpxjs/core'

  createComponent({
    properties: {
      // 判断是否展示白色标题
      whiteBgOpacity: {
        type: String,
        observer: function (newVal, oldVal) {}
      },
      // 页面标题
      title: {
        type: String,
        observer: function (newVal, oldVal) {}
      },
      // 导航icon
      iconName: {
        type: String,
        observer: function (newVal, oldVal) {}
      }
    },
    data() {
      return {
        searchTop: 0
        // whiteBgOpacity: 0,
      }
    },
    ready() {
      this.getBarInfo()
    },
    methods: {
      getBarInfo() {
        const menuButtonInfo = wx.getMenuButtonBoundingClientRect()
        const whiteBarHeight = menuButtonInfo.top + menuButtonInfo.height
        this.triggerEvent('childEvent', whiteBarHeight)
        this.setData({
          searchTop: menuButtonInfo.top
        })
      },
      onTap() {
        this.triggerEvent('handleIconTap')
      }
    }
  })
</script>
<style lang="scss" scoped>
  .custom-nav-bar {
    position: fixed;
    /* top: 70rpx; */
    width: 100%;
    display: flex;
    color: #000000;
    justify-content: space-between;
    align-items: center;
    height: 64rpx;
    .arrow {
      position: absolute;
      width: 48rpx;
      height: 48rpx;
      margin-right: 48rpx;
    }
    .nav-title {
      margin: 0 auto;
      font-size: 34rpx;
      font-weight: 500;
      color: #000000;
    }
  }
  .nav-bar-white {
    position: fixed;
    top: 0;
    width: 100%;
    height: 68rpx;
    background: #fff;
    z-index: 10001;
    display: flex;
    align-items: center;
    font-size: 34rpx;
    font-weight: 500;
    .arrow {
      width: 48rpx;
      height: 48rpx;
      position: absolute;
    }
    .nav-title {
      text-align: center;
      flex: 1;
      font-size: 34rpx;
      font-weight: 500;
    }
  }
</style>
引用代码
javascript
<template>
  <scroll-view
    class="my-scroll-view"
    scroll-y="{{true}}"
    bindscroll="onScroll"
    bindscrolltolower="onScrollToLower"
  >
    <view
      class="record-page-container"
      wx:style="{{ { paddingTop: whiteBarHeight + 'px' } }}"
      style="{{recordPageContainerCss}}"
    >
      <header
        whiteBgOpacity="{{whiteBgOpacity}}"
        iconName="arrow-left"
        bind:handleIconTap="onBack"
        title="过磅记录"
        bind:childEvent="handleChildEvent"
      />
    </view>
  </scroll-view>
</template>

<script>
  import { createPage } from '@mpxjs/core'
  createPage({
    data: {
      whiteBarHeight: 0
    },
    onHide() {},
    onUnload() {},
    onLoad() {},
    async onShow() {},
    onReady() {},

    methods: {
      handleChildEvent(e) {
        this.setData({
          whiteBarHeight: e.detail
        })
      },
      onScroll(e) {
        const { scrollTop } = e.detail || {}
        this.setData({
          whiteBgOpacity: scrollTop < 10 ? 0 : 1
        })
      },
      onBack() {
        wx.navigateBack()
      }
    }
  })
</script>

<script type="application/json">
  {
    "usingComponents": {
      "van-button": "@vant/weapp/dist/button/index",
      "van-cell-group": "@vant/weapp/dist/cell-group/index",
      "van-field": "@vant/weapp/dist/field/index",
      "van-cell": "@vant/weapp/dist/cell/index",
      "van-icon": "@vant/weapp/dist/icon/index",
      "van-loading": "@vant/weapp/dist/loading/index",
      "van-action-sheet": "@vant/weapp/dist/action-sheet/index",
      "van-datetime-picker": "@vant/weapp/dist/datetime-picker/index",
      "header": "../../components/header/index.mpx"
    },
    "disableScroll": true,
    "navigationBarTitleText": "过磅记录",
    "navigationStyle": "custom"
  }
</script>
<style lang="scss" scoped>
  .record-page-container {
    display: flex;
    flex-direction: column;
    justify-content: flex-start;
    align-items: flex-start;
    width: 100vw;
    height: 100vh;
    // padding: 0 12px;
    background-size: 100% auto;
    background-repeat: no-repeat;
    background-position: top left;
    box-sizing: border-box;

    .my-scroll-view {
      width: 100vw;
      // box-sizing: border-box;
    }
  }
</style>
上述两个代码中子组件通过属性方式将展示的标题和icon以及点击icon需要触发的操作进行接收,并在初始化后 ready 方法只用过计算出当前菜单按钮(右上角的多点菜单按钮)的位置和尺寸,并通过childEvent方法【告诉】父组件,并让父组件通过 padding-top 的方式给header组件留出位置。
至于子组件的标题是否展示白色还是透明色,通过父组件的 onScroll 方法判断:
javascript
onScroll(e) {
        const { scrollTop } = e.detail || {}
        this.setData({
          whiteBgOpacity: scrollTop < 10 ? 0 : 1
        })
      },
当页面滚动到一定位置时,白色标题展示。