一、Nginx 基础部署
Nginx 是一款高性能的 HTTP 和反向代理服务器,在高并发场景下可支持高达 5 万个并发连接,同时具备系统资源消耗低、运行稳定的特性。
1.1 安装与基础配置
bash
# 安装 Nginx 服务
[root@server ~ 09:36:27]# yum install -y nginx

# 备份默认主页文件,防止覆盖后无法恢复
[root@server ~ 09:39:56]# cp /usr/share/nginx/html/index.html {,.ori}

# 配置本地域名解析(将域名映射到服务器IP)
[root@server ~ 09:56:39]# vim /etc/hosts
# 添加如下记录:将 www.liu.cloud 指向服务器内网IP
10.1.8.10 www.liu.cloud

# 自定义主页内容,用于测试访问
[root@server ~ 09:55:52]# echo Hello World From Nginx > /usr/share/nginx/html/index.html

# 验证域名解析与 Nginx 服务是否正常
[root@server ~ 09:57:19]# curl http://www.liu.cloud
Hello World From Nginx
1.2 简化版部署流程(补充)
bash
# 快速安装并启动 Nginx
[root@www ~]# yum -y install nginx
[root@www ~]# systemctl enable nginx --now

# 备份并替换默认主页
[root@www ~]# mv /usr/share/nginx/html/index.html{,.ori}
[root@www ~]# echo Hello World From Nginx > /usr/share/nginx/html/index.html

# 配置防火墙允许 HTTP 访问(永久生效)
[root@www ~]# firewall-cmd --add-service=http --permanent
[root@www ~]# firewall-cmd --reload

# 客户端配置域名解析(Windows 编辑 C:\Windows\System32\drivers\etc\hosts;Linux 编辑 /etc/hosts)
# 添加:10.1.8.10 www.liu.cloud
# 客户端验证访问
[root@client ~]# curl http://www.liu.cloud
二、静态站点与动态站点核心区别
2.1 核心概念
- 静态站点:页面内容固定写死,服务器仅原样返回 HTML 文件,无数据交互逻辑。
- 动态站点:由后端程序实时生成页面,支持读写数据库、用户交互等动态逻辑。
2.2 运行原理
| 类型 | 运行流程 | 典型场景 |
|---|---|---|
| 静态站点 | 1. 提前编写 HTML 文件并存储在服务器;2. 用户访问 → 服务器直接返回 HTML;3. 无后端程序、无数据库交互 | 企业官网、产品落地页 |
| 动态站点 | 1. 用户访问 → 请求转发至后端应用程序;2. 后端从数据库取数据,实时拼接生成 HTML;3. 每次刷新重新生成内容 | 电商商城、博客、管理后台 |
2.3 关键特性对比
| 对比项 | 静态站点 | 动态站点 |
|---|---|---|
| 内容展示 | 所有用户看到的内容完全一致,修改需编辑源码并重新上传 | 不同用户 / 不同时间内容不同(如个人中心、实时库存),支持个性化展示 |
| 内容修改 | 必须修改源码文件 → 重新上传服务器 | 后台管理页面在线编辑,自动同步至数据库,无需修改代码 |
| 交互能力 | 仅支持前端 JS 简单动画,无法实现表单提交、数据存储(注册 / 留言等功能不可用) | 支持注册登录、留言、下单、搜索、数据增删改查等复杂交互 |
| 服务器依赖 | 仅需 Nginx/Apache 静态 Web 服务器,无需语言环境、数据库,部署简单 | Web 服务器 + 语言运行环境(PHP/JDK/Python) + 数据库(MySQL),缺一不可 |
| 性能 & 成本 | 访问速度快、资源消耗极低、CDN 适配性好、服务器成本低、SEO 友好 | 需运算 + 查库,高并发下资源消耗大、成本高,但可支撑复杂业务逻辑 |
2.4 常见技术栈
-
静态站点:HTML+CSS+JS、Hugo/VitePress/Hexo 静态站点生成器。
-
动态站点:
-
PHP+MySQL+Nginx(LNMP/LAMP);
-
Java(SpringBoot)+MySQL;
-
Python(Django/Flask)+MySQL;
-
Node.js(Express/NestJS)+MySQL。
-
三、PHP 站点部署与 Nginx 集成
3.1 PHP 访问流程
- 客户端向 Nginx 发起 PHP 页面访问请求;
- Nginx 将请求转发至 php-fpm 服务;
- php-fpm 调用 PHP 程序解析执行代码,返回执行结果;
- php-fpm 将结果回传给 Nginx;
- Nginx 将最终结果返回给客户端。
3.2 PHP 环境安装
bash
# 安装 PHP 核心包与 php-fpm 进程管理服务(建议同步安装常用扩展)
[root@server ~ 09:57:21]# yum install -y php php-fpm
# 补充安装常用扩展,满足业务需求
[root@www ~]# yum install -y php-gd php-common php-pear php-mbstring php-mcrypt

# php-fpm 作用:接收 Nginx 转发的 PHP 代码请求
# PHP 作用:解析执行 PHP 代码,并将结果返回给 php-fpm

# 设置 php-fpm 开机自启并立即启动
[root@server ~ 09:57:45]# systemctl enable php-fpm --now
Created symlink from /etc/systemd/system/multi-user.target.wants/php-fpm.service to /usr/lib/systemd/system/php-fpm.service.

# 验证 PHP 版本
[root@server ~ 09:58:03]# php -v
PHP 5.4.16 (cli) (built: Apr  1 2020 04:07:17)
Copyright (c) 1997-2013 The PHP Group
Zend Engine v2.4.0, Copyright (c) 1998-2013 Zend Technologies
3.3 PHP 功能测试
bash
# 基础语法测试:验证 PHP 解析功能是否正常
[root@server ~ 09:58:11]# echo "<?php echo 'PHP Test Page'.\"\n\"; ?>" > php_test.php
[root@server ~ 09:58:28]# php php_test.php
PHP Test Page

# 生成 phpinfo 测试页,查看 PHP 详细配置(用于调试环境)
[root@server ~ 09:58:44]# echo "<?php phpinfo(); ?>" > /usr/share/nginx/html/info.php
3.4 Nginx 配置 PHP 解析(HTTPS 版本)
bash
[root@server ~ 09:58:57]# vim /etc/nginx/conf.d/vhost-ssl.conf
# 在 server 区块中添加 PHP 解析规则
server {
    listen       443 ssl http2;
    listen       [::]:443 ssl http2;
    server_name  www.liu.cloud;
    root         /usr/share/nginx/html;

    # 配置 SSL 证书路径(HTTPS 必备)
    ssl_certificate      /etc/nginx/conf.d/server.crt;
    ssl_certificate_key  /etc/nginx/conf.d/server.key;

    # 匹配所有 .php 结尾的请求,实现 PHP 解析
    location ~ \.php$ {
        # 安全防护:检测请求的 PHP 文件是否存在,不存在直接返回 404
        # 防止伪造 PHP 路径的恶意请求(如 /xxx.php/yyy.jpg)被解析
        try_files $uri =404;

        # 将 PHP 请求转发至本地 9000 端口(php-fpm 默认监听端口)
        fastcgi_pass 127.0.0.1:9000;

        # 设置默认索引文件为 index.php
        fastcgi_index index.php;

        # 定义 PHP 执行文件的绝对路径(核心参数)
        fastcgi_param SCRIPT_FILENAME $document_root$fastcgi_script_name;

        # 引入 Nginx 内置的 FastCGI 通用参数(如请求方法、查询字符串等)
        include fastcgi_params;
    }
}

# 配置 HTTP 自动重定向到 HTTPS(提升访问安全性)
server {
    listen       80;
    listen       [::]:80;
    server_name  www.liu.cloud;
    root         /usr/share/nginx/html;
    return       301 https://$host$request_uri;
}
3.5 Nginx 配置 PHP 解析(HTTP 简化版)
bash
[root@server ~ 10:02:40]# vim /etc/nginx/default.d/php.conf
# 独立配置 PHP 解析规则,便于维护
location ~ \.php$ {
    try_files $uri =404;          # 安全检测:文件不存在则返回 404
    fastcgi_pass 127.0.0.1:9000; # 转发至 php-fpm 服务
    fastcgi_index index.php;     # 默认索引文件
    fastcgi_param SCRIPT_FILENAME $document_root$fastcgi_script_name; # PHP 文件路径
    include fastcgi_params;      # 引入通用 FastCGI 参数
}

# 重启 Nginx 使配置生效
[root@server ~ 10:03:22]# systemctl restart nginx
四、实战:基于 Nginx+PHP 部署 KodExplorer 私有网盘
4.1 KodExplorer 介绍
KodExplorer(可道云)是开源私有云与文件管理系统,适配 CentOS 7.9 等 Linux 系统,具备以下核心特性:
- 操作便捷:类 Windows 界面,支持拖拽、快捷键等本地文件操作逻辑;
- 文件处理:支持数百种格式在线预览 / 编辑(Office、PDF、代码、设计稿等);
- 协作灵活:支持权限分配、外链分享、文件收集、版本回溯;
- 安全可靠:IP 过滤、双因子认证、操作审计、数据加密存储;
- 多端适配:覆盖 Web、PC 客户端、移动端,支持磁盘挂载与同步。
4.2 实验环境
CentOS 7.9 系统,需部署 Nginx + PHP 7.4(稳定性最优)环境。
4.3 环境部署
4.3.1 安装 Nginx
bash
# 安装并启动 Nginx 服务
yum install -y nginx
systemctl enable nginx --now
4.3.2 安装 PHP 7.4(Remi 源)
bash
# 安装 Remi 源(提供高版本 PHP)
[root@server conf.d 10:46:51]# yum install -y yum-utils https://rpms.remirepo.net/enterprise/remi-release-7.rpm

# 启用 Remi PHP 7.4 仓库
[root@server conf.d 10:51:47]# yum-config-manager --enable remi-php74

# 安装 PHP 7.4 及核心扩展
[root@server conf.d 10:51:51]# yum install -y php php-fpm php-mbstring php-gd
# 扩展安装(备用命令,覆盖更多场景)
[root@centos7 ~]# yum install -y php php-fpm php-mysqlnd php-zip php-gd php-mbstring php-xml php-bcmath php-intl php-opcache php-ldap php-pecl-apcu php-cli

# 验证 PHP 版本
[root@server conf.d 11:01:32]# php -v
PHP 7.4.33 (cli) (built: Jun  5 2024 05:05:14) ( NTS )
Copyright (c) The PHP Group
Zend Engine v3.4.0, Copyright (c) Zend Technologies

# 配置 php-fpm 运行账户(与 Nginx 一致,避免权限问题)
[root@server conf.d 11:03:18]# vim /etc/php-fpm.d/www.conf
user = nginx
group = nginx

# 关闭 Session Secure 选项(HTTP 环境下保证 Cookie 正常传递)
# sed -i 's/^session.cookie_secure = On/session.cookie_secure = Off/' /etc/php.ini

# 设置 PHP 会话目录权限(解决权限不足导致的会话失效问题)
[root@server conf.d 11:16:00]# chgrp -R nginx /var/lib/php/session/

# 启动 php-fpm 并设置开机自启
[root@server conf.d 11:16:44]# systemctl enable php-fpm.service --now
Created symlink from /etc/systemd/system/multi-user.target.wants/php-fpm.service to /usr/lib/systemd/system/php-fpm.service.
4.4 部署 KodExplorer 源码
bash
# 进入 Nginx 网站根目录
[root@server conf.d 11:17:00]# cd /usr/share/nginx/html/

# 上传 KodExplorer 压缩包(rz 命令需提前安装 lrzsz 工具)
[root@server html 11:17:16]# rz -E
rz waiting to receive.
[root@server html 11:17:39]# ls kodexplorer4.51.zip
kodexplorer4.51.zip

# 解压源码包
[root@server html 11:17:45]# unzip kodexplorer4.51.zip

# 设置目录权限(赋予 Nginx 读写权限,避免访问报错)
[root@server html 11:17:59]# chown -R nginx:nginx KODExplorer
[root@server html 11:18:24]# chmod -R 755 KODExplorer

# 配置 KodExplorer 专属 Nginx 站点
[root@server html 11:18:39]# cat > /etc/nginx/conf.d/kod.conf <<EOF
server {
    listen 80;
    server_name www.liu.cloud;
    root /usr/share/nginx/html;
    index index.html index.php;

    # 主请求转发规则
    location / {
        try_files $uri $uri/ /KODExplorer/index.php?$query_string;
    }

    # PHP 解析规则
    location ~ \.php$ {
        fastcgi_pass 127.0.0.1:9000;
        fastcgi_index index.php;
        fastcgi_param SCRIPT_FILENAME $document_root$fastcgi_script_name;
        include fastcgi_params;
    }
    # 配置超大文件上传限制(支持 10GB 文件上传)
    client_max_body_size 10240M;
}
EOF

# 重启 Nginx 使配置生效
[root@server html 11:19:24]# systemctl restart nginx
4.5 KodExplorer 初始化与使用
4.5.1 初始化步骤
- 访问地址:浏览器输入服务器 IP / 域名(www.liu.cloud),自动跳转安装初始化页面;

- 环境自检:页面自动检测 PHP 版本、目录权限、扩展组件,全部绿灯即为环境正常;
- 设置管理员账号:自定义用户名和高强度密码,完成初始化;
- 登录系统:使用管理员账号登录,进入 KodExplorer 主界面。
4.5.2 登录界面

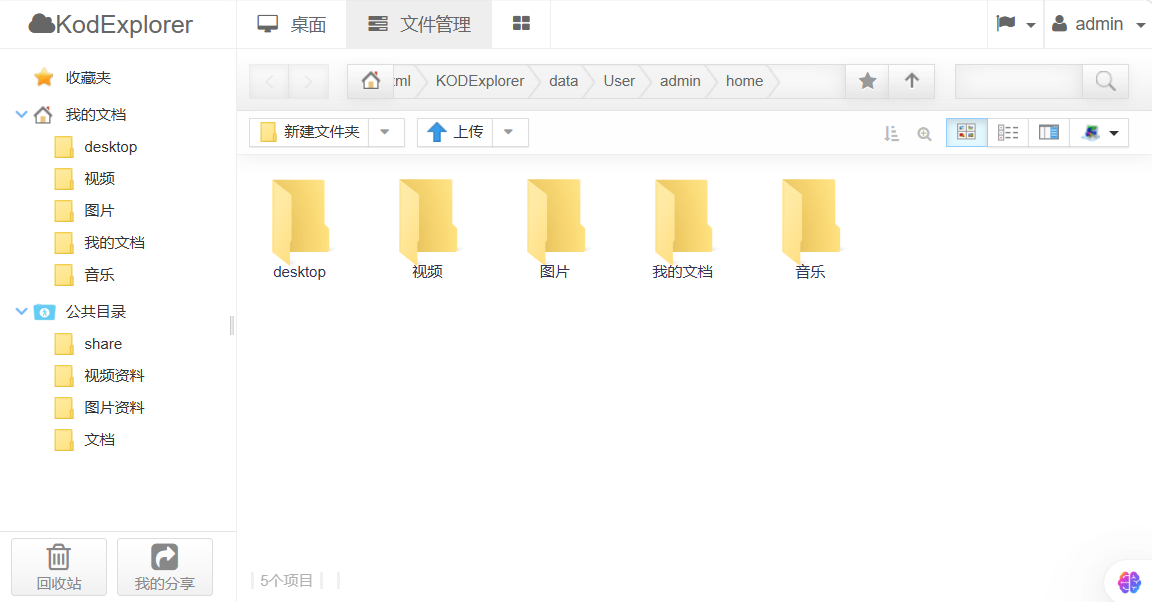
4.5.3 核心功能展示
- 桌面界面:

- 文件管理界面:
五、Nginx 反向代理核心配置与实践
5.1 反向代理基础概念
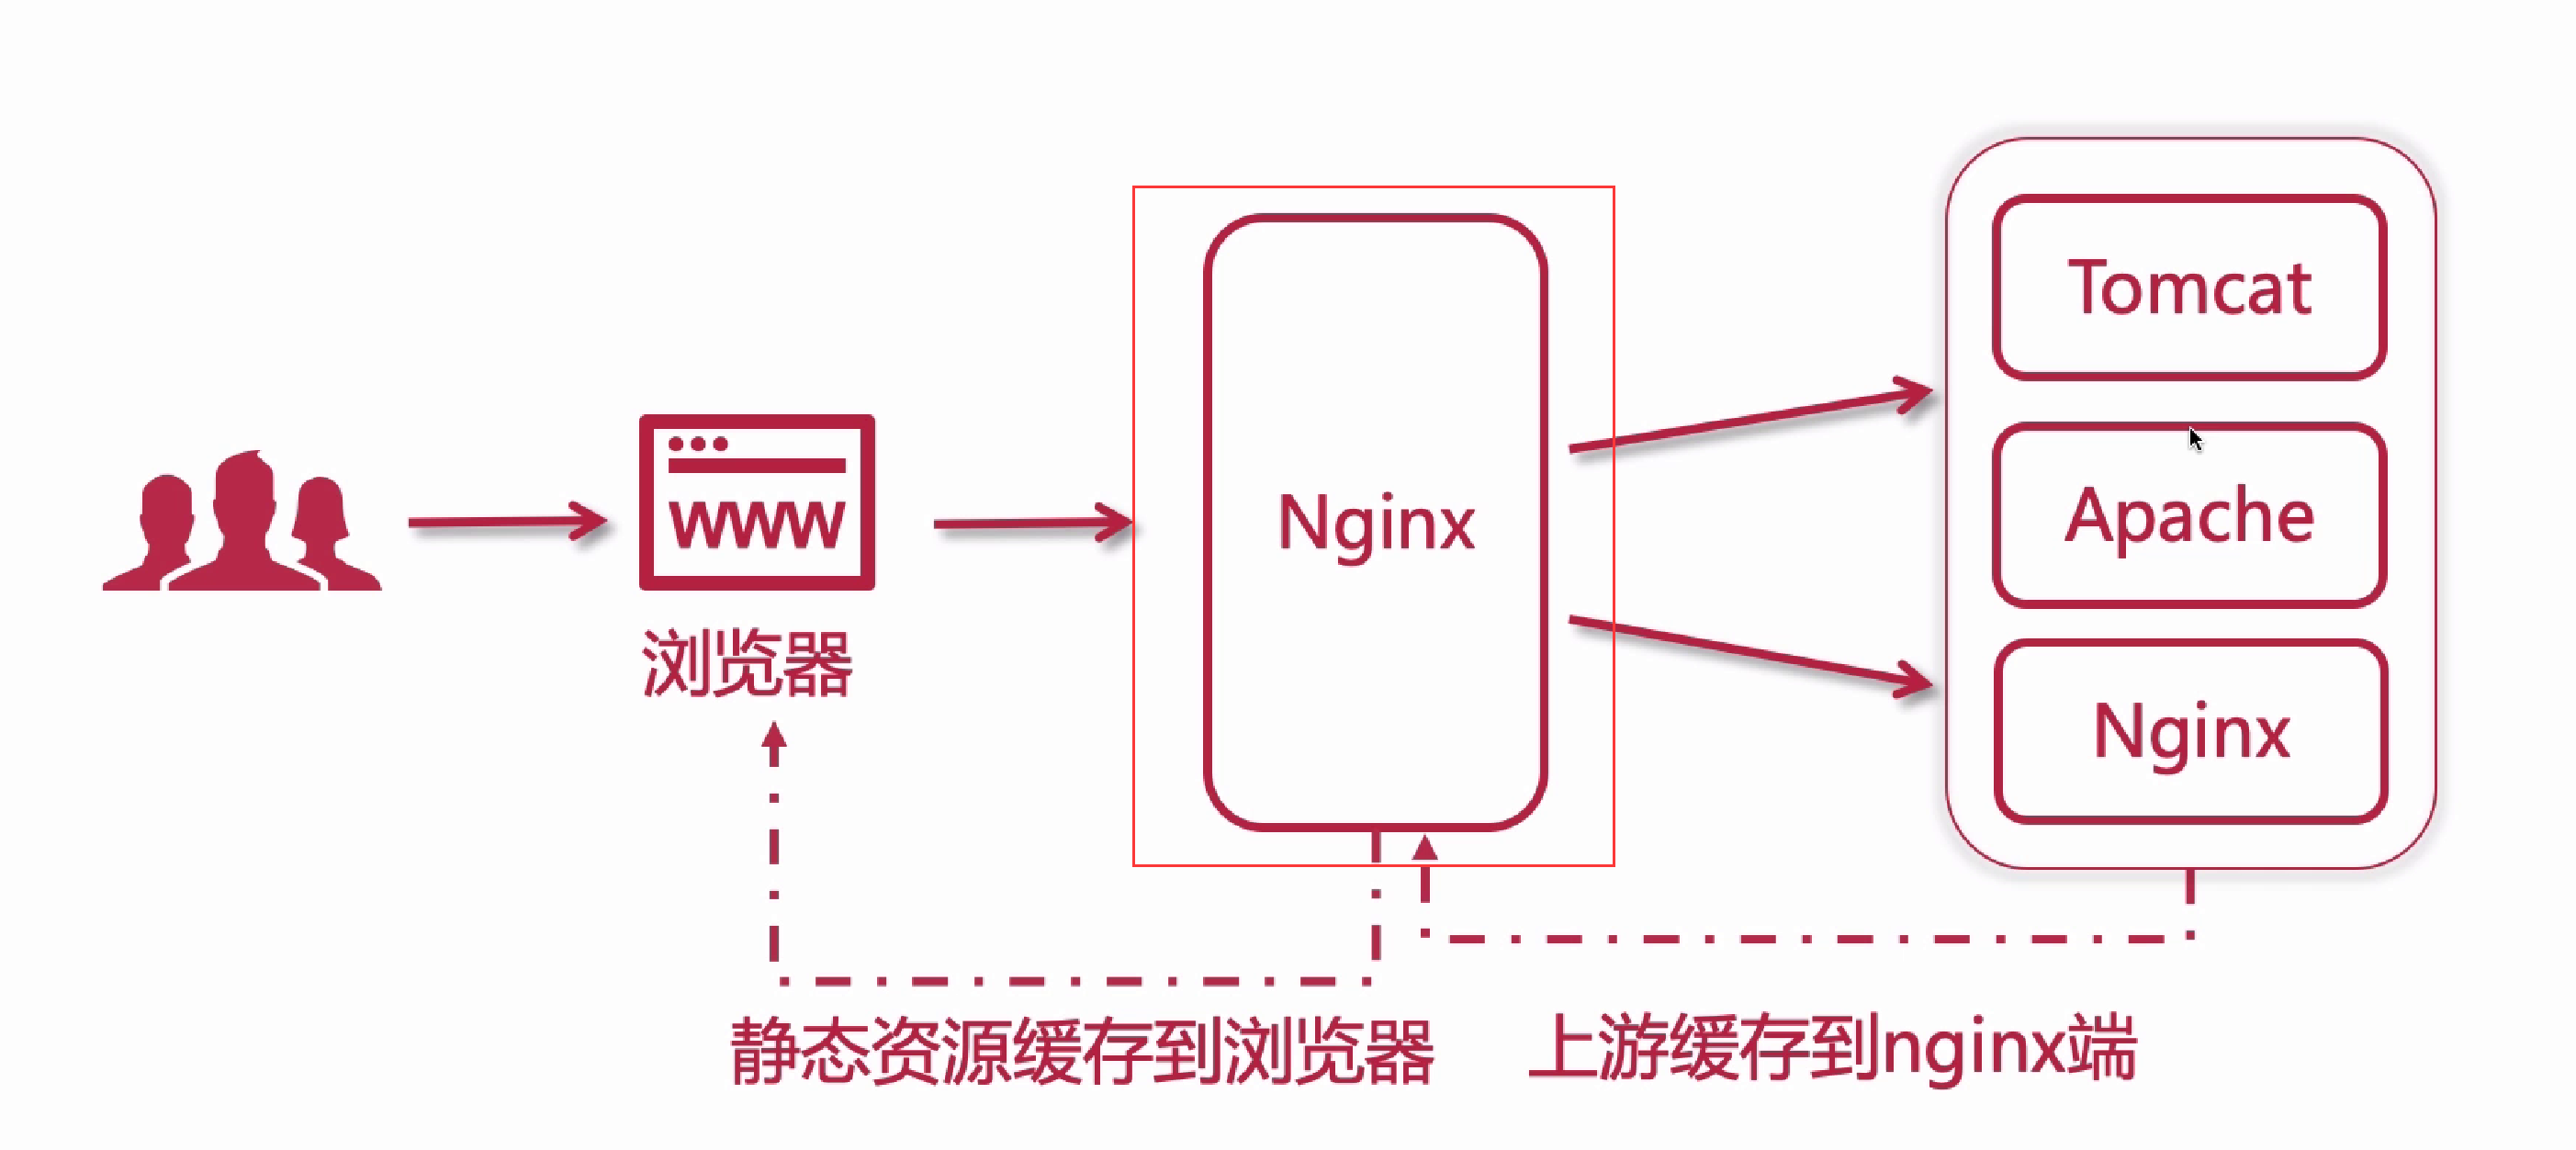
反向代理是指代理服务器接收外网用户请求,转发至内部指定服务器处理,再将结果返回给用户。客户端不直接与后端服务器通信,可隐藏后端 IP,核心作用包括:
- 负载均衡:将请求分发至多个后端服务器,平衡负载;
- 缓存加速:缓存静态资源 / 动态页面,减轻后端压力;
- 动静分离:静态资源与动态请求分别转发至不同服务器;
- 多站点代理:一个 Nginx 代理多个域名 / 虚拟主机。
5.2 反向代理核心模块
| 模块名称 | 功能描述 |
|---|---|
| ngx_http_proxy_module | 以 HTTP 协议转发客户端请求至后端服务器 |
| ngx_http_upstream_module | 定义后端服务器集群(用于负载均衡),供 proxy_pass 等指令引用 |
| ngx_stream_proxy_module | 以 TCP 协议转发客户端请求(适用于非 HTTP 服务,如数据库) |
| ngx_http_fastcgi_module | 以 FastCGI 协议转发 PHP 请求至 php-fpm 服务 |
| ngx_http_uwsgi_module | 以 uWSGI 协议转发 Python 请求至后端 Python 服务 |
5.3 Location 配置核心规则
Nginx 通过 location 匹配 URL 路径,结合 proxy_pass 实现反向代理,核心逻辑为:URL 路径匹配 → 命中规则 → 转发至后端地址。
5.3.1 基础配置示例(含负载均衡)
nginx
http {
    # 定义后端服务器集群(upstream 模块)
    upstream backend_nginx {
        server 192.168.1.100:8080;  # 后端服务器1
        server 192.168.1.101:8080;  # 后端服务器2(自动轮询负载均衡)
    }

    server {
        listen 80;                # Nginx 监听端口
        server_name localhost;    # 访问域名/IP

        # 1. 兜底规则:匹配所有未命中的请求
        location / {
            proxy_pass http://backend_nginx;  # 转发至后端集群
            # 传递客户端真实信息(反向代理必备参数)
            proxy_set_header Host $host;                # 传递访问域名
            proxy_set_header X-Real-IP $remote_addr;    # 传递客户端真实IP
            proxy_set_header X-Forwarded-For $proxy_add_x_forwarded_for; # 传递IP链路
            proxy_set_header X-Forwarded-Proto $scheme; # 传递请求协议(http/https)
        }

        # 2. 特定路径规则:匹配 /api 开头的请求
        location /api/ {
            proxy_pass http://192.168.1.102:9090/;  # 后端地址末尾带 /,剔除匹配的 /api/ 前缀
            proxy_set_header Host $host;
            proxy_set_header X-Real-IP $remote_addr;
        }
    }
}
5.3.2 Location 匹配优先级(从高到低)
- 精确匹配(=):仅匹配完全一致的 URL,优先级最高;
- 前缀匹配(^~):匹配以指定路径开头的 URL,跳过正则匹配;
- 正则匹配(/*):匹配符合正则表达式的 URL(~ 区分大小写,~* 不区分);
- 普通前缀匹配:匹配以指定路径开头的 URL,按路径长度优先;
- 兜底匹配(/):匹配所有未命中的请求,优先级最低。
5.3.3 各类匹配规则详解
1. 精确匹配(=)
bash
# 仅匹配 http://localhost/login,不匹配 /login?a=1、/login/
location = /login {
    proxy_pass http://backend_login:8080;
}
2.前缀匹配(^~)
bash
# 匹配所有 /static 开头的请求(如 /static/css/main.css),优先于正则匹配
location ^~ /static/ {
    proxy_pass http://backend_static:80;
}
3. 正则匹配(~ / ~*)
# 匹配所有 .jpg/.png/.gif 结尾的图片请求(不区分大小写)
location ~* \.(jpg|png|gif)$ {
    proxy_pass http://backend_img:80;
}
4. 普通前缀匹配(无符号)
# 规则1:匹配 /api/xxx(路径长度3)
location /api/ {
    proxy_pass http://backend_api:9090;
}
# 规则2:匹配 /api/user/xxx(路径长度7,优先于规则1)
location /api/user/ {
    proxy_pass http://backend_user:9090;
}
5. 通用匹配(/)
bash
# 所有未命中的请求均转发至主后端服务
location / {
    proxy_pass http://backend_main;
}
5.3.4 proxy_pass 路径重构规则
proxy_pass 末尾是否带 / 决定 URL 路径重构逻辑:
| 场景 | 配置示例 | 客户端请求 | 后端接收地址 |
|---|---|---|---|
| 末尾带 /(剔除前缀) | location /api/ { proxy_pass http://192.168.1.102:9090/; } | http://localhost/api/user | http://192.168.1.102:9090/user |
| 末尾不带 /(保留前缀) | location /api/ { proxy_pass http://192.168.1.102:9090; } | http://localhost/api/user | http://192.168.1.102:9090/api/user |
5.3.5 综合配置示例
bash
http {
    # 定义后端集群
    upstream backend_main { server 192.168.1.200:8080; }
    upstream backend_api { server 192.168.1.201:9090; }
    upstream backend_static { server 192.168.1.202:80; }
    upstream backend_login { server 192.168.1.203:8080; }

    server {
        listen 80;
        server_name localhost;

        # 1. 精确匹配:/login → 登录服务
        location = /login {
            proxy_pass http://backend_login;
            proxy_set_header Host $host;
        }

        # 2. 前缀匹配:/static/ → 静态资源服务(跳过正则)
        location ^~ /static/ {
            proxy_pass http://backend_static;
            proxy_set_header Host $host;
        }

        # 3. 正则匹配:图片请求 → 静态资源服务
        location ~* \.(jpg|png|gif)$ {
            proxy_pass http://backend_static;
            proxy_set_header Host $host;
        }

        # 4. 普通前缀:/api/ → API 服务(剔除 /api 前缀)
        location /api/ {
            proxy_pass http://backend_api/;
            proxy_set_header Host $host;
            proxy_set_header X-Real-IP $remote_addr;
        }

        # 5. 兜底匹配:所有未命中请求 → 主服务
        location / {
            proxy_pass http://backend_main;
            proxy_set_header Host $host;
            proxy_set_header X-Real-IP $remote_addr;
        }
    }
}
5.3.6 匹配流程验证
| 客户端请求 URL | 命中规则 | 后端接收地址 | 对应服务 | ||
|---|---|---|---|---|---|
| http://localhost/login | = /login | http://192.168.1.203:8080 | backend_login | ||
| http://localhost/static/css/main.css | ^~ /static/ | http://192.168.1.202:80/css/main.css | backend_static | ||
| http://localhost/img/1.jpg | ~* .(jpg|png|gif)$ | http://192.168.1.202:80/img/1.jpg | backend_static | ||
| http://localhost/api/user/info | /api/ | http://192.168.1.201:9090/user/info | backend_api | ||
| http://localhost/index | / | http://192.168.1.200:8080/index | backend_main |
5.4 反向代理实战环境
5.4.1 环境架构
| 服务器角色 | 主机名 | IP 地址 |
|---|---|---|
| 测试客户端 | client.liu.cloud | 10.1.8.11 |
| 代理服务器 | proxy.liu.cloud | 10.1.8.20 |
| Web 服务器 1 | nginx1.liu.cloud | 10.1.8.21 |
| Web 服务器 2 | nginx2.liu.cloud | 10.1.8.22 |
| Web 服务器 3 | nginx3.liu.cloud | 10.1.8.23 |
5.4.2 全网域名解析配置
bash
# 所有节点统一配置 /etc/hosts
[root@proxy ~ 13:47:25]# vim /etc/hosts
127.0.0.1   localhost localhost.localdomain localhost4 localhost4.localdomain4
::1         localhost localhost.localdomain localhost6 localhost6.localdomain6
10.1.8.10 server.liu.cloud server
10.1.8.11 client.liu.cloud client
10.1.8.20 www.liu.cloud www
10.1.8.20 proxy.liu.cloud proxy
10.1.8.21 nginx1.liu.cloud nginx1
10.1.8.22 nginx2.liu.cloud nginx2
10.1.8.23 nginx3.liu.cloud nginx3

# 批量推送 hosts 文件至所有节点(客户端执行)
[root@client ~ 14:36:21]# ssh-keygen -t rsa -N '' -f ~/.ssh/id_rsa  # 生成免密登录密钥
[root@client ~ 14:36:45]# for host in 10.1.8.{11,20,21,22,23}; do sshpass -p123456 ssh-copy-id root@$host; done  # 免密登录配置
[root@client ~ 14:43:12]# for host in 10.1.8.{11,20,21,22,23};do scp /etc/hosts root@$host:/etc/hosts;done  # 推送 hosts
[root@client ~ 14:44:11]# for host in 10.1.8.{11,20,21,22,23};do echo "正在推送至$host";ssh root@$host cat /etc/hosts; done  # 验证推送结果
5.4.3 后端 Nginx 服务器基础配置
bash
# 代理节点(proxy.liu.cloud)准备测试文件
[root@proxy ~ 15:08:27]# mkdir /var/nginx{1,2}
[root@proxy ~ 15:10:13]# echo Welcome to www.liu.cloud > /usr/share/nginx/html/index.html
[root@proxy ~ 15:10:20]# echo "Hello, Nginx" > /var/nginx/index.html
[root@proxy ~ 15:10:33]# echo "Hello, liu" > /var/nginx/test.txt
[root@proxy ~ 15:10:54]# cp /usr/share/nginx/html/nginx-logo.png /var/nginx/

# 配置 Nginx 基础代理规则
[root@proxy ~ 15:11:16]# vim /etc/nginx/conf.d/proxy.conf
server {
    listen  80;
    server_name www.liu.cloud;

    # 匹配根路径,指向 /var/nginx 目录
    location / {
      root /var/nginx;
      index index.html;
    }
}

# 重新加载 Nginx 配置
[root@proxy ~ 15:13:19]# nginx -s reload

# 客户端测试访问
[root@client ~ 14:59:01]# curl http://www.liu.cloud/
Hello, Nginx
[root@client ~ 15:13:47]# curl http://www.liu.cloud/test.txt
Hello, liu
[root@client ~ 15:13:58]# curl http://www.liu.cloud/nginx-logo.png  # 返回 PNG 图片二进制数据
访问 www.liu.cloud/nginx-logo.png 验证图片访问:

5.5 反向代理实践(本地代理)
5.5.1 环境准备
bash
# 准备测试目录与文件
[root@proxy ~ 15:13:28]# echo "Hello, I'm here /var/nginx/nginx1" > /var/nginx/nginx1/index.html
[root@proxy ~ 15:16:26]# echo "Hello, I'm here /var/nginx/nginx2" > /var/nginx/nginx2/index.html
[root@proxy ~ 15:16:42]# echo "Hello, Nginx1" > /var/nginx1/index.html
[root@proxy ~ 15:16:53]# echo "Hello, Nginx2" > /var/nginx2/index.html

# 批量创建多层测试目录
[root@proxy ~ 15:17:08]# for path1 in www{1..2}; do
   for path2 in nginx{1..2}; do
     mkdir -p /var/$path1/$path2
     echo "Hello, I'm here /var/$path1/$path2" > /var/$path1/$path2/index.html
   done
 done

# 基础访问测试
[root@client ~ 15:14:50]# curl http://www.liu.cloud/
Hello, Nginx
[root@client ~ 15:22:28]# curl http://www.liu.cloud/nginx1/
Hello, I'm here /var/nginx/nginx1
[root@client ~ 15:22:42]# curl http://www.liu.cloud/nginx2/
Hello, I'm here /var/nginx/nginx2
5.5.2 实践 1:无符号匹配
bash
[root@proxy ~ 15:17:50]# vim /etc/nginx/conf.d/proxy.conf
server {
    listen  80;
    server_name www.liu.cloud;

    # 兜底规则:根路径
    location / {
        root /var/nginx;
        index index.html;
    }

    # 普通前缀匹配:/nginx1 路径
    location /nginx1 {
        root /var;  # 完整路径为 /var + /nginx1 = /var/nginx1
        # 等效于 alias /var/nginx1;(alias 直接指定绝对路径)
        index index.html;
    }
}

# 重新加载配置
[root@proxy ~ 15:41:21]# nginx -s reload

# 客户端测试
[root@client ~ 15:22:45]# curl http://www.liu.cloud/nginx1/  # 需加 /,否则 404
Hello, Nginx1  # 匹配 /var/nginx1/index.html
[root@client ~ 15:41:57]# curl http://www.liu.cloud/nginx2/
Hello, I'm here /var/nginx/nginx2 # 未命中特殊规则,走兜底路径结论:普通前缀匹配优先级高于兜底规则(/)。
5.5.3 实践 2:正则表达式匹配(~)
bash
[root@proxy ~ 15:41:38]# vim /etc/nginx/conf.d/proxy.conf
server {
    listen  80;
    server_name www.liu.cloud;

    # 兜底规则
    location / {
        root /var/nginx;
        index index.html;
    }

    # 普通前缀匹配
    location /nginx1 {
        root /var;
        index index.html;
    }

    # 正则匹配:匹配所有 /nginx 开头的路径
    location ~ /nginx.* {
        root /var/www1;
        index index.html;
    }
}

# 重新加载配置
[root@proxy ~ 15:43:15]# nginx -s reload

# 客户端测试
[root@client ~ 15:41:59]# curl http://www.liu.cloud/nginx1/
Hello, I'm here /var/www1/nginx1  # 命中正则规则,覆盖普通前缀
[root@client ~ 15:43:25]# curl http://www.liu.cloud/nginx2/
Hello, I'm here /var/www1/nginx2 # 命中正则规则结论:正则匹配优先级高于普通前缀匹配。
5.5.4 实践 3:精确匹配(=)
bash
[root@proxy ~ 15:44:40]# vim /etc/nginx/conf.d/proxy.conf
server {
    listen  80;
    server_name www.liu.cloud;

    # 兜底规则
    location / {
        root /var/nginx;
        index index.html;
    }

    # 普通前缀匹配
    location /nginx1 {
        root /var;
        index index.html;
    }

    # 正则匹配
    location ~ /nginx.* {
        root /var/www1;
        index index.html;
    }

    # 精确匹配:仅匹配 /nginx2/index.html
    location = /nginx2/index.html {
        root /var/www2;
        index index.html;
    }
}

# 重新加载配置
[root@proxy ~ 15:46:05]# nginx -s reload

# 客户端测试
[root@client ~ 15:44:55]# curl http://www.liu.cloud/nginx1/
Hello, I'm here /var/www1/nginx1  # 命中正则
[root@client ~ 15:46:10]# curl http://www.liu.cloud/nginx2/index.html
Hello, I'm here /var/www2/nginx2 # 命中精确匹配,覆盖正则结论:精确匹配优先级最高,高于正则匹配。
5.6 反向代理实践(远端代理)
5.6.1实践 1:无符号匹配
bash
[root@proxy ~ 15:46:06]# vim /etc/nginx/conf.d/proxy.conf
server {
    listen  80;
    server_name www.liu.cloud;

    # 匹配根位置
    location / {
        root /var/nginx;
        index index.html;
    }

    # 匹配 /nginx1/ 开头,代理到nginx1.liu.cloud,/nginx1/不组合到后端服务器
    # 访问 /nginx1/ 开头,相当于直接访问http://nginx1.liu.cloud/
    location /nginx1/ {
        # 后端服务
        proxy_pass http://nginx1.liu.cloud/; # 注意:代理后端后面有 /。
        index index.html;
    }
}
# 重新加载nginx配置
[root@proxy ~ 16:12:19]# nginx -s reload

#客户端访问测试
# nginx1 后面必须添加 / 符号
[root@client ~ 15:53:45]# curl http://www.liu.cloud/nginx1/
Welocme to nginx1.liu.cloud
# 显示结果是服务器 nginx1.liu.cloud 内容

# nginx2 后面必须添加 / 符号
[root@client ~ 16:12:36]# curl http://www.liu.cloud/nginx2/
Hello, I'm here /var/nginx/nginx2
# 显示结果是目录/var/nginx/nginx2中内容结论:无符号匹配优先级高于默认的/。
5.6.2实践 2正则表达式匹配
bash
[root@proxy ~ 16:15:41]# vim /etc/nginx/conf.d/proxy.conf


server {
    listen  80;
    server_name www.liu.cloud;

    # 匹配根位置
    location / {
        root /var/nginx;
        index index.html;
    }

    # 匹配 /nginx1/ 开头,代理到nginx1.liu.cloud,/nginx1/不组合到后端服务器
    # 访问 /nginx1/ 开头,相当于直接访问http://nginx1.liu.cloud/
    location /nginx1/ {
        # 后端服务
        proxy_pass http://nginx1.liu.cloud/; # 注意:代理后端后面有 /。
        index index.html;
    }

    # 正则表达式匹配 /nginx.*
    location ~ /nginx[123].* {
        # 手动重写路径:去掉 /nginx 前缀,转发到目标服务器
        # ^/nginx[123](.*)$ 匹配 /nginx[123] 开头的完整路径,$1表示 /nginx[123] 后的所有内容
        # break 表示重写后不再匹配其他 rewrite 规则
        rewrite ^/nginx[123](.*)$ $1 break;

        # proxy_pass 不带 URI(无末尾的 /),配合 rewrite 实现路径替换
        proxy_pass http://nginx2.liu.cloud;
        index index.html;
    }
}
# 重新加载nginx配置
[root@proxy ~ 16:16:52]# nginx -s reload

#访问测试
# nginx 后面必须添加 / 符号
[root@client ~ 16:16:59]# curl http://www.liu.cloud/nginx1/
Welocme to nginx2.liu.cloud

# 显示结果是服务器 nginx2.liu.cloud 内容

# nginx 后面必须添加 / 符号
[root@client ~ 16:18:25]# curl http://www.liu.cloud/nginx2/
Welocme to nginx2.liu.cloud

# 显示结果是服务器 nginx2.liu.cloud 内容

# nginx 后面必须添加 / 符号
[root@client ~ 16:18:48]# curl http://www.liu.cloud/nginx3/
Welocme to nginx2.liu.cloud
# 显示结果是服务器 nginx2.liu.cloud 内容结论:正则表达式匹配优先级高于无符号。
5.6.3实践 3精确匹配
bash
[root@proxy ~ 16:18:00]# vim /etc/nginx/conf.d/proxy.conf
server {
    listen  80;
    server_name www.liu.cloud;

    # 匹配根位置
    location / {
        root /var/nginx;
        index index.html;
    }

    # 匹配 /nginx1/ 开头,代理到nginx1.liu.cloud,/nginx1/不组合到后端服务器
    # 访问 /nginx1/ 开头,相当于直接访问http://nginx1.liu.cloud/
    location /nginx1/ {
        # 后端服务
        proxy_pass http://nginx1.liu.cloud/; # 注意:代理后端后面有 /。
        index index.html;
    }

    # 正则表达式匹配 /nginx.*
    location ~ /nginx[123].* {
        # 手动重写路径:去掉 /nginx 前缀,转发到目标服务器
        # ^/nginx[123](.*)$ 匹配 /nginx[123] 开头的完整路径,$1表示 /nginx[123] 后的所有内容
        # break 表示重写后不再匹配其他 rewrite 规则
        rewrite ^/nginx[123](.*)$ $1 break;

        # proxy_pass 不带 URI(无末尾的 /),配合 rewrite 实现路径替换
        proxy_pass http://nginx2.liu.cloud;
        index index.html;
    }

    # 精确匹配
    location = /nginx3/ {
        proxy_pass http://nginx3.liu.cloud/;
        index index.html;
    }

}
# 重新加载nginx配置
[root@proxy ~ 16:18:20]# nginx -s reload

#访问测试
# nginx1 后面必须添加 / 符号
[root@client ~ 16:18:53]# curl http://www.liu.cloud/nginx1/
Welocme to nginx2.liu.cloud

# 显示结果是服务器 nginx2.liu.cloud 内容

# nginx2 后面必须添加 / 符号
[root@client ~ 16:20:25]# curl http://www.liu.cloud/nginx2/
Welocme to nginx2.liu.cloud

# 显示结果是服务器 nginx2.liu.cloud 内容

# nginx3 后面必须添加 / 符号
[root@client ~ 16:20:28]# curl http://www.liu.cloud/nginx3/
Welocme to nginx3.liu.cloud

# 显示结果是服务器 nginx3.liu.cloud 内容结论:精确匹配优先级高于正则表达式。