文章目录
1.算法原理
对 Y(亮度)通道进行全局亮度和对比度调整。
- 增加亮度: 原理就是在原像素的基础上,加上一定的亮度
bcc_img = self.img + self.brightness - 增加对比度:
对比度调整的目的就是,亮的更亮,暗的更暗 .注意下面我们是以127为分界线的,这个值可以动态调整.
从下面可以看到,当当前像素亮度超过 127,那么(self.img - 127) * self.contrast将会是一个正值,在加上之前的像素值,则处理后的像素更亮. 反之如果亮度值小于127,那么(self.img - 127) * self.contrast得到的是一个负值, 则运算后图像亮度更低.
self.img + (self.img - 127) * self.contrast
关键数学公式
output = input + brightness + (input - 127) × contrast
       = input × (1 + contrast) + brightness - 127 × contrast
等效于以 127 为中心点的线性变换(斜率=1+contrast,截距=brightness-127×contrast)。
brightness > 0→ 整体变亮;brightness < 0→ 整体变暗contrast > 0→ 对比度增加(亮更亮,暗更暗);contrast < 0→ 对比度降低
2.代码实现
实现细节
- 使用
int16中间类型防止溢出 - 主程序中
contrast在传入前额外除以2^5=32(避免重复),使用时注意这个缩放 - 最终 clip 到
[0, bcc_clip]
关键参数
| 参数 | 说明 | 典型值 |
|---|---|---|
brightness |
亮度偏置,范围 -255, 255 | 10 |
contrast |
对比度系数,范围 -1, 4(除以 32 后) | ~0.31 |
clip |
输出 clip | 255 |
python
class BCC:
    'Brightness Contrast Control'

    def __init__(self, img, brightness, contrast, clip):
        self.img = img
        self.brightness = brightness
        self.contrast = contrast
        self.clip = clip

    def clipping(self):
        np.clip(self.img, 0, self.clip, out=self.img)
        return self.img

    def execute(self):
        img_h = self.img.shape[0]
        img_w = self.img.shape[1]
        bcc_img = np.empty((img_h, img_w), np.int16)
        bcc_img = self.img + self.brightness
        bcc_img = bcc_img + (self.img - 127) * self.contrast
        self.img = bcc_img
        return self.clipping()
2.测试程序
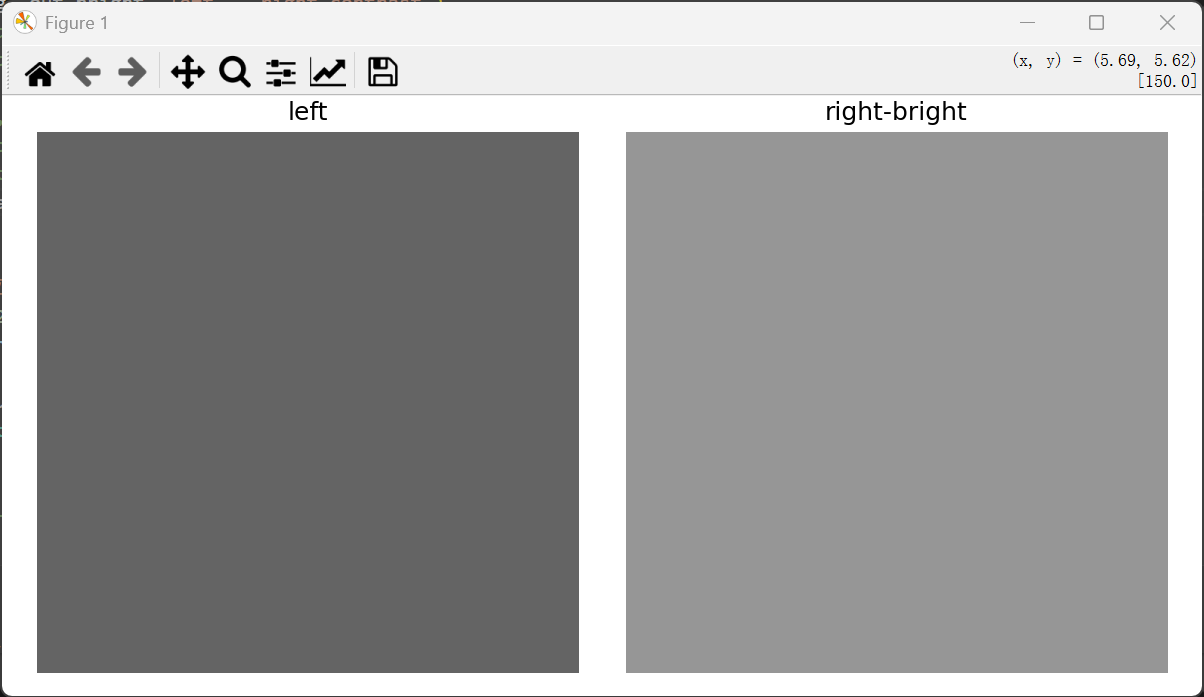
亮度增加测试
生成一个,8x8的灰度图,每个灰度值为100,然后再原来亮度的基础上增加50.
python
    def test_brightness_increase(self):
        """brightness=50 时,所有像素应增加约 50。"""
        img = make_gray(8, 8, val=100).astype(np.int16)
        bcc = BCC(img.copy(), brightness=50, contrast=0, clip=255)
        out = bcc.execute()
        show_gray_images(img, out,"left", "right-bright")
np.testing.assert_array_equal(out, 130)- 测试效果图
如预期,图像整体亮度得到提升.
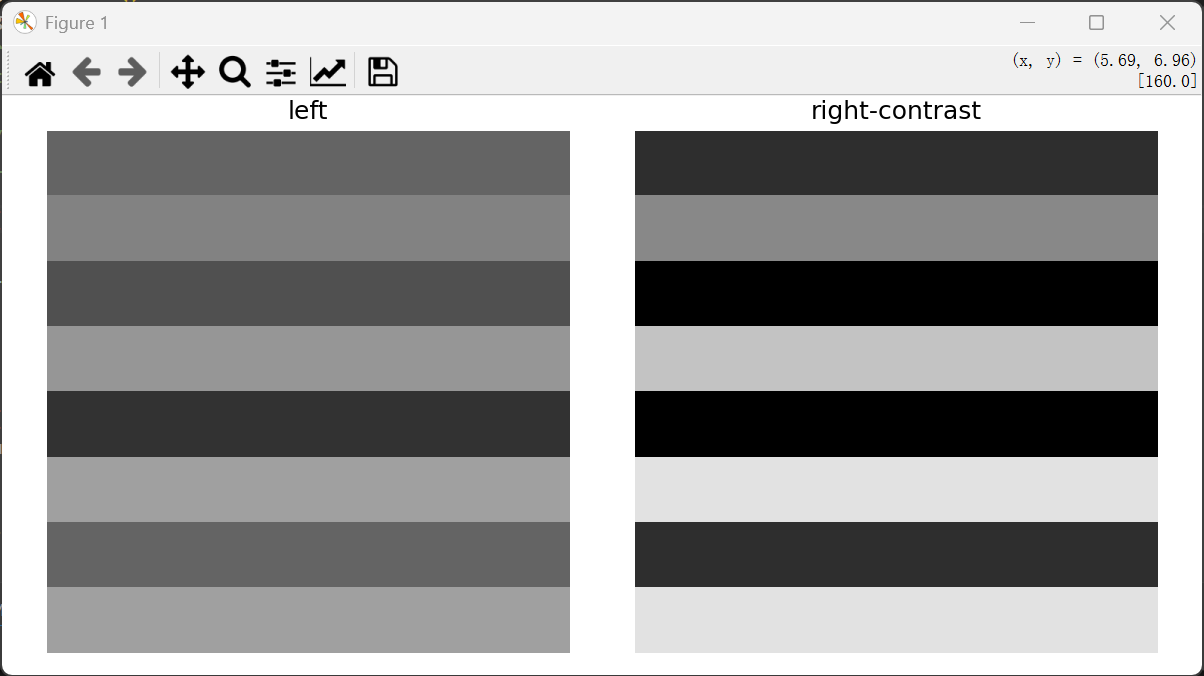
对比度增加
这里构建了一个8x8亮暗的图像,初始图像对比度不高,图像看起来灰蒙蒙的,对比度增加2倍后,亮暗分明.
python
    def test_contrast_increase(self):
        bright_img = make_gray(8, 8, val=150).astype(np.int16)
        bright_img[:] = [
            [100, 100, 100, 100, 100, 100, 100, 100],
            [130, 130, 130, 130, 130, 130, 130, 130],
            [80, 80, 80, 80, 80, 80, 80, 80],
            [150, 150, 150, 150, 150, 150, 150, 150],
            [50, 50, 50, 50, 50, 50, 50, 50],
            [160, 160, 160, 160, 160, 160, 160, 160],
            [100, 100, 100, 100, 100, 100, 100, 100],
            [160, 160, 160, 160, 160, 160, 160, 160]
        ]

        bcc_bright = BCC(bright_img.copy(), brightness=0, contrast=2.0, clip=255)
        out_bright = bcc_bright.execute()
show_gray_images(bright_img, out_bright,"left", "right-contrast")- 测试效果图
处理后,亮暗分明,符合预期.