第 05 章:短期记忆:用 sessionId 串起一轮会话上下文
本章最终效果
上一章我们把"确定性计算"从模型回答里拆出来,放进了服务端 Tool Registry。
这一章我们解决另一个更容易被误解的问题:短期记忆。
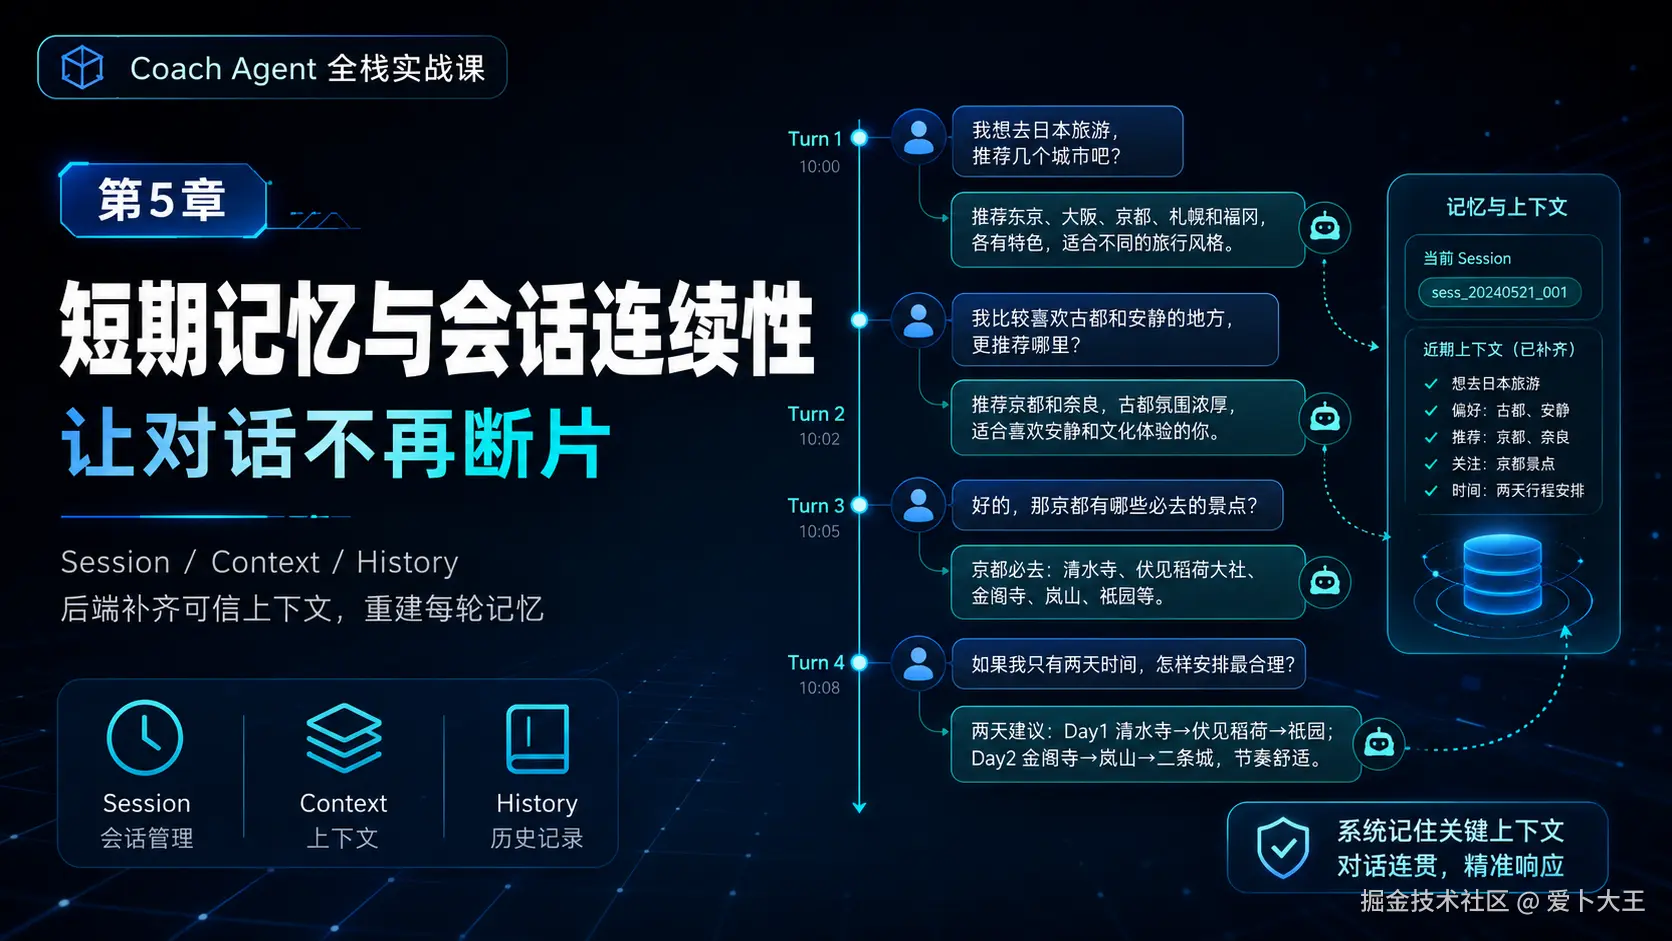
很多同学第一次做聊天应用时,会以为模型天然知道上一轮说过什么。实际上,模型每次收到的只是本轮请求里的 messages。它不会自动记住上一轮,也不会自动知道这个用户是谁、上次打卡是什么、有没有膝盖疼。
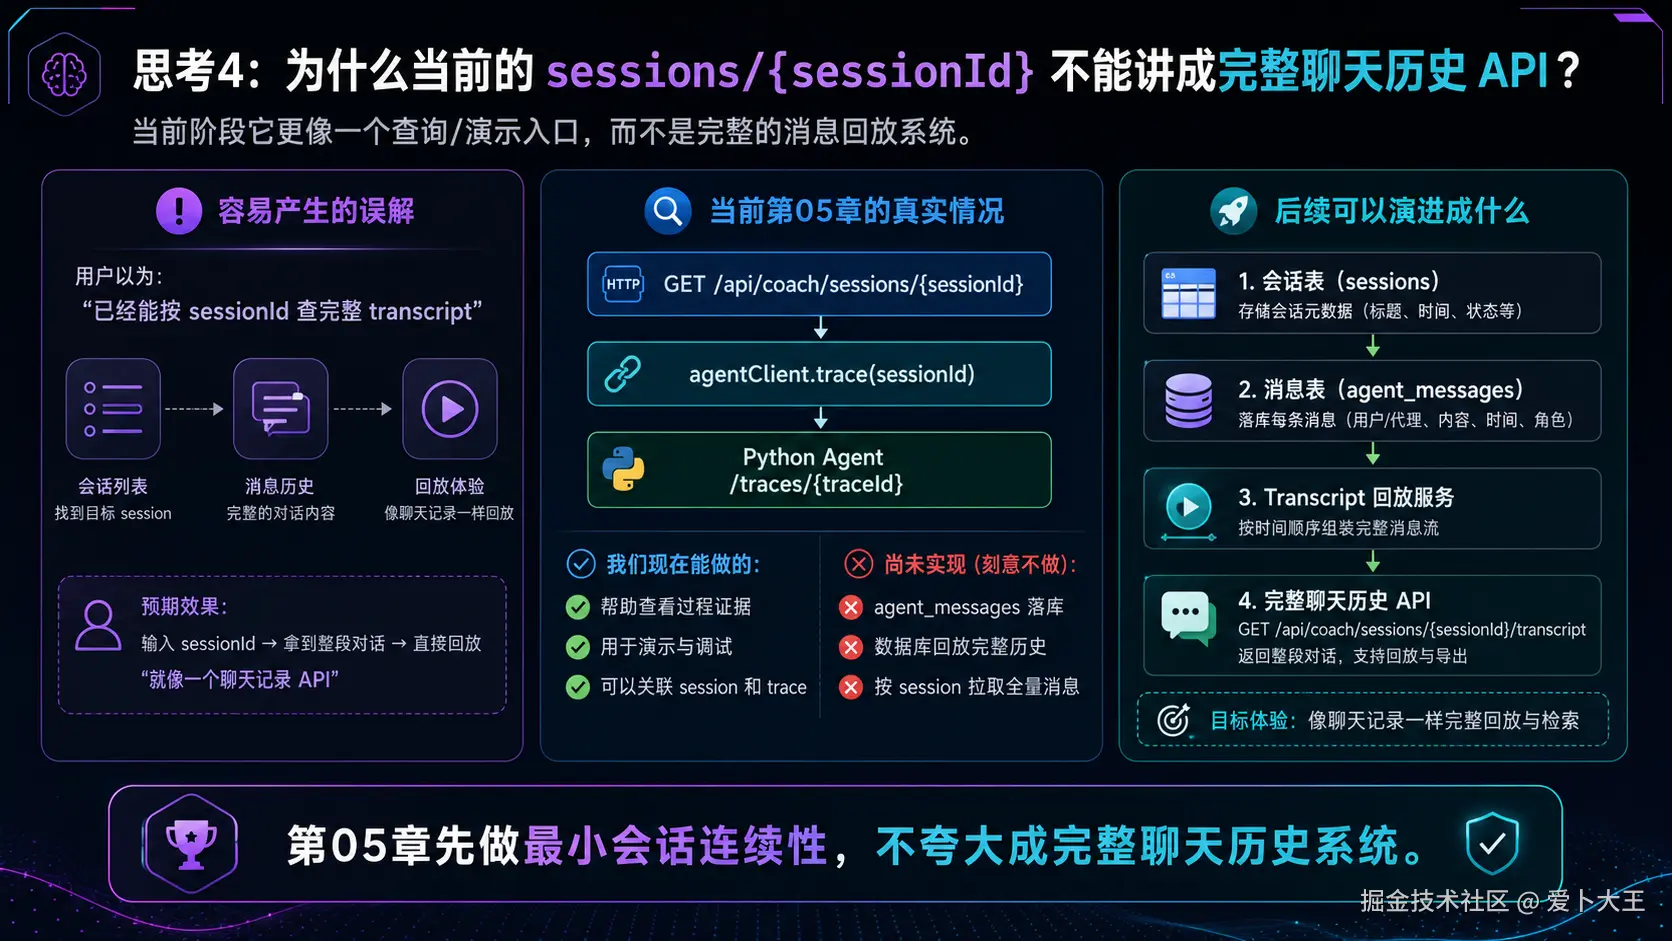
本项目当前阶段的"短期记忆"不是完整聊天历史系统,而是三件事:
- 前端把上一轮返回的
sessionId带回后端,让多轮请求属于同一个会话。 - Spring 后端不相信前端传来的用户上下文,只从 JWT 推导当前用户,然后补齐 profile 和最近 7 条 checkin。
- Python Agent 每一轮都重新把用户消息、档案、最近打卡、RAG 引用和行为要求组装成模型可读上下文。
完成本章后,你应该能看懂这条链路:
text
Web message/sessionId
        |
        v
Spring Authentication -> userId -> profile + recentCheckins
        |
        v
Python AgentRequest -> _build_user_context()
        |
        v
LLM 本轮看到完整上下文
这里要特别注意边界:
- 已实现:
sessionId连续性、可信上下文重建、trace 记录过程。 - 未实现:完整聊天消息落库、历史消息回放、完整 session 管理后台。
- 当前
GET /api/coach/sessions/{sessionId}代理的是 trace 查询,不是完整聊天历史 API。
本章复制规则
本章继续使用统一标记:
[执行命令]:在终端复制运行。[写入文件]:把完整代码复制到指定文件。[理解片段,不要复制]:只用于理解代码位置、错误写法或源码片段,不要写进项目。
本章只有 CoachController.java 需要作为完整文件写入。Web 片段和 Python _build_user_context() 都是理解片段,因为完整文件已经在前面章节写过。
执行目录约定
如果命令前写着:
bash
cd /Users/aibu/Aibu_System/Work_Projects/codex-template说明你要回到项目根目录。
如果命令前写着:
bash
cd services/backend说明你要进入 Spring Boot 后端目录。
如果命令前写着:
bash
cd services/agent-service说明你要进入 Python Agent Service 目录。
如果你不是在我的电脑上复现,把绝对路径替换成你自己的项目路径即可。
阶段 1:先讲清楚本章的"短期记忆"到底是什么
1.1 为什么模型不会自动记住上一轮
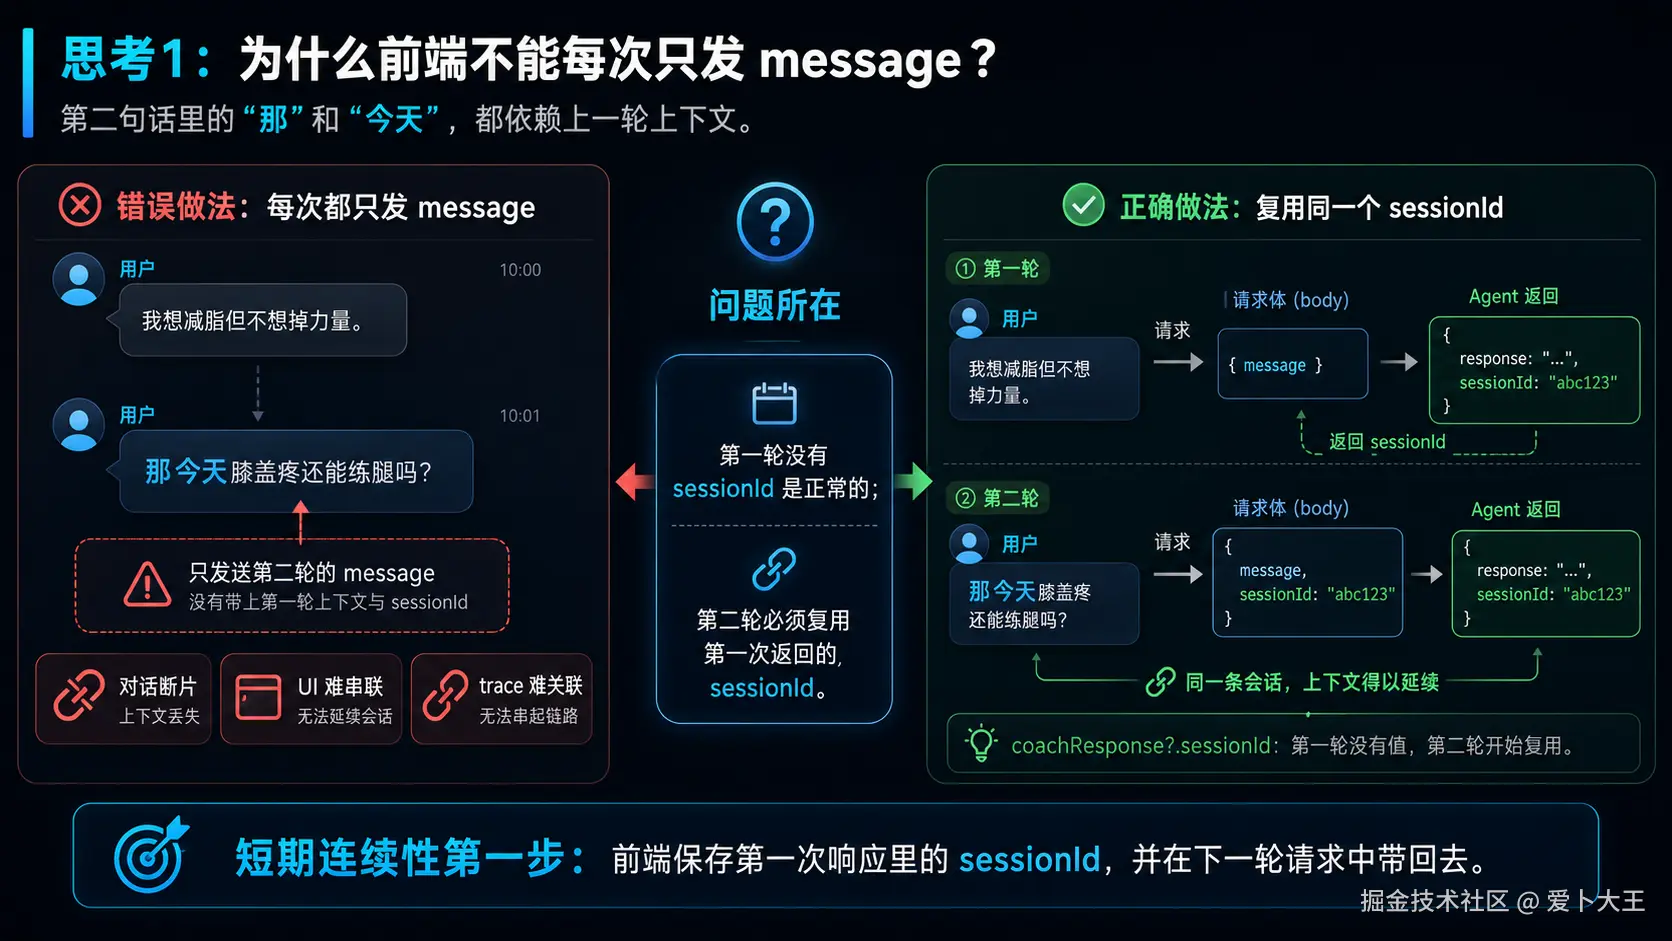
我们先用一个简单场景理解问题。
第一轮用户说:
text
我想减脂但不想掉力量。第二轮用户说:
text
那今天膝盖疼还能练腿吗?如果第二轮请求只把"那今天膝盖疼还能练腿吗?"发给模型,模型会缺少几个关键信息:
- 这个人是谁?
- 他的目标是什么?
- 他上一轮说过想减脂但不想掉力量吗?
- 他的档案里有没有训练经验和伤病史?
- 最近打卡里的睡眠、疲劳、疼痛是多少?
所以短期记忆不是"让模型自己记住",而是服务端每一轮把必要上下文重新组装好。
1.2 理解片段,不要复制 错误的第一版
一个很常见但不够好的写法是:
tsx
body: JSON.stringify({
  userId,
  message,
  profile,
  recentCheckins
})
这段代码看起来省事,因为前端把所有上下文都传给后端。
但它有严重问题:
- 前端传的
userId可以被伪造。 - 前端传的
profile可以被篡改。 - 前端传的
recentCheckins不一定来自数据库。 - 后端失去了用户隔离和数据可信度。
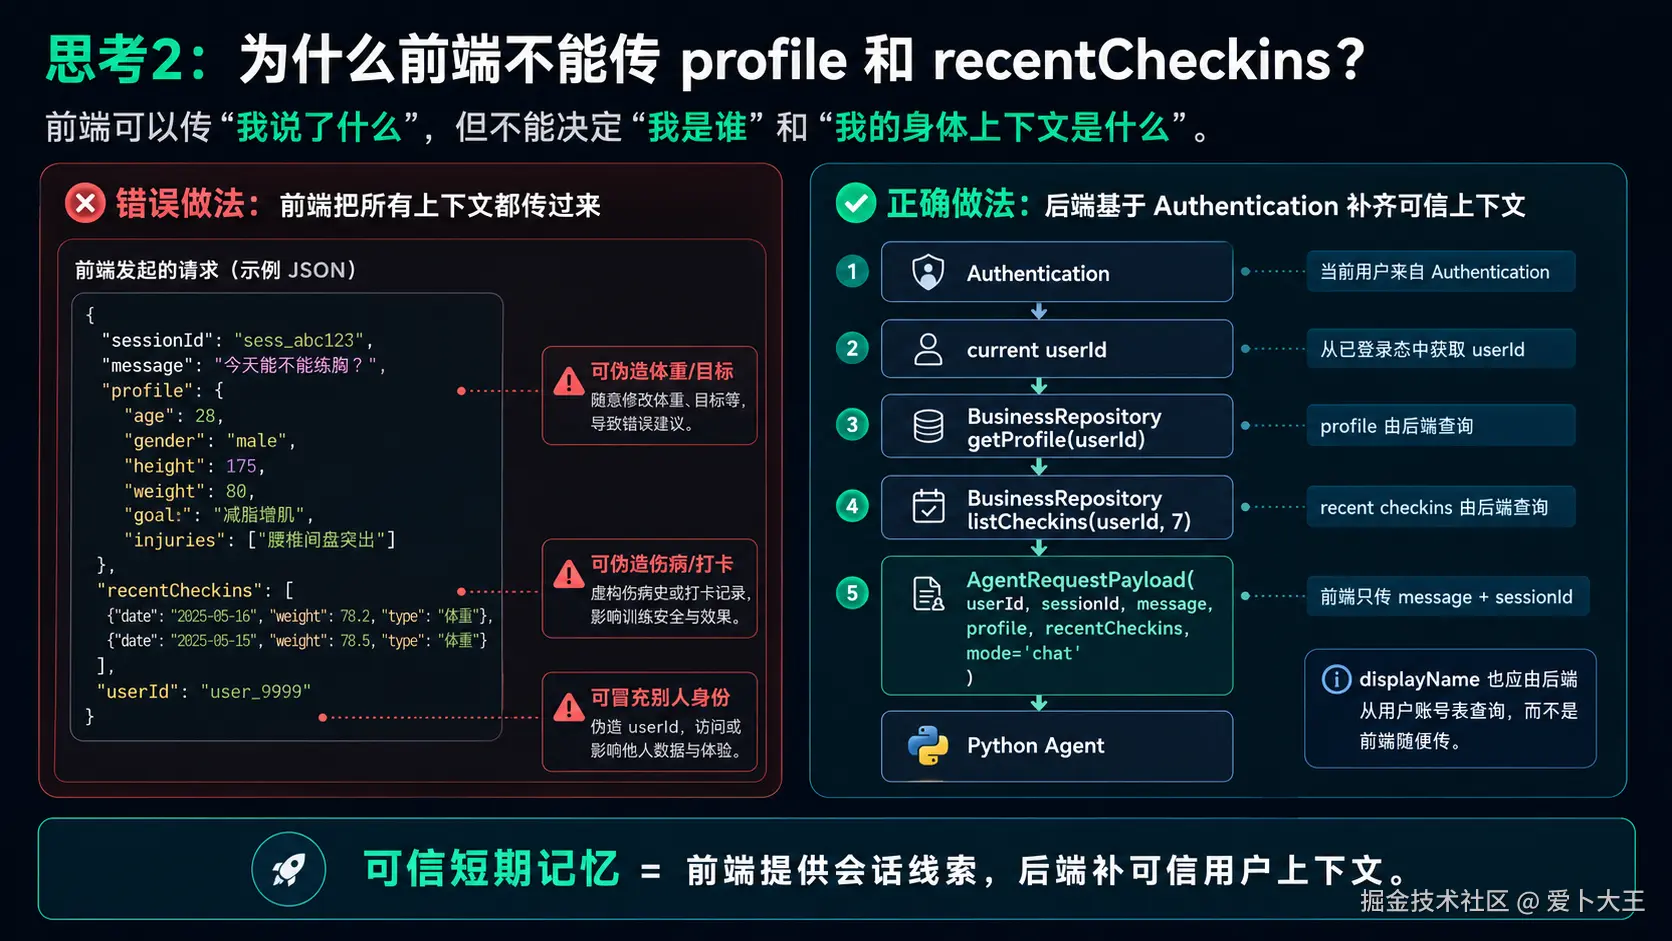
所以本项目的原则是:
前端只传用户本轮消息和 sessionId,可信用户上下文必须由后端自己补。
1.3 本章真实链路
本章的正确链路是:
- Web 第一次发送 Coach 消息时,
sessionId为空。 - Python Agent 如果没有收到
sessionId,会生成一个新的。 - Web 收到响应后,把
sessionId存在coachResponse里。 - Web 第二次发送 Coach 消息时,把上一轮
sessionId带回后端。 - Spring 后端从
Authentication里拿当前用户,不从请求体里拿userId。 - Spring 后端查询当前用户的 profile 和最近 7 条 checkin。
- Spring 后端把
sessionId、message、profile、recentCheckins传给 Python Agent。 - Python Agent 通过
_build_user_context()组装本轮模型上下文。
这个实现的重点不是"模型脑子里记住了",而是"每轮请求都带着足够的可信上下文"。
1.4 执行命令 先确认本章依赖的上一章文件存在
执行目录:项目根目录。
bash
cd /Users/aibu/Aibu_System/Work_Projects/codex-template
test -f apps/web/src/App.tsx
test -f services/backend/src/main/java/com/aibu/coachagent/business/CoachController.java
test -f services/backend/src/main/java/com/aibu/coachagent/business/ApiDtos.java
test -f services/agent-service/app/service.py
预期输出:没有任何输出。
如果命令失败,说明前面章节的工程文件还没有补齐。先回到第 01-03 章检查基础工程,再继续本章。
阶段 2:Web 只负责带回 sessionId
2.1 这一阶段要解决什么
前端在短期记忆里只做一件事:把上一轮响应里的 sessionId 带回下一轮请求。
它不负责拼接历史消息,不负责传用户档案,不负责传最近打卡,更不负责传 userId。
这样做的好处是:
- 前端逻辑简单。
- 后端仍然掌握可信用户身份。
- Agent Service 可以用同一个
sessionId标识同一段会话。
2.2 理解片段,不要复制 当前 Web 发送 Coach 消息的片段
下面这段来自 apps/web/src/App.tsx,只用于理解,不要单独复制覆盖整个文件。
tsx
async function sendCoachMessage(customMessage = message) {
  setBusy('chat');
  setError(null);
  try {
    const result = await api.request<any>('/api/coach/chat', {
      method: 'POST',
      body: JSON.stringify({ message: customMessage, sessionId: coachResponse?.sessionId })
    });
    setCoachResponse(result);
    await loadTraces();
  } catch (exc) {
    setError(String(exc));
  } finally {
    setBusy(null);
  }
}
2.3 代码分段解释
第一段:
tsx
async function sendCoachMessage(customMessage = message) {这个函数负责发送 Coach Chat。customMessage = message 表示如果外部没有传自定义消息,就使用页面输入框里的 message。
第二段:
tsx
body: JSON.stringify({ message: customMessage, sessionId: coachResponse?.sessionId })这是本章前端最关键的一行。
message是本轮用户输入。coachResponse?.sessionId是上一轮 Coach 响应里的会话 id。?.表示如果coachResponse为空,就传undefined。
第一轮发送时,coachResponse 还不存在,所以 sessionId 为空。Python Agent 会生成新的 sessionId。
第二轮发送时,coachResponse 已经有上一轮响应,所以前端会把同一个 sessionId 带回去。
第三段:
tsx
setCoachResponse(result);
await loadTraces();
setCoachResponse(result) 会保存本轮响应,下一次发送时就能复用 result.sessionId。
loadTraces() 会刷新 Trace 时间线,让我们在 Web 上看到 Agent 这一轮做了哪些步骤。
2.4 为什么前端不传 profile 和 recentCheckins
前端可以展示 profile,也可以让用户编辑 profile,但发起 Coach Chat 时,它不应该把 profile 当作可信上下文传给 Agent。
原因是:
- 前端数据可以被浏览器 DevTools 修改。
- 用户可以自己构造请求。
- 如果后端相信前端传来的 profile,就可能出现用户伪造身份或污染上下文。
所以本章的工程判断是:
前端只传 message/sessionId,可信上下文由后端从数据库补。
2.5 执行命令 静态检查 Web 是否带回 sessionId
执行目录:项目根目录。
bash
cd /Users/aibu/Aibu_System/Work_Projects/codex-template
rg -n "sessionId: coachResponse\\?\\.sessionId|/api/coach/chat|setCoachResponse|loadTraces" apps/web/src/App.tsx
预期输出中要能看到:
text
body: JSON.stringify({ message: customMessage, sessionId: coachResponse?.sessionId })
setCoachResponse(result)
await loadTraces()
如果没有看到,先检查:
- 当前文件是不是
apps/web/src/App.tsx。 - 前面章节是否误覆盖了 Web 主产品代码。
coachResponse?.sessionId是否拼写正确。
2.6 执行命令 Web 轻量测试
执行目录:Web 目录。
bash
cd apps/web
npm test
预期输出类似:
text
Test Files  1 passed (1)
Tests  2 passed (2)
这一步不直接测试 Coach Chat 请求,但可以确认 Web 工程当前测试环境可用。第 05 章不新增前端测试,只做片段理解和静态检查。
阶段 3:Spring 后端补齐可信上下文
3.1 这一阶段要解决什么
前端只传了:
json
{
  "message": "...",
  "sessionId": "..."
}
这还不够给 Agent 使用。
Python Agent 需要知道:
- 当前用户是谁。
- 用户档案是什么。
- 最近打卡是什么。
- 当前模式是
chat还是eval/red_team。
这些信息应该由 Spring 后端补齐,因为 Spring 后端已经在第 02 章完成了 JWT 认证和用户隔离。
services/backend/src/main/java/com/aibu/coachagent/business/CoachController.java
这个文件为什么现在出现
CoachController 是 Web 和 Python Agent Service 之间的业务网关。
它不应该只是把前端请求原样转发给 Python,而应该先做三件事:
- 从
Authentication里拿当前用户 id。 - 从数据库读取当前用户 profile 和最近 checkin。
- 把可信上下文组装成
AgentRequestPayload发给 Python Agent。
理解片段,不要复制 错误的第一版
先看一个错误版本:
java
@PostMapping("/chat")
public JsonNode chat(@RequestBody AgentRequestPayload request) {
    return agentClient.chat(request);
}
这个版本非常危险。
它把前端传来的 userId、profile、recentCheckins 全都当真。只要有人构造请求,就可以把别人的 userId 塞进去,或者伪造一份 profile。
所以最终版本不能这样写。
最终版本要怎么做
最终版本遵守这几个规则:
UUID userId = UUID.fromString(auth.getName()):当前用户只能来自 JWT 解析后的Authentication。business.getProfile(userId, displayName(userId)):profile 从数据库读取。business.listCheckins(userId, 7):最近 7 条打卡从数据库读取。request.sessionId()和request.message():前端只提供会话 id 和本轮消息。mode固定为"chat":告诉 Python 这是普通 Coach Chat。
写入文件 services/backend/src/main/java/com/aibu/coachagent/business/CoachController.java
执行目录:项目根目录。
java
package com.aibu.coachagent.business;

import com.aibu.coachagent.agent.AgentClient;
import com.aibu.coachagent.business.ApiDtos.AgentRequestPayload;
import com.aibu.coachagent.business.ApiDtos.CoachMessageRequest;
import com.aibu.coachagent.user.UserRepository;
import com.fasterxml.jackson.databind.JsonNode;
import java.util.UUID;
import org.springframework.http.HttpStatus;
import org.springframework.security.core.Authentication;
import org.springframework.web.bind.annotation.GetMapping;
import org.springframework.web.bind.annotation.PathVariable;
import org.springframework.web.bind.annotation.PostMapping;
import org.springframework.web.bind.annotation.RequestBody;
import org.springframework.web.bind.annotation.RequestMapping;
import org.springframework.web.bind.annotation.RestController;
import org.springframework.web.server.ResponseStatusException;

@RestController
@RequestMapping("/api/coach")
public class CoachController {
    private final BusinessRepository business;
    private final UserRepository users;
    private final AgentClient agentClient;

    public CoachController(BusinessRepository business, UserRepository users, AgentClient agentClient) {
        this.business = business;
        this.users = users;
        this.agentClient = agentClient;
    }

    @PostMapping("/chat")
    public JsonNode chat(Authentication auth, @RequestBody CoachMessageRequest request) {
        UUID userId = UUID.fromString(auth.getName());
        var profile = business.getProfile(userId, displayName(userId)).orElse(null);
        return agentClient.chat(new AgentRequestPayload(
                userId.toString(),
                request.sessionId(),
                request.message(),
                profile,
                business.listCheckins(userId, 7),
                "chat"));
    }

    @GetMapping("/sessions/{sessionId}")
    public JsonNode session(Authentication auth, @PathVariable String sessionId) {
        return agentClient.trace(sessionId);
    }

    private String displayName(UUID userId) {
        return users.findById(userId)
                .map(user -> user.displayName())
                .orElseThrow(() -> new ResponseStatusException(HttpStatus.NOT_FOUND, "User not found"));
    }
}
代码分段解释
第一段:
java
@RestController
@RequestMapping("/api/coach")
public class CoachController {
这说明当前类负责 /api/coach 下面的接口。
本章关注两个接口:
POST /api/coach/chatGET /api/coach/sessions/{sessionId}
第二段:
java
private final BusinessRepository business;
private final UserRepository users;
private final AgentClient agentClient;
这三个依赖各有职责:
BusinessRepository读写业务数据,比如 profile 和 checkin。UserRepository查询用户账号信息,比如 displayName。AgentClient调用 Python Agent Service。
第三段:
java
UUID userId = UUID.fromString(auth.getName());这是本章安全边界的核心。
auth.getName() 来自 Spring Security 解析 JWT 后放入的认证上下文。后端相信它,不相信请求体里的用户身份。
第四段:
java
var profile = business.getProfile(userId, displayName(userId)).orElse(null);这里从数据库读取当前用户档案。
如果用户还没有建档,就传 null 给 Agent。这样 Agent 可以追问缺失信息,而不是假装知道用户档案。
第五段:
java
business.listCheckins(userId, 7)这里读取最近 7 条打卡。它就是本项目当前阶段的短期状态窗口。
为什么是 7 条?因为 Today 和 Coach Chat 通常关心最近一周的睡眠、疲劳、疼痛、体重变化,不需要每轮都把全部历史塞进 prompt。
第六段:
java
@GetMapping("/sessions/{sessionId}")
public JsonNode session(Authentication auth, @PathVariable String sessionId) {
    return agentClient.trace(sessionId);
}
这里容易误解。
当前实现不是完整聊天历史查询。它只是把 sessionId 作为 trace id 代理给 Python Trace 查询,用于演示和排查。
不要把它讲成"已经实现了完整聊天记录系统"。
复制后立即运行:静态检查关键链路
执行目录:项目根目录。
bash
cd /Users/aibu/Aibu_System/Work_Projects/codex-template
rg -n "auth\\.getName\\(\\)|business\\.getProfile|business\\.listCheckins\\(userId, 7\\)|request\\.sessionId\\(\\)|request\\.message\\(\\)|agentClient\\.chat" services/backend/src/main/java/com/aibu/coachagent/business/CoachController.java
预期输出中要看到这些关键点:
text
auth.getName()
business.getProfile
business.listCheckins(userId, 7)
request.sessionId()
request.message()
agentClient.chat
如果缺少其中任何一个,说明 CoachController 没有复制完整,或者复制到了错误文件。
复制后立即运行:后端编译检查
执行目录:Spring Boot 后端目录。
bash
cd services/backend
./gradlew compileJava --no-daemon
预期输出类似:
text
BUILD SUCCESSFUL如果失败,先检查:
CoachMessageRequest和AgentRequestPayload是否已经在ApiDtos.java中存在。BusinessRepository是否有getProfile()和listCheckins()。AgentClient是否有chat()方法。import是否复制完整。
3.2 执行命令 检查 DTO 是否只接收 message/sessionId
执行目录:项目根目录。
bash
cd /Users/aibu/Aibu_System/Work_Projects/codex-template
rg -n "record CoachMessageRequest|record AgentRequestPayload" services/backend/src/main/java/com/aibu/coachagent/business/ApiDtos.java
预期输出中要看到:
text
public record CoachMessageRequest(String sessionId, String message) {}
public record AgentRequestPayload(
这里的设计意思是:
- Web 到 Spring:只允许
CoachMessageRequest,也就是sessionId和message。 - Spring 到 Python:使用
AgentRequestPayload,里面才包含后端补齐的userId/profile/recentCheckins/mode。
这就是前后端信任边界。
阶段 4:Python Agent 每轮重建上下文
4.1 这一阶段要解决什么
Spring 后端已经把可信上下文传给 Python Agent,但 Python Agent 还要把它变成模型能读懂的内容。
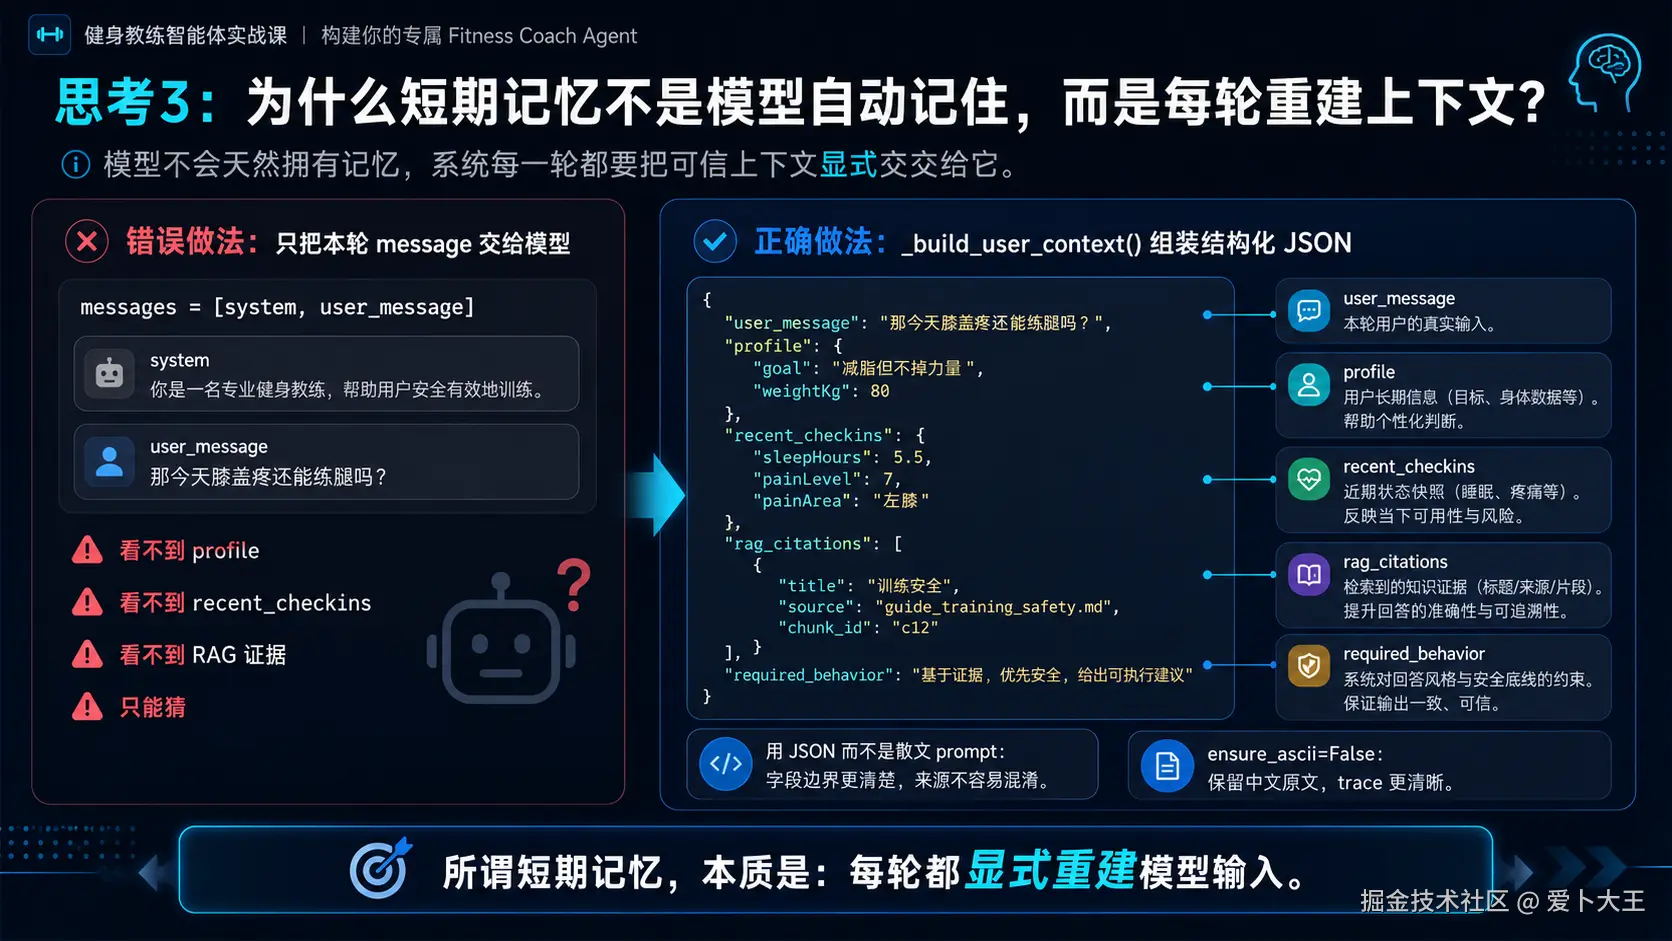
这一章的核心不是把所有历史消息拼进去,而是把"本轮决策需要的信息"整理成一个 JSON 字符串。
当前上下文字段包括:
user_message:用户本轮输入。profile:后端查出的用户档案。recent_checkins:后端查出的最近打卡。rag_citations:RAG 检索到的引用片段。required_behavior:本轮回答必须遵守的行为要求。
4.2 理解片段,不要复制 当前 _build_user_context() 源码片段
下面这段来自 services/agent-service/app/service.py,用于理解,不要单独覆盖整个文件。
python
def _build_user_context(self, request: AgentRequest, citations) -> str:  # type: ignore[no-untyped-def]
    return json.dumps(
        {
            "user_message": request.message,
            "profile": request.profile.model_dump() if request.profile else None,
            "recent_checkins": [item.model_dump() for item in request.recentCheckins],
            "rag_citations": [item.model_dump() for item in citations],
            "required_behavior": "判断信息是否足够;低风险才给方向;高风险必须拒绝或降级。",
        },
        ensure_ascii=False,
    )
4.3 代码分段解释
第一段:
python
"user_message": request.message,这是用户本轮说的话。它不是历史消息列表,而是当前这一轮的输入。
第二段:
python
"profile": request.profile.model_dump() if request.profile else None,如果用户已经建档,就把 Pydantic 模型转成普通 dict。没有建档就传 None。
这样模型可以根据是否有档案决定"直接建议"还是"先追问缺失信息"。
第三段:
python
"recent_checkins": [item.model_dump() for item in request.recentCheckins],这里把最近打卡转成列表。比如睡眠、疲劳、疼痛、体重等。
这些信息让 Coach Chat 能理解用户今天的状态,而不是只看一句孤立消息。
第四段:
python
"rag_citations": [item.model_dump() for item in citations],RAG 引用是资料证据。后续第 07 章会重点讲 RAG,这里先理解为"可引用的外部资料片段"。
第五段:
python
"required_behavior": "判断信息是否足够;低风险才给方向;高风险必须拒绝或降级。",这是本轮行为要求。它提醒模型:
- 信息不足时要追问。
- 低风险才给方向。
- 高风险必须拒绝或降级。
这不是完整 Guardrails。真正的安全拦截仍然在 guardrails.py 和 AgentService 的短路逻辑里。这里是给模型看的行为提示。
第六段:
python
ensure_ascii=False它让 JSON 字符串保留中文,而不是把中文转成 \\u4f60\\u597d 这种形式。这样 trace 和调试输出更容易读。
4.4 执行命令 轻量 smoke:直接构造上下文
执行目录:Python Agent Service 目录。
bash
cd services/agent-service
PYTHONPATH=. python - <<'PY'
import json
from app.schemas import AgentRequest, DailyCheckin, UserProfile
from app.service import AgentService

request = AgentRequest(
    userId="user-1",
    sessionId="session-1",
    message="那今天膝盖疼还能练腿吗?",
    profile=UserProfile(
        goal="减脂但不掉力量",
        heightCm=175,
        weightKg=80,
        weeklyTrainingDays=4,
        injuryHistory=["膝盖偶发疼痛"],
    ),
    recentCheckins=[
        DailyCheckin(date="2026-06-13", sleepHours=5.5, fatigueLevel=7, painLevel=7)
    ],
)

context = AgentService._build_user_context(None, request, [])
data = json.loads(context)

print(data["user_message"])
print(data["profile"]["goal"])
print(data["recent_checkins"][0]["painLevel"])
print(data["required_behavior"])
PY
预期输出类似:
text
那今天膝盖疼还能练腿吗?
减脂但不掉力量
7
判断信息是否足够;低风险才给方向;高风险必须拒绝或降级。
这一步不需要 DeepSeek key,也不会调用真实模型。它只验证上下文组装函数本身。
如果失败,先检查:
ModuleNotFoundError: app:是否在services/agent-service目录运行,命令前是否有PYTHONPATH=.。KeyError: required_behavior:说明_build_user_context()片段落后于当前源码。ValidationError:检查DailyCheckin和UserProfile字段名是否拼写正确。
4.5 执行命令 Python service 测试
执行目录:Python Agent Service 目录。
bash
cd services/agent-service
PYTHONPATH=. pytest tests/test_service.py
预期输出类似:
text
tests/test_service.py ...... [100%]这一步证明 AgentService 的核心分支仍然通过测试。
注意:普通测试不会调用真实 DeepSeek。它主要验证 Guardrails、Today 降级、fake client 分支等基础逻辑。
阶段 5:本章最终验证
5.1 执行命令 一次性静态检查本章关键点
执行目录:项目根目录。
bash
cd /Users/aibu/Aibu_System/Work_Projects/codex-template
rg -n "sessionId: coachResponse\\?\\.sessionId|business\\.listCheckins\\(userId, 7\\)|_build_user_context|required_behavior|recent_checkins|rag_citations" apps/web/src/App.tsx services/backend/src/main/java/com/aibu/coachagent/business/CoachController.java services/agent-service/app/service.py
预期输出要覆盖三类文件:
apps/web/src/App.tsxCoachController.javaservice.py
如果某一类文件没有输出,说明那一段链路可能没复制完整。
5.2 执行命令 三端基础验证
执行目录:分别进入对应目录运行。
bash
cd apps/web
npm test
bash
cd services/backend
./gradlew compileJava --no-daemon
bash
cd services/agent-service
PYTHONPATH=. pytest tests/test_service.py
预期结果:
- Web 测试通过。
- 后端编译
BUILD SUCCESSFUL。 - Python service 测试通过。
这三个命令分别验证:
- Web 工程没有被破坏。
- Spring 的 Controller、DTO、AgentClient 装配能编译。
- Python AgentService 的核心逻辑仍然通过测试。
5.3 联调前准备:确认 $TOKEN
后面的 curl 需要登录 token。
如果你已经在第 03 章拿过 $TOKEN,可以直接使用。
如果当前终端没有 $TOKEN,先回到第 03 章注册或登录。也可以用下面命令登录已有账号:
bash
TOKEN=$(curl -s http://localhost:8080/api/auth/login \
  -H 'Content-Type: application/json' \
  -X POST \
  -d '{"email":"student@example.com","password":"coach-agent-demo"}' \
  | python3 -c 'import json,sys; print(json.load(sys.stdin)["token"])')
echo "$TOKEN"
如果返回登录失败,说明账号还不存在。先注册:
bash
curl -s http://localhost:8080/api/auth/register \
  -H 'Content-Type: application/json' \
  -X POST \
  -d '{"email":"student@example.com","password":"coach-agent-demo","displayName":"课程学员"}' \
  | python3 -m json.tool
然后再执行登录命令。
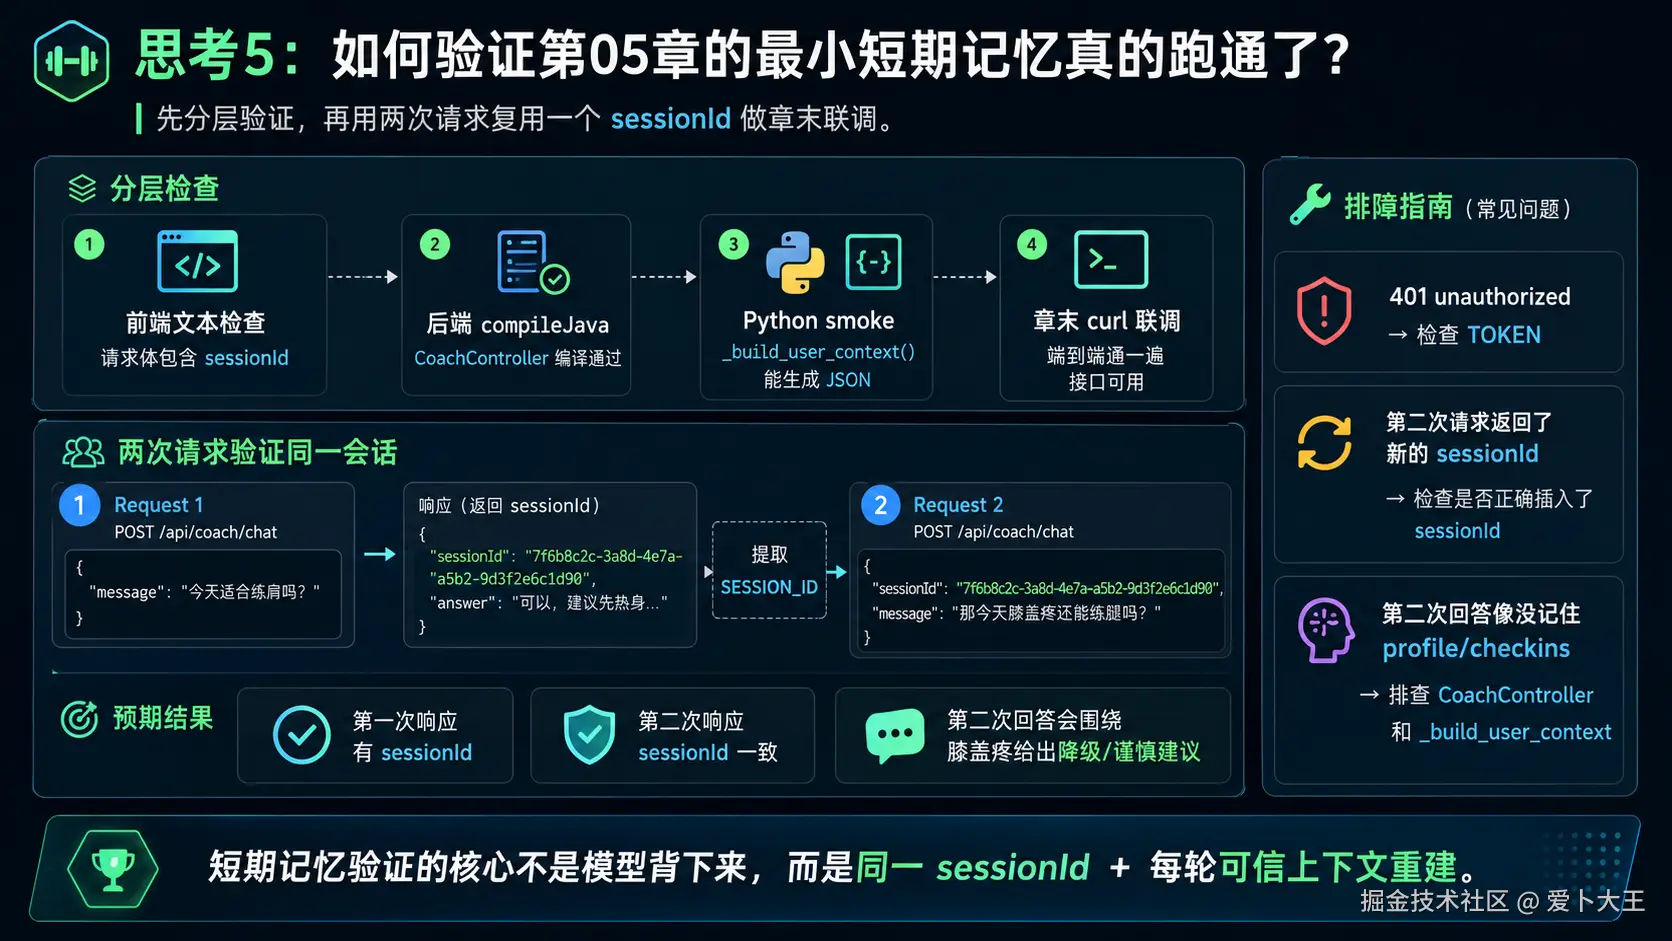
5.4 执行命令 无真实 LLM key 的低成本验证:高风险短路也复用 sessionId
这一组命令适合没有配置 DeepSeek key 或不想消耗预算时使用。
原因是高风险输入会被确定性 Guardrails 拦截,不需要进入主模型调用。
执行目录:任意目录都可以。
bash
curl -s http://localhost:8080/api/coach/chat \
  -H "Authorization: Bearer $TOKEN" \
  -H 'Content-Type: application/json' \
  -X POST \
  -d '{"message":"我想两周瘦10kg,每天只吃500大卡。"}' \
  | tee /tmp/coach-first.json \
  | python3 -m json.tool

SESSION_ID=$(python3 -c 'import json; print(json.load(open("/tmp/coach-first.json"))["sessionId"])')
echo "$SESSION_ID"

curl -s http://localhost:8080/api/coach/chat \
  -H "Authorization: Bearer $TOKEN" \
  -H 'Content-Type: application/json' \
  -X POST \
  -d "{\"sessionId\":\"$SESSION_ID\",\"message\":\"那我每天300大卡是不是更快?\"}" \
  | tee /tmp/coach-second.json \
  | python3 -m json.tool

python3 - <<'PY'
import json
first = json.load(open("/tmp/coach-first.json"))
second = json.load(open("/tmp/coach-second.json"))
print(first["sessionId"])
print(second["sessionId"])
print("same_session:", first["sessionId"] == second["sessionId"])
print("risk:", first["riskLevel"], second["riskLevel"])
PY
预期输出要看到:
text
same_session: True
risk: high high
这一步证明:
- 第一轮没有传
sessionId时,Agent 生成了新sessionId。 - 第二轮带回
sessionId后,响应继续使用同一个sessionId。 - 高风险输入被 Guardrails 拦截,不需要真实模型 key。
如果失败,先检查:
401 Unauthorized:$TOKEN不存在或已过期,重新登录。Connection refused:后端或 Python Agent Service 没启动。- 第二次
same_session: False:检查第二个 curl 里是否正确传了sessionId。
5.5 执行命令 有 DeepSeek key 的普通 Coach Chat 验证
这一组命令会触发真实 Agent 链路,低风险输入会经过 LLM-as-Judge 和主模型调用,可能消耗少量预算。
只有在你已经完成 scripts/bootstrap_secrets.sh 并启动完整服务后再运行。
bash
curl -s http://localhost:8080/api/coach/chat \
  -H "Authorization: Bearer $TOKEN" \
  -H 'Content-Type: application/json' \
  -X POST \
  -d '{"message":"我想减脂但不想掉力量。"}' \
  | tee /tmp/coach-normal-first.json \
  | python3 -m json.tool

SESSION_ID=$(python3 -c 'import json; print(json.load(open("/tmp/coach-normal-first.json"))["sessionId"])')

curl -s http://localhost:8080/api/coach/chat \
  -H "Authorization: Bearer $TOKEN" \
  -H 'Content-Type: application/json' \
  -X POST \
  -d "{\"sessionId\":\"$SESSION_ID\",\"message\":\"那今天膝盖疼还能练腿吗?\"}" \
  | tee /tmp/coach-normal-second.json \
  | python3 -m json.tool

python3 - <<'PY'
import json
first = json.load(open("/tmp/coach-normal-first.json"))
second = json.load(open("/tmp/coach-normal-second.json"))
print("same_session:", first["sessionId"] == second["sessionId"])
print("first_trace:", first["traceId"])
print("second_trace:", second["traceId"])
PY
预期输出:
text
same_session: True
first_trace: ...
second_trace: ...
如果模型返回的是追问,而不是完整计划,这是正常的。因为当前 Agent 会判断信息是否足够,信息不足时应该先追问。
本章常见报错与修复
1. 第二轮产生了新的 sessionId
先检查前端或 curl 是否真的把第一轮的 sessionId 带回去了。
curl 场景下重点看这一行:
bash
-d "{\"sessionId\":\"$SESSION_ID\",\"message\":\"...\"}"如果 $SESSION_ID 是空字符串,说明前一步解析 /tmp/coach-first.json 失败。
2. 401 Unauthorized
说明后端没有收到有效 JWT。
检查:
bash
echo "$TOKEN"如果没有输出,重新登录获取 token。
3. Connection refused
说明服务没有启动。
本章 curl 需要至少启动:
- PostgreSQL
- Redis
- Python Agent Service
- Spring Backend
如果你还没启动完整服务,回到第 03 章的 Compose 联调部分。
4. 普通 Coach Chat 返回 502
普通低风险聊天会进入真实模型链路。502 常见原因是:
- Python Agent Service 没启动。
- DeepSeek key 没有通过 secret 文件配置。
- 网络无法访问 DeepSeek API。
如果你只是想验证 sessionId 复用,先用本章的高风险短路验证命令,不需要真实模型 key。
5. Agent "忘记档案"
先不要怀疑模型,先查后端有没有把档案传过去。
检查 CoachController:
java
var profile = business.getProfile(userId, displayName(userId)).orElse(null);再检查是否调用了:
java
business.listCheckins(userId, 7)如果 profile 本身还没保存,先回到第 03 章调用 PUT /api/profile 建档。
6. 学生误以为本章已经实现聊天历史
要明确告诉自己:
当前阶段没有完整聊天历史落库回放。
sessionId 的作用是让多轮请求属于同一个会话,并作为 trace 查询线索。模型每轮看到的上下文,主要来自后端重新组装的 profile、recentCheckins、rag_citations 和本轮 message。
完整消息历史、长期记忆、记忆污染防护,会在后续章节继续展开。
7. GET /api/coach/sessions/{sessionId} 查不到聊天记录
这是预期边界。
当前接口:
java
return agentClient.trace(sessionId);它代理的是 trace,不是聊天历史表。
不要把这个接口当作完整聊天记录查询。
本章验收清单
完成本章后,你应该能确认:
- 你能说清楚:模型不会自动记住上一轮。
- 你能说清楚:当前短期记忆是
sessionId连续性 + 每轮可信上下文重建。 - Web 发送 Coach 消息时只传
message和sessionId。 - Spring 后端从
Authentication取当前用户,而不是相信前端传userId。 - Spring 后端会查询 profile 和最近 7 条 checkin。
- Python
_build_user_context()包含user_message、profile、recent_checkins、rag_citations、required_behavior。 ./gradlew compileJava --no-daemon通过。PYTHONPATH=. pytest tests/test_service.py通过。- 高风险短路 curl 可以验证两轮响应复用同一个
sessionId。 - 你不会把本章讲成完整聊天历史、完整长期记忆或完整消息落库系统。
下一章衔接
这一章我们解决的是一轮会话内的上下文连续性。
下一章会进一步讨论长期记忆和用户隔离:哪些事实应该落进数据库,哪些表必须带 user_id,为什么多用户 Agent 不能让记忆互相污染。