同步更新至个人站点:用 Cordis 从零构建一个 Mini Harness
从 hello world 插件开始,逐步用服务、依赖注入和事件构建出一个能调用 DeepSeek API、执行 bash/fetch/文件搜索的迷你 Agent 运行框架
上一篇《DeepSeek Harness 速览》讲了"一切皆插件"的理念,这篇动手:用它的底座 Cordis 从零拼出一个 mini harness ------ 八枚插件、三个服务、两个事件、一条 Agent 循环,最后让模型自己搜索代码、执行命令、回答你的问题。
第一章 · 第一个插件
这个教程在做什么
我们要写的是一个 mini 版 DeepSeek Harness :一个能调用模型、执行真实工具(shell 命令、HTTP 请求、文件搜索)、跑通 Agent 循环的最小运行框架。它和真实 Harness 的差距在最后一章总结,但核心机制完全一致------因为用的就是同一个底座 Cordis。
先想清楚"拼出一个 harness"意味着什么。上一篇讲过:harness 没有内核,全部能力都是插件。所以我们的构建方式不是"写一个主程序,再往里加功能",而是把能力拆成一枚枚插件,最后用几行代码把它们拼起来。这篇教程的每一步,就是其中一枚插件。
最后拼出来的东西长这样:
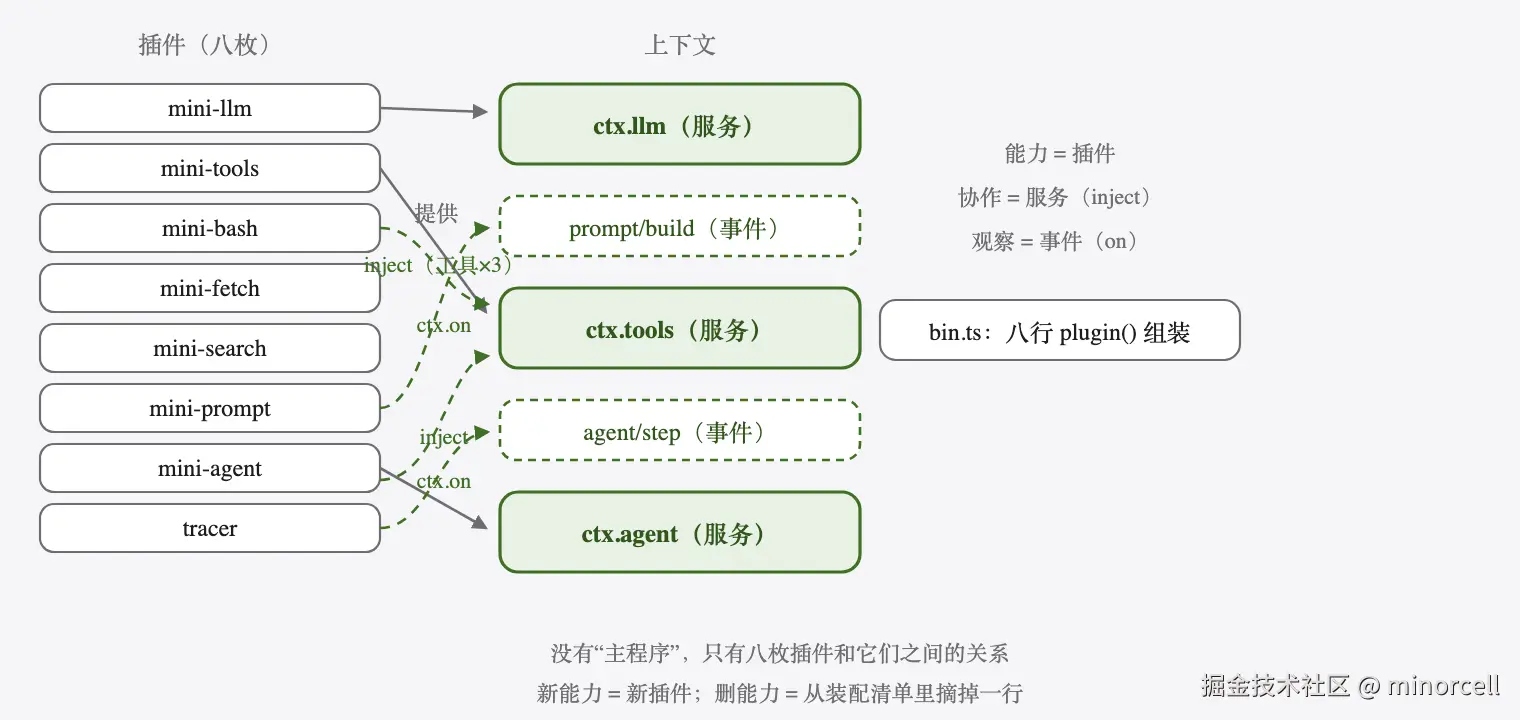
八枚插件,三个服务,两个事件。mini-llm、mini-tools、mini-agent 提供服务;三个工具插件(bash、fetch、search)通过 inject 依赖 tools;mini-prompt 和 tracer 通过 ctx.on 参与事件。没有"主程序"------只有插件和它们之间的关系。
前置要求
- Node.js ≥ 18
- DeepSeek API Key(官网申请,环境变量
DEEPSEEK_API_KEY)
本教程的完整代码是一个独立项目,就在仓库的 project/ 目录里(GitHub 源码)。克隆整个仓库后,进入项目目录装依赖:
bash
cd content/tutorials/cordis-mini-harness/project
npm install
注意包名是 cordis ------npm 上还有一个 @cordisjs/core,那是 v3 时代的遗留包名,别装错。运行 TypeScript 用 tsx(Cordis 自身的模块是无扩展名导入,必须经 tsx 或打包器运行,原生 Node 跑不了),项目里已配好 npm start 脚本。
最小插件长什么样
ts
import { Context } from 'cordis'

const app = new Context()

app.plugin({
  name: 'hello',
  apply(ctx: Context) {
    console.log('hello from my first plugin')
  },
})
把这段保存为任意一个 .ts 文件(比如 hello.ts),用 npx tsx hello.ts 跑一下:控制台会打出 hello from my first plugin。这个文件只是热身,不属于最终项目。
一个 Cordis 应用就是 一个 Context 。new Context() 创建根上下文,app.plugin(...) 把插件挂上去。插件是一个带 name 和 apply(ctx) 的对象------name 是给诊断信息用的标识,apply 是入口,框架在加载时调用它,并把上下文交到你手里。
插件有三种形态:函数 (直接写 apply)、对象 (像上面这样带字段)、类 (Service 子类,后面两步会用到)。三者运行时等价,选哪种取决于你要不要附带状态。
第二章 · 服务:把能力挂上 ctx
为什么需要服务
hello 插件只证明了一件事:插件能被加载。但一个 harness 需要的不是"各自为政的代码",而是可被其他插件发现和使用的能力。Cordis 的答案叫服务(Service):插件把能力挂到上下文上,其他插件按名字找它,而不是 import 它的具体实现。
ts
import { Service, type Context } from 'cordis'

declare module 'cordis' {
  interface Context {
    llm: LlmService
  }
}

export interface LlmConfig {
  model?: string
  baseUrl?: string
}

export interface ChatMessage {
  role: 'system' | 'user' | 'assistant' | 'tool'
  content: string
}

export class LlmService extends Service {
  config: Required<LlmConfig>

  constructor(ctx: Context, config: LlmConfig = {}) {
    super(ctx, 'llm')
    this.config = {
      model: config.model ?? 'deepseek-v4-flash',
      baseUrl: config.baseUrl ?? 'https://api.deepseek.com',
    }
  }

  async chat(messages: ChatMessage[]): Promise<string> {
    const res = await fetch(`${this.config.baseUrl}/v1/chat/completions`, {
      method: 'POST',
      headers: {
        'Content-Type': 'application/json',
        Authorization: `Bearer ${process.env.DEEPSEEK_API_KEY}`,
      },
      body: JSON.stringify({
        model: this.config.model,
        messages,
      }),
    })
    if (!res.ok) {
      throw new Error(`LLM 调用失败:${res.status} ${await res.text()}`)
    }
    const data = await res.json()
    return data.choices[0].message.content as string
  }
}

export const name = 'mini-llm'

export function apply(ctx: Context, config?: LlmConfig) {
  ctx.plugin(LlmService, config)
}
这就是项目里的 llm.ts------harness 的"模型调用"能力,一行行看:
第 3-7 行的 declare module 是 TypeScript 的声明合并:它告诉类型系统"ctx 上从此多了一个 llm 属性"。没有运行时副作用,但有了它,任何拿到 Context 的地方都能带类型地 写出 ctx.llm.chat(...)------这就是上一篇文章说的"通过 key 找服务,而不是 import 具体实现"的类型基础。
LlmService extends Service 是插件与服务的合体:它是插件(可以被 ctx.plugin() 挂载),同时通过 super(ctx, 'llm') 把自己注册成名为 llm 的服务。注册发生在构造时,卸载时自动移除------服务注册本身就是一个可逆的副作用。
配置 走 apply(ctx, config) 的第二参数:model 默认 deepseek-v4-flash(旧模型名 deepseek-chat 已于 2026 年 7 月停用;需要更强推理时换成 deepseek-v4-pro),baseUrl 默认官方 API 地址。这里只做了默认值合并;真实的 Cordis 生态用 Schemastery(标准 Schema)做运行时校验,教程场景从简。
chat() 方法就是一次标准的 OpenAI 兼容请求,返回模型回复的纯文本。它还不知道工具是什么,那是下一步的事。
第三章 · 工具注册表
先做注册表,再注册工具
ts
import { Service, type Context } from 'cordis'

declare module 'cordis' {
  interface Context {
    tools: ToolsService
  }
}

export interface Tool {
  name: string
  description: string
  parameters: Record<string, unknown>
  execute(args: Record<string, unknown>): Promise<string> | string
}

export class ToolsService extends Service {
  private tools = new Map<string, Tool>()

  constructor(ctx: Context) {
    super(ctx, 'tools')
  }

  register(tool: Tool) {
    this.tools.set(tool.name, tool)
  }

  describe(): string {
    return [...this.tools.values()]
      .map(
        (tool) =>
          `- ${tool.name}:${tool.description},参数 ${JSON.stringify(tool.parameters)}`,
      )
      .join('\n')
  }

  async execute(name: string, args: Record<string, unknown>): Promise<string> {
    const tool = this.tools.get(name)
    if (!tool) throw new Error(`未知工具:${name}`)
    return await tool.execute(args ?? {})
  }
}

export const name = 'mini-tools'

export function apply(ctx: Context) {
  ctx.plugin(ToolsService)
}
这就是 tools.ts。它定义了一个工具协议 :每个工具要有 name、description、parameters(JSON Schema 片段,写给模型看的)和一个 execute 函数。
ToolsService 是一个注册表:register() 登记工具,describe() 把已登记的工具渲染成一段给模型看的清单,execute() 按名字执行。注意它不提供任何具体工具------它只负责"能注册、能执行"这件事。
具体工具从哪来?下一章的三枚插件。
第四章 · 三个真实工具
工具不是配置项,是插件
ts
import { exec } from 'node:child_process'
import { promisify } from 'node:util'
import type { Context } from 'cordis'

const execAsync = promisify(exec)

export const name = 'mini-bash'
export const inject = ['tools']

export function apply(ctx: Context) {
  ctx.tools.register({
    name: 'bash',
    description: '执行一条 shell 命令并返回输出(仅限本机,超时 10 秒)',
    parameters: {
      type: 'object',
      properties: {
        command: { type: 'string', description: '要执行的命令' },
      },
      required: ['command'],
    },
    async execute(args) {
      const command = String(args.command ?? '')
      try {
        const { stdout, stderr } = await execAsync(command, { timeout: 10_000 })
        return (stdout + stderr).trim() || '(无输出)'
      } catch (error) {
        return `命令执行失败:${(error as Error).message}`
      }
    },
  })
}
这就是 bash.ts------"一切皆插件"在工具层面的含义:工具不是注册表的配置项,而是独立的插件 。mini-bash 用 inject: ['tools'] 声明自己依赖 tools 服务------框架看到这行,会等 tools 就绪后才加载它,启动顺序由依赖推导,不需要任何编排代码。
实现上注意两点:execAsync 包一层 promisify,设 10 秒超时防止命令挂死;stdout 和 stderr 拼在一起返回。错误不往外抛,而是作为字符串返回给模型------工具失败也是一条信息,模型能据此调整策略,抛异常只会让循环崩溃。
另外两枚模式完全相同,可以对照着看:
ts
import type { Context } from 'cordis'

export const name = 'mini-fetch'
export const inject = ['tools']

export function apply(ctx: Context) {
  ctx.tools.register({
    name: 'fetch',
    description: '请求一个 http/https URL 并返回状态码和文本内容',
    parameters: {
      type: 'object',
      properties: {
        url: { type: 'string', description: '要请求的 URL' },
        method: { type: 'string', description: 'HTTP 方法,默认 GET' },
        body: { type: 'string', description: '请求体(JSON 字符串,可选)' },
      },
      required: ['url'],
    },
    async execute(args) {
      const url = String(args.url ?? '')
      const method = String(args.method ?? 'GET')
      const res = await fetch(url, {
        method,
        headers: { 'Content-Type': 'application/json' },
        body: args.body ? String(args.body) : undefined,
      })
      const text = await res.text()
      return `${res.status}\n${text.slice(0, 2000)}`
    },
  })
}
fetch 请求任意 http/https URL,返回状态码和文本(截断到 2000 字符)。注意 body 只在有值时才传,避免 GET 请求带空 body。
ts
import { readdir, readFile } from 'node:fs/promises'
import { join, extname } from 'node:path'
import type { Context } from 'cordis'

const TEXT_EXT = new Set([
  '.ts', '.tsx', '.js', '.mjs', '.cjs', '.json', '.md', '.txt', '.yml', '.yaml', '.html', '.css',
])

async function searchFiles(dir: string, keyword: string, depth = 3): Promise<string[]> {
  if (depth < 0) return []
  const results: string[] = []
  const entries = await readdir(dir, { withFileTypes: true })
  for (const entry of entries) {
    if (entry.name === 'node_modules' || entry.name.startsWith('.')) continue
    const full = join(dir, entry.name)
    if (entry.isDirectory()) {
      results.push(...(await searchFiles(full, keyword, depth - 1)))
    } else if (TEXT_EXT.has(extname(entry.name))) {
      const content = await readFile(full, 'utf8').catch(() => '')
      if (content.includes(keyword)) results.push(full)
    }
  }
  return results
}

export const name = 'mini-search'
export const inject = ['tools']

export function apply(ctx: Context) {
  ctx.tools.register({
    name: 'file_search',
    description: '在目录下搜索包含关键词的文本文件(跳过 node_modules 和隐藏目录)',
    parameters: {
      type: 'object',
      properties: {
        keyword: { type: 'string', description: '要搜索的关键词' },
        dir: { type: 'string', description: '起始目录,默认当前目录' },
      },
      required: ['keyword'],
    },
    async execute(args) {
      const keyword = String(args.keyword ?? '')
      const dir = String(args.dir ?? process.cwd())
      try {
        const found = await searchFiles(dir, keyword)
        return found.length ? found.slice(0, 20).join('\n') : '没有找到匹配文件'
      } catch (error) {
        return `搜索失败:${(error as Error).message}`
      }
    },
  })
}
file_search 递归搜索文本文件(跳过 node_modules 和隐藏目录,深度限制三层),返回命中文件列表。这是 Agent 最常用的工具类型:先定位,再读文件。
三个工具合起来,模型就有了一套基础的"手脚":执行命令、访问网络、搜索代码。工具的多样性不靠注册表设计,靠插件数量------想加什么工具,就照这个模板再写一枚插件;想禁用什么工具,就从装配清单里摘掉一行。
第五章 · 提示词也是一枚插件
把硬编码的提示词拆出去
下一步写 Agent 时,最容易被写死的就是提示词。真实 Harness 的做法是把提示词做成独立插件(@deepseek-ai/dsh-system-prompt),因为提示词需要被其他插件修改:加规则的、加上下文的、加工具描述的,各管一段,谁也不认识谁。
mini 版照做:
ts
import type { Context } from 'cordis'

export const name = 'mini-prompt'
export const inject = ['tools']

const RULES = `回答规则:
- 需要调用工具时,只输出一行 JSON:{"tool": "工具名", "args": {...}}
- 任务已经完成时,只输出一行 JSON:{"answer": "给用户的最终回答"}
- 不要输出 JSON 之外的任何内容。`

export function apply(ctx: Context) {
  ctx.on('prompt/build', async (base, next) => {
    const downstream = await next()
    return `${downstream}\n\n可用工具:\n${ctx.tools.describe()}\n\n${RULES}`
  })
}
这就是 prompt.ts。它监听 prompt/build 事件------注意这不是普通广播,而是 waterfall 模式:监听器收到参数和一个 next() 续延,await next() 拿到下游的结果,再包装 后返回给上游。这里的下游是 agent 提供的"基础提示词",mini-prompt 在它后面追加工具清单和回答规则。
想要再加一段提示词?再加一枚插件监听同一个事件就行,不用改任何已有代码。提示词从一段字符串变成了一条可插拔的处理链。
(waterfall 的另一个语义是短路 :不调 next() 直接返回,下游就收不到了。对"拦截/否决"类事件这是设计意图,对"追加/修饰"类事件则是纪律------永远记得调 next()。)
第六章 · Agent 循环
把大脑接进身体
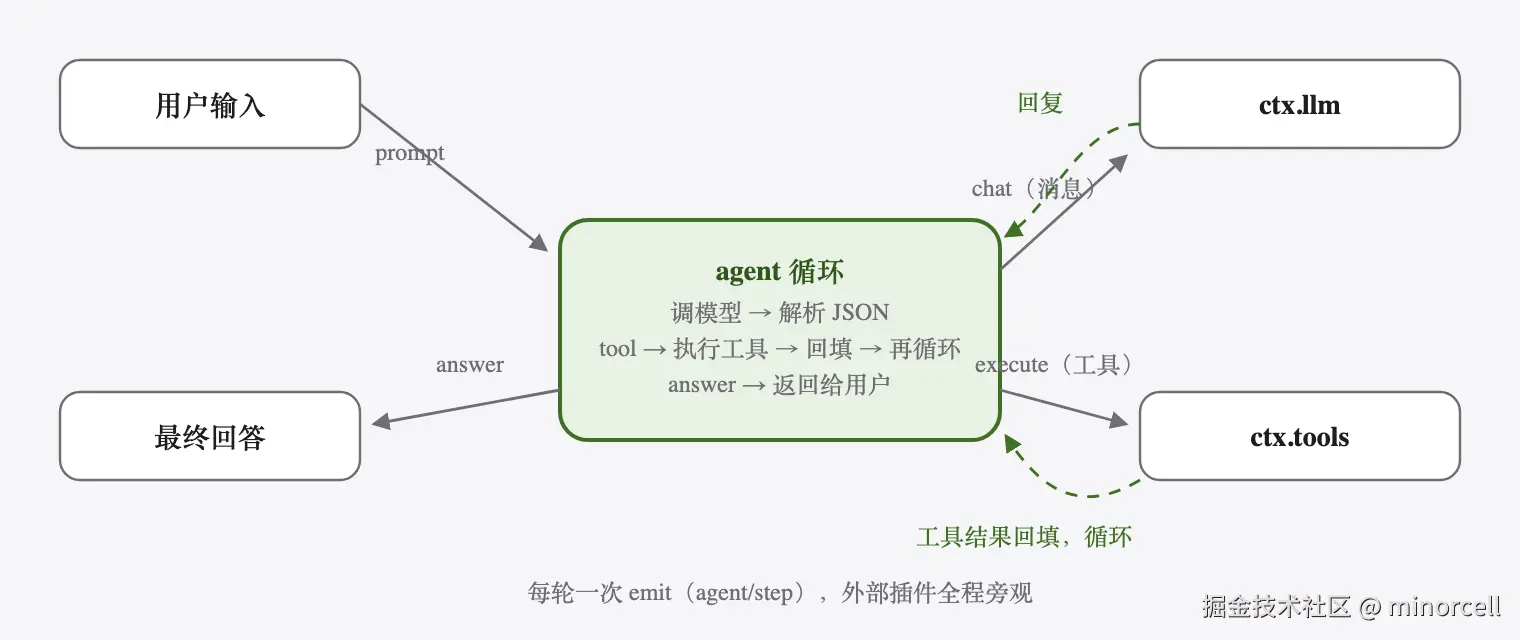
现在有了"能聊天"的 llm、三个真实工具、一条可插拔的提示词链,还差一个把它们连起来的循环。这就是 Agent 的核心:模型输出工具调用 → 代码执行 → 结果回填 → 模型继续决策,直到给出最终回答。
ts
import { Service, type Context } from 'cordis'
import type { ChatMessage } from './llm.js'

declare module 'cordis' {
  interface Context {
    agent: AgentService
  }
  interface Events {
    'agent/step'(step: AgentStep): void
    'prompt/build'(base: string, next: () => Promise<string>): Promise<string>
  }
}

export type AgentStep =
  | { type: 'tool'; tool: string; args: Record<string, unknown>; result: string }
  | { type: 'answer'; answer: string }

const BASE_PROMPT = '你是一个可以调用工具的 agent。'

function parseJson(text: string): Record<string, any> | null {
  const stripped = text.trim().replace(/^```(?:json)?\s*|\s*```$/g, '')
  try {
    return JSON.parse(stripped)
  } catch {
    return null
  }
}

export class AgentService extends Service {
  constructor(ctx: Context) {
    super(ctx, 'agent')
  }

  async buildPrompt(): Promise<string> {
    return this.ctx.waterfall('prompt/build', BASE_PROMPT, async () => BASE_PROMPT)
  }

  async run(prompt: string, maxTurns = 5): Promise<string> {
    const messages: ChatMessage[] = [
      { role: 'system', content: await this.buildPrompt() },
      { role: 'user', content: prompt },
    ]

    for (let turn = 0; turn < maxTurns; turn++) {
      const reply = await this.ctx.llm.chat(messages)
      const parsed = parseJson(reply)

      if (!parsed) {
        return reply
      }
      if (parsed.answer) {
        this.ctx.emit('agent/step', { type: 'answer', answer: parsed.answer })
        return parsed.answer
      }
      if (parsed.tool) {
        const result = await this.ctx.tools.execute(parsed.tool, parsed.args)
        this.ctx.emit('agent/step', {
          type: 'tool',
          tool: parsed.tool,
          args: parsed.args ?? {},
          result,
        })
        messages.push({ role: 'assistant', content: reply })
        messages.push({ role: 'user', content: `工具结果:${result}` })
        continue
      }
      return reply
    }
    return '已达到最大循环轮数,任务中止。'
  }
}

export const name = 'mini-agent'
export const inject = ['llm', 'tools']

export function apply(ctx: Context) {
  ctx.plugin(AgentService)
}
这就是 agent.ts。关键设计有四块:
事件类型声明 (第 4-12 行)。agent/step 是广播事件(emit,纯通知);prompt/build 是 waterfall 事件------注意它的签名带 next: () => Promise<string>,这是 waterfall 监听器的标志,类型系统靠它区分模式。
提示词来自事件链 (第 34-36 行)。buildPrompt() 调用 ctx.waterfall('prompt/build', BASE_PROMPT, async () => BASE_PROMPT):BASE_PROMPT 是给第一个监听器的初始值,最后一个参数是"没有监听器时的兜底值"。agent 不知道提示词最终长什么样,也不知道有谁在改它。
循环在 run() 里 (第 38-70 行)。每轮:调模型 → 解析 JSON → 有 answer 就返回,有 tool 就执行、把结果作为 user 消息回填、进入下一轮。maxTurns = 5 是安全阀,防止模型在工具上打转。解析失败时直接把原文交给用户------模型不按协议出牌不是错误,是常态,要有兜底。
每步都发事件 (第 52、57 行)。工具调用和最终回答都会 ctx.emit('agent/step', ...) 广播出去。Agent 自己用不上它,但日志、统计、防泄漏过滤器这些能力可以在不改 agent 代码的前提下接入。这就是上一篇说的:拦截用事件,调用用服务。
第七章 · 组装与运行
八枚插件,拼成一个 harness
ts
import { Context } from 'cordis'
import * as readline from 'node:readline/promises'
import * as llm from './llm.js'
import * as tools from './tools.js'
import * as bash from './bash.js'
import * as fetchTool from './fetch.js'
import * as search from './search.js'
import * as prompt from './prompt.js'
import * as agent from './agent.js'

const tracer = {
  name: 'tracer',
  apply(ctx: Context) {
    ctx.on('agent/step', (step) => {
      if (step.type === 'tool') {
        console.log(`  [tool] ${step.tool}(${JSON.stringify(step.args)}) => ${step.result}`)
      }
    })
  },
}

const app = new Context()

await app.plugin(llm)
await app.plugin(tools)
await app.plugin(bash)
await app.plugin(fetchTool)
await app.plugin(search)
await app.plugin(prompt)
await app.plugin(agent)
await app.plugin(tracer)

const rl = readline.createInterface({
  input: process.stdin,
  output: process.stdout,
})

console.log('mini harness 已就绪,输入 exit 退出。')
while (true) {
  const line = await rl.question('> ')
  if (!line.trim()) continue
  if (line === 'exit') break
  const reply = await app.agent.run(line)
  console.log(reply)
}
rl.close()
这就是 bin.ts。第 11-21 行的 tracer 是第八枚插件,也是"事件的价值"的现场演示:它监听 agent/step,把每次工具调用打印成一行 [tool] 日志。它不认识 agent,agent 也不认识它------它们唯一的交集是那个类型化事件。把 tracer 从清单里删掉,agent 依然工作;换成写文件、发通知的监听器,agent 也浑然不觉。
第 24-32 行 就是整个 harness 的装配清单:八枚插件按顺序挂载(顺序其实不重要,inject 已经保证了真正的依赖顺序)。await 让每个插件加载完成后才继续。
剩下的是一个 readline 交互循环。跑起来:
bash
npm start真实输出(DeepSeek API,问它"在当前目录搜一下哪些文件里提到 waterfall"):
ini
mini harness 已就绪,输入 exit 退出。
> 在当前目录搜一下哪些文件里提到 waterfall
  [tool] file_search => agent.ts
  [tool] bash => 35:    return this.ctx.waterfall('prompt/build', ...
在当前目录中,agent.ts 第 35 行提到了 waterfall。
完整链路:模型读到提示词链构建出的工具清单 → 判断"需要搜索" → file_search 定位到 agent.ts → 用 bash 精确定位行号 → 综合两轮结果回答。tracer 那两行 [tool] 日志就是 emit 的现场。
它是什么:生命周期级的中间件系统
写到这里,可以回答"Cordis 到底像什么"了。
如果你写过 Express,会觉得它的插件很眼熟------都是一个接一个的处理层。但有一个关键区别:Express 的中间件活在一次请求里 (request 进来 → 穿过层层中间件 → response 出去),而 Cordis 的插件活在整个应用的生命周期里:启动时按依赖顺序加载、提供服务和监听器,卸载时逆序清理,贯穿应用全程。
更有意思的是 Cordis 内部还有第二层:waterfall 事件在每次分发 时构成一条 next() 链------监听器包装、修改、短路,直到终值。这一层才真正对应 Express 中间件的"请求级"体验,比如 mini-prompt 对提示词的包装。
所以严格地说:
| 作用域 | 例子 | |
|---|---|---|
| Cordis 插件 | 应用生命周期 | mini-llm、mini-agent、tracer |
| Cordis 事件链 | 每次分发 | prompt/build 的包装链 |
| Express 中间件 | 每次请求 | 日志、鉴权、路由 |
**插件是生命周期的中间件,事件链是分发的中间件。**理解了这两层,Cordis 的"一切皆插件"就不再是口号,而是一个具体的工程模型。
它离真实 Harness 还差什么
诚实地说,差得还很多:
- 会话记忆 (
ctx.sessions之于真实 Harness):mini 版每次run()都是全新对话 - 流式输出 :
chat()是非流式的,真实 Harness 的ctx.llm是流式服务 - 原生工具协议 :文本 JSON 协议简单透明,但比不上 function calling 的鲁棒性------前面的演示里,模型偶尔会把思考文字和 JSON 混在一起输出,或在开放问题上持续探索直到触发
maxTurns安全阀 - 配置系统 :真实生态用 Schemastery 做运行时校验,还有 loader 的
!!js表达式 - 安全与治理:工具白名单、命令拦截、敏感信息过滤,在真实 Harness 里是独立插件
但骨架是同一副:能力拆成插件、插件通过服务协作、协作过程通过事件可见 。理解了这副骨架,去看真实 Harness 的源码(vendor/ 目录下的 @deepseek-ai/cordis),就不再是看天书了。