当前效果,就是把脏的贴图擦除,显示出干净的贴图,根据某个世界坐标,或者玩家的世界坐标,动态修改当前坐标半径内的擦除遮罩,来实现擦除功能,代码中包含擦除进度,还有一键全部擦除的功能
1.shader代码
// Effect Syntax Guide: https://docs.cocos.com/creator/manual/zh/shader/index.html

CCEffect %{
  techniques:
  - name: opaque
    passes:
    - vert: standard-vs
      frag: standard-fs
      properties: &props
        mainTexture:           { value: grey, target: albedoMap, editor: { displayName: Dirt Texture (污垢) } }
        cleanTexture:          { value: white, target: cleanMap, editor: { displayName: Clean Texture (干净) } }
        maskTexture:           { value: black, target: maskMap, editor: { displayName: Mask Texture (擦除遮罩) } }
        mainColor:                { value: [1.0, 1.0, 1.0, 1.0], target: albedo, linear: true, editor: { displayName: Albedo, type: color } }
        albedoScale:              { value: [1.0, 1.0, 1.0], target: albedoScaleAndCutoff.xyz }
        alphaThreshold:           { value: 0.5, target: albedoScaleAndCutoff.w, editor: { parent: USE_ALPHA_TEST, slide: true, range: [0, 1.0], step: 0.001 } }
        roughness:                { value: 0.8, target: pbrParams.y, editor: { slide: true, range: [0, 1.0], step: 0.001 } }
        metallic:                 { value: 0.6, target: pbrParams.z, editor: { slide: true, range: [0, 1.0], step: 0.001 } }
    - &forward-add
      vert: standard-vs
      frag: standard-fs
      phase: forward-add
      propertyIndex: 0
      embeddedMacros: { CC_FORWARD_ADD: true }
      depthStencilState:
        depthFunc: equal
        depthTest: true
        depthWrite: false
      blendState:
        targets:
        - blend: true
          blendSrc: one
          blendDst: one
          blendSrcAlpha: zero
          blendDstAlpha: one
    - &shadow-caster
      vert: shadow-caster-vs
      frag: shadow-caster-fs
      phase: shadow-caster
      propertyIndex: 0
      rasterizerState:
        cullMode: front
      properties:
        mainColor:      { value: [1.0, 1.0, 1.0, 1.0], target: albedo, editor: { displayName: Albedo, type: color } }
        albedoScale:    { value: [1.0, 1.0, 1.0], target: albedoScaleAndCutoff.xyz }
        alphaThreshold: { value: 0.5, target: albedoScaleAndCutoff.w, editor: { parent: USE_ALPHA_TEST } }
        mainTexture:    { value: grey, target: albedoMap, editor: { displayName: Dirt Texture } }
  - name: transparent
    passes:
    - vert: standard-vs
      frag: standard-fs
      embeddedMacros: { CC_FORCE_FORWARD_SHADING: true }
      depthStencilState:
        depthTest: true
        depthWrite: false
      blendState:
        targets:
        - blend: true
          blendSrc: src_alpha
          blendDst: one_minus_src_alpha
          blendDstAlpha: one_minus_src_alpha
      properties: *props
    - *forward-add
    - *shadow-caster
}%


CCProgram shared-ubos %{
  uniform Constants {
    vec4 albedo;
    vec4 albedoScaleAndCutoff;
    vec4 pbrParams;
  };
}%

CCProgram macro-remapping %{
  #pragma define-meta USE_TWOSIDE
  #pragma define-meta USE_VERTEX_COLOR

  #define CC_SURFACES_USE_TWO_SIDED USE_TWOSIDE
  #define CC_SURFACES_USE_VERTEX_COLOR USE_VERTEX_COLOR
}%

CCProgram surface-vertex %{
  #define CC_SURFACES_VERTEX_MODIFY_WORLD_POS
  vec3 SurfacesVertexModifyWorldPos(in SurfacesStandardVertexIntermediate In)
  {
    return In.worldPos;
  }

  #define CC_SURFACES_VERTEX_MODIFY_WORLD_NORMAL
  vec3 SurfacesVertexModifyWorldNormal(in SurfacesStandardVertexIntermediate In)
  {
    return In.worldNormal.xyz;
  }

  #define CC_SURFACES_VERTEX_MODIFY_UV
  void SurfacesVertexModifyUV(inout SurfacesStandardVertexIntermediate In)
  {
  }
}%


CCProgram surface-fragment %{
  // 基础污垢贴图
  #if USE_ALBEDO_MAP
    uniform sampler2D albedoMap;
    #pragma define-meta ALBEDO_UV options([v_uv, v_uv1])
  #endif

  // 新增:干净的贴图与擦除遮罩贴图
  uniform sampler2D cleanMap;
  uniform sampler2D maskMap;

  #if USE_ALPHA_TEST
    #pragma define-meta ALPHA_TEST_CHANNEL options([a, r])
  #endif

  #define CC_SURFACES_FRAGMENT_MODIFY_BASECOLOR_AND_TRANSPARENCY
  vec4 SurfacesFragmentModifyBaseColorAndTransparency()
  {
    vec4 baseColor = albedo;

    // 默认采样污垢贴图
    vec4 dirtColor = vec4(1.0);
    #if USE_ALBEDO_MAP
      dirtColor = texture(albedoMap, ALBEDO_UV);
      dirtColor.rgb = SRGBToLinear(dirtColor.rgb);
    #endif

    // 采样干净贴图与遮罩贴图
    vec4 cleanColor = texture(cleanMap, ALBEDO_UV);
    cleanColor.rgb = SRGBToLinear(cleanColor.rgb);

    // 采样 Mask 贴图(假设脚本涂抹的是 R 通道)
    vec4 maskColor = texture(maskMap, ALBEDO_UV);
    float mask = maskColor.r; // 0 表示污垢,1 表示干净(或者反过来,取决于你脚本怎么画)

    // 根据遮罩进行线性插值混合
    vec4 mixedTexColor = mix(dirtColor, cleanColor, mask);
    baseColor *= mixedTexColor;

    #if USE_ALPHA_TEST
      if (baseColor.ALPHA_TEST_CHANNEL < albedoScaleAndCutoff.w) discard;
    #endif

    baseColor.rgb *= albedoScaleAndCutoff.xyz;
    return baseColor;
  }

  #define CC_SURFACES_FRAGMENT_ALPHA_CLIP_ONLY
  void SurfacesFragmentAlphaClipOnly()
  {
    #if USE_ALPHA_TEST
      float alpha = albedo.ALPHA_TEST_CHANNEL;
      #if USE_VERTEX_COLOR
        alpha *= FSInput_vertexColor.a;
      #endif
      #if USE_ALBEDO_MAP
        alpha = texture(albedoMap, ALBEDO_UV).ALPHA_TEST_CHANNEL;
      #endif

      if (alpha < albedoScaleAndCutoff.w) discard;
    #endif
  }

  #define CC_SURFACES_FRAGMENT_MODIFY_WORLD_NORMAL
  vec3 SurfacesFragmentModifyWorldNormal()
  {
    return normalize(FSInput_worldNormal);
  }

  #define CC_SURFACES_FRAGMENT_MODIFY_EMISSIVE
  vec3 SurfacesFragmentModifyEmissive()
  {
    return vec3(0.0, 0.0, 0.0);
  }

  #define CC_SURFACES_FRAGMENT_MODIFY_PBRPARAMS
  vec4 SurfacesFragmentModifyPBRParams()
  {
    return vec4(1.0, pbrParams.y, pbrParams.z, 0.5);
  }
}%

// 后面剩余的标准 vs/fs 桥接程序保持不变...
CCProgram standard-vs %{
  precision highp float;
  #include <macro-remapping>
  #include <surfaces/effect-macros/common-macros>
  #include <surfaces/includes/common-vs>
  #include <shared-ubos>
  #include <surface-vertex>
  #include <surfaces/includes/standard-vs>
  #include <shading-entries/main-functions/render-to-scene/vs>
}%

CCProgram shadow-caster-vs %{
  precision highp float;
  #include <surfaces/effect-macros/render-to-shadowmap>
  #include <surfaces/includes/common-vs>
  #include <shared-ubos>
  #include <surface-vertex>
  #include <shading-entries/main-functions/render-to-shadowmap/vs>
}%

CCProgram standard-fs %{
  precision highp float;
  #include <macro-remapping>
  #include <surfaces/effect-macros/common-macros>
  #include <surfaces/includes/common-fs>
  #include <shared-ubos>
  #include <surface-fragment>
  #include <lighting-models/includes/standard>
  #include <surfaces/includes/standard-fs>
  #include <shading-entries/main-functions/render-to-scene/fs>
}%

CCProgram shadow-caster-fs %{
  precision highp float;
  #include <surfaces/effect-macros/render-to-shadowmap>
  #include <surfaces/includes/common-fs>
  #include <shared-ubos>
  #include <surface-fragment>
  #include <shading-entries/main-functions/render-to-shadowmap/fs>
}%
2.把对应的贴图赋值,擦除遮罩,是一个256*256的纯黑图片
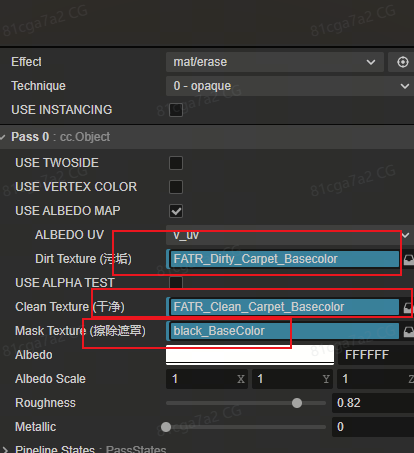
3.把材质赋值给需要擦除的物体,然后增加控制脚本,设置好擦除半径,动态根据要擦除的世界坐标(调用eraseAtWorldPosition),发出射线,更新材质的遮罩数据
控制脚本
import { _decorator, Component, geometry, MeshRenderer, Texture2D, Vec2, Vec3, Mat4, gfx } from 'cc';
const { ccclass, property } = _decorator;

@ccclass('MeshEraser')
export class MeshEraser extends Component {
    @property(MeshRenderer)
    public meshRenderer: MeshRenderer = null!; // 目标模型的 MeshRenderer

    @property
    public brushRadius: number = 10; // 画笔半径(像素)

    @property
    public maskSize: number = 256; // 动态遮罩的分辨率

    private _maskTexture!: Texture2D;
    private _maskData!: Uint8Array;
    private _isInitialized: boolean = false;

    start() {
        this.initMask();
    }

    /** 初始化遮罩纹理 */
    private initMask() {
        // 初始化全黑遮罩数据
        const dataSize = this.maskSize * this.maskSize * 4;
        this._maskData = new Uint8Array(dataSize);
        for (let i = 0; i < dataSize; i += 4) {
            this._maskData[i] = 0;       // R: 0 (代表有污垢)
            this._maskData[i + 1] = 0;   // G
            this._maskData[i + 2] = 0;   // B
            this._maskData[i + 3] = 255; // A
        }

        this._maskTexture = new Texture2D();
        this._maskTexture.reset({
            width: this.maskSize,
            height: this.maskSize,
            format: Texture2D.PixelFormat.RGBA8888,
        });
        this._maskTexture.uploadData(this._maskData);

        const mat = this.meshRenderer.getMaterial(0);
        if (mat) {
            mat.setProperty('maskMap', this._maskTexture);
        }

        this._isInitialized = true;
    }

    /**
     * 根据世界坐标位置进行擦除(供外部调用,如 PlayerController)
     * 从给定世界位置向下发射射线,命中目标 mesh 后在对应 UV 处擦除
     * @param worldPos 世界坐标位置(如清洗机效果节点的位置)
     */
    public eraseAtWorldPosition(worldPos: Vec3) {
        if (!this._isInitialized || !this.meshRenderer || !this.meshRenderer.mesh) return;

        // 从世界位置向下发射射线
        const ray = new geometry.Ray();
        geometry.Ray.set(ray, worldPos.x, worldPos.y + 2, worldPos.z, 0, -1, 0);

        const uv = this.calculateHitUV(ray);
        if (uv) {
            this.drawOnMask(uv);
        }
    }

    // 核心:将世界空间射线转到局部空间,读取网格数据手动做射线-三角形相交计算
    private calculateHitUV(worldRay: geometry.Ray): Vec2 | null {
        const node = this.meshRenderer.node;
        const mesh = this.meshRenderer.mesh!;

        // 1. 计算逆矩阵,将世界坐标系下的射线转换到物体的局部坐标系(Local Space)
        const invWorldMatrix = new Mat4();
        Mat4.invert(invWorldMatrix, node.worldMatrix);

        const localOrigin = new Vec3();
        const localDir = new Vec3();
        Vec3.transformMat4(localOrigin, worldRay.o, invWorldMatrix);

        // 方向向量转换需要注意去掉平移影响
        const worldTarget = new Vec3();
        Vec3.add(worldTarget, worldRay.o, worldRay.d);
        Vec3.transformMat4(worldTarget, worldTarget, invWorldMatrix);
        Vec3.subtract(localDir, worldTarget, localOrigin);
        Vec3.normalize(localDir, localDir);

        // 2. 读取 Mesh 顶点、UV 和索引数据
        const positions = mesh.readAttribute(0, gfx.AttributeName.ATTR_POSITION);
        const uvs = mesh.readAttribute(0, gfx.AttributeName.ATTR_TEX_COORD);
        const indices = mesh.readIndices(0);
        if (!positions || !uvs || !indices) return null;

        let minT = Infinity;
        let finalUV = new Vec2();

        // 临时变量复用避免垃圾回收(GC)
        const v0 = new Vec3(), v1 = new Vec3(), v2 = new Vec3();
        const edge1 = new Vec3(), edge2 = new Vec3(), pvec = new Vec3(), tvec = new Vec3(), qvec = new Vec3();

        // 3. 遍历所有的三角形网格 (每3个索引组成一个面)
        for (let i = 0; i < indices.length; i += 3) {
            const idx0 = indices[i];
            const idx1 = indices[i + 1];
            const idx2 = indices[i + 2];

            // 提取三角形的三个顶点坐标
            v0.set(positions[idx0 * 3], positions[idx0 * 3 + 1], positions[idx0 * 3 + 2]);
            v1.set(positions[idx1 * 3], positions[idx1 * 3 + 1], positions[idx1 * 3 + 2]);
            v2.set(positions[idx2 * 3], positions[idx2 * 3 + 1], positions[idx2 * 3 + 2]);

            // Möller--Trumbore 射线-三角形相交算法
            Vec3.subtract(edge1, v1, v0);
            Vec3.subtract(edge2, v2, v0);
            Vec3.cross(pvec, localDir, edge2);
            const det = Vec3.dot(edge1, pvec);

            // det 接近 0 说明射线与三角形共面或平行
            if (det > -0.000001 && det < 0.000001) continue;
            const invDet = 1.0 / det;

            Vec3.subtract(tvec, localOrigin, v0);
            const u = Vec3.dot(tvec, pvec) * invDet;
            if (u < 0.0 || u > 1.0) continue;

            Vec3.cross(qvec, tvec, edge1);
            const v = Vec3.dot(localDir, qvec) * invDet;
            if (v < 0.0 || u + v > 1.0) continue;

            const t = Vec3.dot(edge2, qvec) * invDet;

            // 如果找到了更近的交点
            if (t > 0.000001 && t < minT) {
                minT = t;
                const w = 1.0 - u - v;

                // 提取三个顶点的原始 UV
                const uv0_x = uvs[idx0 * 2], uv0_y = uvs[idx0 * 2 + 1];
                const uv1_x = uvs[idx1 * 2], uv1_y = uvs[idx1 * 2 + 1];
                const uv2_x = uvs[idx2 * 2], uv2_y = uvs[idx2 * 2 + 1];

                // 重心插值算当前交点的精细 UV
                finalUV.x = uv0_x * w + uv1_x * u + uv2_x * v;
                finalUV.y = uv0_y * w + uv1_y * u + uv2_y * v;
            }
        }
        return minT !== Infinity ? finalUV : null;
    }

    private drawOnMask(uv: Vec2) {
        const centerX = Math.floor(uv.x * this.maskSize);
        const centerY = Math.floor(uv.y * this.maskSize);

        let isDirty = false;

        // 定义羽化内径比例(0.0 ~ 1.0)
        // 0.4 表示画笔中心 40% 的区域是完全擦除的纯白,外围 60% 的区域向外逐渐变淡(模糊)
        const innerRatio = 0.4;
        const innerRadius = this.brushRadius * innerRatio;

        for (let y = centerY - this.brushRadius; y <= centerY + this.brushRadius; y++) {
            for (let x = centerX - this.brushRadius; x <= centerX + this.brushRadius; x++) {
                if (x < 0 || x >= this.maskSize || y < 0 || y >= this.maskSize) continue;

                // 计算当前像素到圆心的真实距离
                const distance = Math.sqrt((x - centerX) * (x - centerX) + (y - centerY) * (y - centerY));

                // 只有在画笔半径内的像素才处理
                if (distance <= this.brushRadius) {
                    let alphaAlpha = 255;

                    if (distance <= innerRadius) {
                        // 1. 在内径以内,完全擦除(纯白)
                        alphaAlpha = 255;
                    } else {
                        // 2. 在内径和外径之间,进行平滑渐变插值 (Smoothstep)
                        // 距离越远,factor 越接近 0
                        const factor = 1.0 - (distance - innerRadius) / (this.brushRadius - innerRadius);

                        // 使用平滑三次插值,让边缘过渡更自然、更柔和
                        const smoothFactor = factor * factor * (3.0 - 2.0 * factor);
                        alphaAlpha = Math.floor(smoothFactor * 255);
                    }

                    const index = (y * this.maskSize + x) * 4;

                    // 核心:因为是多次涂抹,我们要取当前渐变值和原有值的"最大值",防止一笔把之前擦干净的地方又变脏
                    if (this._maskData[index] < alphaAlpha) {
                        this._maskData[index] = alphaAlpha;     // R
                        this._maskData[index + 1] = alphaAlpha; // G
                        this._maskData[index + 2] = alphaAlpha; // B
                        isDirty = true;
                    }
                }
            }
        }

        if (isDirty) {
            this._maskTexture.uploadData(this._maskData);
        }
    }

    /**
     * 获取当前擦除进度 (0~1)
     * 0 = 完全没擦, 1 = 全部擦干净
     */
    public getEraseProgress(): number {
        if (!this._isInitialized) return 0;
        let totalWhite = 0;
        const totalPixels = this.maskSize * this.maskSize;
        for (let i = 0; i < this._maskData.length; i += 4) {
            totalWhite += this._maskData[i]; // R channel
        }
        return totalWhite / (totalPixels * 255);
    }

    /**
     * 强制将所有区域标记为已擦除(全白),用于完成时一次性清理干净
     */
    public eraseAll() {
        if (!this._isInitialized) return;
        for (let i = 0; i < this._maskData.length; i += 4) {
            this._maskData[i] = 255;     // R
            this._maskData[i + 1] = 255; // G
            this._maskData[i + 2] = 255; // B
        }
        this._maskTexture.uploadData(this._maskData);
    }

    onDestroy() {
        if (this._maskTexture) {
            this._maskTexture.destroy();
        }
    }
}