前言
GitHub 近期发布了 Copilot SDK(支持包括 .NET在内的多种开发语言和框架),提供了强大的Agent编排能力,官方的Slogan是,"Agents for every app",适用于每款应用的智能体,它公开了Copilot CLI背后相同的运行引擎,开发者只需要定义智能体行为,Copilot会负责后续规划,工具调用,文件编辑等各项任务。
嗯,描述的还是挺美好的,官方文档在这里:github.com/github/copi...。
本篇不再过多描述该SDK的特性,只根据他提供的.net的案例,做一下本地化处理,感兴趣的小伙伴可以了解一下,尤其是准备在业务系统里接入智能体模块的同学,可以做一下选型,考虑一下这个SDK。
*前置条件
- 官方文档里有说明,如果使用默认配置的话,可能需要本地先安装好Copilot CLI,但是我们使用的是本地模型提供商,这个先决条件其实不受影响,但还是建议大家装一下,提前体验一下成品,验验牌。

- 运行环境,这个没啥说的,跟着要求走即可,Node.js 20+ or Python 3.11+ or Go 1.24+ or Rust 1.94+ or Java 17+ or .NET 8.0+
安装
做验证的话,就用控制台程序最合适了,跟着官方案例走即可
bash
dotnet new console -n CopilotDemo && cd CopilotDemo*国内模型底座
Copilot SDK和Copilot CLI的模型接入策略一样,支持所谓的BYOK策略,也就是允许开发者使用自己的API密钥接入受支持的大语音模型提供商,相关说明在这里:github.com/github/copi...
那基于此,我们可以改造一个支持DeepSeek的统一配置,当然如果你能直接使用或者想直接使用OpenAI,Anthropic之类的原生模型,也是完全没问题的。
csharp
internal static class DeepSeekConfig
{
    public static SessionConfig CreateSessionConfig(
        bool streaming = false,
        ICollection<AIFunctionDeclaration>? tools = null)
    {
        var apiKey = Environment.GetEnvironmentVariable("DEEPSEEK_API_KEY", EnvironmentVariableTarget.User);
        if (string.IsNullOrWhiteSpace(apiKey))
        {
            throw new InvalidOperationException("我没key")
        }
        return new SessionConfig
        {
            Model = "deepseek-v4-flash",
            Provider = new ProviderConfig
            {
                Type = "openai",
                BaseUrl = "https://api.deepseek.com/v1",
                WireApi = "completions",
                ApiKey = apiKey,
            },
            OnPermissionRequest = PermissionHandler.ApproveAll,
            Streaming = streaming,
            Tools = tools,
        };
    }
}
发送基础消息
这个案例比较简单
csharp
internal static class Step2_BasicMessage
{
    public static async Task RunAsync()
    {
        Console.WriteLine("[Step 2] 基础消息:发送 \"What is 2 + 2?\"\n");

        await using var client = new CopilotClient();
        await using var session = await client.CreateSessionAsync(
            DeepSeekConfig.CreateSessionConfig());

        var response = await session.SendAndWaitAsync(
            new MessageOptions { Prompt = "What is 2 + 2?" });

        Console.WriteLine($"\n回复: {response?.Data.Content}");
    }
}
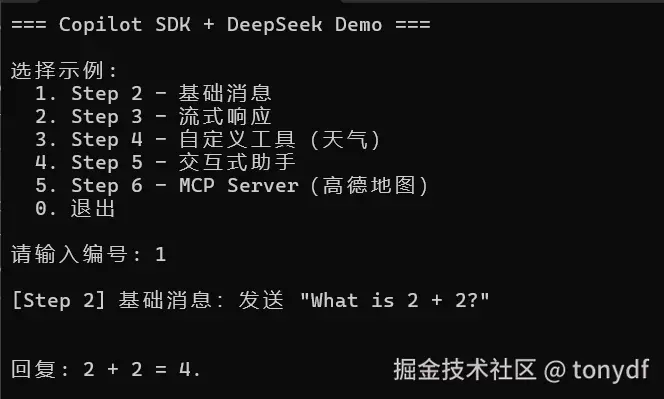
注意,我这里方法前面前面的Step_前缀是我把这几个步骤分别放到了不同的类里,然后在控制台入口方便做调用测试。
运行效果如下
发送流式消息
对基本消息做一些体验上的提升
csharp
internal static class Step3_Streaming
{
    public static async Task RunAsync()
    {
        Console.WriteLine("[Step 3] 流式响应:发送 \"讲一个短笑话\"\n");

        await using var client = new CopilotClient();
        await using var session = await client.CreateSessionAsync(
            DeepSeekConfig.CreateSessionConfig(streaming: true));

        // 订阅流式事件
        session.On<SessionEvent>(ev =>
        {
            if (ev is AssistantMessageDeltaEvent deltaEvent)
            {
                Console.Write(deltaEvent.Data.DeltaContent);
            }
            if (ev is SessionIdleEvent)
            {
                Console.WriteLine();
            }
        });

        await session.SendAndWaitAsync(
            new MessageOptions { Prompt = "讲一个短笑话" });

        Console.WriteLine();
    }
}
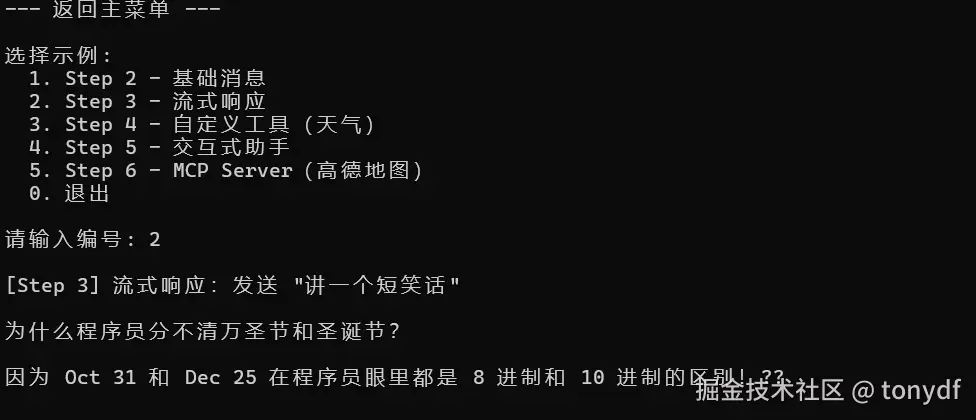
效果如下
自定义工具
csharp
internal static class Step4_CustomTool
{
    public static async Task RunAsync()
    {
        Console.WriteLine("[Step 4] 自定义工具:查询上海和纽约的天气\n");

        // 定义天气查询工具
        var getWeather = CopilotTool.DefineTool(
            ([Description("The city name")] string city) =>
            {
                var conditions = new[] { "晴天", "多云", "小雨", "阴天" };
                var temp = Random.Shared.Next(50, 80);
                var condition = conditions[Random.Shared.Next(conditions.Length)];
                return new { city, temperature = $"{temp}°F", condition };
            },
            factoryOptions: new AIFunctionFactoryOptions
            {
                Name = "get_weather",
                Description = "Get the current weather for a city",
            });

        await using var client = new CopilotClient();
        await using var session = await client.CreateSessionAsync(
            DeepSeekConfig.CreateSessionConfig(streaming: true, tools: [getWeather]));

        // 流式输出
        session.On<SessionEvent>(ev =>
        {
            if (ev is AssistantMessageDeltaEvent deltaEvent)
            {
                Console.Write(deltaEvent.Data.DeltaContent);
            }
            if (ev is SessionIdleEvent)
            {
                Console.WriteLine();
            }
        });

        await session.SendAndWaitAsync(
            new MessageOptions { Prompt = "今天上海天气怎么样?" });

        Console.WriteLine();
    }
}
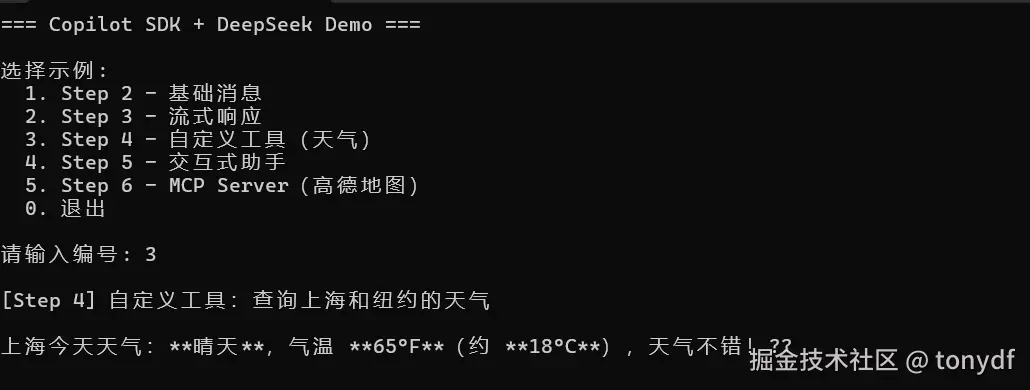
执行效果
交互式助手
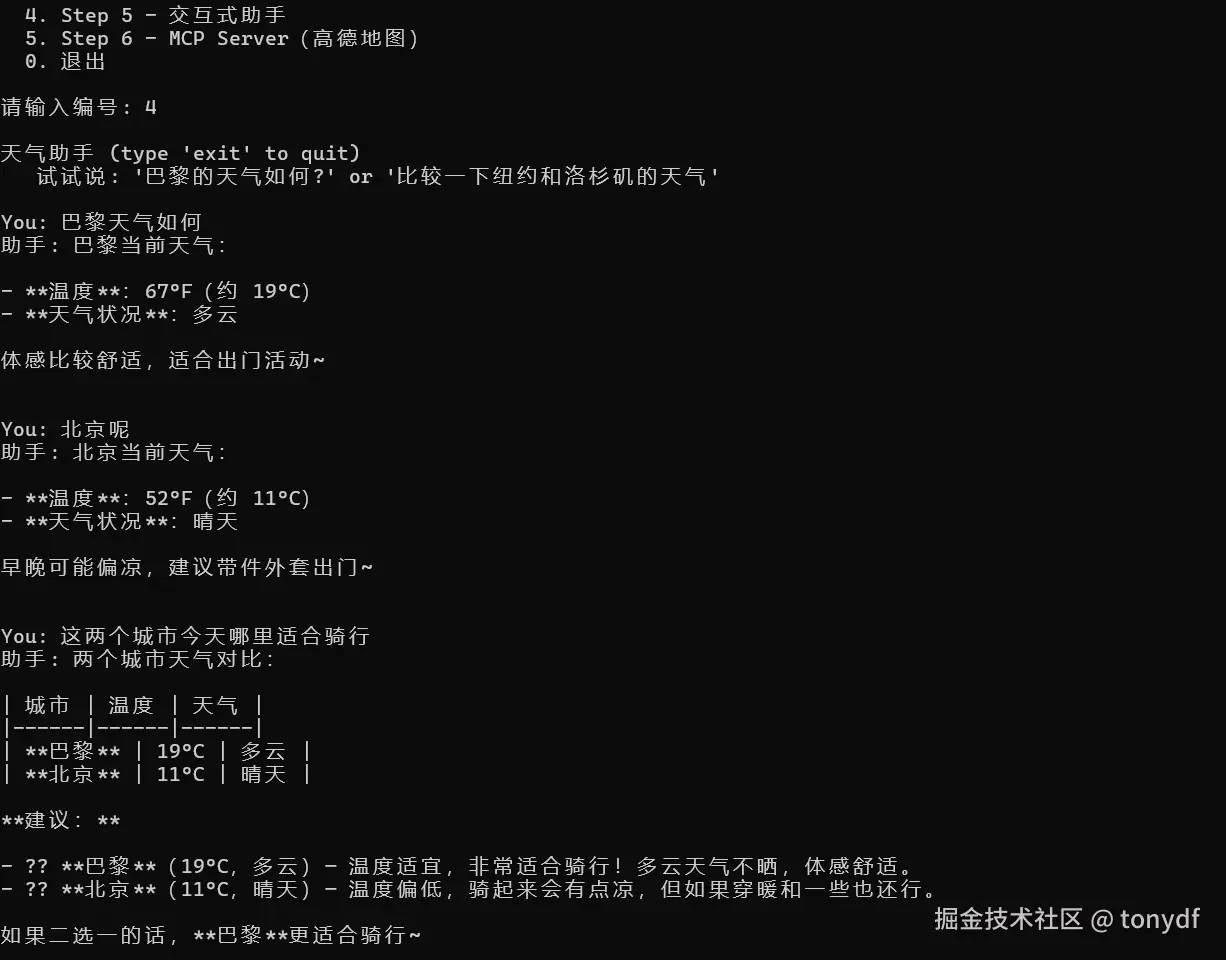
交互式助手的案例体验就很像我们在网页端和模型对话了,但是这里我们给它设定了一个角色前提,只能根据当前天气做一些交互
csharp
internal static class Step5_InteractiveAssistant
{
    public static async Task RunAsync()
    {
        // 定义天气工具
        var getWeather = CopilotTool.DefineTool(
            ([Description("The city name")] string city) =>
            {
                var conditions = new[] { "晴天", "阴天", "小雨", "多云" };
                var temp = Random.Shared.Next(50, 80);
                var condition = conditions[Random.Shared.Next(conditions.Length)];
                return new { city, temperature = $"{temp}°F", condition };
            },
            factoryOptions: new AIFunctionFactoryOptions
            {
                Name = "get_weather",
                Description = "获取指定城市的当前天气",
            });

        await using var client = new CopilotClient();
        await using var session = await client.CreateSessionAsync(
            DeepSeekConfig.CreateSessionConfig(streaming: true, tools: [getWeather]));

        // 流式输出
        session.On<SessionEvent>(ev =>
        {
            if (ev is AssistantMessageDeltaEvent deltaEvent)
            {
                Console.Write(deltaEvent.Data.DeltaContent);
            }
            if (ev is SessionIdleEvent)
            {
                Console.WriteLine();
            }
        });

        Console.WriteLine("天气助手 (type 'exit' to quit)");
        Console.WriteLine("   试试说: '巴黎的天气如何?' or '比较一下纽约和洛杉矶的天气'\n");

        while (true)
        {
            Console.Write("You: ");
            var input = Console.ReadLine();

            if (string.IsNullOrEmpty(input) || input.Equals("exit", StringComparison.OrdinalIgnoreCase))
            {
                break;
            }

            Console.Write("助手: ");
            await session.SendAndWaitAsync(new MessageOptions { Prompt = input });
            Console.WriteLine("\n");
        }
    }
}
*接入MCP
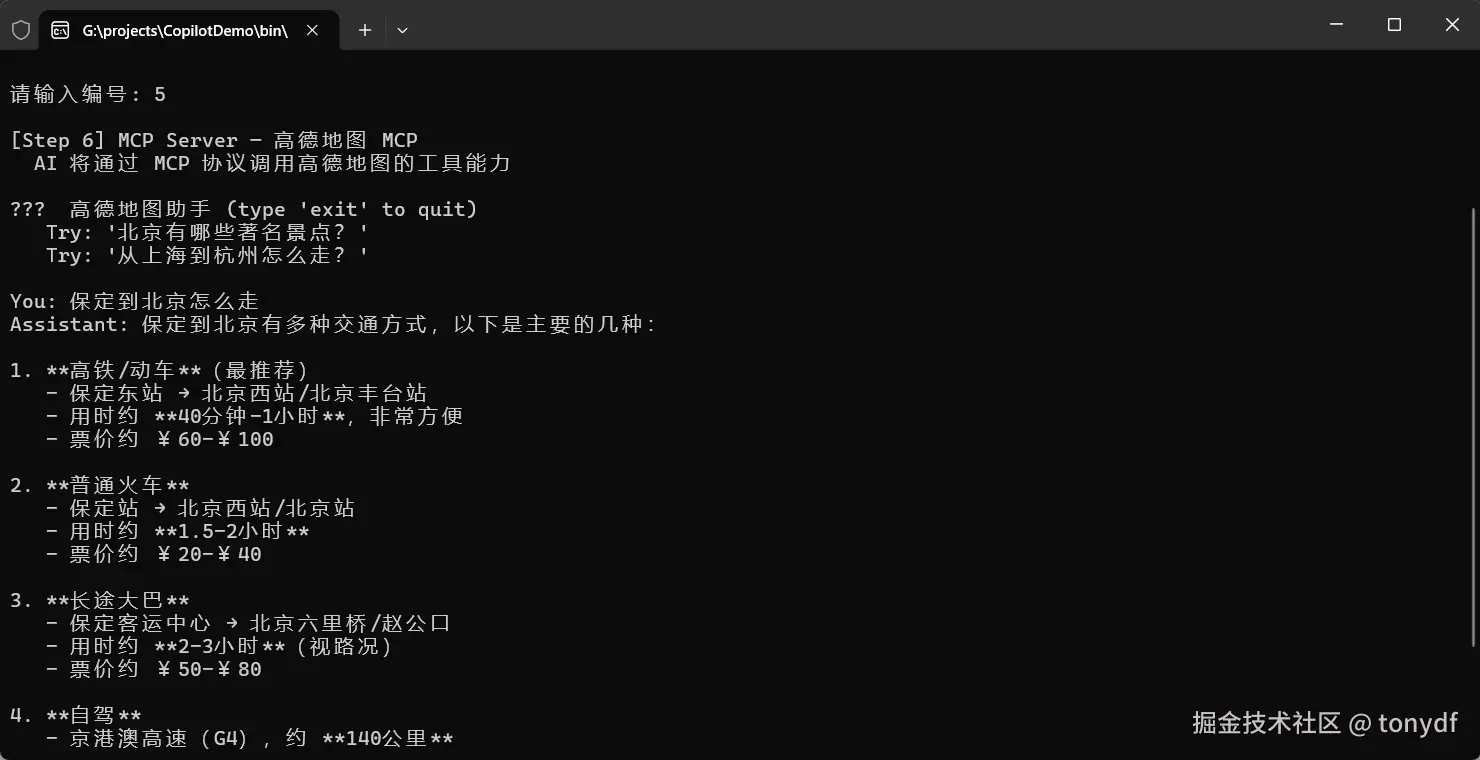
这里以高德MCP Server为例,使用 Streamable HTTP类型接入
csharp
    public static async Task RunAsync()
    {
        var amapKey = Environment.GetEnvironmentVariable("AMAP_API_KEY");
        if (string.IsNullOrWhiteSpace(amapKey))
        {
            throw new InvalidOperationException("请先设置环境变量 AMAP_API_KEY(高德开放平台 API Key)");
        }

        Console.WriteLine("[Step 6] MCP Server --- 高德地图 MCP");
        Console.WriteLine("  AI 将通过 MCP 协议调用高德地图的工具能力\n");

       var config = DeepSeekConfig.CreateSessionConfig(streaming: true);
        config.McpServers = new Dictionary<string, McpServerConfig>
        {
            ["amap-maps"] = new McpHttpServerConfig
            {
                Url = $"https://mcp.amap.com/mcp?key={amapKey}",
            }
        };


        await using var client = new CopilotClient();
        await using var session = await client.CreateSessionAsync(config);
        // 流式输出
        session.On<SessionEvent>(ev =>
        {
            if (ev is AssistantMessageDeltaEvent deltaEvent)
            {
                Console.Write(deltaEvent.Data.DeltaContent);
            }
            if (ev is SessionIdleEvent)
            {
                Console.WriteLine();
            }
        });

        Console.WriteLine("高德地图助手 (type 'exit' to quit)");
        Console.WriteLine("   Try: '北京有哪些著名景点?'");
        Console.WriteLine("   Try: '从上海到杭州怎么走?'\n");

        while (true)
        {
            Console.Write("You: ");
            var input = Console.ReadLine();

            if (string.IsNullOrEmpty(input) || input.Equals("exit", StringComparison.OrdinalIgnoreCase))
            {
                break;
            }

            Console.Write("Assistant: ");
            await session.SendAndWaitAsync(new MessageOptions { Prompt = input });
            Console.WriteLine("\n");
        }
    }
}
效果
结语
想写这些内容是因为,今天看到圣杰老师在公众号上发了一篇文章,👉《.NET+AI | 一文讲清 .NET AI 核心技术选型: OpenAI/Anthropic SDK、MEAI、Copilot SDK 还有 Agent Framework》。看完后说实话如果之前用过Semantic Kernel框架,甚至在已有业务系统里集成过,其实根本不会有选型方面的困惑,因为该踩的那些比较明显的坑以及相关的概念,基本都弄得差不多了。
但是不得不说,Copilot SDK的确是个变量,如我我们只是在业务系统做轻量化集成,那确实实现IChatClient就可以了,但问题是Copilot SDK提供的接口也不麻烦,甚至还很好用,在某些场景下我觉得完全可以替代MAF,接入业务系统,既可以复用Copilot CLI强大的编排能力,还能方便的享受Copilot的周边生态,甚至可以和本地的Copilot CLI做一些集成,尝试打通最后一公里,这都是该SDK的优势。当然,它毕竟是一个高度抽象集成的通用性产品,在一些自定义场景,以及和业务系统做深度接入,自定义编排方面终归还是力有不逮,这种场景下MAF的优势还是不可替代的。
好了,至此copilot SDK的案例就分享完了。