上节课我们学习了vector的使用接下来继续讲解,进行深入它的实现以及底层
vector深度剖析及模拟实现
1.vector的底层结构:
核心数据结构SGI STL 的 vector
cpp
// 出自 SGI STL <stl_vector.h>
template <class T, class Alloc = alloc> // Alloc 是空间配置器
class vector {
public:
//vector的迭代器就是一个原生指针
typedef T value_type;
typedef value_type* iterator; // 迭代器是 T*,说明其行为接近指针
typedef const value_type* const_iterator;
// ... 其他类型定义 (reference, size_type 等)
protected:
// 这是vector的"大脑",用三个指针控制整个空间
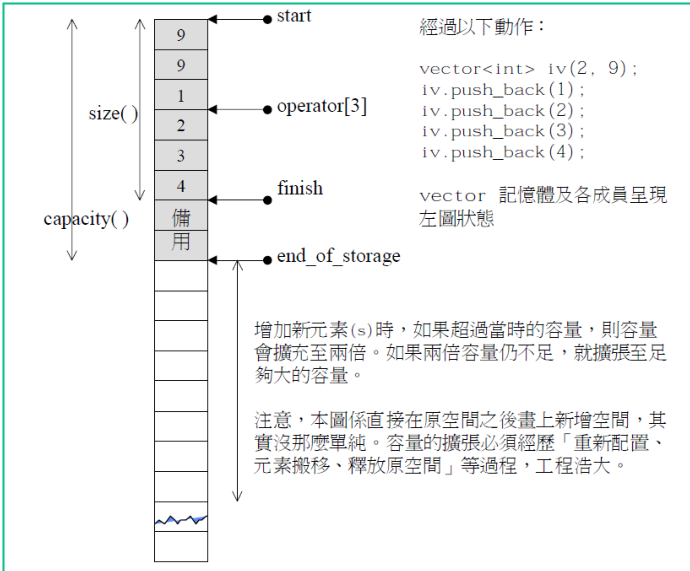
iterator start; // 指向第一个有效元素
iterator finish; // 指向最后一个有效元素的下一个位置 (end)
iterator end_of_storage; // 指向整个已分配内存块的末尾 (capacity)
// ... 空间配置器相关定义,用于内存分配
typedef simple_alloc<value_type, Alloc> data_allocator;
// ...
};
start: 指向 vector 的第一个元素,相当于begin()。
finish: 指向最后一个有效元素的后一个位置,相当于end()。通过finish - start可以计算出当前元素个数size()。
end_of_storage: 指向整个分配的内存块的末尾。通过end_of_storage - start可以得到当前容量capacity()
vector 之所以这么灵活,它的代码实现全靠三个指针干活
vector 底层就靠三个指针管着整块内存:
start指着开头,finish指着有效数据的下一个位置,end_of_storage指着整块内存的尽头。所有操作都是围着这三个指针转。
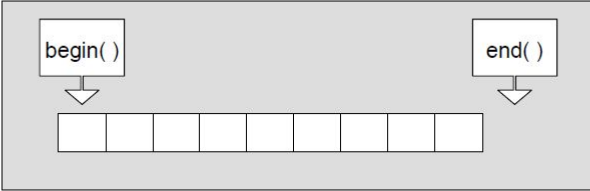
迭代器就是个指针
因为 vector 的数据是连续存放的,所以它的迭代器说白了就是个普通指针(
T*)。你写it++、it--、it + 1这些操作,本质上就是在做指针的加。
插入元素时
往 vector 里插数据时,它会先看一眼还有没有空闲位置,也就是 finish 和 end_of_storage 之间还有没有空格。
有空位 :直接把新元素放到到
finish那个位置,然后把finish往后挪一格。没空位(要扩容):vector 会这样做
根据当前大小计算新容量。SGI STL 的策略是:如果原大小为 0,则分配 1 个元素空间;否则分配原大小的两倍 。从空间配置器(
alloc)申请新内存。将旧空间的数据拷贝或移动到新空间。析构并释放旧空间。同时更新start、finish和end_of_storage三个指针,使它们指向新内存的对应位置。在这个过程中,由于重新分配了内存,所有指向旧空间的迭代器(包括传入的position)都会立刻失效。因此,insert函数通常会在执行后返回一个新的迭代器,指向插入的新元素
删除元素时
删除就简单多了,不涉及内存分配。就是把被删元素后面的所有数据整体往前挪一位,然后把
finish指针往前退一格,最后把末尾那个多余的元素析构掉。虽然内存没变,但删完之后,被删位置后面的那些迭代器也不可以用了,因为它们指向的元素都往前挪了位置,迭代器还在原地方指着,但里面的数据已经变了。
定位 new 表达式的作用
定位 new 表达式在实际开发中通常和内存池配合使用。因为 vector 的空间是从内存池里拿的,内存池分配出来的内存是原始内存,没有被初始化过,里面全是"垃圾值"。这块内存到底要放什么类型的对象,就通过定位 new 表达式显式地调用该类型的构造函数来完成初始化**。这里的
value就是传给T1类型构造函数的参数。**
cpp
template <class T1, class T2>
inline void construct(T1* p, const T2& value) {
    new (p) T1(value);  // 定位new表达式:在p指向的内存位置上构造T1对象
}
问题:为什么需要这样做:
从内存池直接拿到的内存是没有初始化的,不能直接当对象用。必须通过定位 new 把对象构造出来,这块内存才算真正有了"内容"。这和
malloc分配内存后需要调用构造函数是一个道理。这样做的好处是内存分配和对象构造分离,可以灵活控制什么时候分配、什么时候构造,提高效率。
用大家能理解的话就是说:
内存池就像个批发商,只负责给你一块空地(原始内存),但这块地是毛坯房,啥都没有。vector 就是在这块毛坯房里盖房子,定位 new 就是装修队,负责在这块地上把对象建起来。比如要把一个
int对象放进去,就在指定位置调用int的构造函数初始化一下。construct(finish, x)就是在finish指向的地址上构造一个值为x的对象,然后finish++往后挪一格,表示有效数据多了一个,就这么简单的理解。
2. std::vector的核心框架接口的模拟实现bit::vector:
接下来进入实现环节我们分为两个部分:vector.h和vectortest.cpp
vector.h
完整代码如下:
cpp
#pragma once
#include<assert.h>
#include<list>
#include<string>

namespace bit
{
	template<class T>
	class vector
	{
	public:
		typedef T* iterator;
		typedef const T* const_iterator;

		/*vector()
		{}*/

		// C++11 前置生成默认构造
		vector() = default;

		vector(const vector<T>& v)
		{
			reserve(v.size());
			for (auto& e : v)
			{
				push_back(e);
			}
		}

		// 类模板的成员函数,还可以继续是函数模版
		template <class InputIterator>
		vector(InputIterator first, InputIterator last)
		{
			while (first != last)
			{
				push_back(*first);
				++first;
			}
		}

		vector(size_t n, const T& val = T())
		{
			reserve(n);
			for (size_t i = 0; i < n; i++)
			{
				push_back(val);
			}
		}

		vector(int n, const T& val = T())
		{
			reserve(n);
			for (int i = 0; i < n; i++)
			{
				push_back(val);
			}
		}

		void clear()
		{
			_finish = _start;
		}

		// v1 = v3
		/*vector<T>& operator=(const vector<T>& v)
		{
			if (this != &v)
			{
				clear();

				reserve(v.size());
				for (auto& e : v)
				{
					push_back(e);
				}
			}

			return *this;
		}*/

		void swap(vector<T>& v)
		{
			std::swap(_start, v._start);
			std::swap(_finish, v._finish);
			std::swap(_end_of_storage, v._end_of_storage);
		}

		// v1 = v3
		//vector& operator=(vector v)
		vector<T>& operator=(vector<T> v)
		{
			swap(v);

			return *this;
		}

		~vector()
		{
			if (_start)
			{
				delete[] _start;
				_start = _finish = _end_of_storage = nullptr;
			}
		}

		iterator begin()
		{
			return _start;
		}

		iterator end()
		{
			return _finish;
		}

		const_iterator begin() const
		{
			return _start;
		}

		const_iterator end() const
		{
			return _finish;
		}

		void reserve(size_t n)
		{
			if (n > capacity())
			{
				size_t old_size = size();
				T* tmp = new T[n];
				//memcpy(tmp, _start, old_size * sizeof(T));
				for (size_t i = 0; i < old_size; i++)
				{
					tmp[i] = _start[i];
				}
				delete[] _start;

				_start = tmp;
				_finish = tmp + old_size;
				_end_of_storage = tmp + n;
			}
		}

		void resize(size_t n, T val = T())
		{
			if (n < size())
			{
				_finish = _start + n;
			}
			else
			{
				reserve(n);
				while (_finish < _start + n)
				{
					*_finish = val;
					++_finish;
				}
			}
		}

		size_t size() const
		{
			return _finish - _start;
		}

		size_t capacity() const
		{
			return _end_of_storage - _start;
		}

		bool empty() const
		{
			return _start == _finish;
		}

		void push_back(const T& x)
		{
			// 扩容
			if (_finish == _end_of_storage)
			{
				reserve(capacity() == 0 ? 4 : capacity() * 2);
			}

			*_finish = x;
			++_finish;
		}

		void pop_back()
		{
			assert(!empty());
			--_finish;
		}

		iterator insert(iterator pos, const T& x)
		{
			assert(pos >= _start);
			assert(pos <= _finish);

			// 扩容
			if (_finish == _end_of_storage)
			{
				size_t len = pos - _start;
				reserve(capacity() == 0 ? 4 : capacity() * 2);
				pos = _start + len;
			}

			iterator end = _finish - 1;
			while (end >= pos)
			{
				*(end + 1) = *end;
				--end;
			}
			*pos = x;

			++_finish;

			return pos;
		}

		void erase(iterator pos)
		{
			assert(pos >= _start);
			assert(pos < _finish);

			iterator it = pos + 1;
			while (it != end())
			{
				*(it - 1) = *it;
				++it;
			}

			--_finish;
		}

		T& operator[](size_t i)
		{
			assert(i < size());

			return _start[i];
		}

		const T& operator[](size_t i) const
		{
			assert(i < size());

			return _start[i];
		}

	private:
		iterator _start = nullptr;
		iterator _finish = nullptr;
		iterator _end_of_storage = nullptr;
	};

	/*void print_vector(const vector<int>& v)
	{
		vector<int>::const_iterator it = v.begin();
		while (it != v.end())
		{
			cout << *it << " ";
			++it;
		}
		cout << endl;

		for (auto e : v)
		{
			cout << e << " ";
		}
		cout << endl;
	}*/

	template<class T>
	void print_vector(const vector<T>& v)
	{
		// 规定,没有实例化的类模板里面取东西,编译器不能区分这里const_iterator
		// 是类型还是静态成员变量
		//typename vector<T>::const_iterator it = v.begin();
		auto it = v.begin();
		while (it != v.end())
		{
			cout << *it << " ";
			++it;
		}
		cout << endl;

		for (auto e : v)
		{
			cout << e << " ";
		}
		cout << endl;
	}

	template<class Container>
	void print_container(const Container& v)
	{
		/*auto it = v.begin();
		while (it != v.end())
		{
			cout << *it << " ";
			++it;
		}
		cout << endl;*/

		for (auto e : v)
		{
			cout << e << " ";
		}
		cout << endl;
	}

	void test_vector1()
	{
		vector<int> v;
		v.push_back(1);
		v.push_back(2);
		v.push_back(3);
		v.push_back(4);
		v.push_back(5);

		for (size_t i = 0; i < v.size(); i++)
		{
			cout << v[i] << " ";
		}
		cout << endl;

		vector<int>::iterator it = v.begin();
		while (it != v.end())
		{
			cout << *it << " ";
			++it;
		}
		cout << endl;

		for (auto e : v)
		{
			cout << e << " ";
		}
		cout << endl;

		print_vector(v);

		vector<double> vd;
		vd.push_back(1.1);
		vd.push_back(2.1);
		vd.push_back(3.1);
		vd.push_back(4.1);
		vd.push_back(5.1);

		print_vector(vd);
	}

	void test_vector2()
	{
		std::vector<int> v;
		v.push_back(1);
		v.push_back(2);
		v.push_back(3);
		v.push_back(4);
		v.push_back(5);

		print_container(v);

		/*v.insert(v.begin() + 2, 30);
		print_vector(v);*/

		int x;
		cin >> x;
		auto p = find(v.begin(), v.end(), x);
		if (p != v.end())
		{
			// insert以后p就是失效,不要直接访问,要访问就要更新这个失效的迭代器的值
			/*v.insert(p, 20);
			(*p) *= 10;*/

			p = v.insert(p, 40);
			(*(p+1)) *= 10;
		}
		print_container(v);
	}

	void test_vector3()
	{
		std::vector<int> v;
		v.push_back(1);
		v.push_back(2);
		v.push_back(3);
		v.push_back(4);

		print_container(v);

		// 删除所有的偶数
		auto it = v.begin();
		while (it != v.end())
		{
			if (*it % 2 == 0)
			{
				it = v.erase(it);
			}
			else
			{
				++it;
			}
		}

		print_container(v);
	}

	void test_vector4()
	{
		int i = int();
		int j = int(1);
		int k(2);

		vector<int> v;
		v.resize(10, 1);
		v.reserve(20);

		print_container(v);
		cout << v.size() << endl;
		cout << v.capacity() << endl;

		v.resize(15, 2);
		print_container(v);

		v.resize(25, 3);
		print_container(v);

		v.resize(5);
		print_container(v);
	}

	void test_vector5()
	{
		vector<int> v1;
		v1.push_back(1);
		v1.push_back(2);
		v1.push_back(3);
		v1.push_back(4);
		print_container(v1);

		vector<int> v2 = v1;
		print_container(v2);

		vector<int> v3;
		v3.push_back(10);
		v3.push_back(20);
		v3.push_back(30);

		v1 = v3;
		print_container(v1);
		print_container(v3);
	}

	void test_vector6()
	{
		vector<int> v1;
		v1.push_back(1);
		v1.push_back(2);
		v1.push_back(3);
		v1.push_back(4);
		v1.push_back(4);
		v1.push_back(4);

		vector<int> v2(v1.begin(), v1.begin() + 3);
		print_container(v1);
		print_container(v2);

		list<int> lt;
		lt.push_back(10);
		lt.push_back(10);
		lt.push_back(10);
		lt.push_back(10);
		vector<int> v3(lt.begin(), lt.end());
		print_container(lt);
		print_container(v2);

		vector<string> v4(10,"1111111");
		print_container(v4);

		vector<int> v5(10);
		print_container(v5);

		vector<int> v6(10u, 1);
		print_container(v6);

		vector<int> v7(10, 1);
		print_container(v7);
	}

	void test_vector7()
	{
		vector<string> v;
		v.push_back("11111111111111111111");
		v.push_back("11111111111111111111");
		v.push_back("11111111111111111111");
		v.push_back("11111111111111111111");
		print_container(v);

		v.push_back("11111111111111111111");
		print_container(v);
	}
}
这段代码主要写了以下几个部分给:迭代器(原生指针);核心成员变量(三个指针)
;vector 实现了一个容器该有的接口,构造、拷贝、赋值、增删改查、容量管理、迭代器、遍历等等;包括一些测试函数测试函数
解析如下:
一.类框架与成员变量
1. 迭代器部分
cpp
typedef T* iterator;
typedef const T* const_iterator;
在这里我把迭代器定义为原生指针,因为 vector 的数据是连续存储的,指针本身就支持 ++、--等运算符操作,本身就符合迭代器的行为。begin() 返回 _start(指向第一个元素),end() 返回 _finish(指向最后一个有效元素的下一个位置)。同时提供了 const(只读,不可修改) 版本,也供 const 对象使用。
2. 核心成员变量
cpp
iterator _start = nullptr;          // 指向第一个有效元素
iterator _finish = nullptr;         // 指向有效数据末尾的下一个位置
iterator _end_of_storage = nullptr; // 指向已分配内存的末尾
这三个指针就是 vector 的很主要的部分是大心脏缺一不可,所有操作都围绕它们展开:
size() = _finish - _start
capacity() = _end_of_storage - _start
empty()判断_start == _finish
二.构造函数
1. 默认构造
cpp
vector() = default; // C++11 强制生成默认构造
等价于:
vector() : _start(nullptr), _finish(nullptr), _end_of_storage(nullptr) {}2. 迭代器区间构造(函数模板)
cpp
template <class InputIterator>
vector(InputIterator first, InputIterator last)
{
    while (first != last)
    {
        push_back(*first);
        ++first;
    }
}这是个函数模板,可以接受任意类型的迭代器:
cpp
vector<int> v1(v.begin(), v.end());        // vector 迭代器
list<int> lt;
vector<int> v2(lt.begin(), lt.end());      // list 迭代器 不同容器也能用
底层:
InputIterator只要支持++、*、!=操作就能用。这就是 STL 的"迭代器接口统一"思想。
3. 填充构造(size_t 版本)
cpp
vector(size_t n, const T& val = T())
{
    reserve(n);
    for (size_t i = 0; i < n; i++)
    {
        push_back(val);
    }
}
4. 填充构造(int 版本)
cpp
vector(int n, const T& val = T())
{
    reserve(n);
    for (int i = 0; i < n; i++)
    {
        push_back(val);
    }
}
三.析构函数
cpp
~vector()
{
    if (_start)
    {
        delete[] _start;
        _start = _finish = _end_of_storage = nullptr;
    }
}
注意: 这里只释放了
_start指向的堆内存,没有调用每个元素的析构函数 。对于string类型,它的析构函数会在delete[]时自动调用,没问题。但如果元素本身管理资源,需要先显式析构再释放内存,这里可以优化。元素本身管理资源就是:元素里面还有指针指向别的堆内存 。不调析构,那些"别的堆内存"就永远泄漏了。
int这种没指针的,管它析不析构,无所谓。
四.拷贝构造
cpp
vector(const vector<T>& v)
{
    reserve(v.size());
    for (auto& e : v)
    {
        push_back(e);
    }
}
**问题来了?底层干了啥:**开一个和 v 一样大的空间,把 v 的元素逐个拷贝过来。
深拷贝: 对于
string类型,push_back会调用string的拷贝构造,每个string都会复制自己的堆空间,互不影响。
五、赋值运算符
方式一:传统写法
cpp
vector<T>& operator=(const vector<T>& v)
{
    if (this != &v)  // 防止自己给自己赋值
    {
        clear();                     // 清空现有元素
        reserve(v.size());           // 开新空间
        for (auto& e : v)
        {
            push_back(e);            // 拷贝数据
        }
    }
    return *this;
}
传统的问题就是: 代码冗余,而且如果
reserve失败(比如内存不足),原有数据已经清空了,状态不一致。
方式二:现代写法(又叫拷贝交换)
cpp
void swap(vector<T>& v)
{
    std::swap(_start, v._start);
    std::swap(_finish, v._finish);
    std::swap(_end_of_storage, v._end_of_storage);
}

vector<T>& operator=(vector<T> v)  // 传值,拷贝构造
{
    swap(v);  // 把 v 的数据交换过来
    return *this;
}
我们看看底层干了啥:
cpp
比如v1=v3;传值时,
v是v3的拷贝(调拷贝构造);swap(v)把v1和v的数据互换;函数结束,v销毁,带着v1的旧数据一起释放。**好处:**代码简洁;swap 不会抛异常;自动处理自己赋值自己的情况
六.容量管理
1. reserve 扩容函数
第一种: memcpy
cpp
void reserve(size_t n)
{
    if (n > capacity())
    {
        size_t old_size = size();
        T* tmp = new T[n];                    // 1. 开新空间
        memcpy(tmp, _start, size() * sizeof(T)); // 2. 拷贝数据
        delete[] _start;                      // 3. 释放旧空间

        _start = tmp;                         // 4. 更新指针指向新空间
        _finish = tmp + old_size;
        _end_of_storage = tmp + n;
    }
}
注意 :这里用了
memcpy进行浅拷贝。如果T是string之类的自定义类型,memcpy只是按字节拷贝,会导致两个对象指向同一块资源,释放时发生 double free。更安全的方式是用copy,但对于内置类型,memcpy没问题。扩容时迭代器会失效原因是:因为重新开辟了内存,旧空间的指针全部作废。
这里的memcpy后面我会详细的讲这里我先给大家提一下。
进行memcpy简单来说就是
:memcpy是个"搬运工",它不管你搬的是啥,只管按字节把数据从 A 点搬到 B 点。假如你的 vector 里存的是
string类型,每个string对象里其实就存了一个指针,这个指针指向堆上一块真正存字符串内容的空间。memcpy把整个string对象搬过去,但只拷贝了那个指针的值,也就是地址,并没有把指针指向的那块内容也拷过去。结果造成就是:旧
string和新string里的指针**指向了同一块堆空间,**就像两个人共用一把钥匙开同一扇门。
第二种:tmpi
cpp
void reserve(size_t n)
{
    if (n > capacity())
    {
        size_t old_size = size();
        T* tmp = new T[n];
        for (size_t i = 0; i < old_size; i++)
        {
            tmp[i] = _start[i];  // 用赋值,不用 memcpy
        }
        delete[] _start;

        _start = tmp;
        _finish = tmp + old_size;
        _end_of_storage = tmp + n;
    }
}
用
tmp[i] = _start[i]代替memcpy,避免了浅拷贝问题。对于string,赋值会调用string::operator=,正确复制资源。但是: 需要每个元素都有拷贝构造/赋值,比memcpy慢一点,但安全。
2. resize(改变元素个数)
cpp
void resize(size_t n, T val = T())
{
    if (n < size())
    {
        _finish = _start + n;  // 缩小:直接移动 finish
    }
    else
    {
        reserve(n);            // 扩大:保证容量够
        while (_finish < _start + n)
        {
            *_finish = val;    // 用值填充
            ++_finish;
        }
    }
}
resize改变size,可能改变capacity;resize不会缩容(capacity不变);缩小部分元素没有析构
七.增删操作
1. push_back 尾插
cpp
void push_back(const T& x)
{
    if (_finish == _end_of_storage)  // 没有空闲空间了
    {
        reserve(capacity() == 0 ? 4 : capacity() * 2);
    }

    *_finish = x;    // 在尾部写入数据
    ++_finish;       // 更新 finish 指针
}
先检查有没有空间,没有就扩容(扩 2 倍,初始为 4),在
_finish位置写入值,_finish++往后挪一位.
注意 :*_finish = x 是赋值操作,但 _finish 指向的内存可能还没构造对象。对于内置类型没问题,但对于自定义类型,如果没有默认构造,会出现问题。更准确的做法是用定位 new 构造,而不是直接赋值。
改成定位 new 构造:
cpp
void push_back(const T& x)
{
    if (_finish == _end_of_storage)
    {
        reserve(capacity() == 0 ? 4 : capacity() * 2);
    }

    new (_finish) T(x);  // 在 _finish 指向的原始内存上构造对象
    ++_finish;
}
2. pop_back 尾删
cpp
void pop_back()
{
    assert(!empty());  // 不能删空
    --_finish;         // 直接把 finish 往前退一格
}
_finish--表示就算删除了,但实际上并没有销毁元素,只是从逻辑上"忽略"了最后一个元素。对于需要释放资源的类型(比如是string),应该显式调用析构函数,否则可能造成内存泄漏。--_finish只是标记删除,真正的资源还在。
简单来说就是:
你办了个派对,
_finish是门口负责数人数的保安。pop_back就是保安往后挪了一步,把最后一个人从名单上划掉了。但问题是:保安只是不管这个人了,这个人还在屋里没走!他还在吃你的零食、喝你的饮料,你还得为他收拾烂摊子。如果这人是
int类型------就是个路人甲,走了就走了,无所谓。如果这人是
string类型------他走的时候借了你的钱(在堆上开了空间),但你没跟他要回来(没调析构),他的账就烂在你头上了,钱永远要不回来------这就是内存泄漏。**所以正确做法是:**先跟这个人把账算清(调析构),再让保安把他从名单上划掉。这样人走了,账也清了,干干净净。
3. insert 指定位置插入
cpp
iterator insert(iterator pos, const T& x)
{
    // 扩容
    if (_finish == _end_of_storage)
    {
        size_t len = pos - _start;           // 记录 pos 的相对位置
        reserve(capacity() == 0 ? 4 : capacity() * 2);
        pos = _start + len;                  // 更新 pos,因为扩容后_start变了
    }

    // 从后往前搬移数据,腾出位置
    iterator end = _finish - 1;
    while (end >= pos)
    {
        *(end + 1) = *end;
        --end;
    }
    *pos = x;   // 插入新值

    ++_finish;  // 更新 finish

    return pos; // 返回指向新插入元素的迭代器
}
扩容时迭代器更新 :扩容后
_start指向新内存,原来的pos失效了,所以需要用pos = _start + len重新计算位置。搬移数据 :从后往前挪,避免覆盖。
返回新迭代器 :插入后
pos指向新插入的元素,返回给调用者。注意:失效问题:这里返回了新的有效迭代器,调用者应该用返回值更新自己的迭代器。
4. erase-- 删除指定位置的元素
cpp
iterator erase(iterator pos)
{
    assert(pos >= _start);
    assert(pos < _finish);

    iterator it = pos + 1;
    while (it != end())
    {
        *(it - 1) = *it;
        ++it;
    }

    --_finish;
    return pos;  // 返回被删除元素的下一个位置
}
size()减 1;capacity()不变;被删元素后面的所有元素都往前挪了一个位置**问题:**被删除的元素没有调用析构函数(如果是
string,内存泄漏);没有返回值,调用者无法知道下一个有效位置在哪
八.clear--清空所有元素
cpp
void clear()
{
    _finish = _start;  // 逻辑清空,但数据还在内存里
}
size()变成 0;capacity()不变(内存还在);但是原来的数据还在内存里躺着**问题:**如果是 string,那 string 对象还占着堆上的字符串空间,没人析构,内存泄漏
九.operator[] 下标访问
cpp
T& operator[](size_t i)
{
    assert(i < size());
    return _start[i];
}

const T& operator[](size_t i) const
{
    assert(i < size());
    return _start[i];
}
直接返回指针偏移后的引用,提供读写能力。加上
assert防止越界。
十. print_vector 模板函数
cpp
template<class T>
void print_vector(const vector<T>& v)
{
    auto it = v.begin();  // 用 auto 简化类型
    while (it != v.end())
    {
        cout << *it << " ";
        ++it;
    }
    cout << endl;

    for (auto e : v)  // 范围 for 也能用,因为支持 begin() 和 end()
    {
        cout << e << " ";
    }
    cout << endl;
}仔细看我的代码,注意注释里的坑:
cpp
//typename vector<T>::const_iterator it = v.begin();我把这一行被注释掉了,原因是:在模板实例化之前,编译器无法区分
const_iterator是类型还是静态成员变量,需要用typename关键字告诉编译器这是个类型。这里直接用auto避开了这个问题,更简洁。
十一.测试函数详解
测试函数 test_vector1
cpp
void test_vector1()
{
	vector<int> v;
	v.push_back(1);
	v.push_back(2);
	v.push_back(3);
	v.push_back(4);
	v.push_back(5);

	for (size_t i = 0; i < v.size(); i++)
	{
		cout << v[i] << " ";
	}
	cout << endl;

	vector<int>::iterator it = v.begin();
	while (it != v.end())
	{
		cout << *it << " ";
		++it;
	}
	cout << endl;

	for (auto e : v)
	{
		cout << e << " ";
	}
	cout << endl;

	print_vector(v);

	vector<double> vd;
	vd.push_back(1.1);
	vd.push_back(2.1);
	vd.push_back(3.1);
	vd.push_back(4.1);
	vd.push_back(5.1);

	print_vector(vd);
}void test_vector1()
{
	vector<int> v;
	v.push_back(1);
	v.push_back(2);
	v.push_back(3);
	v.push_back(4);
	v.push_back(5);

	for (size_t i = 0; i < v.size(); i++)
	{
		cout << v[i] << " ";
	}
	cout << endl;

	vector<int>::iterator it = v.begin();
	while (it != v.end())
	{
		cout << *it << " ";
		++it;
	}
	cout << endl;

	for (auto e : v)
	{
		cout << e << " ";
	}
	cout << endl;

	print_vector(v);

	vector<double> vd;
	vd.push_back(1.1);
	vd.push_back(2.1);
	vd.push_back(3.1);
	vd.push_back(4.1);
	vd.push_back(5.1);

	print_vector(vd);
}
push_back插入和下标访问,迭代器遍历,范围 for 遍历,print_vector打印,vector<double>也测试模板对不同类型的支持。
测试函数 test_vector2
cpp
测试 insert 和迭代器失效问题:

auto p = find(v.begin(), v.end(), x);
if (p != v.end())
{
    //  错误:insert 后 p 失效了,不能再用
    // v.insert(p, 40);
    // (*p) *= 10;

    //  正确:用返回值更新 p
    p = v.insert(p, 40);
    (*(p + 1)) *= 10;  // p + 1 指向原来的元素(x),修改它
}
找到值为
x的元素位置p,在p之前插入 40,并用返回值更新p,p + 1指向原来的元素x,把它乘以 10。在这里我演示了迭代器失效的典型场景和正确用法。
测试函数 test_vector3 - erase 删除偶数
cpp
void test_vector3()
{
    vector<int> v = {1,2,3,4};

    auto it = v.begin();
    while (it != v.end())
    {
        if (*it % 2 == 0)  // 偶数
        {
            it = v.erase(it);  // 删除后返回下一个位置
        }
        else
        {
            ++it;
        }
    }
}
注意:必须用
it = v.erase(it)更新迭代器,否则it失效。
test_vector4() 测试 resize 和 reserve 这两个容量管理函数
cpp
void test_vector4()
{
    int i = int();      // i = 0,值初始化
    int j = int(1);     // j = 1,传参构造
    int k(2);           // k = 2,直接初始化

    vector<int> v;
    v.resize(10, 1);    // 初始化 10 个元素,值都是 1
    v.reserve(20);      // 预留 20 个空间

    print_container(v);
    cout << v.size() << endl;       // 10
    cout << v.capacity() << endl;   // 20(reserve 20)

    v.resize(15, 2);    // 扩大到 15 个,新增的填 2
    print_container(v); // 1,1,1,1,1,1,1,1,1,1,2,2,2,2,2
                        // size = 15,capacity = 20(够用,不扩容)

    v.resize(25, 3);    // 扩大到 25 个,新增的填 3
    print_container(v); // size = 25,capacity = 40(翻倍扩容 20成为40)

    v.resize(5);        // 缩小到 5 个,后面的全部去掉
    print_container(v); // 1,1,1,1,1
                        // size = 5,capacity = 40(容量不变,不缩容)
}
resize控制元素个数,reserve控制容量大小。resize扩大时顺便扩容,缩小时不改容量。容量只扩不缩;类比房间和人的话
测试函数 test_vector5 - 拷贝构造和赋值测试
cpp
void test_vector5()
{
    vector<int> v1;
    v1.push_back(1);
    v1.push_back(2);
    v1.push_back(3);
    v1.push_back(4);

    vector<int> v2 = v1;   // 拷贝构造
    vector<int> v3;
    v3.push_back(10);
    v3.push_back(20);
    v3.push_back(30);

    v1 = v3;               // 赋值
}
v1 = v3后,v1变成10 20 30,v3不变。这是深拷贝的体现。
测试函数 test_vector6 - 多种构造方式
cpp
void test_vector6()
{
    vector<int> v1 = {1,2,3,4,4,4};                    // 列表构造(需支持)
    vector<int> v2(v1.begin(), v1.begin() + 3);        // 迭代器区间构造

    list<int> lt;
    vector<int> v3(lt.begin(), lt.end());              // 不同容器迭代器

    vector<string> v4(10, "1111111");                  // 填充构造
    vector<int> v5(10);                                // 10 个默认值
    vector<int> v6(10u, 1);                            // size_t 版本
    vector<int> v7(10, 1);                             // int 版本
}
测试函数 test_vector7 - string 扩容测试
cpp
void test_vector7()
	{
		vector<string> v;
		v.push_back("11111111111111111111");
		v.push_back("11111111111111111111");
		v.push_back("11111111111111111111");
		v.push_back("11111111111111111111");
		print_container(v);

		v.push_back("11111111111111111111");
		print_container(v);
	}
目的: 验证
string在扩容时是否被正确拷贝(深拷贝)。如果用memcpy会崩,用赋值没问题。
测试函数 test_vector2
cpp
测试 insert 和迭代器失效问题:

auto p = find(v.begin(), v.end(), x);
if (p != v.end())
{
    //  错误:insert 后 p 失效了,不能再用
    // v.insert(p, 40);
    // (*p) *= 10;

    //  正确:用返回值更新 p
    p = v.insert(p, 40);
    (*(p + 1)) *= 10;  // p + 1 指向原来的元素(x),修改它
}
找到值为
x的元素位置p,在p之前插入 40,并用返回值更新p,p + 1指向原来的元素x,把它乘以 10。在这里我演示了迭代器失效的典型场景和正确用法。
上面我写了测试函数,但我在下面这个文件又加了几个,方便学习,了解
vectortest.cpp
完整代码如下:
cpp
#include<iostream>
#include<vector>
using namespace std;

#include"vector.h"

void test_vector1()
{
	vector<int> v1;
	vector<int> v2(10, 1);

	vector<int> v3(++v2.begin(), --v2.end());

	for (size_t i = 0; i < v3.size(); i++)
	{
		cout << v3[i] << " ";
	}
	cout << endl;

	vector<int>::iterator it = v3.begin();
	while (it != v3.end())
	{
		cout << *it << " ";
		++it;
	}
	cout << endl;

	for (auto e : v3)
	{
		cout << e << " ";
	}
	cout << endl;
}


void TestVectorExpand()
{
	size_t sz;
	vector<int> v;
	//v.reserve(100);

	sz = v.capacity();
	cout << "capacity changed: " << sz << '\n';

	cout << "making v grow:\n";
	for (int i = 0; i < 100; ++i)
	{
		v.push_back(i);
		if (sz != v.capacity())
		{
			sz = v.capacity();
			cout << "capacity changed: " << sz << '\n';
		}
	}
}


void test_vector2()
{
	//TestVectorExpand();

	vector<int> v(10, 1);
	v.reserve(20);
	cout << v.size() << endl;
	cout << v.capacity() << endl;

	v.reserve(15);
	cout << v.size() << endl;
	cout << v.capacity() << endl;

	v.reserve(5);
	cout << v.size() << endl;
	cout << v.capacity() << endl;
}

void test_vector3()
{
	//TestVectorExpand();

	vector<int> v(10, 1);
	v.reserve(20);
	cout << v.size() << endl;
	cout << v.capacity() << endl;

	v.resize(15, 2);
	cout << v.size() << endl;
	cout << v.capacity() << endl;

	v.resize(25, 3);
	cout << v.size() << endl;
	cout << v.capacity() << endl;

	v.resize(5);
	cout << v.size() << endl;
	cout << v.capacity() << endl;
}

void test_vector4()
{
	vector<int> v(10, 1);
	v.push_back(2);
	v.insert(v.begin(), 0);

	for (auto e : v)
	{
		cout << e << " ";
	}
	cout << endl;

	v.insert(v.begin() + 3, 10);

	for (auto e : v)
	{
		cout << e << " ";
	}
	cout << endl;

	vector<int> v1(5, 0);
	for (size_t i = 0; i < 5; i++)
	{
		cin >> v1[i];
	}

	for (auto e : v1)
	{
		cout << e << ",";
	}
	cout << endl;

	vector<char> v2;
	string s2;
	// \0

	vector<int> v3;
	// send(s2.c_str())
}

void test_vector5()
{
	vector<string> v1;
	string s1("xxxx");
	v1.push_back(s1);

	v1.push_back("yyyyy");
	for (const auto& e : v1)
	{
		cout << e << " ";
	}
	cout << endl;

	// ά
	// 10*5
	vector<int> v(5, 1);
	vector<vector<int>> vv(10, v);
	vv[2][1] = 2;
	// vv.operator[](2).operator[](1) = 2;
	for (size_t i = 0; i < vv.size(); i++)
	{
		for (size_t j = 0; j < vv[i].size(); ++j)
		{
			cout << vv[i][j] << " ";
		}
		cout << endl;
	}
	cout << endl;
}

//template<class T>
//class vector
//{
//	T& operator[](int i)
//	{
//		assert(i < _size);
//
//		return _a[i];
//	}
//private:
//	T* _a;
//	size_t _size;
//	size_t _capacity;
//};

// vector<int>
//class vector
//{
//	int& operator[](int i)
//	{
//		assert(i < _size);
//
//		return _a[i];
//	}
//private:
//	int* _a;
//	size_t _size;
//	size_t _capacity;
//};
//
//// vector<vector<int>>
//class vector
//{
//	vector<int>& operator[](int i)
//	{
//		assert(i < _size);
//
//		return _a[i];
//	}
//private:
//	vector<int>* _a;
//	size_t _size;
//	size_t _capacity;
//};

int main()
{
	//test_vector3();
	TestVectorExpand();

	return 0;
}
分析如下:
test_vector1() - 构造函数测试
cpp
void test_vector1()
{
    vector<int> v1;               // 1. 默认构造
    vector<int> v2(10, 1);        // 2. 构造 10 个值为 1 的元素
    vector<int> v3(++v2.begin(), --v2.end());  // 3. 迭代器区间构造
}
迭代器区间构造底层:
cpp
// 伪代码
template<class InputIterator>
vector(InputIterator first, InputIterator last)
{
    while (first != last)
    {
        push_back(*first);
        ++first;
    }
}
++v2.begin()跳过了第一个 1,--v2.end()跳过了最后一个 1,所以拿到的是 8 个 1。这里迭代器是原生指针。
TestVectorExpand() - 扩容测试
cpp
void TestVectorExpand()
{
    size_t sz;
    vector<int> v;
    // v.reserve(100);  // 注释掉

    sz = v.capacity();
    cout << "capacity changed: " << sz << '\n';

    for (int i = 0; i < 100; ++i)
    {
        v.push_back(i);
        if (sz != v.capacity())
        {
            sz = v.capacity();
            cout << "capacity changed: " << sz << '\n';
        }
    }
}
取消
v.reserve(100)注释: 就是说一开始就开 100 个空间,前 100 次push_back都不扩容。
test_vector2() - reserve 测试
cpp
void test_vector2()
{
    vector<int> v(10, 1);   // 10 个 1,capacity = 10
    v.reserve(20);          // 扩容到 20
    cout << v.size() << endl;     // 10
    cout << v.capacity() << endl; // 20

    v.reserve(15);          // 15 < 20,不缩容
    cout << v.size() << endl;     // 10
    cout << v.capacity() << endl; // 20

    v.reserve(5);           // 5 < 20,不缩容
    cout << v.size() << endl;     // 10
    cout << v.capacity() << endl; // 20
}
reserve 底层行为
cpp
void reserve(size_t n)
{
    if (n > capacity())  // 只有 n 大于当前容量才扩容
    {
        // 开新空间、拷数据、释放旧空间、更新指针等等
    }
    // n <= capacity() 时啥也不用干
}
注意:
reserve只扩不缩 ,所以reserve(15)和reserve(5)都无效,容量保持 20。
test_vector3() - resize 测试
cpp
void test_vector3()
{
    vector<int> v(10, 1);   // 10 个 1,此时capacity = 10
    v.reserve(20);          // 扩容到 20
    cout << v.size() << endl;     // 10
    cout << v.capacity() << endl; // 20

    v.resize(15, 2);        // 增加到 15 个元素,新增的填 2
    cout << v.size() << endl;     // 15
    cout << v.capacity() << endl; // 20 容量够,不扩容

    v.resize(25, 3);        // 增加到 25 个元素,新增的填 3
    cout << v.size() << endl;     // 25
    cout << v.capacity() << endl; // 40

    v.resize(5);            // 减少到 5 个元素,删除后面 20 个
    cout << v.size() << endl;     // 5
    cout << v.capacity() << endl; // 40 容量不变
}
resize 底层行为
cpp
void resize(size_t n, const T& val = T())
{
    if (n < size())
    {
        // 缩小:删除末尾元素
        while (size() > n)
        {
            pop_back();
        }
    }
    else if (n > size())
    {
        // 扩大:在后面追加元素
        reserve(n);  // 保证容量够
        while (size() < n)
        {
            push_back(val);
        }
    }
    // n == size() 啥也不干
}
注意:
resize改变size,可能会改变capacity;缩小容量不变(不缩容);扩大时如果容量不够会扩容
test_vector4() - insert 测试
cpp
void test_vector4()
{
    vector<int> v(10, 1);   // 10 个 1
    v.push_back(2);         // 尾部插入 2
    v.insert(v.begin(), 0); // 头部插入 0
    // 结果:0,1,1,1,1,1,1,1,1,1,1,2
}
检查容量,不够就扩容;从后往前,所有元素后移一位;在
begin()位置放入 0;进行**_finish++。**
下标访问输入
cpp
vector<int> v1(5, 0);
for (size_t i = 0; i < 5; i++)
{
    cin >> v1[i];  // 直接用下标访问
}
operator[]返回引用,可以作为左值接收输入。
test_vector5() - 模板嵌套测试
cpp
void test_vector5()
{
    vector<string> v1;
    string s1("xxxx");
    v1.push_back(s1);      // 拷贝构造
    v1.push_back("yyyyy"); // 隐式类型转换:string("yyyyy")
}
v1.push_back(s1) 拷贝构造:用 s1 构造新 string
v1.push_back("yyyyy") 先构造临时 string("yyyyy"),再拷贝构造
vector 嵌套
cpp
vector<int> v(5, 1);                    // v = [1,1,1,1,1]
vector<vector<int>> vv(10, v);          // 10 个 v 的拷贝
vv[2][1] = 2;    // 修改第 3 行的第 2 个元素
底层类型展开:
cpp
// 外层 vector:元素类型是 vector<int>
vector<vector<int>> vv;
// operator[] 返回 vector<int>&
vv[2]     // 返回第 3 行的 vector<int>
vv[2][1]  // 先拿第 3 行,再取该行的第 2 个元素

vv[2][1] = 2 等价于:
vv.operator[](2).operator[](1) = 2;
// 先调用外层 operator[] 返回 vector<int>&
// 再调用内层 operator[] 返回 int&
// 最后赋值
vv[2][1] = 2就是说:根据数组下标先找到第 3 行,再找到这一行的第 2 列,把里面的数改成 2。看起来跟二维数组用起来一模一样,但实际上它是"vector 里面套 vector
模拟编译器底层对模板的实例化过程:
cpp
template<class T>
class vector
{
	T& operator[](int i)
	{
		assert(i < _size);

		return _a[i];
	}
private:
	T* _a;
	size_t _size;
	size_t _capacity;
};

 vector<int>
class vector
{
	int& operator[](int i)
	{
		assert(i < _size);

		return _a[i];
	}
private:
	int* _a;
	size_t _size;
	size_t _capacity;
};

// vector<vector<int>>
class vector
{
	vector<int>& operator[](int i)
	{
		assert(i < _size);

		return _a[i];
	}
private:
	vector<int>* _a;
	size_t _size;
	size_t _capacity;
};
展示:
vector<vector<int>>底层就是外层存的是vector<int>对象,operator[]先返回外层那一行的引用,再调用内层的operator[]拿到具体的int。编译器通过模板实例化自动帮你把T替换成vector<int>,你根本不用操心。
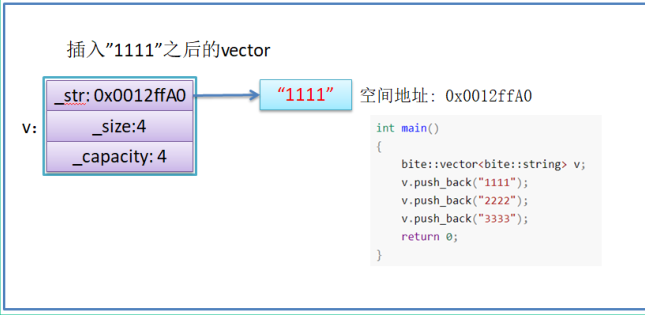
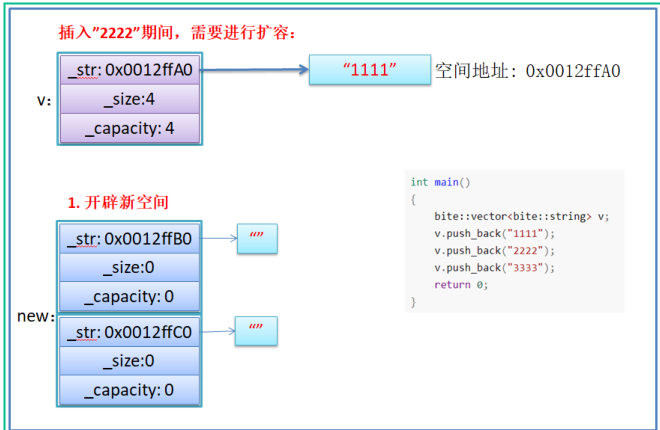
3.使用memcpy拷贝问题
假设模拟实现的vector中的reserve接口中,使用memcpy进行的拷贝,以下代码会发生什么问
题?
cpp
int main()
{
bite::vector<bite::string> v;
v.push_back("1111");
v.push_back("2222");
v.push_back("3333");
return 0;
}
问题出在第 3 次**push_back:我的存储空间不够了,就会触发扩容。**
如果reserve 里用的是 memcpy,memcpy 按字节把旧数据拷到新空间,**只复制了 string 对象本身(里面的指针),没复制指针指向的字符串内容,**旧 string 对象的指针 指向堆上的 "1111";新 string 对象的指针 也指向同一块堆上的 "1111" 两个对象指向同一块内存;然后 delete[] _start 释放旧空间旧空间里的 string 对象被销毁,调用析构函数,释放了堆上的 "1111"、"2222"、"3333"。但新空间的 string 对象里的指针还指着那块已经释放的内存!;最终新空间的 3 个 string 对象全是野指针(指向已释放的内存);程序结束时,新空间的 string 对象再次析构,重复释放同一块内存 程序崩溃
memcpy是内存的二进制格式拷贝,将一段内存空间中内容原封不动的拷贝到另外一段内存空间中
如果拷贝的是自定义类型的元素,memcpy既高效又不会出错,但如果拷贝的是自定义类型元素,并且自定义类型元素中涉及到资源管理时,就会出错,因为memcpy的拷贝实际是浅拷贝。
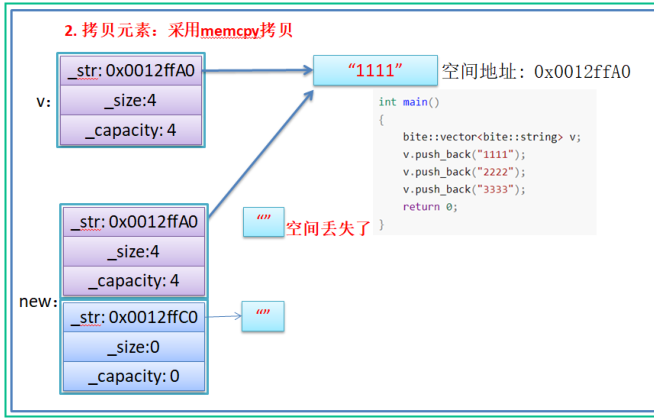
memcpy只复制了string对象本身(里面的指针),没复制指针指向的字符串内容,导致新旧对象指向同一块堆内存,旧空间释放后新对象变成野指针,程序崩溃。
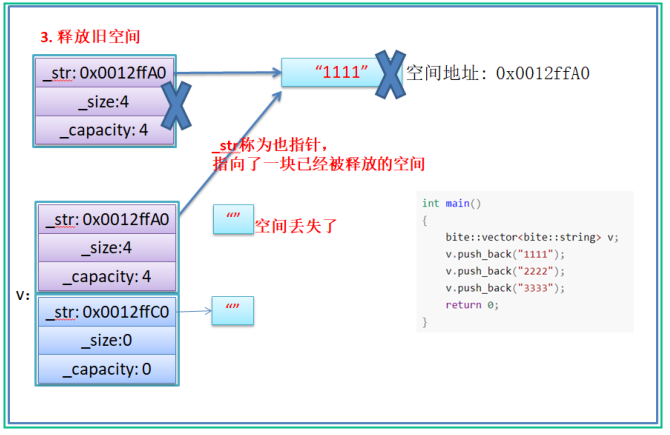
结论:如果对象中涉及到资源管理时,千万不能使用memcpy进行对象之间的拷贝,因为
memcpy是浅拷贝,否则可能会引起内存泄漏甚至程序崩溃。
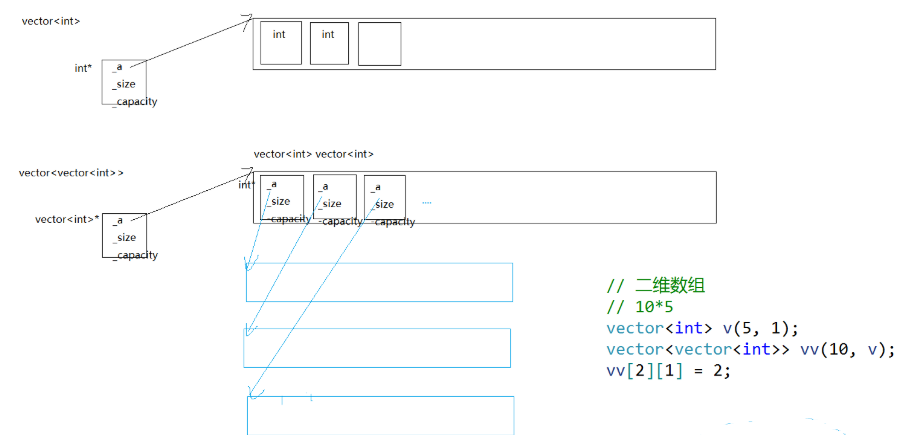
4. 动态二维数组理解
题目描述:

cpp
class Solution {
public:
    vector<vector<int>> generate(int numRows) {
        // 1. 创建二维vector,外层有numRows行
        vector<vector<int>> vv(numRows);

        // 2. 每行初始化:第i行有i+1个元素,全部填1
        for(size_t i = 0; i < numRows; ++i)
        {
            vv[i].resize(i+1, 1);
        }

        // 3. 从第2行开始,计算中间位置的值
        for(int i = 2; i < vv.size(); ++i)           // i从2开始(第3行)
        {
            for(int j = 1; j < vv[i].size()-1; ++j)  // 跳过首尾(已经是1)
            {
                vv[i][j] = vv[i-1][j] + vv[i-1][j-1];
            }
        }

        return vv;
    }
};
bitvector<bitvector<int>> vv(n); 构造一个vv动态二维数组,vv中总共有n个元素,每个元素
都是vector类型的,每行没有包含任何元素,如果n为5时如下所示:
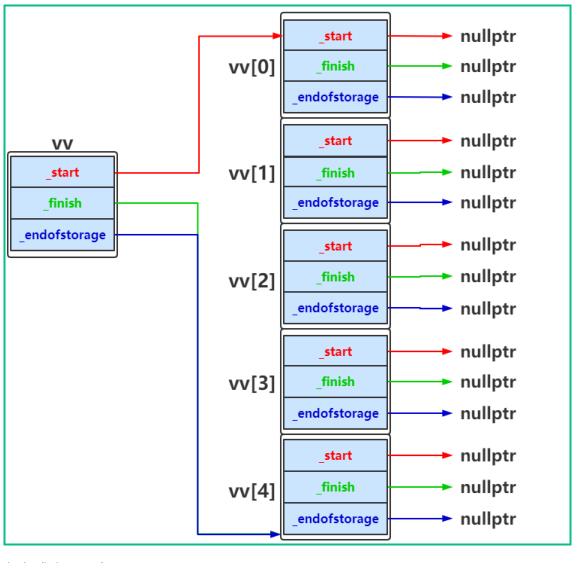
vv中元素填充完成之后,如下图所示:
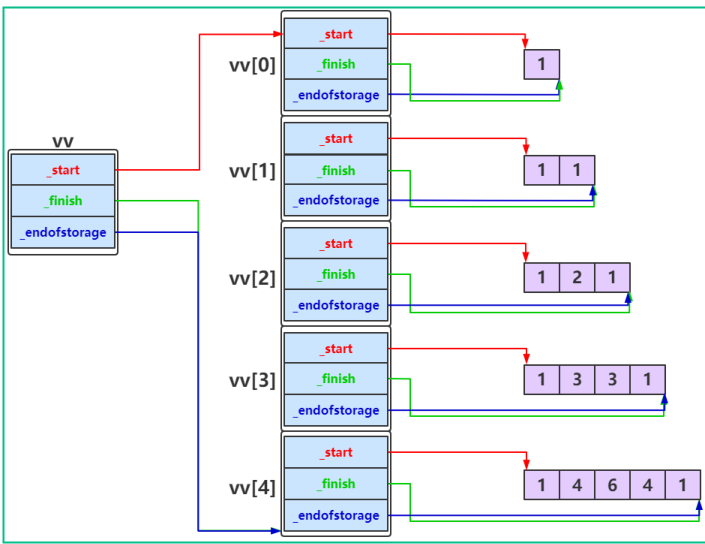
注意:使用标准库中vector构建动态二维数组时与上图实际是一致的。
简单来说就是:vector<vector<int>>就是个"套娃'',外面那层 vector 的每个格子里,放的是一整个内层 vector 对象(不是指针)。每个内层 vector 又自己管着自己那一行的数据。自己写
vv[2][1]时:先找到第 3 个格子,里面是个 vector 对象;再从这个 vector 对象里找到第 2 个元素。和你手动实现的上面的图一样: 外层用指针指着连续的一排内层 vector 对象,内层 vector 自己又有三个指针管自己的数据。标准库底层也就是这样的。类比这样的图: