一、day1
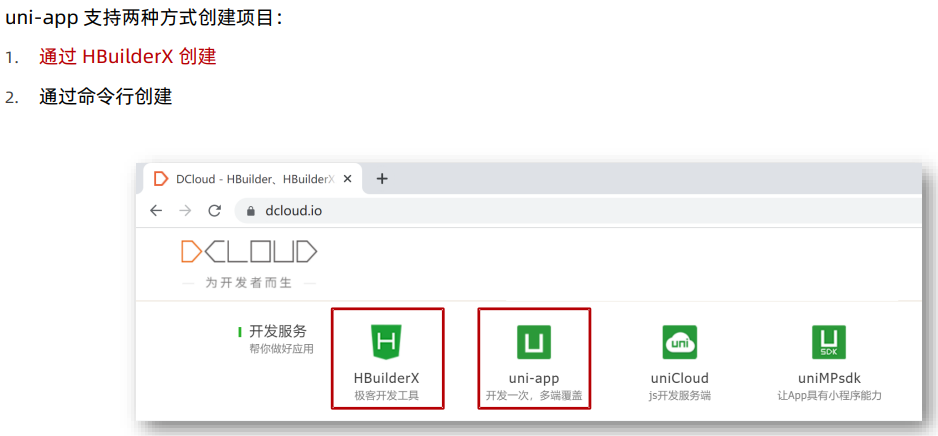
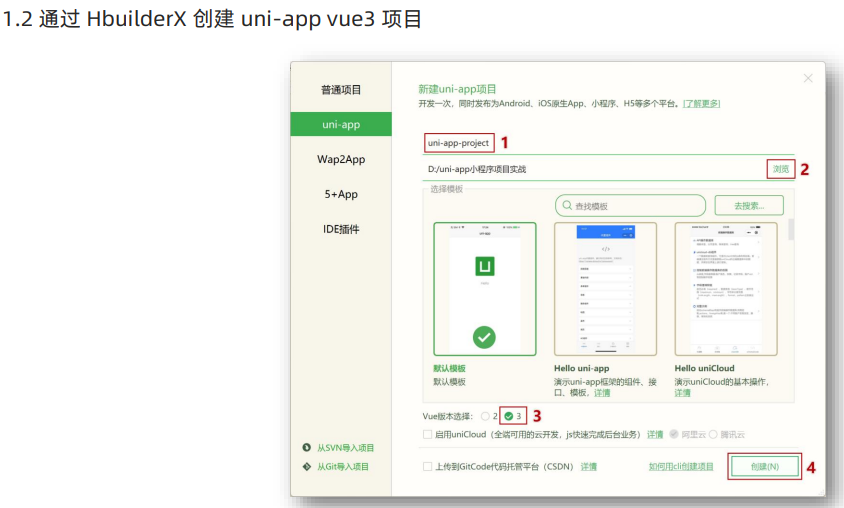
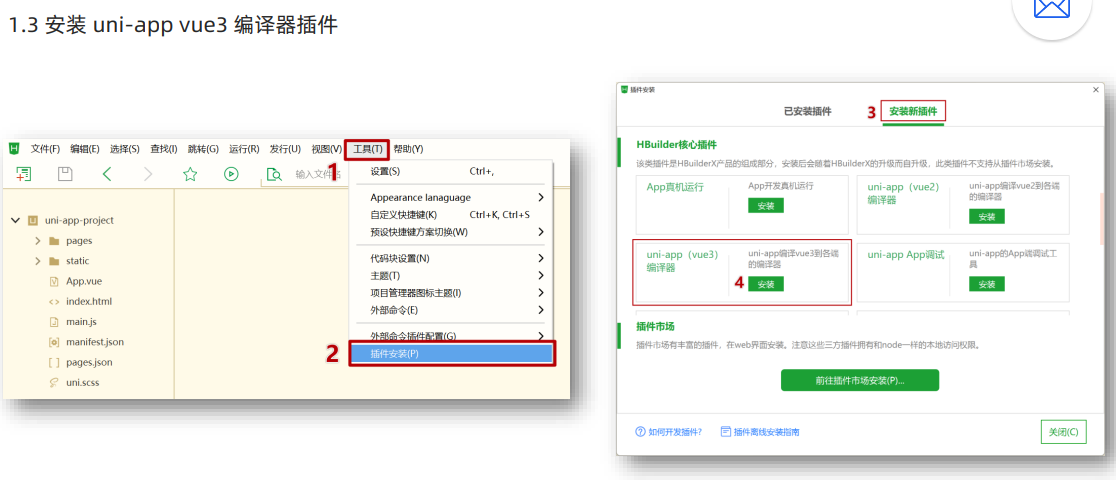
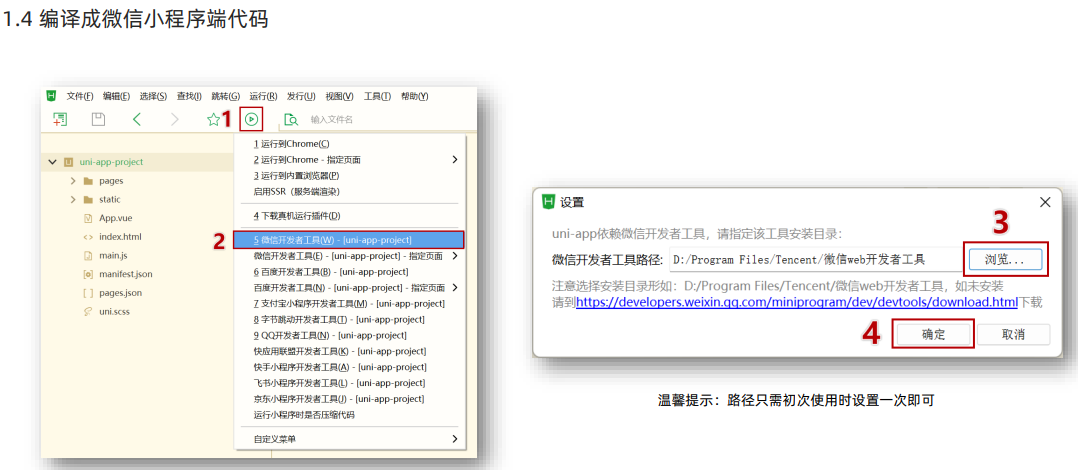
1.创建项目


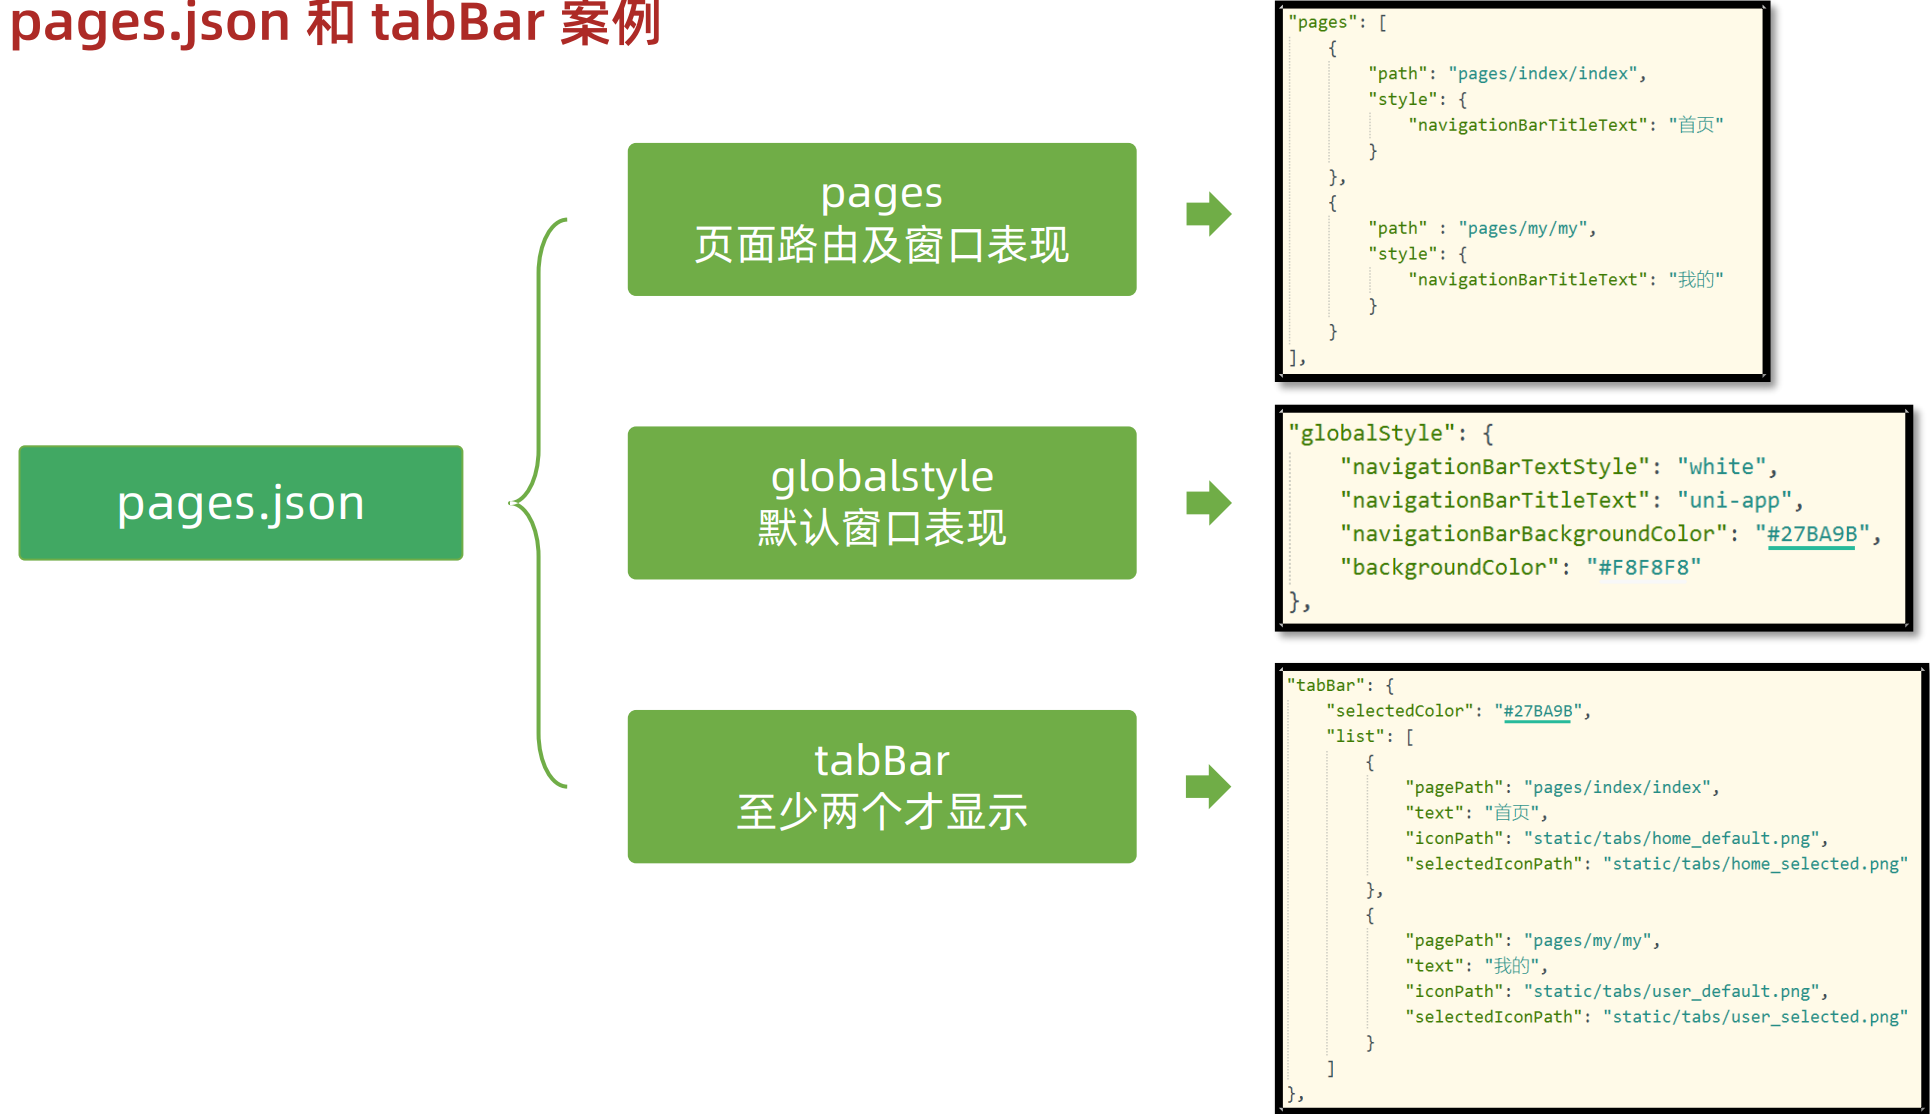
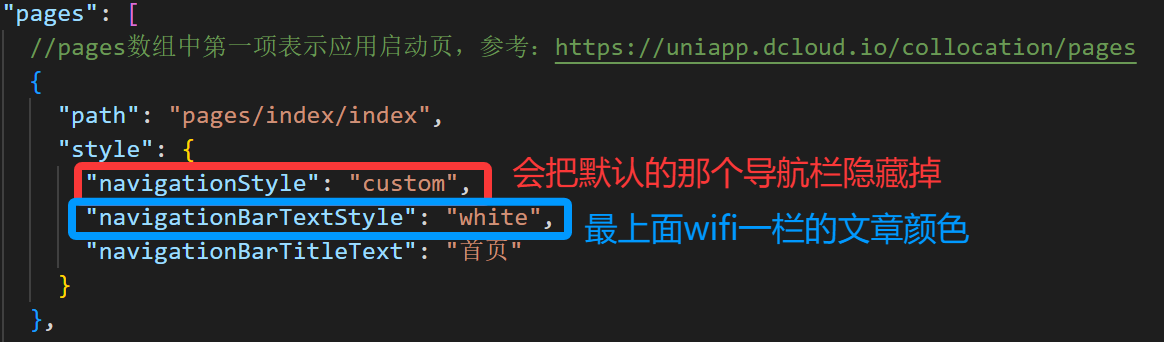
2.pages.json 和 tabBar 案例
javascript
{
"pages": [ //pages数组中第一项表示应用启动页,参考:https://uniapp.dcloud.io/collocation/pages
{
"path": "pages/index/index",
"style": {
"navigationBarTitleText": "首页"
}
},
{
"path": "pages/my/my",
"style": {
"navigationBarTitleText": "我的"
}
}
],
"globalStyle": {
"navigationBarTextStyle": "white",
"navigationBarTitleText": "uni-app",
"navigationBarBackgroundColor": "#27BA9B",
"backgroundColor": "#F8F8F8"
},
"tabBar": {
"selectedColor": "#27BA9B",
"list": [
{
"pagePath": "pages/index/index",
"text": "首页",
"iconPath": "/static/tabs/home_default.png",
"selectedIconPath": "/static/tabs/home_selected.png"
},
{
"pagePath": "pages/my/my",
"text": "我的",
"iconPath": "/static/tabs/user_default.png",
"selectedIconPath": "/static/tabs/user_selected.png"
}
]
},
"uniIdRouter": {}
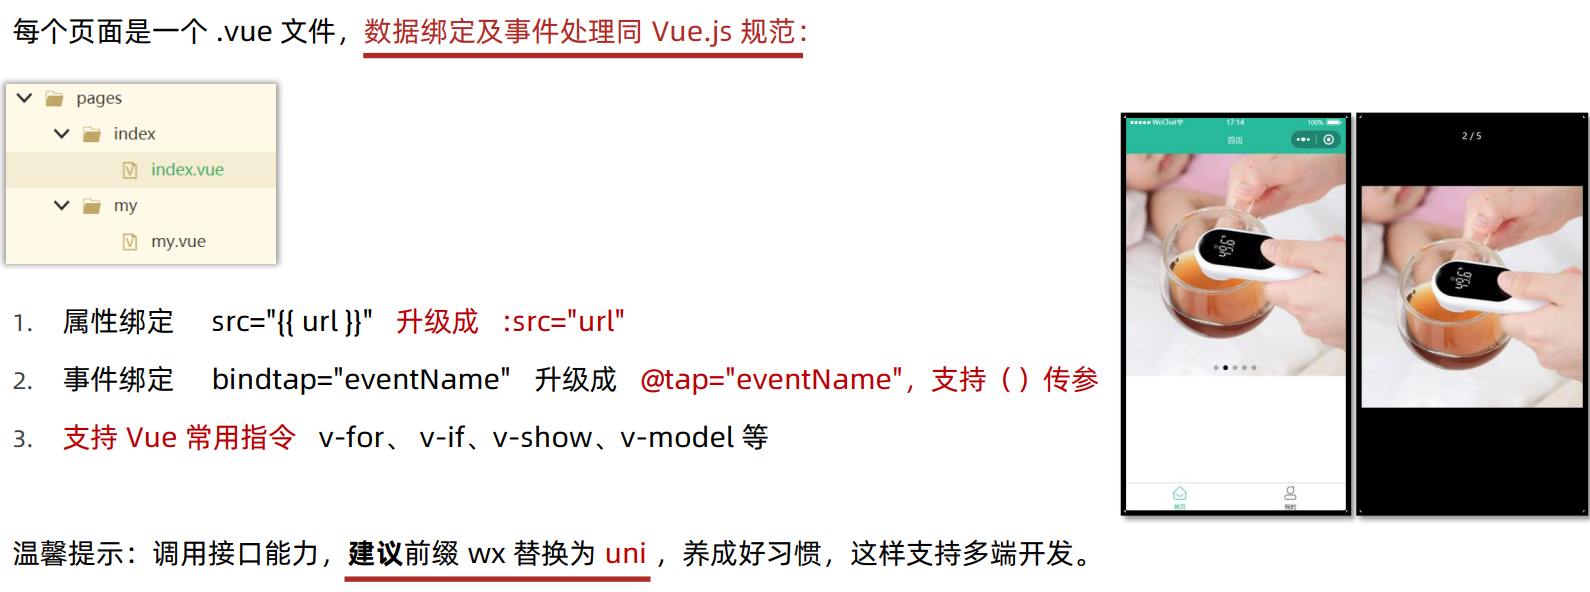
}3.uni-app和原生小程序开发区别
javascript
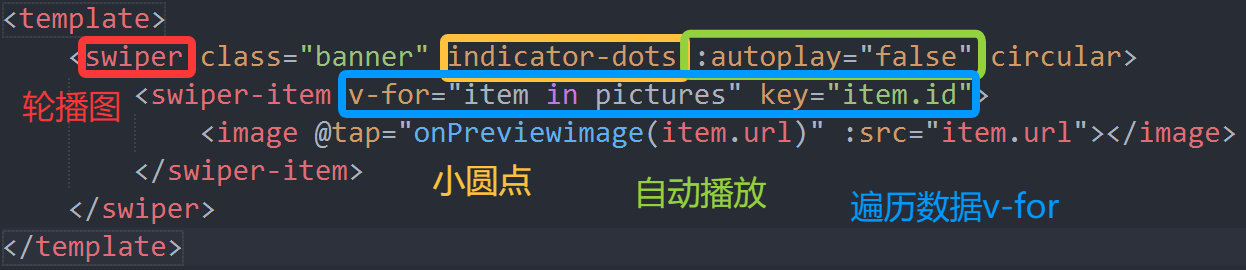
<template>
<swiper class="banner" indicator-dots :autoplay="false" circular>
<swiper-item v-for="item in pictures" key="item.id">
<image @tap="onPreviewimage(item.url)" :src="item.url"></image>
</swiper-item>
</swiper>
</template>
<script>
export default {
data() {
return {
title: 'Hello uni-app',
// 轮播图数据
pictures: [
{ id: '1', url: "https://pcapi-xiaotuxian-front-devtest.itheima.net/miniapp/uploads/goods_preview_1.jpg" },
{ id: '2', url: "https://pcapi-xiaotuxian-front-devtest.itheima.net/miniapp/uploads/goods_preview_2.jpg" },
{ id: '3', url: "https://pcapi-xiaotuxian-front-devtest.itheima.net/miniapp/uploads/goods_preview_3.jpg" },
{ id: '4', url: "https://pcapi-xiaotuxian-front-devtest.itheima.net/miniapp/uploads/goods_preview_4.jpg" },
{ id: '5', url: "https://pcapi-xiaotuxian-front-devtest.itheima.net/miniapp/uploads/goods_preview_5.jpg" }
]
}
},
onLoad() {
},
methods: {
onPreviewimage (url) {
// console.log(url)
uni.previewImage({
urls: this.pictures.map(v=>v.url),
current: url
})
}
}
}
</script>
<style>
.banner,
.banner image {
width: 750rpx;
height: 750rpx;
}
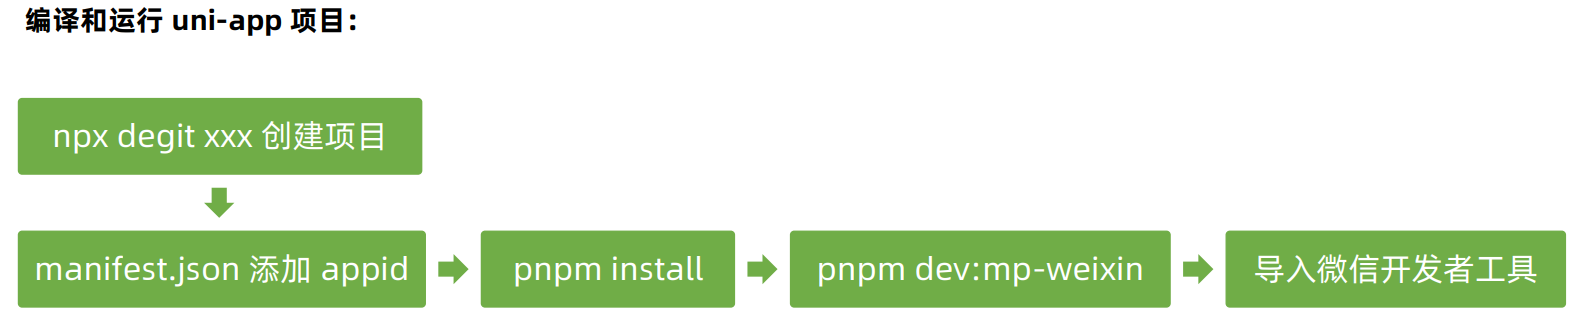
</style>4.命令行创建 uni-app 项目

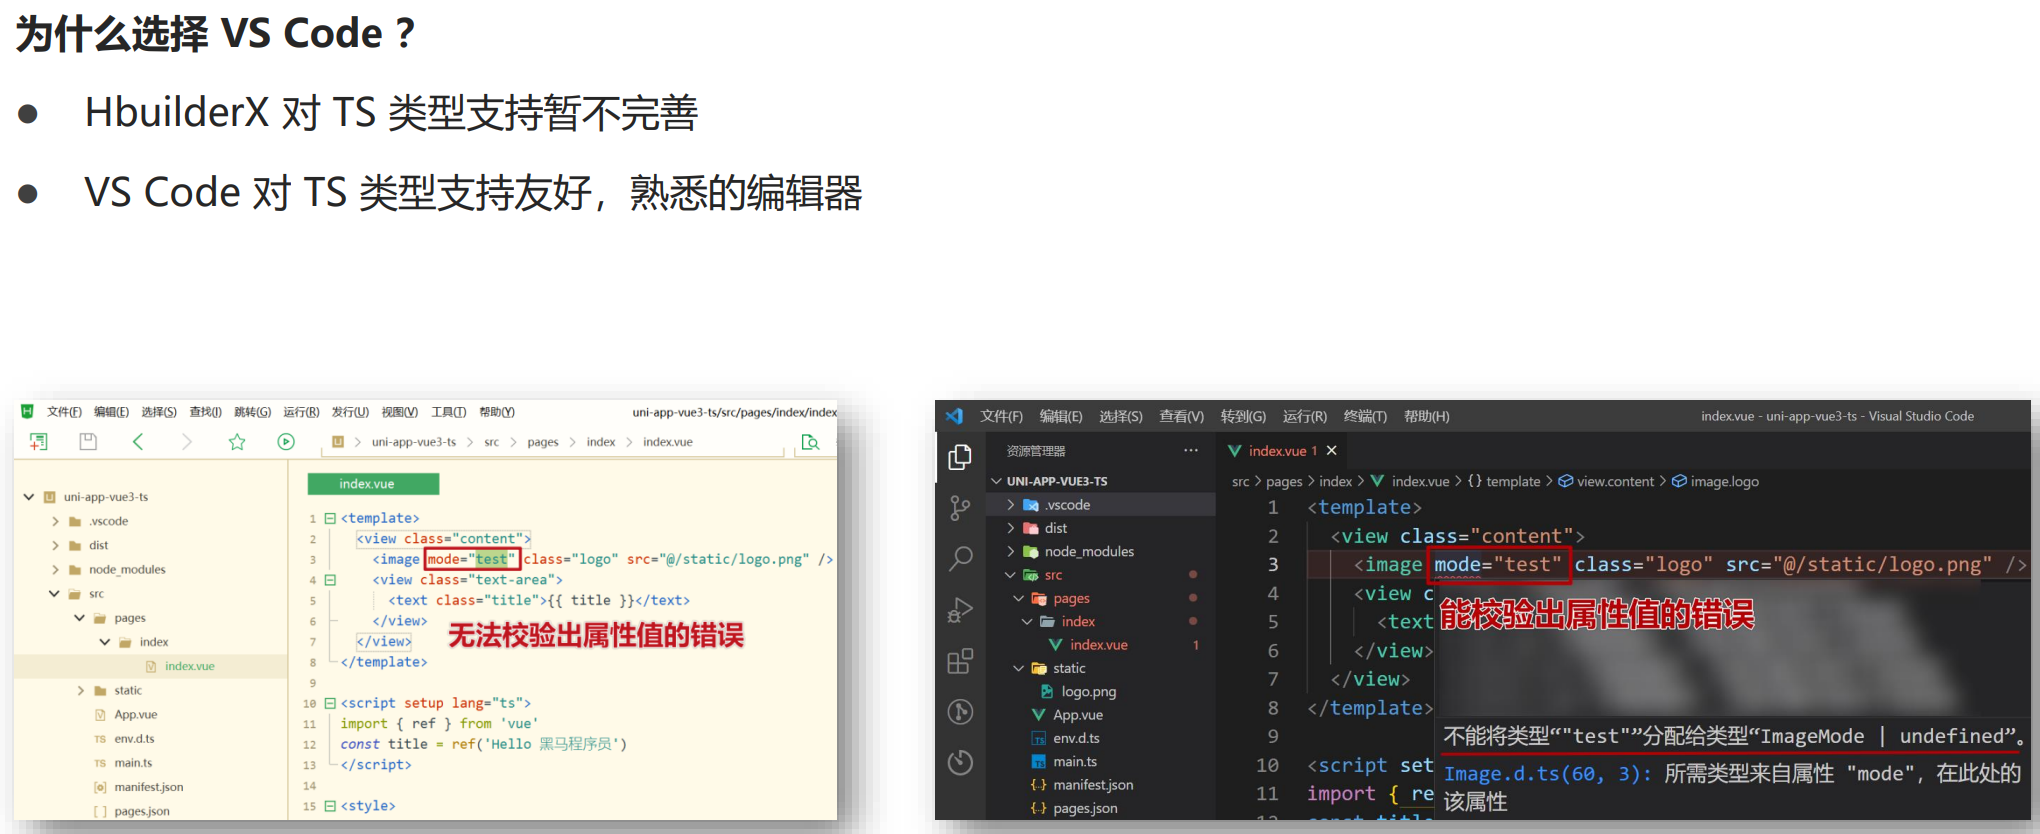
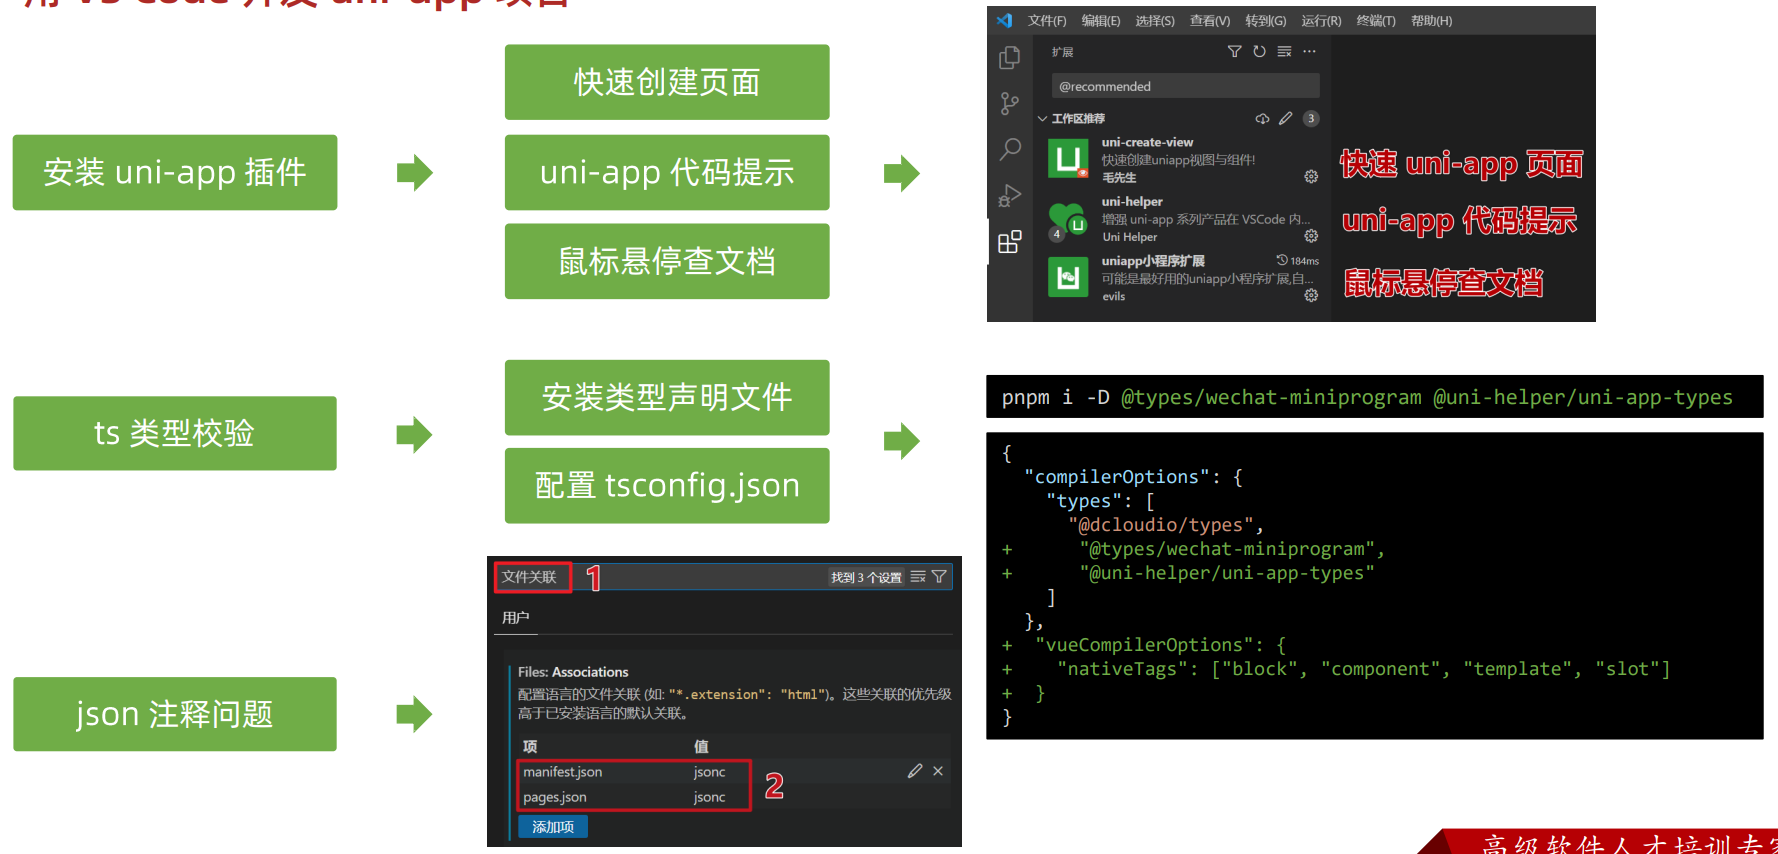
5.用 VS Code 开发 uni-app 项目

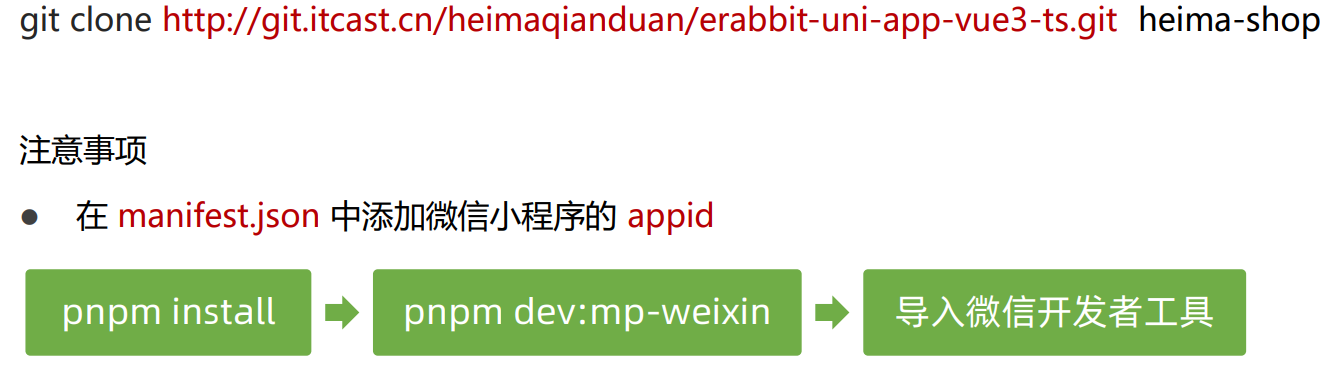
6.拉取小兔鲜儿项目模板代码
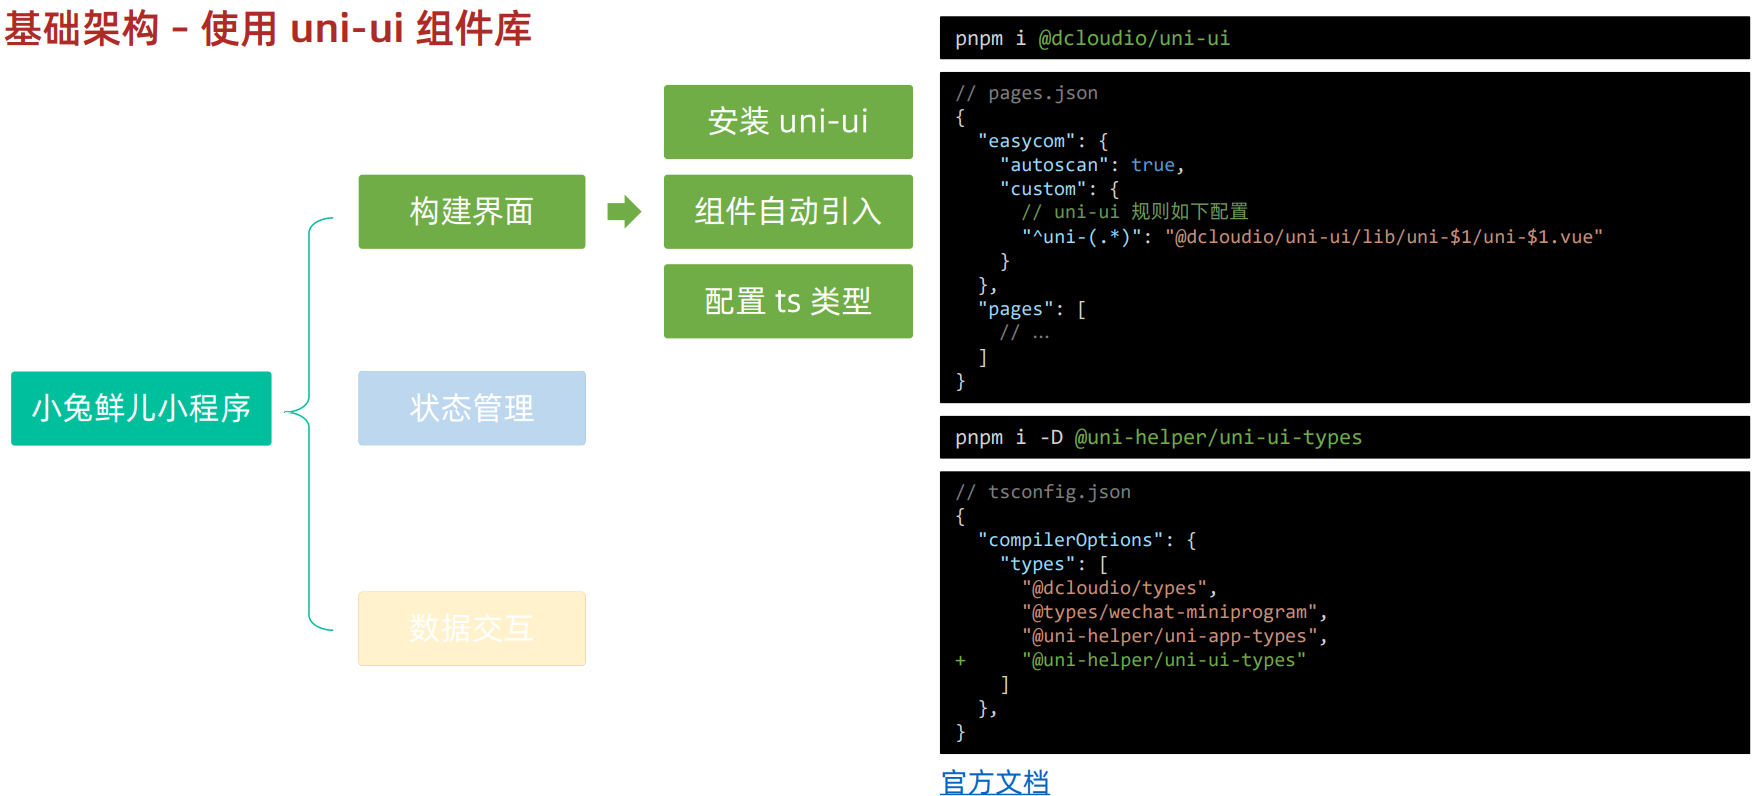
7.基础架构 -- 引入 uni-ui 组件库
官方文档:uni-app官网
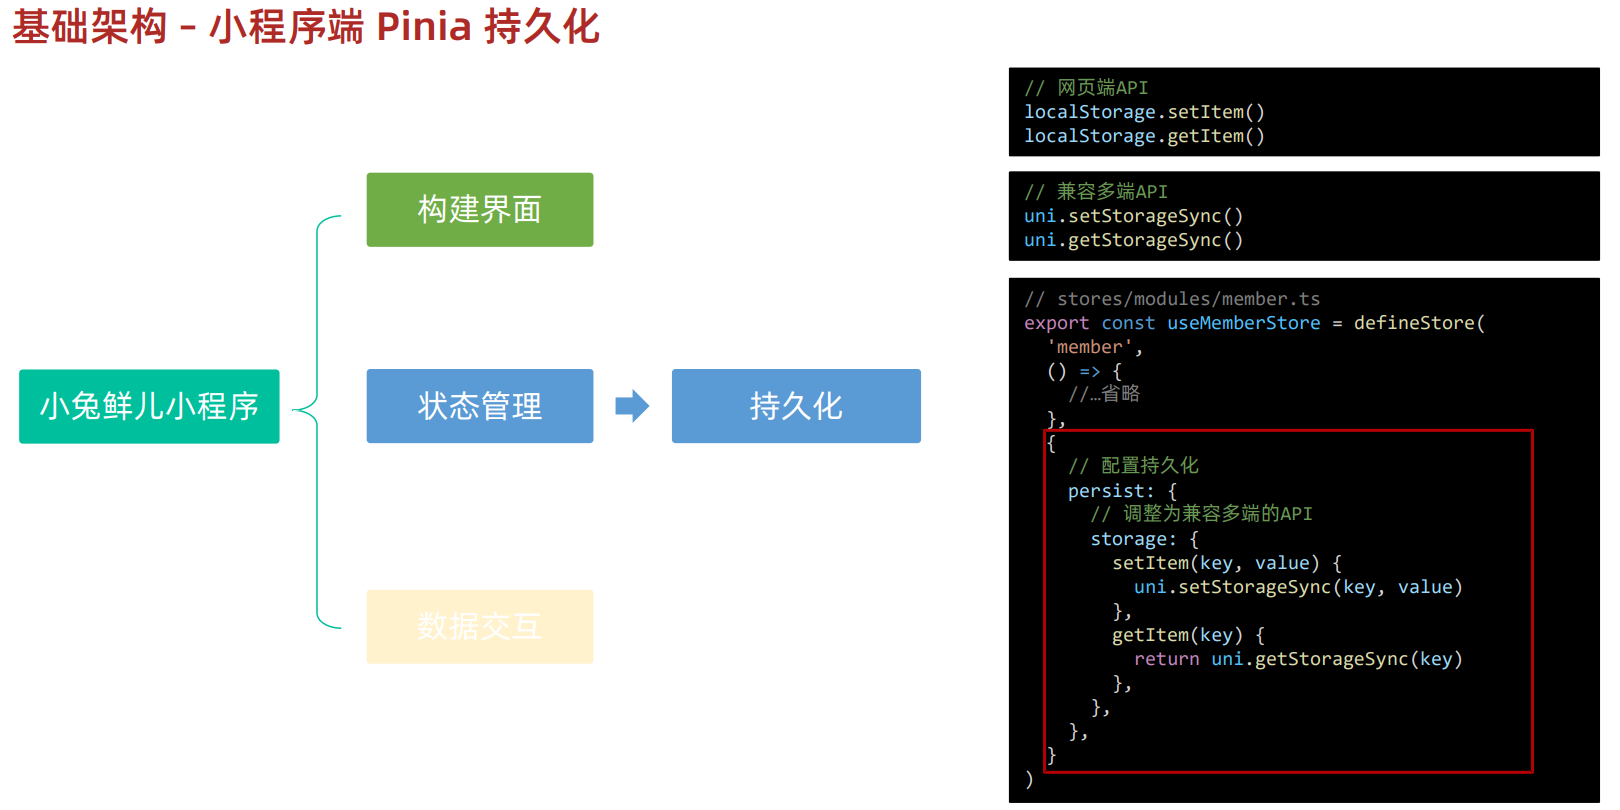
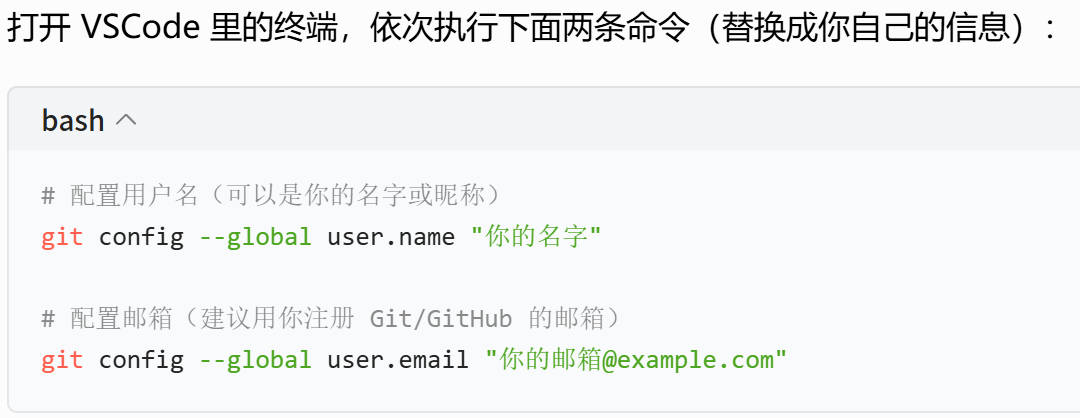
8.基础架构 -- 小程序端 Pinia 持久化
官方文档:配置 |Pinia 插件持久状态
更新git日志:记得先注册好用户名和邮箱
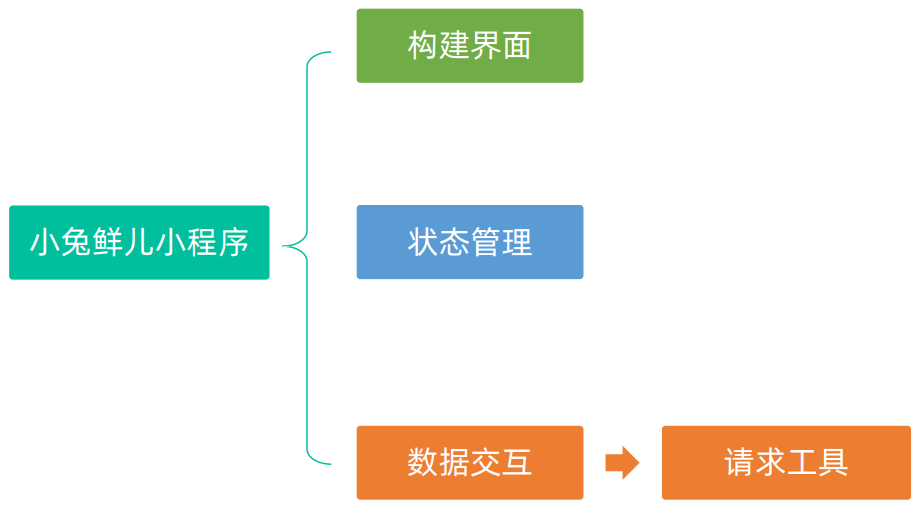
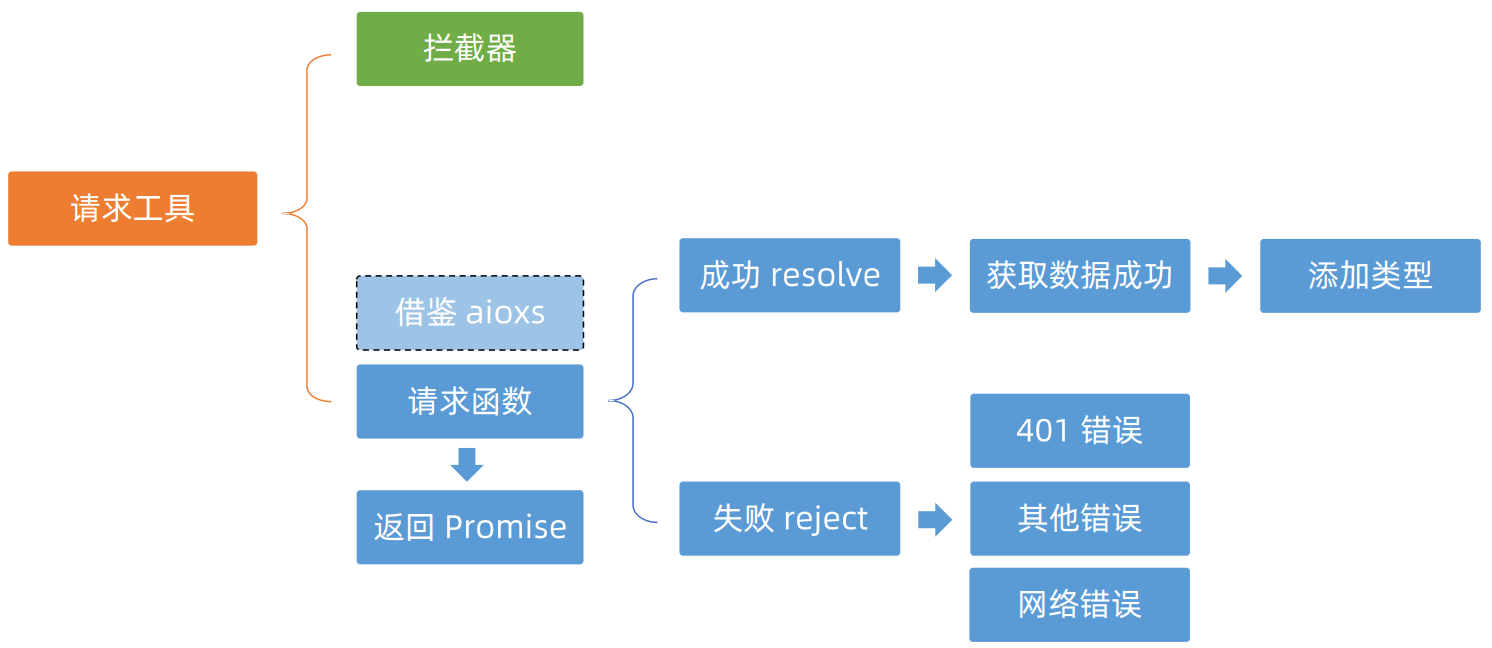
9.基础架构 -- uni.request 请求封装
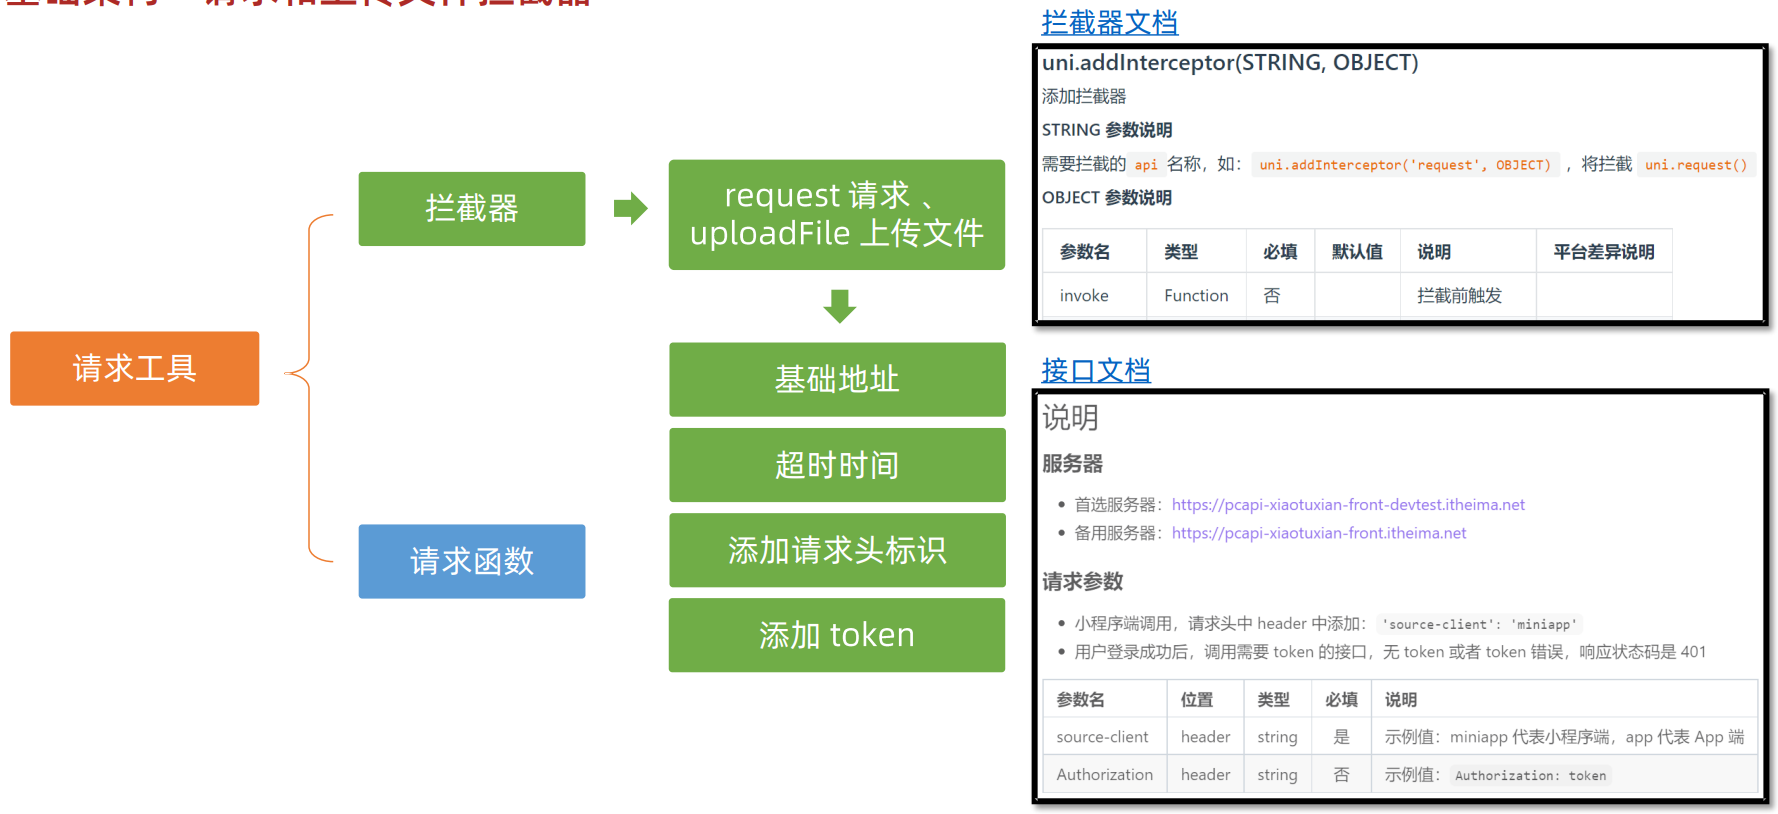
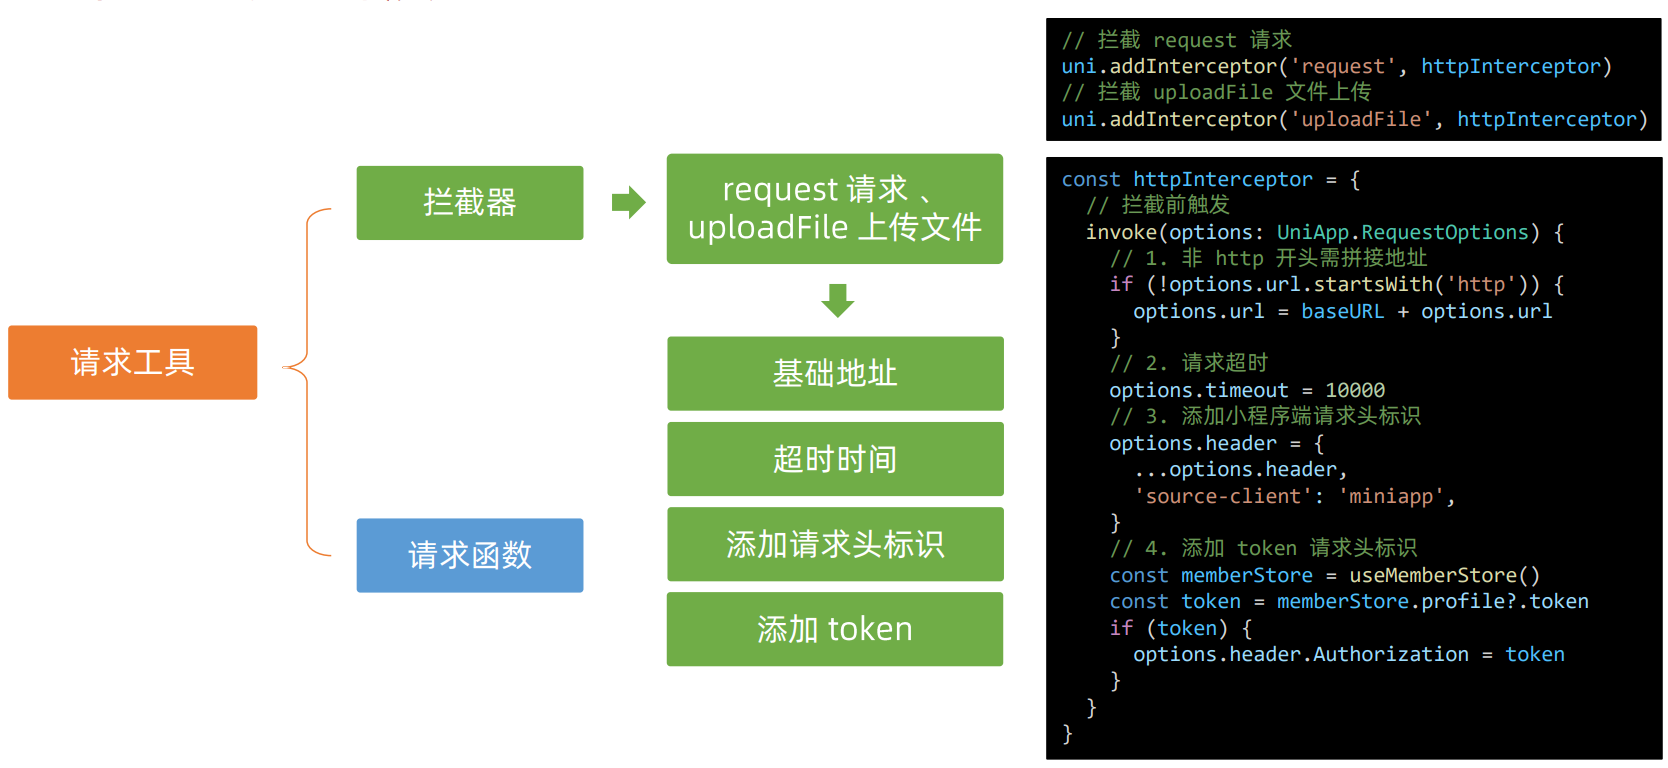
(1)请求和上传文件拦截器
拦截器文档:uni.addInterceptor(STRING, OBJECT) | uni-app官网
接口文档:说明 - 小兔鲜儿-小程序版
javascript
/**
* 添加拦截器:
* 拦截 request 请求
* 拦截 uploadFile 文件上传
*
* TODO:
* 1.非 http 开头需拼接地址
* 2.请求超时
* 3.添加小程序请求头标识
* 4.添加 token 请求头标识
*/
import { useMemberStore } from '@/stores'
const baseURL = 'http://pcapi-xiaotuxian-front-devtest.itheima.net'
// 添加拦截器
const httpInterceptor = {
// 拦截前触发
invoke(options: UniApp.RequestOptions) {
// 1.非 http 开头需拼接地址
if (!options.url.startsWith('http')) {
options.url = baseURL + options.url
}
// 2.请求超时,默认 60s
options.timeout = 10000
// 3.添加小程序请求头标识
options.header = {
...options.header,
'source-client': 'miniapp',
}
// 4.添加 token 请求头标识
const memberStore = useMemberStore()
const token = memberStore.profile?.token
if (token) {
options.header.Authorization = token
}
console.log(options)
},
}
uni.addInterceptor('request', httpInterceptor)
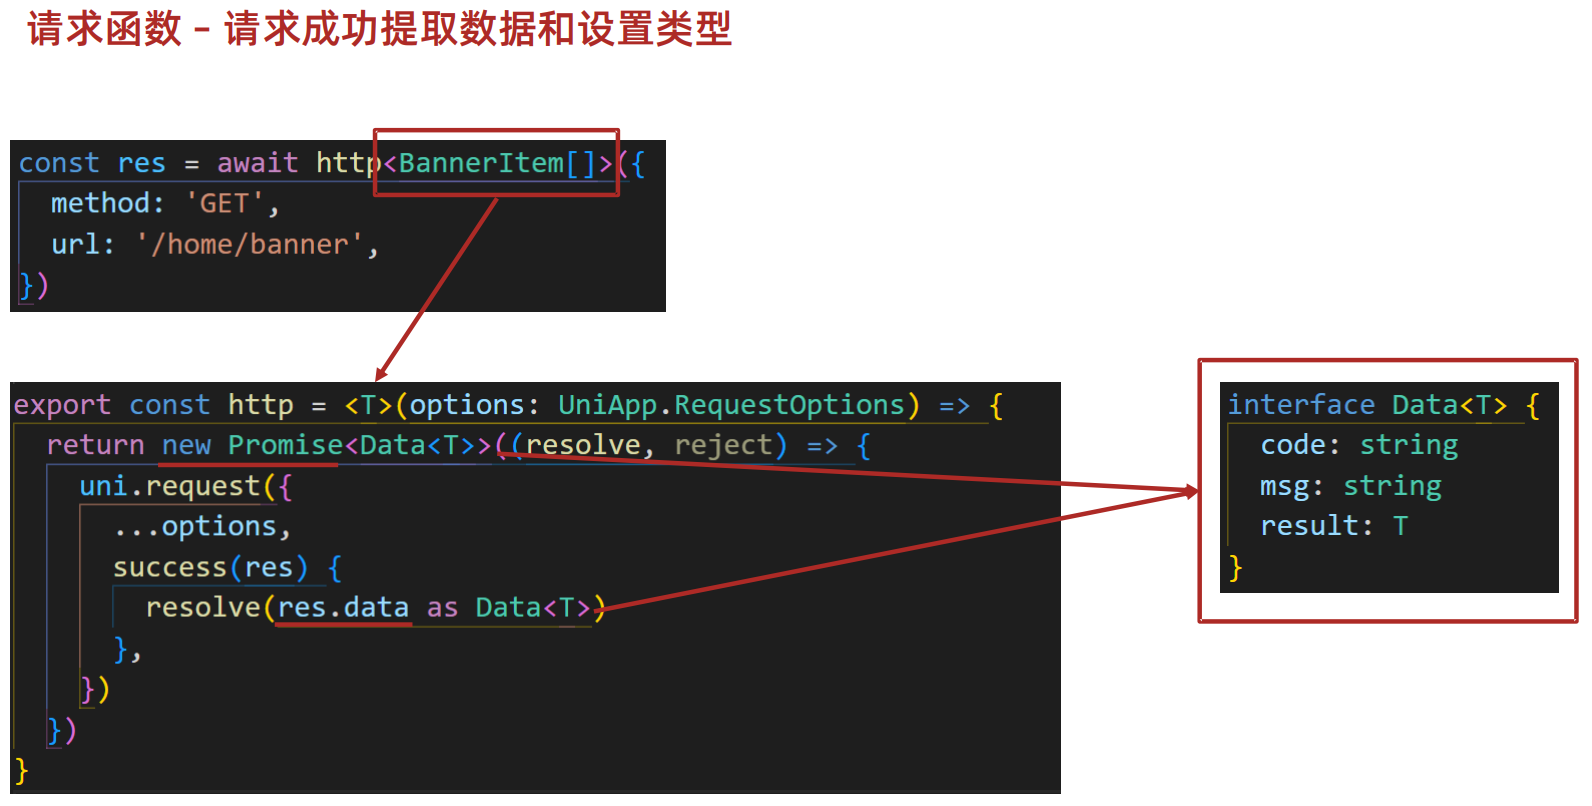
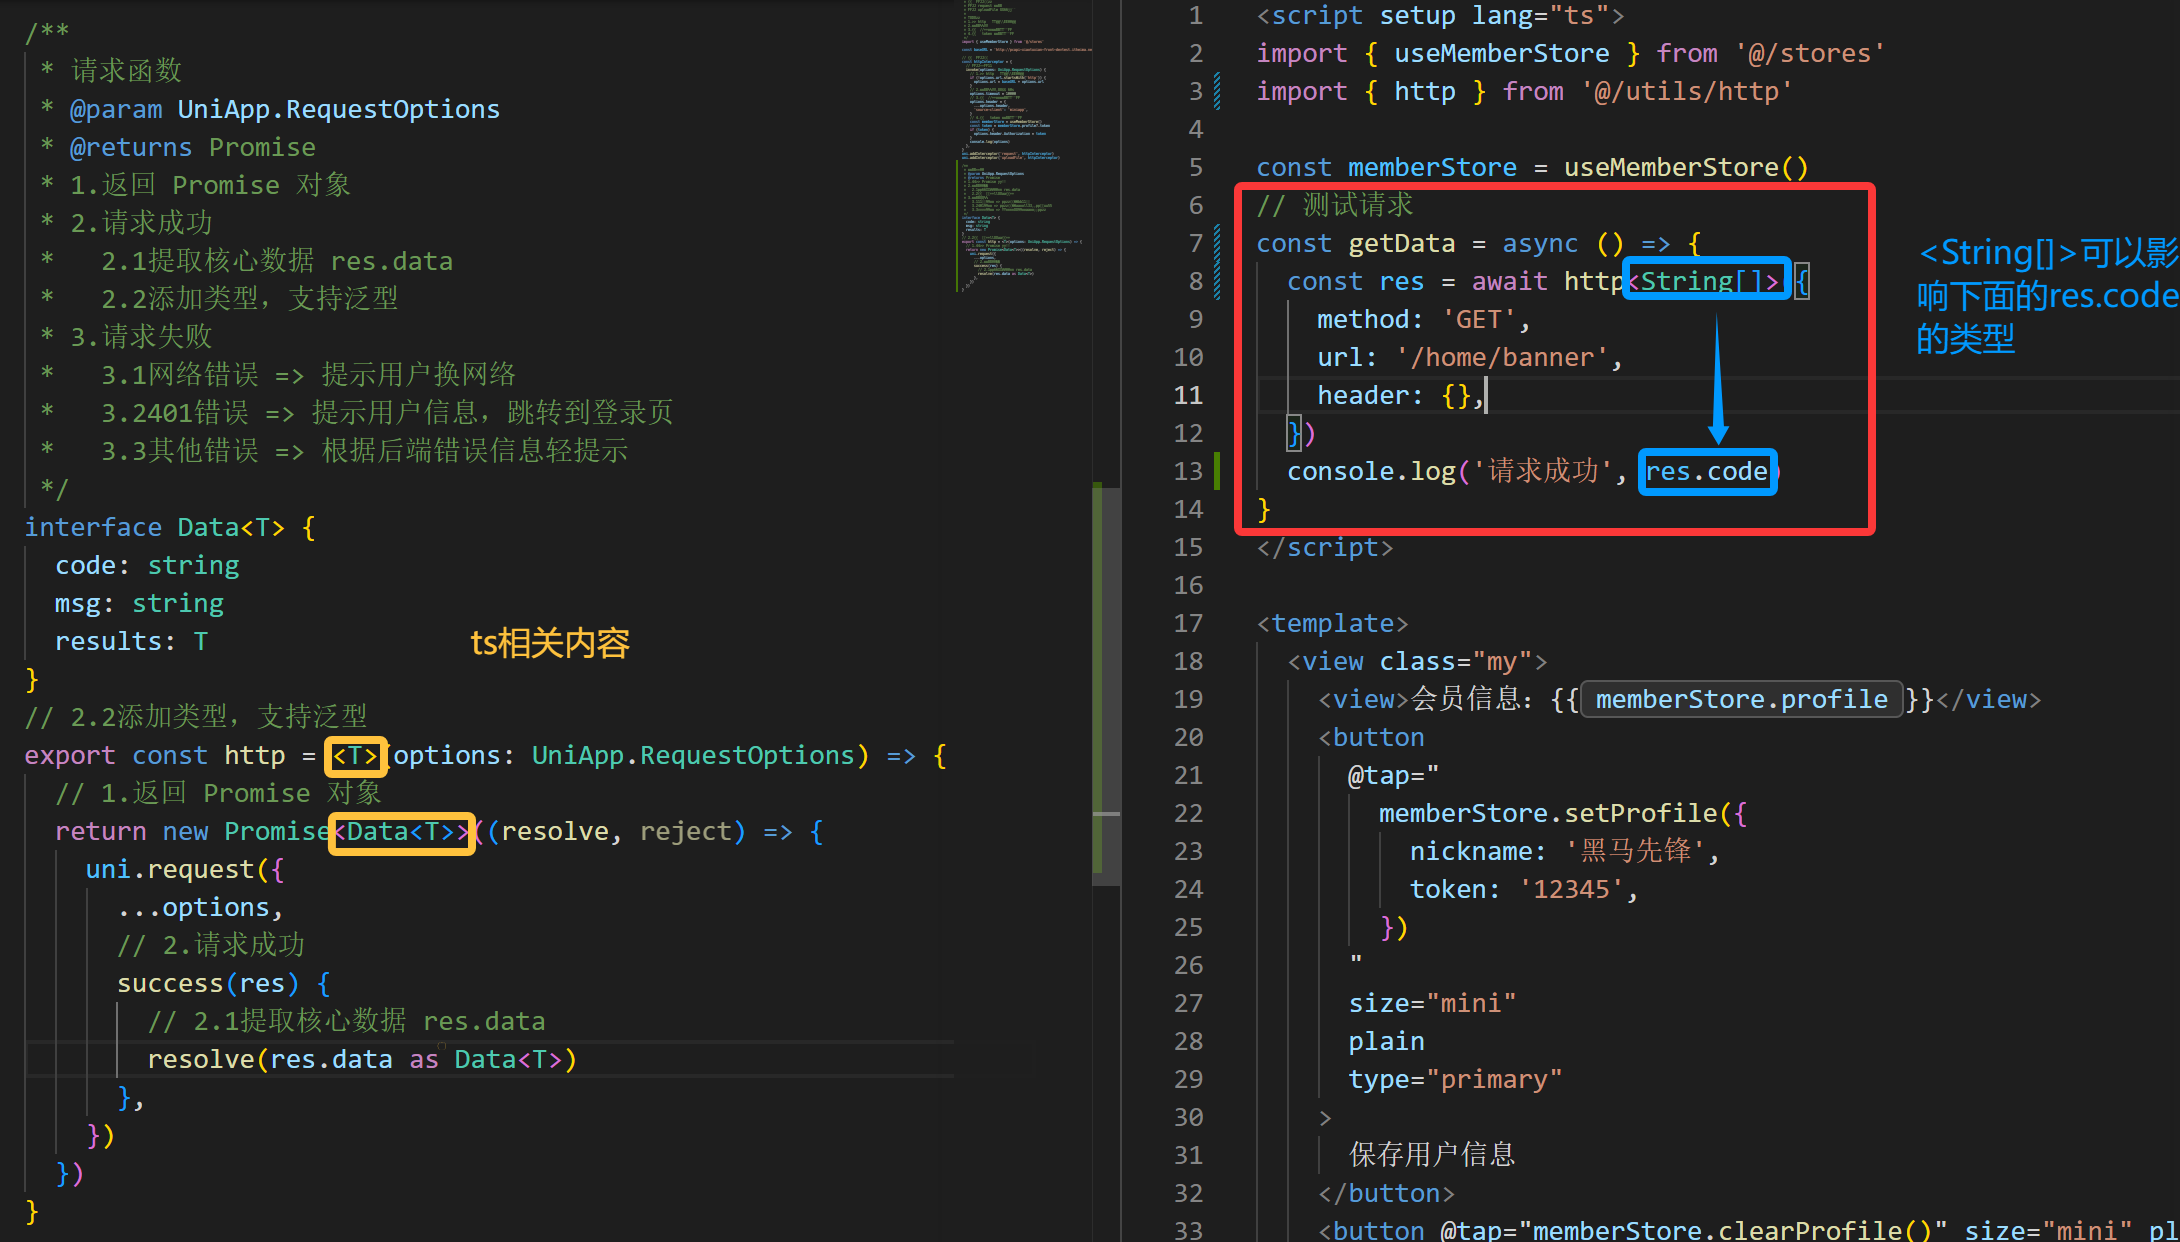
uni.addInterceptor('uploadFile', httpInterceptor)(2)封装 Promise 请求函数
javascript
/**
 * 请求函数
 * @param UniApp.RequestOptions
 * @returns Promise
 * 1.返回 Promise 对象
 * 2.请求成功
 *   2.1提取核心数据 res.data
 *   2.2添加类型,支持泛型
 * 3.请求失败
 *   3.1网络错误 => 提示用户换网络
 *   3.2401错误 => 提示用户信息,跳转到登录页
 *   3.3其他错误 => 根据后端错误信息轻提示
 */
interface Data<T> {
  code: string
  msg: string
  results: T
}
// 2.2添加类型,支持泛型
export const http = <T>(options: UniApp.RequestOptions) => {
  // 1.返回 Promise 对象
  return new Promise<Data<T>>((resolve, reject) => {
    uni.request({
      ...options,
      // 2.请求成功
      success(res) {
        // 2.1提取核心数据 res.data
        resolve(res.data as Data<T>)
      },
    })
  })
}
javascript
<script setup lang="ts">
import { useMemberStore } from '@/stores'
import { http } from '@/utils/http'
const memberStore = useMemberStore()
// 测试请求
const getData = async () => {
const res = await http<String[]>({
method: 'GET',
url: '/home/banner',
header: {},
})
console.log('请求成功', res.code)
}
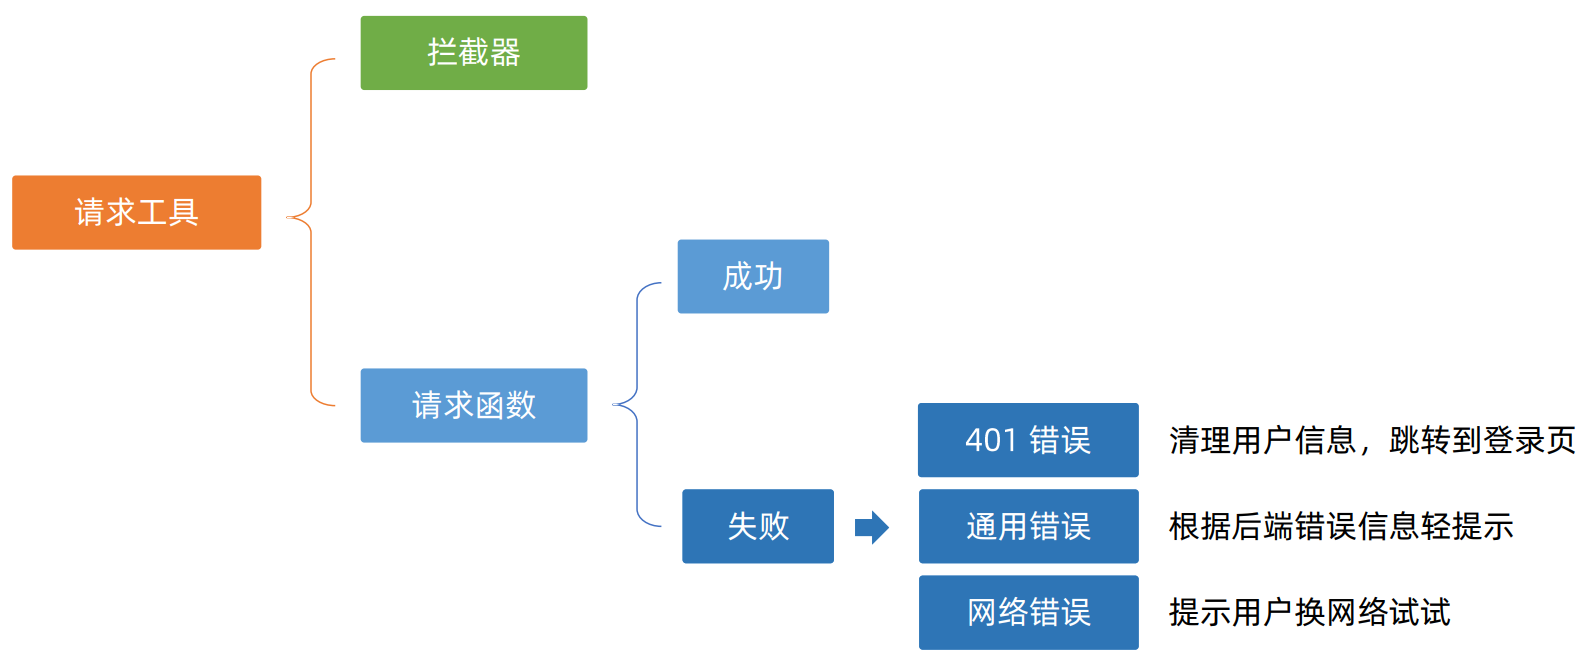
</script>(3)获取数据失败
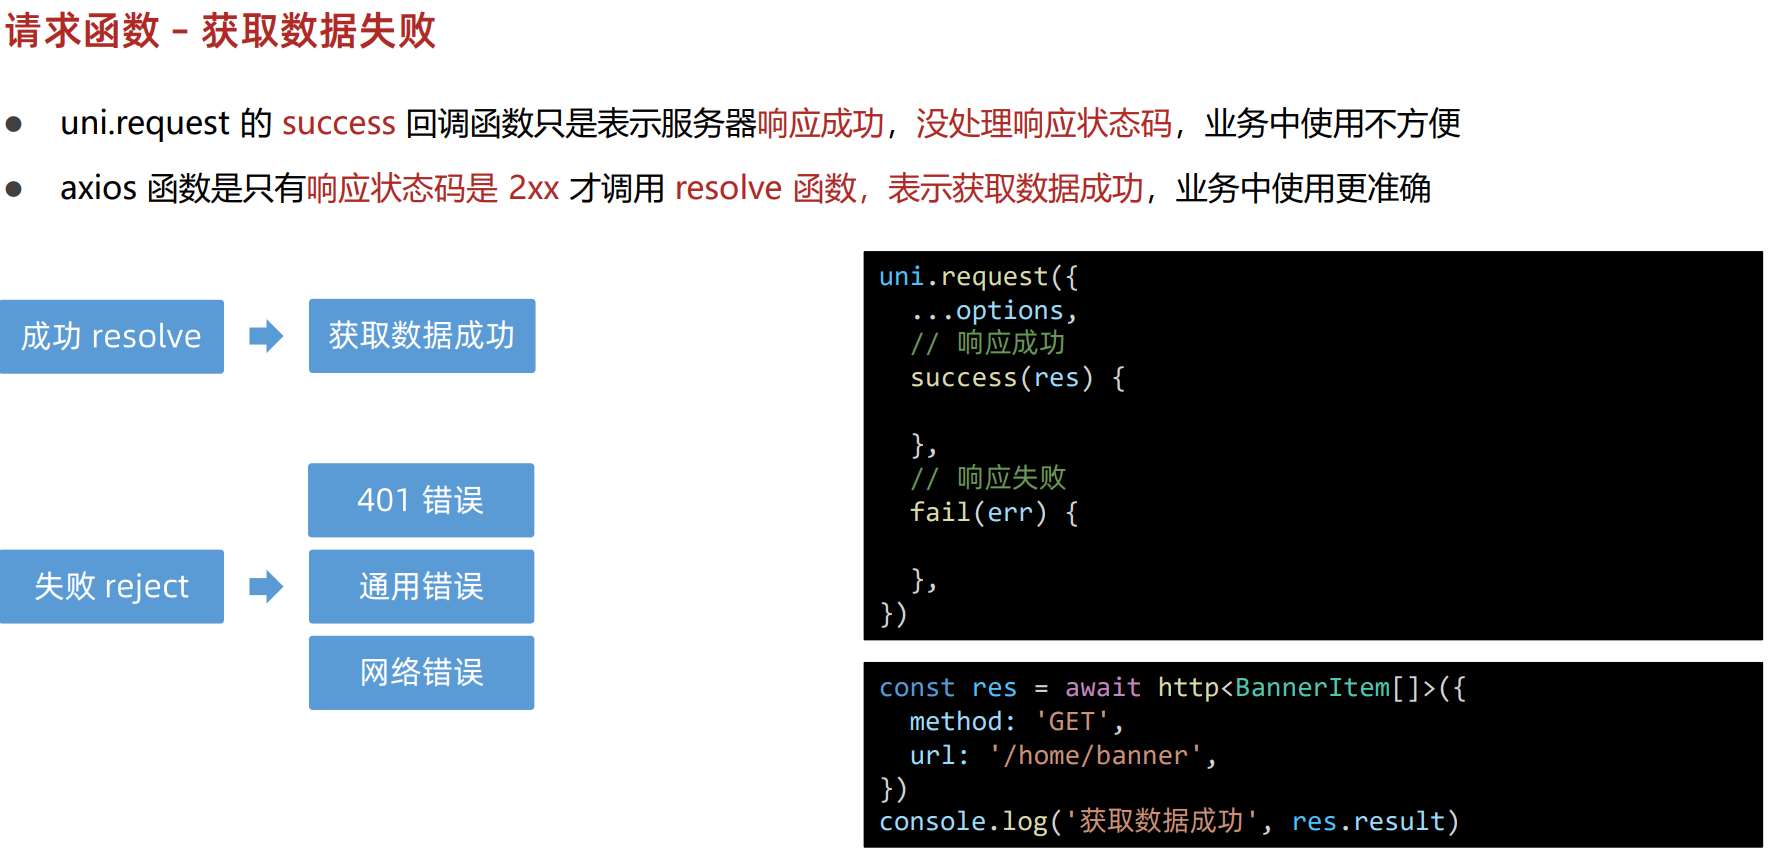

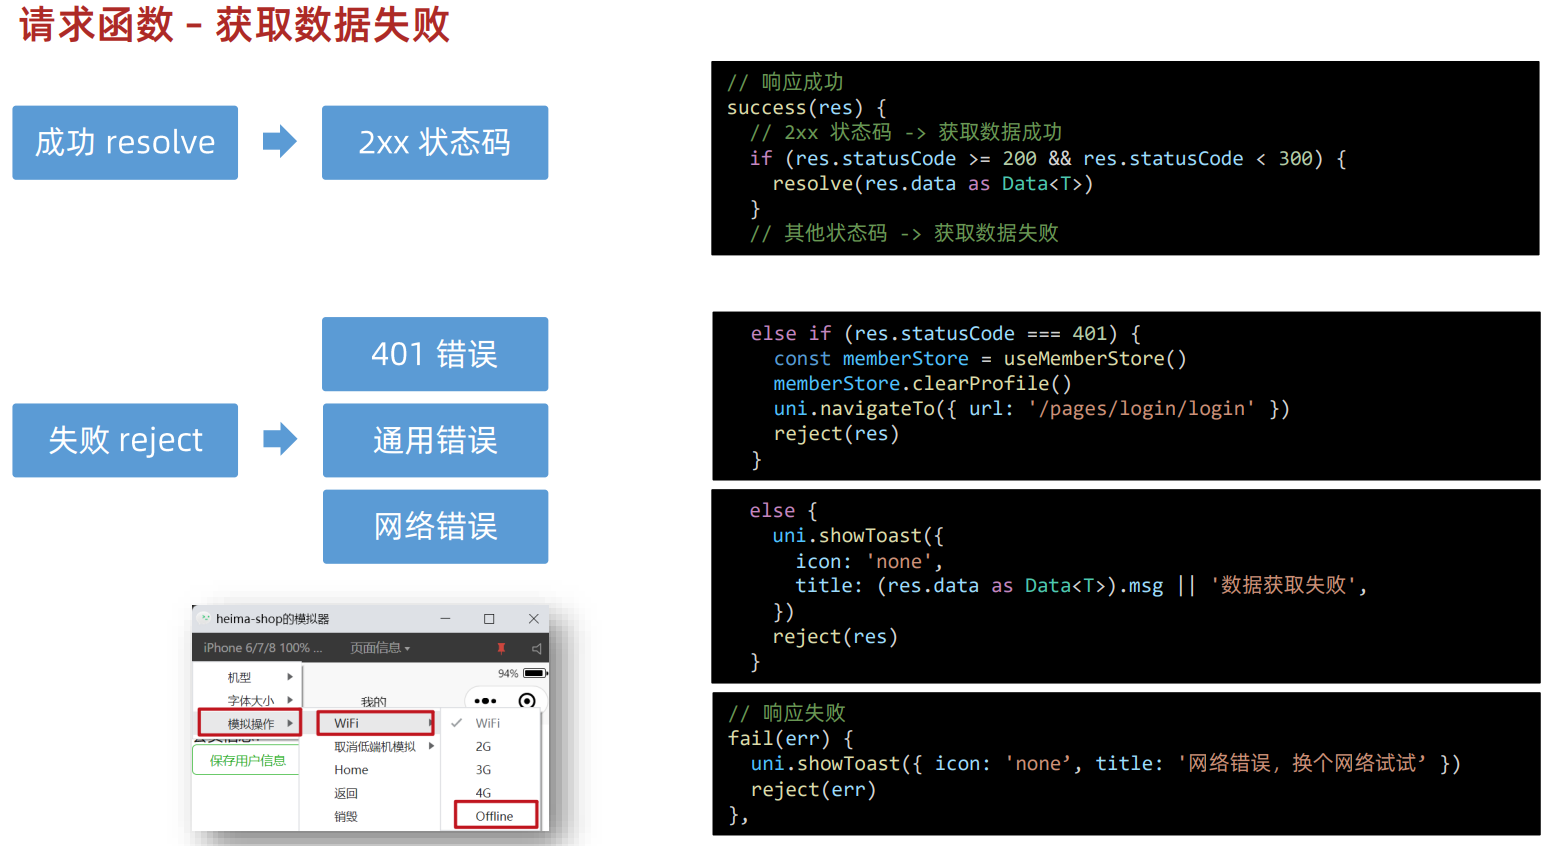
javascript
/**
* 请求函数
* @param UniApp.RequestOptions
* @returns Promise
* 1.返回 Promise 对象
* 2.请求成功
* 2.1提取核心数据 res.data
* 2.2添加类型,支持泛型
* 3.请求失败
* 3.1 网络错误 => 提示用户换网络
* 3.2 401错误 => 提示用户信息,跳转到登录页
* 3.3 其他错误 => 根据后端错误信息轻提示
*/
interface Data<T> {
code: string
msg: string
results: T
}
// 2.2添加类型,支持泛型
export const http = <T>(options: UniApp.RequestOptions) => {
// 1.返回 Promise 对象
return new Promise<Data<T>>((resolve, reject) => {
uni.request({
...options,
// 2.请求成功
success(res) {
// 状态码 2xx,axios 就是这样设计的
if (res.statusCode >= 200 && res.statusCode < 300) {
// 2.1提取核心数据 res.data
resolve(res.data as Data<T>)
} else if (res.statusCode === 401) {
// 3.2 401错误 => 提示用户信息,跳转到登录页
const memberStore = useMemberStore()
memberStore.clearProfile()
uni.navigateTo({ url: '/pages/login/login' })
reject(res)
} else {
// 3.3 其他错误 => 根据后端错误信息轻提示
uni.showToast({
icon: 'none',
title: (res.data as Data<T>).msg || '请求错误',
})
reject(res)
}
},
// 响应失败
fail(err) {
uni.showToast({
icon: 'none',
title: '网络错误,换个网络试试',
})
reject(err)
},
})
})
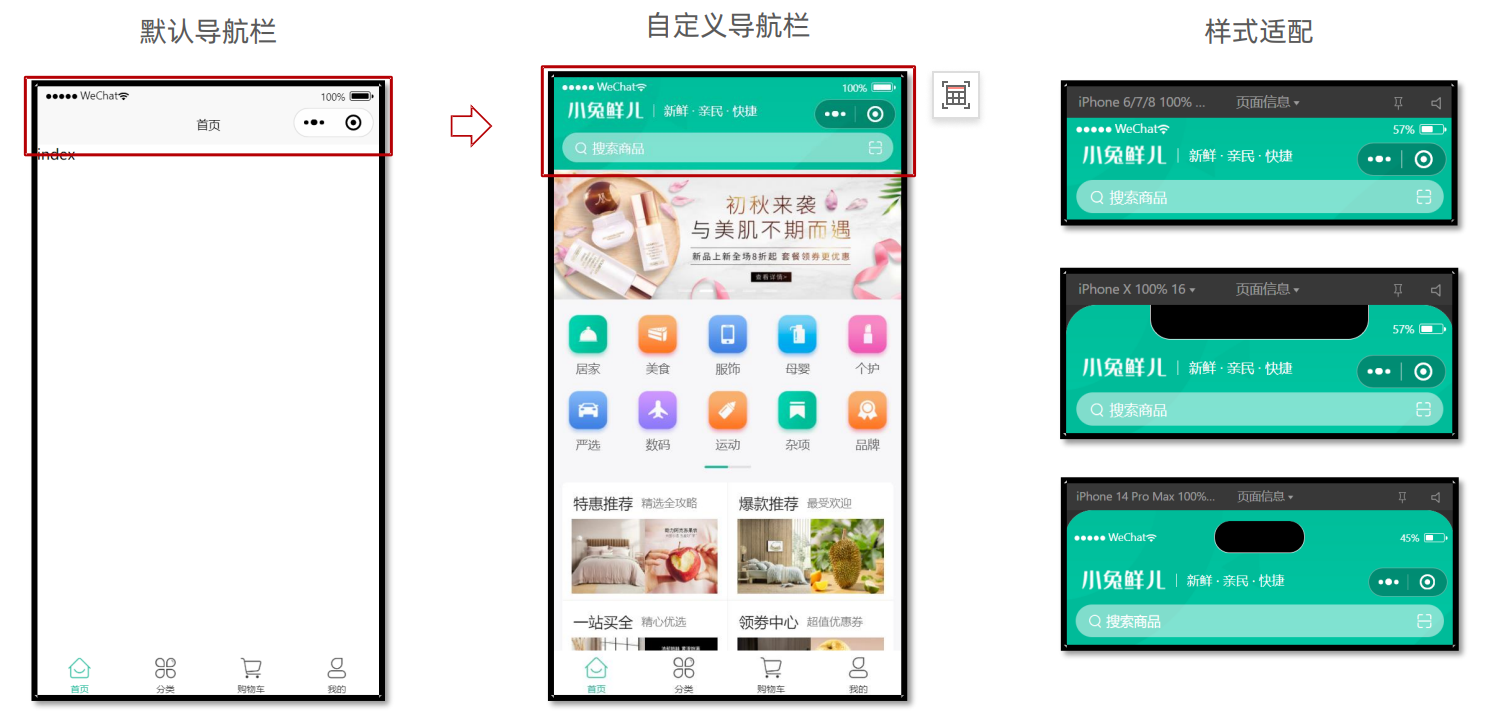
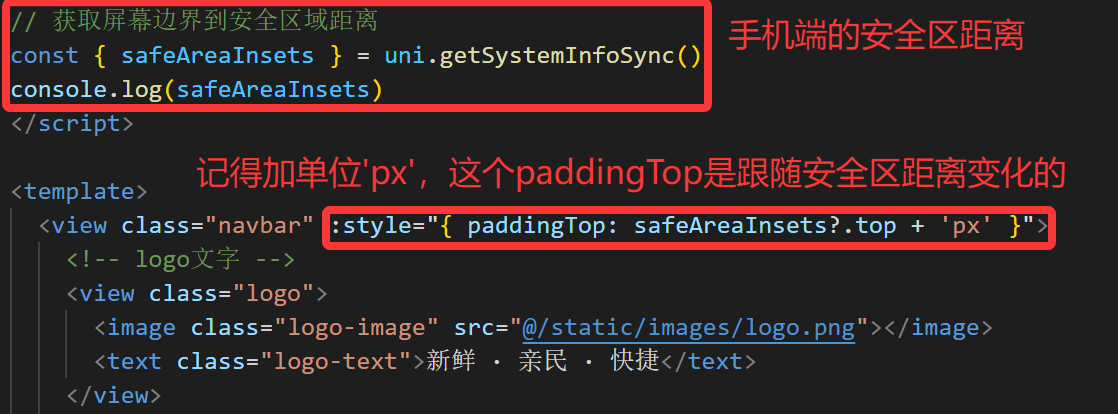
}10.首页 -- 自定义导航栏
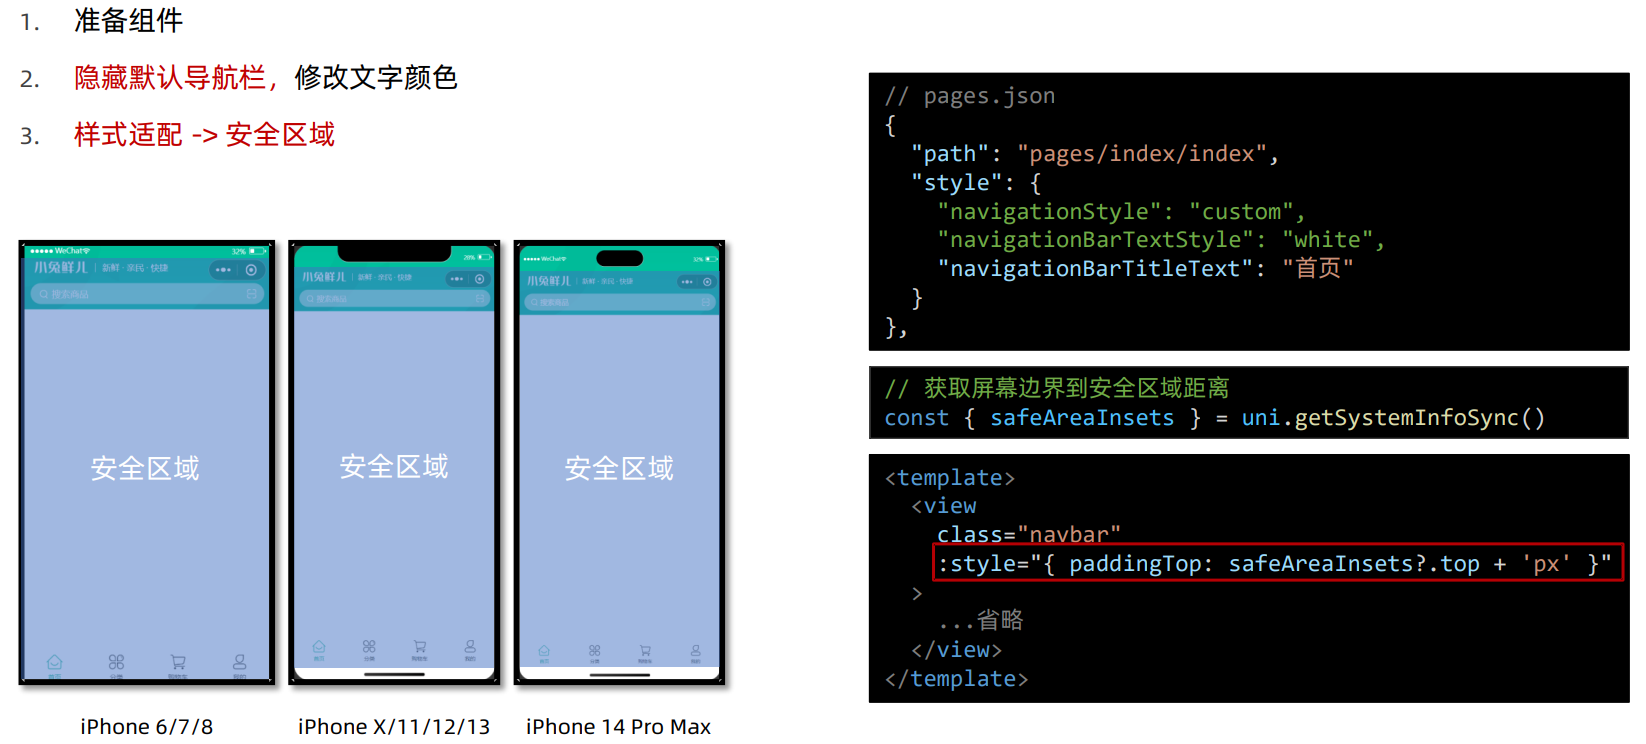
javascript
<script setup lang="ts">
// 获取屏幕边界到安全区域距离
const { safeAreaInsets } = uni.getSystemInfoSync()
console.log(safeAreaInsets)
</script>

<template>
  <view class="navbar" :style="{ paddingTop: safeAreaInsets?.top + 'px' }">
    <!-- logo文字 -->
    <view class="logo">
      <image class="logo-image" src="@/static/images/logo.png"></image>
      <text class="logo-text">新鲜 · 亲民 · 快捷</text>
    </view>
    <!-- 搜索条 -->
    <view class="search">
      <text class="icon-search">搜索商品</text>
      <text class="icon-scan"></text>
    </view>
  </view>
</template>
二、day2
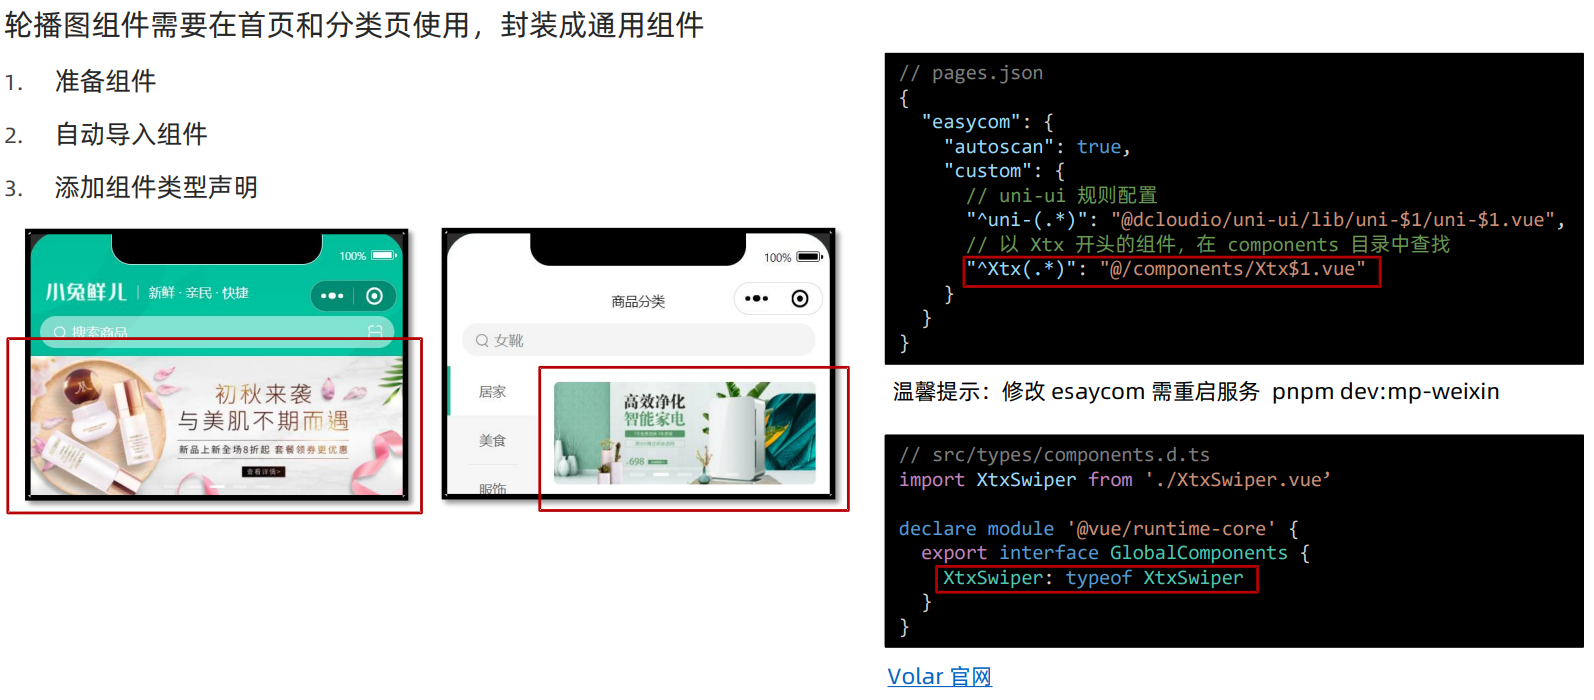
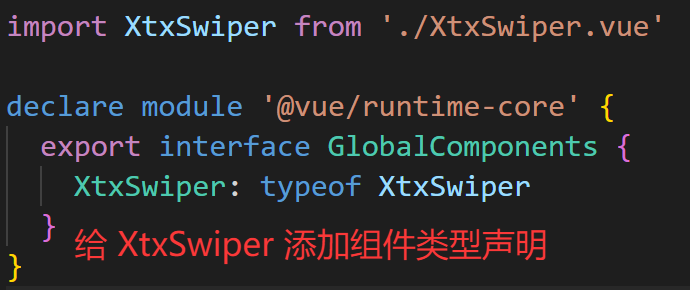
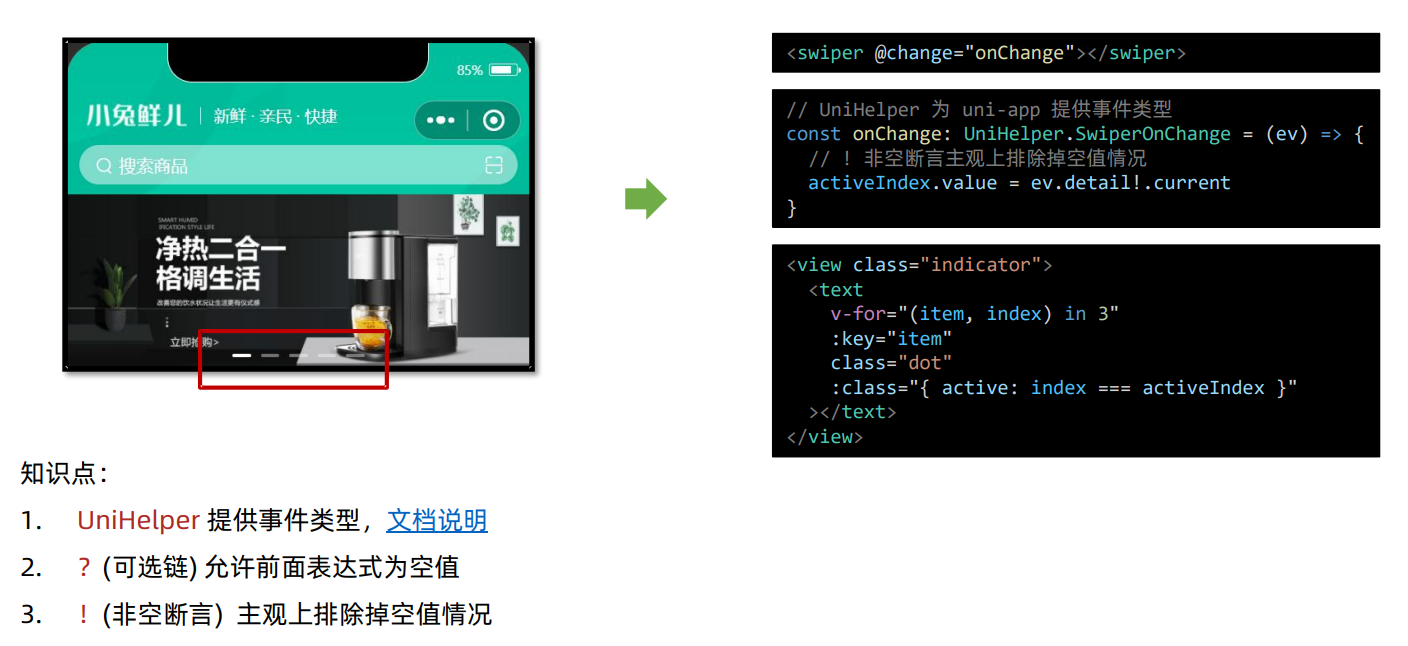
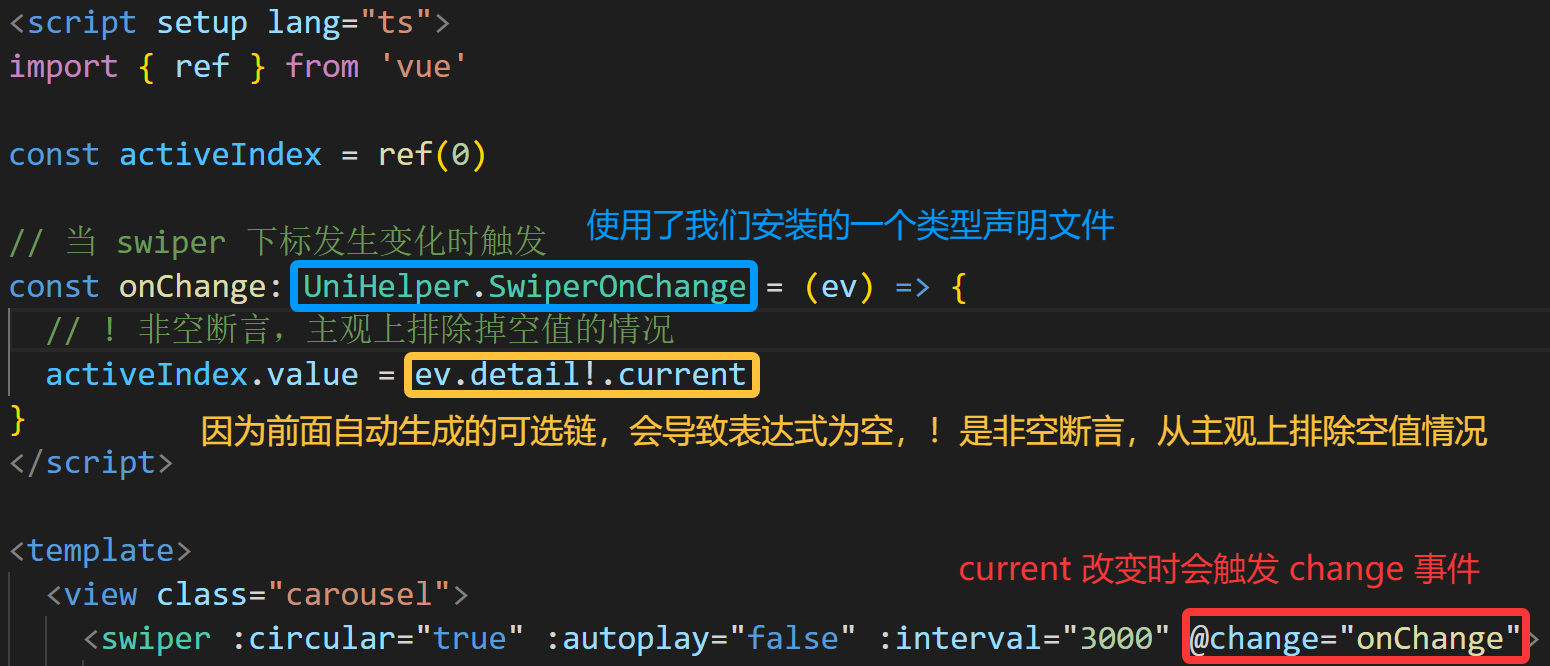
1.轮播图
(1)通用轮播组件
Volar 官网:https://github.com/vuejs/language-tools

(2)指示点
(3)获取轮播图数据
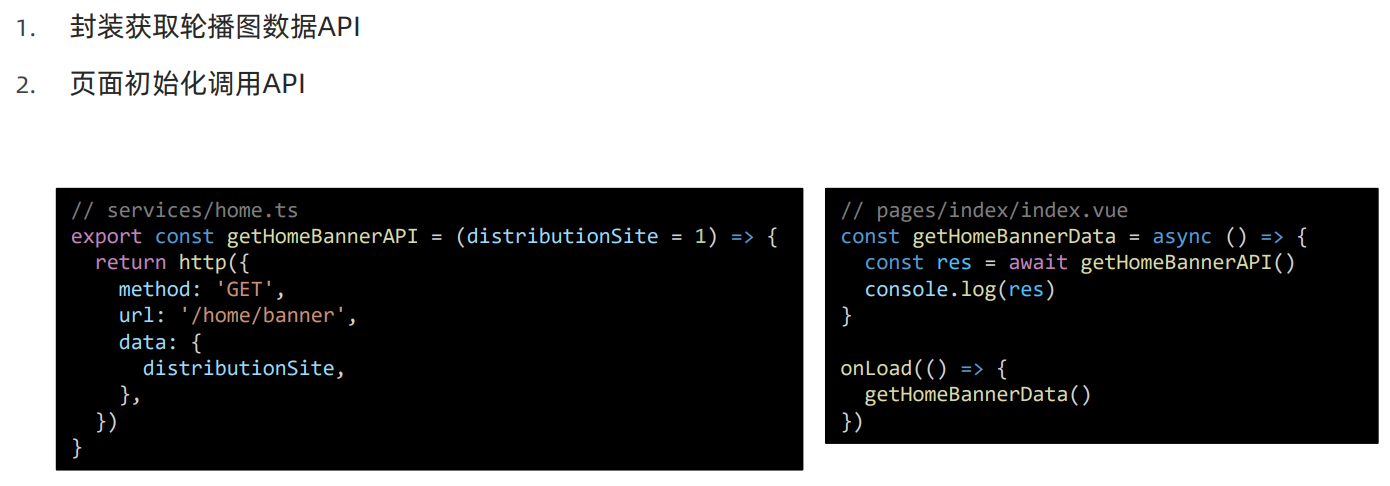
封装API
javascript
import { http } from '@/utils/http'
/**
 * 首页-广告区域-小程序
 * @param distributionSite 广告区域展示位置:1 为首页(默认值);2 为商品分类页
 */
export const getHomeBannerAPI = (distributionSite = 1) => {
  return http({
    method: 'GET',
    url: '/home/banner',
    data: {
      distributionSite,
    },
  })
}
调用API获取数据
javascript
import CustomNavbar from './components/CustomNavbar.vue'
import { getHomeBannerAPI } from '@/services/home'
import { onLoad } from '@dcloudio/uni-app'
const getHomeBannerData = async () => {
const res = await getHomeBannerAPI()
console.log(res)
}
onLoad(() => {
getHomeBannerData()
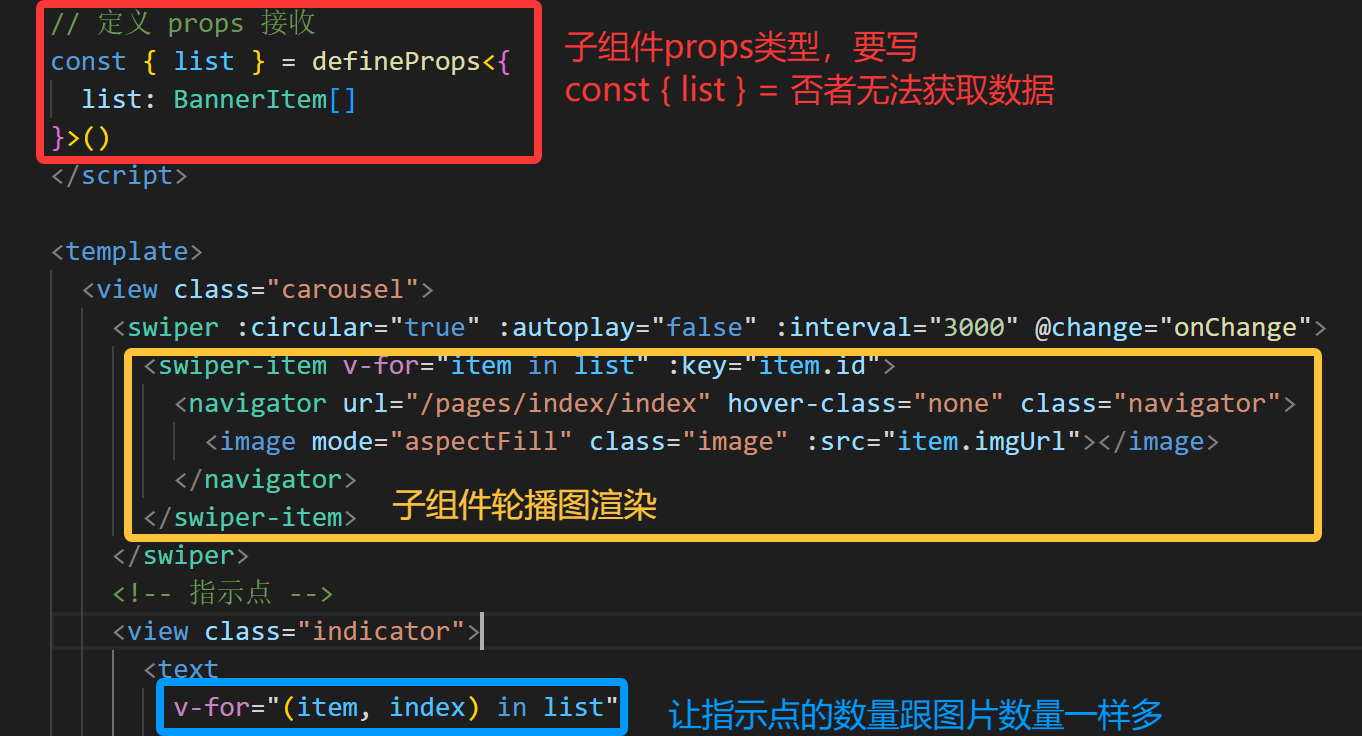
})(4)数据类型定义和渲染

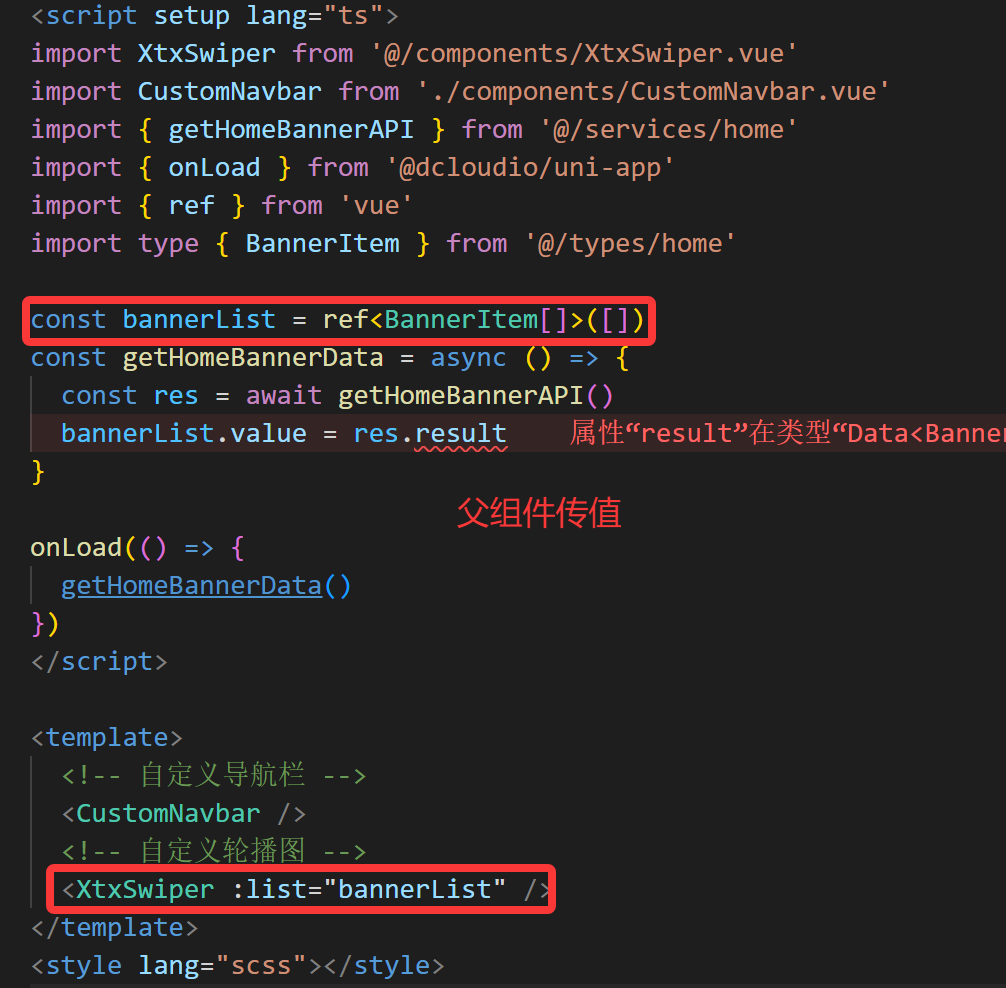
不写const { list } = defineProps
defineProps返回的 props 对象没有被任何变量接收;
你在模板里直接写 ,Vue 会认为这是一个未定义的变量,无法找到父组件传过来的数据 list
最终结果就是轮播图渲染失败
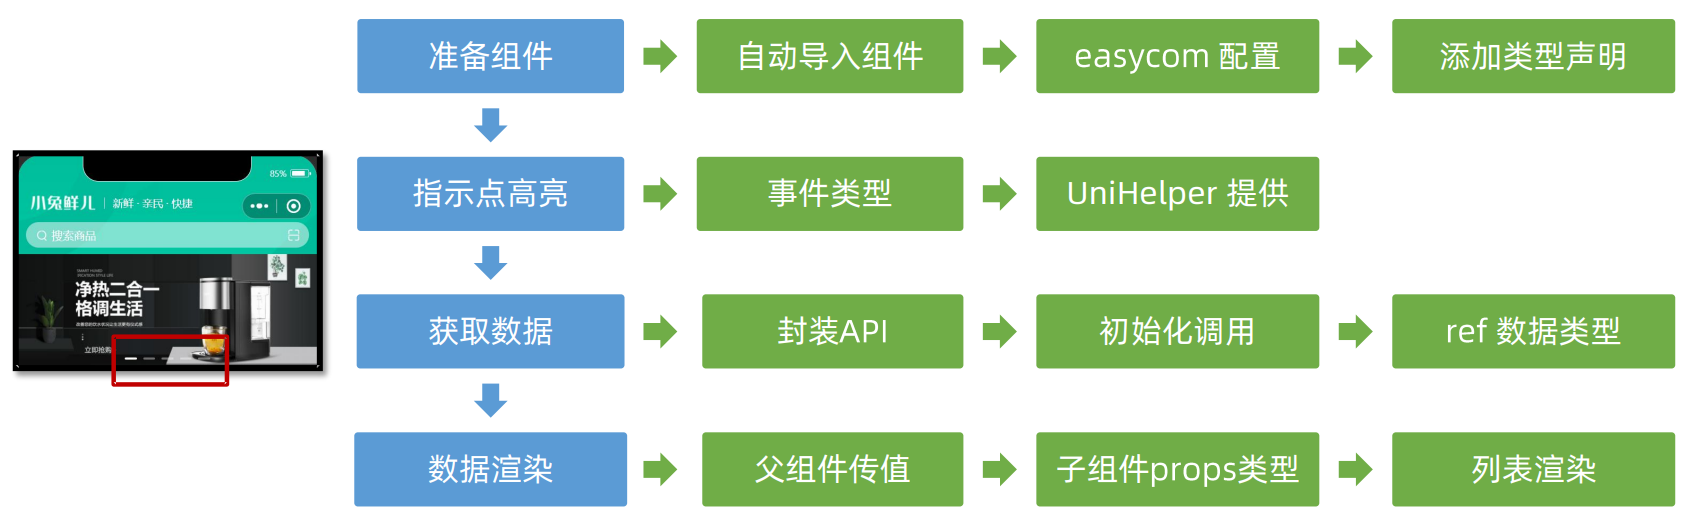
(5)总结:
2.前台分类
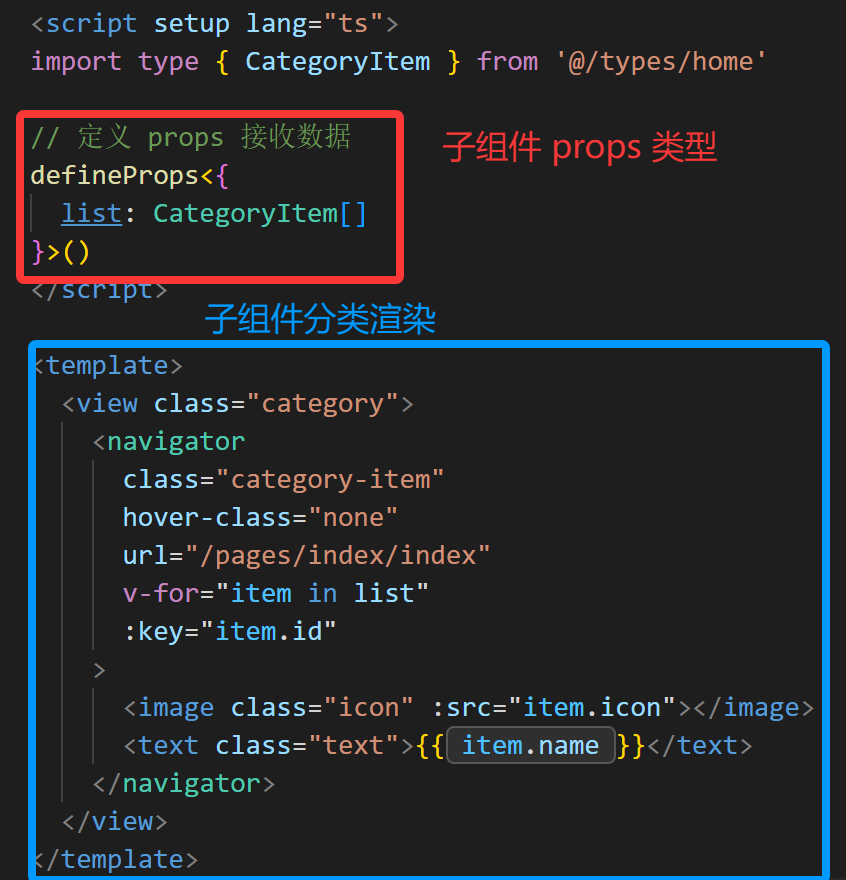
(1)组件封装
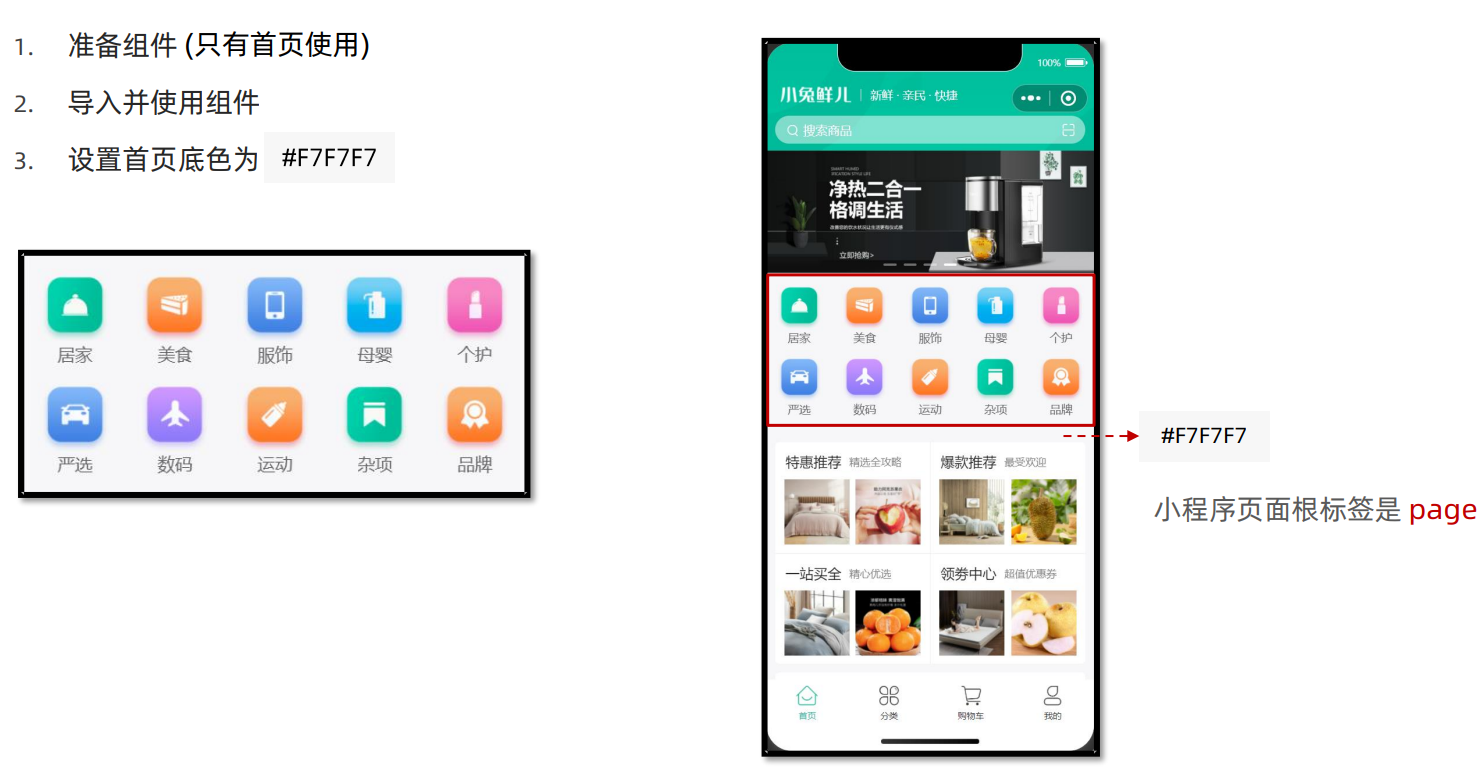
准备组件(CategoryPanel.vue)
javascript
<script setup lang="ts">
//
</script>

<template>
  <view class="category">
    <navigator
      class="category-item"
      hover-class="none"
      url="/pages/index/index"
      v-for="item in 10"
      :key="item"
    >
      <image
        class="icon"
        src="https://pcapi-xiaotuxian-front-devtest.itheima.net/miniapp/images/nav_icon_1.png"
      ></image>
      <text class="text">居家</text>
    </navigator>
  </view>
</template>

<style lang="scss">
/* 前台类目 */
.category {
  margin: 20rpx 0 0;
  padding: 10rpx 0;
  display: flex;
  flex-wrap: wrap;
  min-height: 328rpx;

  .category-item {
    width: 150rpx;
    display: flex;
    justify-content: center;
    flex-direction: column;
    align-items: center;
    box-sizing: border-box;

    .icon {
      width: 100rpx;
      height: 100rpx;
    }
    .text {
      font-size: 26rpx;
      color: #666;
    }
  }
}
</style>
(2)获取数据
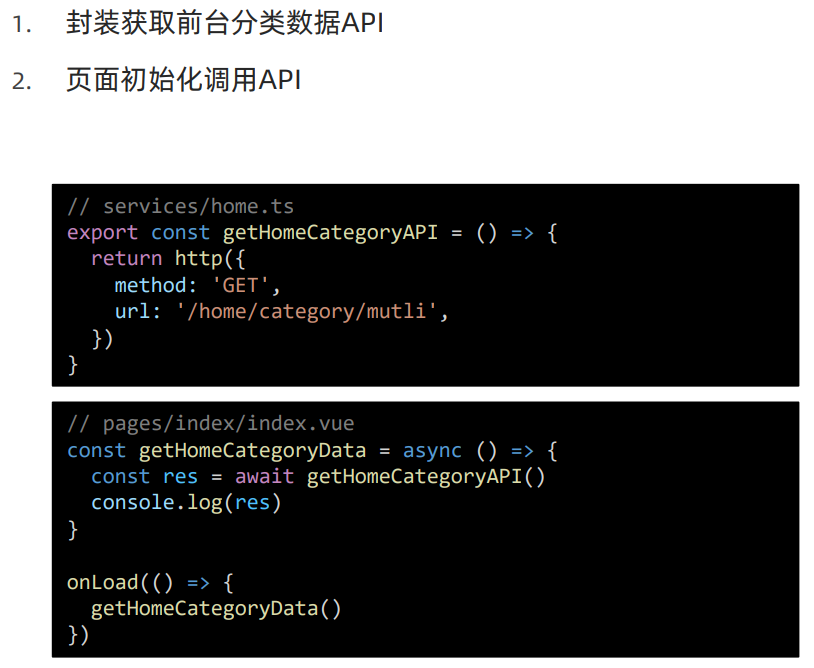
封装API
javascript
/**
* 首页 - 前台分类 - 小程序
*/
export const getHomeCategoryAPI = () => {
return http({
method: 'GET',
url: '/home/category/multi',
})
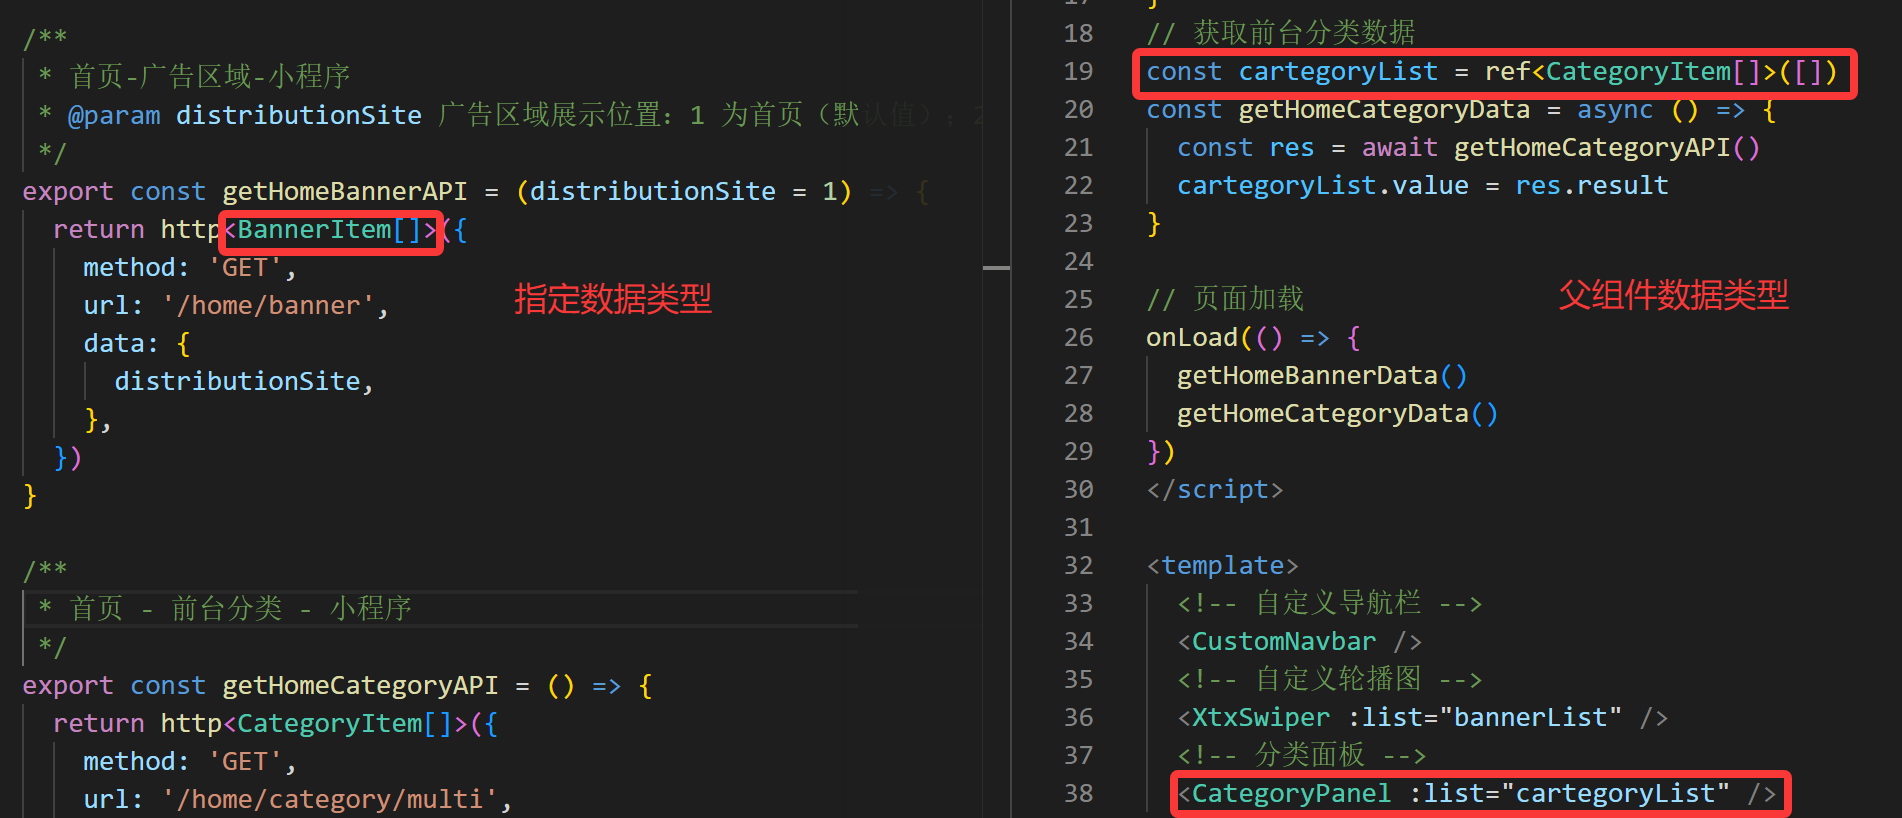
}获取数据
javascript
// 获取前台分类数据
const getHomeCategoryData = async () => {
  const res = await getHomeCategoryAPI()
}

// 页面加载
onLoad(() => {
  getHomeBannerData()
  getHomeCategoryData()
})
(3)前台分类数据类型并渲染
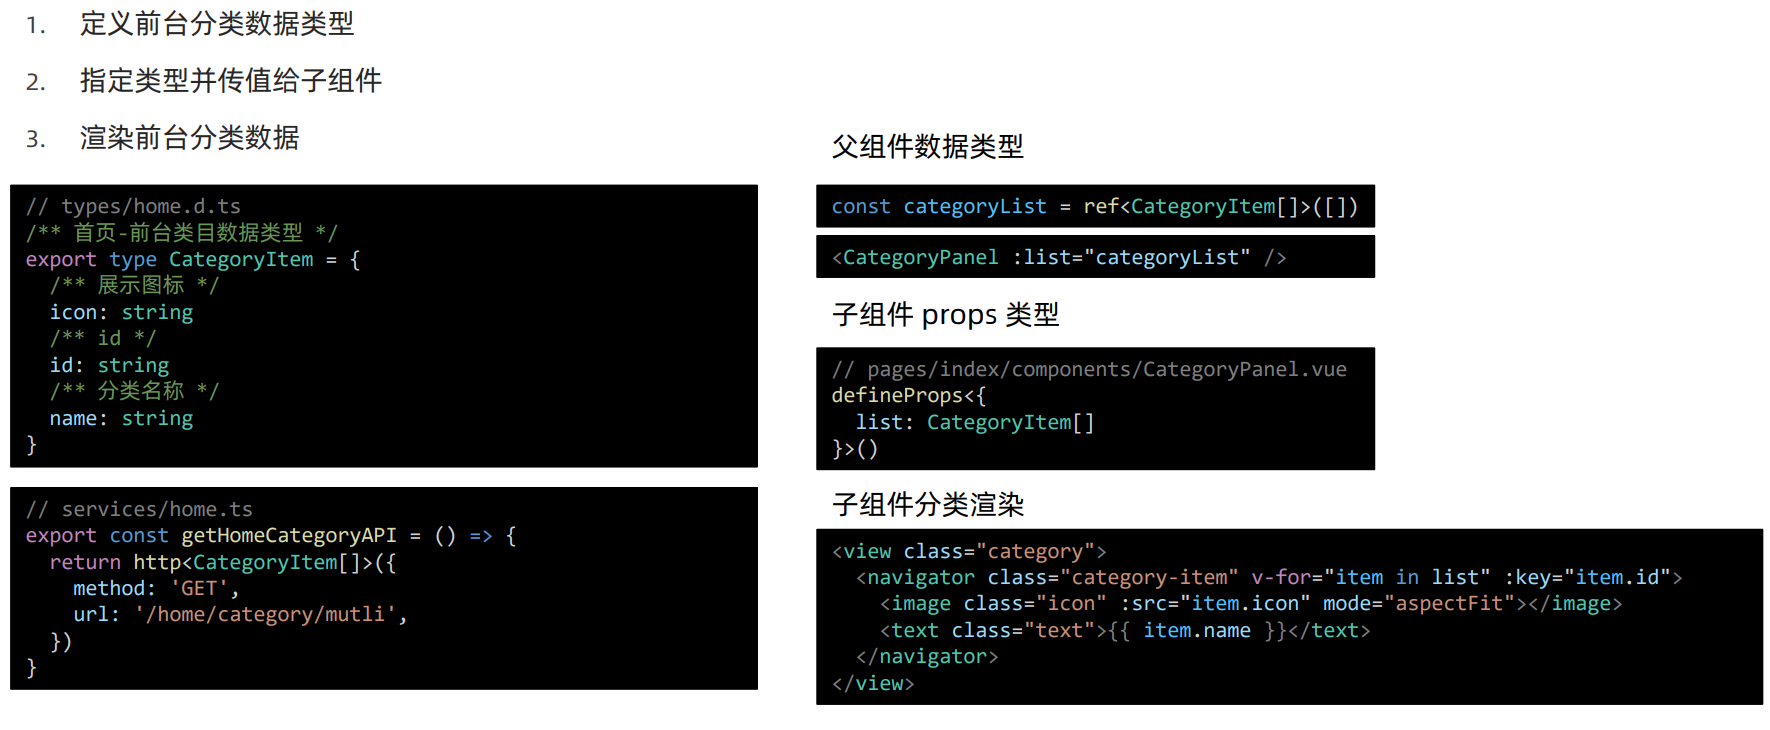
定义前台分类的数据类型
javascript
/** 首页-前台类目数据类型 */
export type CategoryItem = {
  /** 图标路径 */
  icon: string
  /** id */
  id: string
  /** 分类名称 */
  name: string
}
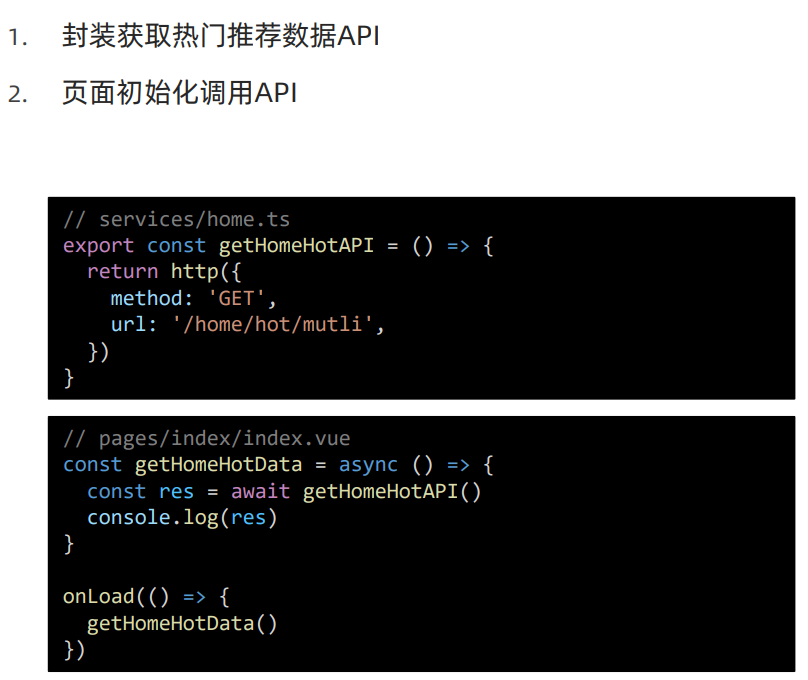
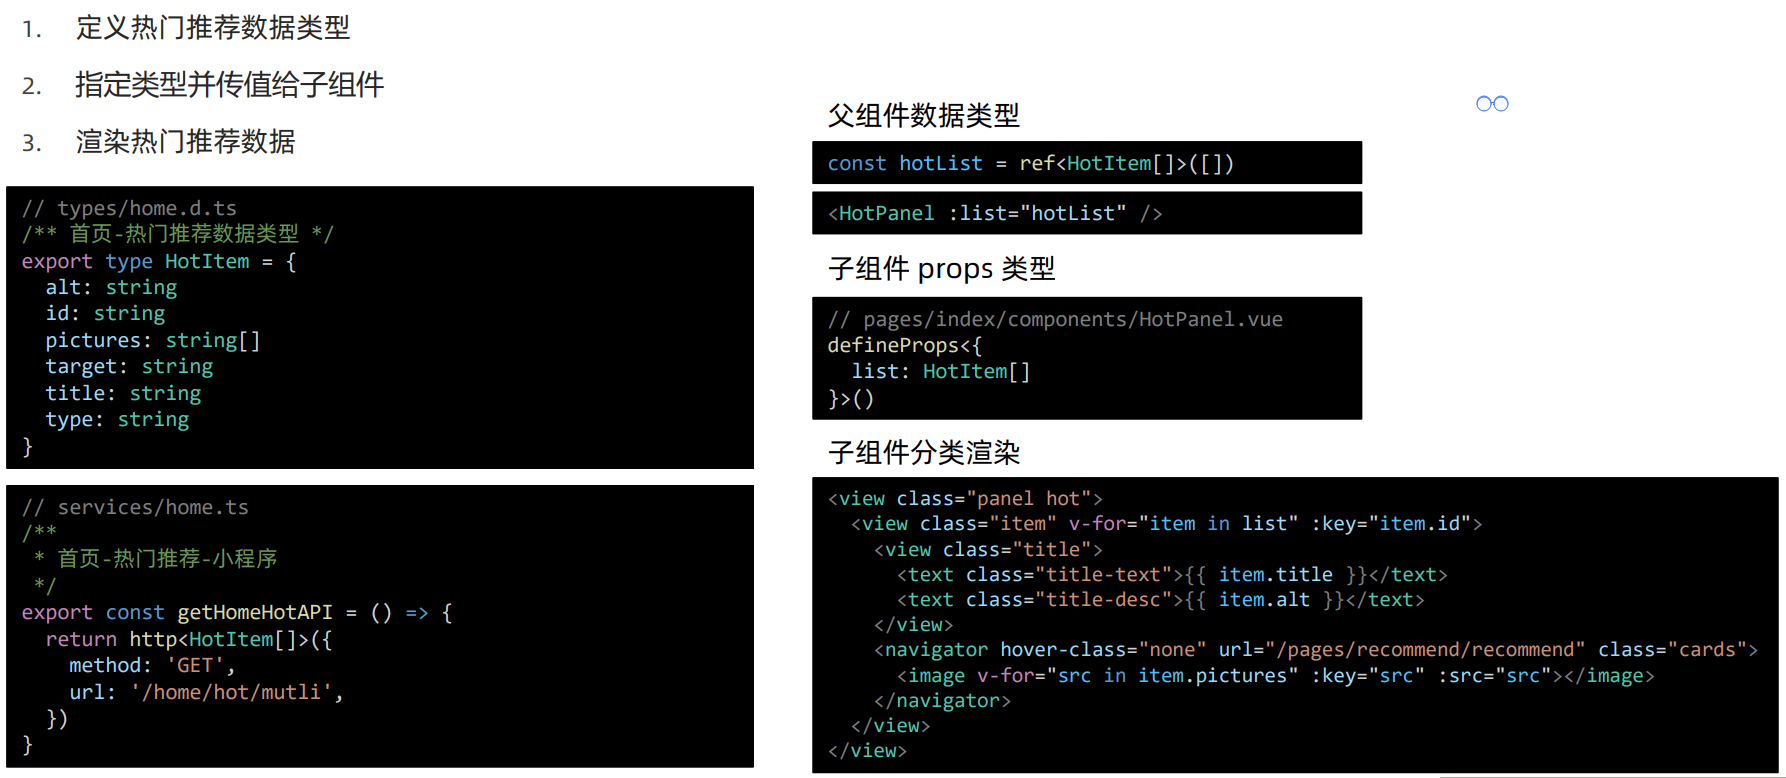
3.热门推荐
(1)组件封装
- 准备组件(只有首页使用) 2. 导入并使用组件
(2)获取热门推荐数据
(3)热门推荐数据类型并渲染
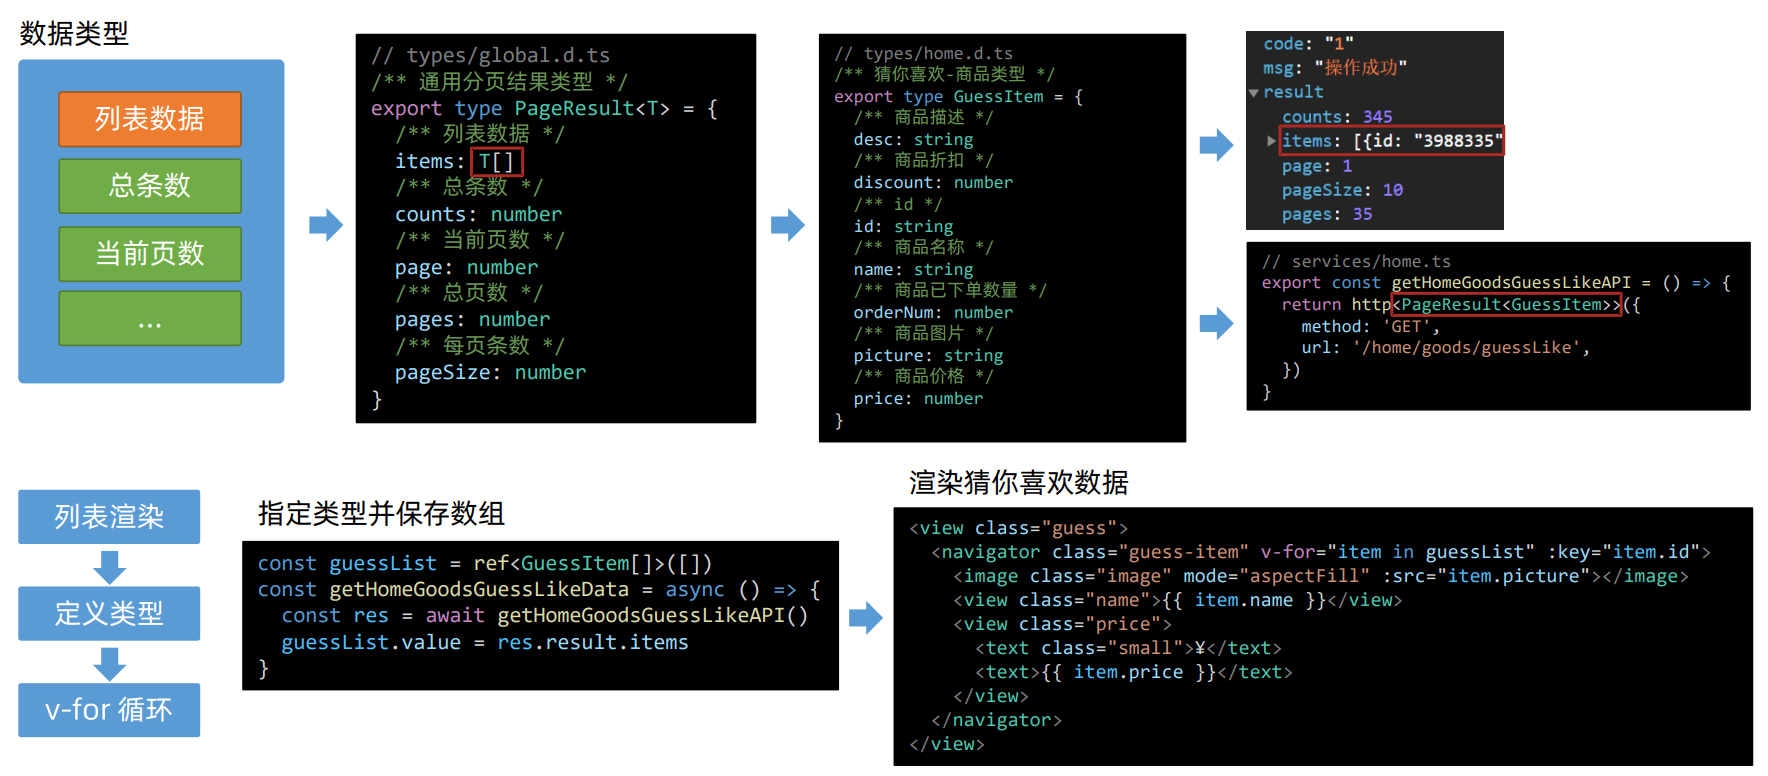
4.猜你喜欢
(1)组件封装
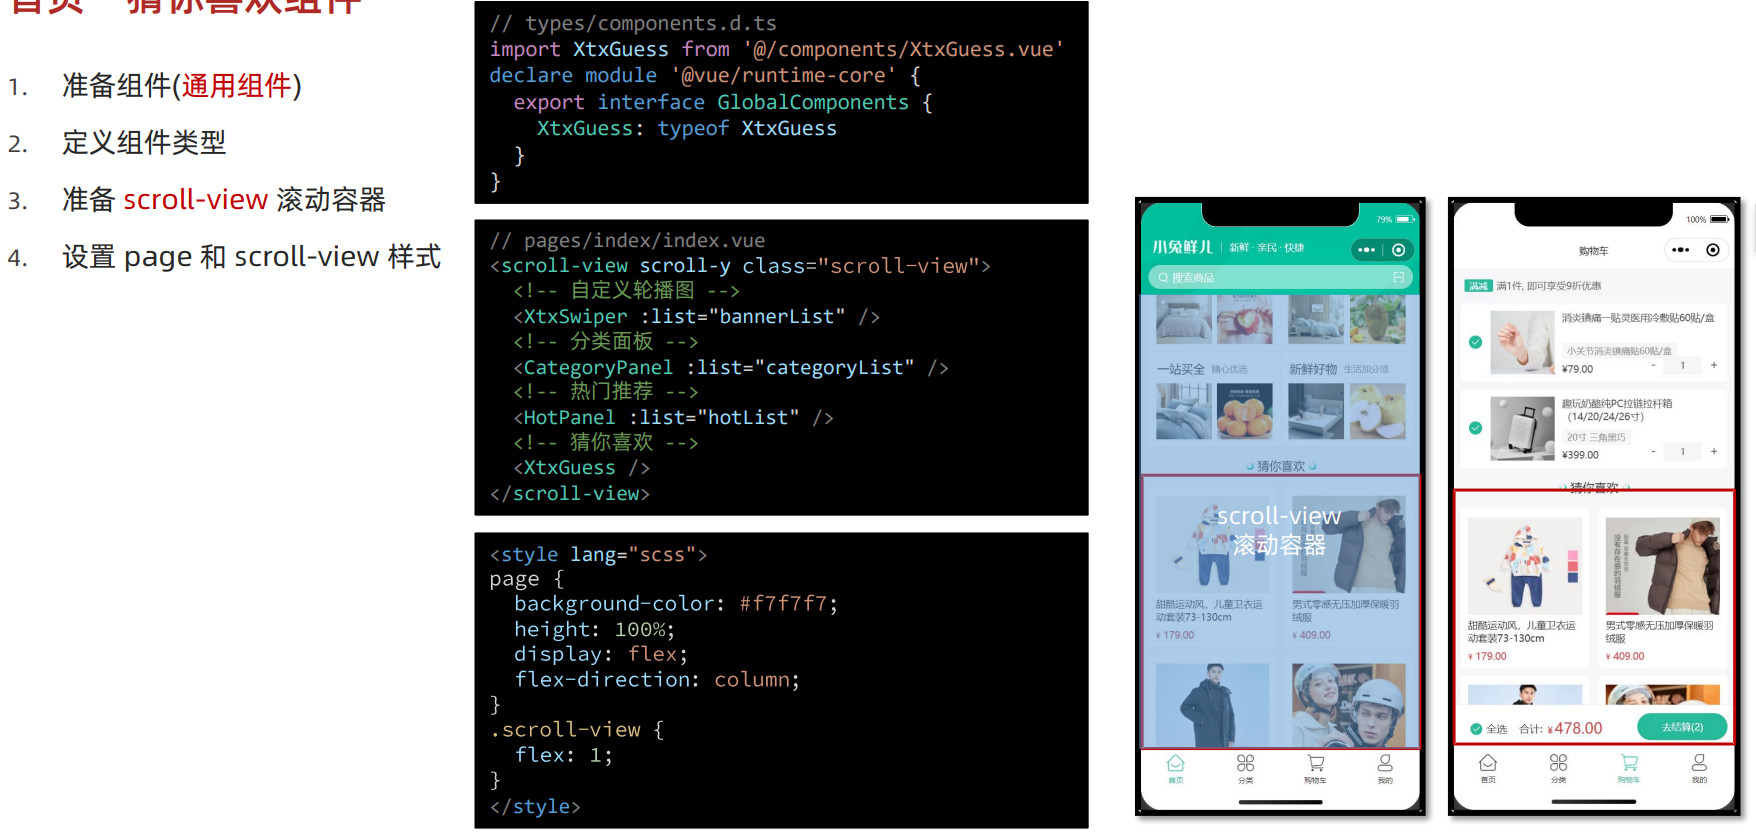
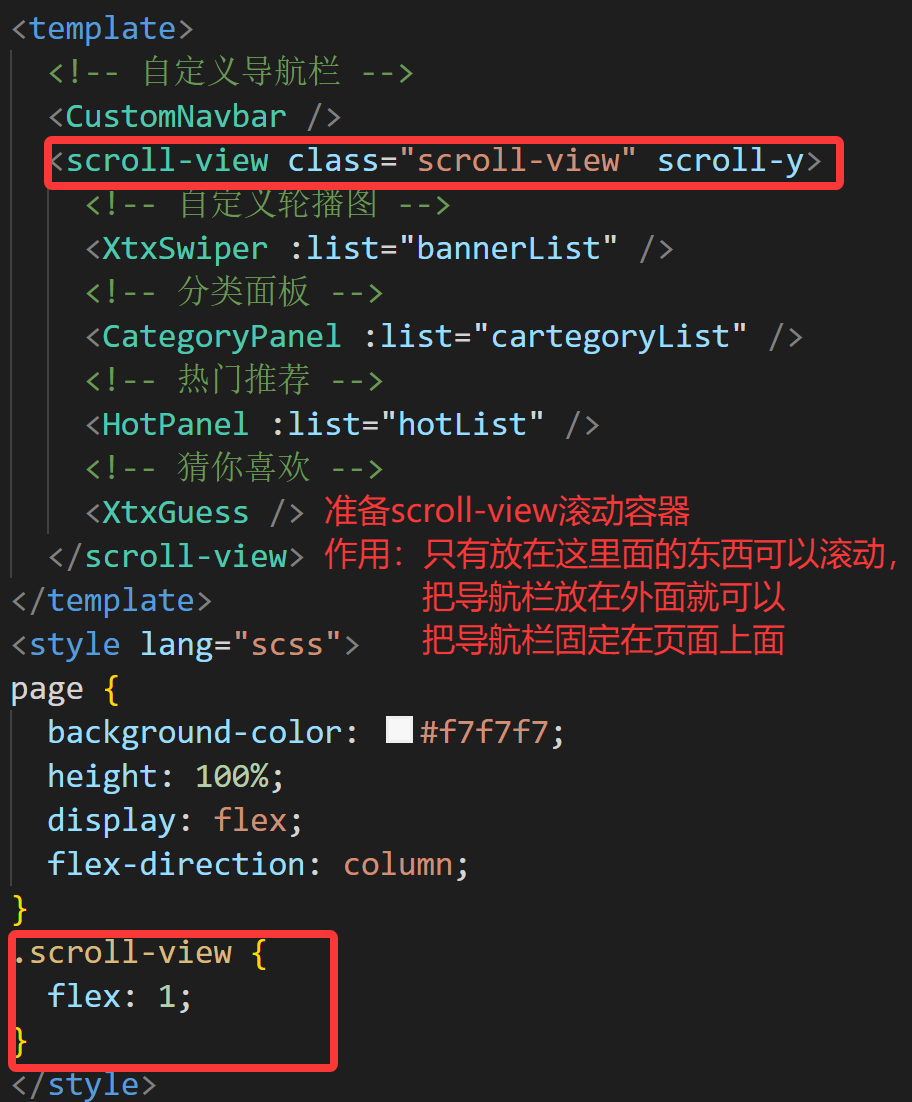
(2)获取数据


(3)类型定义和列表渲染