Android OTA 升级原理和流程介绍

update.zip 包分析

本篇及后续篇幅将通过分析 update.zip 包在 Android 系统升级中的具体过程,来理解 Android 系统中 Recovery 模式服务的工作原理。我们先从 update.zip 包的制作开始,然后依次分析 Android 系统的启动模式、Recovery 工作原理、如何从上层选择 System Update 到重启进入 Recovery 服务,以及 Recovery 服务中具体如何处理 update.zip 包升级、安装脚本 updater-script 是怎样被解析并执行的等一系列问题。分析过程中所用的 Android 源码是 gingerbread0919(tcc88xx 开发板标配),测试开发板是 tcc88xx。这是我在工作中总结的文档,当然在网上参考了不少内容,如有雷同纯属巧合。在分析过程中也存在很多未解决的问题,也希望大家不吝指教。

一、 update.zip包的目录结构

|----boot.img ​ |----system/ ​ |----recovery/ ​ |----recovery-from-boot.p ​|----etc/ ​ |----install-recovery.sh ​ |---META-INF/ ​|CERT.RSA ​ |CERT.SF ​|MANIFEST.MF ​ |----com/ ​|----google/ ​ |----android/ ​|----update-binary ​ |----updater-script ​|----android/ ​ `|----metadata

二、update.zip 包目录结构详解

以上是我们用命令 make otapackage 制作的 update.zip 包的标准目录结构。

1、boot.img:更新 boot 分区所需要的文件。这个 boot.img 主要包括 kernel + ramdisk。

2、system/ 目录 的内容在升级后会放在系统的 system 分区。主要用来更新系统的一些应用或应用会用到的一些库等。可以将 Android 源码编译后 out/target/product/tcc8800/system/ 中的所有文件拷贝到这个目录来代替。

3、recovery/ 目录 中的 recovery-from-boot.p 是 boot.img 和 recovery.img 的补丁(patch),主要用来更新 recovery 分区,其中 etc/ 目录下的 install-recovery.sh 是更新脚本。

4、update-binary :一个二进制文件,相当于一个脚本解释器,能够识别 updater-script 中描述的操作。该文件在 Android 源码编译后 out/target/product/tcc8800/system/bin/updater 中生成,可将 updater 重命名为 update-binary 得到。该文件在具体更新包中的名字由源码 bootable/recovery/install.c 中的宏 ASSUMED_UPDATE_BINARY_NAME 的值而定。

5、updater-script :此文件是一个脚本文件,具体描述了更新过程。我们可以根据具体情况编写该脚本来适应具体需求。该文件的命名由源码 bootable/recovery/updater/updater.c 文件中的宏 SCRIPT_NAME 的值而定。

6、metadata 文件:描述设备信息及环境变量的元数据。主要包括一些编译选项、签名公钥、时间戳以及设备型号等。

7、我们还可以在包中添加 userdata 目录 ,来更新系统中的用户数据部分。这部分内容在更新后会存放在系统的 /data 目录下。

8、update.zip 包的签名:update.zip 更新包在制作完成后需要对其签名,否则在升级时会出现认证失败的错误提示。而且签名要使用和目标板一致的加密公钥。加密公钥及加密需要的三个文件在 Android 源码编译后生成的具体路径为:

out/host/linux-x86/framework/signapk.jar

build/target/product/security/testkey.x509.pem

build/target/product/security/testkey.pk8

我们用命令 make otapackage 制作生成的 update.zip 包是已签过名的,如果自己做 update.zip 包时必须手动对其签名。

具体的加密方法:$ java -jar gingerbread/out/host/linux/framework/signapk.jar -w gingerbread/build/target/product/security/testkey.x509.pem gingerbread/build/target/product/security/testkey.pk8 update.zip update_signed.zip

以上命令在 update.zip 包所在的路径下执行,其中 signapk.jar、testkey.x509.pem 以及 testkey.pk8 文件的引用使用绝对路径。update.zip 是我们已经打好的包,update_signed.zip 是命令执行完生成的已经签过名的包。

9、MANIFEST.MF:这个 manifest 文件定义了与包的组成结构相关的数据,类似 Android 应用的 AndroidManifest.xml 文件。

10、CERT.RSA:与签名文件相关联的签名程序块文件,它存储了用于签名 JAR 文件的公共签名。

11、CERT.SF:这是 JAR 文件的签名文件,其中前缀 CERT 代表签名者。

另外,在具体升级时,对 update.zip 包的检查大致会分三步:① 检验 SF 文件与 RSA 文件是否匹配。② 检验 MANIFEST.MF 与签名文件中的 digest 是否一致。③ 检验包中的文件与 MANIFEST 中所描述的是否一致。

三、Android 升级包 update.zip 的生成过程分析

  1. update.zip 包的制作有两种方式,即手动制作和命令生成。

第一种,手动制作:即按照 update.zip 的目录结构手动创建我们需要的目录,然后将对应的文件拷贝到相应的目录下。比如我们向系统中新加一个应用程序,可以将新增的应用拷贝到我们新建的 update/system/app/ 下(system 目录是事先拷贝编译源码后生成的 system 目录),打包并签名后拷贝到 SD 卡就可以使用了。这种方式在实际的 tcc8800 开发板中未测试成功,签名部分未通过,可能与具体的开发板相关。

第二种,命令制作:Android 源码系统为我们提供了制作 update.zip 刷机包的命令,即 make otapackage。该命令在编译源码完成后并在源码根目录下执行。具体操作方式:在源码根目录下执行

$ . build/envsetup.sh

$ lunch 然后选择你需要的配置(如 17)

$ make otapackage

在编译完源码后最好再执行一遍上面的①、②步,防止执行③时出现未找到对应规则的错误提示。命令执行完成后生成的升级包位于 out/target/product/full_tcc8800_evm_target_files-eng.mumu.20120309.111059.zip,将这个包重新命名为 update.zip,并拷贝到 SD 卡中即可使用。

这种方式(即完全升级)在 tcc8800 开发板中已测试成功。

  1. 使用 make otapackage 命令生成 update.zip 的过程分析。

在源码根目录下执行 make otapackage 命令生成 update.zip 包主要分为两步:第一步是根据 Makefile 执行编译生成一个 update 原包(zip 格式);第二步是运行一个 Python 脚本,以上一步准备的 zip 包作为输入,最终生成我们需要的升级包。下面进一步分析这两个过程。

第一步:编译 Makefile。对应的 Makefile 文件所在位置:build/core/Makefile。从该文件的 884 行(tcc8800,gingerbread0919)开始会生成一个 zip 包,这个包最后会用来制作 OTA package 或者 filesystem image。先将这部分对应的 Makefile 贴出来如下:

makefile 复制代码
# -----------------------------------------------------------------  
# A zip of the directories that map to the target filesystem.  
# This zip can be used to create an OTA package or filesystem image  
# as a post-build step.  
#  
name := $(TARGET_PRODUCT)  
ifeq ($(TARGET_BUILD_TYPE),debug)  
  name := $(name)_debug  
endif  
name := $(name)-target_files-$(FILE_NAME_TAG)  
  
intermediates := $(call intermediates-dir-for,PACKAGING,target_files)  
BUILT_TARGET_FILES_PACKAGE := $(intermediates)/$(name).zip  
$(BUILT_TARGET_FILES_PACKAGE): intermediates := $(intermediates)  
$(BUILT_TARGET_FILES_PACKAGE): \  
        zip_root := $(intermediates)/$(name)  
  
# $(1): Directory to copy  
# $(2): Location to copy it to  
# The "ls -A" is to prevent "acp s/* d" from failing if s is empty.  
define package_files-copy-root  
  if [ -d "$(strip $(1))" -a "$$(ls -A $(1))" ]; then \  
    mkdir -p $(2) && \  
    $(ACP) -rd $(strip $(1))/* $(2); \  
  fi  
endef  
  
built_ota_tools := \  
    $(call intermediates-dir-for,EXECUTABLES,applypatch)/applypatch \  
    $(call intermediates-dir-for,EXECUTABLES,applypatch_static)/applypatch_static \  
    $(call intermediates-dir-for,EXECUTABLES,check_prereq)/check_prereq \  
    $(call intermediates-dir-for,EXECUTABLES,updater)/updater  
$(BUILT_TARGET_FILES_PACKAGE): PRIVATE_OTA_TOOLS := $(built_ota_tools)  
  
$(BUILT_TARGET_FILES_PACKAGE): PRIVATE_RECOVERY_API_VERSION := $(RECOVERY_API_VERSION)  
  
ifeq ($(TARGET_RELEASETOOLS_EXTENSIONS),)  
# default to common dir for device vendor  
$(BUILT_TARGET_FILES_PACKAGE): tool_extensions := $(TARGET_DEVICE_DIR)/../common  
else  
$(BUILT_TARGET_FILES_PACKAGE): tool_extensions := $(TARGET_RELEASETOOLS_EXTENSIONS)  
endif  
  
# Depending on the various images guarantees that the underlying  
# directories are up-to-date.  
$(BUILT_TARGET_FILES_PACKAGE): \  
        $(INSTALLED_BOOTIMAGE_TARGET) \  
        $(INSTALLED_RADIOIMAGE_TARGET) \  
        $(INSTALLED_RECOVERYIMAGE_TARGET) \  
        $(INSTALLED_SYSTEMIMAGE) \  
        $(INSTALLED_USERDATAIMAGE_TARGET) \  
        $(INSTALLED_ANDROID_INFO_TXT_TARGET) \  
        $(built_ota_tools) \  
        $(APKCERTS_FILE) \  
        $(HOST_OUT_EXECUTABLES)/fs_config \  
        | $(ACP)  
    @echo "Package target files: $@"  
    $(hide) rm -rf $@ $(zip_root)  
    $(hide) mkdir -p $(dir $@) $(zip_root)  
    @# Components of the recovery image  
    $(hide) mkdir -p $(zip_root)/RECOVERY  
    $(hide) $(call package_files-copy-root, \  
        $(TARGET_RECOVERY_ROOT_OUT),$(zip_root)/RECOVERY/RAMDISK)  
ifdef INSTALLED_KERNEL_TARGET  
    $(hide) $(ACP) $(INSTALLED_KERNEL_TARGET) $(zip_root)/RECOVERY/kernel  
endif  
ifdef INSTALLED_2NDBOOTLOADER_TARGET  
    $(hide) $(ACP) \  
        $(INSTALLED_2NDBOOTLOADER_TARGET) $(zip_root)/RECOVERY/second  
endif  
ifdef BOARD_KERNEL_CMDLINE  
    $(hide) echo "$(BOARD_KERNEL_CMDLINE)" $(zip_root)/RECOVERY/cmdline  
endif  
ifdef BOARD_KERNEL_BASE  
    $(hide) echo "$(BOARD_KERNEL_BASE)" $(zip_root)/RECOVERY/base  
endif  
ifdef BOARD_KERNEL_PAGESIZE  
    $(hide) echo "$(BOARD_KERNEL_PAGESIZE)" $(zip_root)/RECOVERY/pagesize  
endif  
    @# Components of the boot image  
    $(hide) mkdir -p $(zip_root)/BOOT  
    $(hide) $(call package_files-copy-root, \  
        $(TARGET_ROOT_OUT),$(zip_root)/BOOT/RAMDISK)  
ifdef INSTALLED_KERNEL_TARGET  
    $(hide) $(ACP) $(INSTALLED_KERNEL_TARGET) $(zip_root)/BOOT/kernel  
endif  
ifdef INSTALLED_2NDBOOTLOADER_TARGET  
    $(hide) $(ACP) \  
        $(INSTALLED_2NDBOOTLOADER_TARGET) $(zip_root)/BOOT/second  
endif  
ifdef BOARD_KERNEL_CMDLINE  
    $(hide) echo "$(BOARD_KERNEL_CMDLINE)" $(zip_root)/BOOT/cmdline  
endif  
ifdef BOARD_KERNEL_BASE  
    $(hide) echo "$(BOARD_KERNEL_BASE)" $(zip_root)/BOOT/base  
endif  
ifdef BOARD_KERNEL_PAGESIZE  
    $(hide) echo "$(BOARD_KERNEL_PAGESIZE)" $(zip_root)/BOOT/pagesize  
endif  
    $(hide) $(foreach t,$(INSTALLED_RADIOIMAGE_TARGET),\  
                mkdir -p $(zip_root)/RADIO; \  
                $(ACP) $(t) $(zip_root)/RADIO/$(notdir $(t));)  
    @# Contents of the system image  
    $(hide) $(call package_files-copy-root, \  
        $(SYSTEMIMAGE_SOURCE_DIR),$(zip_root)/SYSTEM)  
    @# Contents of the data image  
    $(hide) $(call package_files-copy-root, \  
        $(TARGET_OUT_DATA),$(zip_root)/DATA)  
    @# Extra contents of the OTA package  
    $(hide) mkdir -p $(zip_root)/OTA/bin  
    $(hide) $(ACP) $(INSTALLED_ANDROID_INFO_TXT_TARGET) $(zip_root)/OTA/  
    $(hide) $(ACP) $(PRIVATE_OTA_TOOLS) $(zip_root)/OTA/bin/  
    @# Files that do not end up in any images, but are necessary to  
    @# build them.  
    $(hide) mkdir -p $(zip_root)/META  
    $(hide) $(ACP) $(APKCERTS_FILE) $(zip_root)/META/apkcerts.txt  
    $(hide) echo "$(PRODUCT_OTA_PUBLIC_KEYS)" $(zip_root)/META/otakeys.txt  
    $(hide) echo "recovery_api_version=$(PRIVATE_RECOVERY_API_VERSION)" $(zip_root)/META/misc_info.txt  
ifdef BOARD_FLASH_BLOCK_SIZE  
    $(hide) echo "blocksize=$(BOARD_FLASH_BLOCK_SIZE)" >$(zip_root)/META/misc_info.txt  
endif  
ifdef BOARD_BOOTIMAGE_PARTITION_SIZE  
    $(hide) echo "boot_size=$(BOARD_BOOTIMAGE_PARTITION_SIZE)" >$(zip_root)/META/misc_info.txt  
endif  
ifdef BOARD_RECOVERYIMAGE_PARTITION_SIZE  
    $(hide) echo "recovery_size=$(BOARD_RECOVERYIMAGE_PARTITION_SIZE)" >$(zip_root)/META/misc_info.txt  
endif  
ifdef BOARD_SYSTEMIMAGE_PARTITION_SIZE  
    $(hide) echo "system_size=$(BOARD_SYSTEMIMAGE_PARTITION_SIZE)" >$(zip_root)/META/misc_info.txt  
endif  
ifdef BOARD_USERDATAIMAGE_PARTITION_SIZE  
    $(hide) echo "userdata_size=$(BOARD_USERDATAIMAGE_PARTITION_SIZE)" >$(zip_root)/META/misc_info.txt  
endif  
    $(hide) echo "tool_extensions=$(tool_extensions)" >$(zip_root)/META/misc_info.txt  
ifdef mkyaffs2_extra_flags  
    $(hide) echo "mkyaffs2_extra_flags=$(mkyaffs2_extra_flags)" $(zip_root)/META/misc_info.txt  
endif  
    @# Zip everything up, preserving symlinks  
    $(hide) (cd $(zip_root) && zip -qry ../$(notdir $@) .)  
    @# Run fs_config on all the system files in the zip, and save the output  
    $(hide) zipinfo -1 $@ | awk -F/ 'BEGIN { OFS="/" } /^SYSTEM// {$$1 = "system"; print}' | $(HOST_OUT_EXECUTABLES)/fs_config $(zip_root)/META/filesystem_config.txt  
    $(hide) (cd $(zip_root) && zip -q ../$(notdir $@) META/filesystem_config.txt)  
  
  
target-files-package: $(BUILT_TARGET_FILES_PACKAGE)  
  
  
ifneq ($(TARGET_SIMULATOR),true)  
ifneq ($(TARGET_PRODUCT),sdk)  
ifneq ($(TARGET_DEVICE),generic)  
ifneq ($(TARGET_NO_KERNEL),true)  
ifneq ($(recovery_fstab),)  

根据上面的 Makefile 可以分析这个包的生成过程

第一步:创建一个 root_zip 根目录,并依次在此目录下创建所需要的如下其他目录

① 创建 RECOVERY 目录,并填充该目录的内容,包括 kernel 的镜像和 recovery 根文件系统的镜像。此目录最终用于生成 recovery.img。

② 创建并填充 BOOT 目录。包含 kernel 和 cmdline 以及 pagesize 大小等,该目录最终用来生成 boot.img。

③ 向 SYSTEM 目录填充 system image。

④ 向 DATA 填充 data image。

⑤ 用于生成 OTA package 包所需要的额外内容。主要包括一些 bin 命令。

⑥ 创建 META 目录并向该目录下添加一些文本文件,如 apkcerts.txt(描述 APK 文件用到的认证证书)、misc_info.txt(描述 Flash 内存的块大小以及 boot、recovery、system、userdata 等分区的大小信息)。

⑦ 使用保留连接选项压缩我们在上面获得的 root_zip 目录。

⑧ 使用 fs_configbuild/tools/fs_config)配置上面的 zip 包内所有系统文件(system/ 下各目录、文件)的权限、属主等信息。fs_config 包含了一个头文件 #include "private/android_filesystem_config.h",在这个头文件中以硬编码的方式设定了 system 目录下各文件的权限、属主。执行完配置后会将配置后的信息以文本方式输出到 META/filesystem_config.txt 中,并再一次 zip 压缩成我们最终需要的原始包。

第二步:上面的 zip 包只是一个编译过程中生成的原始包。

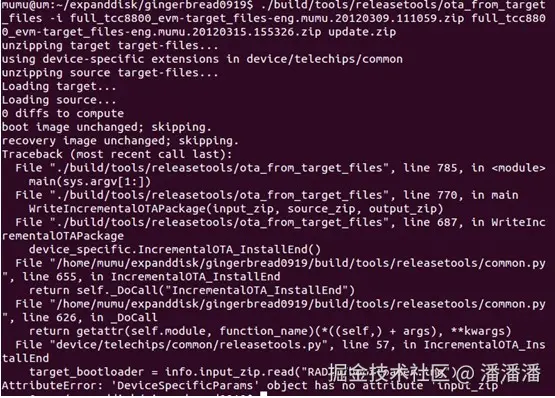
这个原始 zip 包在实际的编译过程中有两个作用:一是用来生成 OTA update 升级包,二是用来生成系统镜像。在编译过程中若生成 OTA update 升级包,会调用(具体位置在 Makefile 的 1037 行到 1058 行)一个名为 ota_from_target_files 的 Python 脚本,位置在 build/tools/releasetools/ota_from_target_files。这个脚本的作用是以第一步生成的 zip 原始包作为输入,最终生成可用的 OTA 升级 zip 包。

下面我们分析使用这个脚本生成最终 OTA 升级包的过程

㈠ 首先看一下这个脚本开始部分的帮助文档。

Usage: ota_from_target_files flags input_target_files output_ota_package -b 过时的。 -k 签名所使用的密钥。 -i 生成增量 OTA 包时使用此选项。后面我们会用到这个选项来生成 OTA 增量包。 -w 是否清除 userdata 分区。 -n 在升级时是否不检查时间戳,缺省要检查,即缺省情况下只能基于旧版本升级。 -e 是否有额外运行的脚本。 -m 执行过程中生成脚本(updater-script)所需要的格式,目前有两种即 amend 和 edify。对应两种版本升级时会采用不同的解释器,缺省会同时生成两种格式的脚本。 -p 定义脚本用到的一些可执行文件的路径。 -s 定义额外运行脚本的路径。 -x 定义额外运行的脚本可能用的键值对。 -v 执行过程中打印出执行的命令。 -h 命令帮助。

㈡ 下面我们分析 ota_from_target_files 这个 Python 脚本是怎样生成最终 zip 包的。先将这个脚本的代码链接如下:

ota_from_target_files 的 Python 脚本

主函数 main 是 Python 的入口函数,我们从 main 函数开始看,大概看一下 main 函数(脚本最后)里的流程就能知道脚本的执行过程了。

① 在 main 函数的开头,首先将用户设定的 option 选项存入 OPTIONS 变量中,它是一个 Python 中的类。紧接着判断有没有额外的脚本,如果有就读入到 OPTIONS 变量中。 ② 解压缩输入的 zip 包,即我们在上文生成的原始 zip 包。然后判断是否用到 device-specific extensions(设备扩展),如果用到,随即读入到 OPTIONS 变量中。 ③ 判断是否签名,然后判断是否有新内容的增量源,有的话就解压该增量源包放入一个临时变量中(source_zip)。自此,所有的准备工作已完毕,随即会调用该脚本中最主要的函数 WriteFullOTAPackage(input_zip, output_zip)。 ④ WriteFullOTAPackage 函数的处理过程是:先获得脚本的生成器,默认格式是 edify;然后获得 metadata 元数据,此数据来自于 Android 的一些环境变量;然后获得设备配置参数比如 API 函数的版本;最后判断是否忽略时间戳。 ⑤ WriteFullOTAPackage 函数做完准备工作后就开始生成升级用的脚本文件(updater-script)了。生成脚本文件后将上一步获得的 metadata 元数据写入到输出包 out_zip。 ⑥ 至此,一个完整的 update.zip 升级包就生成了。生成位置在:out/target/product/tcc8800/full_tcc8800_evm-ota-eng.mumu.20120315.155326.zip。将升级包拷贝到 SD 卡中就可以用来升级了。 四、Android OTA 增量包 update.zip 的生成

在上面的过程中生成的 update.zip 升级包是全部系统的升级包,大小有 80M 多。这对手机用户来说,用来升级的流量是很大的。而且在实际升级中,我们只希望能够升级我们改变的那部分内容,这就需要使用增量包来升级。生成增量包的过程也需要上文中提到的 ota_from_target_files.py 的参与。

下面是制作 update.zip 增量包的过程。

① 在源码根目录下依次执行下列命令: ​ $ . build/envsetup.sh$ lunch 选择 17 ​ $ make$ make otapackage ​ 执行上面的命令后会在 out/target/product/tcc8800/ 下生成我们第一个系统升级包。我们先将其命名为 A.zip。

② 在源码中修改我们需要改变的部分,比如修改内核配置、增加新的驱动等。修改后再一次执行上面的命令,就会生成第二个修改后生成的 update.zip 升级包。将其命名为 B.zip。

③ 在上文中我们看了 ota_from_target_files.py 脚本的使用帮助,其中选项 -i 就是用来生成差分增量包的。使用方法是以上面的 A.zip 和 B.zip 包作为输入,以 update.zip 作为输出。生成的 update.zip 就是我们最后需要的增量包。

具体使用方式是:将上述两个包拷贝到源码根目录下,然后执行下面的命令:

$ ./build/tools/releasetools/ota_from_target_files -i A.zip B.zip update.zip

在执行上述命令时会出现未找到 recovery_api_version 的错误。原因是在执行上面的脚本时如果使用选项 -i 则会调用 WriteIncrementalOTAPackage,它会从 A 包和 B 包中的 META 目录下搜索 misc_info.txt 来读取 recovery_api_version 的值。但是在执行 make otapackage 命令时生成的 update.zip 包中没有这个目录,更没有这个文档。

此时我们就需要使用执行 make otapackage 生成的原始 zip 包。这个包的位置在 out/target/product/tcc8800/obj/PACKAGING/target_files_intermediates/ 目录下,它是在用命令 make otapackage 之后的中间产物,是最原始的升级包。我们将两次编译生成的包分别重命名为 A.zip 和 B.zip,并拷贝到 SD 卡根目录下重复执行上面的命令:

$ ./build/tools/releasetools/ota_from_target_files -i A.zip B.zip update.zip

在上述命令即将执行完毕时,device/telechips/common/releasetools.py 会调用 IncrementalOTA_InstallEnd,在这个函数中读取包中的 RADIO/bootloader.img

而包中是没有这个目录和 bootloader.img 的。所以执行失败,未能生成对应的 update.zip。这可能与我们未修改 bootloader(升级 firmware)有关。此问题在下一篇博客已经解决,在下一篇中讲解制作增量包失败的原因以及解决方案。

一、生成 OTA 增量包失败的解决方案

在上一篇末尾使用 ota_from_target_files 脚本制作 update.zip 增量包时失败,我们先将出现的错误贴出来。

在执行这个脚本的最后,读取 input_zipRADIO/bootloader.img 时出现错误,显示 DeviceSpecificParams 这个对象中没有 input_zip 属性。

我们先从脚本中出现错误的调用函数开始查找。出现错误的调用位置是在函数 WriteIncrementalOTAPackage(443 行)中的 device_specific.IncrementalOTA_InstallEnd(),位于 WriteIncrementalOTAPackage() 的末尾。进一步跟踪源码发现,这是一个回调函数,它的具体执行方法位于源码中 /device/telechips/common/releasetools.py 脚本中的 IncrementalOTA_InstallEnd() 函数。下面就分析这个函数的作用。
releasetools.py 脚本中的两个函数 FullOTA_InstallEnd()IncrementalOTA_InstallEnd() 的作用,都是从输入包中读取 RADIO/ 下的 bootloader.img 文件写到输出包中,同时生成安装 bootloader.img 时执行脚本的那部分命令。只不过一个是直接将输入包中的 bootloader.img 镜像写到输出包中,一个是先比较 target_zipsource_zip 中的 bootloader.img 是否不同(使用 -i 选项生成差分包时),然后将新的镜像写入输出包中。下面先将这个函数(位于 /device/telechips/common/releasetools.py)的具体实现贴出来:

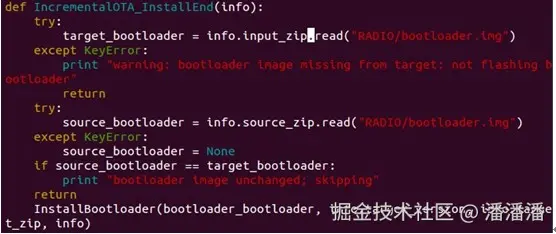
我们的实际情况是,在用命令 make otapackage 时生成的包中是没有 RADIO 目录下的 bootloader.img 镜像文件的(因为这部分更新已被屏蔽掉了)。但是这个函数中对于从包中未读取到 bootloader.img 文件的情况是有错误处理的,即返回。所以我们要从出现的实际错误中寻找问题的原由。
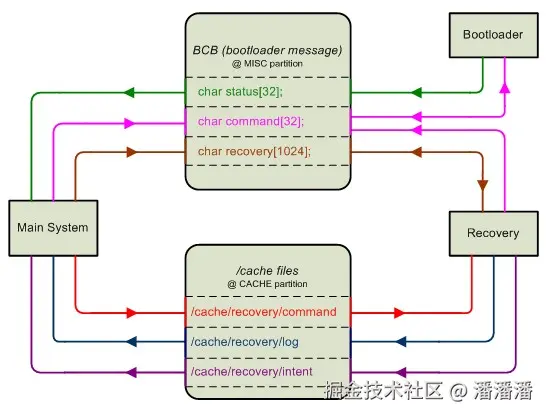
真正出现错误的地方是:

target_bootloader = info.input_zip.read("RADIO/bootloader.img")

出现错误的原因是:AttributeError: 'DeviceSpecificParams' object has no attribute 'input_zip',提示我们 DeviceSpecificParams 对象没有 input_zip 这个属性。

在用 ota_from_target_files 脚本制作差分包时使用了 -i 选项,并且只有这种情况有三个参数,即 target_zipsource_zipout_zip。而出现错误的地方是 target_bootloader = info.input_zip.read("RADIO/bootloader.img"),它使用的是 input_zip。我们要怀疑这个地方是不是用错了,而应该使用 info.target_zip.read()。下面可以证实一下我们的猜测。
ota_from_target_files 脚本中 WriteFullOTAPackage()WriteIncrementalOTAPackage 这两个函数(分别用来生成全包和差分包)可以发现,在它们的开始部分都对 device_specific 进行了赋值。其中 WriteFullOTAPackage() 对应的参数是 input_zipout_zip,而 WriteIncrementalOTAPackage 对应的是 target_zipsource_zipout_zip。我们可以看一下在 WriteIncrementalOTAPackage 函数中这部分的具体实现:

从上图可以发现,在 WriteIncrementalOTAPackage 函数对 DeviceSpecificParams 对象进行初始化时,确实使用的是 target_zip 而不是 input_zip。而在 releasetools.py 脚本中使用的却是 info.input_zip.read(),所以才会出现 DeviceSpecificParams 对象没有 input_zip 这个属性。由此我们找到了问题的所在(这是不是源码中的一个 Bug?)。
releasetools.py 脚本中 IncrementalOTA_InstallEnd(info) 函数里的 target_bootloader = info.input_zip.read("RADIO/bootloader.img") 改为 target_bootloader = info.target_zip.read("RADIO/bootloader.img"),然后重新执行上面提到的制作差分包命令,就生成了我们需要的差分包 update.zip。

二、差分包 update.zip 的更新测试

在上面制作差分包脚本命令中,生成差分包的原理是:参照第一个参数(target_zip),将第二个参数(source_zip)中不同的部分输出到第三个参数(output_zip)中。其中 target_zip 与 source_zip 的先后顺序不同,产生的差分包也将不同。

在实际的测试过程中,我们的增量包要删除之前添加的一个应用(在使用 update.zip 全包升级时增加的),其他的部分如内核都没有改动,所以生成的差分包很简单,只有 META-INF 这个文件夹。主要的不同都体现在 updater-script 脚本中,其中 #----start make changes here---- 之后的部分就是做出改变的部分,最主要的脚本命令是:delete("/system/app/CheckUpdateAll.apk", "/system/recovery.img"); 在具体更新时它将删除 CheckUpdateAll.apk 这个应用。
为了大家参考,还是把这个差分包的升级脚本贴出来,其对应的完全升级的脚本在第九篇已贴出

erlang 复制代码
mount("yaffs2", "MTD", "system", "/system");  
assert(file_getprop("/system/build.prop", "ro.build.fingerprint") == "telechips/full_tcc8800_evm/tcc8800:2.3.5/GRJ90/eng.mumu.20120309.100232:eng/test-keys" ||  
       file_getprop("/system/build.prop", "ro.build.fingerprint") == "telechips/full_tcc8800_evm/tcc8800:2.3.5/GRJ90/eng.mumu.20120309.100232:eng/test-keys");  
assert(getprop("ro.product.device") == "tcc8800" ||  
       getprop("ro.build.product") == "tcc8800");  
ui_print("Verifying current system...");  
show_progress(0.100000, 0);  
  
# ---- start making changes here ----  
  
ui_print("Removing unneeded files...");  
delete("/system/app/CheckUpdateAll.apk",  
       "/system/recovery.img");  
show_progress(0.800000, 0);  
ui_print("Patching system files...");  
show_progress(0.100000, 10);  
ui_print("Symlinks and permissions...");  
set_perm_recursive(0, 0, 0755, 0644, "/system");  
set_perm_recursive(0, 2000, 0755, 0755, "/system/bin");  
set_perm(0, 3003, 02750, "/system/bin/netcfg");  
set_perm(0, 3004, 02755, "/system/bin/ping");  
set_perm(0, 2000, 06750, "/system/bin/run-as");  
set_perm_recursive(1002, 1002, 0755, 0440, "/system/etc/bluetooth");  
set_perm(0, 0, 0755, "/system/etc/bluetooth");  
set_perm(1000, 1000, 0640, "/system/etc/bluetooth/auto_pairing.conf");  
set_perm(3002, 3002, 0444, "/system/etc/bluetooth/blacklist.conf");  
set_perm(1002, 1002, 0440, "/system/etc/dbus.conf");  
set_perm(1014, 2000, 0550, "/system/etc/dhcpcd/dhcpcd-run-hooks");  
set_perm(0, 2000, 0550, "/system/etc/init.goldfish.sh");  
set_perm_recursive(0, 0, 0755, 0555, "/system/etc/ppp");  
set_perm_recursive(0, 2000, 0755, 0755, "/system/xbin");  
set_perm(0, 0, 06755, "/system/xbin/librank");  
set_perm(0, 0, 06755, "/system/xbin/procmem");  
set_perm(0, 0, 06755, "/system/xbin/procrank");  
set_perm(0, 0, 06755, "/system/xbin/su");  
set_perm(0, 0, 06755, "/system/xbin/tcpdump");  
unmount("/system");  

在做更新测试时,我们要以 target_zip 系统为依据,也就是更新之前的开发板系统是用 target_zip 包升级后的系统。否则更新就会失败,因为在更新时会从系统对应的目录下读取设备以及时间戳等信息(updater-script 脚本一开始的部分),进行匹配正确后才进行下一步的安装。

所有准备都完成后,将我们制作的差分包放到 SD 卡中,在 Settings --> About Phone --> System Update --> Installed From SDCARD 执行更新。最后更新完成并重启后,我们会发现之前的 CheckUpdateAll.apk 被成功删掉了,大功告成!

至此终于将 update.zip 包以及其对应的差分包制作成功了。下面的文章开始具体分析制作的 update.zip 包在实际的更新中所走的过程!

以下的篇幅开始分析我们在上两个篇幅中生成的 update.zip 包在具体更新中所经过的过程,并根据源码分析每一部分的工作原理。

一、系统更新 update.zip 包的两种方式

  1. 通过上一个文档,我们知道了怎样制作一个 update.zip 升级包用于升级系统。Android 在升级系统时获得 update.zip 包的方式有两种。一种是离线升级,即手动拷贝升级包到 SD 卡(或 NAND)中,通过 Settings --> About Phone --> System Update --> 选择从 SD 卡升级。另一种是在线升级,即 OTA Install(over the air),用户通过在线下载升级包到本地然后更新。这种方式下的 update.zip 包一般被下载到系统的 /CACHE 分区下。
  2. 无论将升级包放在什么位置,在使用 update.zip 更新时都会重启并进入 Recovery 模式,然后启动 recovery 服务(/sbin/recovery)来安装我们的 update.zip 包。
  3. 为此,我们必须了解 Recovery 模式的工作原理,以及 Android 系统重启时怎样进入 Recovery 工作模式而不是其他模式(如正常模式)。

二、Android 系统中三种启动模式

首先我们要了解 Android 系统启动后可能会进入的几种工作模式。先看下图:
由上图可知,Android 系统启动后可能进入的模式有以下几种:

(一) MAGIC KEY(组合键):

即用户在启动后通过按下组合键,进入不同的工作模式,具体有两种:

① camera + power:若用户在启动刚开始按了 camera + power 组合键,则会进入 bootloader 模式,并可进一步进入 fastboot(快速刷机模式)。

② home + power:若用户在启动刚开始按了 home + power 组合键,系统会直接进入 Recovery 模式。以这种方式进入 Recovery 模式时,系统会进入一个简单的 UI(使用了 minui)界面,用来提示用户进一步操作。在 tcc8800 开发板中提供了以下几种选项操作:

"reboot system now"

"apply update from sdcard"

"wipe data/factory reset"

"wipe cache partition"

(二) 正常启动:

若启动过程中用户没有按下任何组合键,bootloader 会读取位于 MISC 分区的启动控制信息块 BCB(Bootloader Control Block)。它是一个结构体,存放着启动命令 command。根据不同的命令,系统又可以进入三种不同的启动模式。我们先看一下这个结构体的定义:

struct bootloader_message {

char command32; // 存放不同的启动命令

char status32; // update-radio 或 update-hboot 完成后存放执行结果

char recovery1024; // 存放 /cache/recovery/command 中的命令

};
我们先看 command 可能的值,其他的在后文具体分析。command 可能的值有两种,与值为空(即没有命令)一起区分三种启动模式:

command == "boot-recovery" 时,系统会进入 Recovery 模式。Recovery 服务会具体根据 /cache/recovery/command 中的命令执行相应的操作(例如,升级 update.zip 或擦除 cache、data 等)。

command == "update-radio""update-hboot" 时,系统会进入更新 firmware(更新 bootloader),具体由 bootloader 完成。

③ command 为空时,即没有任何命令,系统会进入正常启动,最后进入主系统(main system)。这是最通常的启动流程。

Android 系统不同启动模式的进入是在不同情形下触发的。我们从 SD 卡中升级 update.zip 时会进入 Recovery 模式是其中一种,其他的比如系统崩溃,或者在命令行输入启动命令时也会进入 Recovery 或其他启动模式。
为了了解我们的 update.zip 包具体是怎样在 Recovery 模式中更新完成并重启到主系统的,我们还要分析 Android 中 Recovery 模式的工作原理。下一篇开始看具体的 Recovery 模式工作原理,以及其在更新中的重要作用。
在使用 update.zip 包升级时,怎样从主系统(main system)重启进入 Recovery 模式,进入 Recovery 模式后怎样判断做何种操作,以及怎样获得主系统发送给 Recovery 服务的命令------这一系列问题的解决,是通过整个软件平台不同部分之间的密切通信配合来完成的。为此,我们必须要了解 Recovery 模式的工作原理,这样才能知道我们的 update.zip 包是怎样一步步进入 Recovery 中升级并最后到达主系统的。

一、Recovery 模式中的三个部分

Recovery 的工作需要整个软件平台的配合,从通信架构上来看,主要有三个部分。

① MainSystem:即上面提到的正常启动模式(BCB 中无命令),是用 boot.img 启动的系统,也是 Android 的正常工作模式。更新时,在这种模式中我们的上层操作就是使用 OTA 或从 SD 卡中升级 update.zip 包。在重启进入 Recovery 模式之前,会向 BCB 中写入命令,以便在重启后告诉 bootloader 进入 Recovery 模式。

② Recovery:系统进入 Recovery 模式后会装载 Recovery 分区,该分区包含 recovery.img(与 boot.img 相同,包含了标准的内核和根文件系统)。进入该模式后主要是运行 Recovery 服务(/sbin/recovery)来做相应的操作(重启、升级 update.zip、擦除 cache 分区等)。

③ Bootloader:除了正常的加载启动系统之外,还会通过读取 MISC 分区(BCB)获得来自 Main System 和 Recovery 的消息。

二、Recovery 模式中的两个通信接口

在 Recovery 服务中,上述三个实体之间的通信是必不可少的,它们相互之间又有以下两个通信接口。

(一) 通过 CACHE 分区中的三个文件:

Recovery 通过 /cache/recovery/ 目录下的三个文件与 Main System 通信。具体如下:

/cache/recovery/command:这个文件保存着 Main System 传给 Recovery 的命令行,每一行就是一条命令,支持以下几种的组合。

--send_intent=anystring:将文本输出到 recovery/intent。在 Recovery 结束时,在 finish_recovery 函数中将定义的 intent 字符串作为参数传进来,并写入到 /cache/recovery/intent 中。

--update_package=root:path:验证并安装一个 OTA package 文件。Main System 将这条命令写入时,代表系统需要升级。在进入 Recovery 模式后,将该文件中的命令读取并写入 BCB 中,然后进行相应的更新 update.zip 包的操作。

--wipe_data:擦除用户数据(以及 cache),然后重启。擦除 data 分区时必须要擦除 cache 分区。

--wipe_cache:擦除 cache(但不擦除用户数据),然后重启。

/cache/recovery/log:Recovery 模式在工作中的 Log 打印。在 recovery 服务运行过程中,stdout 以及 stderr 会重定向到 /tmp/recovery.log,在 recovery 退出之前会将其转存到 /cache/recovery/log 中,供查看。

/cache/recovery/intent:Recovery 传递给 Main System 的信息。作用不详。

(二) 通过 BCB(Bootloader Control Block):

BCB 是 bootloader 与 Recovery 的通信接口,也是 Bootloader 与 Main System 之间的通信接口。存储在 Flash 中的 MISC 分区,占用三个 page,其本身就是一个结构体,具体成员及各成员含义如下:

struct bootloader_message {

char command32;

char status32;

char recovery1024;

};

① command 成员:其可能的取值我们在上文已经分析过了,即当我们想要在重启后进入 Recovery 模式时,会更新这个成员的值。另外,在成功更新后结束 Recovery 时,会清除这个成员的值,防止重启时再次进入 Recovery 模式。

② status:在完成相应的更新后,Bootloader 会将执行结果写入到这个字段。

③ recovery:可被 Main System 写入,也可被 Recovery 服务程序写入。该文件的内容格式为:

"recovery\n

\n

"

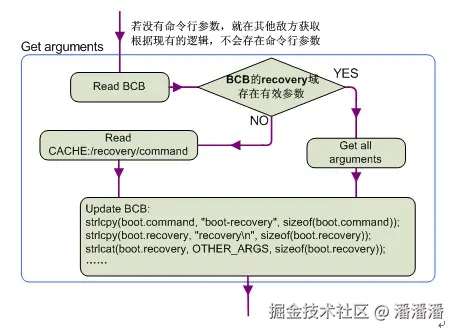
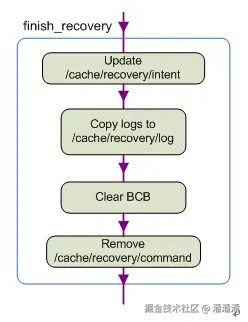
该文件存储的就是一个字符串,必须以 recovery\n 开头,否则这个字段的所有内容域会被忽略。recovery\n 之后的部分,是 /cache/recovery/command 支持的命令。可以将其理解为 Recovery 操作过程中对命令操作的备份。Recovery 对其操作的过程为:先读取 BCB,然后读取 /cache/recovery/command,然后将二者重新写回 BCB,这样在进入 Main System 之前,确保操作被执行。在操作之后、进入 Main System 之前,Recovery 又会清空 BCB 的 command 域和 recovery 域,这样确保重启后不再进入 Recovery 模式。

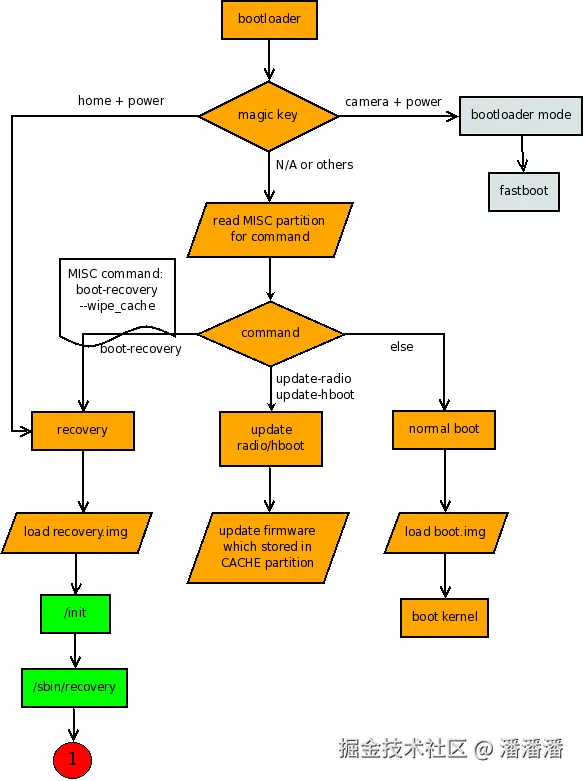
三、如何从 Main System 重启并进入 Recovery 模式

我们先看一下以上三个部分是怎样进行通信的,先看下图:

我们只看从 Main System 如何进入 Recovery 模式,其他的通信在后文中详述。

先从 Main System 开始看。当我们在 Main System 使用 update.zip 包进行升级时,系统会重启并进入 Recovery 模式。在系统重启之前,我们可以看到,Main System 必定会向 BCB 中的 command 域写入 boot-recovery(粉红色线),用来告知 Bootloader 重启后进入 recovery 模式。这一步是必须的。

至于 Main System 是否向 recovery 域写入值,我们在源码中不能肯定这一点。即便如此,重启进入 Recovery 模式后,Bootloader 会从 /cache/recovery/command 中读取值并放入到 BCB 的 recovery 域。而 Main System 在重启之前,肯定会向 /cache/recovery/command 中写入 Recovery 将要进行的操作命令。
至此,我们就大概知道了,在上层使用 update.zip 升级时,主系统是怎样告知重启后的系统进入 Recovery 模式的,以及在 Recovery 模式中要完成什么样的操作。

下一篇开始分析第一个阶段,即我们在上层使用 update.zip 包升级时,Main System 怎样重启并进入 Recovery 服务的细节流程。
文章开头我们就提到 update.zip 包来源有两种:

一个是 OTA 在线下载(一般下载到 /CACHE 分区);

一个是手动拷贝到 SD 卡中。不论是哪种方式获得 update.zip 包,

在进入 Recovery 模式前,都未对这个 zip 包做处理,只是在重启之前将 zip 包的路径告诉了 Recovery 服务(通过将 --update_package=CACHE:some_filename.zip--update_package=SDCARD:update.zip 命令写入到 /cache/recovery/command 中)。在这里我们假设 update.zip 包已经制作好并拷贝到了 SD 卡中,并以 Settings --> About Phone --> System Update --> Installed From SDCARD 方式升级。
我们的测试开发板是 TCC8800,使用的 Android 源码是 gingerbread0919,在这种方式下升级的源码位于 gingerbread/device/telechips/common/apps/TelechipsSystemUpdater/src/com/telechips/android/systemupdater/ 下。下面我们具体分析这种升级方式下,我们的 update.zip 是怎样从上层一步步进入到 Recovery 模式的。

一、从 System Update 到 Reboot

当我们依次选择 Settings --> About Phone --> System Update --> Installed From SDCARD 后,会弹出一个对话框,提示已有 update.zip 包是否现在更新,我们从这个地方跟踪。这个对话框的源码是 SystemUpdateInstallDialog.java

① 在 mNowButton 按钮的监听事件里,会调用 mService.rebootAndUpdate(new File(mFile))

这个 mService 就是 SystemUpdateService 的实例。这个类所在的源码文件是 SystemUpdateService.java。这个函数的参数是一个文件,它肯定就是我们的 update.zip 包了。我们可以证实一下这个猜想。

② mFile 的值

SystemUpdateInstallDialog.java 中的 ServiceConnection 中我们可以看到,这个 mFile 的值有两个来源。

来源一:

mFile 的一个来源是这个"是否立即更新"提示框接收的上一个 Activity 以 "file" 标记传来的值 。这个 Activity 就是 SystemUpdate.java,它是一个 PreferenceActivity 类型的。在其 onPreferenceChange 函数中定义了向下一个 Activity 传送的值,这个值是根据我们不同的选择而定的。如果我们在之前选择了从 SD 卡安装,则这个传下去的 "file" 值为 "/sdcard/update.zip"。如果选择了从 NAND 安装,则对应的值为 "/nand/update.zip"

来源二:

另一个来源是从 mService.getInstallFile() 获得 。我们进一步跟踪就可发现,上面这个函数获得的值就是 "/cache" + mUpdateFileURL.getFile(),这就是 OTA 在线下载后对应的文件路径。不论参数 mFile 的来源如何,我们可以发现在 mNowButton 按钮的监听事件里,是将整个文件(也就是我们的 update.zip 包)作为参数往 rebootAndUpdate() 中传递的。

③ rebootAndUpdate

在这个函数中,Main System 做了重启前的准备。继续跟踪下去会发现,在 SystemUpdateService.java 中的 rebootAndUpdate 函数中新建了一个线程,在这个线程中最后调用的就是 RecoverySystem.installPackage(mContext, mFile),我们的 update.zip 包也被传递进来了。

④ RecoverySystem 类

RecoverySystem 类的源码所在文件路径为:gingerbread0919/frameworks/base/core/java/android/os/RecoverySystem.java。我们关心的是 installPackage(Context context, File packageFile) 函数。这个函数首先根据我们传过来的包文件,获取这个包文件的绝对路径 filename,然后将其拼成 arg = "--update_package=" + filename。它最终会被写入到 BCB 中,这就是重启进入 Recovery 模式后 Recovery 服务要进行的操作。它被传递到函数 bootCommand(context, arg)

⑤ bootCommand()

在这个函数中才是 Main System 在重启前真正做的准备。主要做了以下事情:首先创建 /cache/recovery/ 目录,删除这个目录下的 command 和 log(可能不存在)文件在 SQLite 数据库中的备份,然后将上面④步中的 arg 命令写入到 /cache/recovery/command 文件中。下一步就是真正重启了。接下来看一下在重启函数 reboot 中所做的事情。

⑥ pm.reboot()

重启之前先获得了 PowerManager(电源管理)并进一步获得其系统服务,然后调用了 pm.reboot("recovery") 函数。它就是 gingerbread0919/bionic/libc/unistd/reboot.c 中的 reboot 函数。这个函数实际上是一个系统调用,即 __reboot(LINUX_REBOOT_MAGIC1, LINUX_REBOOT_MAGIC2, mode, NULL)。从这个函数我们可以看出前两个参数就代表了我们的组合键,mode 就是我们传过来的 "recovery"。再进一步跟踪就到了汇编代码了,我们无法直接查看它的具体实现细节。但可以肯定的是,这个函数只将 "recovery" 参数传递过去了,之后将 "boot-recovery" 写入到了 MISC 分区的 BCB 数据块的 command 域中。这样在重启之后 Bootloader 才知道要进入 Recovery 模式。

在这里我们无法肯定 Main System 在重启之前对 BCB 的 recovery 域是否进行了操作。其实在重启前是否更新 BCB 的 recovery 域是不重要的,因为进入 Recovery 服务后,Recovery 会自动去 /cache/recovery/command 中读取要进行的操作,然后写入到 BCB 的 recovery 域中。

至此,Main System 就开始重启并进入 Recovery 模式。在这之前 Main System 做的最实质的就是两件事:一是将 "boot-recovery" 写入 BCB 的 command 域,二是将 --update_package=/cache/update.zip--update_package=/sdcard/update.zip 写入 /cache/recovery/command 文件中。下面的部分就开始重启并进入 Recovery 服务了。

二、从 reboot 到 Recovery 服务

这个过程我们在上文(对照第一个图)已经讲过了。从 Bootloader 开始,如果没有组合键按下,就从 MISC 分区读取 BCB 块的 command 域(在主系统时已经将 "boot-recovery" 写入),然后就以 Recovery 模式开始启动。与正常启动不同的是,Recovery 模式下加载的镜像是 recovery.img。这个镜像与 boot.img 类似,也包含了标准的内核和根文件系统。其后就与正常的启动系统类似,也是启动内核,然后启动文件系统。在进入文件系统后会执行 /init,init 的配置文件就是 /init.rc。这个配置文件来自 bootable/recovery/etc/init.rc。查看这个文件我们可以看到它做的事情很简单:

① 设置环境变量。

② 建立 etc 连接。

③ 新建目录,备用。

④ 挂载 /tmp 为内存文件系统 tmpfs。

⑤ 启动 recovery(/sbin/recovery)服务。

⑥ 启动 adbd 服务(用于调试)。

这里最重要的当然就是 recovery 服务了。在 Recovery 服务中将要完成我们的升级工作。
我们将在下一篇详细分析 Recovery 服务的流程细节。
Recovery 服务毫无疑问是 Recovery 启动模式中最核心的部分。它完成 Recovery 模式所有的工作。Recovery 程序对应的源码文件位于:/gingerbread0919/bootable/recovery/recovery.c

一、Recovery 的三类服务:

先看一下在这个源码文件中开始部分的一大段注释,这将对我们理解 Recovery 服务的主要功能有很大帮助。代码如下:

css 复制代码
/* 
 * The recovery tool communicates with the main system through /cache files. 
 *   /cache/recovery/command - INPUT - command line for tool, one arg per line 
 *   /cache/recovery/log - OUTPUT - combined log file from recovery run(s) 
 *   /cache/recovery/intent - OUTPUT - intent that was passed in 
 * 
 * The arguments which may be supplied in the recovery.command file: 
 *   --send_intent=anystring - write the text out to recovery.intent 
 *   --update_package=path - verify install an OTA package file 
 *   --wipe_data - erase user data (and cache), then reboot 
 *   --wipe_cache - wipe cache (but not user data), then reboot 
 *   --set_encrypted_filesystem=on|off - enables / diasables encrypted fs 
 * 
 * After completing, we remove /cache/recovery/command and reboot. 
 * Arguments may also be supplied in the bootloader control block (BCB). 
 * These important scenarios must be safely restartable at any point: 
 * 
 * FACTORY RESET 
 * 1. user selects "factory reset" 
 * 2. main system writes "--wipe_data" to /cache/recovery/command 
 * 3. main system reboots into recovery 
 * 4. get_args() writes BCB with "boot-recovery" and "--wipe_data" 
 *    -- after this, rebooting will restart the erase -- 
 * 5. erase_volume() reformats /data 
 * 6. erase_volume() reformats /cache 
 * 7. finish_recovery() erases BCB 
 *    -- after this, rebooting will restart the main system -- 
 * 8. main() calls reboot() to boot main system 
 * 
 * OTA INSTALL 
 * 1. main system downloads OTA package to /cache/some-filename.zip 
 * 2. main system writes "--update_package=/cache/some-filename.zip" 
 * 3. main system reboots into recovery 
 * 4. get_args() writes BCB with "boot-recovery" and "--update_package=..." 
 *    -- after this, rebooting will attempt to reinstall the update -- 
 * 5. install_package() attempts to install the update 
 *    NOTE: the package install must itself be restartable from any point 
 * 6. finish_recovery() erases BCB 
 *    -- after this, rebooting will (try to) restart the main system -- 
 * 7. ** if install failed ** 
 *    7a. prompt_and_wait() shows an error icon and waits for the user 
 *    7b; the user reboots (pulling the battery, etc) into the main system 
 * 8. main() calls maybe_install_firmware_update() 
 *    ** if the update contained radio/hboot firmware **: 
 *    8a. m_i_f_u() writes BCB with "boot-recovery" and "--wipe_cache" 
 *        -- after this, rebooting will reformat cache & restart main system -- 
 *    8b. m_i_f_u() writes firmware image into raw cache partition 
 *    8c. m_i_f_u() writes BCB with "update-radio/hboot" and "--wipe_cache" 
 *        -- after this, rebooting will attempt to reinstall firmware -- 
 *    8d. bootloader tries to flash firmware 
 *    8e. bootloader writes BCB with "boot-recovery" (keeping "--wipe_cache") 
 *        -- after this, rebooting will reformat cache & restart main system -- 
 *    8f. erase_volume() reformats /cache 
 *    8g. finish_recovery() erases BCB 
 *        -- after this, rebooting will (try to) restart the main system -- 
 * 9. main() calls reboot() to boot main system 
 * 
 * SECURE FILE SYSTEMS ENABLE/DISABLE 
 * 1. user selects "enable encrypted file systems" 
 * 2. main system writes "--set_encrypted_filesystems=on|off" to 
 *    /cache/recovery/command 
 * 3. main system reboots into recovery 
 * 4. get_args() writes BCB with "boot-recovery" and 
 *    "--set_encrypted_filesystems=on|off" 
 *    -- after this, rebooting will restart the transition -- 
 * 5. read_encrypted_fs_info() retrieves encrypted file systems settings from /data 
 *    Settings include: property to specify the Encrypted FS istatus and 
 *    FS encryption key if enabled (not yet implemented) 
 * 6. erase_volume() reformats /data 
 * 7. erase_volume() reformats /cache 
 * 8. restore_encrypted_fs_info() writes required encrypted file systems settings to /data 
 *    Settings include: property to specify the Encrypted FS status and 
 *    FS encryption key if enabled (not yet implemented) 
 * 9. finish_recovery() erases BCB 
 *    -- after this, rebooting will restart the main system -- 
 * 10. main() calls reboot() to boot main system 
 */  

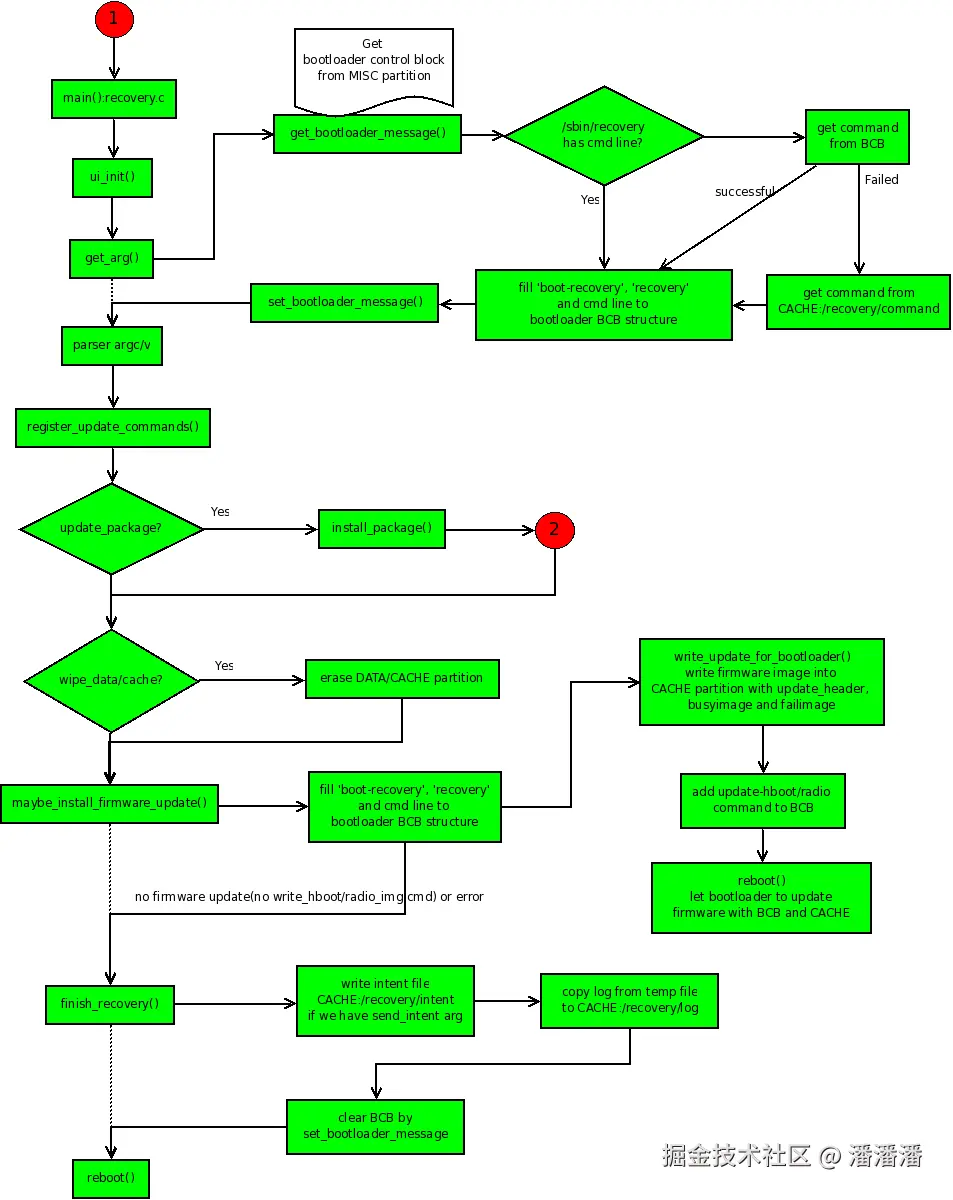
从注释中我们可以看到,Recovery 的服务内容主要有三类:

① FACTORY RESET,恢复出厂设置。

② OTA INSTALL,即我们的 update.zip 包升级。

③ ENCRYPTED FILE SYSTEM ENABLE/DISABLE,使能/关闭加密文件系统。具体的每一类服务的大概工作流程,注释中都有,我们在下文中会详细讲解 OTA INSTALL 的工作流程。这三类服务的大概流程都是通用的,只是不同操作体现为不同的操作细节。下面我们看 Recovery 服务的通用流程。

二、Recovery 服务的通用流程:

在这里我们以 OTA INSTALL 的流程为例具体分析,并从相关函数的调用过程图开始,如下图:

我们顺着流程图分析,从 recovery.c 的 main 函数开始:

1. ui_init()

Recovery 服务使用了一个基于 framebuffer 的简单 UI(minui)系统。这个函数对其进行了简单的初始化。在 Recovery 服务的过程中主要用于显示一个背景图片(正在安装或安装失败)和一个进度条(用于显示进度)。另外还启动了两个线程,一个用于处理进度条的显示(progress_thread),另一个用于响应用户的按键(input_thread)。

2. get_arg()

这个函数主要做了上图中 get_arg() 往右往下直到 parse arg/argv 的工作。我们对照着流程一个一个看。

get_bootloader_message():主要工作是根据分区的文件格式类型(mtd 或 emmc)从 MISC 分区中读取 BCB 数据块到一个临时的变量中。

② 然后开始判断 Recovery 服务是否有带命令行的参数(/sbin/recovery,根据现有的逻辑是没有的),若没有就从 BCB 中读取 recovery 域。如果读取失败则从 /cache/recovery/command 中读取。这样这个 BCB 的临时变量中的 recovery 域就被更新了。在将这个 BCB 的临时变量写回真实的 BCB 之前,又更新了这个 BCB 临时变量的 command 域为 "boot-recovery"。这样做的目的是:如果在升级失败(比如升级还未结束就断电了)时,系统在重启之后还会进入 Recovery 模式,直到升级完成。

③ 在这个 BCB 临时变量的各个域都更新完成后,使用 set_bootloader_message() 写回到真正的 BCB 块中。

这个过程可以用一个简单的图来概括,这样更清晰:

3. parse argc/argv

解析我们获得的参数。注册所解析的命令(register_update_command),在下面的操作中会根据这一步解析的值进行一步步的判断,然后进行相应的操作。

4. if(update_package)

判断 update_package 是否有值,若有就表示需要升级更新包,此时就会调用 install_package()(即图中红色的第二个阶段)。在这一步中将要完成安装实际的升级包。这是最为复杂、也是升级 update.zip 包最为核心的部分。我们在下一节详细分析这一过程。为从宏观上理解 Recovery 服务的框架,我们将这一步先略过,假设已经安装完成了。我们接着往下走,看安装完成后 Recovery 怎样一步步结束服务,并重启到新的主系统。

5. if(wipe_data / wipe_cache)

这一步判断实际是两步,在源码中是先判断是否擦除 data 分区(用户数据部分),然后再判断是否擦除 cache 分区。值得注意的是,在擦除 data 分区的时候必须连带擦除 cache 分区。在只擦除 cache 分区的情形下可以不擦除 data 分区。

6. maybe_install_firmware_update()

如果升级包中包含 radio/hboot firmware 的更新,则会调用这个函数。查看源码发现,在注释(OTA INSTALL)中有这一个流程,但是 main 函数中并没有显式调用这个函数,目前尚未发现到底是在什么地方处理的。但是其流程还是和上面的图示一样,即:① 先向 BCB 中写入 "boot-recovery" 和 "--wipe_cache",之后将 cache 分区格式化,然后将 firmware image 写入原始的 cache 分区中。② 将命令 "update-radio/hboot" 和 "--wipe_cache" 写入 BCB 中,然后开始重新安装 firmware 并刷新 firmware。③ 之后又会进入图示中的末尾,即 finish_recovery()

7. prompt_and_wait()

这个函数是在一个判断中被调用的。其意义是:如果安装失败(update.zip 包错误或验证签名失败),则等待用户的输入处理(如通过组合键 reboot 等)。

8. finish_recovery()

这是 Recovery 关闭并进入 Main System 的必经之路。其大体流程如下:

① 将 intent(字符串)的内容作为参数传进 finish_recovery 中。如果有 intent 需要告知 Main System,则将其写入 /cache/recovery/intent 中。这个 intent 的作用尚不知有何用。

② 将内存文件系统中的 Recovery 服务的日志(/tmp/recovery.log)拷贝到 cache(/cache/recovery/log)分区中,以便告知重启后的 Main System 发生过什么。

③ 擦除 MISC 分区中的 BCB 数据块的内容,以便系统重启后不再进入 Recovery 模式,而是进入更新后的主系统。

④ 删除 /cache/recovery/command 文件。这一步也是很重要的,因为重启后 Bootloader 会自动检索这个文件,如果未删除的话又会进入 Recovery 模式。原理在上面已经讲得很清楚了。

9. reboot()

这是一个系统调用。在这一步,Recovery 完成其服务,重启并进入 Main System。这次重启和在主系统中重启进入 Recovery 模式调用的函数是一样的,但是其方向是不一样的,所以参数也就不一样。查看源码发现,其重启模式是 RB_AUTOBOOT,这是一个系统的宏。
至此,我们对 Recovery 服务的整个流程框架已有了大概的认识。下面就是升级 update.zip 包时特有的、也是 Recovery 服务中关于安装升级包最核心的第二个阶段,即我们图例中红色的 2 号分支。

我们将在下一篇详细讲解这一部分,即 Recovery 服务的核心部分 install_package 函数。

一、Recovery 服务的核心 install_package(升级 update.zip 特有)

和 Recovery 服务中的 wipe_data、wipe_cache 不同,install_package() 是升级 update.zip 特有的一部分,也是最核心的部分。在这一步才真正开始对我们的 update.zip 包进行处理。下面就开始分析这一部分。还是先看图例:
这一部分的源码文件位于:/gingerbread0919/bootable/recovery/install.c。这是一个没有 main 函数的源码文件,还是把源码先贴出来如下:

scss 复制代码
/* 
 * Copyright (C) 2007 The Android Open Source Project 
 * 
 * Licensed under the Apache License, Version 2.0 (the "License"); 
 * you may not use this file except in compliance with the License. 
 * You may obtain a copy of the License at 
 * 
 *      http://www.apache.org/licenses/LICENSE-2.0 
 * 
 * Unless required by applicable law or agreed to in writing, software 
 * distributed under the License is distributed on an "AS IS" BASIS, 
 * WITHOUT WARRANTIES OR CONDITIONS OF ANY KIND, either express or implied. 
 * See the License for the specific language governing permissions and 
 * limitations under the License. 
 */  
  
#include <ctype.h>  
#include <errno.h>  
#include <fcntl.h>  
#include <limits.h>  
#include <sys/stat.h>  
#include <sys/wait.h>  
#include <unistd.h>  
  
#include "common.h"  
#include "install.h"  
#include "mincrypt/rsa.h"  
#include "minui/minui.h"  
#include "minzip/SysUtil.h"  
#include "minzip/Zip.h"  
#include "mtdutils/mounts.h"  
#include "mtdutils/mtdutils.h"  
#include "roots.h"  
#include "verifier.h"  
  
#define ASSUMED_UPDATE_BINARY_NAME  "META-INF/com/google/android/update-binary"  
#define PUBLIC_KEYS_FILE "/res/keys"  
  
// If the package contains an update binary, extract it and run it.  
static int  
try_update_binary(const char *path, ZipArchive *zip) {  
    const ZipEntry* binary_entry =  
            mzFindZipEntry(zip, ASSUMED_UPDATE_BINARY_NAME);  
    if (binary_entry == NULL) {  
        mzCloseZipArchive(zip);  
        return INSTALL_CORRUPT;  
    }  
  
    char* binary = "/tmp/update_binary";  
    unlink(binary);  
    int fd = creat(binary, 0755);  
    if (fd < 0) {  
        mzCloseZipArchive(zip);  
        LOGE("Can't make %s\n", binary);  
        return 1;  
    }  
    bool ok = mzExtractZipEntryToFile(zip, binary_entry, fd);  
    close(fd);  
    mzCloseZipArchive(zip);  
  
    if (!ok) {  
        LOGE("Can't copy %s\n", ASSUMED_UPDATE_BINARY_NAME);  
        return 1;  
    }  
  
    int pipefd[2];  
    pipe(pipefd);  
  
    // When executing the update binary contained in the package, the  
    // arguments passed are:  
    //  
    //   - the version number for this interface  
    //  
    //   - an fd to which the program can write in order to update the  
    //     progress bar.  The program can write single-line commands:  
    //  
    //        progress <frac> <secs>  
    //            fill up the next <frac> part of of the progress bar  
    //            over <secs> seconds.  If <secs> is zero, use  
    //            set_progress commands to manually control the  
    //            progress of this segment of the bar  
    //  
    //        set_progress <frac>  
    //            <frac> should be between 0.0 and 1.0; sets the  
    //            progress bar within the segment defined by the most  
    //            recent progress command.  
    //  
    //        firmware <"hboot"|"radio"> <filename>  
    //            arrange to install the contents of <filename> in the  
    //            given partition on reboot.  
    //  
    //            (API v2: <filename> may start with "PACKAGE:" to  
    //            indicate taking a file from the OTA package.)  
    //  
    //            (API v3: this command no longer exists.)  
    //  
    //        ui_print <string>  
    //            display <string> on the screen.  
    //  
    //   - the name of the package zip file.  
    //  
  
    char** args = malloc(sizeof(char*) * 5);  
    args[0] = binary;  
    args[1] = EXPAND(RECOVERY_API_VERSION);   // defined in Android.mk  
    args[2] = malloc(10);  
    sprintf(args[2], "%d", pipefd[1]);  
    args[3] = (char*)path;  
    args[4] = NULL;  
  
    pid_t pid = fork();  
    if (pid == 0) {  
        close(pipefd[0]);  
        execv(binary, args);  
        fprintf(stdout, "E:Can't run %s (%s)\n", binary, strerror(errno));  
        _exit(-1);  
    }  
    close(pipefd[1]);  
  
    char buffer[1024];  
    FILE* from_child = fdopen(pipefd[0], "r");  
    while (fgets(buffer, sizeof(buffer), from_child) != NULL) {  
        char* command = strtok(buffer, " \n");  
        if (command == NULL) {  
            continue;  
        } else if (strcmp(command, "progress") == 0) {  
            char* fraction_s = strtok(NULL, " \n");  
            char* seconds_s = strtok(NULL, " \n");  
  
            float fraction = strtof(fraction_s, NULL);  
            int seconds = strtol(seconds_s, NULL, 10);  
  
            ui_show_progress(fraction * (1-VERIFICATION_PROGRESS_FRACTION),  
                             seconds);  
        } else if (strcmp(command, "set_progress") == 0) {  
            char* fraction_s = strtok(NULL, " \n");  
            float fraction = strtof(fraction_s, NULL);  
            ui_set_progress(fraction);  
        } else if (strcmp(command, "ui_print") == 0) {  
            char* str = strtok(NULL, "\n");  
            if (str) {  
                ui_print("%s", str);  
            } else {  
                ui_print("\n");  
            }  
        } else {  
            LOGE("unknown command [%s]\n", command);  
        }  
    }  
    fclose(from_child);  
  
    int status;  
    waitpid(pid, &status, 0);  
    if (!WIFEXITED(status) || WEXITSTATUS(status) != 0) {  
        LOGE("Error in %s\n(Status %d)\n", path, WEXITSTATUS(status));  
        return INSTALL_ERROR;  
    }  
  
    return INSTALL_SUCCESS;  
}  
  
// Reads a file containing one or more public keys as produced by  
// DumpPublicKey:  this is an RSAPublicKey struct as it would appear  
// as a C source literal, eg:  
//  
//  "{64,0xc926ad21,{1795090719,...,-695002876},{-857949815,...,1175080310}}"  
//  
// (Note that the braces and commas in this example are actual  
// characters the parser expects to find in the file; the ellipses  
// indicate more numbers omitted from this example.)  
//  
// The file may contain multiple keys in this format, separated by  
// commas.  The last key must not be followed by a comma.  
//  
// Returns NULL if the file failed to parse, or if it contain zero keys.  
static RSAPublicKey*  
load_keys(const char* filename, int* numKeys) {  
    RSAPublicKey* out = NULL;  
    *numKeys = 0;  
  
    FILE* f = fopen(filename, "r");  
    if (f == NULL) {  
        LOGE("opening %s: %s\n", filename, strerror(errno));  
        goto exit;  
    }  
  
    int i;  
    bool done = false;  
    while (!done) {  
        ++*numKeys;  
        out = realloc(out, *numKeys * sizeof(RSAPublicKey));  
        RSAPublicKey* key = out + (*numKeys - 1);  
        if (fscanf(f, " { %i , 0x%x , { %u",  
                   &(key->len), &(key->n0inv), &(key->n[0])) != 3) {  
            goto exit;  
        }  
        if (key->len != RSANUMWORDS) {  
            LOGE("key length (%d) does not match expected size\n", key->len);  
            goto exit;  
        }  
        for (i = 1; i < key->len; ++i) {  
            if (fscanf(f, " , %u", &(key->n[i])) != 1) goto exit;  
        }  
        if (fscanf(f, " } , { %u", &(key->rr[0])) != 1) goto exit;  
        for (i = 1; i < key->len; ++i) {  
            if (fscanf(f, " , %u", &(key->rr[i])) != 1) goto exit;  
        }  
        fscanf(f, " } } ");  
  
        // if the line ends in a comma, this file has more keys.  
        switch (fgetc(f)) {  
            case ',':  
                // more keys to come.  
                break;  
  
            case EOF:  
                done = true;  
                break;  
  
            default:  
                LOGE("unexpected character between keys\n");  
                goto exit;  
        }  
    }  
  
    fclose(f);  
    return out;  
  
exit:  
    if (f) fclose(f);  
    free(out);  
    *numKeys = 0;  
    return NULL;  
}  
  
int  
install_package(const char *path)  
{  
    ui_set_background(BACKGROUND_ICON_INSTALLING);  
    ui_print("Finding update package...\n");  
    ui_show_indeterminate_progress();  
    LOGI("Update location: %s\n", path);  
  
    if (ensure_path_mounted(path) != 0) {  
        LOGE("Can't mount %s\n", path);  
        return INSTALL_CORRUPT;  
    }  
  
    ui_print("Opening update package...\n");  
  
    int numKeys;  
    RSAPublicKey* loadedKeys = load_keys(PUBLIC_KEYS_FILE, &numKeys);  
    if (loadedKeys == NULL) {  
        LOGE("Failed to load keys\n");  
        return INSTALL_CORRUPT;  
    }  
    LOGI("%d key(s) loaded from %s\n", numKeys, PUBLIC_KEYS_FILE);  
  
    // Give verification half the progress bar...  
    ui_print("Verifying update package...\n");  
    ui_show_progress(  
            VERIFICATION_PROGRESS_FRACTION,  
            VERIFICATION_PROGRESS_TIME);  
  
    int err;  
    err = verify_file(path, loadedKeys, numKeys);  
    free(loadedKeys);  
    LOGI("verify_file returned %d\n", err);  
    if (err != VERIFY_SUCCESS) {  
        LOGE("signature verification failed\n");  
        return INSTALL_CORRUPT;  
    }  
  
    /* Try to open the package. 
     */  
    ZipArchive zip;  
    err = mzOpenZipArchive(path, &zip);  
    if (err != 0) {  
        LOGE("Can't open %s\n(%s)\n", path, err != -1 ? strerror(err) : "bad");  
        return INSTALL_CORRUPT;  
    }  
  
    /* Verify and install the contents of the package. 
     */  
    ui_print("Installing update...\n");  
    return try_update_binary(path, &zip);  
}   

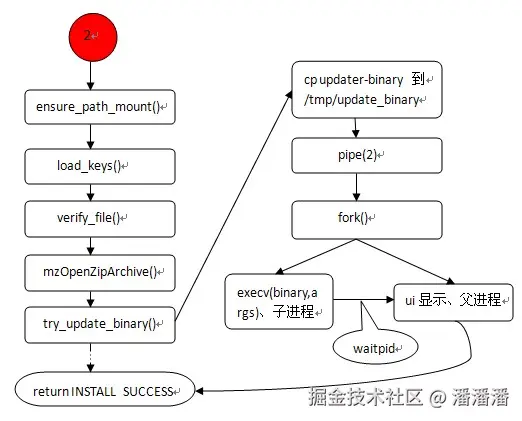
下面顺着上面的流程图和源码来分析这一流程:

ensure_path_mount():先判断所传的 update.zip 包路径所在的分区是否已经挂载。如果没有则先挂载。

load_keys():加载公钥源文件,路径位于 /res/keys。这个文件在 Recovery 镜像的根文件系统中。

verify_file():对升级包 update.zip 进行签名验证。

mzOpenZipArchive():打开升级包,并将相关的信息拷贝到一个临时的 ZipArchive 变量中。这一步并未对我们的 update.zip 包解压。

try_update_binary():这个函数才是对我们的 update.zip 进行升级的地方。这个函数一开始先根据我们上一步获得的 zip 包信息以及升级包的绝对路径,将 update_binary 文件拷贝到内存文件系统的 /tmp/update_binary 中,以便后面使用。

pipe():创建管道,用于下面的子进程和父进程之间的通信。

fork():创建子进程。其中的子进程主要负责执行 binary(execv(binary, args),即执行我们的安装命令脚本),父进程负责接收子进程发送的命令来更新 UI 显示(显示当前的进度)。子父进程间通信依靠管道。

⑧ 在创建子进程后,父进程有两个作用:一是通过管道接收子进程发送的命令来更新 UI 显示;二是等待子进程退出并返回 INSTALL_SUCCESS。其中子进程在解析执行安装脚本的同时所发送的命令有以下几种:

progress <frac> <secs>:根据第二个参数 secs(秒)来设置进度条。

set_progress <frac>:直接设置进度条,frac 取值在 0.0 到 1.0 之间。

firmware <"hboot"|"radio"> <filename>:升级 firmware 时使用,在 API V3 中不再使用。

ui_print <string>:在屏幕上显示字符串,即打印更新过程。

execv(binary, args) 的作用就是去执行 binary 程序,这个程序的实质就是去解析 update.zip 包中的 updater-script 脚本中的命令并执行。由此,Recovery 服务就进入了实际安装 update.zip 包的过程。

一、update_binary 的执行过程分析

上一篇中的子进程所执行的程序 binary,实际上就是 update.zip 包中的 update-binary。我们在上文中也说过,Recovery 服务在做这一部分工作的时候是先将包中的 update-binary 拷贝到内存文件系统中的 /tmp/update_binary,然后再执行的。update_binary 程序的源码位于 gingerbread0919/bootable/recovery/updater/updater.c,源码如下:

c 复制代码
/* 
 * Copyright (C) 2009 The Android Open Source Project 
 * 
 * Licensed under the Apache License, Version 2.0 (the "License"); 
 * you may not use this file except in compliance with the License. 
 * You may obtain a copy of the License at 
 * 
 *      http://www.apache.org/licenses/LICENSE-2.0 
 * 
 * Unless required by applicable law or agreed to in writing, software 
 * distributed under the License is distributed on an "AS IS" BASIS, 
 * WITHOUT WARRANTIES OR CONDITIONS OF ANY KIND, either express or implied. 
 * See the License for the specific language governing permissions and 
 * limitations under the License. 
 */  
  
#include <stdio.h>  
#include <unistd.h>  
#include <stdlib.h>  
  
#include "edify/expr.h"  
#include "updater.h"  
#include "install.h"  
#include "minzip/Zip.h"  
  
// Generated by the makefile, this function defines the  
// RegisterDeviceExtensions() function, which calls all the  
// registration functions for device-specific extensions.  
#include "register.inc"  
  
// Where in the package we expect to find the edify script to execute.  
// (Note it's "updateR-script", not the older "update-script".)  
#define SCRIPT_NAME "META-INF/com/google/android/updater-script"  
  
int main(int argc, char** argv) {  
    // Various things log information to stdout or stderr more or less  
    // at random.  The log file makes more sense if buffering is  
    // turned off so things appear in the right order.  
    setbuf(stdout, NULL);  
    setbuf(stderr, NULL);  
  
    if (argc != 4) {  
        fprintf(stderr, "unexpected number of arguments (%d)\n", argc);  
        return 1;  
    }  
  
    char* version = argv[1];  
    if ((version[0] != '1' && version[0] != '2' && version[0] != '3') ||  
        version[1] != '\0') {  
        // We support version 1, 2, or 3.  
        fprintf(stderr, "wrong updater binary API; expected 1, 2, or 3; "  
                        "got %s\n",  
                argv[1]);  
        return 2;  
    }  
  
    // Set up the pipe for sending commands back to the parent process.  
  
    int fd = atoi(argv[2]);  
    FILE* cmd_pipe = fdopen(fd, "wb");  
    setlinebuf(cmd_pipe);  
  
    // Extract the script from the package.  
  
    char* package_data = argv[3];  
    ZipArchive za;  
    int err;  
    err = mzOpenZipArchive(package_data, &za);  
    if (err != 0) {  
        fprintf(stderr, "failed to open package %s: %s\n",  
                package_data, strerror(err));  
        return 3;  
    }  
  
    const ZipEntry* script_entry = mzFindZipEntry(&za, SCRIPT_NAME);  
    if (script_entry == NULL) {  
        fprintf(stderr, "failed to find %s in %s\n", SCRIPT_NAME, package_data);  
        return 4;  
    }  
  
    char* script = malloc(script_entry->uncompLen+1);  
    if (!mzReadZipEntry(&za, script_entry, script, script_entry->uncompLen)) {  
        fprintf(stderr, "failed to read script from package\n");  
        return 5;  
    }  
    script[script_entry->uncompLen] = '\0';  
  
    // Configure edify's functions.  
  
    RegisterBuiltins();  
    RegisterInstallFunctions();  
    RegisterDeviceExtensions();  
    FinishRegistration();  
  
    // Parse the script.  
  
    Expr* root;  
    int error_count = 0;  
    yy_scan_string(script);  
    int error = yyparse(&root, &error_count);  
    if (error != 0 || error_count > 0) {  
        fprintf(stderr, "%d parse errors\n", error_count);  
        return 6;  
    }  
  
    // Evaluate the parsed script.  
  
    UpdaterInfo updater_info;  
    updater_info.cmd_pipe = cmd_pipe;  
    updater_info.package_zip = &za;  
    updater_info.version = atoi(version);  
  
    State state;  
    state.cookie = &updater_info;  
    state.script = script;  
    state.errmsg = NULL;  
  
    char* result = Evaluate(&state, root);  
    if (result == NULL) {  
        if (state.errmsg == NULL) {  
            fprintf(stderr, "script aborted (no error message)\n");  
            fprintf(cmd_pipe, "ui_print script aborted (no error message)\n");  
        } else {  
            fprintf(stderr, "script aborted: %s\n", state.errmsg);  
            char* line = strtok(state.errmsg, "\n");  
            while (line) {  
                fprintf(cmd_pipe, "ui_print %s\n", line);  
                line = strtok(NULL, "\n");  
            }  
            fprintf(cmd_pipe, "ui_print\n");  
        }  
        free(state.errmsg);  
        return 7;  
    } else {  
        fprintf(stderr, "script result was [%s]\n", result);  
        free(result);  
    }  
  
    if (updater_info.package_zip) {  
        mzCloseZipArchive(updater_info.package_zip);  
    }  
    free(script);  
  
    return 0;  
}  

通过上面的源码来分析这个程序的执行过程:

① 函数参数以及版本的检查:当前 updater binary API 所支持的版本号有 1、2、3 这三个。

② 获取管道并打开:在执行此程序的过程中向该管道写入命令,用于通知其父进程根据命令去更新 UI 显示。

③ 读取 updater-script 脚本:从 update.zip 包中将 updater-script 脚本读到一块动态内存中,供后面执行。

④ Configure edify's functions:注册脚本中的语句处理函数,即识别脚本中命令的函数。主要有以下几类:

RegisterBuiltins():注册程序中控制流程的语句,如 ifelse、assert、abort、stdout 等。

RegisterInstallFunctions():实际安装过程中安装所需的功能函数,比如 mount、format、set_progress、set_perm 等。

RegisterDeviceExtensions():与设备相关的额外添加项,在源码中并没有任何实现。

FinishRegistration():结束注册。

⑤ Parse the script:调用 yy* 库函数解析脚本,并将解析后的内容存放到一个 Expr 类型的类中。主要函数是 yy_scan_string()yyparse()

⑥ 执行脚本:核心函数是 Evaluate(),它会调用其他的 callback 函数,而这些 callback 函数又会去调用 Evaluate 去解析不同的脚本片段,从而实现一个简单的脚本解释器。

⑦ 错误信息提示:最后就是根据 Evaluate() 执行后的返回值,给出一些打印信息。
这一执行过程非常简单,最主要的函数就是 Evaluate。它负责最终执行解析的脚本命令,而安装过程中的命令就来自 updater-script。

下一篇幅将介绍 updater-script 脚本中的语法以及这个脚本在具体升级中的执行流程。
目前 updater-script 脚本格式是 edify,其与 amend 有何区别暂不讨论,我们只分析其中主要的语法以及脚本的流程控制。

一、updater-script 脚本语法简介:

我们顺着所生成的脚本来看其中主要涉及的语法。

  1. assert(condition):如果 condition 参数的计算结果为 False,则停止脚本执行,否则继续执行脚本。

  2. show_progress(frac, sec):frac 表示进度完成的数值,sec 表示整个过程的总秒数。主要用于显示 UI 上的进度条。

  3. format(fs_type, partition_type, location):fs_type,文件系统类型,取值一般为 "yaffs2" 或 "ext4"。partition_type,分区类型,一般取值为 "MTD" 或 "EMMC"。主要用于格式化为指定的文件系统。示例如下:format("yaffs2", "MTD", "system")

  4. mount(fs_type, partition_type, location, mount_point):前两个参数同上,location 为要挂载的设备,mount_point 为挂载点。作用:挂载一个文件系统到指定的挂载点。

  5. package_extract_dir(src_path, destination_path):src_path 为要提取的目录,destination_path 为目标目录。作用:从升级包内提取目录到指定的位置。示例:package_extract_dir("system", "/system")

  6. symlink(target, src1, src2, ..., srcN):target 为字符串类型,是符号链接的目标。srcX 代表要创建的符号链接的源。示例:symlink("toolbox", "/system/bin/ps"),建立指向 toolbox 的符号链接 /system/bin/ps。值得注意的是,在建立新的符号链接之前,要断开已经存在的符号链接。

  7. set_perm(uid, gid, mode, file1, file2, ..., fileN):作用是设置单个文件或一系列文件的权限,最少要指定一个文件。

  8. set_perm_recursive(uid, gid, dir_mode, file_mode, dir1, dir2, ..., dirN):作用同上,但是这里同时改变的是一个或多个目录及其下文件的权限。

  9. package_extract_file(srcfile_path, desfile_path):srcfile_path 为要提取的文件,desfile_path 为提取文件的目标位置。示例:package_extract_file("boot.img", "/tmp/boot.img") 将升级包中的 boot.img 文件拷贝到内存文件系统的 /tmp 下。

scss 复制代码
10. `write_raw_image(src_image, partition)`:src_image 为源镜像文件,partition 为目标分区。作用:将镜像写入目标分区。示例:`write_raw_image("/tmp/boot.img", "boot")` 将 boot.img 镜像写入到系统的 boot 分区。

11. `getprop(key)`:通过指定 key 的值来获取对应的属性信息。示例:`getprop("ro.product.device")` 获取 ro.product.device 的属性值。

也可参考:updater-script 语法(文尾含实例分析)

二、updater-script 脚本执行流程分析:

先看一下在测试过程中用命令 make otapackage 生成的升级脚本如下:

erlang 复制代码
assert(!less_than_int(1331176658, getprop("ro.build.date.utc")));  
assert(getprop("ro.product.device") == "tcc8800" ||  
       getprop("ro.build.product") == "tcc8800");  
show_progress(0.500000, 0);  
format("yaffs2", "MTD", "system");  
mount("yaffs2", "MTD", "system", "/system");  
package_extract_dir("recovery", "/system");  
package_extract_dir("system", "/system");  
symlink("busybox", "/system/bin/cp", "/system/bin/grep",  
        "/system/bin/tar", "/system/bin/unzip",  
        "/system/bin/vi");  
symlink("toolbox", "/system/bin/cat", "/system/bin/chmod",  
        "/system/bin/chown", "/system/bin/cmp", "/system/bin/date",  
        "/system/bin/dd", "/system/bin/df", "/system/bin/dmesg",  
        "/system/bin/getevent", "/system/bin/getprop", "/system/bin/hd",  
        "/system/bin/id", "/system/bin/ifconfig", "/system/bin/iftop",  
        "/system/bin/insmod", "/system/bin/ioctl", "/system/bin/ionice",  
        "/system/bin/kill", "/system/bin/ln", "/system/bin/log",  
        "/system/bin/ls", "/system/bin/lsmod", "/system/bin/lsof",  
        "/system/bin/mkdir", "/system/bin/mount", "/system/bin/mv",  
        "/system/bin/nandread", "/system/bin/netstat",  
        "/system/bin/newfs_msdos", "/system/bin/notify", "/system/bin/printenv",  
        "/system/bin/ps", "/system/bin/reboot", "/system/bin/renice",  
        "/system/bin/rm", "/system/bin/rmdir", "/system/bin/rmmod",  
        "/system/bin/route", "/system/bin/schedtop", "/system/bin/sendevent",  
        "/system/bin/setconsole", "/system/bin/setprop", "/system/bin/sleep",  
        "/system/bin/smd", "/system/bin/start", "/system/bin/stop",  
        "/system/bin/sync", "/system/bin/top", "/system/bin/umount",  
        "/system/bin/uptime", "/system/bin/vmstat", "/system/bin/watchprops",  
        "/system/bin/wipe");  
set_perm_recursive(0, 0, 0755, 0644, "/system");  
set_perm_recursive(0, 2000, 0755, 0755, "/system/bin");  
set_perm(0, 3003, 02750, "/system/bin/netcfg");  
set_perm(0, 3004, 02755, "/system/bin/ping");  
set_perm(0, 2000, 06750, "/system/bin/run-as");  
set_perm_recursive(1002, 1002, 0755, 0440, "/system/etc/bluetooth");  
set_perm(0, 0, 0755, "/system/etc/bluetooth");  
set_perm(1000, 1000, 0640, "/system/etc/bluetooth/auto_pairing.conf");  
set_perm(3002, 3002, 0444, "/system/etc/bluetooth/blacklist.conf");  
set_perm(1002, 1002, 0440, "/system/etc/dbus.conf");  
set_perm(1014, 2000, 0550, "/system/etc/dhcpcd/dhcpcd-run-hooks");  
set_perm(0, 2000, 0550, "/system/etc/init.goldfish.sh");  
set_perm(0, 0, 0544, "/system/etc/install-recovery.sh");  
set_perm_recursive(0, 0, 0755, 0555, "/system/etc/ppp");  
set_perm_recursive(0, 2000, 0755, 0755, "/system/xbin");  
set_perm(0, 0, 06755, "/system/xbin/librank");  
set_perm(0, 0, 06755, "/system/xbin/procmem");  
set_perm(0, 0, 06755, "/system/xbin/procrank");  
set_perm(0, 0, 06755, "/system/xbin/su");  
set_perm(0, 0, 06755, "/system/xbin/tcpdump");  
show_progress(0.200000, 0);  
show_progress(0.200000, 10);  
assert(package_extract_file("boot.img", "/tmp/boot.img"),  
       write_raw_image("/tmp/boot.img", "boot"),  
       delete("/tmp/boot.img"));  
show_progress(0.100000, 0);  
unmount("/system");  

下面分析这个脚本的执行过程:

① 比较时间戳:如果升级包较旧,则终止脚本的执行。

② 匹配设备信息:如果和当前的设备信息不一致,则停止脚本的执行。

③ 显示进度条:如果以上两步匹配,则开始显示升级进度条。

④ 格式化 system 分区并挂载。

⑤ 提取包中 recovery 以及 system 目录下的内容到系统的 /system 下。

⑥ 为 /system/bin/ 下的命令文件建立符号链接。

⑦ 设置 /system/ 下目录及文件的属性。

⑧ 将包中的 boot.img 提取到 /tmp/boot.img

⑨ 将 /tmp/boot.img 镜像文件写入到 boot 分区。

⑩ 完成后卸载 /system

以上就是 updater-script 脚本中的语法及其执行的具体过程。通过分析其执行流程,我们可以发现在执行过程中,并未将升级包另外解压到一个地方,而是需要什么提取什么。值得注意的是,在提取 recovery 和 system 目录中的内容时,一并放在了 /system/ 下。在操作的过程中,并未删除或改变 update.zip 包中的任何内容。在实际的更新完成后,我们的 update.zip 包确实还存在于原来的位置。

三、总结

以上的篇幅着重分析了 Android 系统中 Recovery 模式的一种,即我们做好的 update.zip 包在系统更新时所走过的流程。其核心部分就是 Recovery 服务的工作原理。其他两种------FACTORY RESET、ENCRYPTED FILE SYSTEM ENABLE/DISABLE------与 OTA INSTALL 是相通的。重点是要理解 Recovery 服务的工作原理。另外,详细分析其升级过程,对于我们在实际升级时可以根据需要做出相应的修改。

不足之处,请大家不吝指正!

基础语法

1、mount 语法:

mount(type, location, mount_point);

说明:

type="MTD" location="<partition>" 挂载 yaffs2 文件系统分区;

type="vfat" location="/dev/block/<whatever>" 挂载设备。

例如:

mount("MTD", "system", "/system");

挂载 system 分区,设置返回指针 "/system"。

mount("vfat", "/dev/block/mmcblk1p2", "/system");

挂载 /dev/block/mmcblk1p2,返回指针 "/system"。

2、unmount 语法:

unmount(mount_point);

说明:

mount_point 是 mount 所设置产生的指针。其作用与挂载相对应,卸载分区或设备。此函数与 mount 配套使用。

例如:

unmount("/system");

卸载 /system 分区。

3、format 语法:

format(type, location);

说明:

type="MTD" location=partition(分区),格式化 location 参数所代表的分区。

例如:

format("MTD", "system");

格式化 system 分区。

4、delete 语法:

delete(<path>);

说明:

删除文件 <path>

例如:

delete("/data/zipalign.log");

删除文件 /data/zipalign.log

5、delete_recursive 语法:

delete_recursive(<path>);

说明:

删除文件夹 <path>

例如:

delete_recursive("/data/dalvik-cache");

删除文件夹 /data/dalvik-cache

6、show_progress 语法:

show_progress(<fraction>, <duration>);

说明:

为下面进行的程序操作显示进度条,进度条会根据 <duration> 前进 <fraction>

例如:

show_progress(0.1, 10);

show_progress 下面的操作可能进行 10s,完成后进度条前进 0.1(也就是 10%)。

7、package_extract_dir 语法:

package_extract_dir(package_path, destination_path);

说明:

释放文件夹 package_path 至 destination_path。

例如:

package_extract_dir("system", "/system");

释放 ROM 包里 system 文件夹下所有文件和子文件夹至 /system

8、package_extract_file 语法:

package_extract_file(package_path, destination_path);

说明:

解压 package_path 文件至 destination_path。

例如:

package_extract_file("my.zip", "/system");

解压 ROM 包里的 my.zip 文件至 /system

9、symlink 语法:

symlink(<target>, <src1>, <src2>, ...);

说明:

建立指向 target 的符号链接 src1、src2......

例如:

symlink("toolbox", "/system/bin/ps");

建立指向 toolbox 的符号链接 /system/bin/ps

10、set_perm 语法:

set_perm(<uid>, <gid>, <mode>, <path>);

说明:

设置 <path> 文件的用户为 uid,用户组为 gid,权限为 mode。

例如:

set_perm(1002, 1002, 0440, "/system/etc/dbus.conf");

设置文件 /system/etc/dbus.conf 的所有者为 1002,所属用户组为 1002,权限为:所有者有读权限,所属用户组有读权限,其他无任何权限。

11、set_perm_recursive 语法:

set_perm_recursive(<uid>, <gid>, <dir-mode>, <file-mode>, <path>);

说明:

设置文件夹和文件夹内文件的权限。

例如:

set_perm_recursive(1000, 1000, 0771, 0644, "/data/app");

设置 /data/app 的所有者和所属用户组为 1000,app 文件夹的权限是:所有者和所属组拥有全部权限,其他有执行权限;app 文件夹下的文件权限是:所有者有读写权限,所属组有读权限,其他有读权限。

12、ui_print 语法:

ui_print("str");

说明:

屏幕打印输出 "str"。

例如:

ui_print("It's ready!");

屏幕打印 It's ready!

13、run_program 语法:

run_program(<path>);

说明:

运行 <path> 脚本。

例如:

run_program("/system/xbin/installbusybox.sh");

运行 installbusybox.sh 脚本文件。

14、write_raw_image 语法:

write_raw_image(<path>, partition);

说明:

写入 <path> 至 partition 分区。

例如:

write_raw_image("/tmp/boot.img", "boot")

将 yaffs2 格式的 boot 包直接写入 boot 分区。

15、assert 语法:

assert(<sub1>, <sub2>, <sub3>);

说明:

如果执行 sub1 不返回错误则执行 sub2,如果 sub2 不返回错误则执行 sub3,以此类推。

例如:

less 复制代码
assert(package_extract_file("boot.img", "/tmp/boot.img"), 
write_raw_image("/tmp/boot.img", "boot"), 
delete("/tmp/boot.img"));

执行 package_extract_file,如果不返回错误则执行 write_raw_image,如果 write_raw_image 不出错则执行 delete

16、getprop 语法:

getprop("key")

说明:

通过指定 key 的值来获取对应的属性信息。

例如:

getprop("ro.product.device")

获取 ro.product.device 的属性值。

17、ifelse 语法:

ifelse(condition, truecondition, falsecondition)

说明:

condition------要运算的表达式

truecondition------当值为 True 时执行的 Edify 脚本块

falsecondition------当值为 False 时执行的 Edify 脚本块

例如:

scss 复制代码
ifelse(isuserversion(),
    ui_print(" ----user version----- "),
    ui_print(" --------- ");
    set_perm(0, 2000, 04750, "/system/xbin/su");
);

根据 isuserversion() 返回值判断:如果 true,打印 "----user version-----";如果 false,打印 "---------",并获取 su 权限。

注意:在 false 分支中执行了两个语句,只需通过 ; 来分隔开就可以了。

18、其他

像上一个例子中 isuserversion() 不是常见的函数,这个是什么呢?怎么识别?这就需要特有的 update-binary。

update-binary 相当于一个脚本解释器,能够识别 updater-script 中描述的操作。

实例

Android 刷机脚本 updater-script 实例讲解,在这里引用的是 c8812 的深度 OS 刷机脚本,请移步:

【文件】updater-script 实例讲解

结束语

以上就是对 updater-script 脚本语言的分析,希望对大家有所帮助。感兴趣的同学可以关注我们的微信公众号。

Android OTA 差分包的生成方法

make Android 系统后,会生成系统的 img 文件。

make otapackage 会生成 SD 卡用的全部系统升级包,有 260M 多。要生成增量升级包,需要按以下步骤操作。

  1. mkdir ~/OTA
  2. source build/envsetup.sh
  3. choosecombo 1 1 7 eng
  4. make -jxx
  5. make otapackage
  6. 先将编译生成的 out/target/product/msm8660_surf/obj/PACKAGING/target_files_intermediates/msm8660_surf-target_files-eng.xxxx.zip 拷贝并更名放到目录 ~/OTA/msm8660_surf-target_files-eng.A.zip
  7. 在代码中产生一些更新。
  8. 第二次 make; make otapackage
  9. 将第二次编译生成的 out/target/product/msm8660_surf/obj/PACKAGING/target_files_intermediates/msm8660_surf-target_files-eng.xxxx.zip 拷贝并更名放到目录 ~/OTA/msm8660_surf-target_files-eng.B.zip
  10. 在 src 根目录下执行 ./build/tools/releasetools/ota_from_target_files -i <A包> <B包> <差分包名>。这里必须在 src 根目录下执行,因为 ota_from_target_files.py 这个脚本里面写定了相对路径的引用文件。

如:

javascript 复制代码
./build/tools/releasetools/ota_from_target_files -x pagesize=4096 -k ~/project/build/target/product/security/testkey -d mmc -v -i ~/OTA/msm8660_surf-target_files-eng.A.zip ~/OTA/msm8660_surf-target_files-eng.B.zip ~/OTA/update.zip

~/OTA/update.zip 就是升级用的差分包。

注:

在源码根目录下采用步骤 7 中命令格式不好用,因为我的是厂家自定义编译脚本,需要用到外部 .py 文件,所以修改了 build/core/Makefile 文件。该文件中默认好像执行 ./build/tools/releasetools/ota_from_target_files 生成 FullOtaPackage,我在调用位置采用步骤 7 命令格式保存修改并编译,根据 Log 显示可以看到能够进行 A、B 包的差分比较。

  • -x pagesize=4096:设置 pagesize 的大小,因为执行程序的过程中需要这个参数,否则会报错 keyerror。还有一种情况不加 -x,编译时出现 keyerror 错误,可能是引用外部 key-value 时 key 不存在导致的(如:keyerror: '/recovery')。我编译时折腾了一天,原因是编译脚本是厂家自定义的,里面包含 Android 系统既有编译命令 make otapackage,在自定义的脚本中键值对为 (recovery, recovery),而在调用 build/tools/releasetools/ota_from_target_files 中函数时传的参数为 "/recovery"。
  • -k:签名时会用到的信息,不过貌似不加也可以成功,因为后面会执行 Java 命令进行签名。
  • -d mmc:指使用文件格式为 ext4,默认为 mtd(即 yaffs2)。因为我们这个系统使用了 ext4 文件系统的支持。
  • -v:显示具体命令。
  • -i A.zip B.zip Update.zip:产生增量包,后面跟着源文件和差分包的路径名称。

不明确的话,可以直接打开 ota_from_target_files,里面有各个命令的说明。

这个脚本被 build/core/Makefile 调用,因为 Makefile 中有引用外部变量,所以不用特别设置。但是直接执行这个脚本则要设置 import 相关信息,好像很麻烦,还是用 build/core/Makefile 调用来得方便。

相关推荐
plainGeekDev7 小时前
null 判断 → Kotlin 可空类型
android·java·kotlin
plainGeekDev7 小时前
getter/setter → Kotlin 属性
android·java·kotlin
YXL1111YXL9 小时前
Handler 消息回收与协程异步执行的时序陷阱
android
恋猫de小郭9 小时前
KMP / CMP 鸿蒙版本 Beta 发布,他有什么特别之处?
android·前端·flutter
三少爷的鞋10 小时前
Android 协程并发控制:别动线程池,控制好并发语义就够了
android
weiggle1 天前
第七篇:状态提升与单向数据流——架构设计的核心
android
xingpanvip1 天前
星盘接口开发文档:本命盘接口指南
android·开发语言·css·php·lua
goldenrolan1 天前
A公司物料替代测试系统 v1.7:从需求到 exe/apk 的 AI 辅助全链路实践
android·自动化测试·软件测试·python·ai
AC赳赳老秦1 天前
用 OpenClaw 搭建服务器故障应急响应系统,自动处理 80% 常见运维故障
android·运维·服务器·python·rxjava·deepseek·openclaw