Web Components 由三项主要技术构成,三者可以组合使用,也可以独立使用。
自定义元素(Custom Elements)
自定义元素是一组 JavaScript API,允许开发者定义自己的 HTML 元素及其行为。简单来说,就是可以创建一个像 <my-element> 这样的标签,并赋予它完整的生命周期和交互逻辑。
自定义元素分为两种类型:
- 自主自定义元素(Autonomous Custom Elements) :继承自
HTMLElement基类,需要从头实现所有行为。这是最常用的类型。 - 定制内置元素(Customized Built-in Elements) :继承自标准 HTML 元素(如
HTMLParagraphElement、HTMLImageElement),扩展现有元素的功能。需要注意:Safari 不打算支持定制内置元素,因此在实际项目中应谨慎使用
示例 简单使用
html
  <body>
    <my-button id="btn">默认按钮</my-button>
    <hr />
  </body>
  <script>
    const btn = document.getElementById("btn");

    btn.addEventListener("click", (event) => {
      // PointerEvent 指针事件 => MouseEvent => UIEvent => Event
      console.log("点击了按钮", event);
    });

    btn.onclick = (event) => {
      console.log("点击了按钮-onclick", event);
    };
    class MyButton extends HTMLElement {
      constructor() {
        super();
      }
    }
    customElements.define("my-button", MyButton);

    // 创建自定义按钮元素
    const btnDom = document.createElement("my-button");
    btnDom.textContent = "自定义按钮";
    document.body.appendChild(btnDom); // 添加到 DOM 中

    btnDom.addEventListener("click", (event) => {
      console.log("点击了按钮-dom", event);
    });
  </script>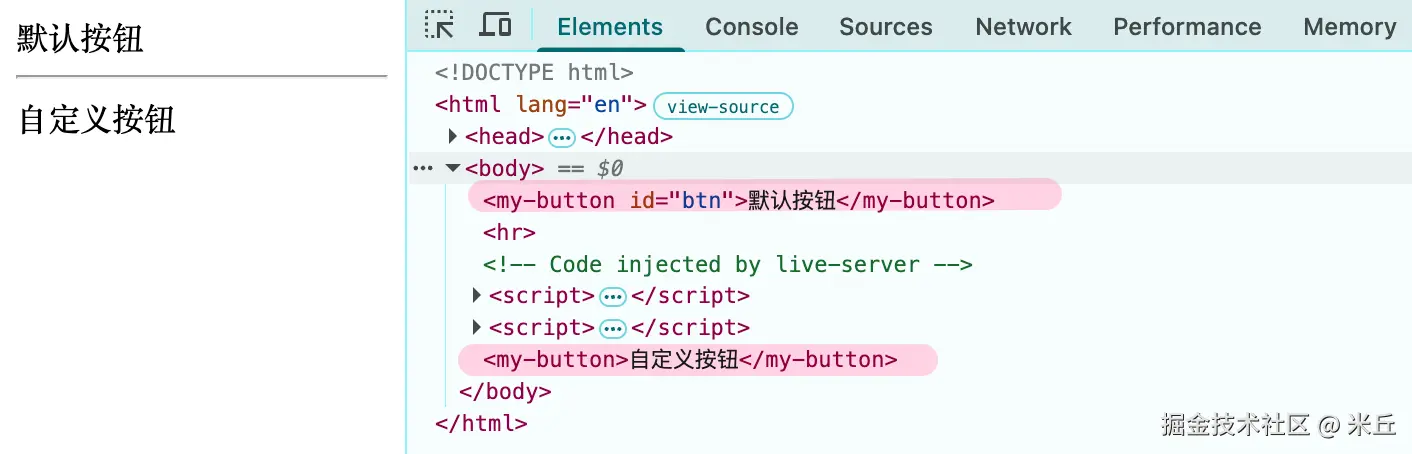
生命周期
constructor- 触发时机:元素实例被创建 时,例如使用
document.createElement()或在HTML中解析到标签时 - 初始化内部状态 :设置初始值、添加默认事件监听器等。注意 :此时元素还未被添加到DOM,不应在此检查其属性或子元素
- 触发时机:元素实例被创建 时,例如使用
connectedCallback- 触发时机:元素被插入到文档DOM中时。每次移动都可能触发
- 进行主要渲染工作,如访问DOM属性、添加子元素、获取数据等
disconnectedCallback- 触发时机:元素从文档DOM中被移除时
- 执行清理工作:用于移除在此元素上添加的全局事件监听器、取消定时器等,以防止内存泄漏
attributeChangedCallback- 触发时机:当自定义元素的属性值发生变化时调用
- 只有被列在
observedAttributes中的属性变化才会触发attributeChangedCallback
adoptedCallback- 触发时机:元素被移动到一个新的文档 (如通过
document.adoptNode())时。 - 适配新环境 :用于处理元素在不同文档(如
<iframe>)间移动时,需要重新初始化或适配的逻辑。 - 普通的 DOM 移动(如 appendChild 到同文档的其他位置)不会触发
adoptedCallback,只有跨文档移动才会触发。
- 触发时机:元素被移动到一个新的文档 (如通过
示例 生命周期的使用
js
<body>
<my-button id="btn" type="primary">默认按钮</my-button>
<button id="addBtn">添加添加一个按钮</button>
<button id="removeBtn">移除一个按钮</button>
<button id="changeBtn">改变按钮属性</button>
<button id="moveBtn">移动到iframe</button>
<br />
<iframe src="about:blank"></iframe>
</body>
<script>
class MyButton extends HTMLElement {
// 触发时机:元素实例被创建时,例如使用 document.createElement() 或在HTML中解析到标签时
constructor() {
super();
}
// 当自定义元素被添加到 DOM 中时调用
connectedCallback() {
console.log("connectedCallback");
}
// 当自定义元素从 DOM 中移除时调用
disconnectedCallback() {
console.log("disconnectedCallback");
}
// 定义需要监听的属性
static get observedAttributes() {
return ["type", "size", "disabled"];
}
// 当自定义元素的属性值发生变化时调用
attributeChangedCallback(name, oldValue, newValue) {
console.log("attributeChangedCallback", name, oldValue, newValue);
}
// 当自定义元素被移动到其他文档时时调用
adoptedCallback() {
console.log("adoptedCallback");
}
}
customElements.define("my-button", MyButton);
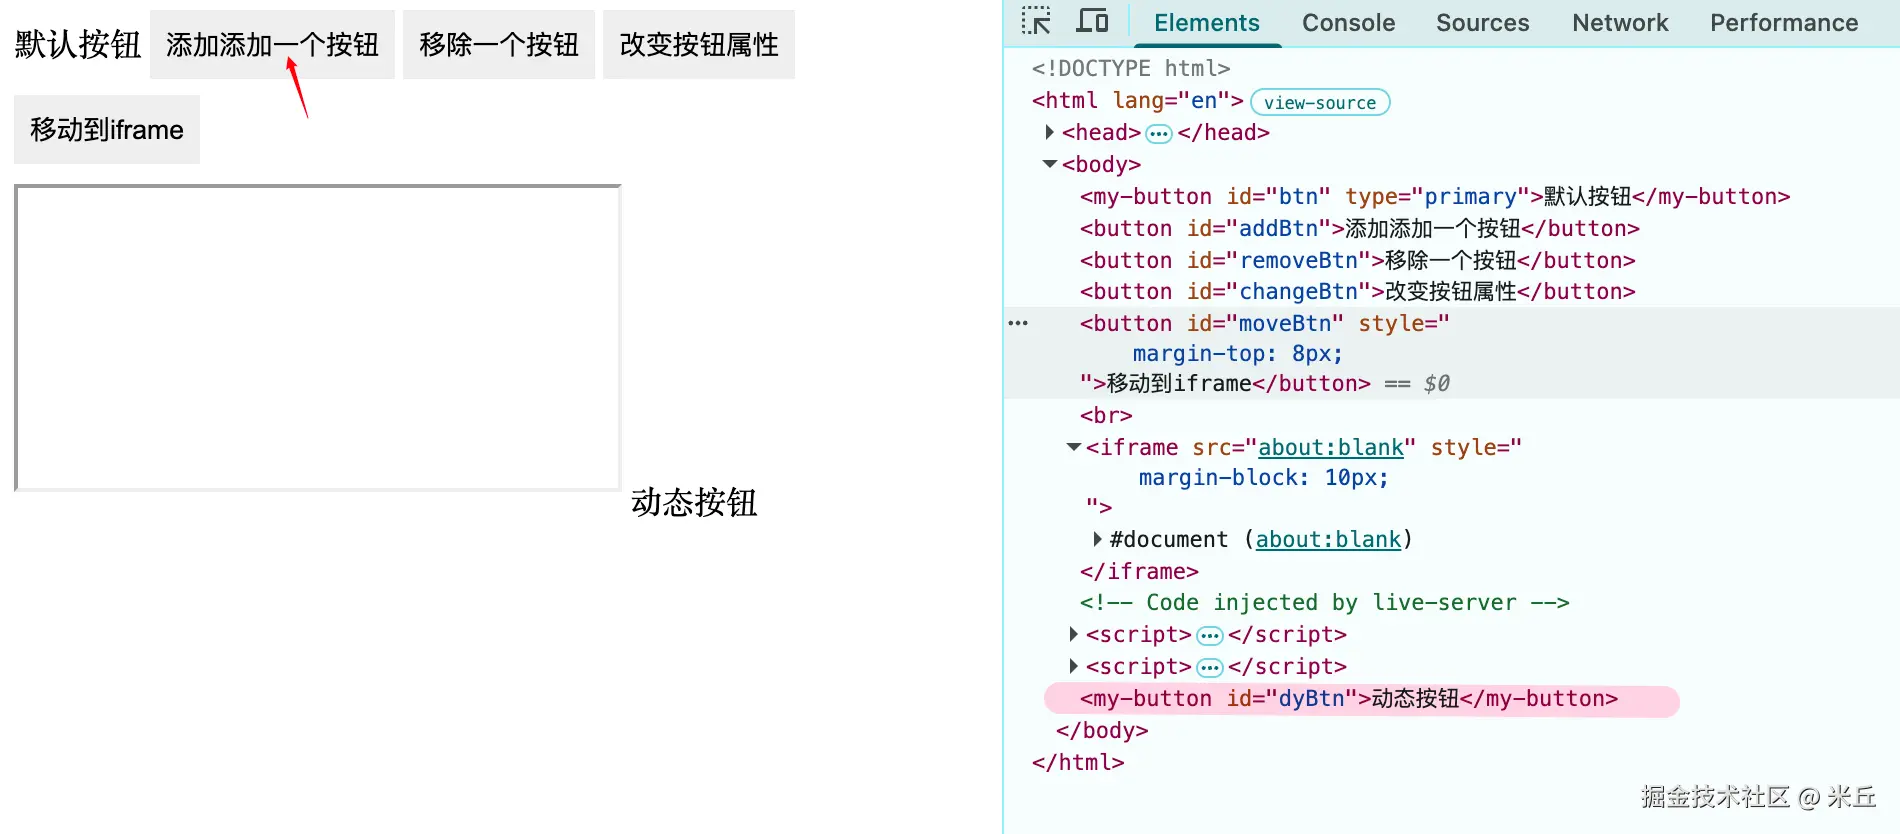
// 添加按钮
const addBtn = document.getElementById("addBtn");
addBtn.addEventListener("click", () => {
const dyBtn = document.createElement("my-button");
dyBtn.id = "dyBtn";
dyBtn.textContent = "动态按钮";
document.body.appendChild(dyBtn);
});
// 移除按钮
const removeBtn = document.getElementById("removeBtn");
removeBtn.addEventListener("click", () => {
const btn = document.getElementById("dyBtn");
btn.remove();
});
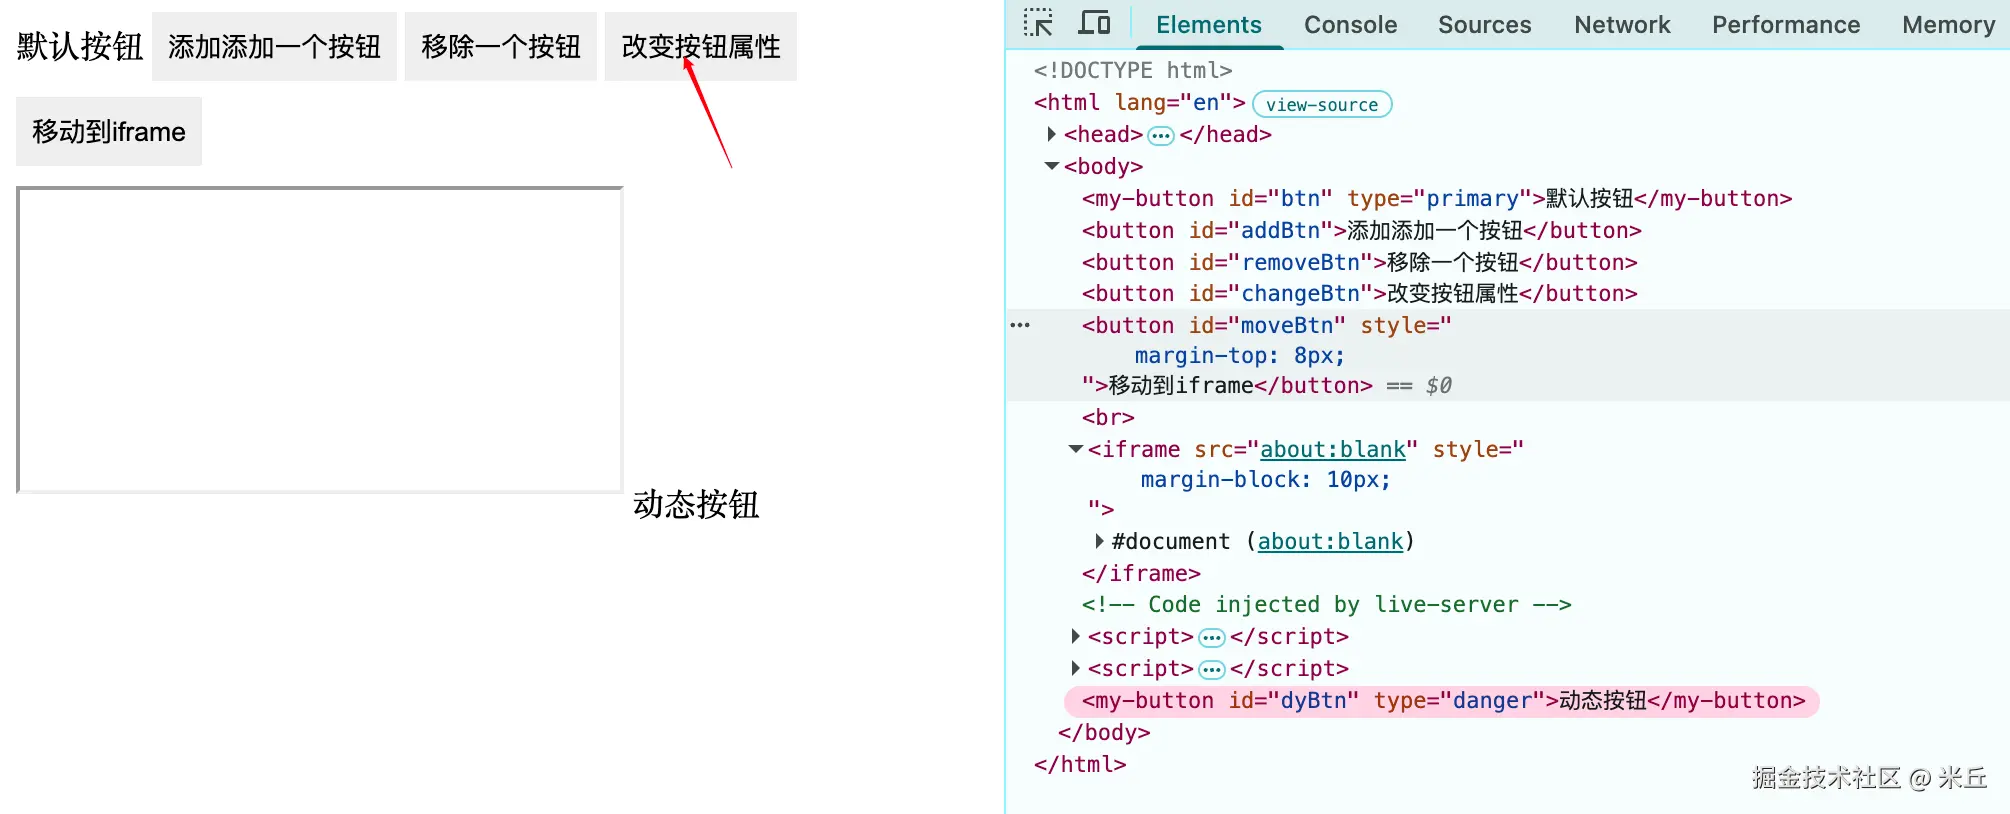
// 改变按钮属性
const changeBtn = document.getElementById("changeBtn");
changeBtn.addEventListener("click", () => {
const btn = document.getElementById("dyBtn");
btn.setAttribute("type", "danger");
});
// 移动按钮到iframe
const moveBtn = document.getElementById("moveBtn");
moveBtn.addEventListener("click", () => {
const btn = document.getElementById("dyBtn");
const iframe = document.querySelector("iframe");
iframe.contentDocument.body.appendChild(btn);
});
</script>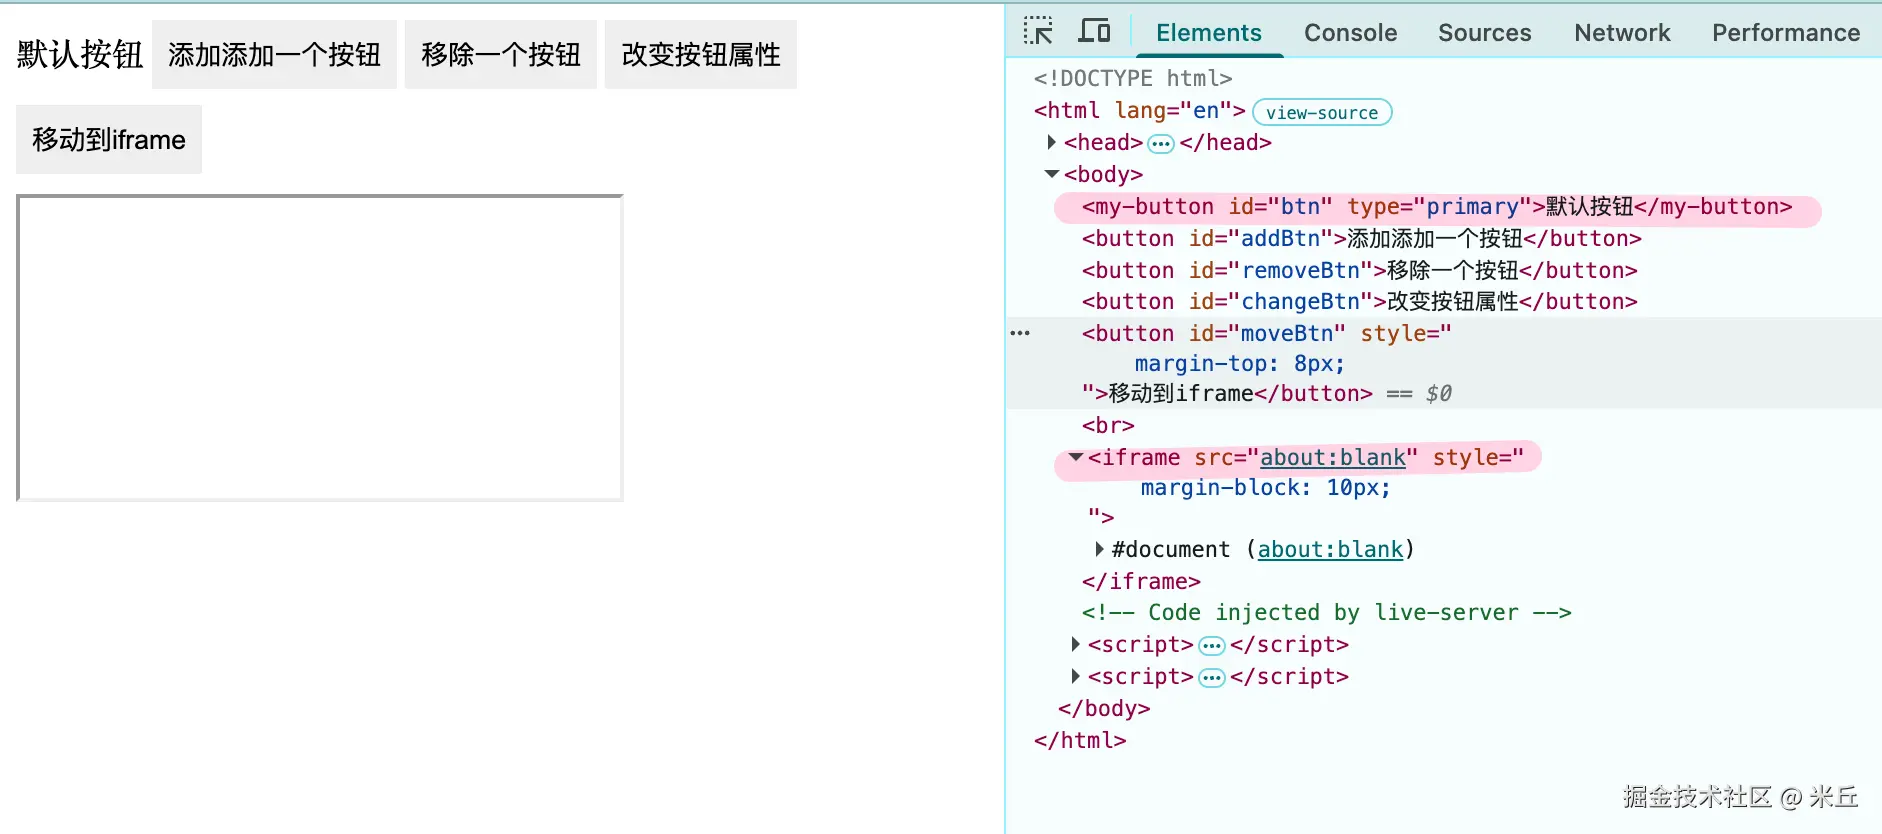
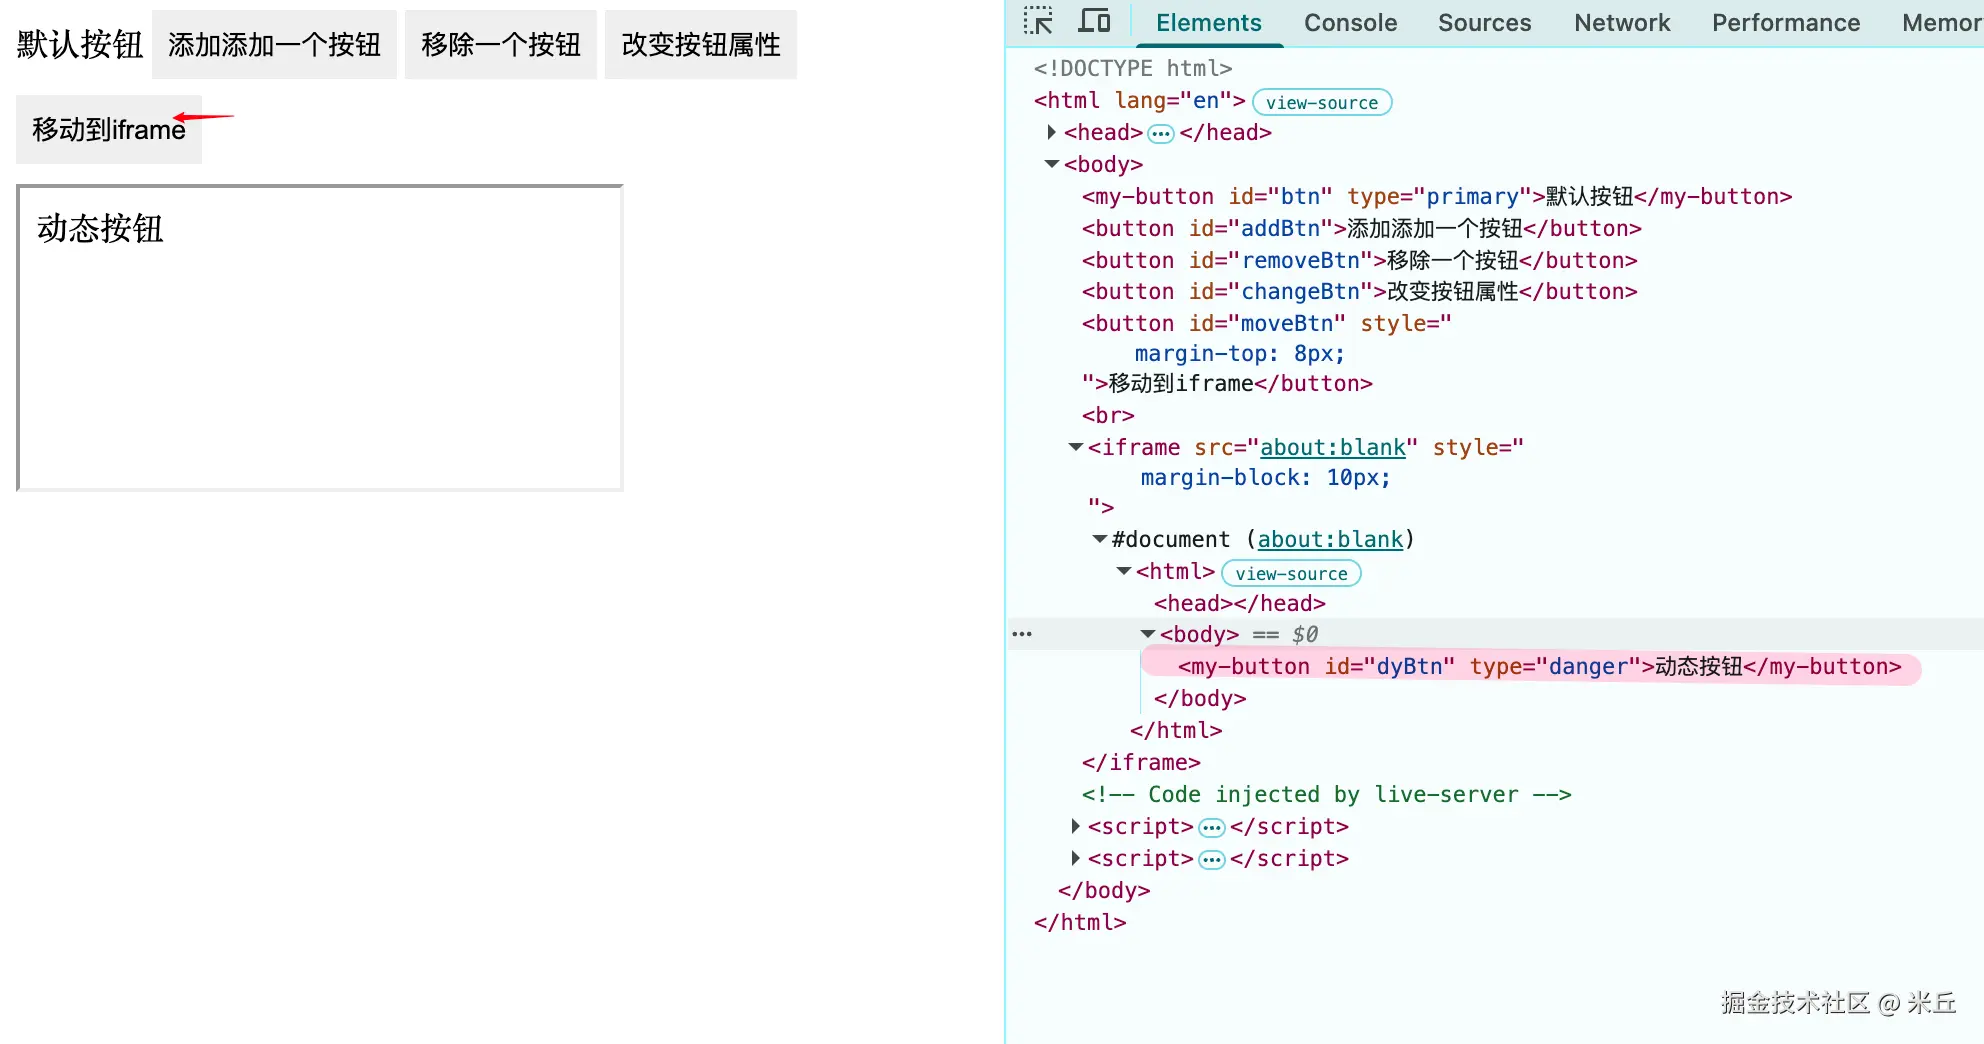
新添加 自定义按钮 显示在页面上,触发 connectedCallback 回调;从页面中移除,也会触发 connectedCallback 回调。
改变按钮属性,触发 attributeChangedCallback 回调。需要同时设置 static get observedAttributes,因为只有被列在 observedAttributes 中的属性变化才会触发 attributeChangedCallback
将自定义按钮移动到 iframe ,触发 adoptedCallback 回调
示例 转移 DOM
使用 appendChild() 将一个节点插入到 不同的文档 时,浏览器会 隐式执行 adopt 操作
js
// 移动按钮到 iframe
const moveBtn = document.getElementById("moveBtn");
moveBtn.addEventListener("click", () => {
  const btn = document.getElementById("dyBtn");
  const iframe = document.querySelector("iframe");

  if (!iframe.contentDocument) {
    return;
  }
  // 如果 iframe 没有加载完成,会报错
  iframe.contentDocument.body.appendChild(btn);
});
克隆一个副本,不会触发 adoptedCallback 回调
js
// 复制按钮到 iframe
const copyBtnDom = document.getElementById("copyBtn");
copyBtnDom.addEventListener("click", () => {
  const btn = document.getElementById("dyBtn");
  const cloneBtn = btn.cloneNode(true);
  const iframe = document.querySelector("iframe");
  // 如果 iframe 没有加载完成,会报错
  if (!iframe.contentDocument) {
    return;
  }
  iframe.contentDocument.body.appendChild(cloneBtn);
});
显示声明跨文档转移
执行 document.adoptNode(externalNode) 时,浏览器会做两件事:
- 修改归属 :将
externalNode.ownerDocument指向当前的document。 - 切断原籍 :如果该节点有父节点,会自动从其原始父节点中移除(相当于剪切)。
js
// 移动按钮到iframe
const moveBtn = document.getElementById("moveBtn");
moveBtn.addEventListener("click", () => {
  const btn = document.getElementById("dyBtn");
  const iframe = document.querySelector("iframe");
  // 如果 iframe 没有加载完成,会报错
  if (!iframe.contentDocument) {
    return;
  }
  // 显示声明跨文档转移,不是必须的
  iframe.contentDocument.adoptNode(btn);
  // 使用 appendChild() 将一个节点插入到 不同的文档 时,浏览器会 隐式执行 adopt 操作
  iframe.contentDocument.body.appendChild(btn);
    });
当执行 document.importNode(externalNode, true) 时,浏览器底层做了两件事:
- 深拷贝 :完全复制该节点及其所有子节点(取决于
deep参数)。 - 修改归属 :将这份副本 的
ownerDocument指向当前文档。
js
moveBtn.addEventListener("click", () => {
  const btn = document.getElementById("dyBtn");
  const iframe = document.querySelector("iframe");
  // 如果 iframe 没有加载完成,会报错
  if (!iframe.contentDocument) {
    return;
  }
  // importNode() 方法复制节点
  // 新节点,不会触发 adoptedCallback() 回调方法
  const imported = iframe.contentDocument.importNode(btn, true);
  iframe.contentDocument.body.appendChild(imported);
});
示例 创建自定义元素
js
customElements.define("my-button", MyButton);

customElements.define('my-element', MyElementClass, {
    extends: 'div'  // 继承 div 元素
});- 标签名必须带
- - 同一个标签名只能注册一次,否则会抛出
NotSupportedError - 类必须继承
HTMLElement或者其子类 - 推荐使用
whenDefined().then()来等待元素定义,而不是用setInterval检查get() define可以在 DOM 解析前或后调用,但如果在元素已存在于 DOM 后定义,浏览器会自动升级它们
js
interface CustomElementRegistry {
/**
* The **`define()`** method of the CustomElementRegistry interface adds a definition for a custom element to the custom element registry, mapping its name to the constructor which will be used to create it.
*
* [MDN Reference](https://developer.mozilla.org/docs/Web/API/CustomElementRegistry/define)
*/
define(name: string, constructor: CustomElementConstructor, options?: ElementDefinitionOptions): void;
/**
* The **`get()`** method of the previously-defined custom element.
*
* [MDN Reference](https://developer.mozilla.org/docs/Web/API/CustomElementRegistry/get)
*/
get(name: string): CustomElementConstructor | undefined;
/**
* The **`getName()`** method of the previously-defined custom element.
*
* [MDN Reference](https://developer.mozilla.org/docs/Web/API/CustomElementRegistry/getName)
*/
getName(constructor: CustomElementConstructor): string | null;
/**
* The **`upgrade()`** method of the elements in a Node subtree, even before they are connected to the main document.
* 强制升级未定义的元素
* [MDN Reference](https://developer.mozilla.org/docs/Web/API/CustomElementRegistry/upgrade)
*/
upgrade(root: Node): void;
/**
* The **`whenDefined()`** method of the resolves when the named element is defined. 异步等待元素定义
*
* [MDN Reference](https://developer.mozilla.org/docs/Web/API/CustomElementRegistry/whenDefined)
*/
whenDefined(name: string): Promise<CustomElementConstructor>;
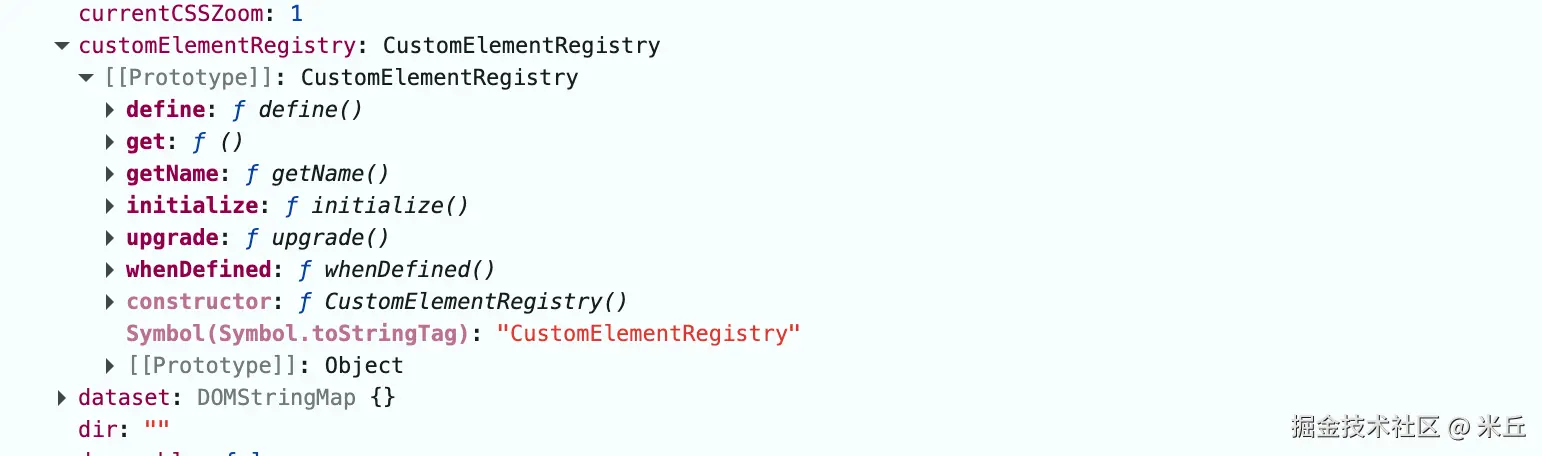
}MyButton 实例,有一个属性 customElementRegistry
Shadow DOM(影子 DOM)
Shadow DOM 是一组 JavaScript API,用于将一个封装的"影子"DOM 树附加到元素上。这个影子 DOM 与主文档的 DOM 分开渲染,实现了:
- 样式隔离:组件内部的样式不会泄漏到外部,外部样式也不会影响组件内部。
- 结构封装:组件的内部结构对外部是不可见的,外部无法直接访问或操作。
通过 Shadow DOM,可以保持元素特性的私有性,使其可以被脚本化和样式化,而不用担心与文档其他部分发生冲突。
js
interface ShadowRootInit {
    clonable?: boolean;
    // 可以传入一个独立的 CustomElementRegistry 实例,
    // 使得在该 Shadow Root 内部定义的或使用的自定义元素(通过 `<x-foo>` 标签)只从这个注册表中查找,而不影响全局注册表
    customElementRegistry?: CustomElementRegistry;
    delegatesFocus?: boolean;
    mode: ShadowRootMode;
    serializable?: boolean;
    // 控制 Shadow DOM 中 插槽(Slot)  的分配机制
    slotAssignment?: SlotAssignmentMode;
}
示例 基本使用
在HTML中解析到 my-button 标签时,触发 MyButton 构造函数
js
  <body>
    <my-button id="btn" type="primary">默认按钮</my-button>
  </body>
  <script>
    class MyButton extends HTMLElement {
      constructor() {
        super();
        // 原型链:HTMLElement => Element(attachShadow) => Node => EventTarget => Object => null
        const shadowRoot = this.attachShadow({
          // 外部 JavaScript 可以通过 element.shadowRoot 属性访问到该 Shadow Root。
          mode: "open",
        });

        this.shadowRoot.innerHTML = `
        <style>
          button {
            padding: 8px 8px;
            border: none;
            &:hover {
              cursor: pointer;
            }
          }
        </style>
          <button>
            ${this.textContent}
          </button>
        `;
      }
      connectedCallback() {
        console.log("connectedCallback");
      }
      disconnectedCallback() {
        console.log("disconnectedCallback");
      }
    }
    customElements.define("my-button", MyButton);
  </script>
HTML 模板(HTML Templates)
<template> 和 <slot> 元素,可以编写在渲染页面中不显示的标记模板。这些模板随后可以多次用作自定义元素结构的基础进行重用。
<template>:定义可复用的 HTML 结构,其内容在页面加载时不会被渲染。<slot>:提供内容分发机制,允许用户在使用自定义元素时插入自定义内容。<slot>只能在 Shadow DOM 中工作,在 Light DOM(innerHTML)中无效。
示例 slot 的使用
js
  <body>
    <my-button id="btn" type="primary">默认按钮</my-button>
    <my-button id="btn1" type="primary">按钮</my-button>
  </body>
  <script>
    class MyButton extends HTMLElement {
      constructor() {
        super();
        // 原型链:HTMLElement => Element(attachShadow) => Node => EventTarget => Object => null
        const shadowRoot = this.attachShadow({
          // 外部 JavaScript 可以通过 element.shadowRoot 属性访问到该 Shadow Root。
          mode: "open",
        });
      }
      connectedCallback() {
        this.render();
        console.log("connectedCallback");
      }
      disconnectedCallback() {
        console.log("disconnectedCallback");
      }

      // 自定义渲染
      render() {
        this.shadowRoot.innerHTML = `
        <style>
          button {
            padding: 8px 8px;
            border: none;
            &:hover {
              cursor: pointer;
            }
          }
        </style>
          <button>
            <slot></slot>
          </button>
        `;
      }
    }
    customElements.define("my-button", MyButton);
  </script>
示例 closed 模式
自定义元素的插槽内容属于 Light DOM,不属于 Shadow DOM。
html
<!doctype html>
<html lang="en">
  <head>
    <meta charset="UTF-8" />
    <meta name="viewport" content="width=device-width, initial-scale=1.0" />
    <title>Document</title>
    <style>
      /* 这里的样式优先级比插槽内部定义的样式高,所以这里定义的样式会生效,插槽内部定义的样式会被覆盖 */
      .title {
        font-size: 24px;
      }
    </style>
  </head>
  <body>
    <my-card>
      <!-- 插槽内容属于 Light DOM,不属于 Shadow DOM -->
      <div class="title">卡片标题</div>
      <div class="content">卡片内容</div>
    </my-card>
  </body>
  <script>
    class MyCard extends HTMLElement {
      constructor() {
        super();

        // 设置 closed 模式,无法从外部访问 shadowRoot
        const shadowRoot = this.attachShadow({
          mode: "closed",
        });

        console.log("shadowRoot", shadowRoot);

        shadowRoot.innerHTML = `
          <style>
           .card {
            padding: 12px;
            border: 1px solid #ccc;
            border-radius: 4px;
            background-color: #F4C0EB;
            padding:12px 14px;
           }
          ::slotted(.title) {
            font-size: 16px;
            font-weight: bold;
          }
          // 匹配插槽中的元素,并应用样式
          ::slotted(.content) {
            font-size: 14px;
          }
          </style>

          <div class="card">
            <slot></slot>
          </div>
          `;

        // 无法从外部访问 shadowRoot
        // console.log("this.shadowRoot", this.shadowRoot); // undefined
      }

      connectedCallback() {
        console.log("connectedCallback");
      }
      disconnectedCallback() {
        console.log("disconnectedCallback");
      }
    }

    customElements.define("my-card", MyCard);
  </script>
</html>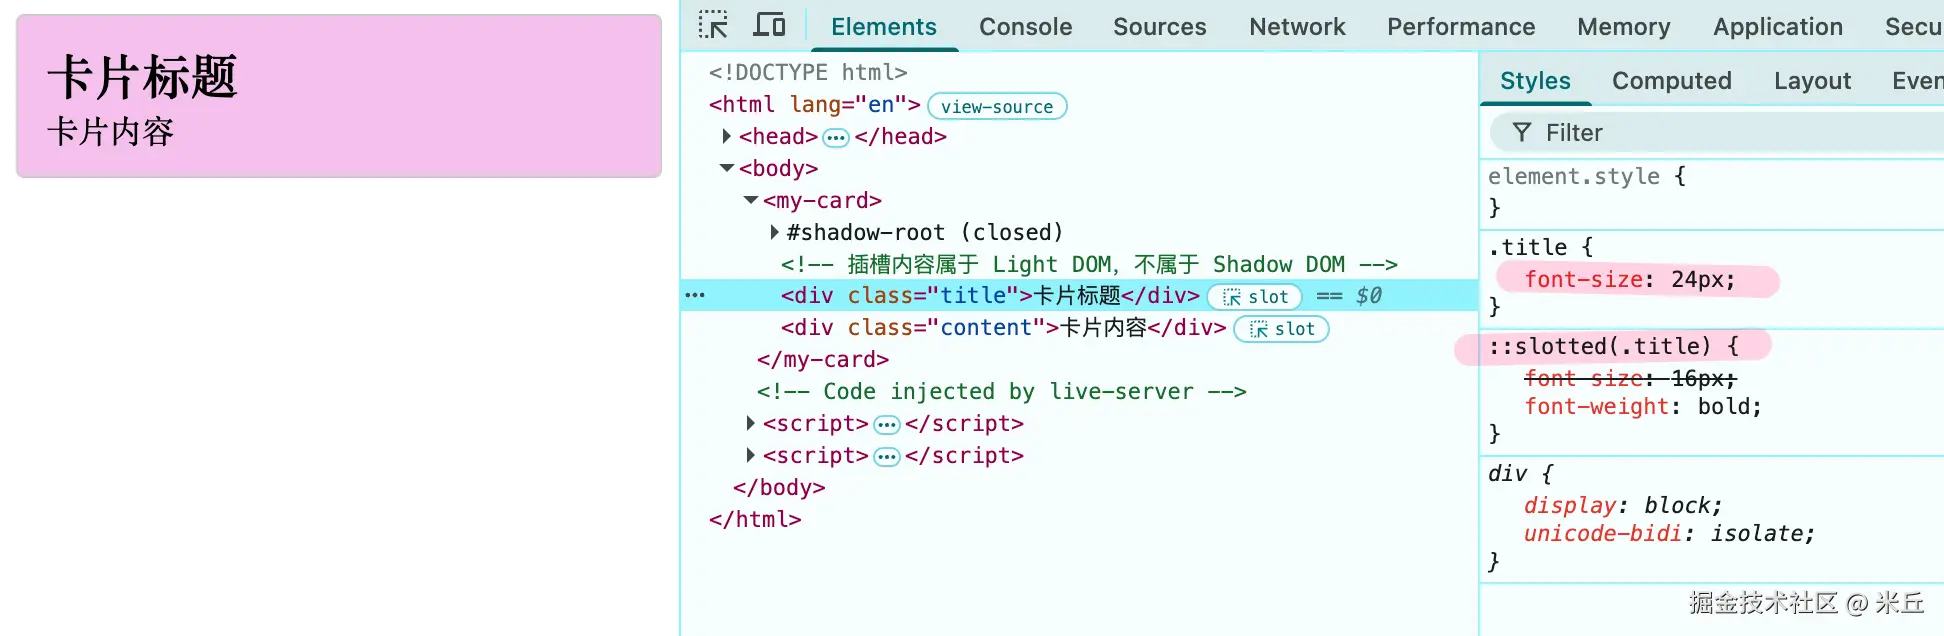
示例 利用宿主元素属性/方法通信
js
<!doctype html>
<html lang="en">
  <head>
    <meta charset="UTF-8" />
    <meta name="viewport" content="width=device-width, initial-scale=1.0" />
    <title>Document</title>
    <style>
      .title {
        font-size: 24px;
      }
    </style>
  </head>
  <body>
    <my-card id="my-card">
      <!-- 插槽内容属于 Light DOM,不属于 Shadow DOM -->
      <div class="title">卡片标题</div>
      <div class="content">卡片内容</div>
    </my-card>

    <button id="btn">增加计数</button>
  </body>
  <script>
    class MyCard extends HTMLElement {
      count = 0;
      constructor() {
        super();

        // 设置 closed 模式,无法从外部访问 shadowRoot
        this.root = this.attachShadow({
          mode: "closed",
        });

        this.render();

        console.log("root", this.root);

        // 无法从外部访问 shadowRoot
        console.log("this.shadowRoot", this.shadowRoot); // undefined
      }

      render() {
        this.root.innerHTML = `
          <style>
           .card {
            padding: 12px;
            border: 1px solid #ccc;
            border-radius: 4px;
            background-color: #F4C0EB;
            padding:12px 14px;
           }
          ::slotted(.title) {
            font-size: 16px;
            font-weight: bold;
          }
          // 匹配插槽中的元素,并应用样式
          ::slotted(.content) {
            font-size: 14px;
          }
          </style>

          <div class="card">
            <slot></slot>
            <p id="count">当前计数: ${this.count || 0}</p>
          </div>
          `;
      }

      connectedCallback() {
        console.log("connectedCallback");
      }
      disconnectedCallback() {
        console.log("disconnectedCallback");
      }

      // 自定义方法,用于交互外部事件
      setCount(count) {
        console.log("setCount", count);
        this.count = count;
        this.render();
      }

      getCount() {
        return this.count;
      }
    }

    customElements.define("my-card", MyCard);

    // 调用自定义方法
    const myCard = document.getElementById("btn");
    const btn = document.getElementById("btn");
    btn.addEventListener("click", () => {
      const cardDom = document.getElementById("my-card");
      cardDom.setCount(cardDom.getCount() + 1);
      console.log(cardDom.getCount());
    });
  </script>
</html>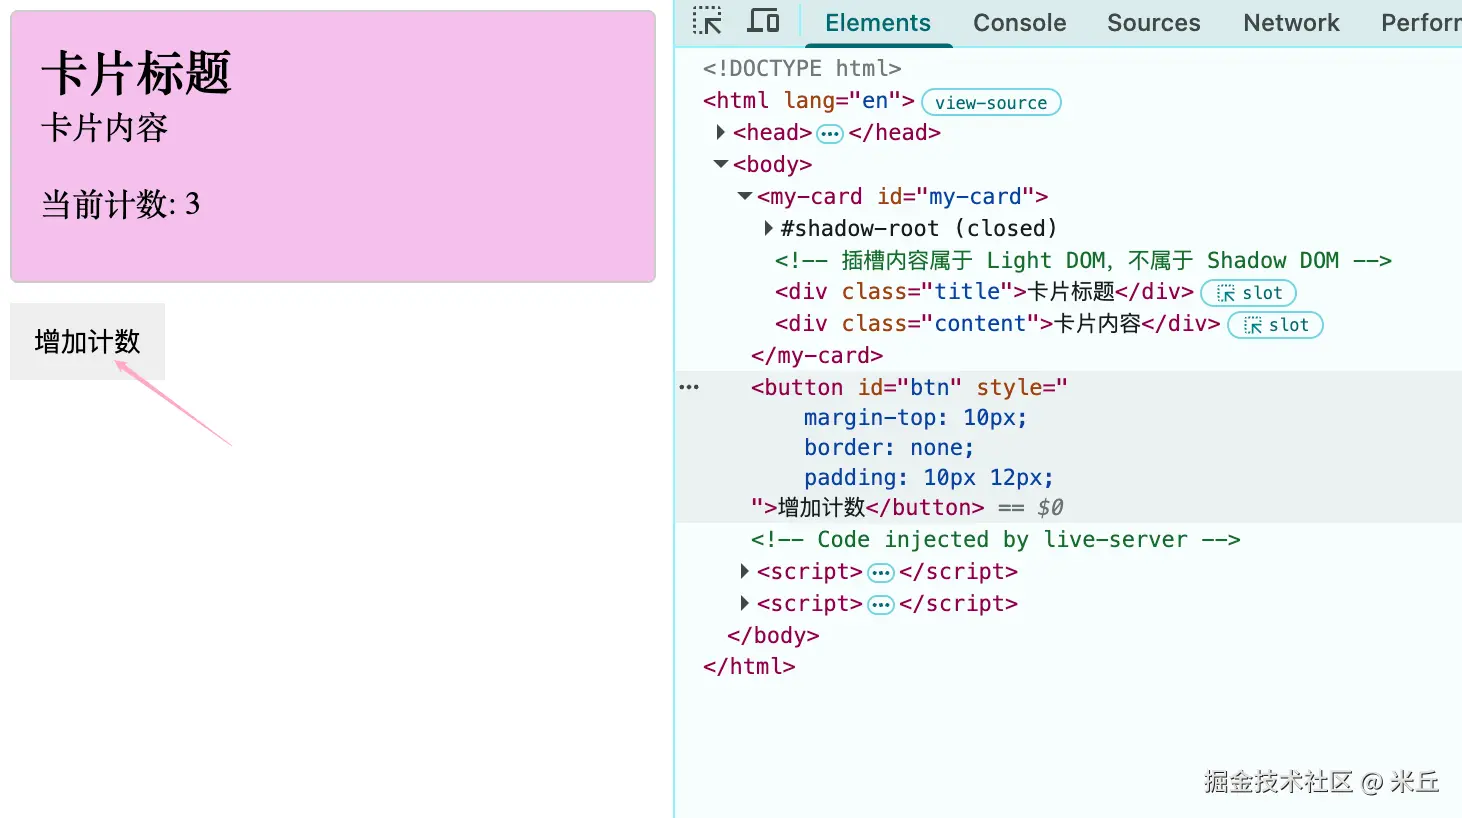
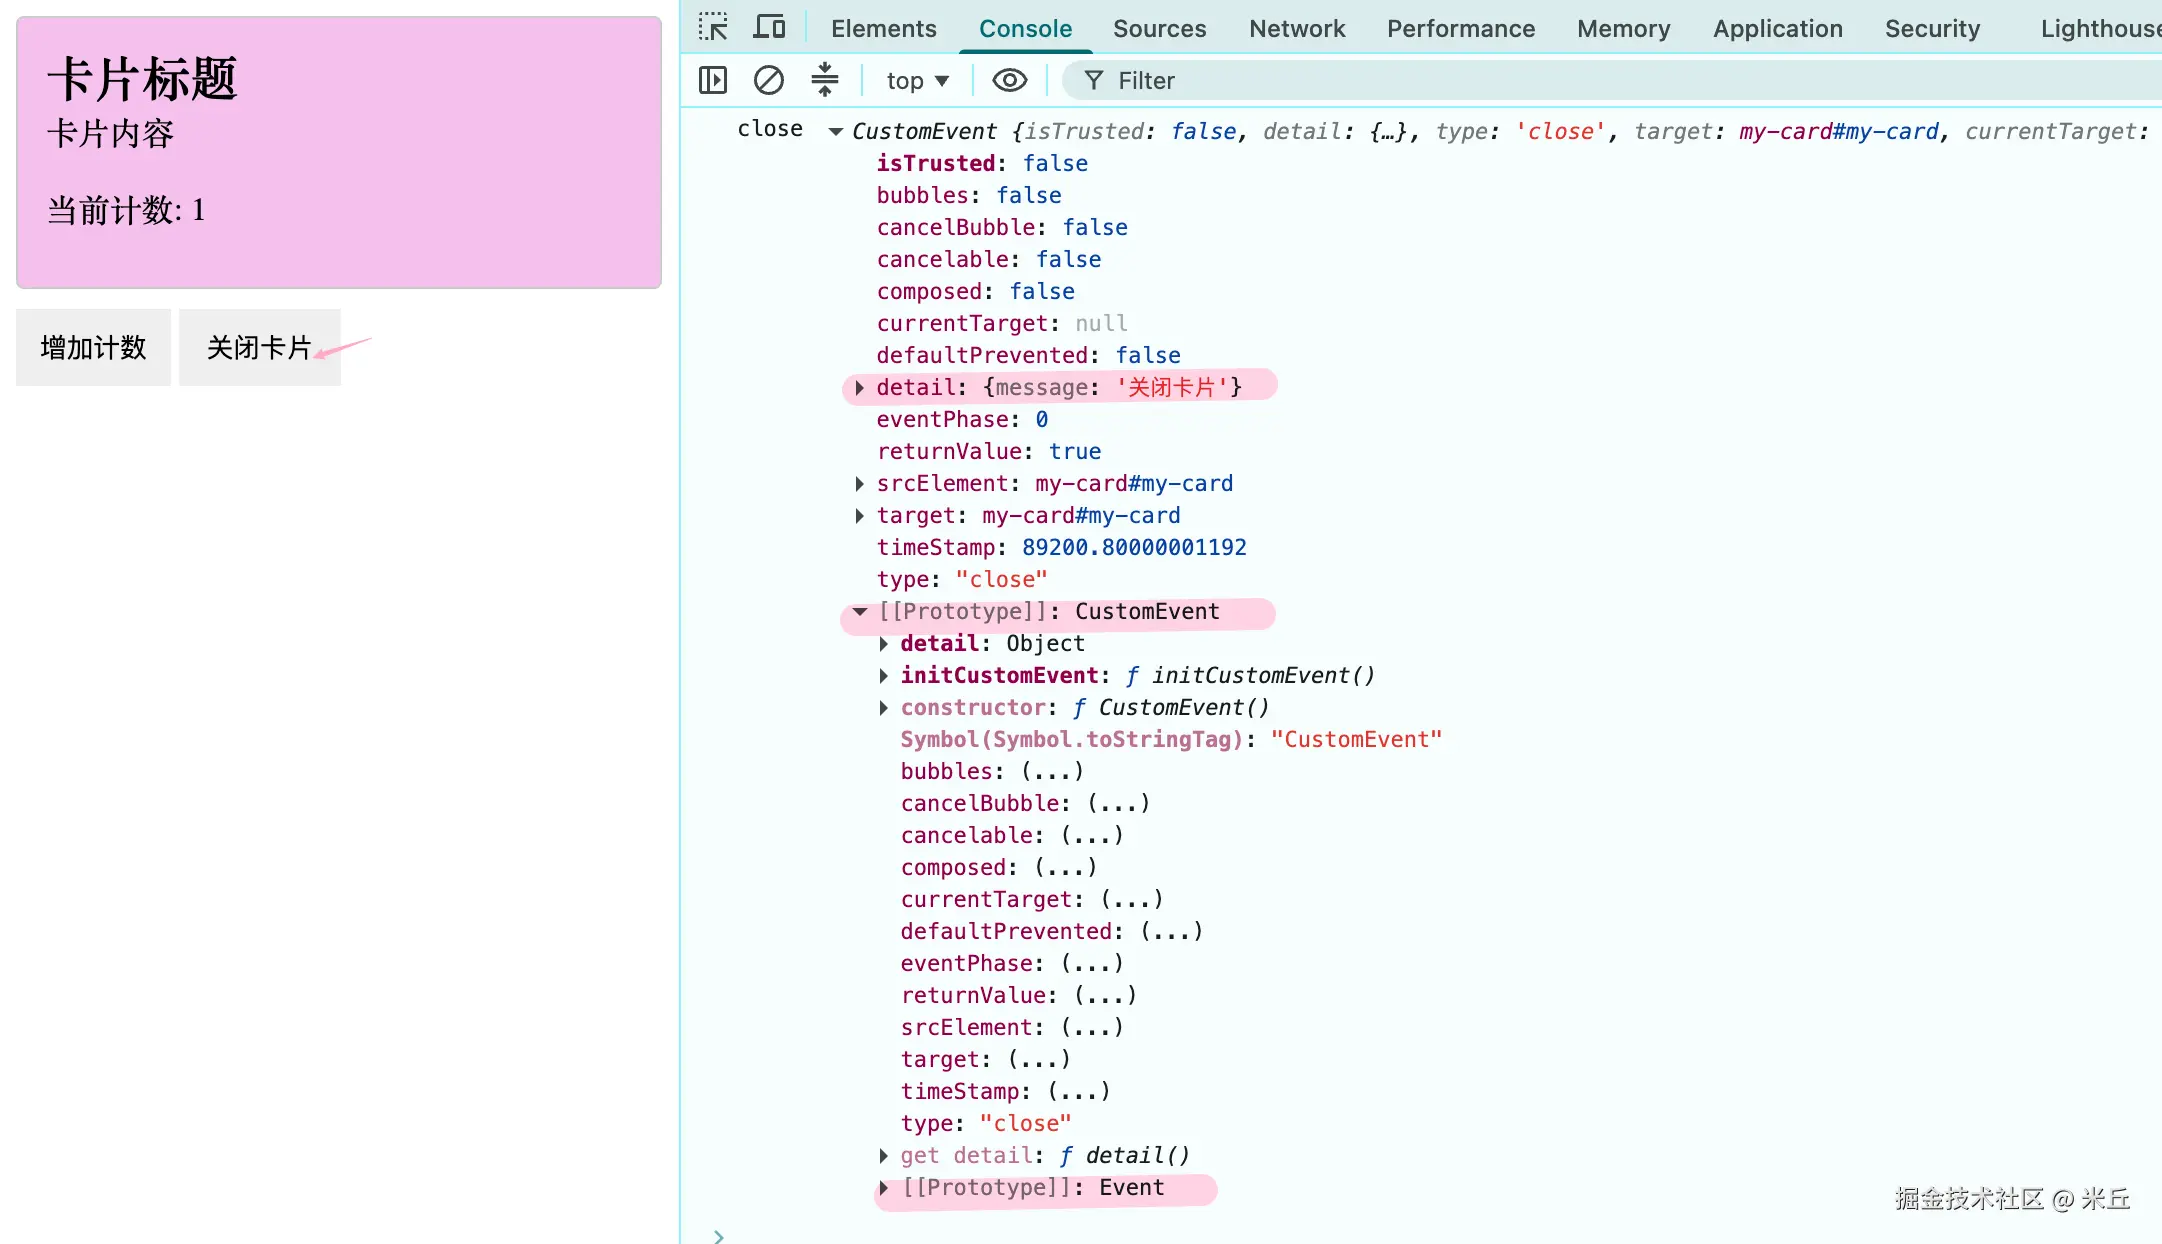
示例 利用自定义事件(需借助宿主方法)
html
<!doctype html>
<html lang="en">
<head>
<meta charset="UTF-8" />
<meta name="viewport" content="width=device-width, initial-scale=1.0" />
<title>Document</title>
<style>
.title {
font-size: 24px;
}
</style>
</head>
<body>
<my-card id="my-card">
<!-- 插槽内容属于 Light DOM,不属于 Shadow DOM -->
<div class="title">卡片标题</div>
<div class="content">卡片内容</div>
</my-card>
<button id="btn">增加计数</button>
<button id="close-btn">关闭卡片</button>
</body>
<script>
class MyCard extends HTMLElement {
count = 0;
constructor() {
super();
// 设置 closed 模式,无法从外部访问 shadowRoot
this.root = this.attachShadow({
mode: "closed",
});
this.render();
this.addEventListener("close", this.closeHandler);
}
closeHandler(e) {
console.log("close", e);
}
render() {
this.root.innerHTML = `
<style>
.card {
padding: 12px;
border: 1px solid #ccc;
border-radius: 4px;
background-color: #F4C0EB;
padding:12px 14px;
}
::slotted(.title) {
font-size: 16px;
font-weight: bold;
}
// 匹配插槽中的元素,并应用样式
::slotted(.content) {
font-size: 14px;
}
</style>
<div class="card">
<slot></slot>
<p id="count">当前计数: ${this.count || 0}</p>
</div>
`;
}
connectedCallback() {
console.log("connectedCallback");
}
disconnectedCallback() {
console.log("disconnectedCallback");
this.removeEventListener("close", this.closeHandler);
}
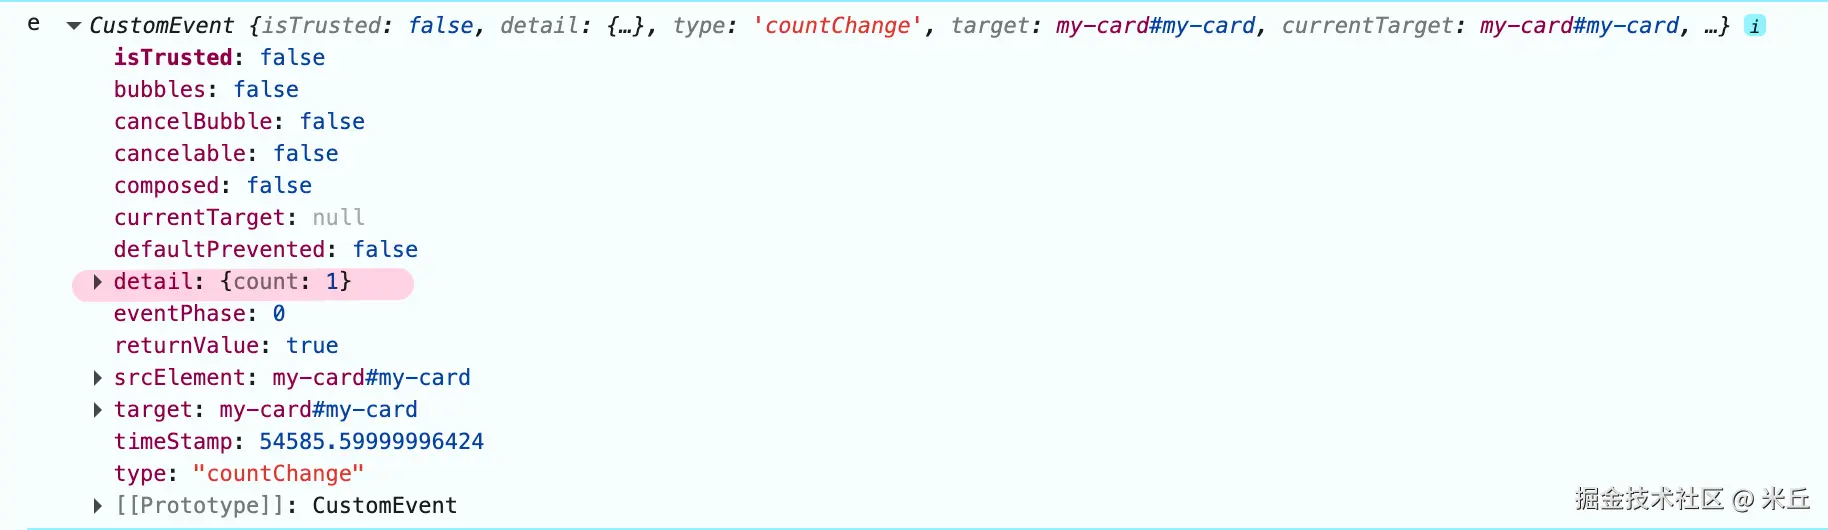
notify() {
this.dispatchEvent(
new CustomEvent("countChange", {
detail: {
count: this.count,
},
// bubbles: true,
// composed: true, // 关键:允许穿透 shadow boundary
}),
);
}
getCount() {
return this.count;
}
setCount(count) {
this.count = count || 0;
this.render();
this.notify();
}
}
customElements.define("my-card", MyCard);
// 调用自定义方法
const btn = document.getElementById("btn");
const cardDom = document.getElementById("my-card");
btn.addEventListener("click", () => {
const cardDom = document.getElementById("my-card");
cardDom.setCount(cardDom.getCount() + 1);
console.log(cardDom.getCount());
});
cardDom.addEventListener("countChange", (e) => {
console.log("e", e);
});
const closeBtn = document.getElementById("close-btn");
closeBtn.addEventListener("click", () => {
cardDom.dispatchEvent(
new CustomEvent("close", {
detail: {
message: "关闭卡片",
},
}),
);
});
</script>
</html>外部 ----> 内部 shadow dom
外部不能直接触发内部的事件监听器(因为事件目标在内部)。通常做法是调用宿主元素的方法 或向宿主元素派发事件,内部通过 this.addEventListener 监听宿主元素自身的事件。
内部 shadow dom ----> 外部
ts
declare var CustomEvent: {
    prototype: CustomEvent;
    new<T>(type: string, eventInitDict?: CustomEventInit<T>): CustomEvent<T>;
};
ts
interface EventInit {
    bubbles?: boolean; // 事件是否冒泡到父元素
    cancelable?: boolean;
    composed?: boolean; // 事件是否能穿透 Shadow DOM 边界
}
直接在目标元素上监听,不需要设置这两个选项。 当外部从父元素/祖先元素监听,需要设置 bubbles 为 true; 当从内部shadow 中触发事件,需要 设置 composed 为 true。
js
this.dispatchEvent(
  new CustomEvent("countChange", {
    detail: {
      count: this.count,
    },
    // bubbles: true,
    // composed: true, // 关键:允许穿透 shadow boundary
  }),
);
示例 宿主父节点/祖先节点监听 shodow dom 事件
结合上述代码修改
js
customElements.define("my-card", MyCard);

// 调用自定义方法
const btn = document.getElementById("btn");
const cardDom = document.getElementById("my-card");

//
btn.addEventListener("click", () => {
  const cardDom = document.getElementById("my-card");
  cardDom.setCount(cardDom.getCount() + 1);
  console.log(cardDom.getCount());
});

// body 触发监听 countChange
document.body.addEventListener("countChange", (e) => {
  console.log("e", e);
});
js
notify() {
this.dispatchEvent(
new CustomEvent("countChange", {
detail: {
count: this.count,
},
bubbles: true,
// composed: true, // 关键:允许穿透 shadow boundary
}),
);
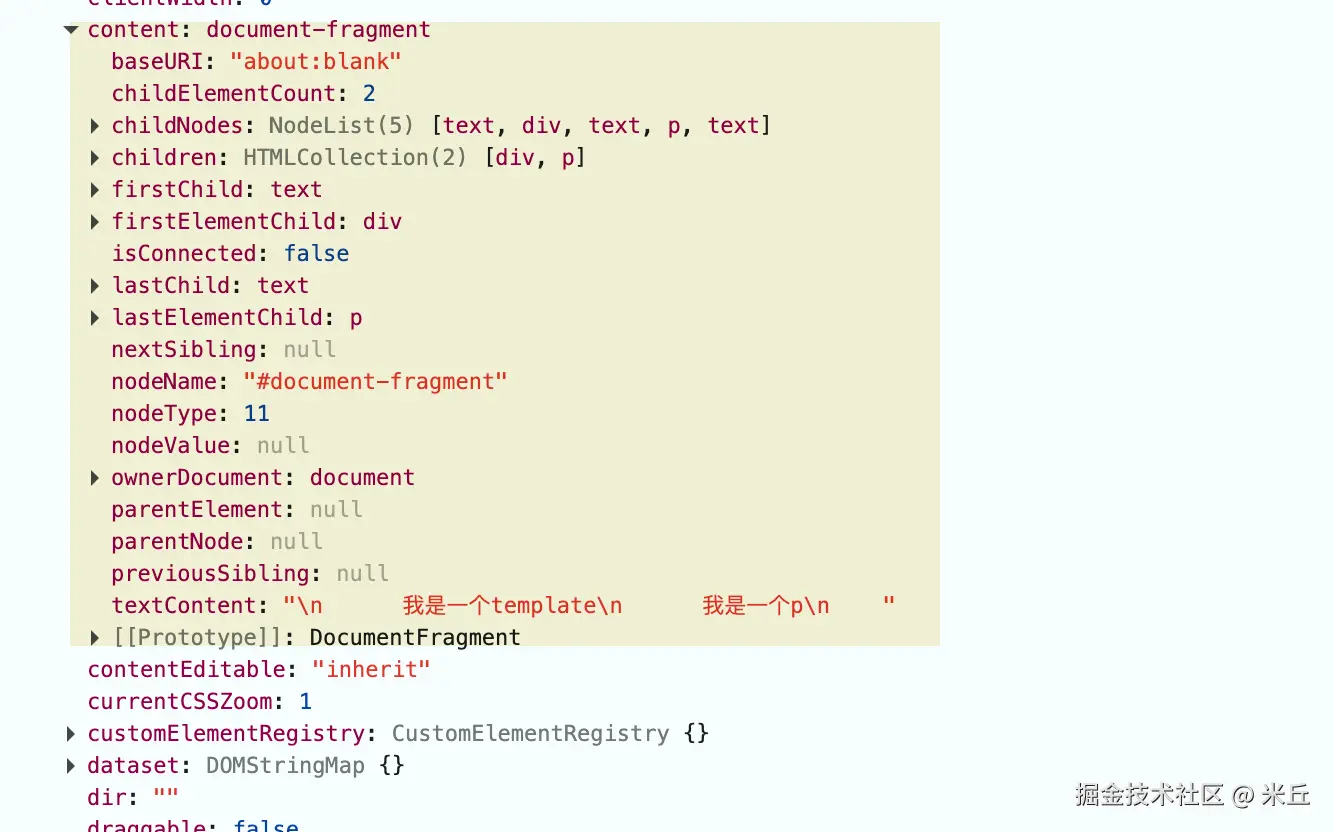
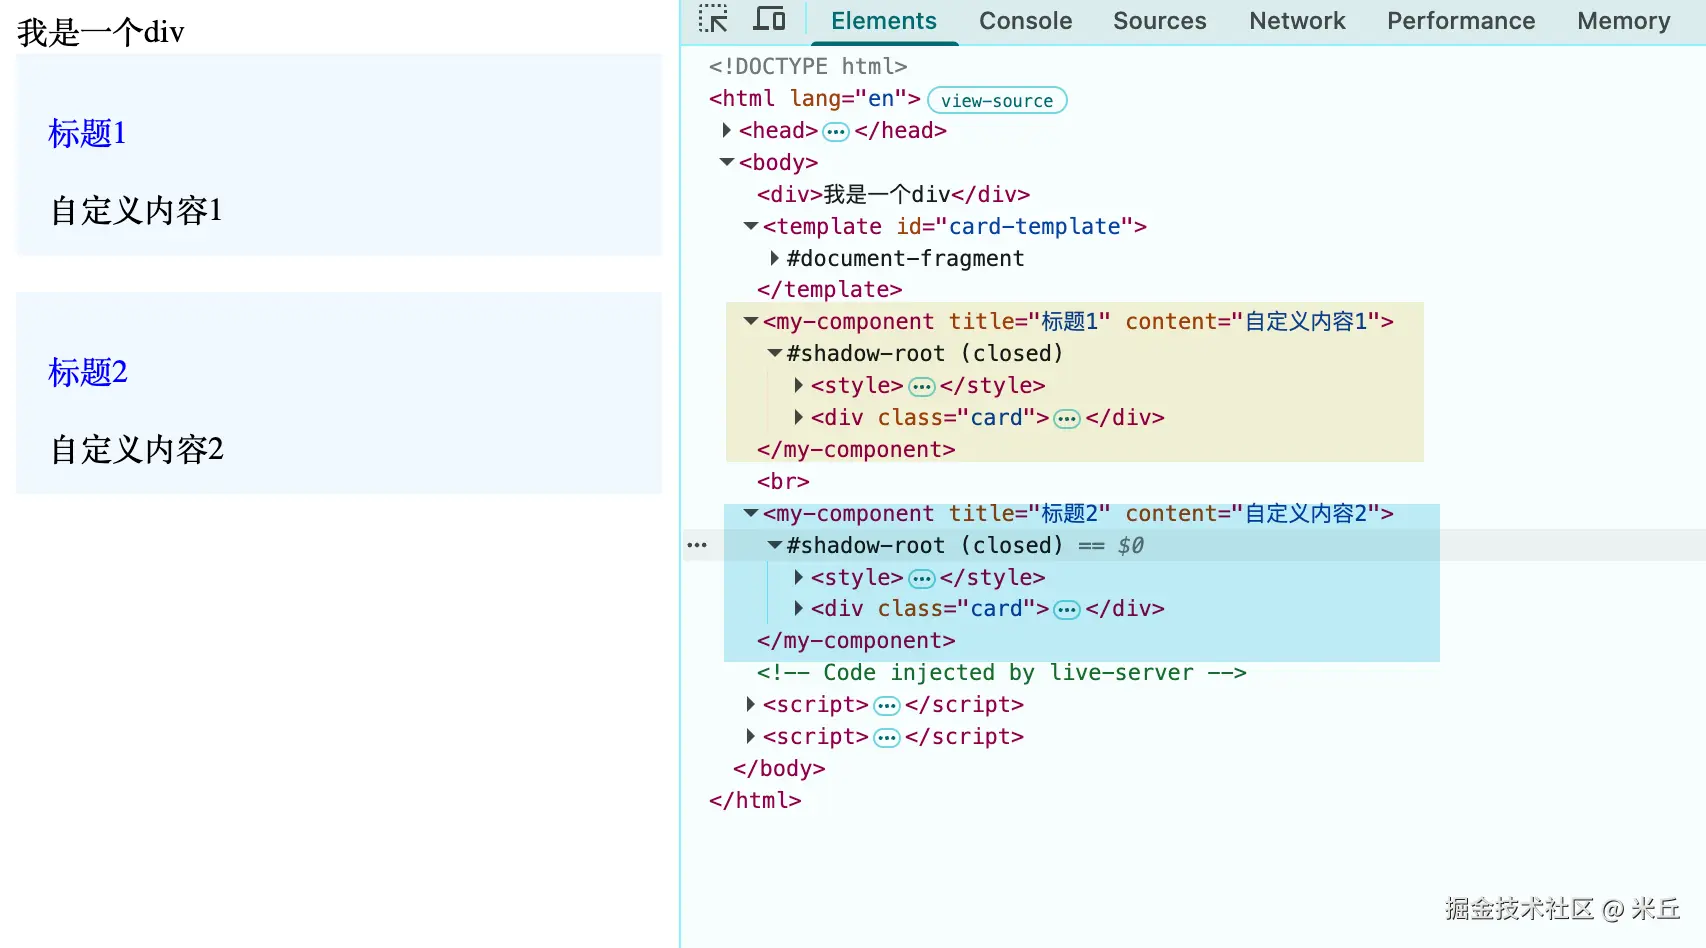
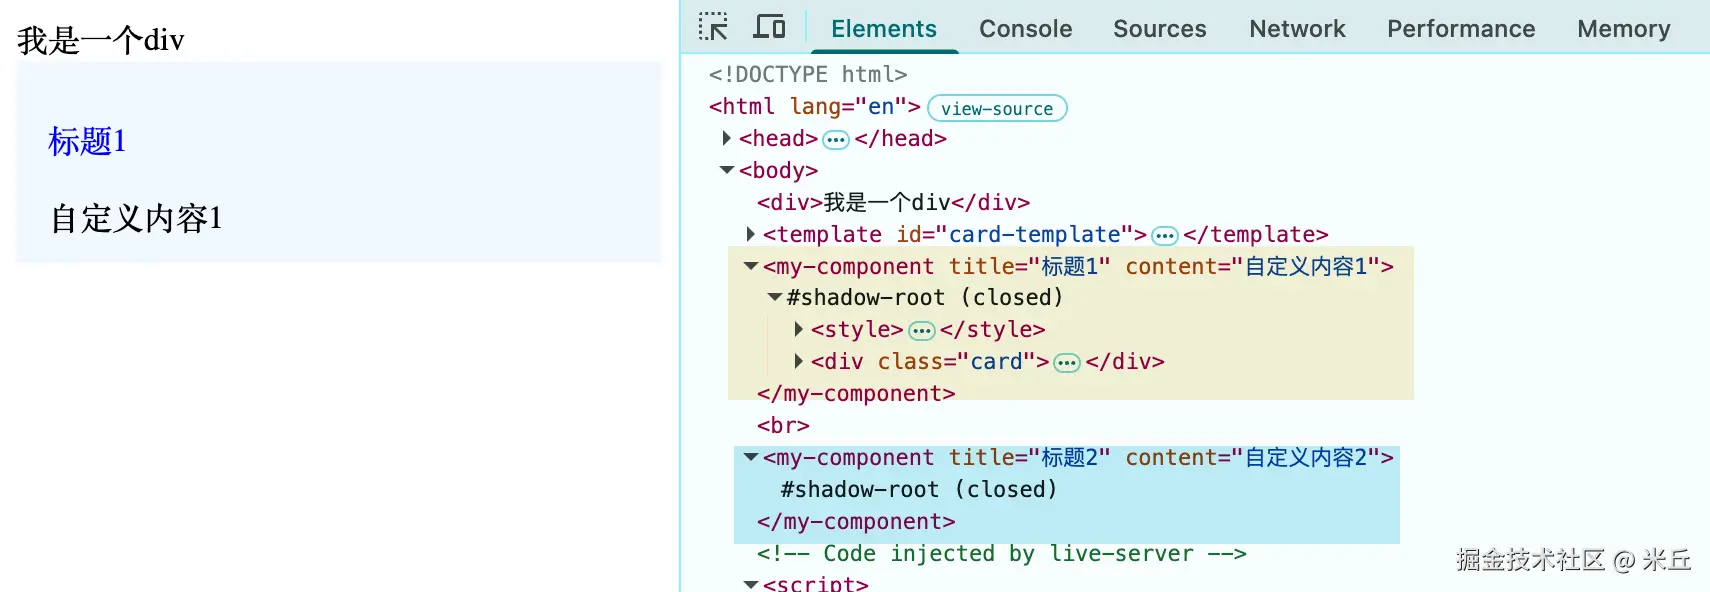
}示例 template 的使用
在 Custom Element(自定义元素)中使用 <template>,是 Web Components 开发中最标准的实践 。它解决了传统 JS 拼接字符串导致 XSS 风险和维护困难的问题,同时提供了极高的渲染性能(模板只解析一次,克隆多次)。
<template> 最大的价值在于惰性:它内部的 DOM 在激活前不会被渲染,也不会请求资源(如图片)。在 Custom Element 中,我们通常这样做:
- 定义模板 :在 HTML 或 JS 中定义
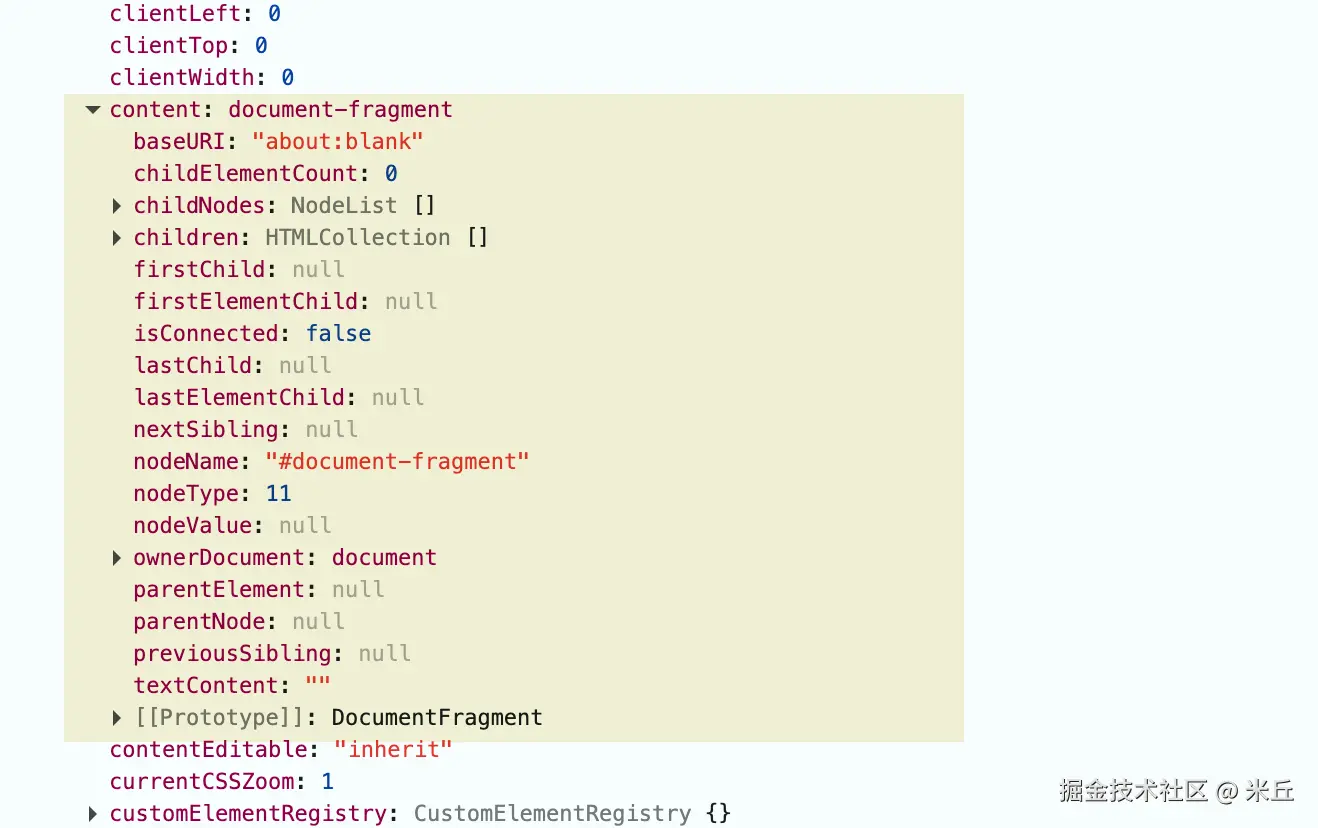
<template>。 - 获取片段 :在组件实例化时,获取
template.content(这是一个DocumentFragment)。 - 深克隆 :使用
cloneNode(true)克隆这个片段(因为片段是引用类型,直接使用会移动节点,导致只能使用一次)。
模板最好定义在 HTML 的 <body> 中,或者通过 JS 动态创建。如果定义在 <head> 中,部分浏览器可能无法正常获取内容。
在 <template> 内部 的子元素不推荐使用 id,模板内部的内容会被克隆多次 ,如果内部写了 id,克隆后会有多个同名 id 存在于同一个 Shadow Root 或 Document 中。
html
<!doctype html>
<html lang="en">
  <head>
    <meta charset="UTF-8" />
    <meta name="viewport" content="width=device-width, initial-scale=1.0" />
    <title>Document</title>
  </head>

  <body>
    <div>我是一个div</div>
    <template id="card-template">
      <style>
        .card {
          background-color: aliceblue;
          padding: 12px 16px;
        }
        p {
          color: blue;
        }
      </style>
      <div class="card">
        <p class="title">我是一个p标题</p>
        <div class="content">我是一个template</div>
      </div>
    </template>
    <my-component title="标题1" content="自定义内容1"></my-component>
    <br />
    <my-component title="标题2" content="自定义内容2"></my-component>
  </body>

  <script>
    class MyComponent extends HTMLElement {
      title = "默认标题";
      content = "默认内容";

      constructor() {
        super();
        this.root = this.attachShadow({ mode: "closed" });

        // 获取模板内容(DocumentFragment)
        // HTMLTemplateElement.content 是一个 DocumentFragment 对象
        const template = document.getElementById("card-template");
        console.log("template", template);

        // 深克隆节点(关键!不能直接用 template.content)
        // DocumentFragment => Node(cloneNode) => EventTarget => Object => null
        const clone = template.content.cloneNode(true);

        // 存储相关dom引用
        this.titleElement = clone.querySelector(".title");
        this.contentElement = clone.querySelector(".content");

        // 挂载到 Shadow Root
        this.root.appendChild(clone);
      }

      static get observedAttributes() {
        return ["title", "content"];
      }

      attributeChangedCallback(name, oldValue, newValue) {
        console.log("attributeChangedCallback", name, oldValue, newValue);

        this._updateContent({
          name,
          newValue,
          oldValue,
        });
      }

      _updateContent({ name, newValue, oldValue }) {
        if (name === "title") {
          this.titleElement.textContent = newValue;
        } else if (name === "content") {
          this.contentElement.textContent = newValue;
        }
      }
    }
    customElements.define("my-component", MyComponent);
  </script>
</html>
DocummentFragment.content
js
const clone = template.content // 直接使用

// 挂载到 Shadow Root
this.root.appendChild(clone);
必须深克隆 (cloneNode(true)) :如果不克隆,template.content 会被移动,导致第二个组件实例挂载时,模板内容是空的。
示例 通信
使用 shadowRoot 的事件委托 来处理内部事件,而不是在模板里写 onclick 属性(不符合内容安全策略 CSP)
html
<template id="card-template">
  <style>
    .card {
      background-color: aliceblue;
      padding: 12px 16px;
    }
    p {
      color: blue;
    }
  </style>
  <div class="card">
    <p class="title">我是一个p标题</p>
    <div class="content">我是一个template</div>
  </div>
</template>
js
class MyComponent extends HTMLElement {
  title = "默认标题";
  content = "默认内容";

  constructor() {
    super();
    this.root = this.attachShadow({ mode: "closed" });

    // 获取模板内容(DocumentFragment)
    // HTMLTemplateElement.content 是一个 DocumentFragment 对象
    const template = document.getElementById("card-template");

    // 深克隆节点(关键!不能直接用 template.content)
    // DocumentFragment => Node(cloneNode) => EventTarget => Object => null
    const clone = template.content.cloneNode(true);


    // 存储相关dom引用
    this.titleElement = clone.querySelector(".title");
    this.contentElement = clone.querySelector(".content");

    // 挂载到 Shadow Root
    this.root.appendChild(clone);
    this.root.addEventListener("click", this.handleClick.bind(this));
  }

  connectedCallback() {
    console.log("connectedCallback");
  }

  disconnectedCallback() {
    // 组件从文档中移除时,移除事件监听
    this.root.removeEventListener("click", this.handleClick.bind(this));
    console.log("disconnectedCallback");
  }

  handleClick(e) {
    console.log("handleClick", e);
    this.dispatchEvent(
      new CustomEvent("message", {
        detail: {
          title: this.title,
          content: this.content,
        },
        composed: true,
      }),
    );
  };

  static get observedAttributes() {
    return ["title", "content"];
  }

  attributeChangedCallback(name, oldValue, newValue) {
    console.log("attributeChangedCallback", name, oldValue, newValue);

    this._updateContent({
      name,
      newValue,
      oldValue,
    });
  }

  _updateContent({ name, newValue, oldValue }) {
    if (name === "title") {
      this.title = newValue;
      this.titleElement.textContent = newValue;
    } else if (name === "content") {
      this.content = newValue;
      this.contentElement.textContent = newValue;
    }
  }
}
customElements.define("my-component", MyComponent);
html
<my-component
  id="component1"
  title="标题1"
  content="自定义内容1"
></my-component>
<br />
<my-component
  id="component2"
  title="标题2"
  content="自定义内容2"
></my-component>

<script>
    const myComponent = document.querySelector("#component1");
    myComponent.addEventListener("message", (e) => {
      console.log("message", e.detail);
    });
</script>
js
class MyComponent extends HTMLElement {
  title = "默认标题";
  content = "默认内容";

  constructor() {
    super();
    this.root = this.attachShadow({ mode: "closed" });

    // 获取模板内容(DocumentFragment)
    // HTMLTemplateElement.content 是一个 DocumentFragment 对象
    const template = document.getElementById("card-template");

    // 深克隆节点(关键!不能直接用 template.content)
    // DocumentFragment => Node(cloneNode) => EventTarget => Object => null
    const clone = template.content.cloneNode(true);

    // console.log("clone---", clone);
    // 存储相关dom引用
    this.titleElement = clone.querySelector(".title");
    this.contentElement = clone.querySelector(".content");

    // 挂载到 Shadow Root
    this.root.appendChild(clone);
    this.root.addEventListener("click", this.handleClick);
  }

  connectedCallback() {
    console.log("connectedCallback");
  }

  disconnectedCallback() {
    // 组件从文档中移除时,移除事件监听
    this.root.removeEventListener("click", this.handleClick);
    console.log("disconnectedCallback");
  }

  // 箭头函数,解决 this 指向问题
  handleClick = (e) => {
    console.log("handleClick", e);
    this.dispatchEvent(
      new CustomEvent("message", {
        detail: {
          title: this.title,
          content: this.content,
        },
        composed: true,
      }),
    );
  };

  static get observedAttributes() {
    return ["title", "content"];
  }

  attributeChangedCallback(name, oldValue, newValue) {
    console.log("attributeChangedCallback", name, oldValue, newValue);

    this._updateContent({
      name,
      newValue,
      oldValue,
    });
  }

  _updateContent({ name, newValue, oldValue }) {
    if (name === "title") {
      this.title = newValue;
      this.titleElement.textContent = newValue;
    } else if (name === "content") {
      this.content = newValue;
      this.contentElement.textContent = newValue;
    }
  }
}
示例 template 和 slot
js
<template id="card-template">
  <style>
    .card {
      background-color: aliceblue;
      padding: 12px 16px;
    }
    p {
      color: blue;
    }
  </style>
  <div class="card">
    <p class="title">我是一个p标题</p>
    <div class="content">我是一个template</div>
    <slot name="other"></slot>
  </div>
</template>
js
<my-component id="component1" title="标题1" content="自定义内容1">
  <div slot="other">我是一个other</div>
</my-component>
<br />
<my-component
  id="component2"
  title="标题2"
  content="自定义内容2"
></my-component>
应用场景
跨框架组件库
Web Components 最大的价值在于框架无关性。无论项目使用 React、Vue、Angular 还是原生 JavaScript,Web Components 都能像原生 HTML 标签一样工作
微前端架构
在微前端场景中,不同子应用可能使用不同的前端框架。Web Components 可以作为"胶水层",让各个子应用共享通用组件,而无需担心框架冲突