文章目录
- 完整代码一览
- 导入库与辅助函数
-
- 定义显示图像函数cv_show
- [辅助轮廓排序函数 sort_contours](#辅助轮廓排序函数 sort_contours)
- 主程序流程
-
- 读取图片,缩放并逆时针旋转90度
- [Canny 边缘检测](#Canny 边缘检测)
- 查找轮廓,筛选扇子外轮廓
- 生成掩膜
- 按位与操作提取扇子区域
- 保存结果
一个完整的图像提取流程:读取图片 → 缩放 + 旋转 → Canny 边缘检测 → 查找轮廓 → 生成掩膜 → 按位与提取目标区域。
项目要求:
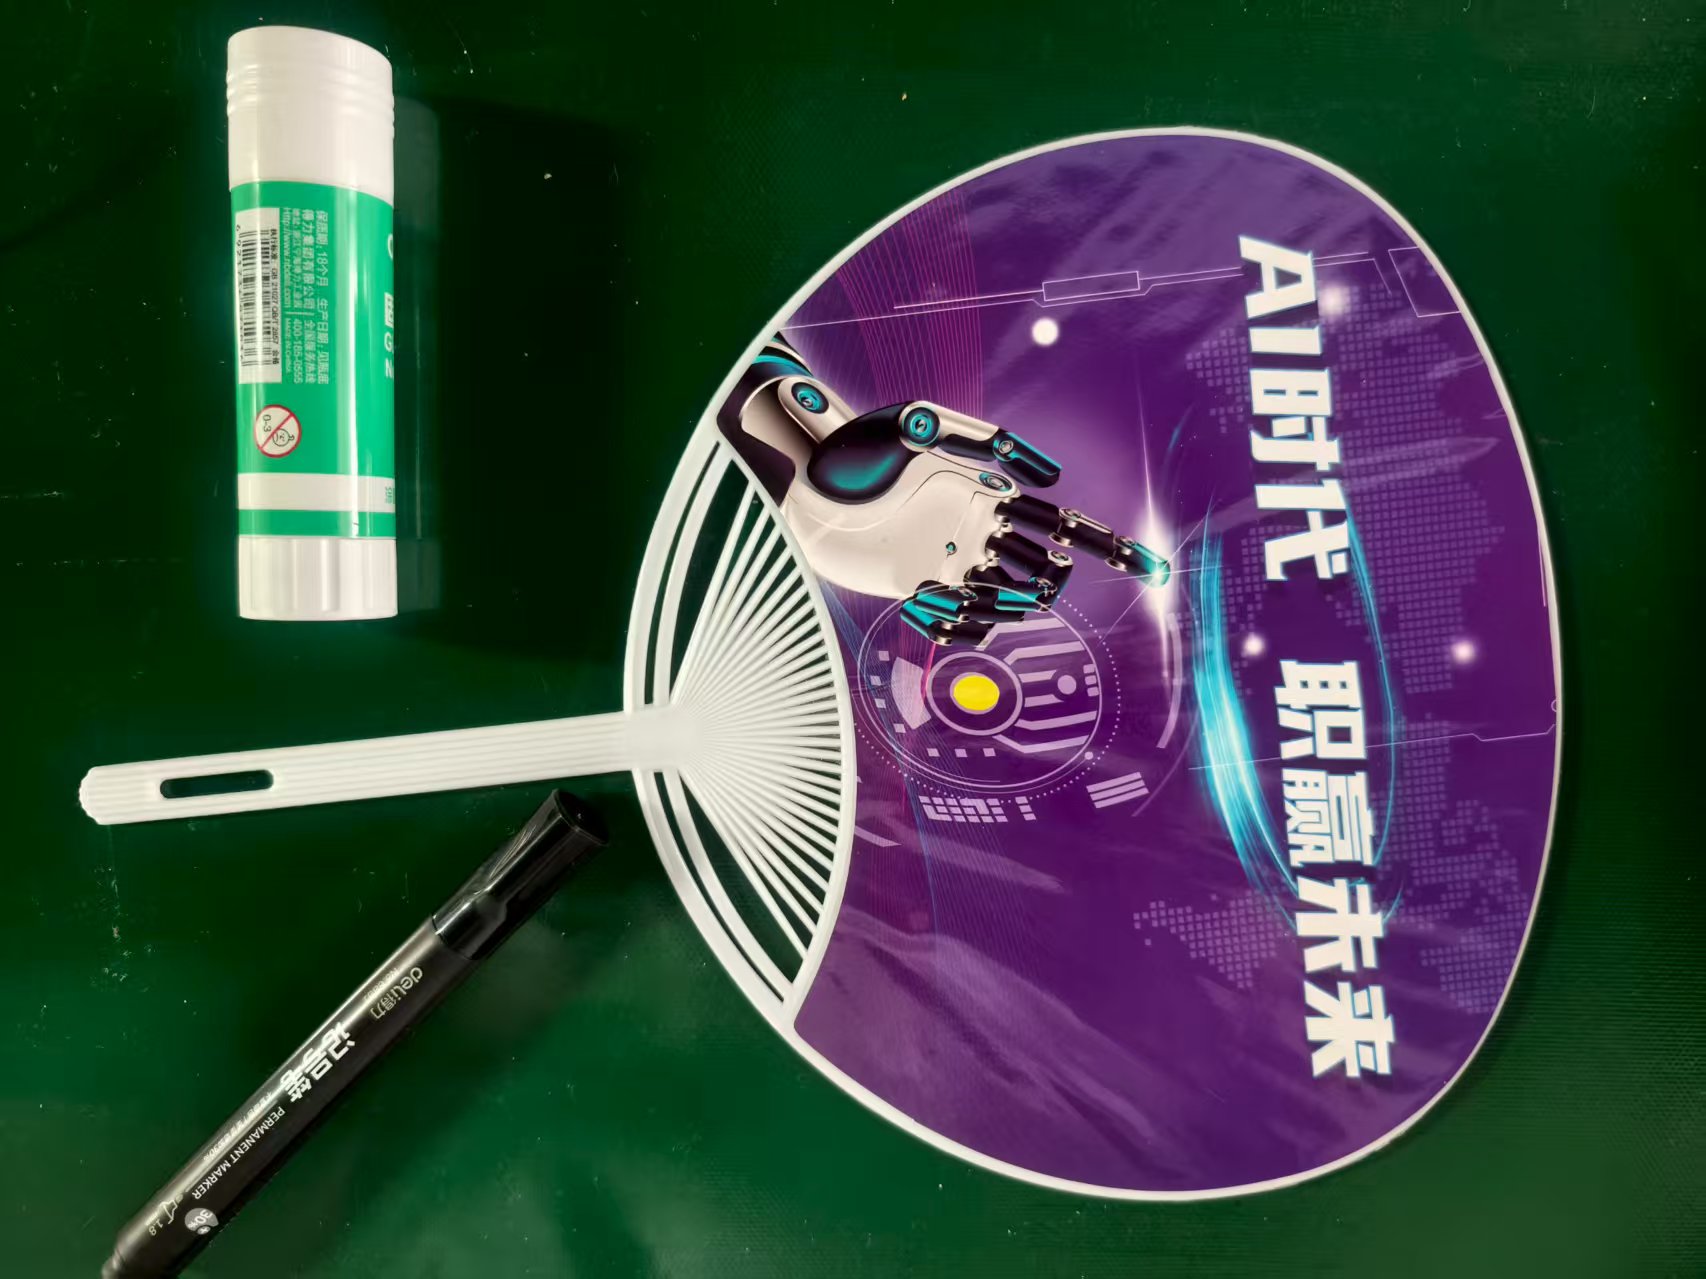
一张名为fan.jpg的图片,现要求使用 Python 结合 OpenCV 库编写代码实现以下功能:
(1)读取名为fan.jpg的图片,将尺寸设置为宽640,高480,然后逆时针旋转90度;
(2)使用Canny边缘检测提取(1)处理后的边缘;
(3)在提取边缘的基础上,查找轮廓并选取扇子的外轮廓,生成相应的掩模;
(4)将步骤 1 处理后的图像与步骤 3 生成的掩模执行按位与操作,提取扇子区域图像,最终将结果保存为shanzi.png文件。
样图:
fan.jpy
完整代码一览
c
import cv2
import numpy as np

def cv_show(name, image):
    cv2.imshow(name, image)
    cv2.waitKey(0)

def sort_contours(cnts, method='left-to-right'):
    reverse = False
    i = 0
    if method == 'right-to-left' or method == 'bottom-to-top':
        reverse = True
    if method == 'top-to-bottom' or method == 'bottom-to-top':
        i = 1
    boundingBoxes = [cv2.boundingRect(c) for c in cnts]
    (cnts, boundingBoxes) = zip(*sorted(zip(cnts, boundingBoxes),
                                        key=lambda b: b[1][i], reverse=reverse))
    return cnts, boundingBoxes

# ---------- 主程序 ----------
# (1) 读取图片,缩放并逆时针旋转90度
img = cv2.imread(r'./fan.jpg')
img = cv2.resize(img, (640, 480))
img_1 = np.rot90(img, k=1)   # k=1 表示逆时针旋转90度
cv2.imshow('yuan_tu', img)
cv2.imshow('fan_image', img_1)
cv2.waitKey(0)
cv2.destroyAllWindows()

# (2) Canny边缘检测
contours_img = img_1.copy()
gray = cv2.cvtColor(img_1, cv2.COLOR_BGR2GRAY)
blurred = cv2.GaussianBlur(gray, ksize=(5, 5), sigmaX=0)
cv_show('blurred', blurred)
img_canny = cv2.Canny(blurred, threshold1=75, threshold2=200)
cv_show('img_canny', img_canny)

# (3) 查找轮廓,选取扇子的外轮廓,生成掩膜
cnts = cv2.findContours(img_canny.copy(), cv2.RETR_EXTERNAL, cv2.CHAIN_APPROX_SIMPLE)[-2]
cv2.drawContours(contours_img, cnts, -1, (0, 0, 255), 3)
cv_show('contours_img', contours_img)

# 排序(其实这里只有一个最大的轮廓,但保留排序习惯)
questionCnts = []
for c in cnts:
    x, y, w, h = cv2.boundingRect(c)
    questionCnts.append(c)
questionCnts = sort_contours(questionCnts, method="top-to-bottom")[0]
fan_conts = questionCnts[0]   # 取第一个(最大的)轮廓

mask = np.zeros_like(gray)
cv2.drawContours(mask, [fan_conts], -1, 255, thickness=-1)   # thickness=-1 填充轮廓内部
cv_show("img_mask", mask)

# (4) 按位与操作,提取扇子区域
img_mask_and = cv2.bitwise_and(img_1, img_1, mask=mask)
cv_show('img_mask_and', img_mask_and)

# 保存结果
cv2.imwrite('shanzi.png', img_mask_and)
导入库与辅助函数
定义显示图像函数cv_show
c
import cv2
import numpy as np

def cv_show(name, image):
    cv2.imshow(name, image)
    cv2.waitKey(0)
辅助轮廓排序函数 sort_contours
c
def sort_contours(cnts, method='left-to-right'):
    reverse = False
    i = 0
    if method == 'right-to-left' or method == 'bottom-to-top':
        reverse = True
    if method == 'top-to-bottom' or method == 'bottom-to-top':
        i = 1
    boundingBoxes = [cv2.boundingRect(c) for c in cnts]
    (cnts, boundingBoxes) = zip(*sorted(zip(cnts, boundingBoxes),
                                        key=lambda b: b[1][i], reverse=reverse))
    return cnts, boundingBoxes
主程序流程
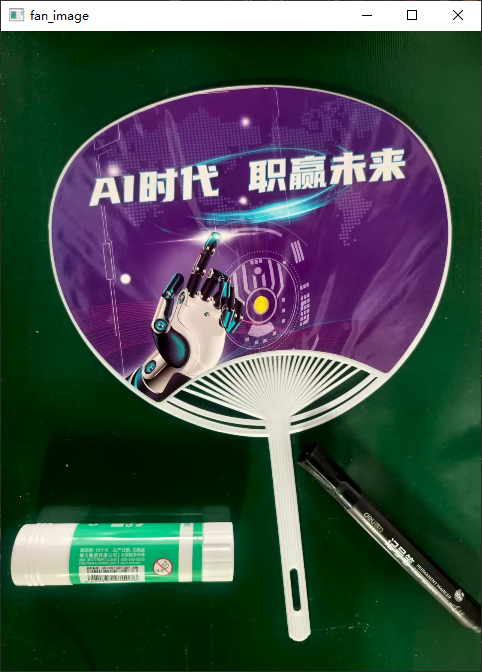
读取图片,缩放并逆时针旋转90度
c
img = cv2.imread(r'./fan.jpg')
img = cv2.resize(img, (640, 480))
img_1 = np.rot90(img, k=1)
cv2.imshow('yuan_tu', img)
cv2.imshow('fan_image', img_1)
cv2.waitKey(0)
cv2.destroyAllWindows()
运行结果:
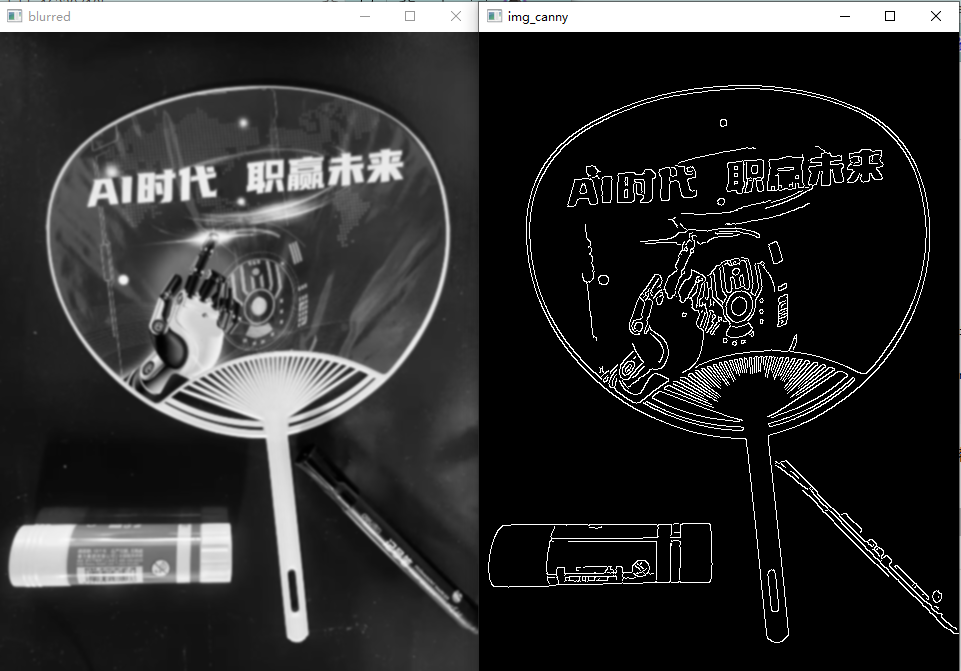
Canny 边缘检测
c
contours_img = img_1.copy()
gray = cv2.cvtColor(img_1, cv2.COLOR_BGR2GRAY)
blurred = cv2.GaussianBlur(gray, ksize=(5, 5), sigmaX=0)
cv_show('blurred', blurred)
img_canny = cv2.Canny(blurred, threshold1=75, threshold2=200)
cv_show('img_canny', img_canny)
先复制旋转后的图像,用于后面绘制轮廓,再转为灰度图,用 5×5 的核进行平滑,去除噪点,避免边缘检测时出现大量假边缘。
Canny 边缘检测:阈值 75 和 200 是经验值,可根据图片对比度调整。数值越小,检测出的边缘越丰富(可能包含噪声);越大则只保留最强边缘。
运行结果:
查找轮廓,筛选扇子外轮廓
c
cnts = cv2.findContours(img_canny.copy(), cv2.RETR_EXTERNAL, cv2.CHAIN_APPROX_SIMPLE)[-2]
cv2.drawContours(contours_img, cnts, -1, (0, 0, 255), 3)
cv_show('contours_img', contours_img)
运行结果:
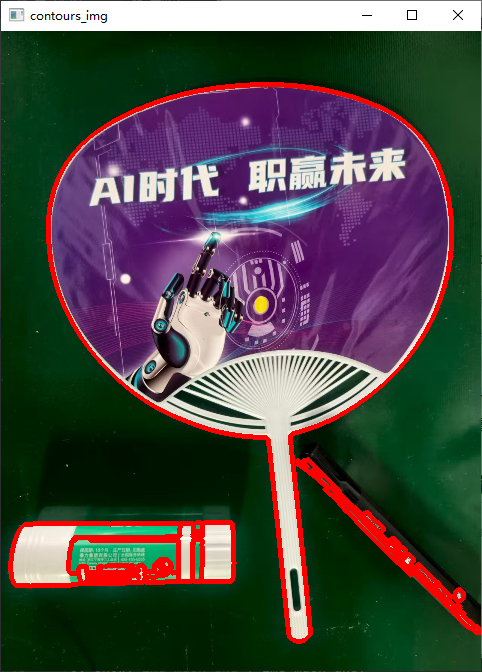
这里把所有轮廓放入列表,然后用排序函数(按从上到下排序)------实际上因为只有一个大轮廓(其他小噪声轮廓面积小),排序后第一个就是面积最大的扇子轮廓。
c
questionCnts = []
for c in cnts:
    x, y, w, h = cv2.boundingRect(c)
    questionCnts.append(c)
questionCnts = sort_contours(questionCnts, method="top-to-bottom")[0]
fan_conts = questionCnts[0]
生成掩膜
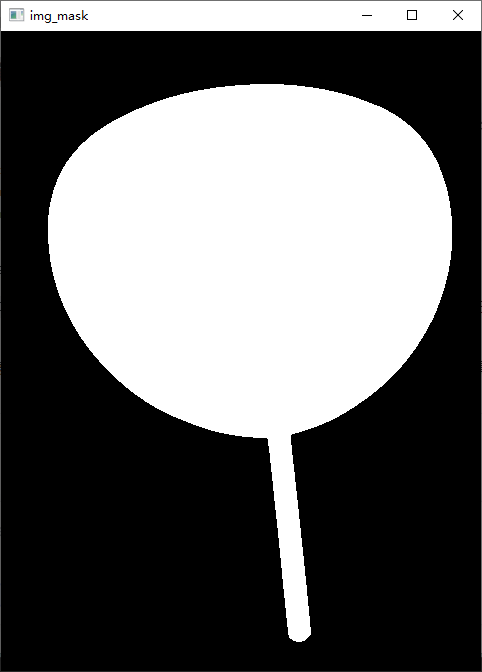
c
mask = np.zeros_like(gray)
cv2.drawContours(mask, [fan_conts], -1, 255, thickness=-1)
cv_show("img_mask", mask)
运行结果:
按位与操作提取扇子区域
对两张图像(这里都是 img_1)按位与,但通过 mask 参数指定只有白色区域才参与运算,黑色区域结果直接为 0。
这样,原图中只有扇子部分被保留,背景全黑,完美抠出扇子。
c
img_mask_and = cv2.bitwise_and(img_1, img_1, mask=mask)
cv_show('img_mask_and', img_mask_and)
运行结果:

保存结果
c
cv2.imwrite('shanzi.png', img_mask_and)