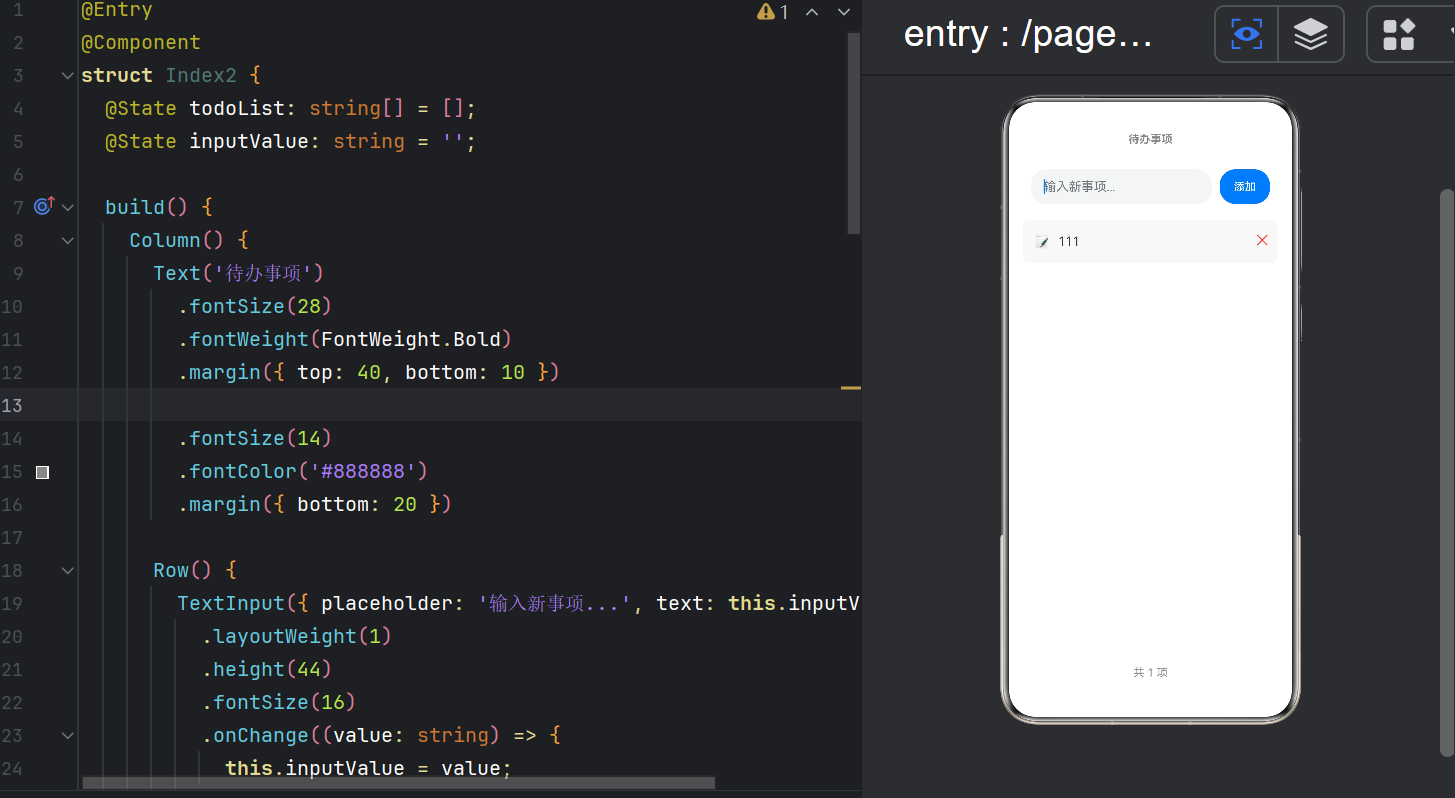
一、引言
待办事项(Todo List)是 CRUD(创建、读取、更新、删除)应用的最小完整示例。在 ArkTS 中实现 Todo List,核心涉及三个技术点:
- 数据渲染 :使用
ForEach遍历数组,List+ListItem高效展示 - 输入处理 :
TextInput组件的双向绑定 - 数组操作 :
push添加、splice删除、响应式更新
本文将从这三点出发,逐行拆解 index2.ets 的完整实现,并深入 ArkTS 的列表渲染机制和数组响应式拦截原理。
二、完整源码
typescript
// index2.ets
@Entry
@Component
struct Index2 {
  @State todoList: string[] = [];
  @State inputValue: string = '';

  build() {
    Column() {
      // ── 标题 ──
      Text('待办事项')
        .fontSize(28)
        .fontWeight(FontWeight.Bold)
        .margin({ top: 40, bottom: 10 })

      // ── 输入区域 ──
      Row() {
        TextInput({ placeholder: '输入新事项...', text: this.inputValue })
          .layoutWeight(1)
          .height(44)
          .fontSize(16)
          .onChange((value: string) => {
            this.inputValue = value;
          })

        Button('添加')
          .width(64)
          .height(44)
          .fontSize(14)
          .backgroundColor('#007AFF')
          .margin({ left: 10 })
          .onClick(() => {
            if (this.inputValue.trim().length > 0) {
              this.todoList.push(this.inputValue.trim());
              this.inputValue = '';
            }
          })
      }
      .width('90%')
      .padding(10)

      // ── 待办列表 ──
      List({ space: 10 }) {
        ForEach(this.todoList, (item: string, index: number) => {
          ListItem() {
            Row() {
              Text('📝')
                .fontSize(18)
                .margin({ right: 10 })

              Text(item)
                .fontSize(16)
                .layoutWeight(1)

              Text('✕')
                .fontSize(18)
                .fontColor('#FF3B30')
                .onClick(() => {
                  this.todoList.splice(index, 1);
                })
            }
            .width('100%')
            .padding(12)
            .backgroundColor('#F8F8F8')
            .borderRadius(8)
          }
        }, (item: string) => item)
      }
      .width('90%')
      .layoutWeight(1)
      .margin({ top: 10 })

      // ── 底部统计 ──
      Text('共 ' + this.todoList.length + ' 项')
        .fontSize(14)
        .fontColor('#8E8E93')
        .margin({ bottom: 20 })
    }
    .width('100%')
    .height('100%')
    .justifyContent(FlexAlign.Start)
    .alignItems(HorizontalAlign.Center)
  }
}
三、TextInput 组件深度解析
3.1 构造函数
typescript
TextInput({ placeholder: '输入新事项...', text: this.inputValue })TextInput 的构造函数接受一个 TextInputOptions 对象:
| 参数 | 类型 | 说明 |
|---|---|---|
placeholder |
string | ResourceStr |
占位文本(灰色提示) |
text |
string |
当前输入框内容 |
controller |
TextInputController |
控制器(用于编程操控) |
type |
InputType |
输入类型(文本/数字/密码等) |
3.2 手动双向绑定
typescript
@State inputValue: string = '';
// ...
TextInput({ placeholder: '输入新事项...', text: this.inputValue })
  .onChange((value: string) => {
    this.inputValue = value;
  })
这是 ArkTS 的手动双向绑定模式:
用户输入 "买水果"
       ↓
.onChange 回调收到 "买水果"
       ↓
this.inputValue = "买水果" (@State 更新)
       ↓
TextInput 的 text 属性绑定到 this.inputValue (不变化,因值相同)当用户点击"添加"后,this.inputValue = '' 清空输入框:
点击"添加"
       ↓
this.inputValue = '' (@State 更新)
       ↓
TextInput 的 text 变为空字符串 → 输入框清空
       ↓
placeholder "输入新事项..." 重新显示
3.3 TextInput 的完整样式 API
typescript
TextInput({ placeholder: '...' })
  .layoutWeight(1)           // 占据剩余空间
  .height(44)                 // 高度
  .fontSize(16)               // 字号
  .placeholderColor('#999999') // 占位文字颜色
  .placeholderFont({ size: 14, weight: FontWeight.Normal })
  .backgroundColor('#F5F5F5')
  .borderRadius(8)
  .border({ width: 1, color: '#DDDDDD' })
  .type(InputType.Normal)     // 输入类型
  .maxLength(100)             // 最大字符数
  .showCounter(true)          // 显示字数统计
  .onChange((value: string) => {})  // 输入变化回调
  .onSubmit((value: string) => {})  // 键盘提交回调
3.4 InputType 枚举
| 值 | 效果 | 适用场景 |
|---|---|---|
InputType.Normal |
普通文本 | 待办事项输入 |
InputType.Number |
数字键盘 | 计数器最小值/最大值 |
InputType.Password |
密码遮罩 | 登录密码 |
InputType.Email |
邮箱键盘(含 @) | 邮箱输入 |
InputType.PhoneNumber |
电话键盘 | 手机号输入 |
四、layoutWeight 弹性权重
4.1 原理
typescript
TextInput({ ... })
  .layoutWeight(1)   // 占据父容器剩余空间
layoutWeight 是 ArkTS 的弹性权重 属性,类似于 CSS Flex 中的 flex-grow。
计算规则:
父容器总宽度 = 子组件1.width + 子组件2.width + 子组件3.layoutWeight 占位

Row 宽度 = 90% 的屏幕宽度
  ├── TextInput.layoutWeight(1) → 占据 Button 宽度之后的所有剩余空间
  └── Button.width(64)          → 固定 64vp
如果多个子组件都有 layoutWeight:
typescript
Row() {
  TextInput({...}).layoutWeight(2)  // 占剩余空间的 2/3
  Button('A').layoutWeight(1)       // 占剩余空间的 1/3
}
4.2 layoutWeight vs width('100%')
typescript
// layoutWeight --- 占据剩余空间,适合非最后一个元素
TextInput({ placeholder: '...' }).layoutWeight(1)

// width('100%') --- 充满父容器,适合作为最后一个或唯一的元素
TextInput({ placeholder: '...' }).width('100%')
在 Row 中,layoutWeight 比 width('100%') 更合适,因为它不会把固定宽度的 Button 挤出父容器。
五、List + ForEach + ListItem 列表渲染三件套
5.1 组件层级
List({ space: 间距 })
  └── ForEach(数据源, 迭代函数, key生成器)
        └── ListItem()
└── 列表项内容为什么需要三层:
| 组件 | 职责 |
|---|---|
List |
可滚动容器,提供滚动条、滚动事件、性能优化 |
ForEach |
数据驱动,遍历数组生成 UI |
ListItem |
列表项包装器,提供滑动删除、拖拽排序等能力 |
5.2 List 组件 API
typescript
List({
  space: 10,              // 列表项间距,单位 vp
  initialIndex: 0,        // 初始滚动位置
  scroller: Scroller(),   // 滚动控制器
  listDirection: Axis.Vertical,   // 滚动方向
  edgeEffect: EdgeEffect.Spring,  // 边缘回弹效果
  chainAnimation: true,   // 链式动画
})
  .width('90%')
  .layoutWeight(1)        // 撑满剩余高度
.margin({ top: 10 })关键属性详解:
| 属性 | 默认值 | 说明 |
|---|---|---|
space |
0 | 列表项间距 |
listDirection |
Axis.Vertical |
垂直或水平滚动 |
edgeEffect |
EdgeEffect.Spring |
触底回弹效果 |
chainAnimation |
true |
拖动时链式跟随动画 |
5.3 ListItem 组件
typescript
ListItem() {
  Row() {
    Text('📝').fontSize(18).margin({ right: 10 })
    Text(item).fontSize(16).layoutWeight(1)
    Text('✕').fontSize(18).fontColor('#FF3B30')
      .onClick(() => {
        this.todoList.splice(index, 1);
      })
  }
  .width('100%')
  .padding(12)
  .backgroundColor('#F8F8F8')
  .borderRadius(8)
}
ListItem 在 List 中提供了滑动删除 功能(需设置 .deleteListItem()):
typescript
ListItem() {
  // 内容
}
.swipeAction({ end: this.deleteButton(index) })  // 左滑显示删除按钮

@Builder
deleteButton(index: number) {
  Button('删除')
    .backgroundColor('#FF3B30')
    .onClick(() => { this.todoList.splice(index, 1); })
}
六、ForEach 渲染原理
6.1 ForEach 的三个参数
typescript
ForEach(
  arr: any[],              // ① 数据源 --- @State 数组
  itemGenerator: Function, // ② 迭代函数 --- 返回 ListItem
  keyGenerator?: Function  // ③ (可选) key 生成函数
)
6.2 keyGenerator 的重要性
typescript
// ✅ 推荐:提供稳定的 key
ForEach(this.todoList, (item, index) => {
  ListItem() { ... }
}, (item: string) => item)  // key = item 本身

// ❌ 不推荐:省略 key(默认使用 index)
ForEach(this.todoList, (item, index) => {
  ListItem() { ... }
})
为什么 key 如此重要?
当列表增删时,key 帮助框架识别"哪些项是新增的、哪些是删除的、哪些是移动的":
初始列表: [A, B, C]     key = [A, B, C]

删除 B 后: [A, C]       key = [A, C]

无 key 时 (用索引):
  原:  索引[0]=A, [1]=B, [2]=C
  删除 B 后: 索引[0]=A, [1]=C  → 框架认为索引[1] 从 B→C 更新了

有 key 时:
  框架知道 A 和 C 是原有项(key 未变),只移除 B
  → 性能更好,动画更流畅
6.3 key 的选择策略
typescript
// 字符串数组:用 item 自身
(city: string) => city

// 对象数组:用唯一 ID
(item: User) => item.id.toString()

// 无唯一 ID:用 index(有性能损失,但可工作)
(item: any, index: number) => index.toString()
七、数组响应式操作
7.1 添加元素
typescript
.onClick(() => {
  if (this.inputValue.trim().length > 0) {
    this.todoList.push(this.inputValue.trim());
    this.inputValue = '';
  }
})
push 方法 是数组的变异方法,ArkTS 的 @State 代理能够检测到数组内容的变化。
添加时的校验逻辑:
| 校验 | 代码 | 目的 |
|---|---|---|
| 非空 | this.inputValue.trim().length > 0 |
禁止空字符串 |
| 去除首尾空格 | .trim() |
规范化输入 |
| 清空输入框 | this.inputValue = '' |
准备下一次输入 |
7.2 删除元素
typescript
Text('✕')
  .onClick(() => {
    this.todoList.splice(index, 1);
  })
splice(index, 1) 从数组中移除指定位置的一个元素。
7.3 @State 数组支持的变异方法
| 方法 | 是否触发更新 | 说明 |
|---|---|---|
push(item) |
✅ | 末尾添加 |
pop() |
✅ | 末尾移除 |
splice(index, count, items) |
✅ | 移除/替换指定位置 |
shift() |
✅ | 开头移除 |
unshift(item) |
✅ | 开头添加 |
sort() |
✅ | 排序 |
reverse() |
✅ | 反转 |
fill(value) |
✅ | 填充 |
copyWithin() |
✅ | 复制内部区间 |
arr[i] = newVal |
✅ | 索引赋值 |
arr.length = 0 |
❌ | 不触发更新,请用 arr = [] |
arr.concat(other) |
❌ | 返回新数组,原数组不变 |
7.4 替代 @State 数组的完整重置
typescript
// 清空列表
this.todoList = [];     // ✅ 触发更新

// 过滤列表
this.todoList = this.todoList.filter(item => item.length > 2);  // ✅ 新数组

// 排序
this.todoList = [...this.todoList].sort(); // ✅ 新数组原则:修改数组内容用变异方法,替换数组整体用赋值。
八、添加按钮的防抖与空值处理
8.1 当前校验
typescript
if (this.inputValue.trim().length > 0) {
  this.todoList.push(this.inputValue.trim());
  this.inputValue = '';
}
8.2 增强校验
typescript
.onClick(() => {
  const trimmed = this.inputValue.trim();

  // 空值校验
  if (trimmed.length === 0) {
    // 可以弹出提示
    return;
  }

  // 重复项校验(可选)
  if (this.todoList.some(item =>
    item.toLowerCase() === trimmed.toLowerCase()
  )) {
    // 提示"事项已存在"
    return;
  }

  this.todoList.push(trimmed);
  this.inputValue = '';
})
8.3 键盘提交
ArkTS 的 TextInput 支持 onSubmit 事件------用户在键盘上按"完成/回车"时触发:
typescript
TextInput({ placeholder: '输入新事项...', text: this.inputValue })
  .onChange((value: string) => { this.inputValue = value; })
  .onSubmit(() => {
    // 回车键提交,逻辑与 Button 的 onClick 相同
    if (this.inputValue.trim().length > 0) {
      this.todoList.push(this.inputValue.trim());
      this.inputValue = '';
    }
  })
九、底部统计的响应式更新
typescript
Text('共 ' + this.todoList.length + ' 项')
  .fontSize(14)
  .fontColor('#8E8E93')
  .margin({ bottom: 20 })
虽然这行代码没有直接绑定 @State 变量,但它使用了 this.todoList.length。由于 todoList 是 @State 数组,每当数组变化时:
@State代理检测到数组变化- 标记所有依赖
todoList的组件为 dirty - 重新计算
this.todoList.length,展示最新数量
这就是链路追踪 ------ArkTS 自动追踪 @State 变量在模板中的所有使用路径,无论是否直接使用变量本身。
十、完整的样式设计
10.1 颜色方案
当前应用的配色是 iOS 风格:
| 组件 | 色值 | 用途 |
|---|---|---|
| 添加按钮 | #007AFF 蓝色 |
主操作 |
| 删除按钮 | #FF3B30 红色 |
危险操作 |
| 列表背景 | #F8F8F8 浅灰 |
列表项背景 |
| 统计文字 | #8E8E93 中灰 |
辅助信息 |
| 标题 | 黑色(默认) | 主要文字 |
10.2 间距系统
typescript
margin({ top: 40, bottom: 10 })  // 标题
margin({ bottom: 20 })            // 副标题
padding(10)                       // 输入栏
padding(12)                       // 列表项
margin({ top: 10 })               // 列表顶部
margin({ bottom: 20 })            // 统计底部
间距层级:40(大标题)→ 20(区块间)→ 10(组件间)→ 8/12(内边距)
10.3 圆角系统
typescript
.borderRadius(8) // 列表项、输入框统一使用 8vp 圆角,现代、柔和。
十一、列表为空时的占位提示
当前代码在列表为空时只显示"共 0 项",没有任何占位提示。可以增强:
typescript
// 在 List 之前添加条件渲染
if (this.todoList.length === 0) {
  Column() {
    Text('📋')
      .fontSize(48)
      .margin({ top: 60 })
    Text('暂无待办事项')
      .fontSize(16)
      .fontColor('#8E8E93')
      .margin({ top: 10 })
    Text('在上方输入框中添加新事项')
      .fontSize(14)
      .fontColor('#C7C7CC')
      .margin({ top: 5 })
  }
  .layoutWeight(1)
  .justifyContent(FlexAlign.Center)
} else {
  // 原来的 List 渲染
  List({ space: 10 }) {
    ForEach(this.todoList, ...)
  }
  .width('90%')
  .layoutWeight(1)
  .margin({ top: 10 })
}
十二、性能优化:懒加载(LazyForEach)
对于大量数据的列表,ForEach 会一次性渲染所有项。ArkTS 提供了 LazyForEach 用于懒加载:
typescript
class TodoDataSource extends IDataSource {
  private data: string[] = [];

  totalCount(): number { return this.data.length; }
  getData(index: number): string { return this.data[index]; }
  // ... registerDataChangeListener / unregisterDataChangeListener

  addItem(item: string): void {
    this.data.push(item);
    this.notifyDataAdd(this.data.length - 1);
  }

  removeItem(index: number): void {
    this.data.splice(index, 1);
    this.notifyDataDelete(index);
  }
}

// 在组件中使用
@State dataSource: TodoDataSource = new TodoDataSource();

List({ space: 10 }) {
  LazyForEach(this.dataSource, (item: string) => {
    ListItem() { ... }
  }, (item: string) => item)
}
LazyForEach 只渲染当前可见区域 + 预加载区域的列表项,滚动时回收不可见项。对于 1000+ 项的列表,性能提升显著。
十三、从 Todo List 到真实应用
这个 83 行的 Todo List 已经包含了 CRUD 的核心能力。扩展方向:
Todo List v1 → v2(当前代码 + 增强功能)

v2 增强:
  ├─ 数据持久化: @ohos.data.preferences → 重启后数据不丢失
  ├─ 状态分类: 待办/进行中/已完成 → @State status 字段
  ├─ 滑动删除: swipeAction → 左滑显示删除按钮
  ├─ 拖拽排序: onDrag → 长按拖拽调整顺序
  ├─ 搜索过滤: filter → 搜索框过滤列表
  └─ 时间戳: Date.now() → 显示创建时间
这就是 MVVM 架构的雏形------@State 是 ViewModel,UI 是 View,数据操作是 Model。
十四、总结
通过待办事项应用,我们深入掌握了:
| 知识点 | 掌握程度 | 关键代码 |
|---|---|---|
TextInput 双向绑定 |
必须掌握 | @State + .onChange() |
layoutWeight 弹性布局 |
常用技能 | .layoutWeight(1) 填充剩余空间 |
List 列表容器 |
核心能力 | List({ space: 10 }) |
ForEach 数据渲染 |
核心能力 | ForEach(arr, fn, key) |
ListItem 列表项 |
常用技能 | ListItem() { 内容 } |
push/splice 数组操作 |
必须掌握 | 增删列表项 |
.trim() 输入净化 |
好习惯 | this.inputValue.trim() |
| 字符串模板 | 基本技能 | '共 ' + length + ' 项' |
| key 生成函数 | 进阶优化 | (item) => item |
| 空列表占位 | 用户体验 | 条件渲染空状态 |
Todo List 是 CRUD 应用的最小原型,掌握它的渲染模式后,备忘录(index7)、天气列表(index9)等复杂列表应用都能基于同样的架构实现。
下一篇预告 : 计时器 ------ setInterval 定时器与生命周期管理
项目地址 :
MyApplication2/entry/src/main/ets/pages/index2.ets