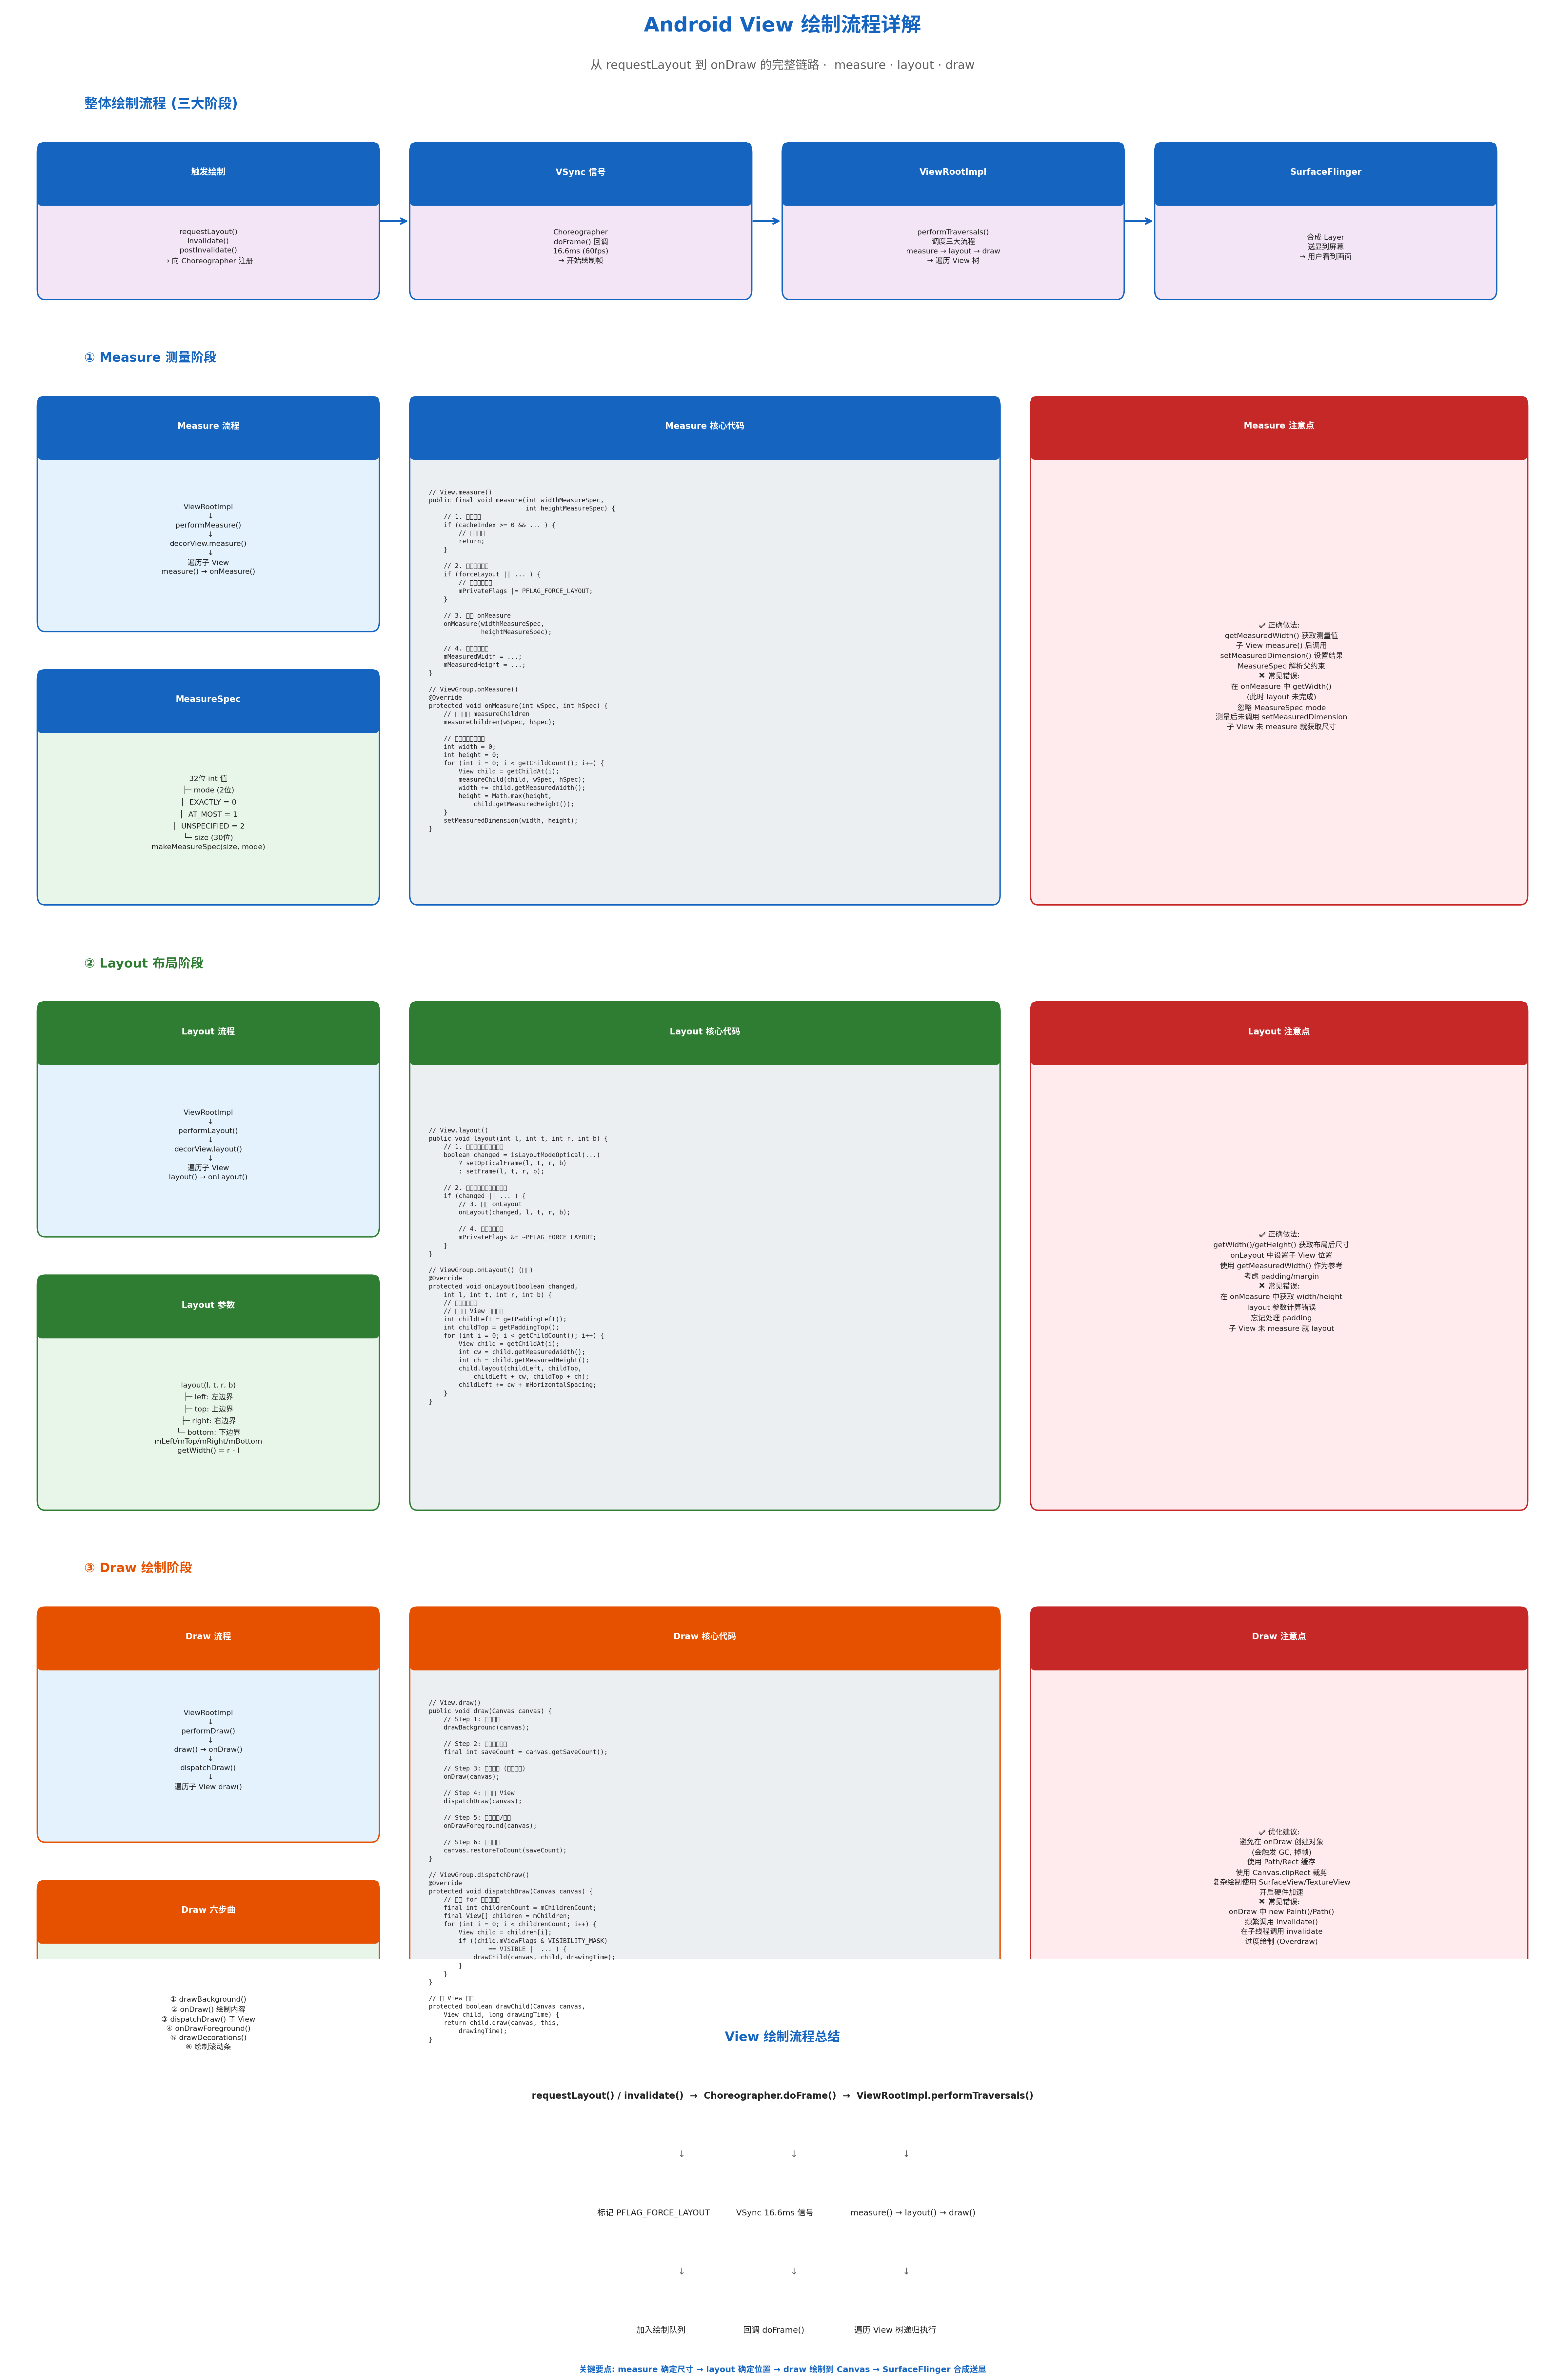
一、整体绘制流程
| 阶段 | 触发方式 | 作用 |
|---|---|---|
| 触发绘制 | requestLayout() / invalidate() / postInvalidate() |
标记 View 需要重绘,加入 Choreographer 队列 |
| VSync 信号 | Choreographer.doFrame() |
16.6ms (60fps) 同步信号,避免画面撕裂 |
| ViewRootImpl | performTraversals() |
调度 measure → layout → draw 三大流程 |
| SurfaceFlinger | 合成 Layer | 送显到屏幕,用户看到画面 |
二、Measure 测量阶段
流程
ViewRootImpl.performMeasure() → decorView.measure() → 遍历子 View measure() → onMeasure()
MeasureSpec
32位 int 值,高 2 位是 mode,低 30 位是 size:
| Mode | 值 | 含义 | 场景 |
|---|---|---|---|
| EXACTLY | 0 | 精确值 | match_parent / 具体数值 |
| AT_MOST | 1 | 最大值 | wrap_content |
| UNSPECIFIED | 2 | 无限制 | ScrollView 内部 |
核心代码
java
// View.measure()
public final void measure(int widthMeasureSpec, int heightMeasureSpec) {
    // 1. 缓存优化
    if (cacheIndex >= 0 && ...) {
        // 使用缓存
        return;
    }

    // 2. 强制重新测量
    if (forceLayout || ...) {
        mPrivateFlags |= PFLAG_FORCE_LAYOUT;
    }

    // 3. 执行 onMeasure
    onMeasure(widthMeasureSpec, heightMeasureSpec);

    // 4. 存储测量结果
    mMeasuredWidth = ...;
    mMeasuredHeight = ...;
}

// ViewGroup.onMeasure()
@Override
protected void onMeasure(int widthMeasureSpec, int heightMeasureSpec) {
    // 默认调用 measureChildren
    measureChildren(widthMeasureSpec, heightMeasureSpec);

    // 或自定义测量逻辑
    int width = 0;
    int height = 0;
    for (int i = 0; i < getChildCount(); i++) {
        View child = getChildAt(i);
        measureChild(child, widthMeasureSpec, heightMeasureSpec);
        width += child.getMeasuredWidth();
        height = Math.max(height, child.getMeasuredHeight());
    }
    setMeasuredDimension(width, height);
}
注意点
| ✅ 正确做法 | ❌ 常见错误 |
|---|---|
getMeasuredWidth() 获取测量值 |
在 onMeasure 中 getWidth()(此时 layout 未完成) |
子 View measure() 后调用 |
忽略 MeasureSpec mode |
setMeasuredDimension() 设置结果 |
测量后未调用 setMeasuredDimension |
| MeasureSpec 解析父约束 | 子 View 未 measure 就获取尺寸 |
三、Layout 布局阶段
流程
ViewRootImpl.performLayout() → decorView.layout() → 遍历子 View layout() → onLayout()
参数
layout(l, t, r, b):left, top, right, bottom 四个边界坐标
- getWidth() = r - l
- getHeight() = b - t
核心代码
java
// View.layout()
public void layout(int l, int t, int r, int b) {
    // 1. 判断是否需要重新布局
    boolean changed = isLayoutModeOptical(...)
        ? setOpticalFrame(l, t, r, b)
        : setFrame(l, t, r, b);

    // 2. 如果位置变化或强制布局
    if (changed || ...) {
        // 3. 调用 onLayout
        onLayout(changed, l, t, r, b);

        // 4. 标记布局完成
        mPrivateFlags &= ~PFLAG_FORCE_LAYOUT;
    }
}

// ViewGroup.onLayout() (抽象,子类必须实现)
@Override
protected void onLayout(boolean changed, int l, int t, int r, int b) {
    // 遍历子 View 设置位置
    int childLeft = getPaddingLeft();
    int childTop = getPaddingTop();
    for (int i = 0; i < getChildCount(); i++) {
        View child = getChildAt(i);
        int cw = child.getMeasuredWidth();
        int ch = child.getMeasuredHeight();
        child.layout(childLeft, childTop, childLeft + cw, childTop + ch);
        childLeft += cw + mHorizontalSpacing;
    }
}
注意点
| ✅ 正确做法 | ❌ 常见错误 |
|---|---|
getWidth()/getHeight() 获取布局后尺寸 |
在 onMeasure 中获取 width/height |
onLayout 中设置子 View 位置 |
layout 参数计算错误 |
使用 getMeasuredWidth() 作为参考 |
忘记处理 padding |
| 考虑 padding/margin | 子 View 未 measure 就 layout |
四、Draw 绘制阶段
流程
ViewRootImpl.performDraw() → draw() → onDraw() → dispatchDraw() → 遍历子View draw()
Draw 六步曲
java
// View.draw()
public void draw(Canvas canvas) {
    // Step 1: 绘制背景
    drawBackground(canvas);

    // Step 2: 保存画布层数
    final int saveCount = canvas.getSaveCount();

    // Step 3: 绘制内容 (子类实现)
    onDraw(canvas);

    // Step 4: 绘制子 View
    dispatchDraw(canvas);

    // Step 5: 绘制前景/装饰
    onDrawForeground(canvas);

    // Step 6: 恢复画布
    canvas.restoreToCount(saveCount);
}
ViewGroup.dispatchDraw()
java
@Override
protected void dispatchDraw(Canvas canvas) {
    // 使用 for 循环或缓存
    final int childrenCount = mChildrenCount;
    final View[] children = mChildren;
    for (int i = 0; i < childrenCount; i++) {
        View child = children[i];
        if ((child.mViewFlags & VISIBILITY_MASK) == VISIBLE || ...) {
            drawChild(canvas, child, drawingTime);
        }
    }
}

// 子 View 绘制
protected boolean drawChild(Canvas canvas, View child, long drawingTime) {
    return child.draw(canvas, this, drawingTime);
}
注意点
| ✅ 优化建议 | ❌ 常见错误 |
|---|---|
避免在 onDraw 创建对象(会触发 GC,掉帧) |
onDraw 中 new Paint()/new Path() |
| 使用 Path/Rect 缓存 | 频繁调用 invalidate() |
使用 Canvas.clipRect 裁剪 |
在子线程调用 invalidate |
| 复杂绘制使用 SurfaceView/TextureView | 过度绘制 (Overdraw) |
| 开启硬件加速 |
五、关键要点总结
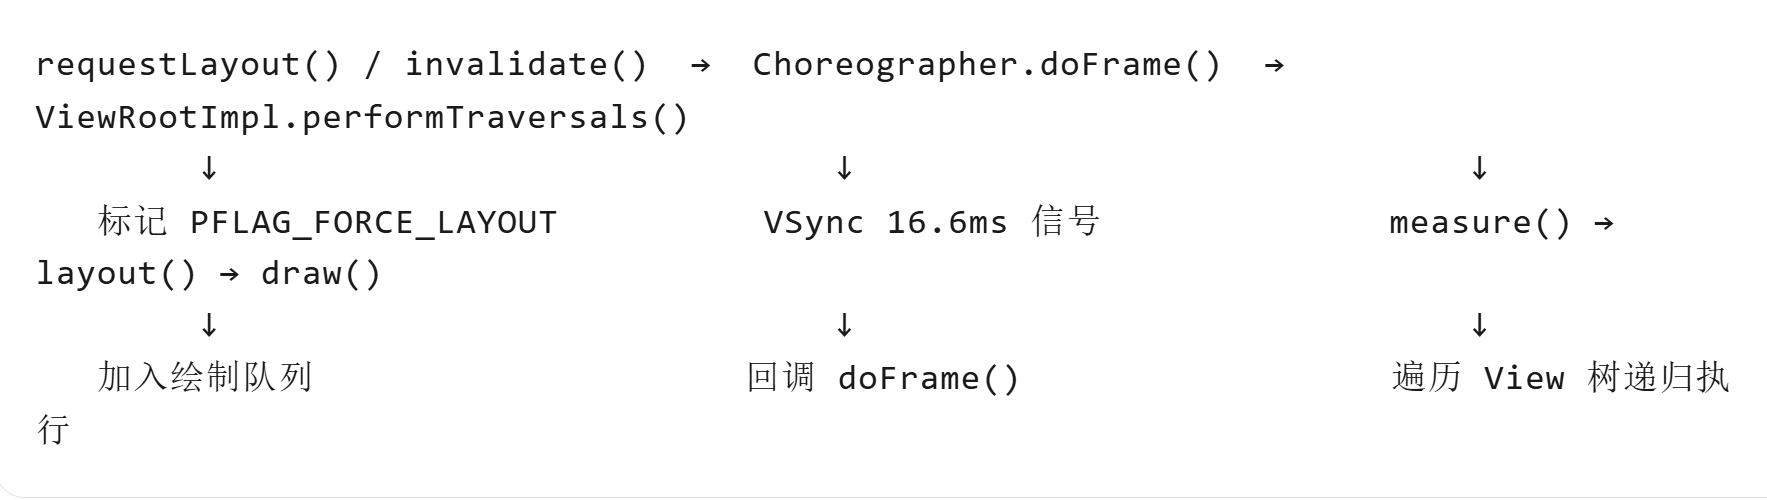
measure 确定尺寸 → layout 确定位置 → draw 绘制到 Canvas → SurfaceFlinger 合成送显
| 阶段 | 核心方法 | 输出结果 | 注意事项 |
|---|---|---|---|
| Measure | onMeasure() |
mMeasuredWidth/Height |
用 getMeasuredWidth(),必须 setMeasuredDimension() |
| Layout | onLayout() |
mLeft/mTop/mRight/mBottom |
用 getWidth()/getHeight(),考虑 padding |
| Draw | onDraw() |
像素渲染到 Canvas | 避免创建对象,使用缓存 |
六、自定义 View 完整示例
java
public class CustomView extends View {
    private Paint paint;
    private Rect rect;

    public CustomView(Context context) {
        super(context);
        init();
    }

    private void init() {
        // 在构造函数初始化,不在 onDraw 中创建
        paint = new Paint(Paint.ANTI_ALIAS_FLAG);
        paint.setColor(Color.RED);
        rect = new Rect();
    }

    @Override
    protected void onMeasure(int widthMeasureSpec, int heightMeasureSpec) {
        super.onMeasure(widthMeasureSpec, heightMeasureSpec);
        // 解析 MeasureSpec
        int widthMode = MeasureSpec.getMode(widthMeasureSpec);
        int widthSize = MeasureSpec.getSize(widthMeasureSpec);

        int width = widthMode == MeasureSpec.EXACTLY ? widthSize : 200;
        int height = MeasureSpec.getMode(heightMeasureSpec) == MeasureSpec.EXACTLY
            ? MeasureSpec.getSize(heightMeasureSpec) : 200;

        setMeasuredDimension(width, height);
    }

    @Override
    protected void onLayout(boolean changed, int left, int top, int right, int bottom) {
        super.onLayout(changed, left, top, right, bottom);
        // 设置绘制区域
        rect.set(0, 0, getWidth(), getHeight());
    }

    @Override
    protected void onDraw(Canvas canvas) {
        super.onDraw(canvas);
        // 使用缓存的 Paint 和 Rect
        canvas.drawRect(rect, paint);
    }
}