将 uniapp 项目从 Vue2 迁移到 Vue3 需要进行一些必要的调整,以确保项目能够正常运行。以下是一些关键步骤和注意事项:
创建应用实例
在 Vue2 中,应用实例的创建方式如下:
// Vue 2
import Vue from 'vue'
import App from './App'
Vue.config.productionTip = false
App.mpType = 'app'
const app = new Vue({
 ...App
})
app.$mount()
在 Vue3 中,应用实例的创建方式有所不同:
// Vue 3
import { createSSRApp } from 'vue'
import App from './App'
export function createApp() {
 const app = createSSRApp(App)
 return {
   app
 }
}
全局属性
在 Vue2 中,可以通过 Vue.prototype 来定义全局属性:
// Vue 2
Vue.prototype.$http = () => {};
在 Vue3 中,需要使用 app.config.globalProperties:
// Vue 3
const app = createApp({});
app.config.globalProperties.$http = () => {};
插件使用
在 Vue2 中,插件的使用方式如下:
// Vue 2
import store from "./store";
Vue.prototype.$store = store;
在 Vue3 中,插件的使用方式有所变化:
// Vue 3
import store from "./store";
const app = createApp(App);
app.use(store);
vuex 用法
//  Vue 2 中使用
  import Vue from 'vue'
  import Vuex from 'vuex'
  Vue.use(Vuex)
  const store = new Vuex.Store({
      state: {}
  })
  export default store

// Vue 3 中使用 (建议使用pinia)
  import { createStore } from 'vuex'
  const store = createStore({
      state: {}
  })
  export default store
模块导入和导出
Vue3 只支持 ES6 模块规范,因此需要将 CommonJS 模块改为 ES6 模块:
// Vue 2
var utils = require("../../../common/util.js");
module.exports.X = X;
// Vue 3
import utils from "../../../common/util.js";
export default { X };
生命周期的适配
在 Vue3 中,组件卸载的生命周期被重新命名:
-
destroyed 修改为 unmounted
-
beforeDestroy 修改为 beforeUnmount
生命周期变更对照表:
| vue2 (Options API) | Vue3 (Composition API / setup) | 说明 |
|---|---|---|
beforeCreate / created |
setup() 本身 |
直接在 setup 顶层编写 |
beforeDestroy |
onBeforeUnmount |
需从 vue 引入 |
destroyed |
onUnmounted |
需从 vue 引入 |
activated / deactivated |
onActivated / onDeactivated |
保持缓存逻辑 |
事件的适配
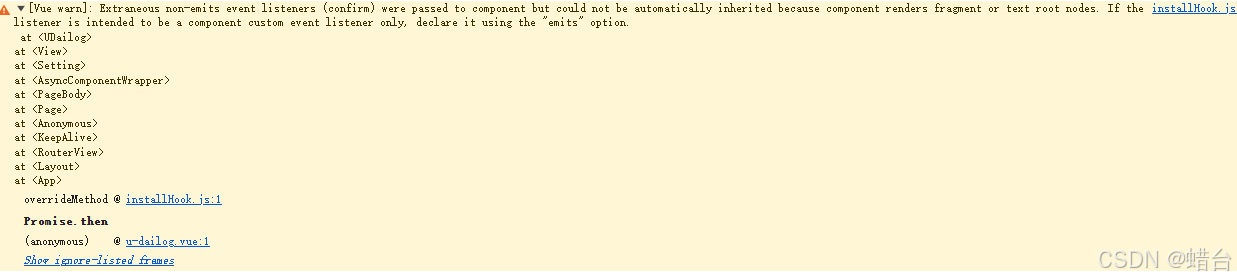
Vue3 提供了一个 emits 选项,用于定义组件可以向其父对象发出的事件:
这里解决截图 上面的警告
// Vue 3
export default {
 emits: ["click"],
 inheritAttrs:false,
 methods: {
   onClick() {
     this.$emit("click", "OK");
   },
 },
};
v-model 的适配
Vue3 的 v-model 语法有所变化,支持多 model:
// Vue 3
export default {
 props: {
   modelValue: String,
 },
 methods: {
   updateValue(value) {
//将之前的 this.$emit('input') 修改为 this.$emit('update:modelValue')
     this.$emit('update:modelValue', value);
   }
 }
};
在模板中使用:
<ChildComponent v-model="pageTitle" />
<!-- 等同于 -->
<ChildComponent :modelValue="pageTitle" @update:modelValue="pageTitle = $event" />
插槽的适配
Vue3 不再支持 slot="xxx" 的用法,需要使用 v-slot:xxx:
<!-- Vue 2 -->
<uni-nav-bar>
 <view slot="left" class="city"></view>
</uni-nav-bar>
<!-- Vue 3 -->
<uni-nav-bar>
 <template v-slot:left>
   <view class="city"></view>
 </template>
</uni-nav-bar>
在 Vue3 中,处理 API Promise 化 调用结果的方式不同于 Vue2 。更多
-
Vue3 中,调用成功会进入 then 方法,调用失败会进入 catch 方法
-
Vue2 中,调用无论成功还是失败,都会进入 then 方法,返回数据的第一个参数是错误对象,第二个参数是返回数据
-
Vue 2 写法转 Vue 3 写法
  // 在 main.js 中写入以下代码即可
  function isPromise(obj) {
    return (
      !!obj &&
      (typeof obj === "object" || typeof obj === "function") &&
      typeof obj.then === "function"
    );
  }

  uni.addInterceptor({
    returnValue(res) {
      if (!isPromise(res)) {
        return res;
      }
      return new Promise((resolve, reject) => {
        res.then((res) => {
          if (res[0]) {
            reject(res[0]);
          } else {
            resolve(res[1]);
          }
        });
      });
    },
  });
Vue 3 写法转 Vue 2 写法
// 在 main.js 中写入以下代码即可
function isPromise(obj) {
  return (
    !!obj &&
    (typeof obj === "object" || typeof obj === "function") &&
    typeof obj.then === "function"
  );
}

uni.addInterceptor({
  returnValue(res) {
    if (!isPromise(res)) {
      return res;
    }
    const returnValue = [undefined, undefined];
    return res
      .then((res) => {
        returnValue[1] = res;
      })
      .catch((err) => {
        returnValue[0] = err;
      })
      .then(() => returnValue);
  },
});