SpringBoot概述
概述:SpringBoot时Spring提供的一个子项目,用于快速构建Spring应用程序
SpringBoot特性:
起步依赖、自动配置、其他特性
起步依赖
本质上就是一个Maven坐标,整合完成了一个功能需要的所有坐标
自动配置
遵循约定大约配置的原则,在boot程序启动后,一些bean对象会自动注入到ioc容器,不需要手动生命,简化开发
其他特性
内嵌的Tomcat、Jettly(无需部署WAR文件)
外部化配置
不需要XML配置(properties/yml)
配置文件
properties配置文件
1.application.properties
java
server.port=9090
server.servlet.context-path=/start
2.application.yml / application.yaml
java
server:
  port: 9191
  servlet:
    context-path: /start2
yaml配置文件 书写与获取
①第三方技术配置信息
②自定义配置信息
java
email:
  user: 593140521@qq.com
  code: jfejwezhcrzcbbbb
  host: smtp.qq.com
  auth: true
书写
· 值前面必须有空格,作为分隔符
· 使用空格作为缩进表示层级关系,相同的层级左侧对齐
获取
· @Value("${键名}")
· @ConfigurationProperties(prefix = "前缀")
整合MyBatis
sql
create database if not exists mybatis;

use mybatis;

create table user(
    id int unsigned primary key auto_increment comment 'ID',
    name varchar(100) comment '姓名',
    age tinyint unsigned comment '年龄',
    gender tinyint unsigned comment '性别, 1:男, 2:女',
    phone varchar(11) comment '手机号'
) comment '用户表';

insert into user(id, name, age, gender, phone) VALUES (null,'白眉鹰王',55,'1','18800000000');
insert into user(id, name, age, gender, phone) VALUES (null,'金毛狮王',45,'1','18800000001');
insert into user(id, name, age, gender, phone) VALUES (null,'青翼蝠王',38,'1','18800000002');
insert into user(id, name, age, gender, phone) VALUES (null,'紫衫龙王',42,'2','18800000003');
insert into user(id, name, age, gender, phone) VALUES (null,'光明左使',37,'1','18800000004');
insert into user(id, name, age, gender, phone) VALUES (null,'光明右使',48,'1','18800000005');
java
package com.itheima.mybatisquickstart.pojo;

public class User {

    private Integer id;
    private String name;
    private Short age;
    private Short gender;
    private String phone;

    public User() {
    }

    public User(Integer id, String name, Short age, Short gender, String phone) {
        this.id = id;
        this.name = name;
        this.age = age;
        this.gender = gender;
        this.phone = phone;
    }

    public Integer getId() {
        return id;
    }

    public void setId(Integer id) {
        this.id = id;
    }

    public String getName() {
        return name;
    }

    public void setName(String name) {
        this.name = name;
    }

    public Short getAge() {
        return age;
    }

    public void setAge(Short age) {
        this.age = age;
    }

    public Short getGender() {
        return gender;
    }

    public void setGender(Short gender) {
        this.gender = gender;
    }

    public String getPhone() {
        return phone;
    }

    public void setPhone(String phone) {
        this.phone = phone;
    }

    @Override
    public String toString() {
        return "User{" +
                "id=" + id +
                ", name='" + name + '\'' +
                ", age=" + age +
                ", gender=" + gender +
                ", phone='" + phone + '\'' +
                '}';
    }
}
Bean管理
Bean扫描
·标签 :<context:component-scan base-package="com.itheima"/>
·注解 :@ComponentScan(basePackages = "com.itheima")
Bean注册
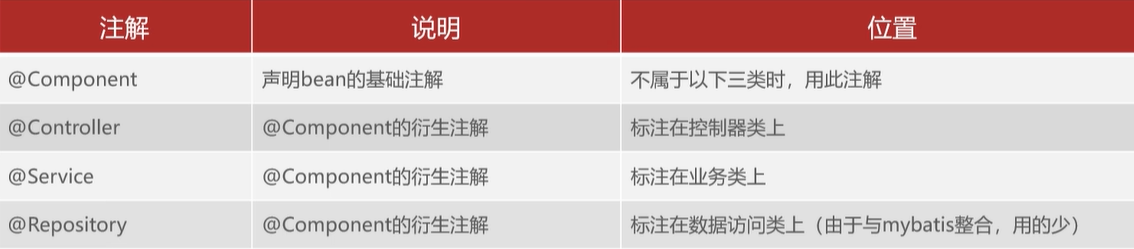
*如果要注册的bean对象来自于第三方(不是自定义的),无法用@Conponent 及衍生注解生命bean的
· @Bean
如果要注册第三方bean,建议在配置类中集中注册
· @Import
导入 配置类
导入 ImportSelector 接口实现类
@EnableXxxx注解,封装@Import注解
注册条件
SpringBoot提供了设置注册生效条件的注解@Conditional

自动配置管理
自动配置原理:
①在主启动类上添加了SpringBootApplication注解,这个注解组合了EnableAutoCongfiguration注解
②EnableAutoCongfiguration注解又组合了Import注解,导入了AutoCongfigurationImportSelector类
③实现selectImprots方法,这个方法经过层层调用,最终会读取META-INF目录下的后缀名为imorts的文件
自定义starter
需求:自定义mybatis的starter
步骤:
·创建 dmybatis-spring-boot-autoconfigure模块,提供自动配置功能,并自定义配置文件META-INF/spring/xxx.imports
·创建dmybatis-spring-boot-starter模块,在starter中引入自动配置模块
1.创建 autoconfigure 模块,编写自动配置类
java
@Configuration
public class CommonConfig {
    // 示例:根据配置文件条件注册 Bean
    @Bean
    @ConditionalOnProperty(prefix = "country", name = {"name", "system"})
    public Country country(@Value("${country.name}") String name,
                           @Value("${country.system}") String system) {
        return new Country(name, system);
    }

    @Bean
    public Province province() {
        return new Province();
    }
}
2.创建自动配置入口类
java
@AutoConfiguration
@Import(CommonConfig.class)
public class CommonAutoConfig {
}
3.配置自动配置加载文件
java
cn.itcast.config.CommonAutoConfig4.创建 starter 模块,引入 autoconfigure 依赖
java
<dependency>
    <groupId>cn.itcast</groupId>
    <artifactId>dmybatis-spring-boot-autoconfigure</artifactId>
    <version>1.0.0</version>
</dependency>