Vue 3.6 目前仍属于 beta 阶段,但从 beta 5 开始就彻底摒弃了过往 Rollup + esbuild 的构建方案,转投 Rolldown 的怀抱,近期更是全面接入 Vite Plus 来提升源码开发者的开发体验。
本文将基于 v3.6.0-beta.17,从零起步搭建 Vue 3.6 源码的项目雏形、讨论其工程化中的技术选型,最终实现一个基础前端工程化方案。

💡 本章案例源码:
- 「1. 初始化项目」~「3. Vite Plus 及其应用」:github.com/VaJoy/vue-3...
- 「4. 源码构建方案」:github.com/VaJoy/vue-3...
- 「5. 类型声明文件构建」~「7. 发布」:github.com/VaJoy/vue-3...
1. 初始化项目
我们创建一个名为 vue 的文件夹作为源码项目,执行 pnpm init 进行初始化、生成 package.json 文件。
Vue 源码项目是严格要求使用 pnpm 来作为包管理器的,我们可以在 package.json 的 script 字段添加 preinstall 钩子指令 ------ 在源码开发者安装项目依赖时,钩子会先被自动触发,可以用来审核开发者的包管理器是否合规:
json
{
  "name": "vue",
  "version": "3.6.0",
  "type": "module",
  "packageManager": "pnpm@11.6.0",
  "scripts": {
    "preinstall": "npx only-allow pnpm"    // 确保项目只能使用 pnpm 作为包管理器
  }
}
其中 only-allow 是 pnpm 官方提供的一个检测工具,用于检测当前是否使用了指定的包管理器,若匹配失败会报错并强行退出程序。
💡 Vue 是基于 Monorepo 架构来维护各模块的,而 pnpm 对 Monorepo 有良好的支持,这是 Vue 选用 pnpm 的关键原因。我们会在后文进行了解。
2. Monorepo
在日常业务项目中,我们可以通过 npm install vue 等方式来下载和使用 Vue,不过除了这个覆盖完整功能的 npm 包,Vue 还提供了多个独立的功能模块包:
@vue/shared:被各模块共享的工具函数模块包。@vue/reactivity:响应式模块包。@vue/compiler-core:模板编译核心模块包。@vue/compiler-dom:DOM 编译模块包。@vue/runtime-core:运行时核心模块包。- ...
例如可以在业务项目中独立下载 Vue 的响应式模块包 @vue/reactivity:
bash
npm install @vue/reactivity并在项目中使用它:
js
import { reactive } from '@vue/reactivity'

const state = reactive({ msg: 'hi' })
此举仅会下载 @vue/reactivity(及其依赖模块),不会下载 Vue 的所有模块包。
然而 Vue 并没有给每个包都独立创建一个 Git 仓库,而是将它们统一放在 Vue 源码项目的 packages 文件夹下进行维护:
js
vue
├── packages
│   ├── shared
│   ├── reactivity
│   ├── compiler-core
│   ├── compiler-dom
│   ├── runtime-core
│   ├── ...
此类「单仓库多包」的架构形式,称为 Monorepo 。
2.1 创建 shared 模块包
基于 Monorepo 架构,我们先创建 packages/shared 文件夹,来维护和发布共享工具模块包 shared ------ 用于存放可复用的工具函数。
packages/shared 文件夹的基础结构如下:
js
vue
├── packages
│   ├── shared
│   │   ├── src           // 存放实际源码
│   │   │   ├── makeMap.ts
│   │   │   ├── general.ts
│   │   │   ├── ...
│   │   │   └── index.ts
│   │   ├── dist          // 存放构建后的产物
│   │   ├── package.json  // npm 包配置
│   │   └── index.ts      // 包入口
src 文件夹
shared/src 文件夹用于存放 shared 的源码文件 ------ 简单起见,我们暂时只创建 makeMap.ts 和 general.ts 两个功能子文件:
js
/** packages/shared/src/makeMap.ts **/

/**
 * 把一个用逗号分隔的字符串(例如 "a,b,c" )预处理成一个"成员判断函数",
 * 用于在运行时高频地判断某个 key 是否属于某个固定集合。
 *
 * 示例:
 * const isHTMLTag = makeMap('div,span,p')
 * isHTMLTag('div') // true
 * isHTMLTag('a')   // false
 */
export function makeMap(str: string): (key: string) => boolean {
  const map = Object.create(null)
  for (const key of str.split(',')) map[key] = 1
  return val => val in map
}
js
/** packages/shared/src/general.ts **/

import { makeMap } from './makeMap'

/** 空函数 */
export const NOOP = (): void => {}

/** 生成一个方法,用于判断一个属性名是否是保留属性 */
export const isReservedProp: (key: string) => boolean = /*@__PURE__*/ makeMap(
  ',key,ref,ref_for,ref_key,' +
    'onVnodeBeforeMount,onVnodeMounted,' +
    'onVnodeBeforeUpdate,onVnodeUpdated,' +
    'onVnodeBeforeUnmount,onVnodeUnmounted',
)
接着创建 src 入口文件 shared/src/index.ts,导出所有功能子文件的接口:
js
/** packages/shared/src/index.ts **/

export * from './general'
export * from './makeMap'
后续仅需引用该文件,就能「一拖多」地间接引入 shared 模块的全部功能接口。
dist 文件夹
shared/dist 文件夹将用于存放 shared/src 源码构建后的产物。
我们会在后文介绍构建工具的技术选型和构建的实现,但目前需要先讨论一个重点 ------ Vue 的 Monorepo 包具体需要哪些构建产物?
首先构建产物是面向安装并使用 Vue 框架的业务开发者的,那它需要被区分出业务应用场景下的「开发环境」和「生产环境」:
- 「开发环境」的产物需要保留开发期逻辑,比如告警、调试钩子、内部一致性检查等,让业务开发者能在开发阶段便于调试、尽早发现问题。
- 「生产环境」的产物需要裁剪掉开发期的冗余逻辑,让代码更精简、性能更高。
以「定义一个空对象常量」为例,其开发环境需通过 Object.freeze 进行冻结、方便暴露常量被篡改的问题,而生产环境使用空对象 {} 即可:
typescript
/** 源码 **/
const EMPTY_OBJ: { readonly [key: string]: any } = !!(process.env.NODE_ENV !== "production")
  ? Object.freeze({})
  : {}

/** 开发环境 **/
const EMPTY_OBJ = Object.freeze({})

/** 生产环境 **/
const EMPTY_OBJ = {}
其次业务开发者可能会在不同的平台上使用 Vue 框架,且需要兼容多种主流模块规范:
- 在 Node.js 侧使用,且需要兼容 CommonJS 规范。
- 在 Node.js 侧使用,且需要兼容 ES Module 规范。
- 在客户端(浏览器)使用,且需要兼容 IIFE / UMD 规范。
- 在客户端使用,且需要兼容 ES Module 规范。
综上所述,一个 Monorepo 模块需要构建如下格式的产出物到其 dist 文件夹(通过文件名后段进行区分):
[pkg].cjs.js:在 Node.js 侧使用、CommonJS 规范的「开发环境」产物。[pkg].cjs.prod.js:在 Node.js 侧使用、CommonJS 规范的「生产环境」产物。[pkg].esm-bundler.js:在 Node.js 侧使用、ES Module 规范的「开发环境」+「生产环境」产物。[pkg].global.js:在客户端使用、IIFE 规范的「开发环境」产物。[pkg].global.prod.js:在客户端使用、IIFE 规范的「生产环境」产物。[pkg].esm-browser.js:在客户端使用、ES Module 规范的「开发环境」产物。[pkg].esm-browser.prod.js:在客户端使用、ES Module 规范的「生产环境」产物。
留意 [pkg].esm-bundler.js 不需要拆分出「开发环境」和「生产环境」两套文件,这得益于 ES Module 的静态导入特性,下游的业务侧构建工具(例如 vite 或 webpack)可在编译期通过 Tree-shaking 精确移除不可达的环境逻辑:
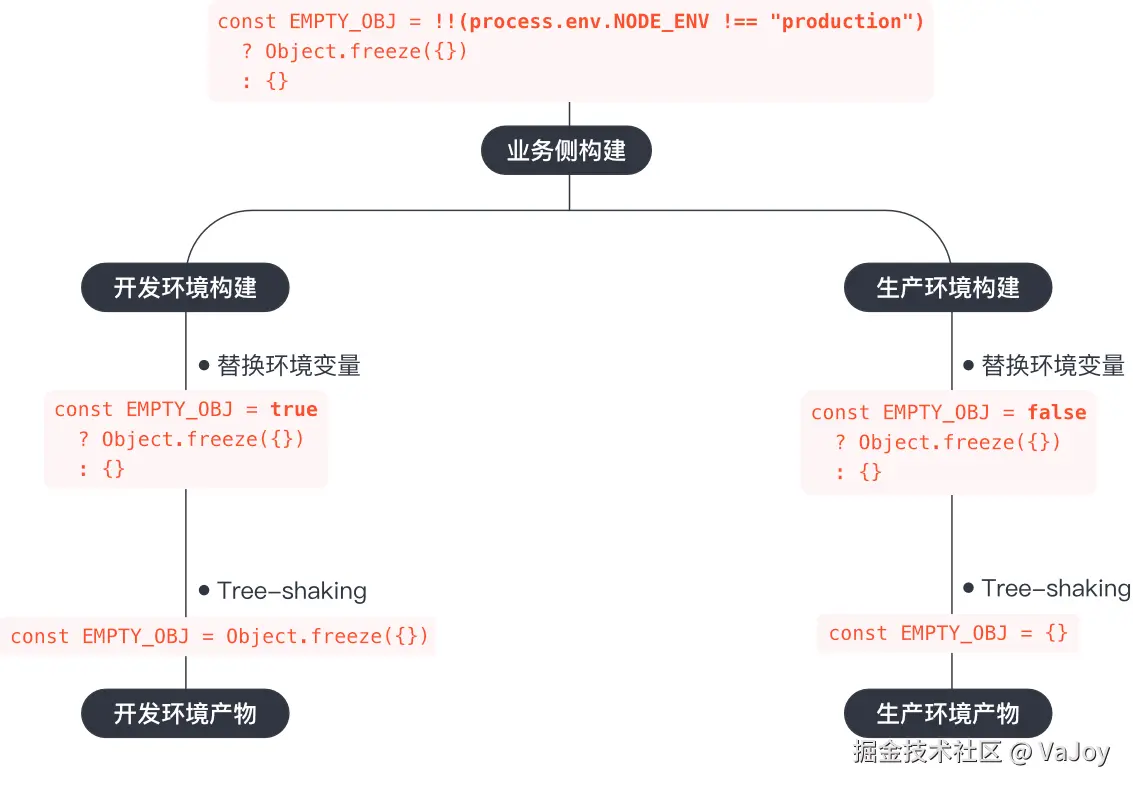
最后,还需要为 shared 模块构建类型声明文件 shared/dist/shared.d.ts,用于在 TypeScript 项目中提供类型检查与智能提示。
包入口文件
我们创建 shared/index.ts 作为 shared 包的传统入口文件(后续会在 shared/package.json 中声明它为基于 CommonJS 规范的传统入口,属于 npm 包分发的标准实现形式)。
它将根据当前的运行环境,引入对应的 CommonJS 构建产物:
js
/** packages/shared/index.ts **/

'use strict'

if (process.env.NODE_ENV === 'production') {
  module.exports = require('./dist/shared.cjs.prod.js')
} else {
  module.exports = require('./dist/shared.cjs.js')
}
留意在这类 CommonJS 入口文件中,会对它们启用严格模式('use strict'),这是为了确保代码能及时暴露一些潜在的问题(例如定义了污染全局的全局变量)。
💡 严格模式在 ES Module 里是默认开启的,因此 ES Module 模块里无需标记
'use strict'。
包配置文件
我们创建 shared/package.json 作为 shared 包的 npm 包配置文件,其职责不只是提供「npm 发布描述」,还包含了工程化相关的配置信息:
json
/** packages/shared/package.json **/

{
  "name": "@vue/shared",                  // 包名,命名空间为 @vue
  "version": "3.6.0",
  "main": "index.js",                     // 指定 CommonJS 规范下的传统入口,主要面向传统 Node.js(CommonJS)工具链
  "module": "dist/shared.esm-bundler.js", // 指定 ES Module 规范下的入口
  "types": "dist/shared.d.ts",            // 指定类型声明文件
  "files": [                              // 指定了在发布到 npm 时,哪些文件会被包含在发布包中(避免将 src、测试代码、构建脚本等无关内容发布到 npm)
    "index.js",
    "dist"
  ],
  "exports": {                            // 更为完善的新规范入口配置字段
    ".": {
      "types": "./dist/shared.d.ts",                 // 指定类型声明文件
      "node": {                                      // 传统 Node.js(CommonJS),开发环境和生产环境对应的入口
        "production": "./dist/shared.cjs.prod.js",
        "development": "./dist/shared.cjs.js",
        "default": "./index.js"
      },
      "module": "./dist/shared.esm-bundler.js",      // ES Module 规范下的入口(用于部分构建工具识别)
      "import": "./dist/shared.esm-bundler.js",      // ES Module 规范下的入口(用于 Node.js 侧识别)
      "require": "./index.js"                        // 传统 Node.js(CommonJS)默认入口(兜底)
    },
    "./*": "./*"                                     // 指定可访问的子路径映射
  },
  "sideEffects": false          // 声明该包在模块初始化阶段不存在副作用,当模块的导出未被使用时,整个模块可被剔除(Tree-shaking)
  }
}
其中 main、module 和 types 三个字段是为了兼容旧生态所保留的约定式入口,exports 则是更为完善的新规范字段(可以指定更细粒度的入口映射),现代 Node.js 和构建工具会优先采用 exports 字段指定的入口。
构建信息字段 buildOptions
Vue 中的每一个包需要构建的配置、构建产物的格式可能是不一致的,我们可以把这块信息抽离出来,放到各包的 package.json 中去独立维护。
以 shared 包为例,我们在 shared/package.json 内部新增一个自定义的、可拓展的 buildOptions 字段,来存储 shared 包的构建信息:
json
/** packages/shared/package.json **/

{
  "name": "@vue/shared",
  // 略...
  "buildOptions": {       // 构建信息字段
    "formats": [
      "esm-bundler",
      "cjs"
    ]
  }
}
其中 formats 指定了 shared 包只需构建 esm-bundler 和 cjs 两种格式 ------ shared 包的定位是「内部工具」,不需要面向「直接被浏览器消费」的分发形态,因此其所需的构建格式是最精简的。
后续构建工具在构建各包时,只需读取 [pkg]/package.json 中的 buildOptions 字段,即可获得该包的构建信息。
这种「包配置随包走」的模式也很契合 Monorepo 的管理理念。
2.2 Monorepo 模块之间的联系
创建 reactivity 模块包
为了更好地了解 Monorepo 下各独立包之间的联系,我们仿照 shared 包的结构,在 packages 下创建一个名为 reactivity 的响应式模块包:
js
vue
├── packages
│   ├── reactivity        // 新增响应式模块文件夹
│   │   ├── src           // 存放实际源码
│   │   │   ├── reactive.ts
│   │   │   └── index.ts
│   │   ├── package.json  // npm 包配置
│   │   └── index.ts      // 包入口
reactivity下各文件的内容和shared的基本一致。
目前我们仅打算搭建一个项目雏形,因此 reactivity 模块的内容将尽量简化,其中 src/reactive.ts 的代码仅用来模拟 shared 模块接口的引入和导出:
js
/** packages/reactivity/src/reactive.ts **/

export * from '@vue/shared' // 通过 packages/shared/package.json 中定义的包名引入 shared 模块
此时在 IDE 中会出现报错,提示 TypeScript 找不到 @vue/shared:
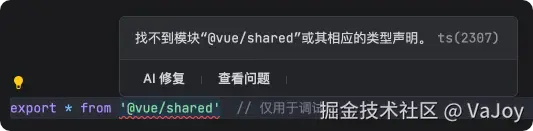
对此可以在 vue 根目录下新增 tsconfig.json 文件,用于配置 TypeScript 的编译选项:
json
/** tsconfig.json **/

{
  "compilerOptions": {
    "rootDir": ".",
    "paths": {                         // IDE 类型检查路径
      "@vue/*": ["./packages/*/src"],  // 把 @vue/* 映射到 packages/*/src 下
      "*": ["./*"]
    }
  },
  "include": [
    "packages/*/src",
  ]
}
此时 src/reactive.ts 中不再标红报错,IDE 的 TypeScript 类型检查功能已可成功识别到 @vue/shared 模块。
另外,由于 reactivity 属于 Vue 面向业务开发者的核心功能模块包,需要支持多种使用场景的构建格式,我们可以在 reactivity/package.json 的 buildOptions 字段上补充这块需求:
json
/** packages/reactivity/package.json **/

{
  "name": "@vue/reactivity",
  "version": "3.6.0",
  "main": "index.js",
  "module": "dist/reactivity.esm-bundler.js",
  // 略...

  "buildOptions": {
    "name": "VueReactivity",  // global 构建产物中的全局变量名
    "formats": [
      "esm-bundler",
      "esm-browser",          // 新增面向浏览器的 ES Module 构建格式
      "cjs",
      "global"                // 新增全局脚本构建格式
    ]
  }
}
pnpm 的 workspace 协议
@vue/reactivity 最终会被独立发布到 npm 上,我们需要为其声明对 @vue/shared npm 包的依赖:
json
/** packages/reactivity/package.json **/

{
  "name": "@vue/reactivity",
  // 略...

  "dependencies": {    // 补充对 shared 模块的依赖信息
    "@vue/shared": "3.6.0"
  }
}
这里所填入的 @vue/shared 版本号 3.6.0 存在一个问题 ------ 该远程版本的内容无法同步我们本地 packages/shared 文件夹下的内容,而且每次发布 npm 包之前都需要手动更新依赖包的版本号,一旦遗漏就会出错。
pnpm 官方提供了一个解决方案,即使用 workspace 协议来替换依赖包的版本号,它表示依赖包必须解析自当前 Monorepo 中声明的 workspace 包,而不会从远程 npm registry 下载:
js
/** packages/reactivity/package.json **/

  "dependencies": {
    "@vue/shared": "workspace:*"    // 更替为 workspace 协议
  }
我们还需在 vue 根目录下新增 pnpm-workspace.yaml 文件,用于告知 pnpm「哪些文件夹可以作为独立的 workspace」:
js
/** pnpm-workspace.yaml **/

packages:
  - "packages/*"    // 把 packages 文件夹里的每一个一级子目录,都当作一个独立的 workspace 包
pnpm 在执行时会扫描 pnpm-workspace.yaml 中所配置的目录,将其中包含 package.json 的子目录注册为 workspace 成员,后续在解析 workspace:* 时,会从这些 workspace 成员中进行检索和匹配。
经过此番配置后,通过 pnpm publish 指令来发布 @vue/reactivity 包时,pnpm 会把将要提交到 npm registry 的 manifest 中的 @vue/shared 依赖包版本号,自动填写为本地对应 workspace 成员 package.json(即 packages/shared/package.json)中的版本号。
💡 此处提及的是「依赖包版本号」的解决方案,但每个包的
package.json里还有个version字段,用于描述自己的版本号。我们会在后文创建一个脚本,用于统一修改所有包自己的版本号。
3. Vite Plus 的应用
从 Vue 3.6 Beta 8 版本开始,Vue 源码项目全面使用了 Vite Plus 来作为(除构建流程之外的)外围基建解决方案。
💡 关于 Vite Plus 的介绍请查阅《前端工具链新标杆 Vite Plus 初探》一文。
3.1 项目基建
安装基础依赖
安装好了 Vite Plus 之后,我们在项目根目录执行如下 Vite Plus 指令:
sql
vp add -D vite-plus typescript @types/node来安装项目基础依赖模块、写入到根目录 package.json 中的 devDependencies 中:
vite-plus:确保所有源码开发者都安装和使用 Vite Plus。typescript:TypeScript 编译器,提供 tsc 命令,实现类型检查、生成.d.ts等 TypeScript 相关的功能。@types/node:Node.js API 的类型声明,让 TypeScript 编译器能「知道」Node.js 各 API 的类型。
💡 Vite Plus 会自行检测
package.json中的packageManager信息、pnpm-workspace.yaml等包管理器相关的文件,来获悉当前项目使用的包管理器是什么,在通过vp add指令安装依赖时会使用该包管理器进行处理。
锁定 Node.js 版本号
为了统一源码开发者所使用的 Node.js 版本号(24.15.0),我们在项目根目录执行如下 Vite Plus 指令:
bash
vp env pin 24.15.0Vite Plus 会自动在项目根目录生成一个 .node-version 文件,记录指定的 Node.js 版本号(这里为 24.15.0)。
后续任意源码开发者在执行 vp 指令时,Vite Plus 都会先检查当前环境所使用的 Node.js 版本号是否匹配 .node-version 文件中所记录的版本号,若不匹配会自动下载和切换到指定的 Node.js 版本。
代码检查与格式化
Vite Plus 内置了代码检查(Lint)与格式化(Format)的能力,可以借助 vp 指令执行对应的功能:
js
vp lint   // 代码语法检查
vp fmt    // 代码格式化
我们在项目根目录创建 Vite Plus 配置文件 vite.config.ts,来对这两项功能进行自定义配置:
js
/** `vite.config.ts` **/

import { defineConfig } from "vite-plus";

export default defineConfig({
  /** 配置 Lint 规则 **/
  lint: {
    categories: {
      correctness: 'off',            // 关闭 correctness 类别的规则
    },
    env: {
      builtin: true,                 // 允许使用内建运行时环境提供的全局对象(例如 console、Promise 等)
    },
    ignorePatterns: [ '**/dist/' ],  // 忽略的文件或目录
    overrides: [                     // 覆盖默认规则(https://eslint.org/docs/latest/rules/)
      {
        files: ['**/*.js', '**/*.ts', '**/*.tsx'],
        rules: {
          'no-debugger': 'error',          // 禁止在生产代码中使用 debugger 语句,出现即报错
          // 略...
        }
      },
      {
        files: ['packages/shared/**'],
        rules: {
          'no-restricted-globals': 'off',  // 允许使用 window、document 等全局对象
        },
      },
      // 略...
    ],
  },

  /** 配置格式化规则 **/
  fmt: {
    semi: false,                 // 末尾不加分号
    singleQuote: true,           // 字符串使用单引号
    arrowParens: 'avoid',        // 箭头函数参数只有一个时,不使用括号
    printWidth: 80,              // 按每行最多 80 个字符的宽度排版,超过时换行
    experimentalSortPackageJson: false,                      // 不对 package.json 里的键序重新排序
    ignorePatterns: [ 'dist', 'CHANGELOG*.md', '*.toml' ],   // 忽略的文件或目录
  },
});
留意在第 9 行关闭了 Lint 功能非常核心的 correctness 类别规则,这是因为项目中已安装的 TypeScript 编译器(tsc)针对这块核心规则具备更强大的语法检查、跨文件类型推导能力,所以需要禁用 Lint 中这块重叠的部分,改为使用 tsc 来落实核心规则的检查:
js
tsc --incremental --noEmit // --incremental:启用增量编译。--noEmit:仅输出错误信息,不修改代码我们顺便完善根目录的 tsconfig.json 配置:
json
/** tsconfig.json **/

{
  "compilerOptions": {
    "sourceMap": false,                   // 编译不生成 source map 文件
    "target": "es2016",                   // 指定编译后的 JavaScript 版本
    "newLine": "LF",                      // 强制使用 LF(\n)作为编译后文件的行尾符号,确保多平台的一致性
    "useDefineForClassFields": false,     // 类字段按照旧方式处理(在构造函数中赋值),而不是使用 Object.defineProperty
    "module": "esnext",                   // 使用 ESNext 模块语法(import/export),保留为未来标准
    "moduleResolution": "bundler",        // 模块解析使用打包器的策略,以支持 exports 条件导出、路径映射等
    "allowJs": false,                     // 禁止编译 JavaScript 文件
    "strict": true,                       // 启用所有严格类型检查选项
    "noUnusedLocals": true,               // 检查未使用的局部变量
    "experimentalDecorators": true,       // 启用实验性装饰器语法
    "resolveJsonModule": true,            // 允许导入 .json 文件作为模块
    "isolatedModules": true,              // 强制写出明确的类型导入/导出,确保每个文件都可以被构建工具(例如 Rolldown)独立转译
    "skipLibCheck": true,                 // 跳过所有声明文件(.d.ts)的类型检查
    "esModuleInterop": true,              // 为 CommonJS 模块提供 ES Module 兼容性
    "removeComments": false,              // 保留源代码中的注释
    "jsx": "preserve",                    // 保留 JSX 语法不变,由下游业务侧工具(如 Vite、Babel)进一步处理
    "lib": ["es2016", "dom"],             // 宿主环境类型库,包含 ES2016 标准库(Promise、Array 等)和 DOM API(document、window)的类型
    "types": ["node"],                    // 只加载 @types/node 类型声明包
    "isolatedDeclarations": true,         // 每个文件的导出变量/函数都必须显式声明类型(不能依赖上下文推断)
    "rootDir": ".",
    "paths": {
      "@vue/*": ["./packages/*/src"],
      "*": ["./*"]
    },
    "composite": true                     // 标记当前项目为复合项目,允许被其它项目 tsconfig.json 中的 references 字段引用
  },
  "include": ["packages/*/src"]
}
💡
tsconfig.json各项配置的详情可查阅官方文档。
最后,我们把代码检查和格式化的相关指令,都写入项目根目录的 package.json 文件的 scripts 中统一维护和使用:
json
/** package.json **/

{
  "name": "vue",
  // 略...

  "scripts": {
    "preinstall": "npx only-allow pnpm",
    "check": "tsc --incremental --noEmit",    // 使用 tsc 检查核心语法规则
    "lint": "vp lint",                        // 执行 Vite Plus Lint 语法检查
    "format": "vp fmt",                       // 执行 Vite Plus 格式化(直接修改代码)
    "format-check": "vp fmt --check"          // 执行 Vite Plus 格式化(仅检查并抛出错误提示,不修改代码)
  }
}
暂存区文件检查
随着 Vue 源码项目越来越庞大,如果每次 Lint 与格式化都覆盖整个项目,会是很低效的事情。Vite Plus 提供了类似 lint-staged 的指令 vp stage 来处理该问题 ------ 执行 vp stage 时,只会针对 Git 暂存区的文件执行代码检查与格式化操作。
为了让「暂存区文件检查」的操作自动化,我们执行 vp config 来初始化 Git 钩子 ------ Vite Plus 会创建 .vite-hooks 文件夹,在 Git 操作流程中自动触发该文件夹下的钩子脚本:
js
.vite-hooks
  └── pre-commit     // 对应 Git pre-commit hook
我们手动修改 Vite Plus 自动生成的 .vite-hooks/pre-commit 文件内容为:
bash
vp staged && vp run check这样每次 git commit 前,都会先对暂存区的文件进行 Lint 与格式化处理,并对项目代码执行 tsc 增量式语法检查。
💡
vp run check等价于pnpm run check。
我们顺便让 vp config 在 npm prepare 钩子中触发执行,确保源码开发者都会通过该指令初始化 Git 钩子功能:
json
/** package.json **/

{
  "name": "vue",
  // 略...

  "scripts": {
    "preinstall": "npx only-allow pnpm",
    "prepare": "vp config",    // 新增 npm prepare 钩子指令
    // 略...
  }
}
最后,我们可以在 vite.config.ts 中自定义 vp staged 的规则:
js
/** vite.config.ts **/

export default defineConfig({
  /** 配置 Staged 规则 **/
  staged: {
    '*.{js,json}': ['vp fmt --no-error-on-unmatched-pattern'],                // 匹配已暂存的 .js 和 .json 文件并执行格式化操作,若匹配失败不要因此报错退出
    '*.ts?(x)': ['vp lint --fix', 'vp fmt --no-error-on-unmatched-pattern'],  // 匹配已暂存的 .ts 和 .tsx 文件并执行 Lint 操作,若匹配失败不要因此报错退出
  },
  // 略...
}
Git 提交信息检查
在以往应用了 Husky 和 lint-staged 的前端项目,通常会再安装 commitlint 来检查 git commit 时的 message 是否符合规范。
然而对于 Vue 源码项目而言,其仓库的提交规范非常简单(参考规范文档 verify-commit.js),只需要对提交内容进行一次正则匹配即可,而不是依赖 commitlint 这么重的工具包。
我们在项目根目录创建 scripts 文件夹,用于存放后续各种工程化相关的脚本,接着在该文件夹内创建 verify-commit.js 文件来校验 Git 提交信息的合规性:
js
/** verify-commit.js **/

// @ts-check
import pico from 'picocolors'
import { readFileSync } from 'node:fs'
import path from 'node:path'

const msgPath = path.resolve('.git/COMMIT_EDITMSG')
const msg = readFileSync(msgPath, 'utf-8').trim()

const commitRE =
  /^(revert: )?(feat|fix|docs|dx|style|refactor|perf|test|workflow|build|ci|chore|types|wip|release)(\(.+\))?: .{1,50}/

if (!commitRE.test(msg)) {    // git commit message 校验不合格
  console.error(              // 输出报错
    `  ${pico.white(pico.bgRed(' ERROR '))} ${pico.red(
      `invalid commit message format.`,
    )}\n\n` +
      pico.red(
        `  Proper commit message format is required for automated changelog generation. Examples:\n\n`,
      ) +
      `    ${pico.green(`feat(compiler): add 'comments' option`)}\n` +
      `    ${pico.green(
        `fix(v-model): handle events on blur (close #28)`,
      )}\n\n` +
      pico.red(`  See .github/commit-convention.md for more details.\n`),
  )
  process.exit(1)             // 退出进程
}
该脚本文件主要做了两件事:
- 读取
.git/COMMIT_EDITMSG信息(即当次提交的 message 内容)。 - 用正则校验 header 格式,若不符合规范,则使用 picocolors 高亮输出自定义提示并退出进程。
我们接着在根目录的 .vite-hooks 下新增 commit-msg 钩子脚本文件:
bash
node scripts/verify-commit.js这样在每次 git commit 时,都会自动跑一遍 verify-commit.js 对当前的 message 进行合规性校验。
💡 新增 npm 包需要通过
vp add pkgname -D来安装和同步写入package.json的dependencies;新增文件夹或文件时需审视是否需要在tsconfig.json的include字段,或vite.config.ts的lint配置中进行补充。这些基础操作后文不赘述。
3.2 测试用例
一个大型的框架项目通常需要配置测试用例,来确保各模块包的功能正确性、及时发现缺陷并防止问题回归。
在 Vue 源码项目中,使用了 Vitest 来作为测试用例工具,并统一在各个 Monorepo 包的目录下创建 __tests__ 文件夹来存放该包的测试用例。
下方是一个 shared 包测试用例的示例:
js
/** packages/shared/__tests__/reservedProp.spec.ts **/

import { isReservedProp } from '../src'

test('isReservedProp', () => {
  expect(isReservedProp('key')).toBe(true)
  expect(isReservedProp('ref')).toBe(true)
  expect(isReservedProp('ref_for')).toBe(true)
  expect(isReservedProp('ref_key')).toBe(true)
  expect(isReservedProp('onVnodeBeforeMount')).toBe(true)
  expect(isReservedProp('onVnodeMounted')).toBe(true)
  expect(isReservedProp('onVnodeBeforeUpdate')).toBe(true)
  expect(isReservedProp('onVnodeUpdated')).toBe(true)
  expect(isReservedProp('onVnodeBeforeUnmount')).toBe(true)
  expect(isReservedProp('onVnodeUnmounted')).toBe(true)
})
留意这段代码使用了全局变量 test 和 expect ,我们需要做两件事情来支持这个快捷写法:
-
通过
vp add vitest -D安装 Vitest,并在tsconfig.json中添加 Vitest 包体内置的全局 API 类型声明:json/** tsconfig.json **/ { // 略... "compilerOptions": { "types": ["vitest/globals", "node"], // 补充 vitest/globals,让 TypeScript 解释器了解 Vitest 的全局 API 类型 } } -
在
vite.config.ts中开启全局 API 能力的支持:js/** vite.config.ts **/ export default defineConfig({ /** Vitest 配置 **/ test: { globals: true, }, // 略... }

此时执行 Vite Plus 的内置指令 vp test,即可调用 Vitest 执行所有文件名含有 .spec. 的测试用例脚本:
4. 源码构建
我们进入 Vue 源码工程化的重点环节 ------ 实现一个可靠的构建方案,将分散在 packages/*/src 下的源码,构建出各种格式的产物到 packages/*/dist。
要注意的是,Vue 需要被构建为一个「通用的前端框架」,而不是被构建为一个「Web 应用」,因此需要尽可能地保证构建产物代码的可阅读性。像 Webpack 会在每个模块周围包裹大量的 __webpack_require__ 等运行时代码,这类面向「Web 应用」的构建工具是不适合用来构建 Vue 框架的。
虽然我们可以通过 Vite Plus 的 vp pack 指令来执行 Monorepo 项目的包构建,但 Vue 是一个多包、多格式、多宏分支的大型项目,构建需求相较复杂,因此需要独立开发构建脚本,来达成更定制化、更可控的构建实现。
Vue 源码项目从 3.6 Beta 5 版本开始把全线构建工具统一为 Rolldown,它是使用 Rust 编写的高性能现代化打包器,像 Vite Plus 的构建能力实际上也是通过 Rolldown 搭配 Vite 来实现的。
4.1 build 指令与参数获取
我们在项目根目录的 scripts 文件夹下创建构建任务脚本 build.js,并在 package.json 中补充 build 指令:
json
/** package.json **/

{
  "name": "vue",
  // 略...

  "scripts": {
    "build": "node scripts/build.js",    // 新增 build 构建任务指令
    // 略...
  }
}
预期后续执行 vp run build 指令时可以执行 Vue 源码项目的构建流程。
另外我们希望可以通过传入的参数来灵活控制需构建的模块、构建的格式等信息:
-
vp run build:构建所有模块所有环境下的所有格式产出物。 -
vp run build --devOnly:构建所有模块「开发环境」下的所有格式产出物(不构建「生产环境」的.prod.js文件)。 -
vp run build shared --prodOnly:只构建shared模块「生产环境」下的所有格式产出物。 -
vp run build shared reactivity --formats esm-bundler+cjs --sourceMap:只构建shared和reactivity模块所有环境下的「esm-bundler」和「cjs」格式产出物,并额外生成.map文件。 -
vp run build shared --formats ~cjs:只构建shared模块所有环境下的,除「cjs」之外的格式的产出物。
且传入的包名能支持模糊匹配:
vp run build re:模糊匹配到reactivity并执行构建(留意仅会构建一个包)。vp run build re --all:模糊匹配到reactivity和shared并执行构建。
综上所述,构建指令的预期格式为:
js
vp run build [fuzzyTarget1 fuzzyTarget2 ...] [--formats xxx] [--devOnly] [--prodOnly] [--sourceMap] [--all]
vp run build [fuzzyTarget1 fuzzyTarget2 ...] [-f xxx] [-d] [-p] [-s] [-a]    // 简写形式
因此 scripts/build.js 需要实现的首件事情,是获取与解构传入的指令参数:
js
/** scripts/build.js **/
// @ts-check

import { parseArgs } from 'node:util'

const { values, positionals: targets } = parseArgs({
  allowPositionals: true,    // 允许指令输入不带 - 或 -- 前缀的普通参数
  options: {
    formats: {               // 要构建的格式。可以通过 + 连接多种格式,若由波浪符 ~ 开头表示取反
      type: 'string',
      short: 'f',
    },
    devOnly: {               // 只构建开发环境
      type: 'boolean',
      short: 'd',
    },
    prodOnly: {              // 只构建生产环境
      type: 'boolean',
      short: 'p',
    },
    sourceMap: {             // 额外生成 sourcemap 文件
      type: 'boolean',
      short: 's',
    },
    all: {                   // 模糊匹配时,是否匹配多个
      type: 'boolean',
      short: 'a',
    },
  },
})

const {
  formats: rawFormats,
  devOnly,
  prodOnly,
  sourceMap,
} = values

/**
 * @type {string[] | undefined}
 */
let formats
let isNegation = false
if (rawFormats) {
  isNegation = rawFormats.startsWith('~')  // 是否取反。后续创建 Rolldown 配置时会用到
  formats = (isNegation ? rawFormats.slice(1) : rawFormats).split('+')  // 指定构建的格式数组
}

run()

function run() {
  // TODO - 执行构建任务
}
这段代码使用了 Node.js 内置的 util.parseArgs 方法来取得传入的指令参数。
接下来我们分步实现 run 函数中「执行构建任务」的逻辑。
4.2 创建工具模块
我们先实现「所有目标包名」和「模糊匹配传入的包名」两个工具接口,为了细化职责粒度、提高复用性,我们创建一个 scripts/utils.js 模块,来独立维护这些工具接口。
所有目标包名
我们可以通过 Node.js 的 fs 模块接口,来获取 packages 文件夹下的所有目标包名:
js
/** scripts/utils.js **/

import fs from 'node:fs'
import { createRequire } from 'node:module'
import path from 'node:path'

const require = createRequire(import.meta.url)                          // 用于导入 json 文件
const packagesPath = path.resolve(import.meta.dirname, '../packages')   // packages 文件夹的绝对路径

/**
 * 所有目标包的名称
 * @type {string[]}
 */
export const allTargets = fs
  .readdirSync(packagesPath)
  .filter(f => {
    const folder = path.resolve(packagesPath, f)
    if (
      !fs.statSync(folder).isDirectory() ||
      !fs.existsSync(`${folder}/package.json`)
    ) {
      return false
    }
    const pkg = require(`${folder}/package.json`)
    if (!pkg.buildOptions) {
      return false
    }
    return true
  })
鉴于仓库目前只有 shared 和 reactivity 两个包,因此 allTargets 的值为 ["shared", "reactivity"]。
模糊匹配传入的包名
我们创建一个 fuzzyMatchTarget 方法用于模糊匹配传入的包名:
js
/** scripts/utils.js **/

/**
 * 从所有目标包中模糊匹配给定的目标包名称
 * @param {ReadonlyArray<string>} partialTargets - 给定的目标包名称列表
 * @param {boolean | undefined} includeAllMatching - 是否返回所有匹配项,传空表示仅返回首次匹配到的目标包
 * @returns {Array<string>}
 */
export function fuzzyMatchTarget(partialTargets, includeAllMatching) {
  /** @type {Array<string>} */
  const matched = []
  partialTargets.forEach(partialTarget => {
    for (const target of allTargets) {
      if (target.match(partialTarget)) {
        matched.push(target)
        if (!includeAllMatching) {
          break    // 若未传入 includeAllMatching,只命中第一个匹配项
        }
      }
    }
  })
  if (matched.length) {
    return matched
  } else {           // 没有匹配到任何包,报错并退出进程
    console.log()    // 打印换行,确保美观
    console.error(
      `  ${pico.white(pico.bgRed(' ERROR '))} ${pico.red(
        `Target ${pico.underline(partialTargets.toString())} not found!`,
      )}`,
    )
    console.log()
    process.exit(1)
  }
}
然而这段代码存在一个问题 ------ 假设仓库中同时存在 shared 和 runtime-shared 两个包,源码开发者在传入 shared 包名进行模糊匹配,且仅匹配单个目标包时,可能会先命中 runtime-shared,而不是开发者真正想要的 shared。
对此我们在遍历前补充一段逻辑:
js
/** scripts/utils.js **/

export function fuzzyMatchTarget(partialTargets, includeAllMatching) {
  const matched = []
  partialTargets.forEach(partialTarget => {
    // 新增逻辑,确保「仅返回首次匹配到的目标包」的命中更精准
    if (!includeAllMatching && allTargets.includes(partialTarget)) {
      matched.push(partialTarget)
      return
    }

    for (const target of allTargets) {
      if (target.match(partialTarget)) {
        matched.push(target)
        if (!includeAllMatching) {
          break
        }
      }
    }
  })
  if (matched.length) {
    return matched
  } else {
    // 略...
  }
}
在构建脚本中使用
我们在 scripts/build.js 中引入上述的两个工具接口,并封装 async buildAll 方法来异步执行 Rolldown 构建:
js
/** scripts/build.js **/

import { allTargets, fuzzyMatchTarget } from './utils.js'
import { rolldown } from 'rolldown'

// 略...

await run()

async function run() {
  const resolvedTargets = targets.length ? fuzzyMatchTarget(targets, buildAllMatching) : allTargets
  await buildAll(resolvedTargets)
}

/**
 * 异步构建所有目标包
 * @param {Array<string>} targets - 目标包名称列表
 * @returns {Promise<void>}
 */
async function buildAll(targets) {
  const start = performance.now()
  const all = []
  let count = 0
  for (const t of targets) {
    const configs = createConfigsForTarget(t)     // 创建目标包的 Rolldown 配置
    if (configs) {
      all.push(
        Promise.all(
          configs.map(c => {
            return rolldown(c).then(bundle => {   // 调用 Rolldown 接口执行构建。API 参考 https://rolldown.rs/apis/bundler-api
              return bundle.write(c.output).then(() => {
                return c.output.file
              })
            })
          }),
        ).then(files => {
          const from = process.cwd()              // 项目根目录绝对路径
          files.forEach((/** @type {string} */ f) => {
            count++
            console.log(pico.gray('built: ') + pico.green(path.relative(from, f)))
          })
        }),
      )
    }
  }
  await Promise.all(all)
  console.log(`\n${count} files built in ${(performance.now() - start).toFixed(2)}ms.`)
}

function createConfigsForTarget(target) {
  // TODO - 针对指定的目标包创建 rolldown 构建配置
}
4.3 创建 Rolldown 配置
目前 scripts/build.js 已完成了构建功能的大致框架,还剩余一块「创建 Rolldown 配置」的拼图。
完善前置工作
在创建 Rolldown 配置前,需要先读取目标包 package.json 中的 buildOptions 字段来获悉该包的构建信息,还需要做构建格式取反、移除 dist 文件夹等操作。
我们在 createConfigsForTarget 中完善这块前置工作,并额外封装一个 createConfigsForPackage 接口来专项处理「创建 Rolldown 配置」这件事:
js
/** scripts/build.js **/

import { existsSync, readFileSync, rmSync } from 'node:fs'

/**
 * 针对指定的目标包创建 rolldown 构建配置
 * @param {string} target - 目标包的名称
 * @returns {import('rolldown').RolldownOptions[] | void} - 构建配置数组或 void
 */
function createConfigsForTarget(target) {
  const pkgDir = path.resolve(__dirname, `../packages/${target}`)
  const pkg = JSON.parse(readFileSync(`${pkgDir}/package.json`, 'utf-8'))  // 获取目标包配置

  let resolvedFormats
  if (formats) {
    const pkgFormats = pkg.buildOptions?.formats
    if (pkgFormats) {
      if (isNegation) {    // 取反处理
        resolvedFormats = pkgFormats.filter(
          (f) => !formats.includes(f),
        )
      } else {
        resolvedFormats = formats.filter(f => pkgFormats.includes(f))
      }
    }
    if (!resolvedFormats.length) {
      return
    }
  }

  // 指定构建格式时,先删除已有的 dist 文件夹,避免遗留前次构建的其它格式产物
  if (!formats && existsSync(`${pkgDir}/dist`)) {
    rmSync(`${pkgDir}/dist`, { recursive: true })
  }

  return createConfigsForPackage({
    target,
    formats: resolvedFormats,
    prodOnly,
    devOnly,
    sourceMap,
  })
}

function createConfigsForPackage({
  target,
  formats,
  devOnly = false,
  prodOnly = false,
  sourceMap = false,
  inlineDeps = false,
}) {
  // TODO - 创建 Rolldown 配置
}
最后进一步实现 createConfigsForPackage 方法即可,由于这块的逻辑比较繁琐,我们在 scripts 文件夹下创建一个 create-rolldown-config.js 脚本来独立维护,并在 scripts/build.js 中引用:
js
/** scripts/build.js **/

// 创建独立模块来维护「创建 Rolldown 配置」的功能
import { createConfigsForPackage } from './create-rolldown-config.js'

function createConfigsForTarget(target) {
  // 略...

  return createConfigsForPackage({
    target,
    formats: resolvedFormats,
    prodOnly,
    devOnly,
    sourceMap,
  })
}
实现 Rolldown 配置雏形
根据 Rolldown 官方的 API 指引,我们先实现一个最基础的配置创建功能:
js
/** scripts/create-rolldown-config.js **/

import assert from 'node:assert/strict'
import { createRequire } from 'node:module'
import { fileURLToPath } from 'node:url'
import path from 'node:path'

const require = createRequire(import.meta.url)                 // 用于直接引入 JSON 文件
const __dirname = fileURLToPath(new URL('.', import.meta.url))
const packagesDir = path.resolve(__dirname, '../packages')     // packages 文件夹的绝对路径
const masterVersion = require('../package.json').version       // 版本号,统一取项目根目录包配置中的 version

export function createConfigsForPackage({
  target, pkg, formats, devOnly = false, prodOnly = false, sourceMap = false,
}) {
  const packageOptions = pkg.buildOptions || {}
  const packageDir = path.resolve(packagesDir, target)
  const name = path.basename(packageDir)
  const resolve = (p) => path.resolve(packageDir, p)
  const banner = `/**
  * ${pkg.name} v${masterVersion}
  * (c) 2018-present Vue
  * @license MIT
  **/`

  const outputConfigs = {
    'esm-bundler': {
      file: resolve(`dist/${name}.esm-bundler.js`),
      format: 'es',
    },
    'esm-browser': {
      file: resolve(`dist/${name}.esm-browser.js`),
      format: 'es',
    },
    cjs: {
      file: resolve(`dist/${name}.cjs.js`),
      format: 'cjs',
    },
    global: {
      file: resolve(`dist/${name}.global.js`),
      format: 'iife',
    },
  }

  const resolvedFormats = (formats || ['esm-bundler', 'cjs']).filter((format) => outputConfigs[format])  // 要构建的格式(数组)
  const packageConfigs = resolvedFormats.map(format => createConfig(format, outputConfigs[format]))      // 各包的 Rolldown 配置

  /** 创建并返回 Rolldown 配置对象 **/
  function createConfig(format, output) {
    const isBundlerESMBuild = /esm-bundler/.test(format)
    const isGlobalBuild = /global/.test(format)

    output.postBanner = banner           // 在构建产物头部固定的横幅内容
    output.sourcemap = sourceMap

    if (isGlobalBuild) {
      output.name = packageOptions.name  // 指定 global 构建产物中的全局变量名
    }

    return {
      input: resolve('src/index.ts'),    // 包源码入口文件
      output,
      treeshake: {
        moduleSideEffects: false,        // 声明所有模块没有副作用,Tree-shaking 时会移除所有导出了但未使用的模块
      },
      experimental: {
        nativeMagicString: true,         // 启用基于 Rust 的 MagicString 来提升 SourceMap 的生成效率
      },
    }
  }

  return packageConfigs
}
此时 createConfigsForPackage 方法已能创建一个最简单的 Rollup 配置,我们在这个基础上逐步对它进行完善。
💡 MagicString 是一个专门用于源码编辑的工具,能够根据 AST 提供的位置信息高效修改源码,因此被众多构建工具广泛采用。
别名处理
Rolldown 在构建运行时是无法识别 @vue/shared 这种自定义包名的,需要通过 resolve.alias 将「包的别名与该包绝对路径的映射」告知 Rolldown。我们在 scripts 文件夹下额外创建一个 aliases.js 脚本用于维护这些别名:
js
/** scripts/aliases.js **/

// @ts-check

import { readdirSync, statSync } from 'node:fs'
import path from 'node:path'
import { fileURLToPath } from 'node:url'

// 获取传入包名的源码入口绝对路径
const resolveEntryForPkg = (/** @type {string} */ p) =>
  path.resolve( fileURLToPath(import.meta.url), `../../packages/${p}/src/index.ts`)

// 读取 packages 目录下所有文件和子文件夹
const dirs = readdirSync(new URL('../packages', import.meta.url))

/** @type {Record<string, string>} */
const entries = {}

for (const dir of dirs) {
  const key = `@vue/${dir}`
  if ( statSync(new URL(`../packages/${dir}`, import.meta.url)).isDirectory() ) {
    entries[key] = resolveEntryForPkg(dir)
  }
}

export { entries }
接着在 scripts/create-rolldown-config.js 中使用:
js
/** scripts/create-rolldown-config.js **/

import { entries } from './aliases.js'

export function createConfigsForPackage({ ... }){
  // 略...

  function createConfig(format, output) {
    // 略...

    return {
      input: resolve('src/index.ts'),
      output,
      resolve: {
        alias: entries,  // 使用别名
      },
      // 略...
    }
  }

  // 略...
}
宏常量的使用与构建替换
在前文我们曾举过一个示例:
ts
/** 源码 **/
const EMPTY_OBJ: { readonly [key: string]: any } = !!(process.env.NODE_ENV !== "production")
  ? Object.freeze({})
  : {}

/** 开发环境 **/
const EMPTY_OBJ = Object.freeze({})

/** 生产环境 **/
const EMPTY_OBJ = {}
用来展示一份「源码」被构建为「开发环境」和「生产环境」产物后的状态。
实际上它是面向下游业务侧构建工具的「源码」,已经是 Vue 原始代码经过构建后的 ESM Bundler 产物。
在真正的源码中,我们并不会把环境判断直接写作 !!(process.env.NODE_ENV !== "production") ------ 该表达式过于冗长,且不便在构建运行时被 AST 化和替换。
取而代之的是「宏常量」占位符,我们往 packages/shared/src/general.ts 源码文件新增两行代码作为示例:
ts
/** packages/shared/src/general.ts **/

// 空对象(新增)
export const EMPTY_OBJ: { readonly [key: string]: any } = __DEV__
  ? Object.freeze({})
  : {}

// 空数组(新增)
export const EMPTY_ARR: readonly never[] = __DEV__ ? Object.freeze([]) : []

// 略...
其中 __DEV__ 就是一个「宏常量」,通常会在构建工具中将宏常量配置为指定值:
- 通过 define 的形式对宏常量进行定义,通常在 AST 转换后按标识符做替换,会更安全、不会影响到注释里的同名内容。
- 通过 Replace Plugin 的插件形式进行替换,通常使用正则匹配的形式进行简单粗暴的替换。
我们采用第一种形式,对 __DEV__ 进行定义和替换:
js
/** scripts/create-rolldown-config.js **/

export function createConfigsForPackage({ ... }){
  // 略...

  function createConfig(format, output) {
     function resolveDefine() {
      const defines = {
        __DEV__: isBundlerESMBuild
          ? `!!(process.env.NODE_ENV !== 'production')`  // 面向下游构建工具的产物需保留环境判断表达式(交由下游构建工具去处理)
          : String(!isProductionBuild),                  // 其它场景替换为 boolean,确保在当次构建时能被 Tree-shake 掉
      }
      return defines
    }

    return {
      input: resolve('src/index.ts'),
      transform: {
        define: resolveDefine(),      // 替换宏常量
      },
      output,
      treeshake: {
        moduleSideEffects: false,
      },
      experimental: {
        nativeMagicString: true,
      },
    }
}
💡 以往大部分构建工具要求 define 配置中赋予宏常量的值必须符合严格的 JSON 规范,因此无法兼容
!!(process.env.NODE_ENV !== 'production')的模板字符串写法,只能改为 Replace Plugin 的形式去替换。而最新的 Vue 项目底层采用了 oxc 工具,已能兼容模板字符串的赋值。本文截止前,Vue 源码项目暂未将 Replace Plugin 形式的旧逻辑迁移到 define 中。
我们顺便补充更多宏常量,并允许通过指令覆盖默认的 define 定义,方便后续的使用:
js
/** scripts/create-rolldown-config.js **/

export function createConfigsForPackage({ ... }){
  // 略...

  function createConfig(format, output) {
    const isProductionBuild = /\.prod\.js$/.test(String(output.file) || '')
    const isBundlerESMBuild = /esm-bundler/.test(format)
    const isBrowserESMBuild = /esm-browser/.test(format)
    const isCJSBuild = format === 'cjs'
    const isGlobalBuild = /global/.test(format)
    const isBrowserBuild =
      (isGlobalBuild || isBrowserESMBuild || isBundlerESMBuild) &&
      !packageOptions.enableNonBrowserBranches

    output.sourcemap = sourceMap

    if (isGlobalBuild) {
      output.name = packageOptions.name
    }

    function resolveDefine() {
      const defines = {
        __VERSION__: `"${masterVersion}"`,
        __TEST__: `false`,
        __BROWSER__: String(isBrowserBuild),
        __GLOBAL__: String(isGlobalBuild),
        __ESM_BUNDLER__: String(isBundlerESMBuild),
        __ESM_BROWSER__: String(isBrowserESMBuild),
        __CJS__: String(isCJSBuild),
        __DEV__: isBundlerESMBuild
          ? `!!(process.env.NODE_ENV !== 'production')`
          : String(!isProductionBuild),
      }

      // 允许在命令行中手动输入环境变量来覆盖默认的 define 定义,例如
      // __DEV__=true vp run build
      Object.keys(defines).forEach(key => {
        if (key in process.env) {
          const value = process.env[key]
          assert(typeof value === 'string')
          defines[key] = value
        }
      })

      return defines
    }

    // 略...
  }
}
不过由于缺乏类型声明,IDE 的 TypeScript 编译器会针对这些宏常量报错:
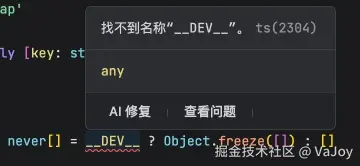
因此需要在 packages 目录下新增 global.d.ts 文件,对宏常量进行全局性的类型声明:
ts
/** packages/global.d.ts **/

declare var __DEV__: boolean;
declare var __TEST__: boolean
declare var __BROWSER__: boolean
declare var __GLOBAL__: boolean
declare var __ESM_BUNDLER__: boolean
declare var __ESM_BROWSER__: boolean
declare var __CJS__: boolean
declare var __VERSION__: string;
💡 未来有新增的自定义宏常量也需要在该文件补齐,后文不赘述。
为测试用例配置别名和宏
此时如果执行 vp test 测试用例指令会报错:
diff
ReferenceError: __DEV__ is not defined这是由于我们并未给执行测试用例的工具(Vite Plus)补充宏定义的配置,我们在 vite.config.ts 文件同步补上这块配置项:
ts
/** vite.config.ts **/

import { defineConfig } from 'vite-plus'

export default defineConfig({
  /** 宏定义 **/
  define: {
    __DEV__: process.env.MODE !== 'benchmark',
    __TEST__: true,
    __BROWSER__: false,
    __GLOBAL__: false,
    __ESM_BUNDLER__: true,
    __ESM_BROWSER__: false,
    __CJS__: true,
  },
  // 略...
})
同理还需要同步补充上别名的定义:
ts
/** vite.config.ts **/

import { defineConfig } from 'vite-plus'
import { entries } from './scripts/aliases.js'    // 复用别名模块

export default defineConfig({
  define: {
    __DEV__: process.env.MODE !== 'benchmark',
    __TEST__: true,
    __BROWSER__: false,
    __GLOBAL__: false,
    __ESM_BUNDLER__: true,
    __ESM_BROWSER__: false,
    __CJS__: true,
  },
  /** 别名配置 **/
  resolve: {
    alias: entries,
  },
  // 略...
})
此时再执行 vp test 指令不再报错。
生产环境的额外处理
鉴于生产环境的构建产物名称应该带有 .prod 后缀,且面向浏览器的构建产物需要进行压缩来缩小引用体积,我们需要对生产环境的构建配置做额外处理:
js
/** scripts/create-rolldown-config.js **/

export function createConfigsForPackage({ ... }){
  // 略...

  const outputConfigs = {
    'esm-bundler': {
      file: resolve(`dist/${name}.esm-bundler.js`),
      format: 'es',
    },
    'esm-browser': {
      file: resolve(`dist/${name}.esm-browser.js`),
      format: 'es',
    },
    cjs: {
      file: resolve(`dist/${name}.cjs.js`),
      format: 'cjs',
    },
    global: {
      file: resolve(`dist/${name}.global.js`),
      format: 'iife',
    },
  }

  const resolvedFormats = (formats || ['esm-bundler', 'cjs']).filter((format) => outputConfigs[format])
  const packageConfigs = prodOnly
    ? []           // 仅构建生产环境的配置可以先置空(因为不需要生成开发环境配置)
    : resolvedFormats.map(format => createConfig(format, outputConfigs[format]))

  if (!devOnly) {  // 「仅构建生产环境」和「同时构建生产环境和开发环境」,等价于「需要构建生产环境」的场景
    resolvedFormats.forEach(format => {
      if (format === 'cjs') {
        packageConfigs.push(createProductionConfig(format))        // 重命名
      }
      if (/^(global|esm-browser)$/.test(format)
      ) {
        packageConfigs.push(createProductionConfig(format, true))  // 重命名 + 面向浏览器的构建产物需要进行压缩
      }
    })
  }

  /** 创建基础配置(等价于创建开发环境配置)**/
  function createConfig(format, output) {
    // 略...
  }

  /** 创建生产环境配置(基于 createConfig 的开发环境配置上做修改)**/
  function createProductionConfig(/** @type {PackageFormat} */ format, minify = false) {
    return createConfig(format, {
      file: resolve(`dist/${name}.${format}.prod.js`),
      format: outputConfigs[format].format,
      minify,   // 代码压缩
    })
  }

  return packageConfigs
}
此时 createConfig 相当于创建了「开发环境」的配置,而 createProductionConfig 是在 createConfig 的基础上生成「生产环境」的配置。
兼容性处理
Rolldown 提供了一些配置项,可以提升构建产物在不同场景上的兼容性:
js
/** scripts/create-rolldown-config.js **/

export function createConfigsForPackage({ ... }){
  // 略...

  function createConfig(format, output) {
    // 略...

    // 强制将模块的导出打包为 CJS 的属性(即键值对对象),提升「下游构建工具在处理 ESM + CJS 混用项目时」的兼容性
    output.exports = 'named'

    if (isCJSBuild) {
      // 为导出对象(module.exports)添加一个 __esModule: true 的属性,告知下游构建工具「该 CJS 文件由 ESM 转换而来」
      output.esModule = true
    }

    return {
      input: resolve('src/index.ts'),
      output,
      transform: {
        define: resolveDefine(),
        target: isCJSBuild ? 'es2019' : 'es2016',  // 面向浏览器的构建产物采用兼容性更高的 es2016 标准
      },
      platform: format === 'cjs' ? 'node' : isBundlerESMBuild ? 'neutral' : 'browser',
      // 略...
    }
  }

  // 略...
}
其中 platform 表示「构建代码预期运行的平台」,Rolldown 会针对指定的平台进行构建适配和优化:
- 当构建格式为
cjs时,其值为node,表示构建产物将运行在 Node.js 平台上。构建时将保留process.env.NODE_ENV和其他 Node.js 全局变量。 - 当构建格式为
esm-bundler时,其值为neutral,表示与平台无关。将构建为多平台通用的 ES Module 格式。 - 其它构建格式时,其值为
browser,表示构建产物将运行在浏览器上。构建时属于 Node.js 的内置模块默认不会进行填充。
💡
platform值为browser所对应的构建产物代码中,若执行 Node.js 内置模块(例如path)的接口会因为找不到而报错,后文会针对compiler-sfc这类「需要在浏览器上运行,同时又需要使用 Node.js 内置模块」的特殊包,通过插件形式进行 polyfill 处理。
缩减构建产物体积
我们针对生产环境的构建启用了代码压缩功能,但还有其它进一步缩减构建产物体积的手段。
首先可以对外部依赖下手 ------ 以 reactivity 包为例,虽然它依赖了 shared 包,但在构建非面向浏览器平台的产物时(例如构建的是 esm-bundler 或 cjs 格式),并不需要将 shared 包的代码内联入 reactivity 包的构建产物中。
通过 Rolldown 的 external 属性可以实现依赖裁剪的功能:
js
/** scripts/create-rolldown-config.js **/

export function createConfigsForPackage({ ... }){
  // 略...

  function createConfig(format, output) {
    // 略...

    // 裁剪外部依赖,非浏览器的构建不要把依赖模块的代码内联进构建产物中
    function resolveExternal() {
      if (!isGlobalBuild && !isBrowserESMBuild) {
        // 非面向浏览器的构建,外部化所有依赖项
        return [
          ...Object.keys(pkg.dependencies || {}),
          ...Object.keys(pkg.peerDependencies || {}),
        ]
      }
    }

    return {
      input: resolve('src/index.ts'),
      output,
      external: resolveExternal(),
      // 略...
    }
  }

  // 略...
}
其次 Rolldown 的构建产物会默认启用 ESM 的「动态绑定」特性,使用 Object.defineProperty 对引入的模块属性进行定义:
js
// 输入
export { x } from 'external';
js
// 构建后的 CJS 产物
var external = require('external');

Object.defineProperty(exports, 'x', {
  enumerable: true,
  get: function () {
    return external.x;
  },
});
将 Rolldown 的 externalLiveBindings 配置设为 false,可以关闭「动态绑定」特性,从而减少构建产物体积:
js
// 构建后的 CJS 产物(externalLiveBindings 设为 false)
var external = require('external');

exports.x = external.x;
我们在 scripts/create-rolldown-config.js 中新增一行代码关闭该特性:
js
/** scripts/create-rolldown-config.js **/

export function createConfigsForPackage({ ... }){
  // 略...

  function createConfig(format, output) {
    // 关闭动态绑定特性(不使用 Object.defineProperty 来定义导入模块的属性),减少构建产物体积
    output.externalLiveBindings = false

    // 略...
  }

  // 略...
}
至此我们便完成了一个基础的源码构建方案:

5. 类型声明文件构建
业务侧的项目如果是基于 TypeScript 开发的,引入前文构建后的代码会因为缺少类型声明而报错,因此还需要专门构建 .d.ts 声明文件供业务侧的 TypeScript 编译器使用。
我们在 scripts 文件夹下创建 build-types.js 文件来实现此功能,并先在项目根目录的包配置中加上相关指令:
json
/** package.json **/

{
  "name": "vue",
  "version": "3.6.0",
  "scripts": {
    "preinstall": "npx only-allow pnpm",
    "build": "node scripts/build.js",
    "build-dts": "node scripts/build-types.js",    // 构建类型声明文件
    // 略...
  },
  // 略...
}
5.1 为源码独立模块构建的 .d.ts
虽然 tsc 指令可以实现「完整项目语义分析 + 声明生成」,但 Vue 源码项目本质是一个 Monorepo 架构的多包仓库,为每个包独立生成类型声明文件并存放到对应的 dist 文件夹下更为合理。
我们可以利用 oxc 的 isolatedDeclaration 接口,对 src 下的每个独立的源码模块生成 .d.ts 文件,并将它们写入到 temp 临时文件夹下:
js
/** scripts/build-types.js **/

import fs from 'node:fs'
import path from 'node:path'
import glob from 'fast-glob'
import { isolatedDeclaration } from 'oxc-transform'

if (fs.existsSync('temp/packages')) {
  fs.rmSync('temp/packages', { recursive: true })    // 先移除 temp/packages 临时文件夹(若有)
}

const files = await glob('packages/*/src/**/*.ts')   // 读取各包 src 下的所有独立源码模块
for (const file of files) {
  const ts = fs.readFileSync(file, 'utf-8')
  const dts = await isolatedDeclaration(file, ts, {  // 使用 oxc 接口生成类型声明文件
    sourcemap: false,
    stripInternal: true,
  })

  write(path.join('temp', file.replace(/\.ts$/, '.d.ts')), dts.code)  // 写入到 temp 文件夹下
}

/** 写入内容到指定文件 **/
function write(file, content) {
  const dir = path.dirname(file)
  if (!fs.existsSync(dir)) fs.mkdirSync(dir, { recursive: true })     // 若文件夹不存在,则直接创建
  fs.writeFileSync(file, content)
}
执行 vp run build-dts 指令,会在项目根目录创建 temp/packages 临时文件夹,并将各包源码独立模块的类型声明存入其中:
css
temp
└── packages
    ├── reactivity
    │   └── src
    │       ├── index.d.ts
    │       └── reactive.d.ts
    └── shared
        └── src
            ├── general.d.ts
            ├── index.d.ts
            └── makeMap.d.ts
之所以将类型声明文件的产出存放到临时文件夹,而非各包的 dist 文件夹下,是因为每个包面向业务侧的类型声明文件应当「有且仅有一个」,而非分散的多个类型声明文件。
因此接下来要做的事情,是将 temp/packages 下各包分散的 .d.ts 文件合并为单个文件。
5.2 合并类型声明
参照之前将各包 src 下的多个 .ts 源码文件打包成 dist 下的单个构建产物的形式,可以沿用 Rolldown 将各包 src 下的多个 .d.ts 源码文件打包成 dist 下的单个类型声明文件。
我们在项目根目录创建 rolldown.dts.config.js 文件用于维护打包类型声明的 Rolldown 配置:
js
/** rolldown.dts.config.js **/

import assert from 'node:assert/strict'
import { parseSync } from 'oxc-parser'
import { existsSync, readFileSync, readdirSync, writeFileSync } from 'node:fs'
import { dts } from 'rolldown-plugin-dts'
import { createRequire } from 'node:module'
import { fileURLToPath } from 'node:url'
import path from 'node:path'

const require = createRequire(import.meta.url)
const __dirname = fileURLToPath(new URL('.', import.meta.url))
const packagesDir = path.resolve(__dirname, 'packages')

const packages = readdirSync('temp/packages')
// 可从环境变量获取目标包,例如执行 TARGETS=reactivity,shared vp run build-types
const targets = process.env.TARGETS ? process.env.TARGETS.split(',') : null
const targetPackages = targets
  ? packages.filter(pkg => targets.includes(pkg))
  : packages

/** 移除外部依赖 **/
function resolveExternal(packageName) {
  const pkg = require(`${packagesDir}/${packageName}/package.json`)
  return [
    ...Object.keys(pkg.dependencies || {}),
    ...Object.keys(pkg.devDependencies || {}),
    ...Object.keys(pkg.peerDependencies || {}),
  ]
}

// 导出配置项(数组)
export default targetPackages.map(
  pkg => {
    return {
      input: `./temp/packages/${pkg}/src/index.d.ts`,
      output: {
        file: `packages/${pkg}/dist/${pkg}.d.ts`,
        format: 'es',
      },
      experimental: {
        nativeMagicString: true,  // 启用基于 Rust 的 MagicString 来提升代码变换阶段的效率
      },
      external: resolveExternal(pkg),
      plugins: [ dts() ],         // 让 Rolldown 能「理解」如何打包 TypeScript 声明文件
    }
  },
)
留意 Rolldown 默认是无法「理解」如何打包 TypeScript 声明文件的,因此需要使用 rolldown-plugin-dts 插件来支持此能力。
我们回到 build-types.js 补充 Rolldown 的打包逻辑:
js
/** scripts/build-types.js **/

import { rolldown } from 'rolldown'
import picocolors from 'picocolors'
// 略...

const files = await glob('packages/*/src/**/*.ts')
// 略...

const rolldownConfigs = (await import('../rolldown.dts.config.js')).default  // 引入目标包配置

await Promise.all(
  rolldownConfigs.map(c =>
    rolldown(c).then(bundle => {
      return bundle.write(c.output).then(() => {
        console.log(picocolors.gray('built: ') + picocolors.blue(c.output.file))
      })
    }),
  ),
)
留意第 10 行和第 12 行均是使用了 await 的异步方式来处理 Rolldown 流程 ------ 这是由于前方已存在异步获取 .ts 文件的逻辑(第 7 行),后方逻辑需要「封装」自己为异步的微任务来确保前置条件的异步逻辑先执行完毕。
此时执行 vp run build-dts 即可构建出 packages/shared/dist/shared.d.ts 和 packages/reactivity/dist/reactivity.d.ts 两个类型声明文件,其中 shared 包的类型声明文件内容如下:
ts
/** packages/shared/src/general.d.ts **/

//#region temp/packages/shared/src/general.d.ts
declare const EMPTY_OBJ: {
  readonly [key: string]: any;
};
declare const EMPTY_ARR: readonly never[];
/** 空函数 */
declare const NOOP: () => void;
/** 生成一个方法,用于判断一个属性名是否是保留属性 */
declare const isReservedProp: (key: string) => boolean;
//#endregion
//#region temp/packages/shared/src/makeMap.d.ts
/**
* 把一个用逗号分隔的字符串(例如 "a,b,c" )预处理成一个"成员判断函数",
* 用于在运行时高频地判断某个 key 是否属于某个固定集合。
*
* 示例:
* const isHTMLTag = makeMap('div,span,p')
* isHTMLTag('div') // true
* isHTMLTag('a')   // false
*/
declare function makeMap(str: string): (key: string) => boolean;
//#endregion
export { EMPTY_ARR, EMPTY_OBJ, NOOP, isReservedProp, makeMap };
最后,我们将类型声明文件构建作为可选任务加入到整体的源码构建流程:
js
/** scripts/build.js **/

const { values, positionals: targets } = parseArgs({
  allowPositionals: true,
  options: {
    formats: {
      type: 'string',
      short: 'f',
    },
    withTypes: {              // 新增可选指令参数,用于异步构建类型声明文件
      type: 'boolean',
      short: 't',
    },
    sourceMap: {
      type: 'boolean',
      short: 's',
    },
    all: {
      type: 'boolean',
      short: 'a',
    },
  },
})

const {
  formats: rawFormats,
  all: buildAllMatching,
  devOnly,
  prodOnly,
  withTypes: buildTypes,
  sourceMap,
} = values

run()

async function run() {
  const resolvedTargets = targets.length
    ? fuzzyMatchTarget(targets, buildAllMatching)
    : allTargets
  if (buildTypes) {
    await import('./build-types.js')    // 异步构建类型声明文件
  }
  await buildAll(resolvedTargets)
}

// 略...
此时执行 vp run build -t 会在之前 build 构建的基础上,同时异步构建出类型声明文件到各包的 dist 中去。
6. 源码开发环境构建
我们在前文所实现的 build 方案可以构建出面向业务侧的「开发环境」与「生产环境」的构建产物,然而对于「Vue 源码开发者」而言,还需要实现一个帮助我们自己提升开发者体验的「源码开发环境」构建方案,它需要是一个「更快速的、可持续的、适合本地调试」的方案,它与 build 构建会存在一些不同:
- 更重视指定包的构建,无需构建所有包。
- 更重视指定格式的构建,无需构建所有格式。
- 没有类型声明文件的构建需求(那是面向业务侧使用者的)。
- 输出总是带 sourceMap,方便源码调试。
- 具备 watch 的监听能力,文件修改后能自动增量重建。
其中前三条可以有效提升构建的速度,最后一条可以确保本地开发构建的持续性。
我们在 scripts 文件夹下创建 dev.js 文件来实现源码开发环境构建的功能:
js
/** scripts/dev.js **/

import { dirname, relative, resolve } from 'node:path'
import { fileURLToPath } from 'node:url'
import { createRequire } from 'node:module'
import { parseArgs } from 'node:util'
import { watch } from 'rolldown'

const require = createRequire(import.meta.url)
const __dirname = dirname(fileURLToPath(import.meta.url))

const {
  values: { format: rawFormat, prod },
  positionals,
} = parseArgs({
  allowPositionals: true,
  options: {
    format: {
      type: 'string',
      short: 'f',
      default: 'global',
    },
    prod: {
      type: 'boolean',
      short: 'p',
      default: false,
    },
  },
})

const format = rawFormat || 'global'
const targets = positionals.length ? positionals : ['shared']
const outputFormat = format.startsWith('global') ? 'iife'  : (format === 'cjs' ? 'cjs'  : 'es')
const postfix = format.endsWith('-runtime') ? `runtime.${format.replace(/-runtime$/, '')}` : format

for (const target of targets) {
  const pkgBasePath = `../packages/${target}`
  const pkg = require(`${pkgBasePath}/package.json`)
  const outfile = resolve(__dirname, `${pkgBasePath}/dist/${target}.${postfix}.${prod ? `prod.` : ``}js`)

  // 裁剪外部依赖,非浏览器的构建不要把依赖模块的代码内联进构建产物中
  let external = []
  if (format === 'cjs' || format.includes('esm-bundler')) {
    external = [
      ...Object.keys(pkg.dependencies || {}),
      ...Object.keys(pkg.peerDependencies || {}),
    ]
  }

  const config = {
    input: resolve(__dirname, `${pkgBasePath}/src/index.ts`),
    output: {
      file: outfile,
      format: outputFormat,
      sourcemap: true,
      name: pkg.buildOptions?.name,
    },
    external,
    platform: format === 'cjs' ? 'node' : 'browser',
    treeshake: {
      moduleSideEffects: false,
    },
    transform: {
      define: {
        __VERSION__: `"${pkg.version}"`,
        __DEV__: prod ? `false` : `true`,
        __TEST__: `false`,
        __BROWSER__: String(format !== 'cjs'),
        __GLOBAL__: String(format === 'global'),
        __ESM_BUNDLER__: String(format.includes('esm-bundler')),
        __ESM_BROWSER__: String(format.includes('esm-browser')),
        __CJS__: String(format === 'cjs'),
      },
    },
  }

  // 调用 Rolldown 的 watch 接口监听本地改动,实时触发构建
  watch(config).on('event', event => {
    if (event.code === 'BUNDLE_END') {
      console.log(`built ${config.output.file} in ${event.duration}ms`)
    }
  })
}
其本质是一个简化版的 build.js + create-rolldown-config.js,且调用了 Rolldown 的 watch 接口监听本地源码改动,来实现热构建的能力。
💡 旧版本的 Vue 项目由于构建工具 Rollup 的模块图主要面向「一次性构建」设计,缺乏面向长期运行进程的增量构建能力,因此在构建源码开发环境时需要改为使用 esbuild。然而不同于 Rollup,新工具 Rolldown 会把模块图视为长期驻留的一等公民,能从架构层面支持增量重建,得以适配开发态的高频变更场景,这是 Vue 3.6 可以统一使用 Rolldown 作为构建基座的原因。
最后在项目根目录的包配置中加上 dev 指令:
json
/** package.json **/

{
  "name": "vue",
  "version": "3.6.0",
  "scripts": {
    "preinstall": "npx only-allow pnpm",
    "dev": "node scripts/dev.js",         // 源码开发环境构建
    "build": "node scripts/build.js",
    // 略...
  },
  // 略...
}
执行效果如下:

7. 发布
发布的处理是项目工程化的最后一个环节,它需要负责「各包版本号的更新、生成 CHANGELOG、执行构建、发布 npm」等功能。
我们在 scripts 文件夹下创建 release.js 文件,先实现一个最简单的发布流程:
js
/** scripts/release.js **/

import pico from 'picocolors'
import { createRequire } from 'node:module'

const step = (msg) => console.log(pico.cyan(msg))  // 专用工具方法,使用 picocolors 打印当前步骤信息
const currentVersion = createRequire(import.meta.url)('../package.json').version  // 当前版本号(项目根目录包配置中的 version 字段)

// 更新各包 package.json 中的 version
function updateVersions(version) {
  // TODO
}

// 构建,执行指令 vp run build --withTypes
async function buildPackages() {
  step('\nBuilding all packages...')
  // TODO
}

// 发布所有包到 npm
async function publishPackages(version) {
  step('\nPublishing packages...')
  // TODO
}

async function main() {
  updateVersions(currentVersion)
  await buildPackages(currentVersion)
  await publishPackages(currentVersion)
}

main()
同时在项目根目录的包配置中加上 release 指令:
json
/** package.json **/

{
  "name": "vue",
  "version": "3.6.0",
  "scripts": {
    "preinstall": "npx only-allow pnpm",
    "dev": "node scripts/dev.js",
    "build": "node scripts/build.js",
    "release": "node scripts/release.js",   // 发包
    // 略...
  },
  // 略...
}
我们逐步来完善 release.js 中各方法的逻辑。
7.1 更新版本号
每个 Monorepo 包的包配置文件中都有自己的版本号,如果每次发包前都要手动去修改,会是一件繁琐且容易出错的事情。
我们可以读取项目根目录 package.json 中的 version 字段,再统一遍历和修改 packages 文件夹下所有包的包配置文件:
js
/** scripts/release.js **/

// 略...

const currentVersion = createRequire(import.meta.url)('../package.json').version  // 当前版本号(项目根目录包配置中的 version 字段)
const getPkgRoot = (pkg) => path.resolve(__dirname, '../packages/' + pkg)  // 获取指定包的绝对路径

// packages 文件夹下所有包的名称
const packages = fs
  .readdirSync(path.resolve(__dirname, '../packages'))
  .filter(p => {
    const pkgRoot = path.resolve(__dirname, '../packages', p)
    const pkgPath = path.resolve(pkgRoot, 'package.json')
    if (!fs.statSync(pkgRoot).isDirectory() || !fs.existsSync(pkgPath)) {
      return false // 过滤空包
    }
    return true
  })

/**
 * 更新各包 package.json 中的 version
 * @param {string} version
 */
function updateVersions(version = currentVersion) {
  // 遍历和修改 packages 文件夹下所有包的包配置文件
  packages.forEach(p => updatePackage(getPkgRoot(p), version))
}

/**
 * @param {string} pkgRoot
 * @param {string} version
 */
function updatePackage(pkgRoot, version) {
  const pkgPath = path.resolve(pkgRoot, 'package.json')
  const pkg = JSON.parse(fs.readFileSync(pkgPath, 'utf-8'))
  pkg.version = version
  fs.writeFileSync(pkgPath, JSON.stringify(pkg, null, 2) + '\n')
}

// 略...
💡 项目根目录
package.json中version字段值为"3.6.0-beta.17",后不赘述。
这种形式虽然无需再手动去修改各包的包配置版本号,但项目根目录包配置的版本号依旧需要手动先去修改,如果遗漏了这一步依旧会导致版本号错误的问题。
更合理的方式是交由指令参数和脚本来灵活处理「新版本号生成」和「各包版本号更新」事项:
- 可以通过指令参数指定版本号(例如
vp run release 3.6.0-beta.18),由脚本直接修改所有包配置(含项目根目录包配置)的版本信息。 - 发布正式版的新版本时,可以通过指令参数指定发布类型(例如
vp run release patch),由脚本增量生成新的版本号,并同步修改所有包配置版本信息。 - 发布预发布版的新版本时,可以通过指令参数指定预发布类型(例如
vp run release --preid alpha),由脚本增量生成新的版本号,并同步修改所有包配置版本信息。 - 当不传入任何指令参数时,脚本能通过 CLI 询问用户,让用户选择或输入版本号。
我们在脚本中完善这块需求:
js
/** scripts/release.js **/

import semver from 'semver'
import { parseArgs } from 'node:util'
import enquirer from 'enquirer'    // enquirer 是 CommonJS 模块,无法直接写作 import { prompt } from 'enquirer'
const { prompt } = enquirer
// 略...

// 解构命令行指令参数
const { values: args, positionals } = parseArgs({
  allowPositionals: true,
  options: {
    preid: {           // 预发布类型标识符,例如 alpha、beta、rc
      type: 'string',
    },
  },
})

let currentVersion = createRequire(import.meta.url)('../package.json').version

// 预发布类型标识符,例如 alpha、beta、rc(若为正式版,值为 undefined)
const preId = args.preid || semver.prerelease(currentVersion)?.[0]  // semver.prerelease('3.6.0-beta.17') 返回 ['beta', 17];semver.prerelease('3.6.0') 返回 null

// 发布类型名称列表
const versionIncrements = [
  'patch', 'minor', 'major',
  ...(preId ? ['prepatch', 'preminor', 'premajor', 'prerelease'] : []),  // 若属于预发布,补充更多预发布相关的类型
]

// 根据发布类型生成新的语义版本
const inc = (/** @type {import('semver').ReleaseType} */ i) => semver.inc(currentVersion, i, String(preId ?? ''))

function updateVersions(version) {
  currentVersion = version
  updatePackage(path.resolve(__dirname, '..'), version)  // 同步修改项目根目录的包配置版本号
  packages.forEach(p => updatePackage(getPkgRoot(p), version))
}

// 略...

async function main() {
  const targetVersion = positionals[0]

  if (!targetVersion) {                 // 执行指令时若未指定版本号,询问、确认版本号
    const { release } = await prompt({
      type: 'select',
      name: 'release',
      message: 'Select release type',
      choices: versionIncrements.map(i => `${i} (${inc(i)})`).concat(['custom']),
    })

    if (release === 'custom') {         // 自定义版本号
      const result = await prompt({
        type: 'input',
        name: 'version',
        message: 'Input custom version',
        initial: currentVersion,
      })
      targetVersion = result.version
    } else {
      targetVersion = release.match(/\((.*)\)/)?.[1] ?? ''
    }
  }

  if (versionIncrements.includes(targetVersion)) {
    targetVersion = inc(targetVersion)   // 如果输入的是发布类型,调用 inc 函数生成新的语义版本
  }

  updateVersions(targetVersion)
  await buildPackages()
  await publishPackages(currentVersion)
}

main()
这里使用了 semver 作为版本语义化工具,像第 30 行的 semver.inc 可以非常便捷、规范地生成新版本:
js
semver.inc('3.6.0', 'patch')              // 新增修订版本,返回 "3.6.1"
semver.inc('3.6.0', 'minor')              // 新增次要版本,返回 "3.7.0"
semver.inc('3.6.0-alpha.2', 'major')      // 新增大版本,返回 "4.6.0"(忽略 alpha 等预发布信息)

semver.inc('3.6.0-rc', 'prepatch')        // 新增预发布版本的修订版本,返回 "3.6.1-rc"
semver.inc('3.6.0-beta.17', 'prerelease') // 直接推进预发布版本,返回 "3.6.0-beta.18"
还使用了 enquirer 作为 CLI 询问工具,在执行 vp run release 指令时,enquirer 会按自定义的询问流程让你选择、输入版本号信息:

最后,鉴于我们修改了多个包的 package.json 内容,也需要同步修改项目根目录 pnpm-lock.yaml 文件中的对应包的元信息(例如版本号和哈希值):
js
/** scripts/release.js **/

// 略...

async function main() {
  // 略...

  updateVersions(targetVersion)

  step('\nUpdating lockfile...')
  await run('vp', ['install', '--prefer-offline'])  // 同步修改项目根目录 `pnpm-lock.yaml` 文件中的对应包的元信息

  await buildPackages()
  await publishPackages(currentVersion)
}
新增的 run('vp', ['install', '--prefer-offline']) 将触发 pnpm 重装依赖(优先使用本地缓存的依赖包来安装),进而更新 pnpm-lock.yaml 文件。
7.2 生成 CHANGELOG
每次发包时,Vue 主仓库都需要生成 / 更新当前版本的变更日志,告知用户新包对应的改动点有哪些。对此,Vue 在严格规范 Git commit 内容的同时,搭配使用了 conventional-changelog 来自动生成 CHANGELOG.md 文件:
json
/** package.json **/

{
  "name": "vue",
  "version": "3.6.0-beta.17",
  "license": "MIT",
  "author": "VaJoy Lan",
  "type": "module",
  "scripts": {
    // 略...
    "release": "node scripts/release.js",
    "changelog": "conventional-changelog -p angular -i CHANGELOG.md -s"   // 生成变更日志
  },
  // 略...
}
当执行第 11 行的 changelog 脚本任务时,conventional-changelog 会通过读取 Git 的提交信息并进行归类,应用 Angular 的预设在项目根目录生成 CHANGELOG.md 文件。
我们可以顺便在发包流程加上「生成 CHANGELOG」环节:
js
/** scripts/release.js **/

// 略...

async function main() {
  // 略...

  updateVersions(targetVersion)

  // 通过 conventional-changelog 生成 CHANGELOG 文件
  step('\nGenerating changelog...')
  await run('vp', ['run', 'changelog'])

  // 略...
}
7.3 执行构建任务
更新版本号后,需要触发 vp run build --withTypes 对源码进行构建,生成最新的业务侧构建产物。我们可以先利用 Node.js 的 child_process.spawn 封装一个「执行指令」的工具方法:
js
/** scripts/utils.js **/

import { spawn } from 'node:child_process'

/**
 * @param {string} command
 * @param {ReadonlyArray<string>} args
 * @param {object} [options]
 * @returns {Promise<{ ok: boolean, code: number | null, stderr: string, stdout: string }>}
 */
export async function exec(command, args, options) {
  return new Promise((resolve, reject) => {
    // 1. 启动子进程
    const _process = spawn(command, args, {
      stdio: [
        'ignore', // stdin 配置,默认不会读取输入(适合非交互命令,避免等候不必要的输入而卡住)
        'pipe',   // stdout 配置,默认标准输出通过管道回流到当前 Node 进程,由脚本自己读取(stdoutChunks)
        'pipe',   // stderr 配置,默认错误输出也通过管道回流,由脚本自己读取(stderrChunks)
      ],
      ...options,
      shell: process.platform === 'win32',  // 兼容处理,针对 Windows 启用 shell
    })

    // 2. 收集输出
    /**
     * @type {Buffer[]}
     */
    const stderrChunks = []
    /**
     * @type {Buffer[]}
     */
    const stdoutChunks = []

    _process.stderr?.on('data', chunk => {
      stderrChunks.push(chunk)
    })

    _process.stdout?.on('data', chunk => {
      stdoutChunks.push(chunk)
    })

    _process.on('error', error => {
      reject(error)
    })

    // 3. 判断结果并返回
    _process.on('exit', code => {
      const ok = code === 0
      const stderr = Buffer.concat(stderrChunks).toString().trim()
      const stdout = Buffer.concat(stdoutChunks).toString().trim()

      if (ok) {
        const result = { ok, code, stderr, stdout }
        resolve(result)
      } else {
        reject(
          new Error(
            `Failed to execute command: ${command} ${args.join(' ')}: ${stderr}`,
          ),
        )
      }
    })
  })
}
接着在 release.js 脚本中使用并完善 buildPackages 方法:
js
/** scripts/release.js **/

import { exec } from './utils.js'

const { values: args, positionals } = parseArgs({
  allowPositionals: true,
  options: {
    skipBuild: {          // 可通过指令参数跳过构建环节
      type: 'boolean',
    },
    // 略...
  },
})

// 略...

// 构建,执行指令 vp run build --withTypes
async function buildPackages() {
  step('\nBuilding all packages...')

  if (!args.skipBuild) {
    await run('vp', ['run', 'build', '--withTypes'])  // 触发构建任务
  } else {
    console.log(`(skipped)`)
  }
}

// 用于执行「无需处理输出信息」且「需要实时查看信息」的指令
const run = async (bin, args, opts = {}) => exec(bin, args, { stdio: 'inherit', ...opts })
留意 run 方法调整了 stdio 的配置为 inherit,会让 exec 不再收集和处理输出,改为把输出信息透传到终端。此举是为了方便使用者实时看到指令执行的过程。
7.4 执行发包
在依序执行完「更新版本号」和「构建」任务后,就可以将各包构建物发布到 npm 上了,我们对发包的 publishPackages 方法进行完善:
js
/** scripts/release.js **/

const { values: args, positionals } = parseArgs({
  allowPositionals: true,
  options: {
    tag: {
      type: 'string',       // 可通过指令参数指定发布时提交的标签信息
    },
    // 略...
  },
})

// 略...

// 遍历所有包,通过 publishPackage 方法执行发包
async function publishPackages(version) {
  step('\nPublishing packages...')

  for (const pkg of packages) {
    await publishPackage(pkg, version)
  }
}

async function publishPackage(pkgName, version) {
  const packageName = JSON.parse(fs.readFileSync(path.resolve(getPkgRoot(pkgName), 'package.json')))

  let releaseTag = null
  if (args.tag) {
    releaseTag = args.tag
  } else if (version.includes('alpha')) {
    releaseTag = 'alpha'
  } else if (version.includes('beta')) {
    releaseTag = 'beta'
  } else if (version.includes('rc')) {
    releaseTag = 'rc'
  }

  try {
    await run(
      'vp',
      [
        'exec',
        'pnpm',
        'publish',
        ...(releaseTag ? ['--tag', releaseTag] : []),  // 设置发布标签
        '--access',
        'public',                                      // 设置包的访问权限为公开
      ],
      {
        cwd: getPkgRoot(pkgName),
        stdio: 'pipe',
      },
    )
    console.log(pico.green(`Successfully published ${packageName}@${version}`))
  } catch (e) {  // 出错时的处理
    if (e.message?.match(/previously published/)) {
      console.log(pico.red(`Skipping already published: ${packageName}@${version}`))  // 提示该包已发布过
    } else {
      throw e
    }
  }
}
其本质是通过执行 pnpm publish [--tag tagName] --access public 指令,将各包发布到 npm 仓库。
7.5 异常处理
当主流程出现异常时,需要及时打印错误信息并停止进程:
js
/** scripts/release.js **/

// 略...

main().catch(err => {
  console.error(err)
  process.exit(1)
})
但这里还存在一个问题 ------ 很可能我们已经通过 updateVersions 修改了所有包的版本号,例如将它们从原本的 3.6.0-beta.17 修改成了 3.6.0-beta.18,但因为发布流程失败,后续重新执行 release 任务时会再次增量更新版本号为 3.6.0-beta.19,导致发出去的版本号是错误的。
因此在主流程出错时,还需要把各包版本号更改回旧版本:
js
/** scripts/release.js **/

// 略...

let versionUpdated = false   // 记录版本号是否更新过
let currentVersion = createRequire(import.meta.url)('../package.json').version
const originalVersion = currentVersion

function updateVersions(version) {
  versionUpdated = true
  // 略...
}

main().catch(err => {
  if (versionUpdated) {
    // 若更新过版本号,需要将其重置
    updateVersions(originalVersion)
  }
  console.error(err)
  process.exit(1)
})
8. 小结
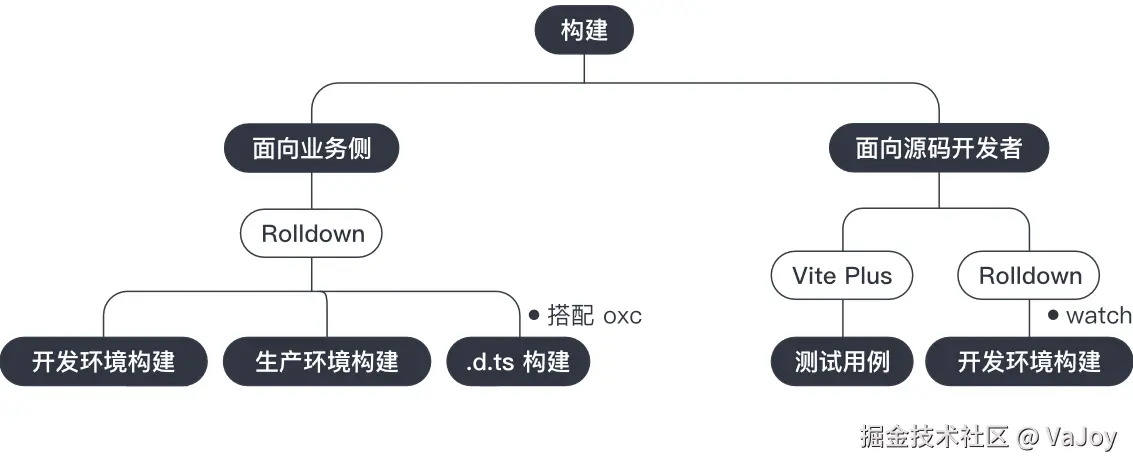
回顾本章的旅程,我们从最基础的 pnpm init 开始,逐步搭建起了 Vue 3.6 源码项目的工程化雏形。读者需要重点掌握如何使用 Vite Plus 与 Rolldown、区分面向「业务侧」和「源码开发者」的构建,后者的思维导图参考如下:
另外通过一系列的实践,可以提炼出 Vue 工程化设计中的几个核心哲学:
-
模块化与 Monorepo 治理 Vue 并没有将所有代码揉在一个巨大的单体中,而是通过 Monorepo 架构拆分为
shared、reactivity等职责单一的模块。配合 pnpm 的workspace协议和各包独立的buildOptions配置,实现了依赖的精准管理与构建的按需定制。 -
面向多场景的精细化构建 作为一个需要兼容 Node.js、浏览器、各种下游构建工具以及多种模块规范(CJS / ESM / IIFE)的底层框架,Vue 的构建方案堪称「戴着镣铐跳舞」。 通过 Rolldown 强大的定制能力与宏常量的 AST 级替换,Vue 能够用同一套源码,精准构建出面向不同环境、不同规范的产物。另外配合 Tree-shaking、依赖裁剪、关闭动态绑定等优化手段,有效压缩了构建产物的体积、提升了运行时性能。
-
卓越的开发者体验(DX) Vue 3.6 全面拥抱了 Vite Plus 与 Rolldown,让源码开发者具备更舒适的开发体验 ------ 通过 Vite Plus 统一了 Lint、格式化、Git 钩子与测试用例的管理,降低了源码贡献者的上手门槛。
另外得益于 Rolldown 模块图的能力,Vue 抛弃了以往需要 esbuild 辅助的妥协方案,实现了基于 Rust 的高性能
watch增量构建。 -
可靠的发布闭环 Vue 的发布流程是一个高度自动化的闭环 ------ 通过 CLI 交互式询问、语义化版本(semver)自动生成,以及异常回滚机制等环节,确保了每次版本迭代的可靠性,避免了人工操作可能带来的疏漏。