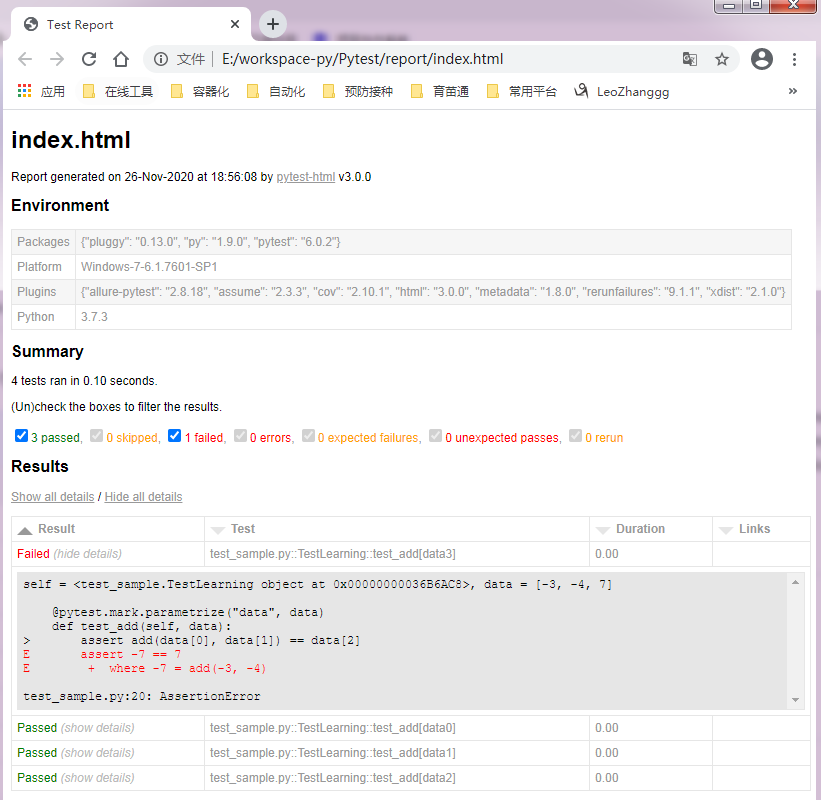
def test_add(self, data):
assert add(data[0], data[1]) == data[2]
E assert -7 == 7
E + where -7 = add(-3, -4)
test_sample.py:20: AssertionError
------------------------------------------------- generated html file: file://E:\workspace-py\Pytest\report\index.html --------------------------------------------------
======================================================================== short test summary info ========================================================================
FAILED test_sample.py::TestLearning::test_adddata3 - assert -7 == 7
====================================================================== 1 failed, 3 passed in 0.14s ======================================================================
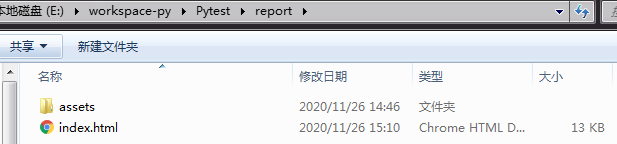
运行完,会生产一个html文件 和 css样式文件夹assets,用浏览器打开html即可查看清晰的测试结果。
 后面我将会更新更加清晰美观的测试报告插件:
[allure-python]( )
#### 2、[pytest-cov]( ):用于生成覆盖率报告
在做单元测试时,代码覆盖率常常被拿来作为衡量测试好坏的指标,甚至,用代码覆盖率来考核测试任务完成情况。
###### 安装:pip install -U pytest-cov
###### 运行:E:\workspace-py\Pytest>pytest --cov=.
========================================================================== test session starts ==========================================================================
platform win32 -- Python 3.7.3, pytest-6.0.2, py-1.9.0, pluggy-0.13.0
rootdir: E:\workspace-py\Pytest
plugins: allure-pytest-2.8.18, cov-2.10.1, html-3.0.0, rerunfailures-9.1.1, xdist-2.1.0
collected 4 items
test_sample.py ... 100%
----------- coverage: platform win32, python 3.7.3-final-0 -----------
Name Stmts Miss Cover
conftest.py 5 3 40%
test_sample.py 7 0 100%
TOTAL 12 3 75%
=========================================================================== 4 passed in 0.06s ===========================================================================
#### 3、[pytest-xdist]( ):实现多线程、多平台执行


通过将测试发送到多个CPU来加速运行,可以使用-n NUMCPUS指定具体CPU数量,或者使用-n auto自动识别CPU数量并全部使用。


###### 安装:
pip install -U pytest-xdist
###### 用例:test_sample.py
import pytest
import time
被测功能
def add(x, y):
time.sleep(3)
return x + y
测试类
class TestAdd:
def test_first(self):
assert add(3, 4) == 7
def test_second(self):
    assert add(-3, 4) == 1

def test_three(self):
    assert add(3, -4) == -1

def test_four(self):
    assert add(-3, -4) == 7


######  运行:
E:\workspace-py\Pytest>pytest test_sample.py
========================================================================== test session starts ==========================================================================
platform win32 -- Python 3.7.3, pytest-6.0.2, py-1.9.0, pluggy-0.13.0
rootdir: E:\workspace-py\Pytest
plugins: allure-pytest-2.8.18, cov-2.10.1, html-3.0.0, rerunfailures-9.1.1, xdist-2.1.0
collected 4 items
test_sample.py ... 100%
========================================================================== 4 passed in 12.05s ===========================================================================
E:\workspace-py\Pytest>pytest test_sample.py -n auto
========================================================================== test session starts ==========================================================================
platform win32 -- Python 3.7.3, pytest-6.0.2, py-1.9.0, pluggy-0.13.0
rootdir: E:\workspace-py\Pytest
plugins: allure-pytest-2.8.18, assume-2.3.3, cov-2.10.1, forked-1.3.0, html-3.0.0, rerunfailures-9.1.1, xdist-2.1.0
gw0 4 / gw1 4 / gw2 4 / gw3 4
... 100%
=========================================================================== 4 passed in 5.35s ===========================================================================
E:\workspace-py\Pytest>pytest test_sample.py -n 2
========================================================================== test session starts ==========================================================================
platform win32 -- Python 3.7.3, pytest-6.0.2, py-1.9.0, pluggy-0.13.0
rootdir: E:\workspace-py\Pytest
plugins: allure-pytest-2.8.18, assume-2.3.3, cov-2.10.1, forked-1.3.0, html-3.0.0, rerunfailures-9.1.1, xdist-2.1.0
gw0 4 / gw1 4
... 100%
=========================================================================== 4 passed in 7.65s ===========================================================================
上述分别进行了未开多并发、开启4个cpu、开启2个cpu,从运行耗时结果来看,很明显多并发可以大大缩减你的测试用例运行耗时。


4、pytest-rerunfailures:实现重新运行失败用例
  我们在测试时可能会出现一些间接性故障,比如接口测试遇到网络波动,web测试遇到个别插件刷新不及时等,这时重新运行则可以帮忙我们消除这些故障。


 安装:
 pip install -U pytest-rerunfailures
 运行:
E:\workspace-py\Pytest>pytest test_sample.py --reruns 3
========================================================================== test session starts ==========================================================================
platform win32 -- Python 3.7.3, pytest-6.0.2, py-1.9.0, pluggy-0.13.0
rootdir: E:\workspace-py\Pytest
plugins: allure-pytest-2.8.18, cov-2.10.1, html-3.0.0, rerunfailures-9.1.1, xdist-2.1.0
collected 4 items
test_sample.py ...R 100%R
100%\]R \[100%\]F \[100%
=============================================================================== FAILURES ================================================================================
___________________________________________________________________________ TestAdd.test_four ___________________________________________________________________________
self = <test_sample.TestAdd object at 0x00000000045FBF98>
def test_four(self):
assert add(-3, -4) == 7
E assert -7 == 7
E + where -7 = add(-3, -4)
test_sample.py:22: AssertionError
======================================================================== short test summary info ========================================================================
FAILED test_sample.py::TestAdd::test_four - assert -7 == 7
================================================================= 1 failed, 3 passed, 3 rerun in 0.20s ==================================================================
如果你想设定重试间隔,可以使用 --rerun-delay 参数指定延迟时长(单位秒);


如果你想重新运行指定错误,可以使用 --only-rerun 参数指定正则表达式匹配,并且可以使用多次来匹配多个。


pytest --reruns 5 --reruns-delay 1 --only-rerun AssertionError --only-rerun ValueError
 如果你只想标记单个测试失败时自动重新运行,可以添加 pytest.mark.flaky() 并指定重试次数以及延迟间隔。


@pytest.mark.flaky(reruns=5, reruns\_delay=2)
 def test\_example():
     import random
     assert random.choice([True, False])
 5、pytest-randomly:实现随机排序测试
 测试中的随机性非常越大越容易发现测试本身中隐藏的缺陷,并为你的系统提供更多的覆盖范围。


安装:
 pip install -U pytest-randomly
 运行:
E:\workspace-py\Pytest>pytest test_sample.py
========================================================================== test session starts ==========================================================================
platform win32 -- Python 3.7.3, pytest-6.0.2, py-1.9.0, pluggy-0.13.0
Using --randomly-seed=3687888105
rootdir: E:\workspace-py\Pytest
plugins: allure-pytest-2.8.18, cov-2.10.1, html-3.0.0, randomly-3.5.0, rerunfailures-9.1.1, xdist-2.1.0
collected 4 items
test_sample.py F... 100%
=============================================================================== FAILURES ================================================================================
___________________________________________________________________________ TestAdd.test_four ___________________________________________________________________________
self = <test_sample.TestAdd object at 0x000000000567AD68>
def test_four(self):
assert add(-3, -4) == 7
E assert -7 == 7
E + where -7 = add(-3, -4)
test_sample.py:22: AssertionError
======================================================================== short test summary info ========================================================================
FAILED test_sample.py::TestAdd::test_four - assert -7 == 7
====================================================================== 1 failed, 3 passed in 0.13s ======================================================================
E:\workspace-py\Pytest>pytest test_sample.py
========================================================================== test session starts ==========================================================================
platform win32 -- Python 3.7.3, pytest-6.0.2, py-1.9.0, pluggy-0.13.0
Using --randomly-seed=3064422675
rootdir: E:\workspace-py\Pytest
plugins: allure-pytest-2.8.18, assume-2.3.3, cov-2.10.1, forked-1.3.0, html-3.0.0, randomly-3.5.0, rerunfailures-9.1.1, xdist-2.1.0
collected 4 items
test_sample.py ...F 100%
=============================================================================== FAILURES ================================================================================
___________________________________________________________________________ TestAdd.test_four ___________________________________________________________________________
self = <test_sample.TestAdd object at 0x00000000145EA940>
def test_four(self):
assert add(-3, -4) == 7
E assert -7 == 7
E + where -7 = add(-3, -4)
test_sample.py:22: AssertionError
======================================================================== short test summary info ========================================================================
FAILED test_sample.py::TestAdd::test_four - assert -7 == 7
====================================================================== 1 failed, 3 passed in 0.12s ======================================================================
这功能默认情况下处于启用状态,但可以通过标志禁用(假如你并不需要这个模块,建议就不要安装)。
pytest -p no:randomly
如果你想指定随机顺序,可以通过 --randomly-send 参数来指定,也可以使用 last 值来指定沿用上次的运行顺序。
pytest --randomly-seed=4321
pytest --randomly-seed=last
#### 6、其他活跃的插件
还有一些其他功能性比较活跃的、一些专门为个别框架所定制的、以及为了兼容其他测试框架,这里暂不做演示,我就简单的做个列举:
>
> pytest-django:用于测试Django应用程序(Python Web框架)。
> pytest-flask:用于测试Flask应用程序(Python Web框架)。
> pytest-splinter:兼容Splinter Web自动化测试工具。
> pytest-selenium:兼容Selenium Web自动化测试工具。
> pytest-testinfra:测试由Salt,Ansible,Puppet, Chef等管理工具配置的服务器的实际状态。
> pytest-mock:提供一个mock固件,创建虚拟的对象来实现测试中个别依赖点。
> pytest-factoryboy:结合factoryboy工具用于生成各式各样的数据。
> pytest-qt:提供为PyQt5和PySide2应用程序编写测试。
> pytest-asyncio:用于使用pytest测试异步代码。
> pytest-bdd:实现了Gherkin语言的子集,以实现自动化项目需求测试并促进行为驱动的开发。
> pytest-watch:为pytest提供一套快捷CLI工具。
> pytest-testmon:可以自动选择并重新执行仅受最近更改影响的测试。
> pytest-assume:用于每个测试允许多次失败。
> pytest-ordering:用于测试用例的排序功能。
> pytest-sugar:可立即显示失败和错误并显示进度条。
> pytest-dev/pytest-repeat:可以重复(可指定次数)执行单个或多个测试。
>
>
>
【软件测试行业现状】2023年了你还敢学软件测试?未来已寄..测试人该何去何从?【自动化测试、测试开发、性能测试】
最后: 下方这份完整的软件测试视频教程已经整理上传完成,需要的朋友们可以自行领取 【保证100%免费】
###### 软件测试面试文档
我们学习必然是为了找到高薪的工作,下面这些面试题是来自阿里、腾讯、字节等一线互联网大厂最新的面试资料,并且有字节大佬给出了权威的解答,刷完这一套面试资料相信大家都能找到满意的工作。