从零手写 Mini Cursor 编程Agent:LangChain.js+DeepSeek全自动创建React TodoList
前言
用过Cursor、Claude Code的前端应该都深有体会: 一句自然语言,AI就能自动创建项目、读写文件、执行终端命令、写完完整业务代码,全程不用手动操作。
网上大多只讲Python版LangChain Agent,Node.js前端原生可运行的完整实战教程极少,很多人照着文档写还疯狂踩坑:
- 循环逻辑错乱,
response is not defined报错 - 多工具串行执行,任务卡顿严重
- 文件/命令工具缺少容错,一报错直接中断流程
workingDirectory和cd混用,目录找不到- 模块导入后缀不统一,报
ERR_MODULE_NOT_FOUND
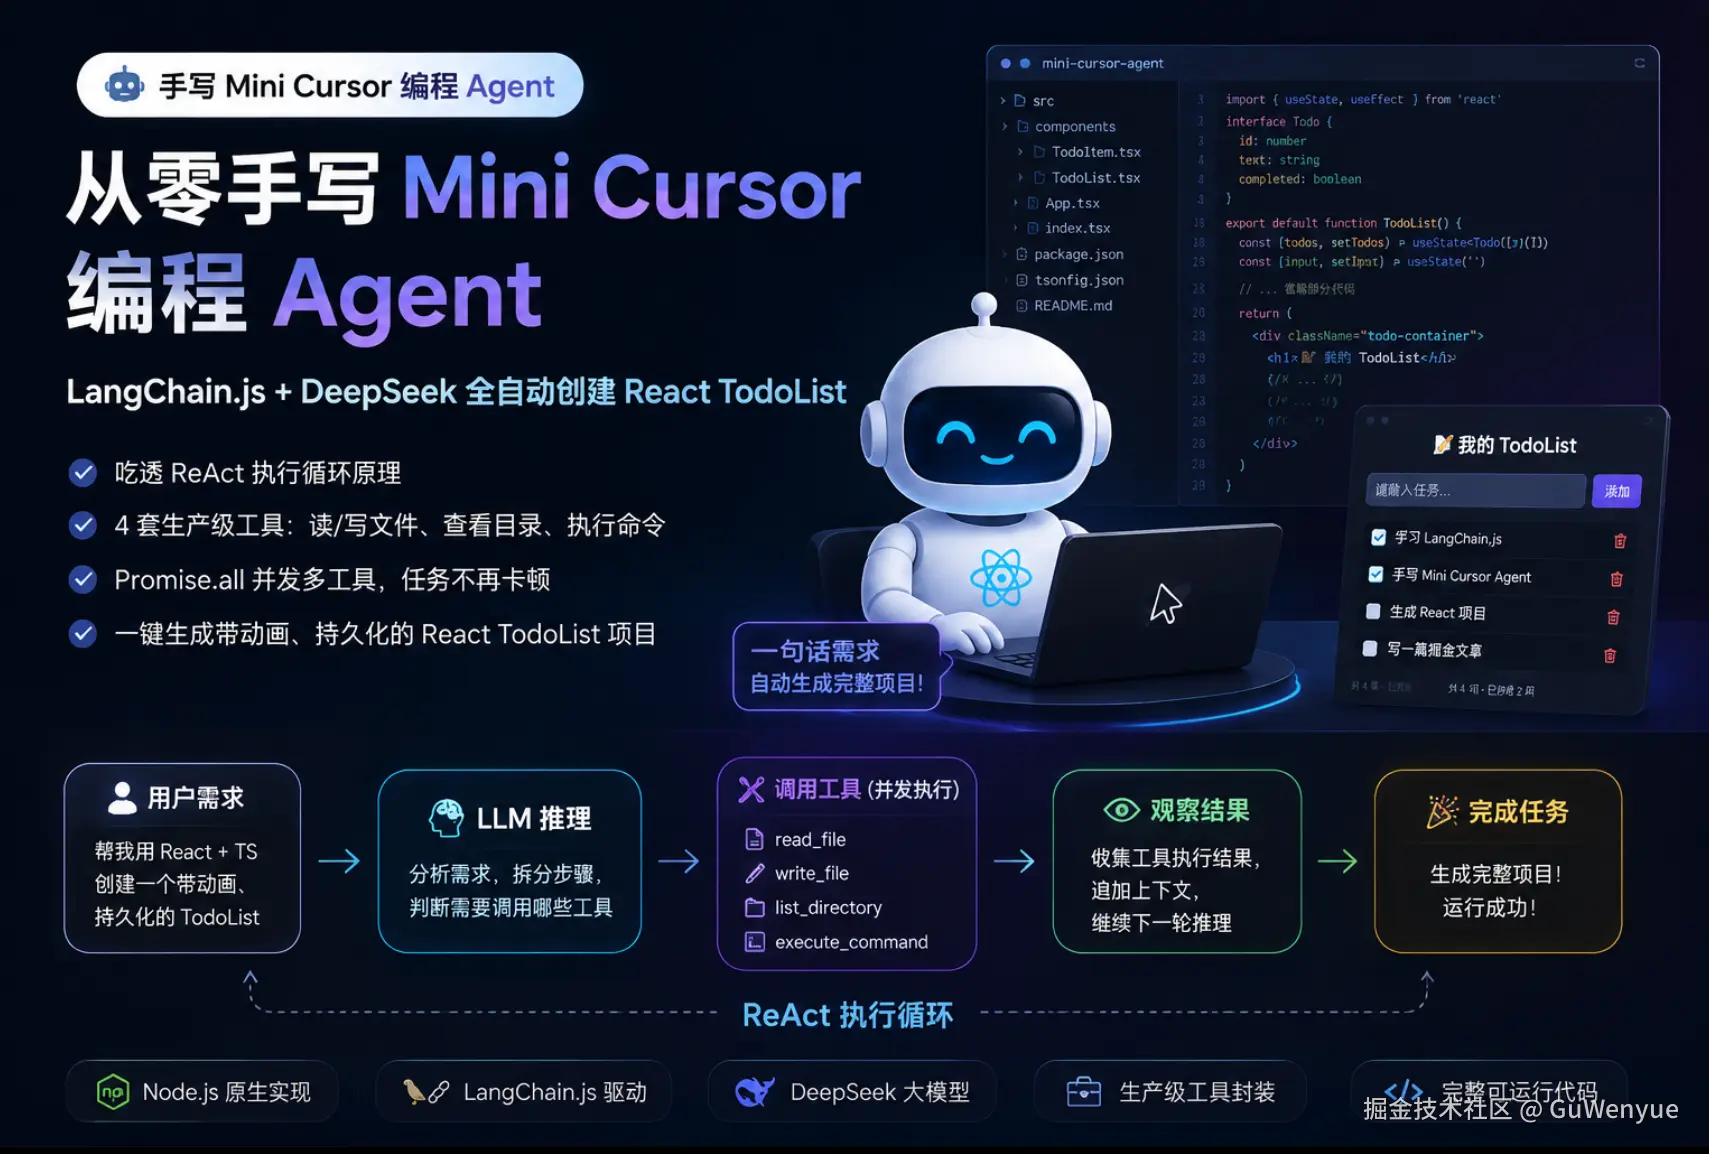 本文带你从零手写一套可直接运行的迷你Cursor编程Agent,读完你能收获:
- 吃透ReAct Agent完整执行循环底层原理
- 4套生产级工具:读/写文件、查看目录、执行终端命令
- Promise.all并发多工具,解决串行卡顿痛点
- 完整可运行Node.js代码,一键自动生成带动画、持久化的React+TS TodoList
- 全套踩坑解决方案、空值兜底、异常捕获、最大循环防死循环逻辑
一、先搞懂:纯大模型为什么做不了自动化编程?
原生LLM天生存在3个致命短板,只能输出文字,无法真正操作本地项目:
- 无状态:不会自动保存对话上下文,必须手动维护消息数组
- 无操作权限:不能读写本地文件、执行bash命令、查看目录结构
- 无自主规划能力:复杂任务不会拆分步骤,不会迭代校验结果
Agent核心公式
Agent = LLM + Memory记忆 + Tool工具调用 + ReAct循环 工具就是给大模型装上手脚,让AI拥有操作系统文件、执行终端的能力,自主完成完整开发流程。
ReAct完整执行流程(本文代码核心逻辑)
- 传入系统提示词+用户需求,组装消息列表
- LLM推理判断是否需要调用工具,返回
tool_calls数组 - 并发批量执行所有工具,捕获执行结果
- 工具结果绑定唯一
tool_call_id,追加进消息上下文 - 循环执行推理→调用工具,直到模型不再返回工具调用,输出最终结果
二、前置环境准备
1. 安装依赖
bash
pnpm install dotenv @langchain/openai @langchain/core chalk zod2. 环境变量 .env
env
DEEPSEEK_API_KEY=你的密钥DeepSeek接口完全兼容OpenAI格式,使用ChatOpenAI即可快速对接,无需额外适配。
3. 项目目录结构
bash
hello-langchain/
├── .env
├── src/
│   ├── all-tools.mjs      # 四大工具统一导出
│   └── mini-cursor.mjs    # Agent主执行逻辑
踩坑提醒:文件后缀统一使用
.mjsESM模块,混用.js会出现模块找不到报错。
三、工具层实现:all-tools.mjs 完整代码
封装4个编程必备工具,基于node:fs、child_process实现,自带异常兜底、路径自动创建。
javascript
import { tool } from '@langchain/core/tools';
import fs from 'node:fs/promises';
import path from 'node:path';
import { spawn } from 'node:child_process'
import { z } from 'zod';

// 1. 读取文件工具
const readFileTool = tool(
    async({ filePath }) => {
        const content = await fs.readFile(filePath, 'utf-8');
        console.log(`[工具调用] read_file(${filePath}) 成功读取 ${content.length} 字节`)
        return content;
    },
    {
        name: 'read_file',
        description: `读取本地文件内容,查看代码、分析配置时调用,支持相对/绝对路径`,
        schema: z.object({
            filePath: z.string().describe('待读取文件路径')
        })
    }
)

// 2. 写入文件工具,自动递归创建目录
const writeFileTool = tool(
  async({filePath,content}) => {
    try{
        const dir = path.dirname(filePath);
        await fs.mkdir(dir, { recursive: true });
        await fs.writeFile(filePath, content, 'utf-8');
        console.log(`[工具调用] write_file(${filePath}) 成功写入 ${content.length} 字节`)
        return `成功写入文件:${filePath}`
    }catch(err){
        console.log(`[工具调用] write_file(${filePath}) 错误:${err.message}`)
        return `写入文件失败:${err.message}`
    }
  },{
      name: 'write_file',
      description: '写入文件,自动创建不存在的上级目录',
      schema: z.object({
          filePath: z.string().describe('文件路径'),
          content: z.string().describe('文件文本内容')
      })
  }
)

// 3. 列出目录文件工具
const listDirectoryTool = tool(
  async({directoryPath}) => {
    try {
        const files = await fs.readdir(directoryPath);
        console.log(`[工具调用] list_directory(${directoryPath}) 列出${files.length}个文件`)
        return `目录内容:\n ${files.join('\n')}`
    } catch(err) {
        console.log(`[工具调用] list_directory(${directoryPath}) 错误:${err.message}`)
        return `读取目录失败:${err.message}`
    }
  },
  {
      name: 'list_directory',
      description: '查看指定目录下全部文件与文件夹',
      schema: z.object({
          directoryPath: z.string().describe('目标目录路径')
      })
  }
)

// 4. 执行终端命令工具(核心,封装spawn子进程)
const executeCommandTool = tool(
    async ({ command, workingDirectory }) => {
        const cwd = workingDirectory || process.cwd();
        console.log(`[工具调用] execute_command(${command}) 工作目录:${cwd}`);
        return new Promise((resolve, reject) => {
            // 拆分命令与参数
            const [cmd, ...args] = command.split(' ');
            const child = spawn(cmd, args, {
                cwd,
                stdio: 'inherit',
                shell: true,
            })
            let errorMsg = '';
            child.on('error', (err) => {
                errorMsg = err.message
            });
            child.on('close', (code) => {
                if (code === 0) {
                   // 三元兜底空字符串,防止undefined
                   const cwdInfo = workingDirectory?
                   `\n\n重要提示:命令在目录"${workingDirectory}" 执行`
                   : '';
                   resolve(`命令行成功执行 ${command}${cwdInfo}`);
                } else {
                    resolve(`命令执行失败,退出码:${code}\n 错误:${errorMsg}`)
                }
            })
        })

    },
    {
        name: 'execute_command',
        description: '执行系统bash命令,支持指定工作目录,禁止在command内使用cd',
        schema: z.object({
            command: z.string().describe('待执行命令字符串'),
            workingDirectory: z.string().describe('指定命令运行目录')
        })
    }
)

// 统一导出工具
export {
    readFileTool,
    writeFileTool,
    listDirectoryTool,
    executeCommandTool
}
关键细节说明
- 三元兜底空值写法
const cwdInfo = workingDirectory ? 提示文本 : ''行业叫法:默认值兜底、空保护 ,强制变量永远为字符串,避免undefined导致拼接报错。 - spawn拆分命令 通过解构
[cmd,...args]拆分指令与参数,适配任意多参数命令。 - 执行目录规范
workingDirectory会自动切换工作目录,命令内禁止写cd xxx,否则会路径找不到。
四、主程序mini-cursor.mjs:ReAct循环Agent完整实现
完整可运行代码
javascript
// 手写mini-cursor编程Agent,自动生成React TodoList
import 'dotenv/config';
import { ChatOpenAI } from '@langchain/openai';
import {
    HumanMessage,
    SystemMessage,
    ToolMessage
} from '@langchain/core/messages';
import {
    executeCommandTool,
    readFileTool,
    writeFileTool,
    listDirectoryTool
} from './all-tools.mjs';
import chalk from 'chalk';

// 初始化DeepSeek模型
const model = new ChatOpenAI({
  modelName:'deepseek-v4-pro',
  apiKey: process.env.DEEPSEEK_API_KEY,
  temperature: 0, // 关闭随机性,工具调用稳定
  configuration: {
    baseURL: 'https://api.deepseek.com/v1',
  },
});

// 注册全部工具
const tools = [
    readFileTool,
    writeFileTool,
    listDirectoryTool,
    executeCommandTool
]
const modelWithTools = model.bindTools(tools);

// Agent执行任务需求
const case1 = `
创建一个功能丰富的React TodoList 应用:
1. 创建项目 :
echo -e "n\nn" | pnpm create vite react-todo-app --template react-ts
2. 修改 src/App.tsx ,实现完整功能的TodoList:
- 添加、删除、标记完成
- 分类筛选(全部/进行中/已完成)
- 统计信息显示
- localStorage 数据持久化
3. 添加复杂样式
- 渐变背景(蓝到紫)
- 卡片阴影,圆角
- 悬停效果
4. 添加动画:
- 添加/删除时的过渡动画
- 使用css transitions
5. 列出目录确定项目结构
注意: 使用pnpm, 功能要完整, 样式要美观, 要有动画效果
之后 react-todo-app 项目中:
1. 使用 pnpm install 安装依赖
2. 使用 pnpm run dev 启动服务器
`

// Agent核心执行函数,带最大迭代次数防死循环
async function runAgentWithTools(query, maxIterations=30) {
    // 初始化消息上下文,仅创建一次,不重复覆盖
    const messages = [
        new SystemMessage(`你是专业前端项目管理助手,使用工具完成开发任务。
        当前工作目录: ${process.cwd()}
        可用工具:
        1. read_file: 读取文件
        2. write_file: 写入/创建文件
        3. execute_command: 执行终端命令(支持workingDirectory)
        4. list_directory: 查看目录结构
        强制规则 execute_command:
            workingDirectory 参数会自动切换目录,命令内绝对不能写cd
            错误示例:{ command: "cd react-todo-app && pnpm install", workingDirectory: "react-todo-app" }
            正确示例:{ command: "pnpm install", workingDirectory: "react-todo-app" }
            回复简洁,仅描述执行操作
        `),
        new HumanMessage(query)
    ];

    // ReAct循环主逻辑
    for(let i = 0; i < maxIterations; i++){
        console.log(chalk.blue(`\n===== 第${i+1}轮LLM推理 =====`));
        // 关键:调用模型获取response,修复response未定义报错
        const response = await modelWithTools.invoke(messages);
        messages.push(response);

        // 无工具调用,任务结束
        if (!response.tool_calls || response.tool_calls.length === 0) {
            console.log(chalk.green(`\n✅ AI 任务完成,最终回复:\n ${response.content}\n`));
            return response.content
        }

        console.log(chalk.yellow(`检测到${response.tool_calls.length}个工具调用,串行执行`));
        // 批量执行工具,可替换Promise.all实现并发提速
        for (const toolCall of response.tool_calls) {
            const foundTool = tools.find(t => t.name === toolCall.name);
            if (foundTool) {
                const toolResult = await foundTool.invoke(toolCall.args)
                messages.push(new ToolMessage({
                    content: toolResult,
                    tool_call_id: toolCall.id
                }))
            }
        }
    }
    // 达到最大循环次数强制退出
    return messages[messages.length - 1].content
}

// 程序入口
try {
    await runAgentWithTools(case1);
} catch (err) {
    console.error(chalk.red(`\n ❌ 运行错误:${err.message}`));
}

// 超时兜底,1000000毫秒强制退出进程
setTimeout(() => {
  console.log("⏰ 超时兜底强制退出进程");
  process.exit(0);
}, 1000000);
之前踩坑核心修复点
- response is not defined报错根源 最初代码循环内部没有调用
modelWithTools.invoke获取response,直接使用变量,修复后每轮循环先请求大模型拿到返回对象。 - 上下文丢失问题 删除循环内重复定义
messages数组,仅外层初始化一次,完整保存多轮工具交互历史。 - 死循环防护 增加
maxIterations=30最大循环限制,防止模型无限调用工具卡死程序。 - 彩色日志区分状态 引入chalk区分推理、成功、错误日志,调试更直观。
五、性能优化:Promise.all并发多工具
串行VS并行性能差距
模拟两个IO工具耗时对比:
javascript
// 模拟耗时工具
function getFileA() {
    return new Promise((resolve) => setTimeout(()=>resolve("文件A内容"),2000))
}
function getFileB() {
    return new Promise((resolve) => setTimeout(()=>resolve("文件B内容"),500))
}

// 串行:总耗时2000+500=2500ms
const runSerial = async ()=>{
    const a = await getFileA();
    const b = await getFileB();
}
// 并行:总耗时Max(2000,500)=2000ms
const runParallel = async ()=>{
    const [a,b] = await Promise.all([getFileA(),getFileB()]);
}
改造工具执行逻辑,实现并发
把循环串行执行替换为Promise.all批量并发,工具越多性能提升越明显:
javascript
// 替换原for循环工具执行代码
console.log(chalk.yellow(`检测到${response.tool_calls.length}个工具调用,并发执行`));
const toolResults = await Promise.all(
    response.tool_calls.map(async (toolCall) => {
        const foundTool = tools.find(t => t.name === toolCall.name);
        if (!foundTool) return `工具不存在:${toolCall.name}`;
        try {
            return await foundTool.invoke(toolCall.args);
        } catch (err) {
            return `工具执行异常:${err.message}`;
        }
    })
);
// 绑定对应tool_call_id存入消息列表
response.tool_calls.forEach((toolCall, idx) => {
    messages.push(new ToolMessage({
        content: toolResults[idx],
        tool_call_id: toolCall.id
    }))
});
并发核心优势
- 独立无依赖工具同时启动,总耗时等于最慢工具耗时
- 单个工具报错单独捕获,不会中断整批任务
- 结果数组顺序与
tool_calls一一对应,完美匹配tool_call_id
六、开发全流程高频踩坑提醒
坑1:ERR_MODULE_NOT_FOUND 文件找不到
- 导入路径后缀必须完整写
.mjs,ESM不支持省略后缀 - 文件名大小写严格匹配,Windows ESM导入区分大小写
- 确认
all-tools.mjs文件真实存在,导出名称和导入完全一致
坑2:workingDirectory与cd混用,目录不存在
错误写法:
javascript
command: "cd react-todo-app && pnpm install", workingDirectory: "react-todo-app"正确写法:
javascript
command: "pnpm install", workingDirectory: "react-todo-app"子进程会自动切换到指定目录,无需手动cd。
坑3:缺少tool_call_id绑定,LLM上下文错乱
所有工具返回结果必须通过ToolMessage绑定tool_call_id,否则模型无法区分哪条结果对应哪个工具调用,逻辑完全混乱。
坑4:串行调用多工具,响应速度极慢
文件读取、命令执行都是IO密集操作,无依赖工具必须使用Promise.all并发;仅工具存在数据依赖时才串行执行。
坑5:未做空值兜底,变量出现undefined
所有可选变量使用三元?: ''、空值合并??兜底字符串,避免后续字符串拼接、打印时报错。
坑6:无限循环调用工具
必须设置最大迭代次数上限,防止模型幻觉持续调用工具,程序卡死。
七、完整执行效果
运行命令:
bash
node src/mini-cursor.mjsAgent全自动完成6大步骤,全程无需人工干预:
- 调用
execute_command执行pnpm create vite,创建React+TS项目 - 调用
list_directory校验项目目录生成成功 - 调用
writeFileTool重写App.tsx,实现Todo完整业务、样式、动画 - 调用
readFileTool读取生成代码,校验功能完整性 - 切换目录执行
pnpm install安装项目依赖 - 执行
pnpm run dev启动开发服务器,输出最终完成总结
八、拓展升级方向
- 接入LangGraph:拆分规划Agent、执行Agent,实现多智能体分工
- 增加超时控制 :使用
Promise.allSettled替代all,单独处理超时卡死工具 - 新增更多工具:git操作、npm包查询、代码格式化工具
- 记忆持久化:接入Memory模块,支持多轮连续开发对话
- MCP第三方工具:接入联网搜索、文档解析能力,拓展AI能力边界
九、总结
本文从零手写了一套迷你Cursor编程Agent,完整覆盖LangChain.js工具调用、ReAct循环、Node子进程、文件IO、并发优化核心知识点。 核心要点回顾:
- Agent本质是「大模型推理+工具执行循环」,工具是AI操作本地环境的核心
- Promise.all并发多工具是解决Agent卡顿的关键优化手段
- 生产级Agent必须包含:参数校验、异常捕获、空值兜底、循环次数限制
workingDirectory是命令行工具规范,禁止在命令内拼接cd切换目录