天气预报总结
文章目录
前言
我们的APP不可能永远使用本地数据,网络请求作为大多数APP的硬性要求,需要在软件里实现API调用,JSON数据解析,在我们的天气预报里,我们要实现城市搜索和数据的刷新,所以这次仿写主要考察的就是UI的排版和网络请求,设计模式主要为MVC
异步处理
iOS 应用的所有 UI 更新(刷新 TableView、响应点击、滚动列表)都发生在主线程上。而网络请求可能耗时数秒,应用无法响应用户操作,系统会判定应用"无响应"并弹出"卡死"提示,用户体验极差
异步处理的作用:将耗时任务(网络请求、文件读写、大量计算)放到后台线程执行,主线程继续处理 UI 事件。等任务完成后,再将结果传递回主线程更新 UI
objc
dispatch_async(dispatch_get_main_queue(), ^{
          self.cityArray = array;
          self.collection.hidden = NO;
          self.tableView.hidden = YES;
          [self.collection reloadData];
      });
首页
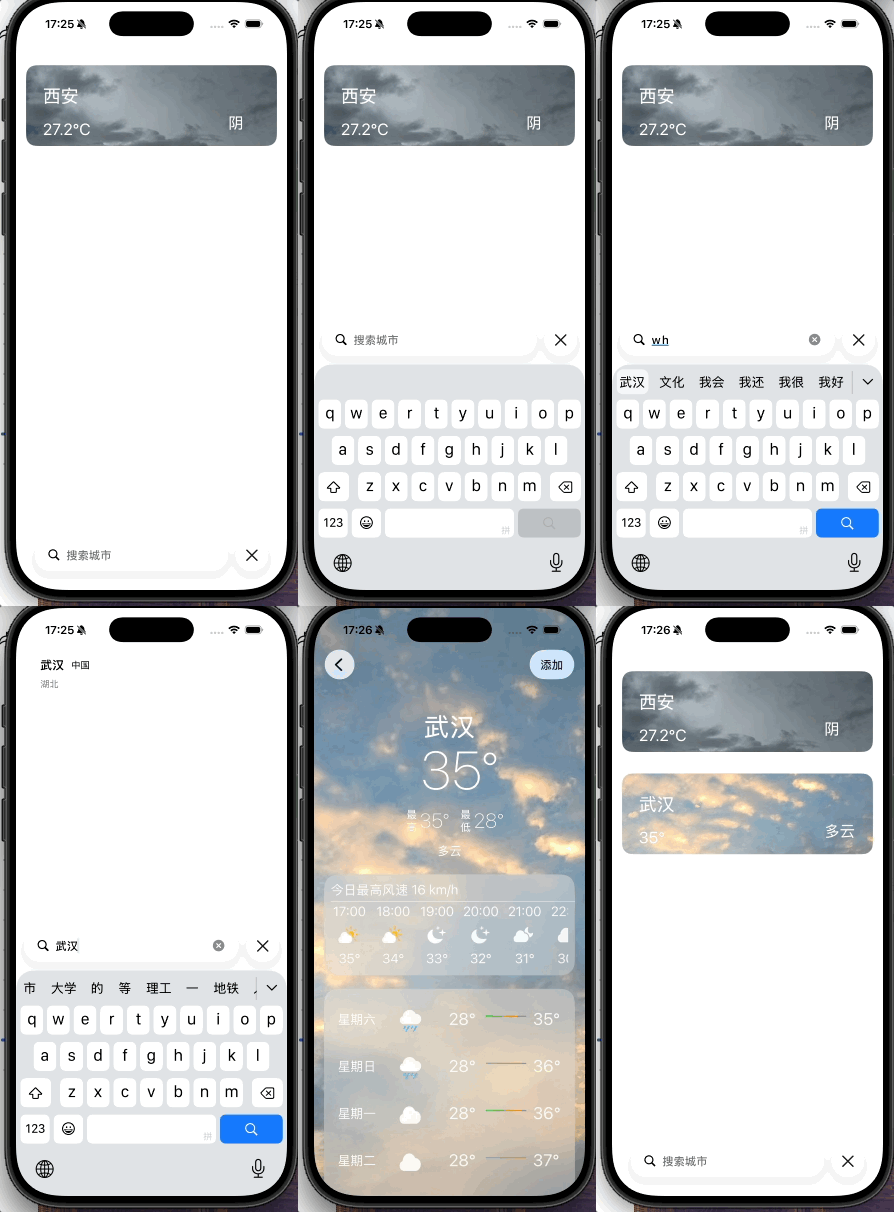
首页需要展示的是已添加城市的天气卡片和搜索框,并支持添加城市到首页,对于卡片和搜索列表我们使用cell就行,里面把我们需要的城市温度等等数据放进去,想要一个城市的数据,就得通过相关的信息查询,城市名称不适合我们精准查找但适合模糊搜索,所以我们的搜索功能就是先通过searchController里的文字查询(使用专门的查询api)得到经纬度(最精准),再请求详细数据,
objc
- (void) requestSearch:(NSString *) city {
    NSString *cityEncode = [city stringByAddingPercentEncodingWithAllowedCharacters:[NSCharacterSet URLQueryAllowedCharacterSet]];

    NSString *urlString = [NSString stringWithFormat:@"https://geocoding-api.open-meteo.com/v1/search?name=%@&count=10&language=zh&format=json", cityEncode];
    NSURL *url = [NSURL URLWithString:urlString];
    NSURLSessionDataTask *task = [[NSURLSession sharedSession] dataTaskWithURL:url completionHandler:^(NSData *data, NSURLResponse *response, NSError *error) {
        if (error) {
            NSLog(@"%@", error);
            return;
        }
        NSDictionary *dict = [NSJSONSerialization JSONObjectWithData:data options:0 error:nil];
        NSArray *results = dict[@"results"];
        NSMutableArray *array = [NSMutableArray array];
        for (NSDictionary *item in results) {
            cityModel *model = [[cityModel alloc] init];
            model.cityname = item[@"name"];
            model.latitude = item[@"latitude"];
            model.longitude = item[@"longitude"];
            model.country = item[@"country"];
            model.admin1 = item[@"admin1"];
            [array addObject:model];
        }
        dispatch_async(dispatch_get_main_queue(), ^{
            self.cityArray = array;
            self.collection.hidden = NO;
            self.tableView.hidden = YES;
            [self.collection reloadData];
        });
    }];
    [task resume];
}
搜索要注意的就是cell是搜索框输入时自己会刷新展示出来,而在我们决定添加某个城市时要自动清除输入框里的文字,不然cell还是会根据框内文字刷新遮盖视图
而对于我们的天气卡片,就要使用搜索获得的经纬度查询
objc
- (void) requestWeather : (cityModel *)city{
NSString *urlString = [NSString stringWithFormat:
@"https://api.open-meteo.com/v1/forecast?latitude=%@&longitude=%@¤t=temperature_2m,weather_code&hourly=temperature_2m,weather_code&daily=weather_code,temperature_2m_max,temperature_2m_min&timezone=auto", city.latitude, city.longitude];
NSURL *url = [NSURL URLWithString:urlString];
NSURLSessionDataTask *task = [[NSURLSession sharedSession] dataTaskWithURL:url completionHandler:^(NSData *data, NSURLResponse *response, NSError *error) {
if (error) {
NSLog(@"%@", error);
return;
}
NSDictionary *dict = [NSJSONSerialization JSONObjectWithData:data options:0 error:nil];
WeatherModel *model = [[WeatherModel alloc] init];
NSDictionary *current = dict[@"current"];
model.city = city.cityname;
model.tem = [NSString stringWithFormat:@"%@℃", dict[@"current"][@"temperature_2m"]];
NSNumber *code = current[@"weather_code"];
NSInteger weatherCode = [code integerValue];
if (weatherCode == 0) {
model.weather = @"晴";
} else if (weatherCode == 1 || weatherCode == 2) {
model.weather = @"多云";
} else if (weatherCode == 3) {
model.weather = @"阴";
} else if ((weatherCode >= 45 && weatherCode <= 48)) {
model.weather = @"阴";
} else if ((weatherCode >= 51 && weatherCode <= 67) || (weatherCode >= 80 && weatherCode <= 82) || (weatherCode >= 95 && weatherCode <= 99)) {
model.weather = @"雨";
} else if ((weatherCode >= 71 && weatherCode <= 77) || weatherCode == 85 || weatherCode == 86) {
model.weather = @"雪";
} else {
model.weather = @"阴";
}
model.time = [NSString stringWithFormat:@"%@", current[@"time"]];
dispatch_async(dispatch_get_main_queue(), ^{
BOOL exist = NO;
for (WeatherModel *m in self.weatherArray) {
if ([m.latitude isEqualToNumber:model.latitude] && [m.longitude isEqualToNumber:model.longitude]) {
exist = YES;
break;
}
}
if (!exist) {
[self.weatherArray addObject:model];
}
self.cityArray = @[];
self.searchController.searchBar.text = @"";
self.searchController.active = NO;
[self.tableView reloadData];
});
}];
[task resume];
}在我们得到weather_code要挂定天气范围方便展示,同时也可以根据文字决定背景图,在主线程回调时还要进行是否有重复城市添加的检查,再清空输入框里的文字
在首页的cell排版时我们看我能会遇到中间没有间隔的问题,给header一个空白View就行了
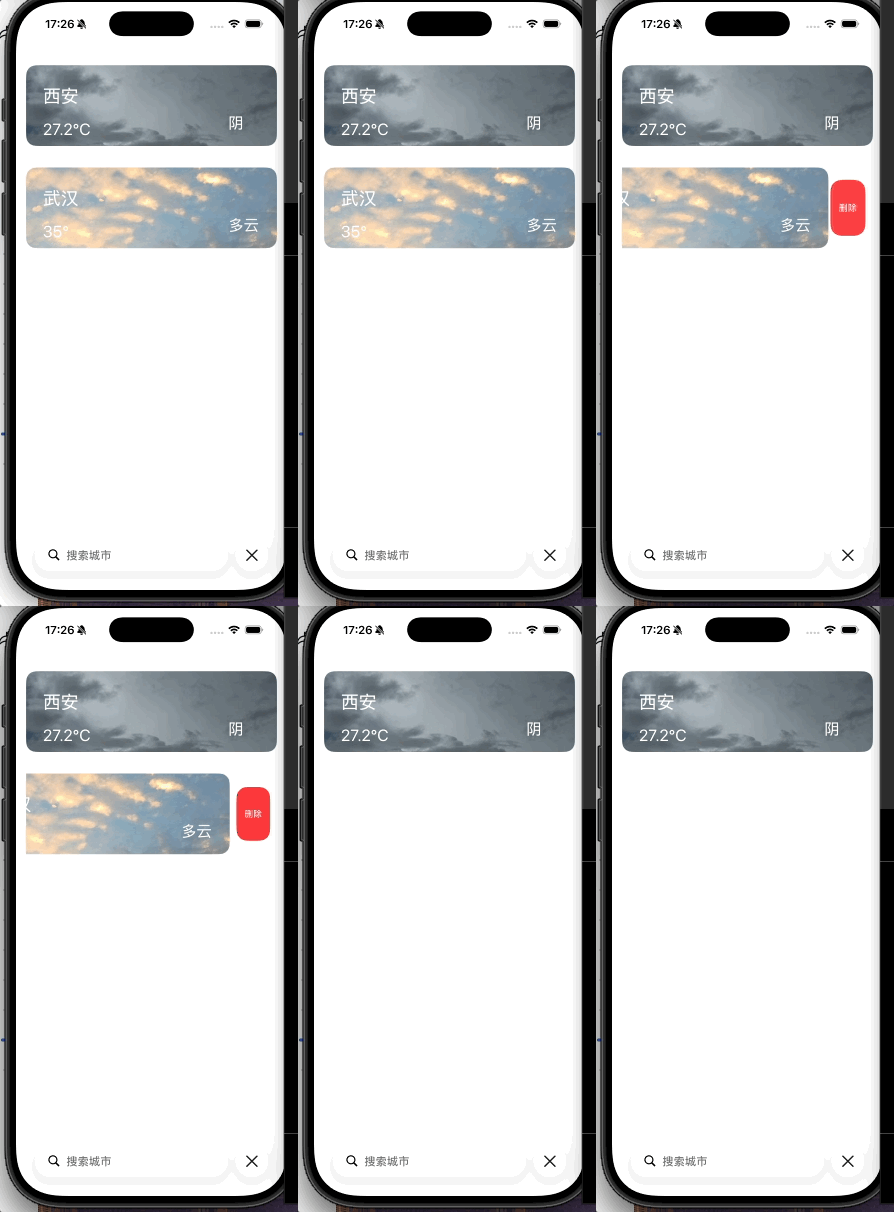
天气卡片还要实现左滑删除的功能
objc
- (UISwipeActionsConfiguration *)tableView:(UITableView *)tableView trailingSwipeActionsConfigurationForRowAtIndexPath:(NSIndexPath *)indexPath {
    UIContextualAction *deleteAction = [UIContextualAction contextualActionWithStyle:UIContextualActionStyleDestructive title:@"删除" handler:^(UIContextualAction *action, UIView *sourceView, void (^completionHandler)(BOOL)) {
        [self.weatherArray removeObjectAtIndex:indexPath.section];
        NSIndexSet *sections = [NSIndexSet indexSetWithIndex:indexPath.section];
        [tableView deleteSections:sections withRowAnimation:UITableViewRowAnimationAutomatic];
        completionHandler(YES);
    }];
    UISwipeActionsConfiguration *configuration = [UISwipeActionsConfiguration configurationWithActions:@[deleteAction]];
    configuration.performsFirstActionWithFullSwipe = NO;
    return configuration;
}
这样左滑会出现一个按钮,继续左滑可以直接删除
详情页面
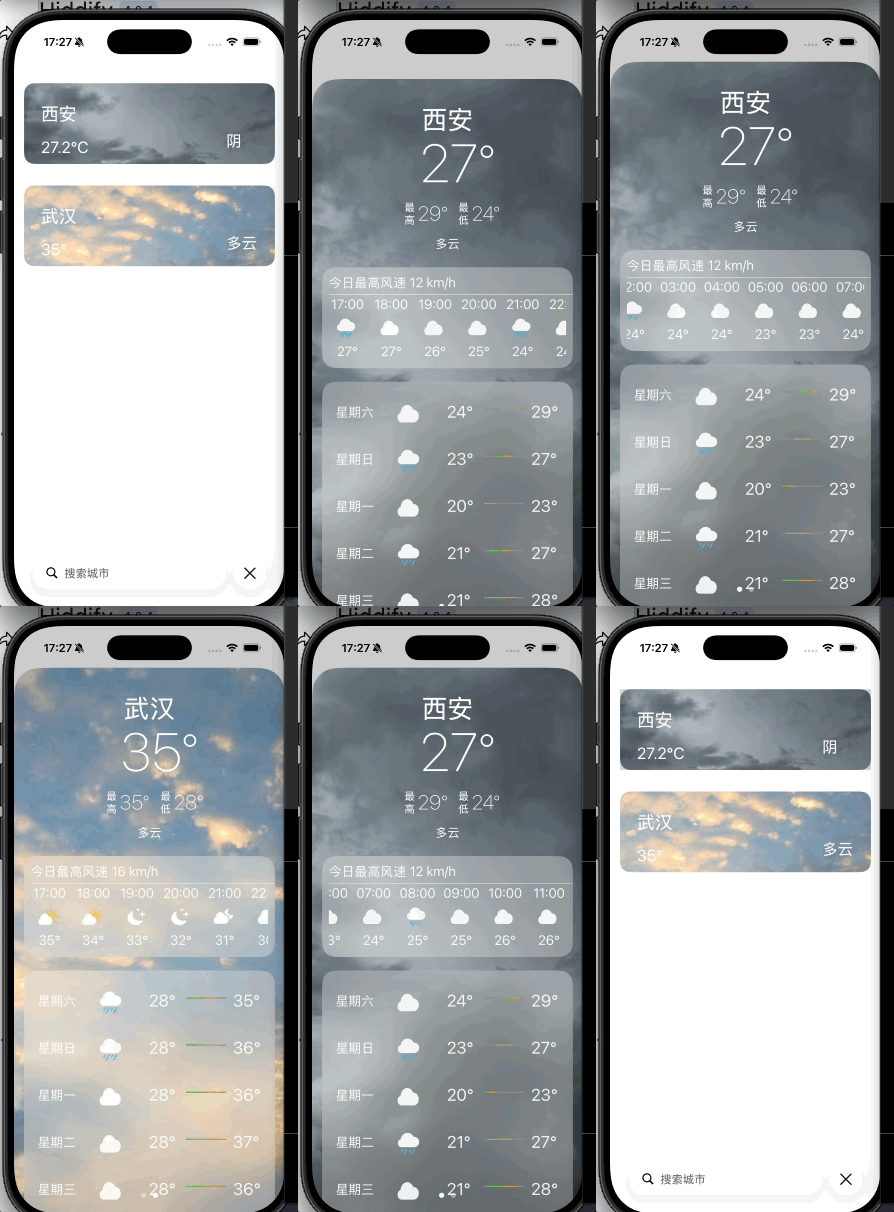
我们点进一个卡片或者搜索就会展示详情页面,我们在首页使用present,搜索页面使用push,首页使用present是因为我们需要在几个城市的详情页面里实现滑动切换的功能,另外使用pageController实现底部小白点的展示
objc
UIPageViewController *pageVC = [[UIPageViewController alloc]
    initWithTransitionStyle:UIPageViewControllerTransitionStyleScroll
    navigationOrientation:UIPageViewControllerNavigationOrientationHorizontal
    options:nil];
pageVC.dataSource = self;
pageVC.delegate = self;
[self addChildViewController:pageVC];
[self.view addSubview:pageVC.view];
pageVC.view.frame = self.view.bounds;
[pageVC didMoveToParentViewController:self];
self.pageController = pageVC;
objc
self.pageControl = [[UIPageControl alloc] init];
self.pageControl.numberOfPages = self.pages.count;
self.pageControl.currentPage = self.currentIndex;
self.pageControl.pageIndicatorTintColor = [[UIColor whiteColor] colorWithAlphaComponent:0.4];
self.pageControl.currentPageIndicatorTintColor = UIColor.whiteColor;
[self.view addSubview:self.pageControl];
[self.pageControl mas_makeConstraints:^(MASConstraintMaker *make) {
    make.centerX.equalTo(self.view);
    make.bottom.equalTo(self.view.mas_bottom).offset(-15);
}];
在点击任意卡片的时候一定要保证索引被正确传递,否则只能进去pages里的第一个界面不符合要求
objc
- (void)tableView:(UITableView *)tableView didSelectRowAtIndexPath:(NSIndexPath *)indexPath {
    pageViewController *vc = [[pageViewController alloc] init];
    vc.weatherArray = self.weatherArray;
    vc.currentIndex = indexPath.section;
    [self presentViewController:vc animated:YES completion:nil];
}
那么我们从首页给pageView传值后还不够,还要pageView给我们的详情页传经纬度方便详情页刷新各种数据,这里要注意的是我们不需要从首页传所有的数据,其他数据可以在页面进去后再请求,这样可以减少不跟手的情况增加流畅度
objc
for (WeatherModel *model in self.weatherArray) {
        cardViewController *vc = [[cardViewController alloc] init];
        vc.city = model.city;
        vc.latitude = model.latitude;
        vc.longitude = model.longitude;
        [self.pages addObject:vc];
    }
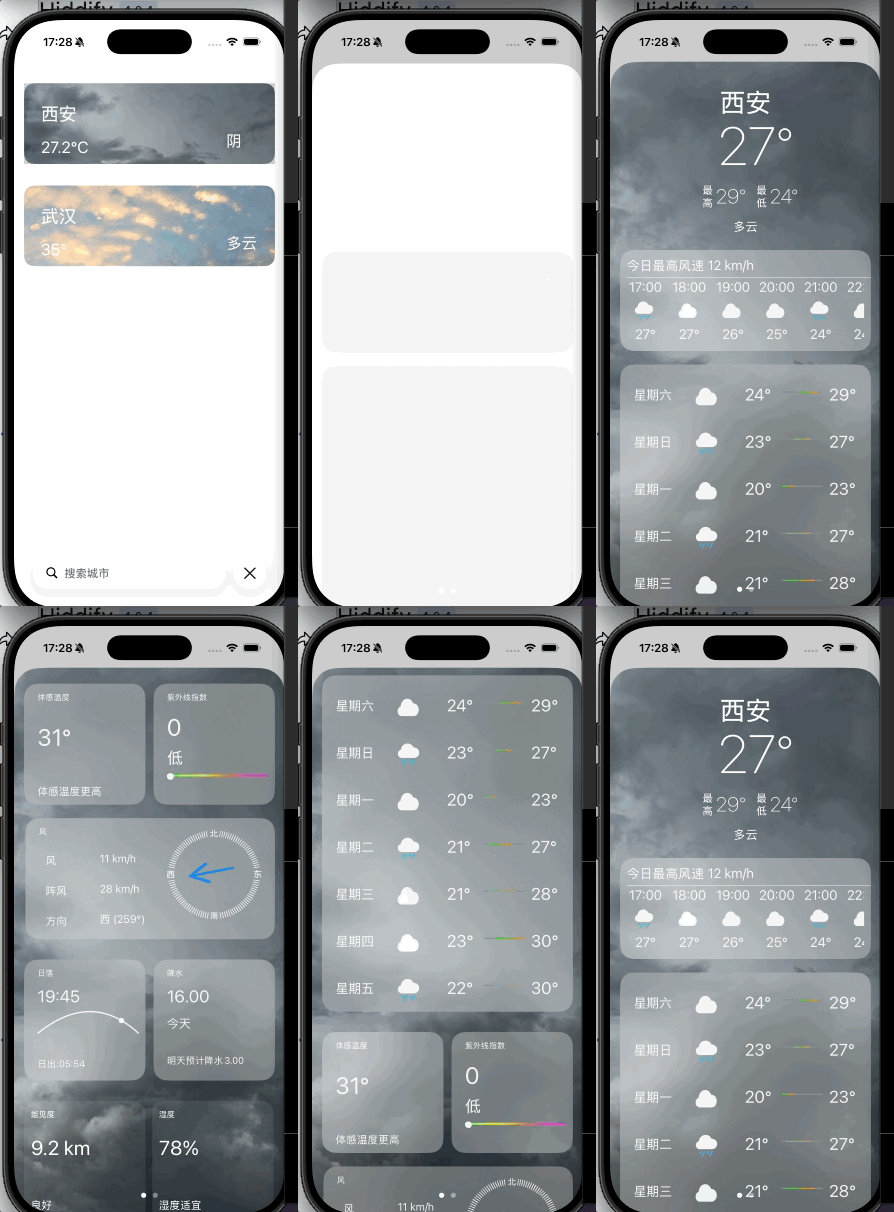
那么现在我们就到了详情页的内部,这里我们要实现苹果天气预报一样的视觉效果,就要使用iOS的毛玻璃
objc
- (UIVisualEffectView *)createBlurView {
    UIBlurEffect *effect = [UIBlurEffect effectWithStyle:UIBlurEffectStyleSystemUltraThinMaterialLight];
    UIVisualEffectView *blurView = [[UIVisualEffectView alloc] initWithEffect:effect];
    blurView.alpha = 0.9;
    return blurView;
}UIBlurEffect:模糊效果的核心
它是一个视觉效果描述对象,定义了模糊的样式(如 SystemUltraThinMaterialLight),但不直接渲染。
系统会基于其背后内容的颜色、亮度等信息,实时计算并生成动态模糊效果
UIVisualEffectView:承载模糊效果的容器
它有两个关键的层:
UIVisualEffectView 自身负责渲染模糊背景。
contentView是它的子视图容器,所有需要显示在毛玻璃之上的 UI 控件(文字、图片等)都应添加到 contentView 中,以确保它们显示在模糊层上方。
当 blurView 覆盖在其他视图上时,背后的内容会被实时模糊处理。
UIBlurEffectStyleSystemUltraThinMaterialLight
这是 iOS 13+ 引入的材质化样式,会根据系统深色/浅色模式自动适配:
浅色模式:呈现浅色半透明毛玻璃
深色模式:呈现深色半透明毛玻璃
| 样式 | 效果 |
|---|---|
UIBlurEffectStyleExtraLight |
极浅色模糊 |
UIBlurEffectStyleLight |
浅色模糊 |
UIBlurEffectStyleDark |
深色模糊 |
UIBlurEffectStyleRegular |
常规材质(适配深/浅色模式) |
UIBlurEffectStyleProminent |
突出材质 |
将内容添加到contentView上就可以实现毛玻璃效果了
我们的这些数据部分里几个需要单独拿出来讲
- 渐变视图
objc
self.gradientLayer = [CAGradientLayer layer];
self.gradientLayer.colors = @[
    (__bridge id)[UIColor systemGreenColor].CGColor,
    (__bridge id)[UIColor systemOrangeColor].CGColor
];
self.gradientLayer.startPoint = CGPointMake(0, 0.5);
self.gradientLayer.endPoint = CGPointMake(1, 0.5);
self.gradientLayer.cornerRadius = 1;
[self.temLine.layer addSublayer:self.gradientLayer];
CAGradientLayer 是 专门用于绘制颜色渐变的图层类。它是 CALayer 的子类
colors 渐变的颜色数组,定义渐变中使用的颜色序列,至少需要两个颜色
locations颜色分布的位置,第一个颜色必须是0.0,最后一个必须为1.0
startPoint 和 endPoint 渐变的方向与范围,水平渐变:(0, 0.5) → (1, 0.5),垂直渐变:(0.5, 0)→ (0.5, 1),对角线渐变:(0, 0)→ (1, 1)
在比较最近一周高低温的时候会用到,再通过数学计算实现渐变条的长短变化,就可以有和苹果差不多的效果
- 旋转视图
objc
self.img2.transform = CGAffineTransformMakeRotation(direction * M_PI / 180.0);CGAffineTransform 是 Core Graphics 框架中用于仿射变换的结构体,所有变换都相对于视图的 center 或 anchorPoint进行
这里我也只会用它来实现旋转,其他的并未了解,括号里的就是我们旋转的弧度
这样可以实现风向的可视化,通过箭头的转向实现
- 曲线
使用 UIBezierPath 绘制路径
objc
UIBezierPath *path = [UIBezierPath bezierPath];
[path moveToPoint:CGPointMake(10, 110)];
[path addQuadCurveToPoint:CGPointMake(160, 110) controlPoint:CGPointMake(90, 45)];
以 (160, 110) 为终点,(90, 45) 为控制点
将路径渲染到屏幕
objc
self.sunLayer = [CAShapeLayer layer];
self.sunLayer.path = path.CGPath;
self.sunLayer.strokeColor = [UIColor whiteColor].CGColor;
self.sunLayer.fillColor = UIColor.clearColor.CGColor;
self.sunLayer.lineWidth = 2;
[self.contentView.layer addSublayer:self.sunLayer];
CAShapeLayer 负责渲染路径,由 GPU 加速
strokeColor 设置线条颜色为白色
fillColor = clear 表示不填充内部,只描边
这样一条曲线就出现在屏幕上了,后面创建一个小白点结合日升日落时间在这条线上移动就可以实现太阳的可视化了
那么我们在写详情界面的时候尽量使用一个collectionView并复用,优化性能,另外在使用pages翻页的时候,我们可以提前把本页的上一页与下一页给加载出来,切换时视觉上更流畅
总结
本次天气预报涉及了网络请求,MVC架构和更多UI的学习,让我们开始能体会到用户体验的重要性