vue框架安装文档: 安装 | vue-next-admin https://lyt-top.github.io/vue-next-admin-doc-preview/home/install/
一动态路由修改
1. 配置代理
路径:vite.config.ts
修改:修改其proxy代理(25到38行左右);根据接口不同,其代理名称不同
server: {
			host: '0.0.0.0',
			port: env.VITE_PORT as unknown as number,
			open: JSON.parse(env.VITE_OPEN),
			hmr: true,
			proxy: {
				'/pc': {
					target: '接口地址',
					changeOrigin: true,
				},
			},
		},
2. 修改响应式拦截效果
位置:src/utils/request.ts(38行左右)
修改:将if (res.code && res.code !== 0) { 修改成 if (res.code !== undefined && res.code !== 0 && res.code !== 1) {
service.interceptors.response.use(
	(response) => {
		// 对响应数据做点什么
		const res = response.data;
		if (res.code !== undefined && res.code !== 0 && res.code !== 1) {
			// `token` 过期或者账号已在别处登录
			if (res.code === 401 || res.code === 4001) {
				Session.clear(); // 清除浏览器全部临时缓存
				window.location.href = '/'; // 去登录页
				ElMessageBox.alert('你已被登出,请重新登录', '提示', {})
					.then(() => {})
					.catch(() => {});
			}
			return Promise.reject(service.interceptors.response);
		} else {
			return res;
		}
	},
	(error) => {
		// 对响应错误做点什么
		if (error.message.indexOf('timeout') != -1) {
			ElMessage.error('网络超时');
		} else if (error.message == 'Network Error') {
			ElMessage.error('网络连接错误');
		} else {
			if (error.response.data) ElMessage.error(error.response.statusText);
			else ElMessage.error('接口路径找不到');
		}
		return Promise.reject(error);
	}
);
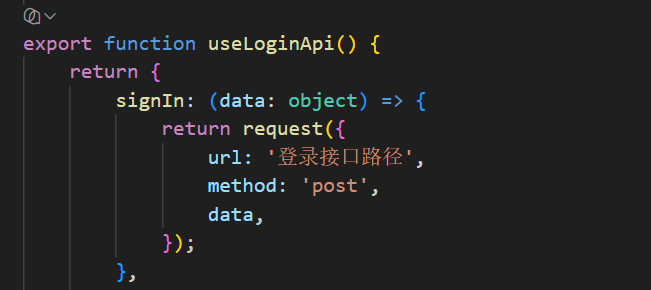
3. 修改请求接口
位置:src/api/login/index.ts
修改:将signIn中的url改成登录接口路径
4. 在登录页中请求登录接口
位置:src/views/login/component/account.vue
修改:1. 引入登录接口import { useLoginApi } from '/@/api/login/index';
-
声明变量 const loginApi = useLoginApi();
-
请求接口:
// 登录
const onSignIn = async () => {
state.loading.signIn = true;
try {
// 1、调用登录接口(参数:username、password)
const res = await loginApi.signIn({
username: state.ruleForm.userName,
password: state.ruleForm.password,
});
// 2、接口成功标志 code == 1或200
if (res.code !== 1 && res.code !== 200) {
ElMessage.error(res.msg || '登录失败');
return;
}
// 3、存储 token 到浏览器缓存(必须用 Session.set:模板路由守卫 / request 拦截器都用 Session.get('token') 读 Cookie,存 localStorage 读不到会导致路由初始化失败、加载动画卡死)
Session.set('token', res.data.token);
// 4、存储用户信息(接口 userinfo 需转成模板所需的 userInfos 结构,供 /src/stores/userInfo.ts 使用)
Session.set('userInfo', {
userName: res.data.userinfo.username,
photo: res.data.userinfo.avatar ?地址${res.data.userinfo.avatar}: '',
time: new Date().getTime(),
roles: res.data.userinfo.role_id === 1 ? ['admin'] : ['common'],
authBtnList: ['btn.add', 'btn.del', 'btn.edit', 'btn.link'],
});
// 5、存储后端菜单数据(供后端控制路由 isRequestRoutes=true 时使用)
Session.set('menuList', res.data.menus);
// 6、初始化路由
if (!themeConfig.value.isRequestRoutes) {
// 前端控制路由,2、请注意执行顺序
const isNoPower = await initFrontEndControlRoutes();
signInSuccess(isNoPower);
} else {
// 后端控制路由,isRequestRoutes 为 true,则开启后端控制路由
// 添加完动态路由,再进行 router 跳转,否则可能报错 No match found for location with path "/"
const isNoPower = await initBackEndControlRoutes();
// 执行完 initBackEndControlRoutes,再执行 signInSuccess
signInSuccess(isNoPower);
}
} catch (error) {
// 请求失败,request.ts 拦截器已弹出错误提示
} finally {
state.loading.signIn = false;
}
};
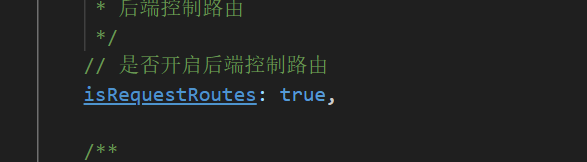
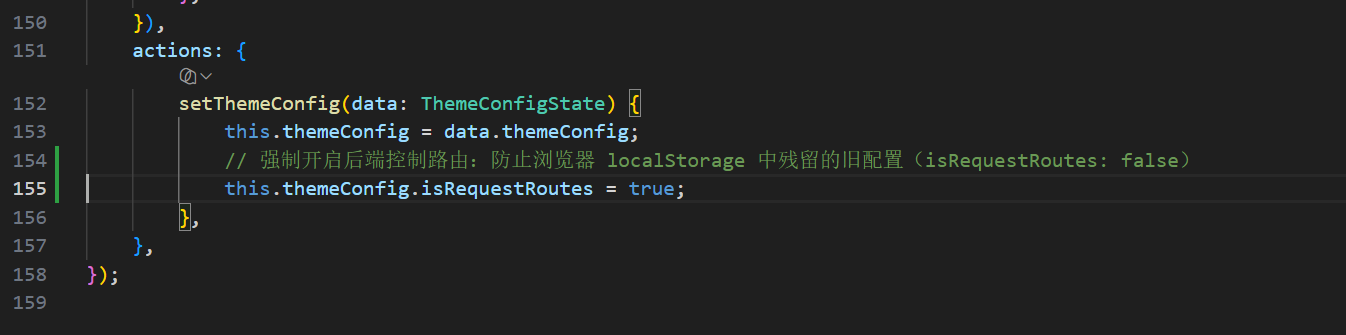
4. 开启动态路由
位置: src/stores/themeConfig.ts
修改:将 isRequestRoutes: false,改为 isRequestRoutes: true,(134行左右)
并在最后的setThemeConfig中加上 this.themeConfig.isRequestRoutes = true;
5. 菜单数据渲染到左侧菜单栏中
位置: src/router/backEnd.ts
修改:删除 import { useMenuApi } from '/@/api/menu/index';和const menuApi = useMenuApi();动态路由请求效果。
并修改以下内容(92到118行左右)
/**
 * 添加动态路由
 * @method router.addRoute
 * @description 此处循环为 dynamicRoutes(/@/router/route)第一个顶级 children 的路由一维数组,非多级嵌套
 * @link 参考:https://next.router.vuejs.org/zh/api/#addroute
 */
export async function setAddRoute() {
	await setFilterRouteEnd().forEach((route: RouteRecordRaw) => {
		router.addRoute(route);
	});
}

// 有子菜单的父级菜单统一使用子路由出口组件
const parentComponent = '/layout/routerView/parent';
// 无对应页面的菜单统一指向 404
const noPageComponent = '/error/404';

// 模块加载时快照 route.ts 中 dynamicRoutes.children 定义的业务路由。
// 后续 dynamicRoutes[0].children 会被接口菜单覆盖,但此快照始终保留 route.ts 的原始定义
const staticRouteList = dynamicRoutes[0].children || [];

/**
 * 获取路由菜单
 * @description 菜单数据在登录接口返回时已存入 Session('menuList'),此处读取并转换为路由所需格式
 * @returns 返回 { data: 嵌套路由菜单 }
 */
export function getBackEndControlRoutes() {
	const menus = Session.get('menuList') || [];
	const tree = formatBackMenu(menus);
	return Promise.resolve({ data: tree });
}

/**
 * 从 route.ts 的 dynamicRoutes.children 中提取 path → 路由配置
 * 供接口菜单匹配页面组件:只需在 route.ts 的 dynamicRoutes.children 中定义业务页面路由,
 * 即可实现「点击接口返回的树形菜单 → 显示对应页面」;未在 route.ts 中定义 path 的菜单进入 404
 */
const getStaticRouteMap = () => {
	const routeMap = new Map<string, any>();
	staticRouteList.forEach((r: any) => {
		routeMap.set(r.path.replace(/^\//, ''), r);
	});
	return routeMap;
};

/**
 * 将接口返回的扁平菜单(pid 关联)转成嵌套树,并补全路由所需字段
 * @param menus 接口返回的 menus 数组
 * @returns 嵌套路由菜单数组
 */
export function formatBackMenu(menus: any) {
	const map = new Map<number, any>();
	menus.forEach((m: any) => {
		map.set(m.id, {
			...m,
			component: '',
			meta: { title: m.title, icon: m.icon, isKeepAlive: true },
			children: [] as any[],
		});
	});
	// 构建 route.ts 业务路由的 path → 路由 查找表
	const routeMap = getStaticRouteMap();
	const tree: any[] = [];
	map.forEach((item) => {
		if (item.pid === 0 || !map.has(item.pid)) {
			tree.push(item);
		} else {
			map.get(item.pid).children.push(item);
		}
	});
	// 递归:拼接完整 path、生成唯一 name、补 component / redirect
	const setTree = (list: any[], parentPath: string) => {
		list.forEach((item) => {
			item.path = `${parentPath}/${item.path.replace(/^\//, '')}`;
			item.name = `${item.path.replace(/[^a-zA-Z0-9]/g, '')}_${item.id}`;
			if (item.children.length > 0) {
				item.component = parentComponent;
				// 先递归拼接子菜单完整 path,再取其第一个作为父级默认跳转
				setTree(item.children, item.path);
				item.redirect = item.children[0].path;
			} else {
				// 从 route.ts 的 dynamicRoutes.children 中按 path 匹配页面组件
				const matched = routeMap.get(item.path.replace(/^\//, ''));
				if (matched) {
					item.component = matched.component;
					// 合并 route.ts 中定义的路由 meta(title/icon 等),接口菜单数据优先
					item.meta = { ...item.meta, ...(matched.meta || {}) };
				} else {
					item.component = noPageComponent;
				}
			}
		});
	};
	setTree(tree, '');
	return tree;
}
6. 修改路由页面无用页面路径
位置: src/router/route.ts
修改:完整页面内容如下
若要添加页面,需要在export const dynamicRoutes: Array<RouteRecordRaw> = [ 内容中的children中进行修改
import { RouteRecordRaw } from 'vue-router';

// 扩展 RouteMeta 接口
declare module 'vue-router' {
    interface RouteMeta {
        title?: string;
        isLink?: string;
        isHide?: boolean;
        isKeepAlive?: boolean;
        isAffix?: boolean;
        isIframe?: boolean;
        roles?: string[];
        icon?: string;
    }
}

/**
 * 定义动态路由
 */
export const dynamicRoutes: Array<RouteRecordRaw> = [
    {
        path: '/',
        name: '/',
        component: () => import('/@/layout/index.vue'),
        redirect: '/home',
        meta: {
            isKeepAlive: true,
        },
        children: [
            //  首页
            {
                path: '/home',
                name: 'home',
                component: () => import('/@/views/home/index.vue'),
                meta: {
                    title: '首页',
                    icon: 'iconfont icon-barcode-qr',
                    isKeepAlive: true,
                },
            },
            // 创业/就业
            {
                path: '/article',
                name: 'article',
                // 根据图1路径 src/views/chart/index.vue 进行引入
                component: () => import('/@/views/chart/index.vue'),
                meta: {
                    title: '创业/就业',
                    icon: 'iconfont icon-gerenzhongxin',
                    isKeepAlive: true,
                    roles: ['admin', 'common'],
                },
            },
        ],
    },
];

/**
 * 定义404、401界面
 */
export const notFoundAndNoPower = [
    {
        path: '/:path(.*)*',
        name: 'notFound',
        component: () => import('/@/views/error/404.vue'),
        meta: {
            title: 'message.staticRoutes.notFound',
            isHide: true,
        },
    },
    {
        path: '/401',
        name: 'noPower',
        component: () => import('/@/views/error/401.vue'),
        meta: {
            title: 'message.staticRoutes.noPower',
            isHide: true,
        },
    },
];

/**
 * 定义静态路由(默认路由)
 */
export const staticRoutes: Array<RouteRecordRaw> = [
    {
        path: '/login',
        name: 'login',
        component: () => import('/@/views/login/index.vue'),
        meta: {
            title: '登录',
        },
    },
];
二 其他内容修改
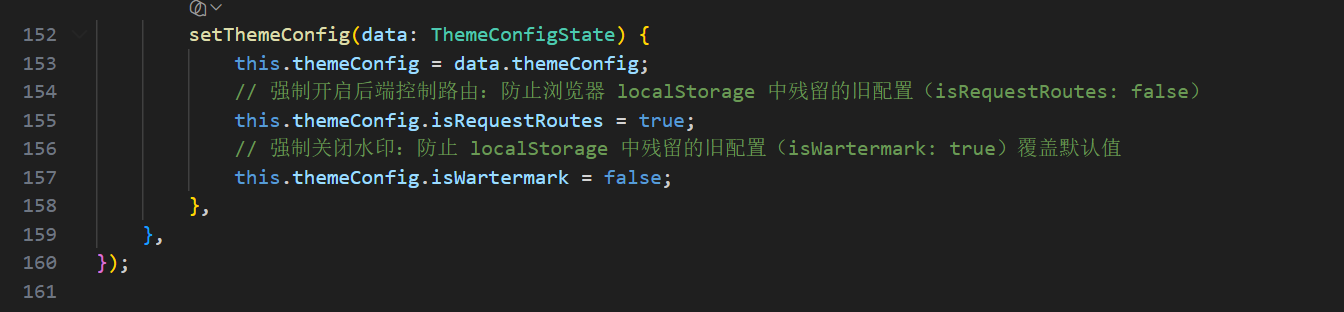
- 去除水印效果
位置:src/stores/themeConfig.ts
修改: isWartermark的true改为false(105)行左右;若修改完后还是有水印,给其加上强制去除水印的效果在setThemeConfig中加上 this.themeConfig.isWartermark = false;

- 关闭赞助商:
位置:src/App.vue
修改:删除<Sponsors />(第8行)和const Sponsors = defineAsyncComponent(() => import('/@/layout/sponsors/index.vue'));(29行)内容