一、web服务基础介绍
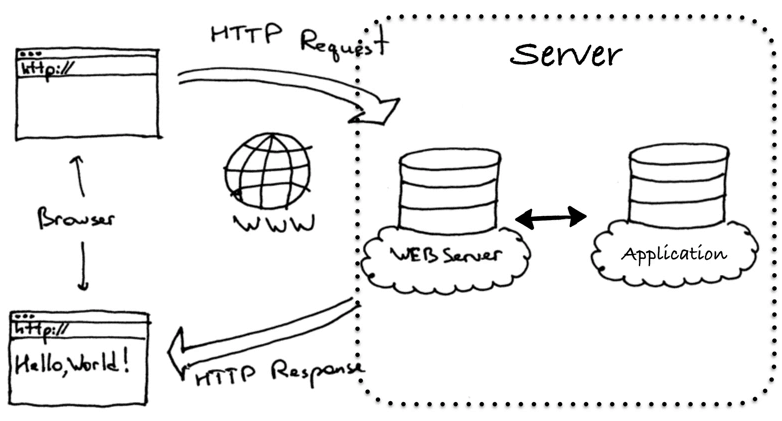
1.1.web服务介绍
1.1.1Apache:经典web服务器

Apache prefork****模型
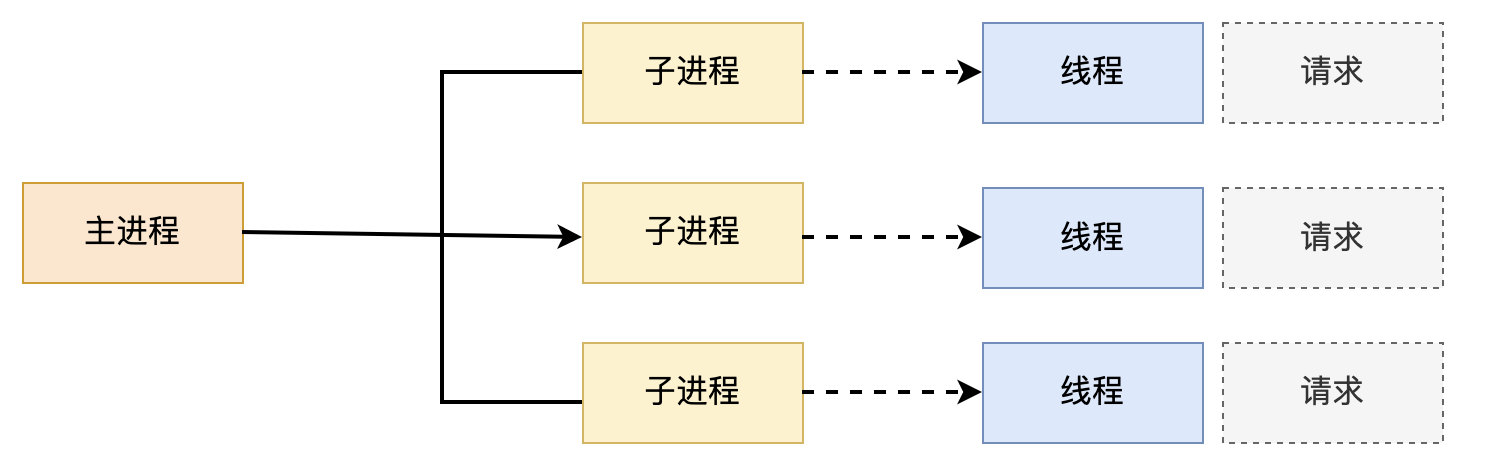
预派生模式,有一个主控制进程,然后生成多个子进程,使用select模型,最大并发1024
每个子进程有一个独立的线程响应用户请求
相对比较占用内存,但是比较稳定,可以设置最大和最小进程数
是最古老的一种模式,也是最稳定的模式,适用于访问量不是很大的场景
优点:稳定
缺点:每个用户请求需要对应开启一个进程,占用资源较多,并发性差,不适用于高并发场景
Apache worker****模型
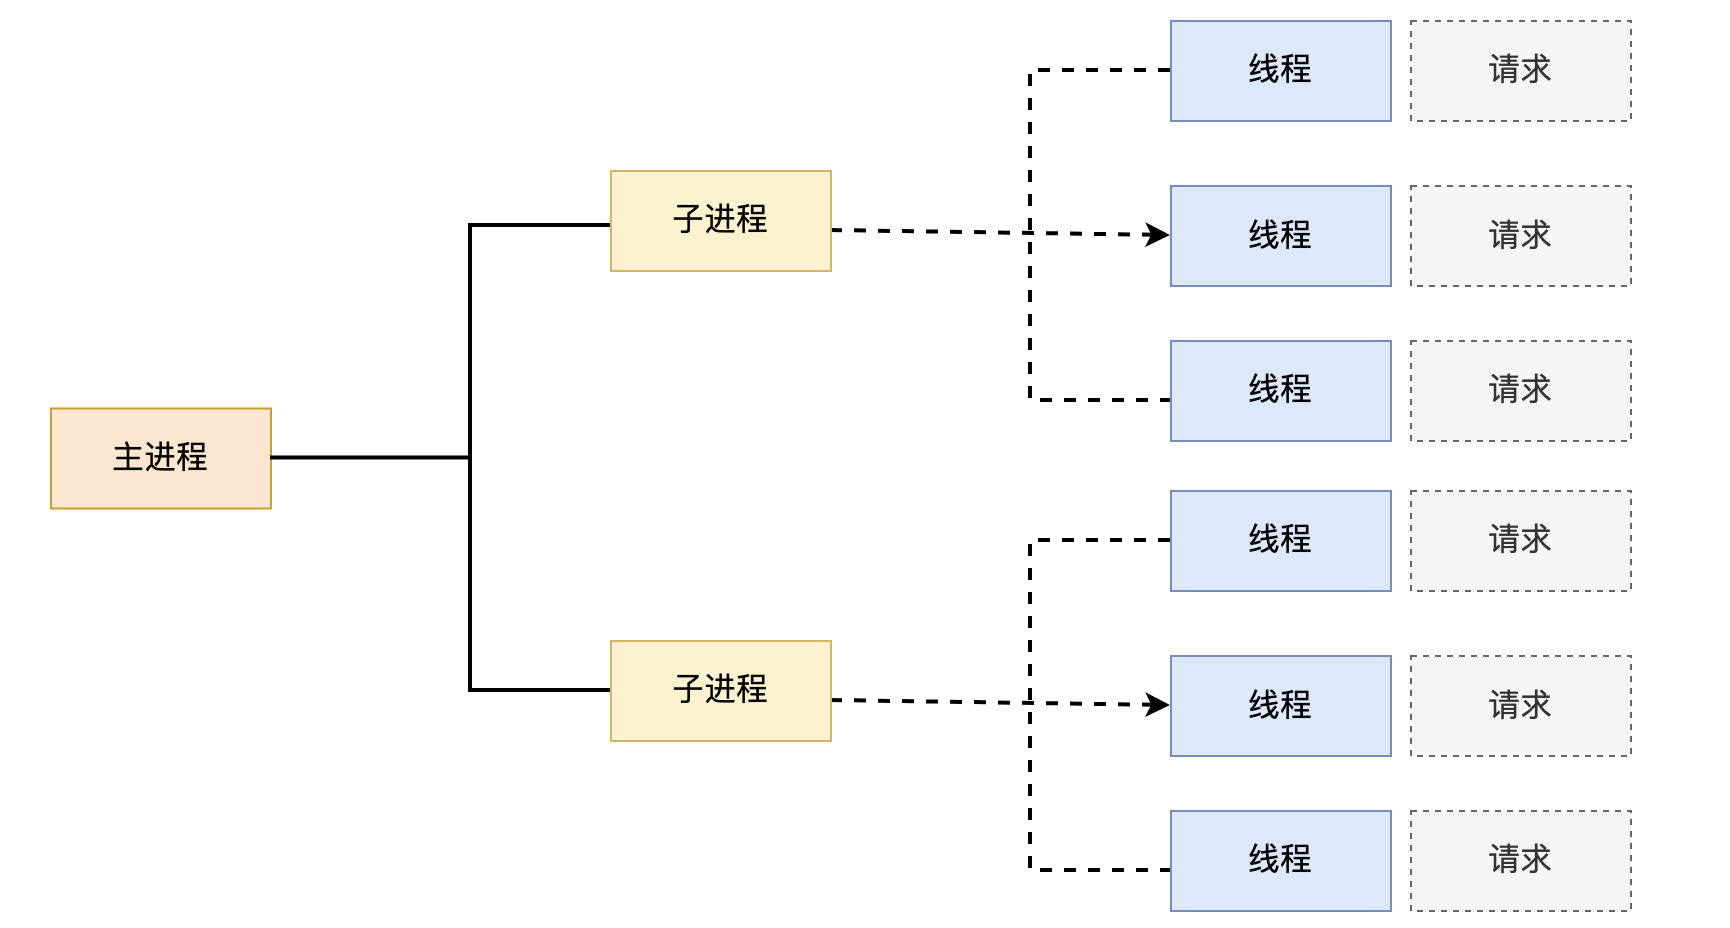
一种多进程和多线程混合的模型,有一个控制进程,启动多个子进程;每个子进程里面包含固定的线程;使用线程程来处理请求;当线程不够使用的时候会再启动一个新的子进程,然后在进程里面再启动线程处理请求;由于其使用了线程处理请求,因此可以承受更高的并发
优点:相比prefork 占用的内存较少,可以同时处理更多的请求
缺点:使用keepalive的长连接方式,某个线程会一直被占据,即使没有传输数据,也需要一直等待到超时才会被释放。如果过多的线程,被这样占据,也会导致在高并发场景下的无服务线程可用(该问题在prefork模式下,同样会发生)
Apache event****模型
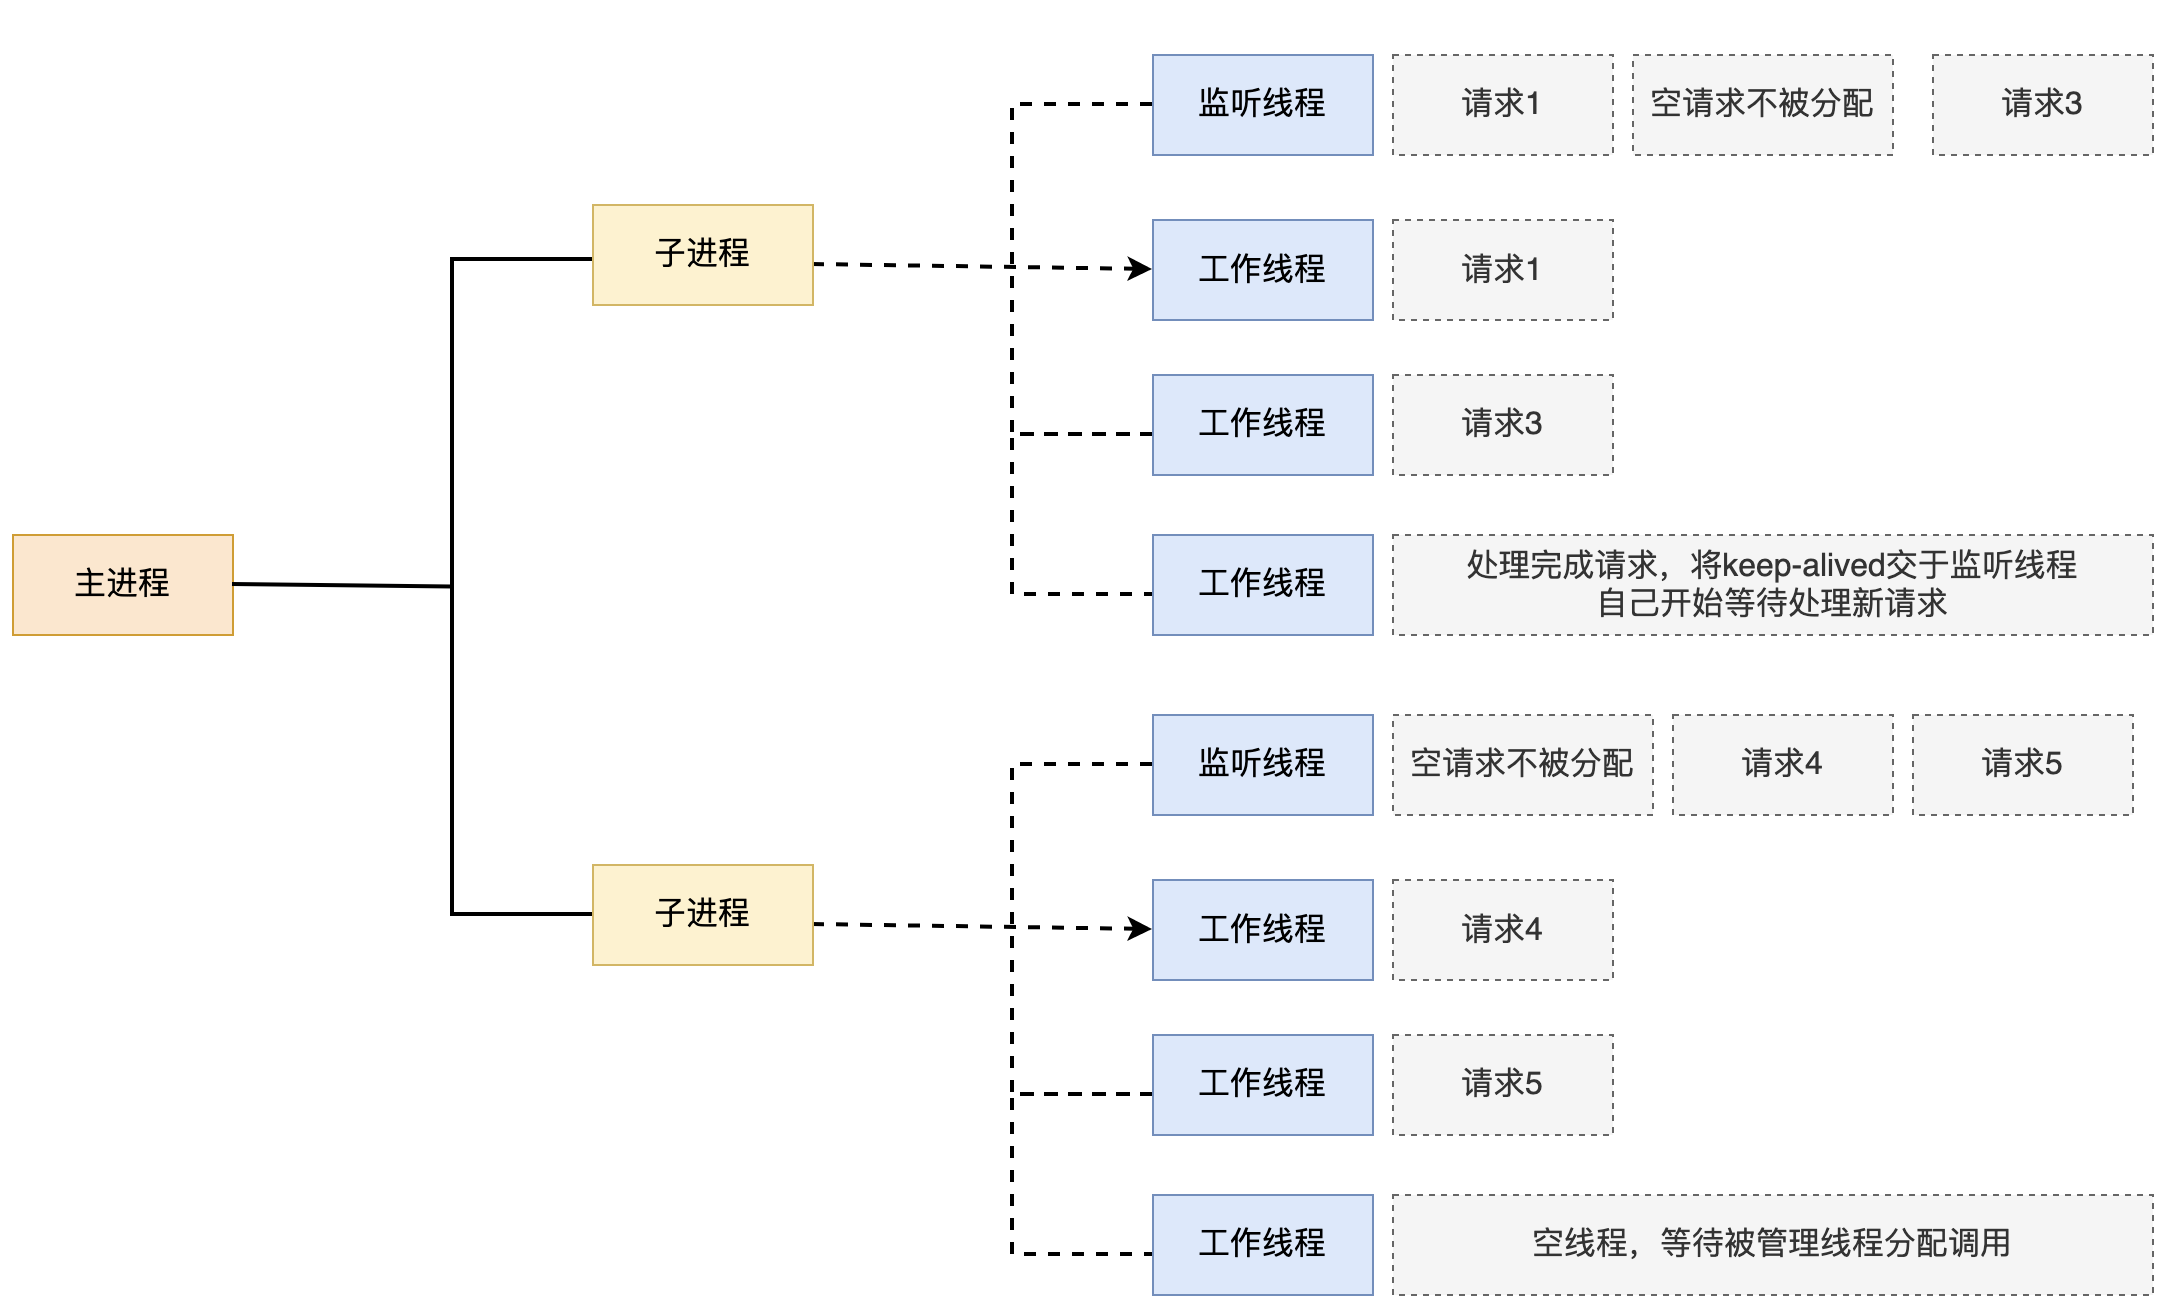
Apache中最新的模式,2012年发布的apache 2.4.X系列正式支持event 模型,属于事件驱动模型(epoll);每个进程响应多个请求,在现在版本里的已经是稳定可用的模式;它和worker模式很像,最大的区别在于,它解决了keepalive场景下长期被占用的线程的资源浪费问题(某些线程因为被keepalive,空挂在哪里等待,中间几乎没有请求过来,甚至等到超时);event MPM中,会有一个专门的线程来管理这些keepalive类型的线程;当有真实请求过来的时候,将请求传递给服务线程,执行完毕后,又允许它释放。这样增强了高并发场景下的请求处理能力
优点:单线程响应多请求,占据更少的内存,高并发下表现更优秀,会有一个专门的线程来管理keepalive类型的线程,当有真实请求过来的时候,将请求传递给服务线程,执行完毕后,又允许它释放
缺点:没有线程安全控制
1.2.Nginx:高性能的web服务器
官方地址:www.nginx.org
Nginx的版本分为开发版、稳定版和过期版,nginx以功能丰富著称,它即可以作为http服务
器,也可以作为反向代理服务器或者邮件服务器能够快速的响应静态网页的请求
支持FastCGI/SSL/Virtual Host/URL Rwrite /Gzip / HTTP Basic Auth/http或者TCP的负载均衡(1.9版本以 上且开启stream模块)等功能,并且支持第三方的功能扩展。
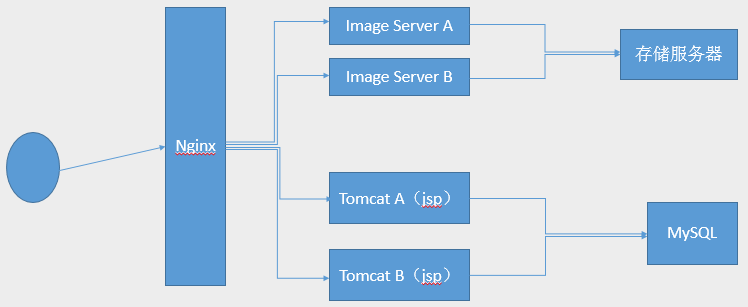
基于Nginx的工作场景:
1.3.服务端I/O流程
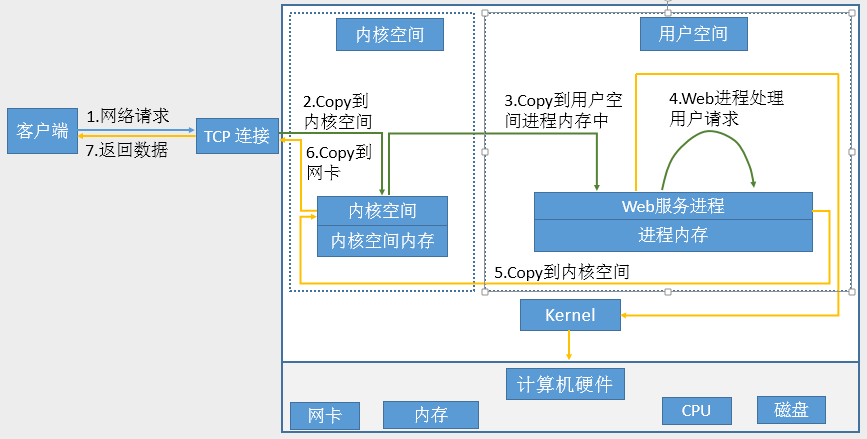
I/O在计算机中指Input/Output, IOPS (Input/Output Per Second)即每秒的输入输出量(或读写次数),是衡量磁盘性能的主要指标之一。IOPS是指单位时间内系统能处理的I/O请求数量,一般以每秒处理的 I/O请求数量为单位,I/O请求通常为读或写数据操作请求。简单说I/O就是把数据从内核空间中的内存数据复制到用户空间中进程的内存当中。
服务器的I/O类型
磁盘I/O
网络I/O
磁盘I/O
磁盘 I/O 指进程与本地磁盘设备之间进行数据读写;磁盘I/O是进程向内核发起系统调用,请求磁盘上的某个资源比如HTML 文件或者图片,然后内核通过相应的驱动程序将目标文件加载到内核的内存空间,加载完成之后把数据从内核内存再复制给进程内存
网络I/O
网络 I/O 是进程通过网卡与远端主机收发网络数据
每次I/O,倒要经历两个阶段
- 将数据从文件先加载至内核内存空间(缓冲区),等待数据准备完成,时间较长
2.将数据从内核缓冲区复制到用户空间的进程的内存中,时间较短
1.4.I/O模型
1.4.1I/O模型相关概念
同步(synchronous):被调用者并不提供事件的处理结果相关的通知消息,需要调用者主动询问事请是否处理完成
异步(asynchronous):被调用者通过状态、通知或回调机制主动通知调用者被调用者的运行状态

阻塞(blocking):指IO操作需要彻底完成后才返回到用户空间,调用结果返回之前,调用者被挂 起,干不了别的事情。
非阻塞(nonblocking):指IO操作被调用后立即返回给用户一个状态值,而无需等到IO操作彻底完成,在最终的调用结果返回之前,调用者不会被挂起,可以去做别的事情。

1.5.网络I/O模型
阻塞型、非阻塞型、信号驱动型、异步、复用型
1.5.1 阻塞型I/O模型(blocking IO)
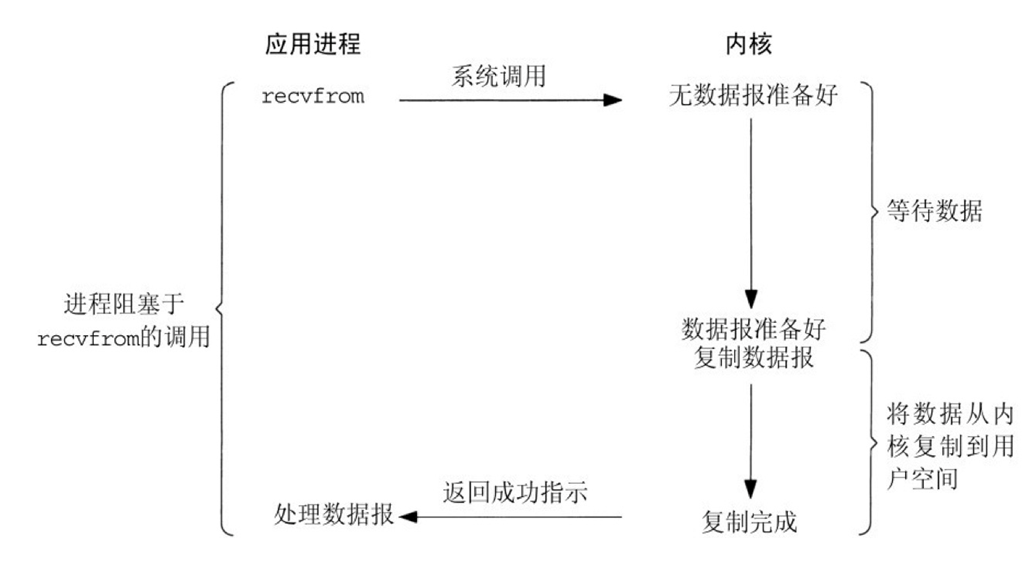
阻塞 IO 模型:应用调用 IO 系统调用时,如果数据未准备好,线程就会被阻塞挂起,不占用 CPU,直到数据准备完成、拷贝到用户空间之后,调用才返回,线程继续执行。 网络 BIO 就是典型阻塞 IO;缺点是一个连接需要一个线程,高并发下线程数量过多,上下文切换开销大,并发能力差;优点是程序简单,在阻塞等待数据期间进程/线程挂起,基本不会占用 CPU 资源。
同步阻塞 IO:属于同步 IO 的一种。当用户线程发起 IO 系统调用,如果数据未就绪,线程就会被阻塞挂起,让出 CPU;整个 IO(等待数据 + 数据拷贝)完成之后调用才返回。同步指 IO 操作由用户线程主动发起并等待完成;阻塞指线程在 IO 期间挂起休眠。传统 BIO 就是同步阻塞 IO,并发高时需要大量线程,性能差,但编码简单。
1.5.2 非阻塞型I/O模型(nonblocking IO)
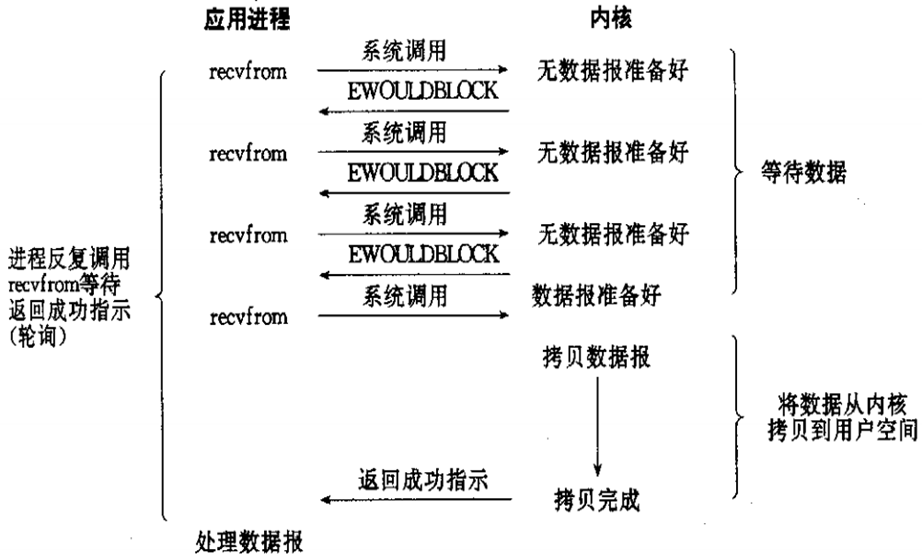
非阻塞 I/O 模型:将文件描述符设置为非阻塞,调用 IO 系统调用时,如果数据未就绪,调用不会阻塞线程,会立即返回错误提示,由用户线程不断轮询检测数据是否就绪;数据就绪后,再发起调用完成内核到用户空间的数据拷贝。 它仍然是同步 IO,因为数据拷贝由用户线程完成;缺点是频繁轮询带来 CPU 开销,一般配合 IO 多路复用使用。
非阻塞:程序向内核发送请I/O求后一直等待内核响应,如果内核处理请求的IO操作不能立即返回IO结 果,进程将不再等待,而且继续处理其他请求,但是仍然需要进程隔一段时间就要查看内核I/O是否完成。
1.5.3 信号驱动式I/O模型(signal-driven IO)
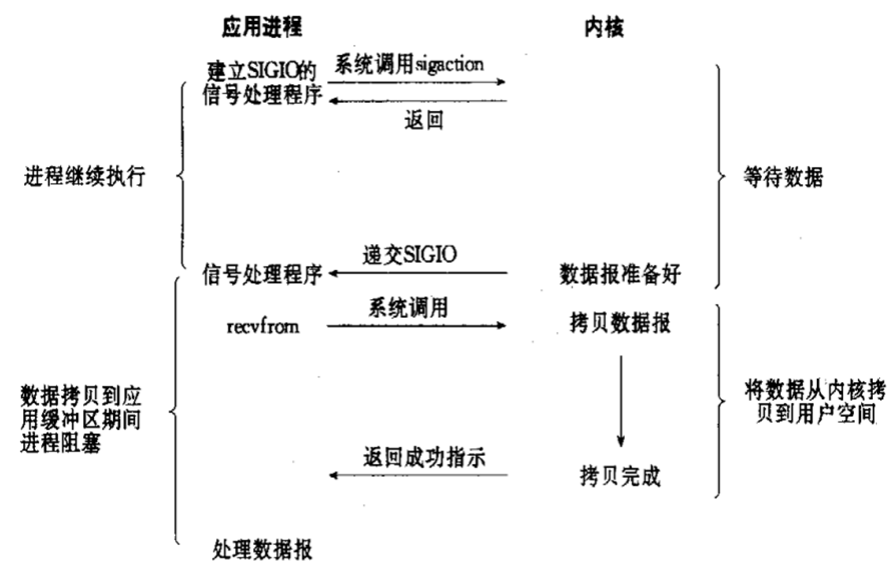
信号驱动 I/O 模型:应用预先向内核注册信号处理函数,当数据在内核缓冲区就绪时,内核向进程发送 SIGIO 信号通知应用。进程收到信号后,在信号处理函数中调用 IO 系统调用完成内核到用户空间的数据拷贝。 等待数据阶段不阻塞也无需轮询,但数据拷贝依旧由用户线程完成,属于同步 IO;缺点是信号为进程级别,无法区分哪个文件描述符就绪,信号处理编程复杂,网络开发很少使用。
异步阻塞:程序进程向内核发送IO调用后,不用等待内核响应,可以继续接受其他请求,内核收到进程请求后,进行的IO如果不能立即返回,就由内核等待结果,直到IO完成后内核再通知进程。
1.5.4 异步I/O模型(asynchronous IO)
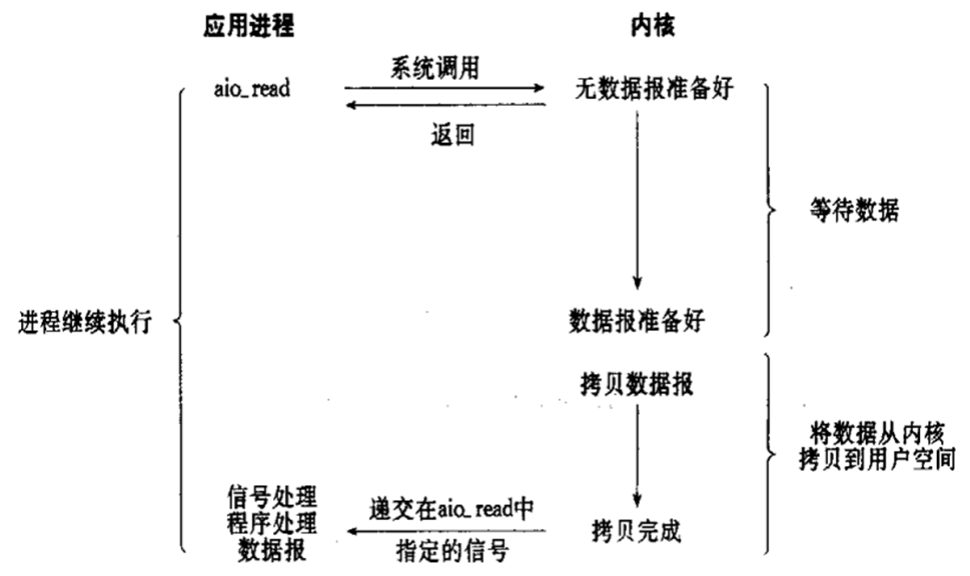
异步 I/O 模型:应用发起异步 IO 请求后立刻返回,由内核全权完成等待数据就绪以及内核缓冲区到用户空间的数据拷贝,全部 IO 操作完成后内核通知应用程序。应用拿到通知时数据已经在用户内存,不需要再调用 IO 系统调用拷贝数据。它是五大 IO 模型中唯一真正的异步 IO;Linux 原生 AIO 更多用于磁盘 IO,网络编程很少使用。
优点:异步 I/O 能够充分利用 DMA 特性,让 I/O 操作与计算重叠
缺点:要实现真正的异步 I/O,操作系统需要做大量的工作。目前 Windows 下通过 IOCP 实现了真正的异步 I/O,在 Linux 系统下,Linux 2.6才引入,目前 AIO 并不完善,因此在 Linux下实现高并发网络编程时以 IO 复用模型模式+多线程任务的架构基本可以满足需求
Linux提供了AIO库函数实现异步,但是用的很少。目前有很多开源的异步IO库,例如libevent、libev、libuv。
异步非阻塞:程序进程向内核发送IO调用后,不用等待内核响应,可以继续接受其他请求,内核调用的IO如果不能立即返回,内核会继续处理其他事物,直到IO完成后将结果通知给内核,内核在将IO完成的结果返回给进程,期间进程可以接受新的请求,内核也可以处理新的事物,因此相互不影响,可以实现较大的同时并实现较高的IO复用,因此异步非阻塞是使用最多的一种通信方式。
1.5.5 多路复用I/O模型**(I/O multiplexing)**
上面的模型中,每一个文件描述符对应的IO是由一个线程监控和处理
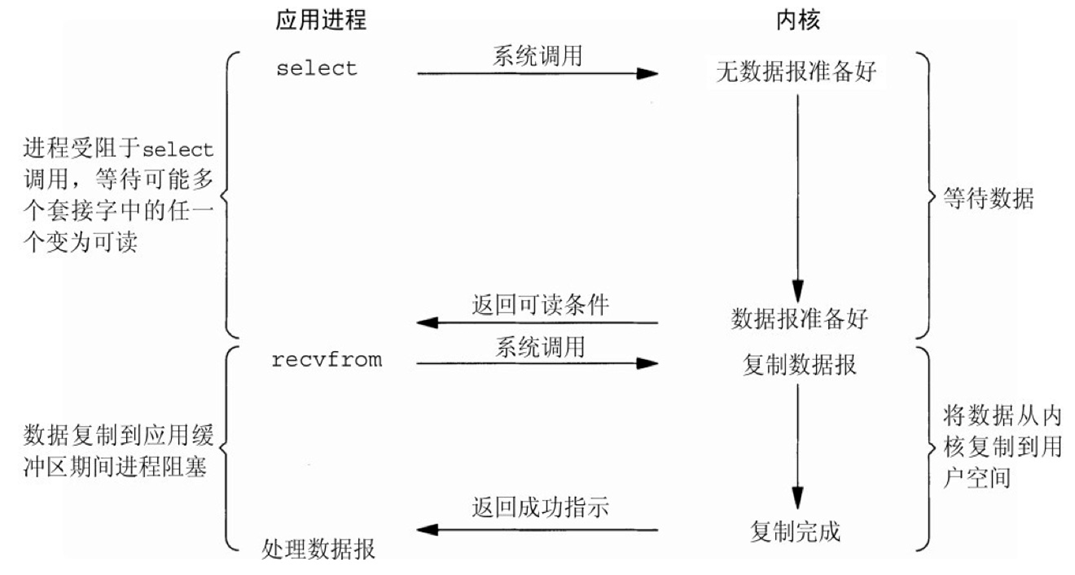
I/O 多路复用模型:通过 select/poll/epoll,单个线程监听多个文件描述符,线程阻塞在多路复用函数上等待 IO 事件。当某个 fd 数据就绪,函数返回就绪 fd 集合,再由用户线程调用 IO 系统调用完成内核缓冲区到用户空间的数据拷贝。它属于同步 IO。优势是少量线程管理大量网络连接,减少线程资源与上下文切换开销;Linux 下 epoll 是主流实现,Nginx、Netty 都基于该模型。
优点:可以基于一个阻塞对象,同时在多个描述符上等待就绪,而不是使用多个线程(每个文件描述符一个线程),这样可以大大节省系统资源
缺点:当连接数较少时效率相比多线程+阻塞 I/O 模型效率较低,可能延迟更大,因为单个连接处理需要 2 次系统调用,占用时间会有增加
IO多路复用(IO Multiplexing) :是一种机制,程序注册一组socket文件描述符给操作系统,表示"我要监视这些fd是否有IO事件发生,有了就告诉程序处理"IO多路复用一般和NIO一起使用的。NIO和IO多路复用是相对独立的。NIO仅仅是指IO API总是能立刻返回,不会被Blocking;而IO多路复用仅仅是操作系统提供的一种便利的通知机制。操作系统并不会强制这俩必须得一起用,可以只用IO多路复用 + BIO,这时还是当前线程被卡住。IO多路复用和NIO是要配合一起使用才有
**IO多路复用适用如下场合:**当客户端处理多个描述符时(一般是交互式输入和网络套接口),必须使用I/O复用;当一个客户端同时处理多个套接字时,此情况可能的但很少出现;当一个服务器既要处理监听套接字,又要处理已连接套接字,一般也要用到I/O复用;当一个服务器即要处理TCP,又要处理UDP,一般要使用I/O复用;当一个服务器要处理多个服务或多个协议,一般要使用I/O复用
1.5.6 五种IO对比
这五种 I/O 模型中,越往后,阻塞越少,理论上效率也是最优前四种属于同步 I/O,因为其中真正的 I/O操作(recvfrom)将阻塞进程/线程,只有异步 I/O 模型才与 POSIX 定义的异步 I/O 相匹配
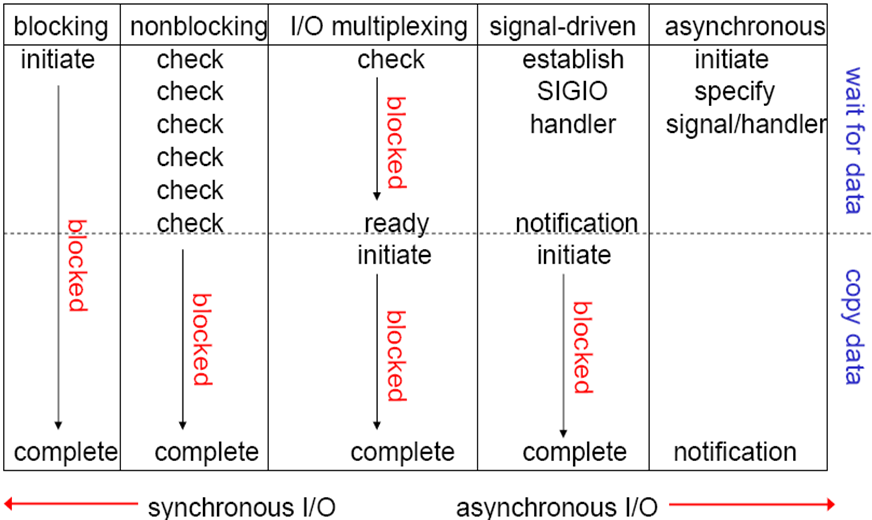
常用IO模型比较

1.6. 零拷贝
1.6.1 零拷贝介绍
传统Linux中的I/O的问题
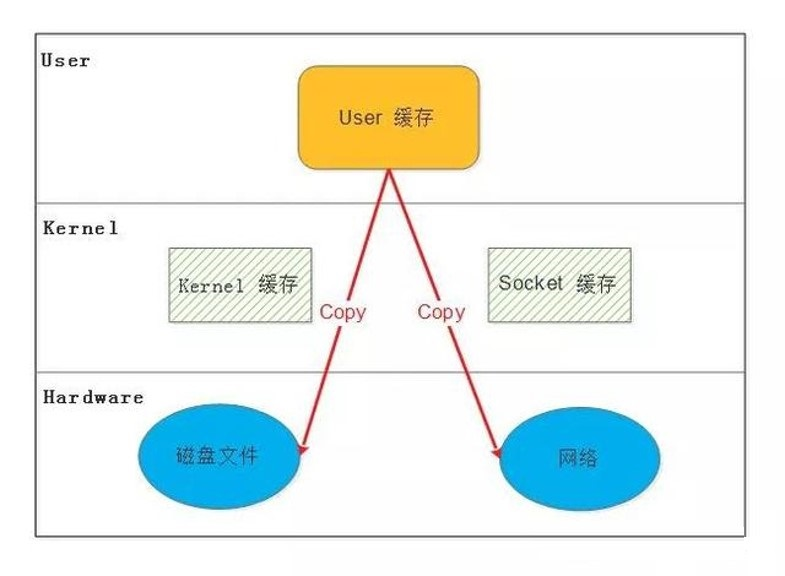
传统的 Linux 系统的标准 I/O 接口(read、write)是基于数据拷贝的,也就是数据都是 copy_to_user或者 copy_from_user,这样做的好处是,通过中间缓存的机制,减少磁盘 I/O 的操作,但是坏处也很明显,大量数据的拷贝,用户态和内核态的频繁切换,会消耗大量的 CPU 资源,严重影响数据传输的性能,统计表明,在Linux协议栈中,数据包在内核态和用户态之间的拷贝所用的时间甚至占到了数据包整个处理流程时间的57.1%
什么是零拷贝?
零拷贝就是上述问题的一个解决方案,通过尽量避免拷贝操作来缓解 CPU 的压力。零拷贝并没有真正做到"0"拷贝,它更多是一种思想,很多的零拷贝技术都是基于这个思想去做的优化
零拷贝相关技术
MMAP ( Memory Mapping )

mmap()系统调用使得进程之间通过映射同一个普通文件实现共享内存。普通文件被映射到进程地址空间后,进程可以向访问普通内存一样对文件进行访问。
mmap是一种内存映射文件的方法,即将一个文件或者其它对象映射到进程的地址空间,实现文件磁盘地址和进程虚拟地址空间中一段虚拟地址的一一对映关系。
实现这样的映射关系后,进程就可以采用指针的方式读写操作这一段内存,而系统会自动回写脏页面到对应的文件磁盘上,即完成了对文件的操作而不必再调用read,write等系统调用函数。相反,内核空间对这段区域的修改也直接反映用户空间,从而可以实现不同进程间的文件共享。
内存映射减少数据在用户空间和内核空间之间的拷贝操作,适合大量数据传输

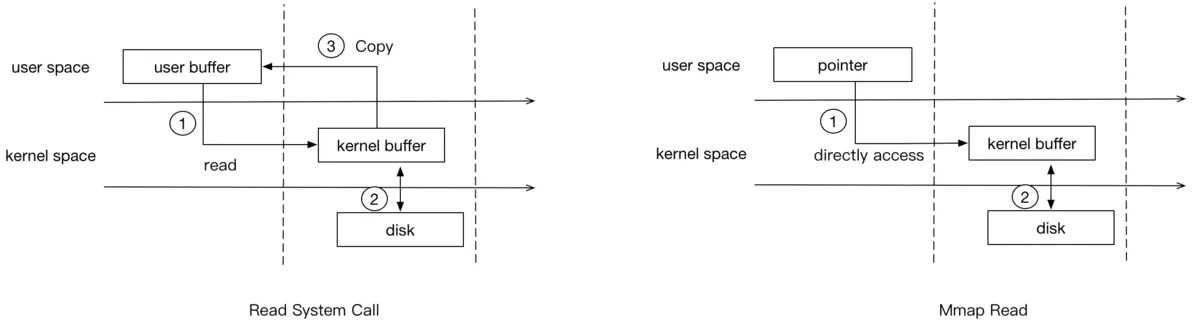
第一张图为传统读写,第二张图为MMAP.两者相比mmap要比普通的read系统调用少了一次copy的过程。因为read调用,进程是无法直接访问kernel space的,所以在read系统调用返回前,内核需要将数据从内核复制到进程指定的buffer。但mmap之后,进程可以直接访问mmap的数据(page cache)。
SENDFILE

DMA辅助的SENDFILE

二、Nginx架构和安装
2.1.Nginx介绍
- 开发者:伊戈尔・赛索耶夫,2004 年首次发布;2019 被 F5 收购。
- 定位:高性能 HTTP 服务器、反向代理、TCP/UDP 邮件代理,解决 C10K 万级并发问题;国内阿里、京东、新浪大规模使用。
- 衍生版本:
- Tengine:淘宝基于 Nginx 二次开发,面向大流量业务。
- OpenResty:嵌入 LuaJIT,支持 Lua 脚本扩展,实现高度定制网关。
- 核心特性:模块化、热部署(不停机升级、重载配置)、低内存消耗、事件驱动、支持 sendfile/mmap/aio。
2.2.Web服务相关功能
- 虚拟主机(server)
- 支持 keep-alive 和管道连接(利用一个连接做多次请求)
- 访问日志(支持基于日志缓冲提高其性能)
- url rewrite
- 路径别名
- 基于IP及用户的访问控制
- 支持速率限制及并发数限制
- 重新配置和在线升级而无需中断客户的工作进程
2.3.Nginx架构和进程
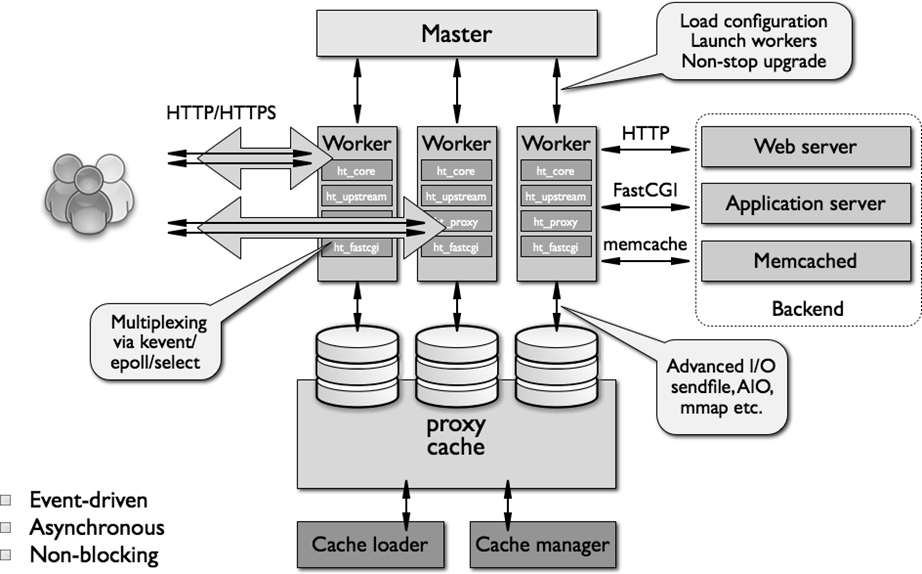
2.3.1 Nginx进程结构
web请求处理机制
- 多进程方式:服务器每接收到一个客户端请求就有服务器的主进程生成一个子进程响应客户端,直到用户关闭连接,这样的优势是处理速度快,子进程之间相互独立,但是如果访问过大会导致服务器资源耗尽而无法提供请求
- 多线程方式:与多进程方式类似,但是每收到一个客户端请求会有服务进程派生出一个线程和此客户端进行交互,一个线程的开销远远小于一个进程,因此多线程方式在很大程度减轻了web服务器对系统资源的要求,但是多线程也有自己的缺点,即当多个线程位于同一个进程内工作的时候,可以相互访问同样的内存地址空间,所以他们相互影响,一旦主进程挂掉则所有子线程都不能工作了,IIS服务器使用了多线程的方式,需要间隔一段时间就重启一次才能稳定。
Nginx是多进程组织模型,而且是一个由Master主进程和Worker工作进程组成。
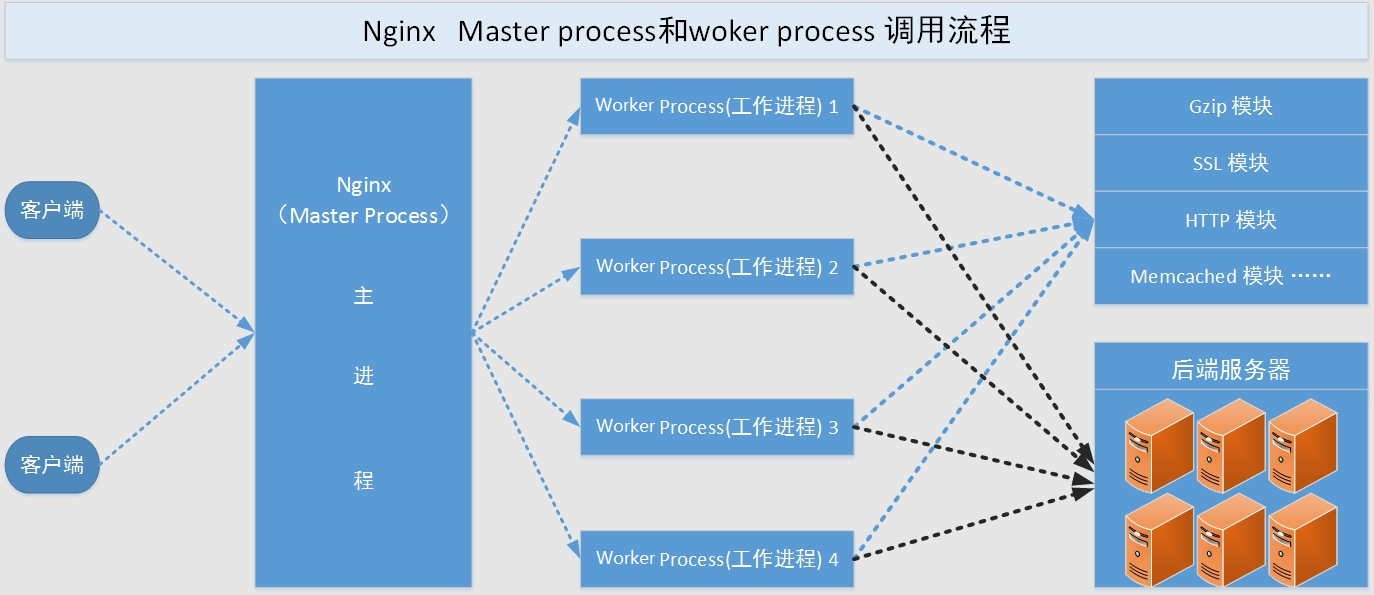
主进程(master process)的功能:
- 对外接口:接收外部的操作(信号)
- 对内转发:根据外部操作的不同,通过信号管理Worker
- 监控:监控 worker 进程的运行状态,worker 进程异常终止后,自动重启 worker 进程
- 读取Nginx配置文件并验证其有效性和正确性
- 建立、绑定和关闭socket连接
- 按照配置生成、管理和结束工作进程
- 接受外部指令,比如重启、升级及退出服务器等指令
- 不中断服务,实现平滑升级,重启服务并应用新的配置;升级失败进行回滚处理
- 开启日志文件,获取文件描述符
- 编译和处理perl脚本
工作进程(worker process)的功能:
- 所有 worker 平等,实际处理客户端网络请求;数量建议等于 CPU 核心数,减少 CPU 上下文切换;竞争 accept 锁处理新连接(解决惊群);处理请求、代理后端、返回响应。
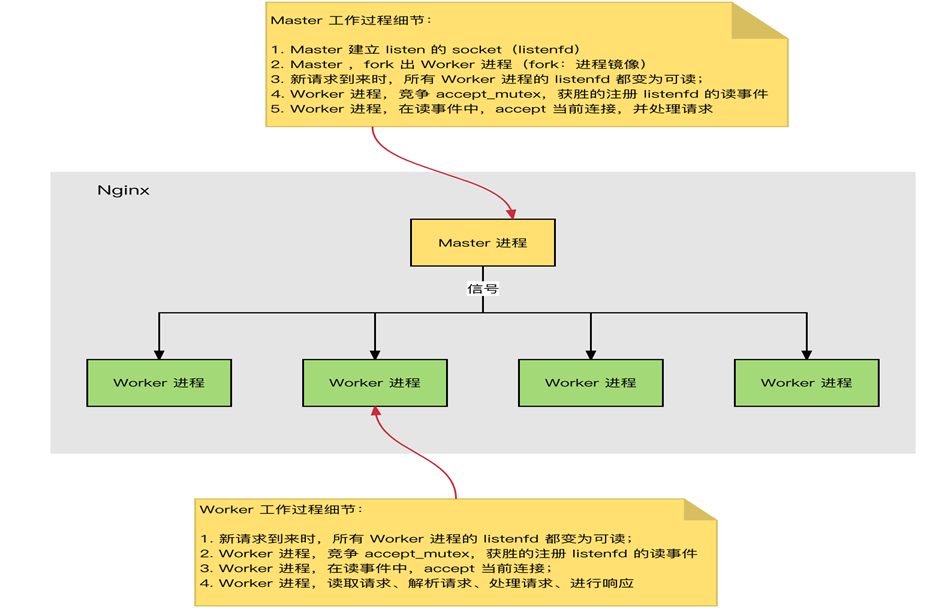
2.3.2 Nginx进程间通信
进程通信:master 通过单向管道下发指令;worker 之间依靠 master 转发消息,共享内存实现数据交互(limit_conn、upstream zone)。
主进程与外界通过信号机制进行通信,当接收到需要处理的信号时,它通过管道向相关的工作进程发送正确的指令,每个工作进程都有能力捕获管道中的可读事件,当管道中有可读事件的时候,工作进程就会从管道中读取并解析指令,然后采取相应的执行动作,这样就完成了主进程与工作进程的交互
worker进程之间的通信原理基本上和主进程与worker进程之间的通信是一样的,只要worker进程之间能够取得彼此的信息,建立管道即可通信,但是由于worker进程之间是完全隔离的,因此一个进程想要知道另外一个进程的状态信息,就只能通过主进程来实现。
为了实现worker进程之间的交互,master进程在生成worker进程之后,在worker进程表中进行遍历,将该新进程的PID以及针对该进程建立的管道句柄传递给worker进程中的其他进程,为worker进程之间的通信做准备,当worker进程1向worker进程2发送指令的时候,首先在master进程给它的其他worker进程工作信息中找到2的进程PID,然后将正确的指令写入指向进程2的管道,worker进程2捕获到管道中的事件后,解析指令并进行相关操作,这样就完成了worker进程之间的通信。
另worker进程可以通过共享内存来通讯的,比如upstream中的zone,或者limit_req、limit_conn中的zone等。操作系统提供了共享内存机制
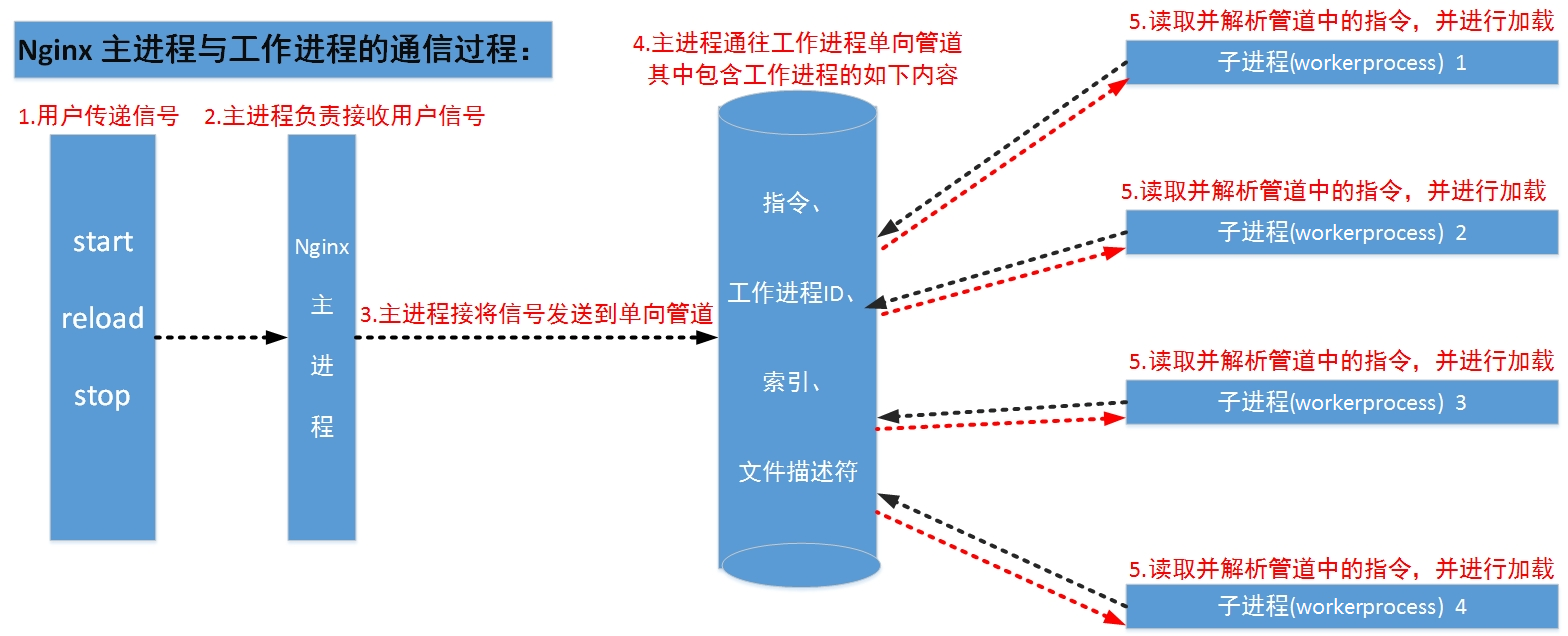
2.3.3Nginx启动和HTTP的连接建立
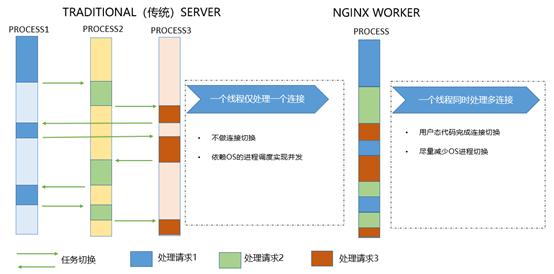
Nginx 启动时,Master 进程,加载配置文件 ;Master 进程,初始化监听的 socket ;Master 进程,fork 出多个 Worker 进程 ;Worker 进程,竞争新的连接,获胜方通过三次握手,建立 Socket 连接,并处理请求
2.3.4HTTP处理过程
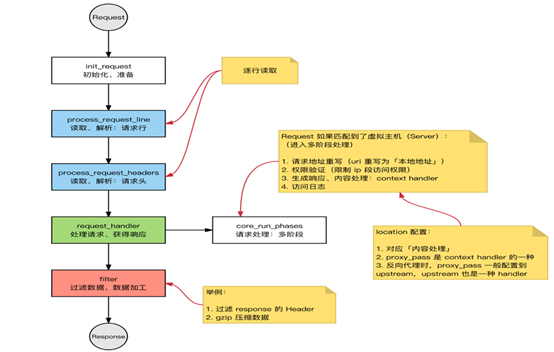
2.4.Nginx模块介绍
- 核心模块:进程管理、事件驱动、错误日志,必不可少。
- 标准 HTTP 模块:http 协议解析、虚拟主机、日志等基础 http 能力。
- 可选 HTTP 模块:ssl、gzip 压缩、状态页等扩展。
- Mail 模块:pop3/imap 邮件代理。
- Stream 模块:TCP/UDP 四层代理。
- 第三方模块:lua、json 等自定义扩展,1.9.11 支持动态加载模块。
核心模块:core module
标准模块:
HTTP 模块: ngx_http_*
HTTP Core modules #默认功能
HTTP Optional modules #需编译时指定
Mail 模块: ngx_mail_*
Stream 模块 ngx_stream_*
第三方模块

2.5.Nginx安装
2.5.1Nginx版本和安装方式
Nginx版本
- Mainline version 主要开发版本,一般为奇数号版本,比如1.19
- Stable version 当前最新稳定版,一般为偶数版本,如:1.20
- Legacy version 旧的稳定版,一般为偶数版本,如:1.18
Nginx安装可以使用yum或源码安装,但是推荐使用源码编译安装
- yum的版本比较旧
- 编译安装可以更方便自定义相关路径
- 使用源码编译可以自定义相关功能,更方便业务上的使用
2.5.2 Nginx编译安装
编译器介绍
源码安装需要提前准备标准的编译器,GCC的全称是(GNU Compiler collection),其有GNU开发,并以GPL即LGPL许可,是自由的类UNIX即苹果电脑Mac OS X操作系统的标准编译器,因为GCC原本只能处理C语言,所以原名为GNU C语言编译器,后来得到快速发展,可以处理C++,Fortran,pascal,objective C,java以及Ada等其他语言,此外还需要Automake工具,以完成自动创建Makefile的工作,Nginx的一些模块需要依赖第三方库,比如: pcre(支持rewrite),zlib(支持gzip模块)和openssl(支持ssl模块)等。
官方源码下载地址:
示例:
1下载软件包
bash
[root@nginx-node1 ~]# wget https://nginx.org/download/nginx-1.28.1.tar.gz2 解压
bash
[root@nginx-node1 ~]# tar zxf nginx-1.28.1.tar.gz
[root@nginx-node1 ~]# cd nginx-1.28.1/
[root@nginx-node1 nginx-1.28.1]# ls
auto     CHANGES.ru          conf       contrib          html     man        SECURITY.md
CHANGES  CODE_OF_CONDUCT.md  configure  CONTRIBUTING.md  LICENSE  README.md  src
3 检测环境
bash
#安装依赖
[root@nginx-node1 nginx-1.28.1]# dnf install gcc openssl-devel.x86_64 pcre2-devel.x86_64 zlib-devel -y

[root@nginx-node1 nginx-1.28.1]# ./configure --prefix=/usr/local/nginx --user=nginx --group=nginx --with-http_ssl_module --with-http_v2_module --with-http_realip_module --with-http_stub_status_module --with-http_gzip_static_module --with-pcre --with-stream --with-stream_ssl_module --with-stream_realip_module
4 编译
bash
[root@nginx-node1 nginx-1.28.1]# make
[root@nginx-node1 nginx-1.28.1]# make install
5 启动nginx
bash
#设定环境变量
[root@nginx-node1 nginx-1.28.1]# vim ~/.bash_profile
export PATH=$PATH:/usr/local/nginx/sbin
[root@nginx-node1 nginx-1.28.1]# source ~/.bash_profile
#设定nginx用户
[root@nginx-node1 nginx-1.28.1]# useradd  -s /sbin/nologin -M nginx
[root@nginx-node1 nginx-1.28.1]# nginx
[root@nginx-node1 nginx-1.28.1]# ps aux | grep nginx
root       42208  0.0  0.1  15752  2788 ?        Ss   20:02   0:00 nginx: master process nginx
nginx      42209  0.0  0.2  15952  4284 ?        S    20:02   0:00 nginx: worker process
root       42277  0.0  0.1   6652  2400 pts/0    S+   20:02   0:00 grep --color=auto nginx
#测试
[root@nginx-node1 nginx-1.28.1]# echo ys > /usr/local/nginx/html/index.html
[root@nginx-node1 nginx-1.28.1]# curl 172.25.254.100
ys
#关闭nginx
[root@nginx-node1 nginx-1.28.1]# nginx -s stop
6 编写启动文件
bash
[root@nginx-node1 ~]# vim /lib/systemd/system/nginx.service
[Unit]
Description=The NGINX HTTP and reverse proxy server
After=syslog.target network-online.target remote-fs.target nss-lookup.target
Wants=network-online.target

[Service]
Type=forking
ExecStartPre=/usr/local/nginx/sbin/nginx -t
ExecStart=/usr/local/nginx/sbin/nginx
ExecReload=/usr/local/nginx/sbin/nginx -s reload
ExecStop=/bin/kill -s QUIT $MAINPID
PrivateTmp=true

[Install]
WantedBy=multi-user.target
[root@nginx-node1 ~]# chmod +x /lib/systemd/system/nginx.service
[root@nginx-node1 ~]# systemctl daemon-reload

#启动并验证
[root@nginx-node1 ~]# systemctl enable --now nginx.service
Created symlink /etc/systemd/system/multi-user.target.wants/nginx.service → /usr/lib/systemd/system/nginx.service.
[root@nginx-node1 ~]# systemctl status nginx.service
● nginx.service - The NGINX HTTP and reverse proxy server
     Loaded: loaded (/usr/lib/systemd/system/nginx.service; enabled; preset: disabled)
     Active: active (running) since Fri 2026-08-21 20:06:38 CST; 6s ago
    Process: 43984 ExecStartPre=/usr/local/nginx/sbin/nginx -t (code=exited, status=0/SUCCES>
    Process: 43985 ExecStart=/usr/local/nginx/sbin/nginx (code=exited, status=0/SUCCESS)
   Main PID: 43986 (nginx)
      Tasks: 2 (limit: 10441)
     Memory: 2.1M (peak: 2.3M)
        CPU: 15ms
     CGroup: /system.slice/nginx.service
             ├─43986 "nginx: master process /usr/local/nginx/sbin/nginx"
             └─43987 "nginx: worker process"

8月 21 20:06:38 nginx-node1 systemd[1]: Starting The NGINX HTTP and reverse proxy server...
8月 21 20:06:38 nginx-node1 nginx[43984]: nginx: the configuration file /usr/local/nginx/con>
8月 21 20:06:38 nginx-node1 nginx[43984]: nginx: configuration file /usr/local/nginx/conf/ng>
8月 21 20:06:38 nginx-node1 systemd[1]: Started The NGINX HTTP and reverse proxy server.
命令详解
root@nginx-node1 nginx-1.28.1# ./configure --prefix=/usr/local/nginx \
--user=nginx \ # 指定nginx运行用户
--group=nginx \ # 指定nginx运行组
--with-http_ssl_ module \ # 支持https://
--with-http_v2_module \ # 支持http版本2
--with-http_realip_module \ # 支持ip透传
--with-http_stub_status_module \ # 支持状态页面
--with-http_gzip_static_module \ # 支持压缩
--with-pcre \ # 支持正则
--with-stream \ # 支持tcp反向代理
--with-stream_ssl_module \ # 支持tcp的ssl加密
--with-stream_realip_module # 支持tcp的透传ip
nginx完成安装后有四个主目录
root@nginx-node1 \~# ls /usr/local/nginx/
conf html logs sbin
#conf:保存nginx所有的配置文件,其中nginx.conf是nginx服务器的最核心最主要的配置文件,其他的.conf则是用来配置nginx相关的功能的,例如fastcgi功能使用的是fastcgi.conf和
fastcgi_params两个文件,配置文件一般都有一个样板配置文件,是以.default为后缀,使用时可将其复制并将default后缀去掉即可。
#html目录中保存了nginx服务器的web文件,但是可以更改为其他目录保存web文件,另外还有一个50x的web文件是默认的错误页面提示页面。
#logs:用来保存nginx服务器的访问日志错误日志等日志,logs目录可以放在其他路径,比
如/var/logs/nginx里面。
#sbin:保存nginx二进制启动脚本,可以接受不同的参数以实现不同的功能。
常用命令
nginx -t校验配置;nginx -V查看版本和编译参数;nginx -s reload平滑重载;nginx -s quit优雅停止。
2.5.3 平滑升级和回滚
有时候我们需要对Nginx版本进行升级以满足对其功能的需求,例如添加新模块,需要新功能,而此时Nginx又在跑着业务无法停掉,这时我们就可能选择平滑升级
2.5.3.1 平滑升级流程
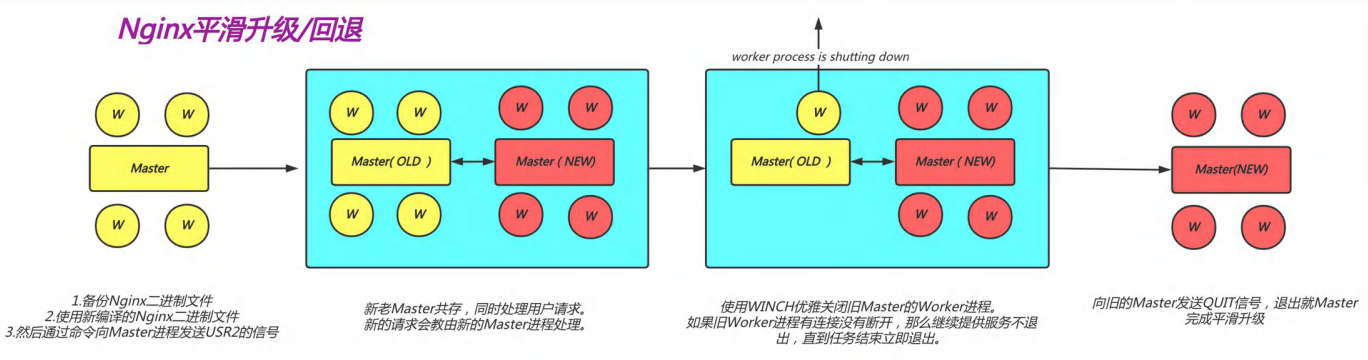
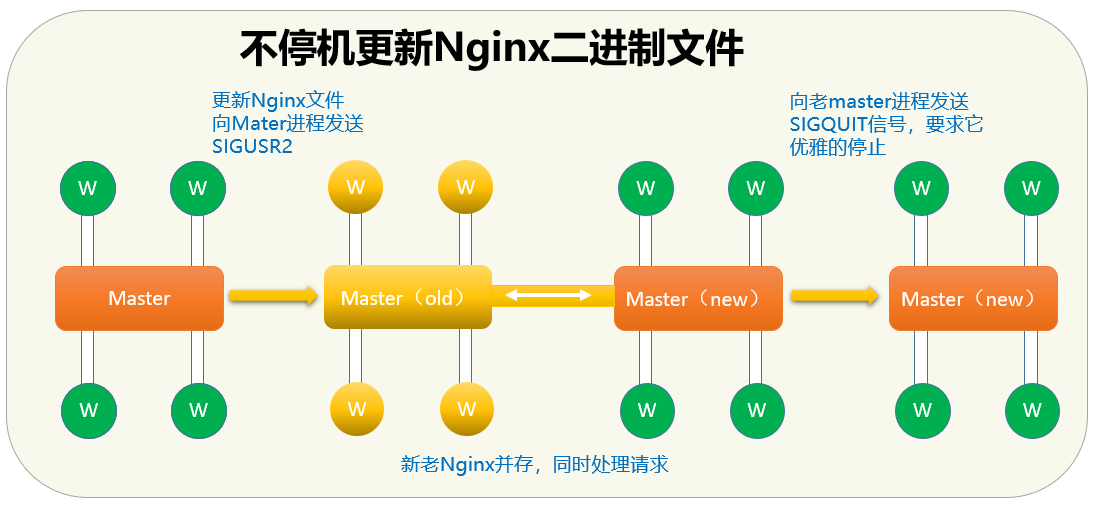
- 将旧Nginx二进制文件换成新Nginx程序文件(注意先备份)
- 向master进程发送USR2信号
- master进程修改pid文件名加上后缀.oldbin,成为nginx.pid.oldbin
- master进程用新Nginx文件启动新master进程成为旧master的子进程,系统中将有新旧两个Nginx主进程共同提供Web服务,当前新的请求仍然由旧Nginx的worker进程进行处理,将新生成的master进程的PID存放至新生成的pid文件nginx.pid
- 向旧的Nginx服务进程发送WINCH信号,使旧的Nginx worker进程平滑停止
- 向旧master进程发送QUIT信号,关闭老master,并删除Nginx.pid.oldbin文件
- 如果发现升级有问题,可以回滚∶向老master发送HUP,向新master发送QUIT
示例:
1.下载高版本的软件
bash
[root@nginx-node1 ~]# wget https://nginx.org/download/nginx-1.29.4.tar.gz2.对于新版本的软件进行源码编译并进行平滑升级
bash
#编译nginx和隐藏版本
[root@nginx-node1 ~]# tar zxf nginx-1.29.4.tar.gz
[root@nginx-node1 ~]# cd nginx-1.29.4/src/core/
[root@nginx-node1 core]# vim nginx.h
#define nginx_version      1029004
#define NGINX_VERSION      ""
#define NGINX_VER          "YS_GS/" NGINX_VERSION
#源码编译
[root@nginx-node1 core]# cd /root/nginx-1.29.4/
[root@nginx-node1 nginx-1.29.4]# ./configure   --prefix=/usr/local/nginx --user=nginx --group=nginx --with-http_ssl_module --with-http_v2_module --with-http_realip_module --with-http_stub_status_module --with-http_gzip_static_module --with-pcre --with-stream --with-stream_ssl_module --with-stream_realip_module

[root@nginx-node1 nginx-1.29.4]# make
[root@nginx-node1 nginx-1.29.4]# cd /usr/local/nginx/sbin/
[root@nginx-node1 sbin]# ls
nginx

[root@nginx-node1 sbin]# cp -p nginx nginx.old
[root@nginx-node1 sbin]# cp -f /root/nginx-1.29.4/objs/nginx /usr/local/nginx/sbin/nginx
cp:是否覆盖'/usr/local/nginx/sbin/nginx'? y
[root@nginx-node1 sbin]# ls
nginx  nginx.old

[root@nginx-node1 sbin]# ls /usr/local/nginx/logs/
access.log  error.log  nginx.pid
[root@nginx-node1 sbin]# ps aux | grep nginx
root       43986  0.0  0.1  15748  2776 ?        Ss   20:06   0:00 nginx: master process /usr/local/nginx/sbin/nginx
nginx      43987  0.0  0.2  15948  4272 ?        S    20:06   0:00 nginx: worker process
root       57311  0.0  0.1   6652  2400 pts/0    S+   20:35   0:00 grep --color=auto nginx
#杀死nginx master进程
[root@nginx-node1 sbin]# kill -USR2 43986
[root@nginx-node1 sbin]# ps aux | grep nginx
root       43986  0.0  0.1  15748  2776 ?        Ss   20:06   0:00 nginx: master process /usr/local/nginx/sbin/nginx
nginx      43987  0.0  0.2  15948  4272 ?        S    20:06   0:00 nginx: worker process
root       57311  0.0  0.1   6652  2400 pts/0    S+   20:35   0:00 grep --color=auto nginx
[root@nginx-node1 sbin]# kill -USR2 43986
[root@nginx-node1 sbin]# ps aux | grep nginx
root       43986  0.0  0.1  15748  3188 ?        Ss   20:06   0:00 nginx: master process /usr/local/nginx/sbin/nginx
nginx      43987  0.0  0.2  15948  4272 ?        S    20:06   0:00 nginx: worker process
root       57979  0.0  0.5  15780  8872 ?        S    20:37   0:00 nginx: master process /usr/local/nginx/sbin/nginx
nginx      57980  0.0  0.2  15980  4560 ?        S    20:37   0:00 nginx: worker process
root       58042  0.0  0.1   6652  2396 pts/0    S+   20:37   0:00 grep --color=auto nginx
[root@nginx-node1 sbin]# ls /usr/local/nginx/logs/
access.log  error.log  nginx.pid  nginx.pid.oldbin

#测试
[root@nginx-node1 sbin]# nginx -V
nginx version: YS_GS/        #新版本
built by gcc 11.5.0 20240719 (Red Hat 11.5.0-14) (GCC)
built with OpenSSL 3.5.5 27 Jan 2026
TLS SNI support enabled
configure arguments: --prefix=/usr/local/nginx --user=nginx --group=nginx --with-http_ssl_module --with-http_v2_module --with-http_realip_module --with-http_stub_status_module --with-http_gzip_static_module --with-pcre --with-stream --with-stream_ssl_module --with-stream_realip_module
#回收旧版本子进程
[root@nginx-node1 sbin]# kill -WINCH 43987
[root@nginx-node1 sbin]# ps aux | grep nginx
root       43986  0.0  0.1  15748  3192 ?        Ss   20:06   0:00 nginx: master process /usr/local/nginx/sbin/nginx
root       57979  0.0  0.5  15780  8872 ?        S    20:37   0:00 nginx: master process /usr/local/nginx/sbin/nginx
nginx      57980  0.0  0.2  15980  4560 ?        S    20:37   0:00 nginx: worker process
nginx      59363  0.0  0.2  15948  4272 ?        S    20:40   0:00 nginx: worker process
root       59383  0.0  0.1   6652  2404 pts/0    S+   20:41   0:00 grep --color=auto nginx
3.版本回退/版本回滚
bash
[root@nginx-node1 sbin]# cd /usr/local/nginx/sbin/
[root@nginx-node1 sbin]# ls
nginx  nginx.old
[root@nginx-node1 sbin]# cp -p nginx nginx.new
[root@nginx-node1 sbin]# \cp nginx.old  nginx -pf
[root@nginx-node1 sbin]# ls
nginx  nginx.new  nginx.old
[root@nginx-node1 sbin]# ps aux | grep nginx
root       43986  0.0  0.1  15748  3192 ?        Ss   20:06   0:00 nginx: master process /usr/local/nginx/sbin/nginx
root       57979  0.0  0.5  15780  8872 ?        S    20:37   0:00 nginx: master process /usr/local/nginx/sbin/nginx
nginx      57980  0.0  0.2  15980  4560 ?        S    20:37   0:00 nginx: worker process
nginx      59363  0.0  0.2  15948  4272 ?        S    20:40   0:00 nginx: worker process
root       60462  0.0  0.1   6652  2404 pts/0    S+   20:44   0:00 grep --color=auto nginx

[root@nginx-node1 sbin]# kill -HUP 43986
[root@nginx-node1 sbin]# ps aux | grep nginx
root       43986  0.0  0.1  15748  3192 ?        Ss   20:06   0:00 nginx: master process /usr/local/nginx/sbin/nginx
root       57979  0.0  0.5  15780  8872 ?        S    20:37   0:00 nginx: master process /usr/local/nginx/sbin/nginx
nginx      57980  0.0  0.2  15980  4560 ?        S    20:37   0:00 nginx: worker process
nginx      59363  0.0  0.2  15948  4336 ?        S    20:40   0:00 nginx: worker process
nginx      61232  0.0  0.2  15948  4272 ?        S    20:46   0:00 nginx: worker process
root       61246  0.0  0.1   6652  2352 pts/0    S+   20:46   0:00 grep --color=auto nginx

#查看版本
[root@nginx-node1 sbin]# nginx -V
nginx version: nginx/1.28.1
built by gcc 11.5.0 20240719 (Red Hat 11.5.0-14) (GCC)
built with OpenSSL 3.5.5 27 Jan 2026
TLS SNI support enabled
configure arguments: --prefix=/usr/local/nginx --user=nginx --group=nginx --with-http_ssl_module --with-http_v2_module --with-http_realip_module --with-http_stub_status_module --with-http_gzip_static_module --with-pcre --with-stream --with-stream_ssl_module --with-stream_realip_module

#回收新版本进程
[root@nginx-node1 sbin]# kill -WINCH 57979
[root@nginx-node1 sbin]# ps aux | grep nginx
root       43986  0.0  0.1  15748  3192 ?        Ss   20:06   0:00 nginx: master process /usr/local/nginx/sbin/nginx
root       57979  0.0  0.5  15780  8872 ?        S    20:37   0:00 nginx: master process /usr/local/nginx/sbin/nginx
nginx      59363  0.0  0.2  15948  4336 ?        S    20:40   0:00 nginx: worker process
nginx      61232  0.0  0.2  15948  4272 ?        S    20:46   0:00 nginx: worker process
root       62245  0.0  0.1   6652  2396 pts/0    S+   20:48   0:00 grep --color=auto nginx
三、Nginx核心配置详解
3.1 配置文件说明
nginx 官方帮助文档:http://nginx.org/en/docs/
Nginx的配置文件的组成部分:
- 主配置文件:nginx.conf
- 子配置文件: include conf.d/*.conf
- fastcgi, uwsgi,scgi 等协议相关的配置文件
- mime.types:支持的mime类型,MIME(Multipurpose Internet Mail Extensions)多用途互联网邮件扩展类型,MIME消息能包含文本、图像、音频、视频以及其他应用程序专用的数据,是设定某种扩展名的文件用一种应用程序来打开的方式类型,当该扩展名文件被访问的时候,浏览器会自动使用指定应用程序来打开。多用于指定一些客户端自定义的文件名,以及一些媒体文件打开方式。
nginx 配置文件格式说明
配置文件由指令与指令块构成
每条指令以;分号结尾,指令与值之间以空格符号分隔
可以将多条指令放在同一行,用分号分隔即可,但可读性差,不推荐
指令块以{ }大括号将多条指令组织在一起,且可以嵌套指令块
include语句允许组合多个配置文件以提升可维护性
使用#符号添加注释,提高可读性
使用$符号使用变量
部分指令的参数支持正则表达式
nginx主配置文件的配置指令方式
directive value value2 ...;
注意
(1) 指令必须以分号结尾
(2) 支持使用配置变量
内建变量:由Nginx模块引入,可直接引用
自定义变量:由用户使用set命令定义,格式: set variable_name value;
引用变量:$variable_name
主配置文件结构:四部分
main block:主配置段,即全局配置段,对http,mail都有效
#事件驱动相关的配置
event {
...
}
#http/https 协议相关配置段
http {
...
}
#默认配置文件不包括下面两个块
#mail 协议相关配置段
mail {
...
}
#stream 服务器相关配置段
stream {
...
}
默认的nginx.conf配置文件格式说明
#全局配置端,对全局生效,主要设置nginx的启动用户/组,启动的工作进程数量,工作模式,Nginx的PID路径,日志路径等。
user nginx nginx;
worker_processes 1; #启动工作进程数数量
events { #events #设置快,主要影响nginx服务器与用户的网络连接,比如是否允许同时接受多个网络连接,使用哪种事件驱动模型
#处理请求,每个工作进程可以同时支持的最大连接数,是否开启对多工作进程下的网络连接进行序列化等。
worker_connections 1024; #设置单个nginx工作进程可以接受的最大并发,作为web服务器的时候最大并发数为1024 #worker_connections* worker_processes,作为反向代理的时候为 #(worker_connections * worker_processes)/2
}
http { #http块是Nginx服务器配置中的重要部分,缓存、代理和日志格式定义等绝大多数功能和第三方模块都可以在这设置,http块可以包含多个server块,而一个server块中又可以包含多个location块,server块可以配置文件引入、MIME-Type定义、日志自定义、是否启用sendfile、连接超时时间和单个链接的请求上限等
include mime.types;
default_type application/octet-stream;
sendfile on; #作为web服务器的时候打开sendfile加快静态文件传输,指定是否使用sendfile系统调用来传输文件,sendfile系统调用在两个文件描述符之间直接传递数据(完全在内核中操作)从而避免了数据在内核缓冲区和用户缓冲区之间的拷贝,操作效率很高,被称之为零拷贝,硬盘 >> kernel buffer (快速拷贝到kernelsocketbuffer) >>协议栈。
keepalive_timeout 65; #长连接超时时间,单位是秒
server { #设置一个虚拟机主机,可以包含自己的全局快,同时也可以包含多个location模块,比如本虚拟机监听的端口、本虚拟机的名称和IP配置,多个server 可以使用一个端口比如都使用80端口提供web服务
listen 80; #配置server监听的端口
server_name localhost; #本server的名称,当访问此名称的时候nginx会调用当前serevr内部的配置进程匹配。
location / { #location其实是server的一个指令,为nginx服务器提供比较多而且灵活的指令都是在location中体现的,主要是基于nginx接受到的请求字符串对用户请求的UIL进行匹配,并对特定的指令进行处理,包括地址重定向、数据缓存和应答控制等功能都是在这部分实现。另外很多第三方模块的配置也是在location模块中配置。
root html; #相当于默认页面的目录名称,默认是安装目录的相对路径,可以使用绝对路径配置。
index index.html index.htm; #默认的页面文件名称
}
error_page 500 502 503 504 /50x.html; #错误页面的文件名称
location = /50x.html { #location处理对应的不同错误码的页面定义到/50x.html
#这个跟对应其server中定义的目录下。
root html; #定义默认页面所在的目录
}
}
#和邮件相关的配置
#mail {...
} mail 协议相关配置段
#tcp代理配置,1.9版本以上支持
#stream {...
} stream 服务器相关配置段
#导入其他路径的配置文件
#include /apps/nginx/conf.d/*.conf
}
3.2 全局配置
Main 全局配置段常见的配置指令分类
- 正常运行必备的配置
- 优化性能相关的配置
- 用于调试及定位问题相关的配置
- 事件驱动相关的配置
全局配置说明:
user nginx nginx; #启动Nginx工作进程的用户和组
worker_processes number \| auto; #启动Nginx工作进程的数量,一般设为和CPU核心数相同
worker_cpu_affinity 00000001 00000010 00000100 00001000 | auto ;
#将Nginx工作进程绑定到指定的CPU核心,默认Nginx是不进行进程绑定的,绑定并不是意味着当前nginx进程独占以一核心CPU,但是可以保证此进程不运行在其他核心上,这就极大减少了nginx的工作进程在不同的cpu核心上的来回跳转,减少了CPU对进程的资源分配与回收以及内存管理等,因此可以有效的提升nginx服务器的性能。
CPU MASK: 00000001:0号CPU
00000010:1号CPU
10000000:7号CPU
#错误日志记录配置,语法:error_log file debug \| info \| notice \| warn \| error \| crit \| alert \| emerg
#error_log logs/error.log;
#error_log logs/error.log notice;
error_log /usr/local/nginx/logs/error.log error;
#pid文件保存路径
pid /usr/local/nginx/logs/nginx.pid;
worker_priority 0; #工作进程优先级,-20~20(19)
worker_rlimit_nofile 65536; #所有worker进程能打开的文件数量上限,#包括:Nginx的所有连接(例如与代理服务器的连接等)而不仅仅是与客户端的连接;另一个考虑因素是实际的并发连接数不能超过系统级别的最大打开文件数的限制,最好与ulimit -n 或者limits.conf的值保持一致
最好与ulimit -n 或者limits.conf的值保持一致,
#修改pam限制
root@Nginx \~# sudo -u nginx ulimit -n
1024
daemon off; #前台运行Nginx服务用于测试、docker等环境。
master_process off|on; #是否开启Nginx的master-worker工作模式,仅用于开发调试场景,默认为on
events {
worker_connections 65535; #设置单个工作进程的最大并发连接数
use epoll; #使用epoll事件驱动,Nginx支持众多的事件驱动,比如:select、poll、epoll,只能设置在events模块中设置
accept_mutex on; #on为同一时刻一个请求轮流由work进程处理,而防止被同时唤醒所有worker;避免多个睡眠进程被唤醒的设置,默认为off;新请求会唤醒所有worker进程,此过程也称为"惊群",因此nginx刚安装完以后要进行适当的优化。建议设置为on
multi_accept on; #on时Nginx服务器的每个工作进程可以同时接受多个新的网络连接;此指令默认为off,即默认为一个工作进程只能一次接受一个新的网络连接打开后几个同接受多个。建议设置为on
}
示例:Nginx配置文件的管理及优化
bash
[root@nginx-node1 ~]# vim /usr/local/nginx/conf/nginx.conf
user  nginx;
[root@nginx-node1 ~]# nginx -t
nginx: the configuration file /usr/local/nginx/conf/nginx.conf syntax is ok
nginx: configuration file /usr/local/nginx/conf/nginx.conf test is successful
[root@nginx-node1 ~]# nginx -s reload
[root@nginx-node1 ~]# ps aux | grep nginx
root       43986  0.0  0.1  15748  3192 ?        Ss   20:06   0:00 nginx: master process /usr/local/nginx/sbin/nginx
root       57979  0.0  0.5  15780  8996 ?        S    20:37   0:00 nginx: master process /usr/local/nginx/sbin/nginx
nginx      59363  0.0  0.2  15948  4336 ?        S    20:40   0:00 nginx: worker process
nginx      61232  0.0  0.2  15948  4272 ?        S    20:46   0:00 nginx: worker process
nginx      76831  0.0  0.2  16200  4692 ?        S    21:29   0:00 nginx: worker process
root       76881  0.0  0.1   6652  2400 pts/0    S+   21:29   0:00 grep --color=auto nginx
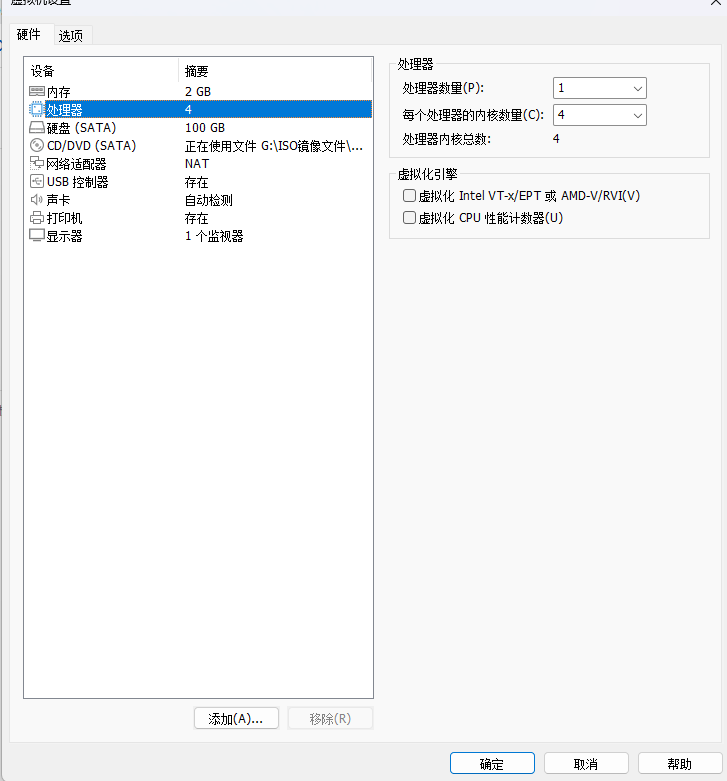
改为4核
bash
[root@nginx-node1 ~]# vim /usr/local/nginx/conf/nginx.conf
worker_processes  2;
[root@nginx-node1 ~]# ps aux | grep nginx
root         844  0.0  0.2  15744  4272 ?        Ss   21:32   0:00 nginx: master process /usr/local/nginx/sbin/nginx
nginx       2513  0.0  0.2  16160  4368 ?        S    21:33   0:00 nginx: worker process
nginx       2514  0.0  0.2  16160  4368 ?        S    21:33   0:00 nginx: worker process
root        2565  0.0  0.1   6652  2400 pts/0    S+   21:33   0:00 grep --color=auto nginx

#在vmware中更改硬件cpu核心个数为4个,然后重启
[root@nginx-node1 ~]# vim /usr/local/nginx/conf/nginx.conf
worker_processes  auto;
worker_cpu_affinity 0001 0010 0100 1000;
[root@nginx-node1 ~]# nginx -s reload
[root@nginx-node1 ~]# ps aux | grep nginx
root         844  0.0  0.2  15744  4292 ?        Ss   21:32   0:00 nginx: master process /usr/local/nginx/sbin/nginx
nginx       3272  0.0  0.2  16168  4384 ?        S    21:35   0:00 nginx: worker process
nginx       3273  0.0  0.2  16168  4384 ?        S    21:35   0:00 nginx: worker process
nginx       3274  0.0  0.2  16168  4384 ?        S    21:35   0:00 nginx: worker process
nginx       3275  0.0  0.2  16168  4384 ?        S    21:35   0:00 nginx: worker process
root        3325  0.0  0.1   6652  2556 pts/0    R+   21:35   0:00 grep --color=auto nginx

[root@nginx-node1 ~]# ps axo pid,cmd,psr | grep nginx
    844 nginx: master process /usr/   3
   3272 nginx: worker process         0
   3273 nginx: worker process         1
   3274 nginx: worker process         2
   3275 nginx: worker process         3
并发测试
bash
[root@nginx-node1 ~]# vim /usr/local/nginx/conf/nginx.conf
events {
    worker_connections  1024;
    use epoll;
    accept_mutex on;
    multi_accept on;
}
[root@nginx-node1 ~]# nginx -s reload

#测试并发
[root@nginx-node1 ~]# dnf install httpd-tools -y
[root@nginx-node1 ~]# ab  -n 100000 -c 5000 http://172.25.254.100/index.html
This is ApacheBench, Version 2.3 <$Revision: 1913912 $>
Copyright 1996 Adam Twiss, Zeus Technology Ltd, http://www.zeustech.net/
Licensed to The Apache Software Foundation, http://www.apache.org/

Benchmarking 172.25.254.100 (be patient)
socket: Too many open files (24)     #并发数量过多导致访问失败

#处理本地文件系统的并发文件数量
[root@nginx-node1 ~]# vim /etc/security/limits.conf
*               -       nofile          100000
#*               -       noproc          100000
root            -       nofile          100000
[root@nginx-node1 ~]# sudo -u nginx ulimit -n
100000

#测试
[root@nginx-node1 ~]# ab  -n 100000 -c 10000 http://172.25.254.100/index.html
This is ApacheBench, Version 2.3 <$Revision: 1913912 $>
Copyright 1996 Adam Twiss, Zeus Technology Ltd, http://www.zeustech.net/
Licensed to The Apache Software Foundation, http://www.apache.org/

Benchmarking 172.25.254.100 (be patient)
Completed 10000 requests
Completed 20000 requests
Completed 30000 requests
Completed 40000 requests
Completed 50000 requests
3.3http配置块
#在响应报文中将指定的文件扩展名映射至MIME对应的类型
include /etc/nginx/mime.types;
default_type application/octet-stream; #除mime.types中的类型外,指定其它文件的默认MIME类型,浏览器一般会提示下载
types {
text/html html;
image/gif gif;
image/jpeg jpg;
}
3.4 核心配置示例
基于不同的IP、不同的端口以及不用得域名实现不同的虚拟主机,依赖于核心模块
ngx_http_core_module实现。
3.4.1 新建一个PC web站点
#定义子配置文件路径
http {
......
include /usr/local/nginx/conf/conf.d/*.conf; #在配置文件的最后面添加此行,注意不要放在最前面,会导致前面的命令无法生效
}
3.4.2 root与alias
root:指定web的家目录,在定义location的时候,文件的绝对路径等于 root+location
1.location中的root
bash
[root@nginx-node1 ~]# cd /usr/local/nginx/conf/
[root@nginx-node1 conf]# mkdir conf.d
[root@nginx-node1 conf]# vim nginx.conf
85 include "/usr/local/nginx/conf/conf.d/*.conf";  #写在server块后面

[root@nginx-node1 conf]# nginx -s reload
[root@nginx-node1 conf]# cd conf.d/
[root@nginx-node1 conf.d]# mkdir -p /webdata/nginx/ys.org/lee/html
[root@nginx-node1 conf.d]# echo lee.ys.org > /webdata/nginx/ys.org/lee/html/index.html
[root@nginx-node1 conf.d]# vim vhost.conf
server {
    listen 80;
    server_name lee.ys.org;
    location / {
        root /webdata/nginx/ys.org/lee/html;
    }


}


#测试
[root@nginx-node1 conf.d]# vim /etc/hosts
172.25.254.100      nginx-node1   www.ys.org  lee.ys.org
[root@nginx-node1 conf.d]# nginx -s reload
[root@nginx-node1 conf.d]# curl www.ys.org
ys
[root@nginx-node1 conf.d]# curl lee.ys.org
lee.ys.org

#local示例需要访问lee.ys.org/lee/目录
[root@nginx-node1 conf.d]# vim vhost.conf
server {
    listen 80;
    server_name lee.ys.org;
    location / {
        root /webdata/nginx/ys.org/lee/html;
    }
    location /lee {    #lee标识location中的root值+location 后面指定的值代表目录的路径
        root /webdata/nginx/ys.org/lee/html;
    }


}

[root@nginx-node1 conf.d]# systemctl restart nginx.service
[root@nginx-node1 conf.d]# mkdir -p /webdata/nginx/ys.org/lee/html/lee
[root@nginx-node1 conf.d]# echo lee > /webdata/nginx/ys.org/lee/html/lee/index.html
[root@nginx-node1 conf.d]# curl lee.ys.org/lee/
lee
alias:定义路径别名,会把访问的路径重新定义到其指定的路径,文档映射的另一种机制;仅能用于
location上下文,此指令使用较少
2.location中的alias
bash
[root@nginx-node1 conf.d]# vim vhost.conf
server {
    listen 80;
    server_name lee.ys.org;

    location /passwd {        #表示文件
        alias /etc/passwd;
    }

    location /passwd/ {        #表示目录
        alias /mnt/;
    }


}
[root@nginx-node1 conf.d]# nginx -s reload
[root@nginx-node1 conf.d]# echo passwd > /mnt/index.html
[root@nginx-node1 conf.d]# curl lee.ys.org/passwd
root:x:0:0:root:/root:/bin/bash
bin:x:1:1:bin:/bin:/sbin/nologin
daemon:x:2:2:daemon:/sbin:/sbin/nologin
adm:x:3:4:adm:/var/adm:/sbin/nologin
[root@nginx-node1 conf.d]# curl lee.ys.org/passwd/
passwd
注意:
location中使用root指令和alias指令的意义不同
root #给定的路径对应于location中的/uri左侧的/
alias #给定的路径对应于location中的/uri的完整路径
3.4.3 location的详细使用
- 在一个server中location配置段可存在多个,用于实现从uri到文件系统的路径映射;
- ngnix会根据用户请求的URI来检查定义的所有location,按一定的优先级找出一个最佳匹配
而后应用其配置;在没有使用正则表达式的时候,nginx会先在server中的多个location选取匹配度最高的一个uri
- ngnix会根据用户请求的URI来检查定义的所有location,按一定的优先级找出一个最佳匹配
- uri是用户请求的字符串,即域名后面的web文件路径
- 然后使用该location模块中的正则url和字符串,如果匹配成功就结束搜索,并使用此location处理此请求。
#语法规则:
location = \| \~ \| \~\* \| \^\~ uri { ... }
= #用于标准uri前,需要请求字串与uri精确匹配,大小敏感,如果匹配成功就停止向下匹配并立即处理请求
^~ #匹配前缀;用于标准uri前,表示包含正则表达式,并且匹配以指定的正则表达式开头,对uri的最左边部分做匹配检查,不区分字符大小写
~ #用于标准uri前,表示包含正则表达式,并且区分大小写
~* #用于标准uri前,表示包含正则表达式,并且不区分大写
不带符号 #普通匹配前缀;匹配起始于此uri的所有的uri
/ #用于标准uri前,表示包含正则表达式并且转义字符。可以将 . * ?等转义为普通符号
#匹配优先级从高到低:
=, ^~, ~/~*, 不带符号
3.4.4 Nginx账户认证功能
由 ngx_http_auth_basic_module 模块提供此功能
示例:
1.基于IP的服务访问控制
bash
[root@nginx-node1 conf.d]# vim vhost.conf
server {
    listen 80;
    server_name lee.ys.org;
    root /webdata/lee/html;
    index index.html;
    location /admin {
            allow 172.25.254.200;
            deny all;
    }


}

#测试
[root@nginx-node1 conf.d]# systemctl restart nginx.service
[root@nginx-node1 conf.d]# mkdir /webdata/lee/html/admin
[root@nginx-node1 conf.d]# echo "admin'page" > /webdata/lee/html/admin/index.html

[root@nginx-node1 conf.d]# curl lee.ys.org/admin
<html>
<head><title>403 Forbidden</title></head>
<body>
<center><h1>403 Forbidden</h1></center>
<hr><center>nginx/1.28.1</center>
</body>
</html>
[root@nginx-node2 ~]# curl lee.ys.org/admin/
admin'page
2.服务访问认证
bash
[root@nginx-node1 ~]# htpasswd -cmb /usr/local/nginx/conf/conf.d/.htpasswd admin 123
[root@nginx-node1 conf.d]# vim vhost.conf
server {
    listen 80;
    server_name lee.ys.org;
    root /webdata/lee/html;
    index index.html;
    location /admin {
            auth_basic "login passwd";
            auth_basic_user_file "/usr/local/nginx/conf/conf.d/.htpasswd";
    }


}
[root@nginx-node1 conf.d]# systemctl restart nginx.service

#测试
[root@nginx-node1 conf.d]# curl lee.ys.org/admin/
<html>
<head><title>401 Authorization Required</title></head>
<body>
<center><h1>401 Authorization Required</h1></center>
<hr><center>nginx/1.28.1</center>
</body>
</html>
[root@nginx-node1 conf.d]# curl -uadmin:123 http://lee.ys.org/admin/
admin'page
3.4.5 自定义错误页面
自 定义错误页,同时也可以用指定的响应状态码进行响应, 可用位置:http, server, location, if in
location
示例:
bash
[root@nginx-node1 conf.d]# mkdir /errorpage
[root@nginx-node1 conf.d]# echo "页面走丢了" > /errorpage/40x.html
[root@nginx-node1 conf.d]# vim vhost.conf
server {
    listen 80;
    server_name lee.ys.org;
    root /webdata/lee/html;
    index index.html;
    error_page 404 403 402 405 401 /40x.html;
    location /admin {
            auth_basic "login passwd";
            auth_basic_user_file "/usr/local/nginx/conf/conf.d/.htpasswd";
    }

    location /40x.html {
        root /errorpage;
    }

}

#测试
[root@nginx-node1 conf.d]# systemctl restart nginx.service
[root@nginx-node1 conf.d]# curl lee.ys.org/adqqe
页面走丢了
3.4.6 自定义错误日志
bash
[root@nginx-node1 conf.d]# mkdir -p /logs/nginx
[root@nginx-node1 conf.d]# vim vhost.conf
server {
    listen 80;
    server_name lee.ys.org;
    root /webdata/lee/html;
    index index.html;
    error_page 404 403 402 405 401 /40x.html;
    error_log /logs/nginx/error.log
    location /admin {
            auth_basic "login passwd";
            auth_basic_user_file "/usr/local/nginx/conf/conf.d/.htpasswd";
    }

    location /40x.html {
        root /errorpage;
    }

}
#测试
[root@nginx-node1 conf.d]# systemctl restart nginx.service
[root@nginx-node1 conf.d]# curl lee.ys.org/kkkasd
页面走丢了
[root@nginx-node1 conf.d]# ll /logs/nginx/
总用量 4
-rw-r--r-- 1 root root 209  8月 22 17:39 error.log
3.4.7 检测文件是否存在
try_files会按顺序检查文件是否存在,返回第一个找到的文件或文件夹(结尾加斜线表示为文件夹),如果所有文件或文件夹都找不到,会进行一个内部重定向到最后一个参数。只有最后一个参数可以引起一个内部重定向,之前的参数只设置内部URI的指向。最后一个参数是回退URI且必须存在,否则会出现内部500错误。
bash
[root@nginx-node1 conf.d]# echo "你访问的页面不存在!!!" > /errorpage/default.html
[root@nginx-node1 conf.d]# vim vhost.conf
server {
    listen 80;
    server_name lee.ys.org;
    root /webdata/lee/html;
    index index.html;
    error_page  403 402 405 401 /40x.html;
    error_log /logs/nginx/error.log;
    try_files $uri $uri.html $uri/index.html /errorpage/default.html;
    location /admin {
            auth_basic "login passwd";
            auth_basic_user_file "/usr/local/nginx/conf/conf.d/.htpasswd";
    }

    location /40x.html {
        root /errorpage;
    }

}
[root@nginx-node1 conf.d]# systemctl restart nginx.service

#测试
[root@nginx-node2 ~]# curl lee.ys.org/adm
你访问的页面不存在!!!
3.4.8 长连接配置
keepalive_timeout timeout header_timeout; #设定保持连接超时时长,0表示禁止长连
接,默认为75s;通常配置在http字段作为站点全局配置
keepalive_requests 数字; #在一次长连接上所允许请求的资源的最大数量;默认为100次,建议适当调大,比如:500
示例:
1.设定长连接时间
bash
[root@nginx-node1 conf.d]# vim /usr/local/nginx/conf/nginx.conf
    keepalive_timeout  5 3;
[root@nginx-node1 conf.d]# nginx -s reload

#测试
[root@nginx-node2 ~]# dnf install telnet -y
[root@nginx-node2 ~]# telnet lee.ys.org 80
Trying 172.25.254.100...
Connected to lee.ys.org.
Escape character is '^]'.
GET / HTTP/1.1
Host: 172.25.254.100
#等待5s后连接会断开
Trying 172.25.254.100...
Connected to lee.ys.org.
Escape character is '^]'.
GET / HTTP/1.1
Host: 172.25.254.100

HTTP/1.1 200 OK
Server: nginx/1.28.1
Date: Sat, 22 Aug 2026 10:16:20 GMT
Content-Type: text/html
Content-Length: 3
Last-Modified: Fri, 21 Aug 2026 12:02:53 GMT
Connection: keep-alive
Keep-Alive: timeout=3
ETag: "6a883e6d-3"
Accept-Ranges: bytes

ys
Connection closed by foreign host.
2.设定长链接次数
bash
[root@nginx-node1 conf.d]# vim /usr/local/nginx/conf/nginx.conf
keepalive_requests 3;
[root@nginx-node1 conf.d]# systemctl restart nginx.service

#测试
[root@nginx-node2 ~]# telnet lee.ys.org 80
Trying 172.25.254.100...
Connected to lee.ys.org.
Escape character is '^]'.
GET / HTTP/1.1
Host: 172.25.254.100

HTTP/1.1 200 OK        #第一次
Server: nginx/1.28.1
Date: Sat, 22 Aug 2026 10:26:00 GMT
Content-Type: text/html
Content-Length: 3
Last-Modified: Fri, 21 Aug 2026 12:02:53 GMT
Connection: keep-alive
ETag: "6a883e6d-3"
Accept-Ranges: bytes

ys
GET / HTTP/1.1         #第二次
Host: 172.25.254.100

HTTP/1.1 200 OK
Server: nginx/1.28.1
Date: Sat, 22 Aug 2026 10:26:22 GMT
Content-Type: text/html
Content-Length: 3
Last-Modified: Fri, 21 Aug 2026 12:02:53 GMT
Connection: keep-alive
ETag: "6a883e6d-3"
Accept-Ranges: bytes

ys
GET / HTTP/1.1            #第三次
Host: 172.25.254.100

HTTP/1.1 200 OK
Server: nginx/1.28.1
Date: Sat, 22 Aug 2026 10:26:33 GMT
Content-Type: text/html
Content-Length: 3
Last-Modified: Fri, 21 Aug 2026 12:02:53 GMT
Connection: close
ETag: "6a883e6d-3"
Accept-Ranges: bytes

ys
Connection closed by foreign host.
3.4.9 作为下载服务器
ngx_http_autoindex_module 模块处理以斜杠字符 "/" 结尾的请求,并生成目录列表,可以做为下载服务配置使用
相关指令:
autoindex on | off; #自动文件索引功能,默为off
autoindex_exact_size on | off; #计算文件确切大小(单位bytes),off 显示大概大小(单位K、M),默认on
autoindex_localtime on | off ; #显示本机时间而非GMT(格林威治)时间,默认off
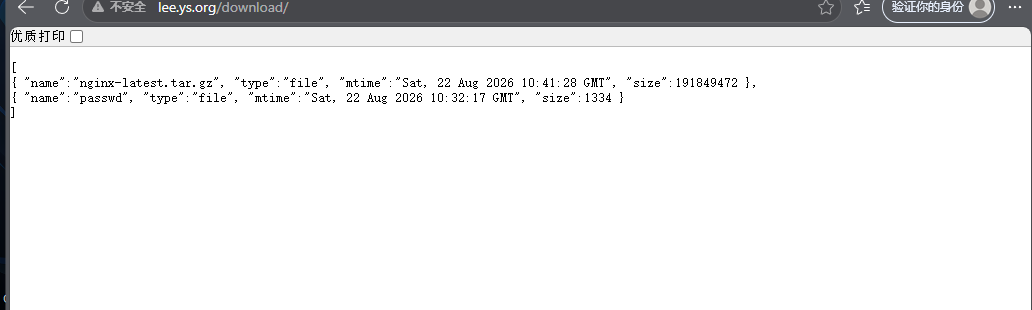
autoindex_format html | xml | json | jsonp; #显示索引的页面文件风格,默认html
limit_rate rate; #限制响应客户端传输速率(除GET和HEAD以外的所有方法),单位B/s,bytes/second,默认值0,表示无限制,此指令ngx_http_core_module提供
set $limit_rate 4k; #也可以通变量限速,单位B/s,同时设置,此项优级高.
示例:
1.启用列表功能
bash
[root@nginx-node1 conf.d]# mkdir -p /usr/local/nginx/download
[root@nginx-node1 conf.d]# cp /etc/passwd /usr/local/nginx/download/
[root@nginx-node1 conf.d]# vim vhost.conf
server {
    listen 80;
    server_name lee.ys.org;
    root /webdata/lee/html;
    index index.html;
    error_page 404 403 402 405 401 /40x.html;
    error_log /logs/nginx/error.log;
    location /admin {
            auth_basic "login passwd";
            auth_basic_user_file "/usr/local/nginx/conf/conf.d/.htpasswd";
    }

    location = /40x.html {
        root /errorpage;
    }

    location /download {
        root /usr/local/nginx;
        autoindex on;
    }

}
[root@nginx-node1 conf.d]# nginx -s reload
访问效果:
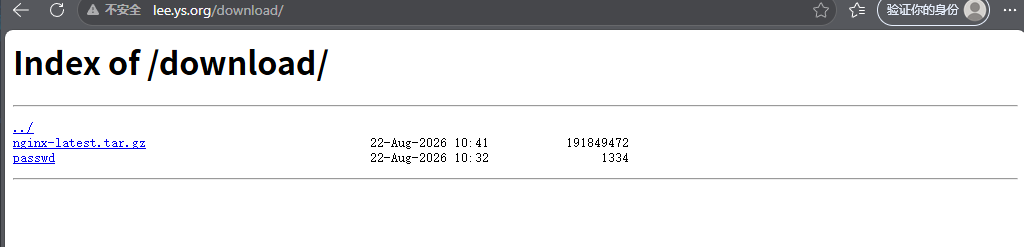
2.下载控速
bash
#控速之前
[root@nginx-node1 conf.d]# wget http://lee.ys.org/download/nginx-latest.tar.gz
--2026-08-22 18:43:33--  http://lee.ys.org/download/nginx-latest.tar.gz
正在解析主机 lee.ys.org (lee.ys.org)... 172.25.254.100
正在连接 lee.ys.org (lee.ys.org)|172.25.254.100|:80... 已连接。
已发出 HTTP 请求,正在等待回应... 200 OK
长度:191849472 (183M) [application/octet-stream]
正在保存至: "nginx-latest.tar.gz"

nginx-latest.tar.gz     100%[============================>] 182.96M   312MB/s  用时 0.6s

2026-08-22 18:43:34 (312 MB/s) - 已保存 "nginx-latest.tar.gz" [191849472/191849472])

[root@nginx-node1 conf.d]# ls
passwd  vhost.conf
[root@nginx-node1 conf.d]# ls
passwd  vhost.conf

#控速后
[root@nginx-node1 conf.d]# rm -rf nginx-latest.tat.gz
[root@nginx-node1 conf.d]# vim vhost.conf
....
location /download {
        root /usr/local/nginx;
        autoindex on;
        limit_rate 1024k;
    }
.....
[root@nginx-node1 conf.d]# wget http://lee.ys.org/download/nginx-latest.tar.gz
--2026-08-22 18:42:48--  http://lee.ys.org/download/nginx-latest.tar.gz
正在解析主机 lee.ys.org (lee.ys.org)... 172.25.254.100
正在连接 lee.ys.org (lee.ys.org)|172.25.254.100|:80... 已连接。
已发出 HTTP 请求,正在等待回应... 200 OK
长度:191849472 (183M) [application/octet-stream]
正在保存至: "nginx-latest.tar.gz"

nginx-latest.tar.gz       2%[                             ]   4.00M  1.01MB/s  剩余 2m 57s
3.显示文件大小优化
bash
[root@nginx-node1 conf.d]# vim vhost.conf
    location /download {
        root /usr/local/nginx;
        autoindex on;
        limit_rate 1024k;
        autoindex_exact_size off;
    }
[root@nginx-node1 conf.d]# systemctl restart nginx.service
访问效果
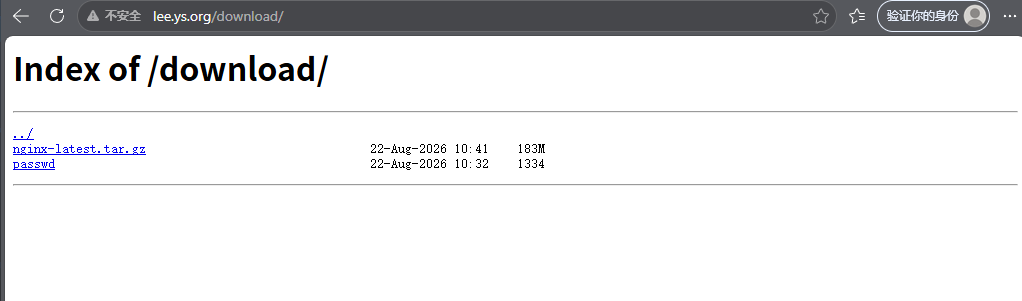
4.时间显示调整
bash
[root@nginx-node1 conf.d]# vim vhost.conf
location /download {
        root /usr/local/nginx;
        autoindex on;
        limit_rate 1024k;
        autoindex_exact_size off;
        autoindex_localtime on;
    }
[root@nginx-node1 conf.d]# systemctl restart nginx.service
访问效果

5.设定页面风格
bash
[root@nginx-node1 conf.d]# vim vhost.conf
location /download {
        root /usr/local/nginx;
        autoindex on;
        limit_rate 1024k;
        autoindex_exact_size off;
        autoindex_localtime on;
        autoindex_format html | xml | json | jsonp;
    }
[root@nginx-node1 conf.d]# systemctl restart nginx.service
json风格