0.资源管理介绍
在kubernetes中,所有的内容都抽象为资源,用户需要通过操作资源来管理kubernetes。
kubernetes的本质上就是一个集群系统,用户可以在集群中部署各种服务 所谓的部署服务,其实就是在kubernetes集群中运行一个个的容器,并将指定的程序跑在容器中。
kubernetes的最小管理单元是pod而不是容器,只能将容器放在 Pod 中,
kubernetes一般也不会直接管理Pod,而是通过 Pod控制器来管理Pod的。
Pod中服务的访问是由kubernetes提供的 Service 资源来实现。
Pod中程序的数据需要持久化是由kubernetes提供的各种存储系统来实现
一.资源管理方式
命令式对象管理:
直接使用命令去操作kubernetes资源
kubectl run nginx-pod --image=nginx:latest --port=80
命令式对象配置:通过命令配置和配置文件去操作kubernetes资源
kubectl create/patch -f nginx-pod.yaml
声明式对象配置:通过apply命令和配置文件去操作kubernetes资源
kubectl apply -f nginx-pod.yaml
命令式对象管理
kubectl是kubernetes集群的命令行工具,通过它能够对集群本身进行管理,并能够在集群上进行容器 化应用的安装部署
kubectl命令的语法如下:
kubectl command type name flags
comand:指定要对资源执行的操作,例如create、get、delete
type:指定资源类型,比如deployment、pod、service
name:指定资源的名称,名称大小写敏感
flags:指定额外的可选参数
查看所有pod
cpp
kubectl get pod查看某个pod
cpp
kubectl get pod pod_name查看某个pod,以yaml格式展示结果
cpp
kubectl get pod pod_name -o yaml资源类型
kubernetes中所有的内容都抽象为资源
cpp
kubectl api-resources常用资源类型
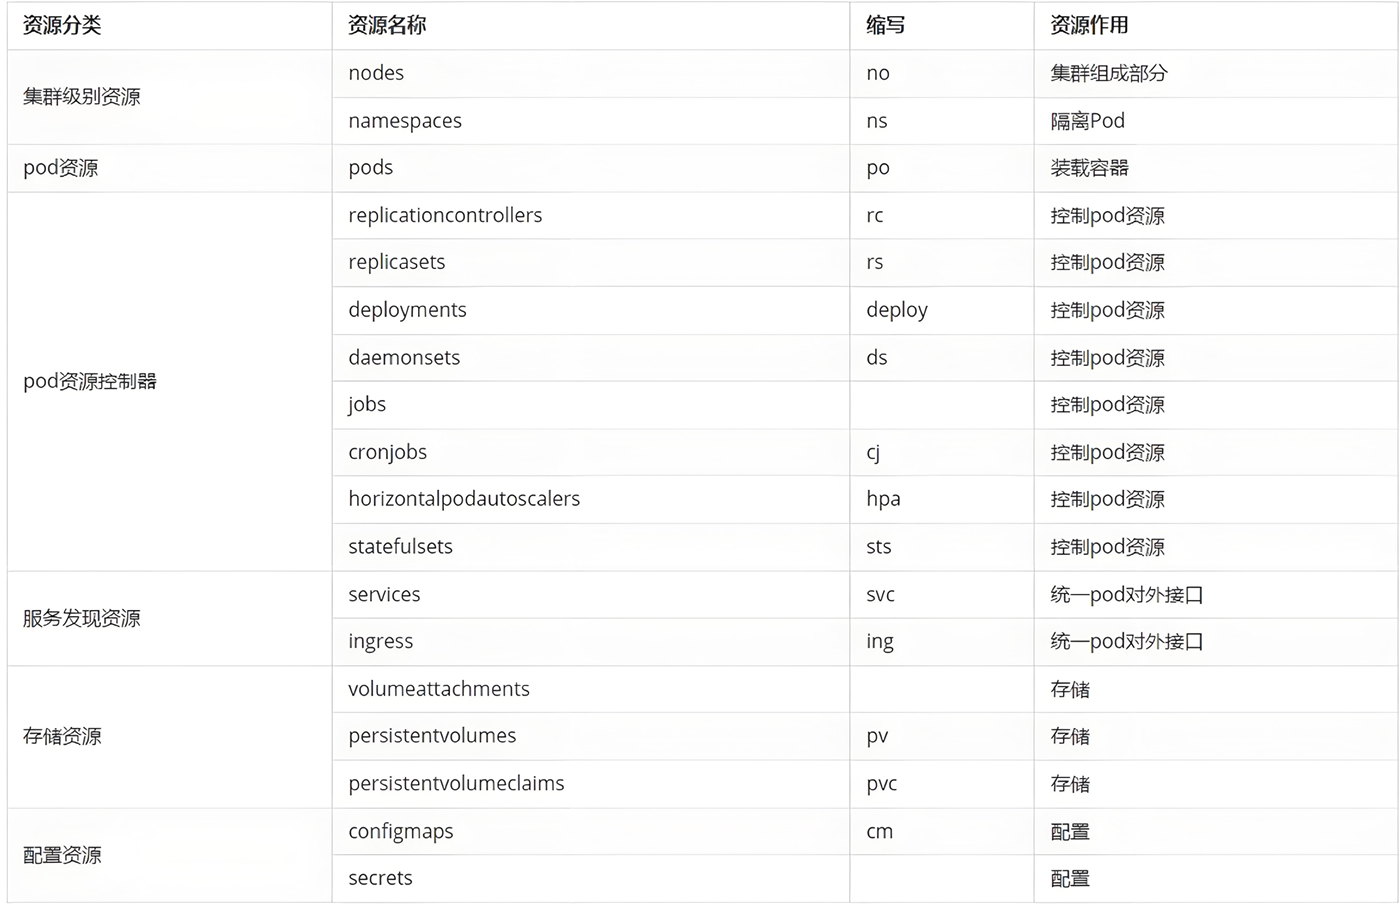
kubectl 常见命令操作
cpp
[root@master ~]# kubectl get namespaces  #查看命名空间
NAME              STATUS   AGE
default           Active   5d1h
kube-flannel      Active   5d1h
kube-node-lease   Active   5d1h
kube-public       Active   5d1h
kube-system       Active   5d1h

[root@master ~]# kubectl create namespace lin #创建
namespace/lin created
[root@master ~]# kubectl get namespaces
NAME              STATUS   AGE
default           Active   5d1h
kube-flannel      Active   5d1h
kube-node-lease   Active   5d1h
kube-public       Active   5d1h
kube-system       Active   5d1h
lin               Active   7s
[root@master ~]# kubectl delete  namespaces lin  #删除
namespace "lin" deleted
[root@master ~]# kubectl get namespaces
NAME              STATUS   AGE
default           Active   5d1h
kube-flannel      Active   5d1h
kube-node-lease   Active   5d1h
kube-public       Active   5d1h
kube-system       Active   5d1h
pod管理
cpp
[root@master ~]# kubectl run lin --image nginx:latest #创建pod
pod/lin created
[root@master ~]# kubectl get pods -o wide  #查看pod
NAME   READY   STATUS    RESTARTS   AGE   IP           NODE    NOMINATED NODE   READINESS GATES
lin    1/1     Running   0          10s   10.244.1.4   node1   <none>           <none>

[root@master ~]# kubectl run lin1 --image nginx  #错误的pod
pod/lin1 created
[root@master ~]# kubectl get pods -o wide  #查看
NAME   READY   STATUS              RESTARTS   AGE    IP           NODE    NOMINA                                                                              TED NODE   READINESS GATES
lin    1/1     Running             0          102s   10.244.1.4   node1   <none>                                                                                         <none>
lin1   0/1     ContainerCreating   0          6s     <none>       node3   <none>                                                                                         <none>
[root@master ~]# kubectl describe pods lin1 #查看详细信息
Name:             lin1
Namespace:        default
[root@master ~]# kubectl delete  pods lin1 #删除指定pod
pod "lin1" deleted from default namespace
[root@master ~]# kubectl delete pods --all #删除全部pod
pod "lin" deleted from default namespace
cpp
[root@master ~]# mkdir pod
[root@master ~]# cd pod
[root@master pod]# kubectl version #显示集群版本
Client Version: v1.35.7
Kustomize Version: v5.7.1
Server Version: v1.35.7
[root@master pod]# kubectl cluster-info #显示集群信息
Kubernetes control plane is running at https://172.25.254.100:6443
CoreDNS is running at https://172.25.254.100:6443/api/v1/namespaces/kube-system/                                                                              services/kube-dns:dns/proxy

To further debug and diagnose cluster problems, use 'kubectl cluster-info dump'.
[root@master pod]# kubectl create deployment  web1 --replicas 2 --image myapp:v1
#创建一个web1控制器,控制器中pod数量为2  create(创建)创建一个资源
deployment.apps/web1 created
[root@master pod]# kubectl get deployments.apps #查看控制器
NAME   READY   UP-TO-DATE   AVAILABLE   AGE
web1   2/2     2            2           9s
[root@master pod]# kubectl get pods
NAME                   READY   STATUS    RESTARTS   AGE
web1-59647bb49-9kcx2   1/1     Running   0          18s
web1-59647bb49-wvztv   1/1     Running   0          18s
[root@master pod]# kubectl edit deployments.apps web1 #edit(编辑)编辑一个资源
deployment.apps/web1 edited
[root@master pod]# kubectl get pods
NAME                   READY   STATUS    RESTARTS   AGE
web1-59647bb49-6nnvj   1/1     Running   0          8s
web1-59647bb49-9kcx2   1/1     Running   0          3m9s
web1-59647bb49-wvztv   1/1     Running   0          3m9s
patch(更新)更新一个资源
cpp
[root@master pod]# kubectl patch deployments.apps  web1 -p '{"spec":{"replicas":1}}'
deployment.apps/web1 patched
[root@master pod]# kubectl get pods
NAME                   READY   STATUS    RESTARTS   AGE
web1-59647bb49-9kcx2   1/1     Running   0          5m51s
expose(解释)展示资源文档

cpp
[root@master pod]# kubectl delete svc web1
service "web1" deleted from default namespace
[root@master pod]# kubectl expose  deployment web1 --port 80 --target-port 80
service/web1 exposed
[root@master pod]# kubectl get service
NAME          TYPE        CLUSTER-IP       EXTERNAL-IP   PORT(S)        AGE
kubernetes    ClusterIP   10.96.0.1        <none>        443/TCP        5d2h
testservice   ClusterIP   10.106.33.104    <none>        80/TCP         29h
web1          ClusterIP   10.101.114.159   <none>        80/TCP         21s
webcluster    NodePort    10.107.214.127   <none>        80:30665/TCP   4d5h
webservice    ClusterIP   10.96.155.94     <none>        80/TCP         27h
[root@master pod]# kubectl describe  svc web1
Name:                     web1
Namespace:                default
Labels:                   app=web1
Annotations:              <none>
Selector:                 app=web1
Type:                     ClusterIP
IP Family Policy:         SingleStack
IP Families:              IPv4
IP:                       10.101.114.159
IPs:                      10.101.114.159
Port:                     <unset>  80/TCP
TargetPort:               80/TCP
Endpoints:                10.244.3.5:80
Session Affinity:         None
Internal Traffic Policy:  Cluster
Events:                   <none>

[root@master pod]# curl 10.101.114.159
Hello MyApp | Version: v1 | <a href="hostname.html">Pod Name</a>
[root@master pod]# curl 10.101.114.159
Hello MyApp | Version: v1 | <a href="hostname.html">Pod Name</a>
#logs(日志)输出容器在pod中的日志
[root@master pod]# kubectl logs pods/web1-59647bb49-9kcx2
10.244.0.0 - - [25/Aug/2026:09:21:42 +0000] "GET / HTTP/1.1" 200 65 "-" "curl/7.76.1" "-"
10.244.0.0 - - [25/Aug/2026:09:21:44 +0000] "GET / HTTP/1.1" 200 65 "-" "curl/7.76.1" "-"
#查看资源帮助
cpp
[root@master pod]# kubectl explain deployment#查看控制器参数帮助
cpp
[root@master pod]# kubectl explain deployment.specattach(缠绕)进入运行中的pod
cpp
#运行交互pod
[root@master pod]# kubectl run -it testpod --image busybox:latest
All commands and output from this session will be recorded in container logs, including credentials and sensitive information passed through the command prompt.
If you don't see a command prompt, try pressing enter.
/ #
/ #
/ # <ctrl+pq>(退出)不停止pod

[root@master pod]# kubectl attach  pods/testpod -it  #可进入运行中的pod
All commands and output from this session will be recorded in container logs, including credentials and sensitive information passed through the command prompt.
If you don't see a command prompt, try pressing enter.
/ #
/ #
/ #
exec(执行)执行容器中的一个命令
cpp
[root@master pod]# kubectl run testpod1 --image nginx:latest
pod/testpod1 created
[root@master pod]# kubectl get pods
NAME                   READY   STATUS    RESTARTS   AGE
testpod                1/1     Running   0          6m49s
testpod1               1/1     Running   0          8s
web1-59647bb49-9kcx2   1/1     Running   0          27m
[root@master pod]# kubectl exec -it pods/testpod1 -c testpod1  -- /bin/bash
root@testpod1:/#
cp(复制)在pod内外复制文件
cpp
[root@master pod]# kubectl cp testpod1:/usr/share/nginx/html/index.html /mnt/test
tar: Removing leading `/' from member names
[root@master pod]# ls /mnt
hgfs  test
[root@master pod]# echo lin > /mnt/test
[root@master pod]# kubectl cp /mnt/test testpod1:/usr/share/nginx/html/index.html
[root@master pod]# kubectl get pods -o wide
NAME                   READY   STATUS    RESTARTS   AGE     IP           NODE    NOMINATED NODE   READINESS GATES
testpod                1/1     Running   0          12m     10.244.1.6   node1   <none>           <none>
testpod1               1/1     Running   0          5m55s   10.244.1.7   node1   <none>           <none>
web1-59647bb49-9kcx2   1/1     Running   0          33m     10.244.3.5   node3   <none>           <none>
[root@master pod]# curl 10.244.1.7
lin
rollout(首次展示)管理资源的发布
cpp
[root@master pod]# kubectl create deployment web1 --image myapp:v1 --replicas 2                                                                                --dry-run=client -o yaml > web1.yml
[root@master pod]# vim web1.yml
[root@master pod]# kubectl apply -f web1.yml
deployment.apps/web1 created
[root@master pod]# kubectl get deployments.apps
NAME   READY   UP-TO-DATE   AVAILABLE   AGE
web1   2/2     2            2           8s
[root@master pod]# kubectl get pods
NAME                   READY   STATUS    RESTARTS   AGE
web1-59647bb49-9hsw2   1/1     Running   0          17s
web1-59647bb49-s7c2r   1/1     Running   0          17s
[root@master pod]# kubectl rollout  status deployment web1
deployment "web1" successfully rolled out
[root@master pod]# kubectl rollout restart  deployment web1
deployment.apps/web1 restarted
[root@master pod]# kubectl get pods
NAME                   READY   STATUS    RESTARTS   AGE
web1-d9c85fcb5-8xmrw   1/1     Running   0          10s
web1-d9c85fcb5-wgrhc   1/1     Running   0          10s
scale(规模)扩/缩容pod的数量
cpp
[root@master pod]# kubectl scale  deployment web1 --replicas 4
deployment.apps/web1 scaled
[root@master pod]# kubectl get pods
NAME                   READY   STATUS    RESTARTS   AGE
web1-98bb59bf5-5b9rp   1/1     Running   0          7s
web1-98bb59bf5-9txw5   1/1     Running   0          2m54s
web1-98bb59bf5-jhdh9   1/1     Running   0          7s
web1-98bb59bf5-stf9b   1/1     Running   0          2m53s
[root@master pod]# kubectl scale deployment web1 --replicas 1
deployment.apps/web1 scaled
[root@master pod]# kubectl get pods
NAME                   READY   STATUS    RESTARTS   AGE
web1-98bb59bf5-9txw5   1/1     Running   0          3m14s
label(标签)更新资源上的标签
cpp
[root@master pod]# kubectl get pods
NAME                   READY   STATUS    RESTARTS   AGE
web1-98bb59bf5-9txw5   1/1     Running   0          3m14s
[root@master pod]# kubectl get pods --show-labels
NAME                   READY   STATUS    RESTARTS   AGE     LABELS
web1-98bb59bf5-9txw5   1/1     Running   0          4m50s   app=web1,pod-template-hash=98bb59bf5
[root@master pod]# kubectl get deployments.apps web1  --show-labels
NAME   READY   UP-TO-DATE   AVAILABLE   AGE     LABELS
web1   1/1     1            1           7m13s   app=web1
#删除标签
[root@master pod]# kubectl label pods web1-98bb59bf5-9txw5 app-
pod/web1-98bb59bf5-9txw5 unlabeled
#打上标签
[root@master pod]# kubectl label pods web1-98bb59bf5-9txw5 app=web1
pod/web1-98bb59bf5-9txw5 labeled
二.什么是pod
Pod是可以创建和管理Kubernetes计算的最小可部署单元
一个Pod代表着集群中运行的一个进程,每个pod都有一个唯一的ip。
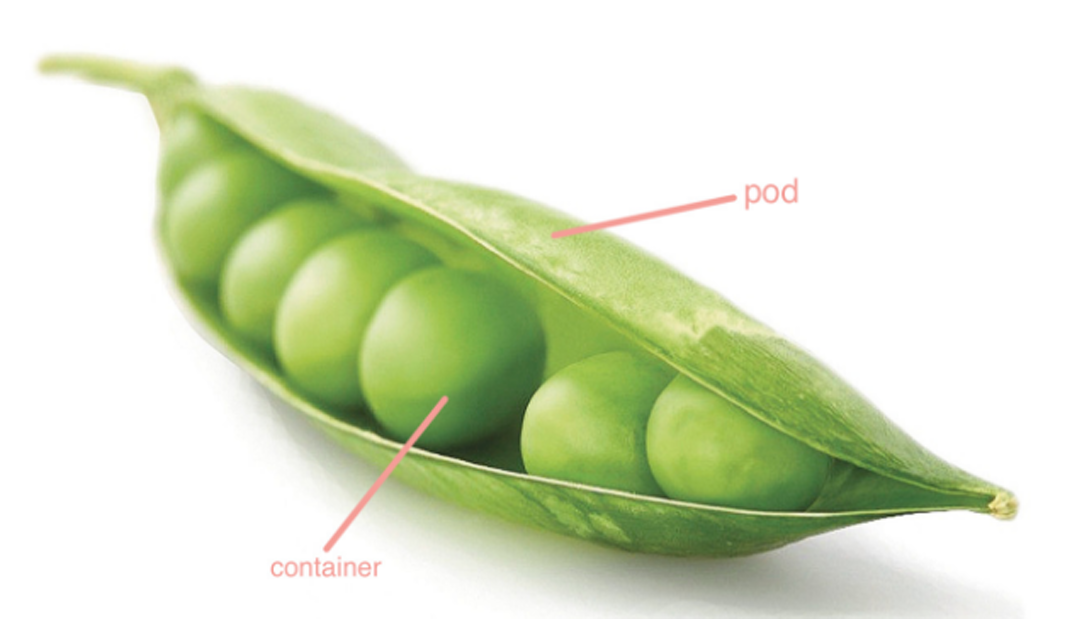
一个pod类似一个豌豆荚,包含一个或多个容器(通常是docker)
多个容器间共享IPC、Network和UTC namespace。
1.创建自主式pod (生产不推荐)
优点:
灵活性高: 可以精确控制 Pod 的各种配置参数,包括容器的镜像、资源限制、环境变量、命令和参数等,满足 特定的应用需求。
学习和调试方便: 对于学习 Kubernetes 的原理和机制非常有帮助,通过手动创建 Pod 可以深入了解 Pod 的结构和配 置方式。在调试问题时,可以更直接地观察和调整 Pod 的设置。
适用于特殊场景: 在一些特殊情况下,如进行一次性任务、快速验证概念或在资源受限的环境中进行特定配置时,手 动创建 Pod 可能是一种有效的方式。
缺点:
管理复杂: 如果需要管理大量的 Pod,手动创建和维护会变得非常繁琐和耗时。难以实现自动化的扩缩容、故 障恢复等操作。
缺乏高级功能: 无法自动享受 Kubernetes 提供的高级功能,如自动部署、滚动更新、服务发现等。这可能导致应 用的部署和管理效率低下。
可维护性差:
手动创建的 Pod 在更新应用版本或修改配置时需要手动干预,容易出现错误,并且难以保证一致 性。相比之下,通过声明式配置或使用 Kubernetes 的部署工具可以更方便地进行应用的维护和更 新。
cpp
#删除web1控制器清空pod
[root@master pod]# kubectl delete deployments.apps web1
deployment.apps "web1" deleted from default namespace
[root@master pod]# kubectl get pods
No resources found in default namespace.

#手动建立pod
[root@master pod]# kubectl run lin --image nginx:latest
pod/lin created
[root@master pod]# kubectl get pods -o wide
NAME   READY   STATUS    RESTARTS   AGE   IP            NODE    NOMINATED NODE   READINESS GATES
lin    1/1     Running   0          19s   10.244.1.13   node1   <none>           <none>
2.利用控制器管理pod(推荐)
高可用性和可靠性:
自动故障恢复:如果一个 Pod 失败或被删除,控制器会自动创建新的 Pod 来维持期望的副本数 量。确保应用始终处于可用状态,减少因单个 Pod 故障导致的服务中断。
健康检查和自愈:可以配置控制器对 Pod 进行健康检查(如存活探针和就绪探针)。如果 Pod 不 健康,控制器会采取适当的行动,如重启 Pod 或删除并重新创建它,以保证应用的正常运行。
可扩展性:
轻松扩缩容:可以通过简单的命令或配置更改来增加或减少 Pod 的数量,以满足不同的工作负载需 求。例如,在高流量期间可以快速扩展以处理更多请求,在低流量期间可以缩容以节省资源。
水平自动扩缩容(HPA):可以基于自定义指标(如 CPU 利用率、内存使用情况或应用特定的指 标)自动调整 Pod 的数量,实现动态的资源分配和成本优化。
版本管理和更新:
滚动更新:对于 Deployment 等控制器,可以执行滚动更新来逐步替换旧版本的 Pod 为新版本,确 保应用在更新过程中始终保持可用。可以控制更新的速率和策略,以减少对用户的影响。
回滚:如果更新出现问题,可以轻松回滚到上一个稳定版本,保证应用的稳定性和可靠性。
声明式配置:
简洁的配置方式:使用 YAML 或 JSON 格式的声明式配置文件来定义应用的部署需求。这种方式使 得配置易于理解、维护和版本控制,同时也方便团队协作。
期望状态管理:只需要定义应用的期望状态(如副本数量、容器镜像等),控制器会自动调整实际 状态与期望状态保持一致。无需手动管理每个 Pod 的创建和删除,提高了管理效率。
服务发现和负载均衡:
自动注册和发现:Kubernetes 中的服务(Service)可以自动发现由控制器管理的 Pod,并将流量 路由到它们。这使得应用的服务发现和负载均衡变得简单和可靠,无需手动配置负载均衡器。
流量分发:可以根据不同的策略(如轮询、随机等)将请求分发到不同的 Pod,提高应用的性能和 可用性。
多环境一致性:
一致的部署方式:在不同的环境(如开发、测试、生产)中,可以使用相同的控制器和配置来部署 应用,确保应用在不同环境中的行为一致。这有助于减少部署差异和错误,提高开发和运维效率。
cpp
[root@master pod]# kubectl create deployment web1 --image myapp:v1 --replicas 2                                                                               --dry-run=client -o yaml  > web1.yml
[root@master pod]# vim web1.yml
[root@master pod]# kubectl apply -f web1.yml
deployment.apps/web1 created
[root@master pod]# kubectl get pods
NAME                   READY   STATUS    RESTARTS   AGE
web1-59647bb49-2s6gr   1/1     Running   0          10s
web1-59647bb49-zcl5r   1/1     Running   0          10s
[root@master pod]# kubectl rollout history deployment web1
deployment.apps/web1
REVISION  CHANGE-CAUSE
1         <none>

[root@master pod]# kubectl delete  svc web1
service "web1" deleted from default namespace
[root@master pod]# kubectl expose  deployment web1  --port 80 --target-port  80                                                                               --type NodePort

[root@master pod]# kubectl expose  deployment web1  --port 80 --target-port  80                                                                               --type NodePort
service/web1 exposed
[root@master pod]# kubectl get svc
NAME          TYPE        CLUSTER-IP       EXTERNAL-IP   PORT(S)        AGE
kubernetes    ClusterIP   10.96.0.1        <none>        443/TCP        5d3h
testservice   ClusterIP   10.106.33.104    <none>        80/TCP         30h
web1          NodePort    10.105.134.116   <none>        80:32600/TCP   9s
webcluster    NodePort    10.107.214.127   <none>        80:30665/TCP   4d6h
webservice    ClusterIP   10.96.155.94     <none>        80/TCP         28h
[root@master pod]# curl http://172.25.254.100:32600/
Hello MyApp | Version: v1 | <a href="hostname.html">Pod Name</a>
[root@master pod]# curl http://172.25.254.100:32600/
Hello MyApp | Version: v1 | <a href="hostname.html">Pod Name</a>
[root@master pod]# curl http://172.25.254.100:32600/
Hello MyApp | Version: v1 | <a href="hostname.html">Pod Name</a>
更新业务版本
cpp
#更新业务版本
[root@master pod]# kubectl set image deployments web1  myapp=myapp:v2
deployment.apps/web1 image updated

[root@master pod]# kubectl annotate deployments.apps web1 kubernetes.io/change-cause="myapp:v2" --overwrite
#为本次更新设定标签
deployment.apps/web1 annotated
[root@master pod]# kubectl get pods
NAME                    READY   STATUS    RESTARTS   AGE
web1-6758f96b8d-hbkg4   1/1     Running   0          69s
web1-6758f96b8d-zlh4l   1/1     Running   0          68s
[root@master pod]# kubectl rollout history
error: required resource not specified
[root@master pod]# kubectl rollout history deployment web1
deployment.apps/web1
REVISION  CHANGE-CAUSE
1         <none>
2         myapp:v2

[root@master pod]# curl http://172.25.254.100:32600/                            Hello MyApp | Version: v2 | <a href="hostname.html">Pod Name</a>
#这里更新到v2版
cpp
#版本回退
[root@master pod]# kubectl rollout  history deployment web1
deployment.apps/web1
REVISION  CHANGE-CAUSE
1         <none>
2         myapp:v2

[root@master pod]# kubectl rollout undo deployment web1 --to-revision 1
deployment.apps/web1 rolled back
[root@master pod]# curl http://172.25.254.100:32600/
Hello MyApp | Version: v1 | <a href="hostname.html">Pod Name</a>
#这里又回到了v1版
3.利用yaml文件部署应用
用yaml文件部署应用有以下优点
声明式配置:
清晰表达期望状态:以声明式的方式描述应用的部署需求,包括副本数量、容器配置、网络设置 等。这使得配置易于理解和维护,并且可以方便地查看应用的预期状态。
可重复性和版本控制:配置文件可以被版本控制,确保在不同环境中的部署一致性。可以轻松回滚 到以前的版本或在不同环境中重复使用相同的配置。
团队协作:便于团队成员之间共享和协作,大家可以对配置文件进行审查和修改,提高部署的可靠 性和稳定性。
灵活性和可扩展性:
丰富的配置选项:可以通过 YAML 文件详细地配置各种 Kubernetes 资源,如 Deployment、 Service、ConfigMap、Secret 等。可以根据应用的特定需求进行高度定制化。
组合和扩展:可以将多个资源的配置组合在一个或多个 YAML 文件中,实现复杂的应用部署架构。 同时,可以轻松地添加新的资源或修改现有资源以满足不断变化的需求。
与工具集成:
与 CI/CD 流程集成:可以将 YAML 配置文件与持续集成和持续部署(CI/CD)工具集成,实现自动 化的应用部署。例如,可以在代码提交后自动触发部署流程,使用配置文件来部署应用到不同的环 境。
命令行工具支持:Kubernetes 的命令行工具 kubectl 对 YAML 配置文件有很好的支持,可以方便 地应用、更新和删除配置。同时,还可以使用其他工具来验证和分析 YAML 配置文件,确保其正确 性和安全性。
cpp
# K8s API接口版本,Pod资源固定使用v1版本
apiVersion: v1
# 资源类型,当前定义的是Pod
kind: Pod
# 元数据:资源标识信息
metadata:
  # Pod的名称,同一命名空间下不能重名
  name: testpod
  # 命名空间,不写默认就是default
  namespace: default
# Pod核心规约,定义Pod整体行为与容器
spec:
  # Pod重启策略:Always,无论容器如何退出都自动重启(默认策略)
  restartPolicy: Always
  # 容器列表,一个Pod可运行多个容器
  containers:
  - name: nginx       # 容器名称,Pod内部唯一
    image: nginx:1.24 # 使用的镜像与版本
    # 镜像拉取策略:本地存在镜像就使用本地,不存在才远程拉取
    imagePullPolicy: IfNotPresent
    # 容器端口配置
    ports:
    - containerPort: 80  # 容器内部监听端口,nginx默认80
      protocol: TCP       # 端口协议,默认TCP,支持UDP
    # 容器资源配置:requests调度请求,limits资源上限
    resources:
      # requests:调度时向节点申请的最小资源,用于k8s调度选节点
      requests:
        cpu: 100m      # CPU请求:100毫核,1000m=1核
        memory: 128Mi  # 内存请求:128兆
      # limits:容器能够使用的最大资源,超出会被限流/终止
      limits:
        cpu: 200m      # CPU最大使用上限200毫核
        memory: 256Mi  # 内存最大使用上限256兆
1.在pod中运行多容器
cpp
[root@master pod]# kubectl run testpod --image myapp:v1 --dry-run=client -o yaml > tastpod.yaml
[root@master pod]# vim tastpod.yaml
apiVersion: v1
kind: Pod
metadata:
  labels:
    run: testpod
  name: testpod
spec:
  containers:
  - image: myapp:v1
    name: testpod
  - image: busyboxplus:latest
    name: busybox
    command:
    - /bin/sh
    - -c
    - sleep 10000
[root@master pod]# kubectl apply -f tastpod.yaml
pod/testpod created
[root@master pod]# kubectl get pods
NAME      READY   STATUS    RESTARTS   AGE
testpod   2/2     Running   0          8s
[root@master pod]# kubectl  exec -it pods/testpod -c busybox -- /bin/sh
/bin/sh: shopt: not found
[ root@testpod:/ ]$ curl 127.0.0.1
Hello MyApp | Version: v1 | <a href="hostname.html">Pod Name</a>
[ root@testpod:/ ]$ exit
2.在pod运行主机中暴漏端口
cpp
[root@master pod]# vim tastpod.yaml
apiVersion: v1
kind: Pod
metadata:
  labels:
    run: testpod
  name: testpod
spec:
  containers:
  - image: myapp:v1
    name: testpod
    ports:
    - name: http
      containerPort: 80
      hostPort: 80
      protocol: TCP

[root@master pod]# kubectl delete -f tastpod.yaml
pod "testpod" deleted from default namespace
[root@master pod]# kubectl apply -f tastpod.yaml
pod/testpod created
[root@master pod]# kubectl get pods -o wide
NAME      READY   STATUS    RESTARTS   AGE   IP            NODE    NOMINATED NODE   READINESS GATES
testpod   1/1     Running   0          18s   10.244.1.18   node1   <none>           <none>
[root@master pod]# curl node1
Hello MyApp | Version: v1 | <a href="hostname.html">Pod Name</a>
[root@master pod]#
3.在pod中指定变量
cpp
[root@master pod]# vim mysql.yml
apiVersion: v1
kind: Pod
metadata:
  labels:
    run: mysql
  name: mysql
spec:
  containers:
  - image: mysql:8.0
    name: mysql8
    env:
    - name: MYSQL_ROOT_PASSWORD
      value: "123"

  - image: phpmyadmin:latest
    name: mysqladmin
    env:
    - name: PMA_ARBITRARY
      value: "1"
    ports:
    - name: phpadminport
      containerPort: 80
      hostPort: 80
      protocol: TCP
[root@master pod]# kubectl apply -f mysql.yml
pod/mysql created
[root@master pod]# kubectl get pods -o wide
NAME    READY   STATUS    RESTARTS   AGE   IP            NODE    NOMINATED NODE   READINESS GATES
mysql   2/2     Running   0          18s   10.244.1.19   node1   <none>           <none>

#去浏览器访问 node1 的IP看能不能登录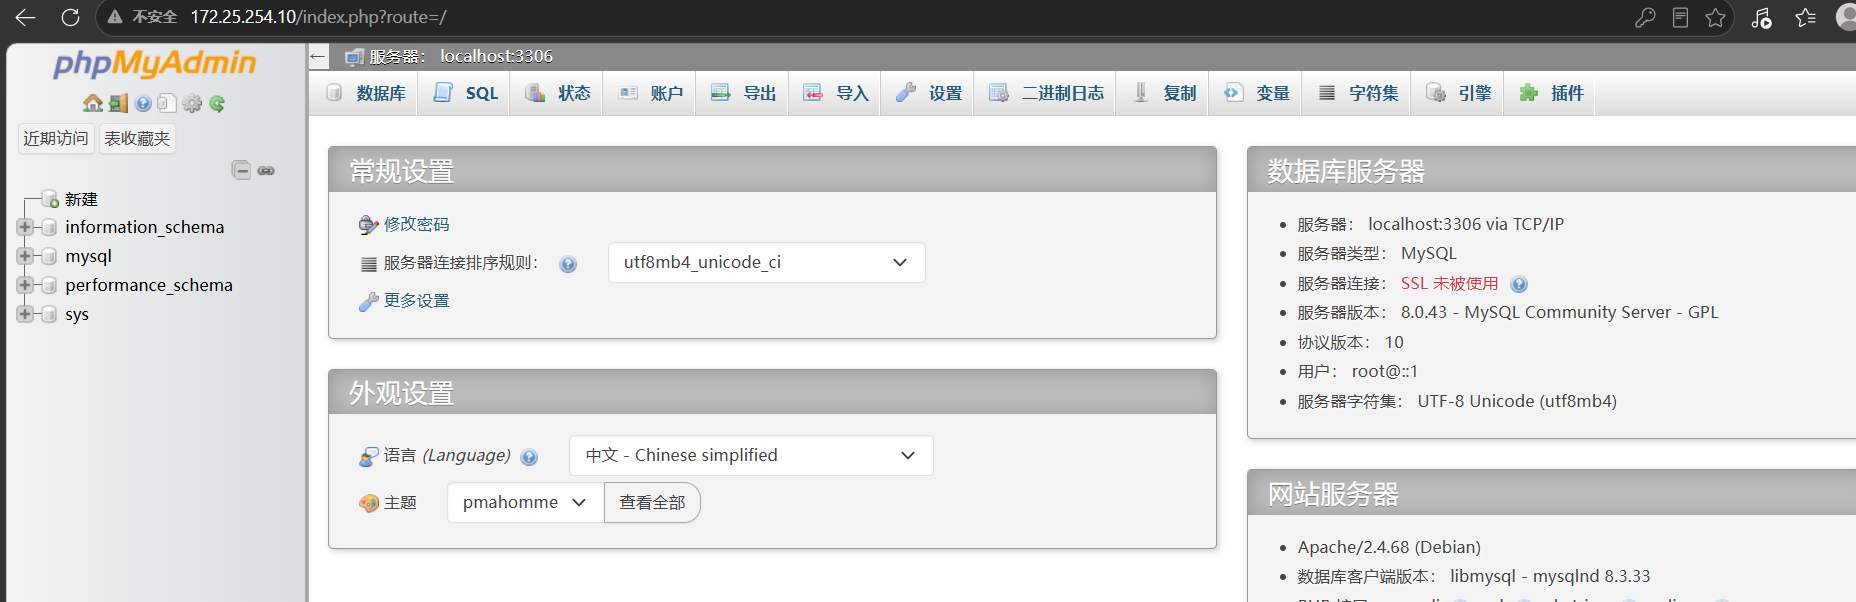
4.选择运行节点
cpp
[root@master pod]# vim mysql.yml
apiVersion: v1
kind: Pod
metadata:
  labels:
    run: mysql
  name: mysql
spec:
  nodeSelector:
    kubernetes.io/hostname: node2
  containers:
  - image: mysql:8.0
    name: mysql8
    env:
    - name: MYSQL_ROOT_PASSWORD
      value: "123"

  - image: phpmyadmin:latest
    name: mysqladmin
    env:
    - name: PMA_ARBITRARY
      value: "1"
    ports:
    - name: phpadminport
      containerPort: 80
      hostPort: 80
      protocol: TCP

[root@master pod]# kubectl delete pod mysql
pod "mysql" deleted from default namespace
[root@master pod]# kubectl apply -f mysql.yml
pod/mysql created
[root@master pod]# kubectl get pods -o wide
NAME    READY   STATUS              RESTARTS   AGE   IP       NODE    NOMINATED NODE   READINESS GATES
mysql   0/2     ContainerCreating   0          13s   <none>   node2   <none>           <none>
[root@master pod]# kubectl get pods -o wide
NAME    READY   STATUS    RESTARTS   AGE   IP            NODE    NOMINATED NODE   READINESS GATES
mysql   2/2     Running   0          59s   10.244.2.37   node2   <none>           <none>
[root@master pod]#
5.共享宿主机网络
cpp
[root@master pod]# vim tastpod.yaml
[root@master pod]# kubectl apply -f tastpod.yaml
pod/testpod configured
[root@master pod]# kubectl get pods
NAME      READY   STATUS    RESTARTS   AGE
mysql     2/2     Running   0          7m33s
testpod   1/1     Running   0          3m
[root@master pod]# kubectl exec -it pods/testpod  -c busybox  -- /bin/sh
/ #
/ # ifconfig
cni0      Link encap:Ethernet  HWaddr 9A:22:8D:20:CF:D4
          inet addr:10.244.1.1  Bcast:10.244.1.255  Mask:255.255.255.0
          inet6 addr: fe80::9822:8dff:fe20:cfd4/64 Scope:Link
          UP BROADCAST MULTICAST  MTU:1500  Metric:1
          RX packets:462 errors:0 dropped:0 overruns:0 frame:0
          TX packets:372 errors:0 dropped:0 overruns:0 carrier:0
          collisions:0 txqueuelen:1000
          RX bytes:686053 (669.9 KiB)  TX bytes:84946 (82.9 KiB)

docker0   Link encap:Ethernet  HWaddr 8E:E6:5D:67:11:0E
          inet addr:172.17.0.1  Bcast:172.17.255.255  Mask:255.255.0.0
          UP BROADCAST MULTICAST  MTU:1500  Metric:1
          RX packets:0 errors:0 dropped:0 overruns:0 frame:0
          TX packets:0 errors:0 dropped:3 overruns:0 carrier:0
          collisions:0 txqueuelen:0
          RX bytes:0 (0.0 B)  TX bytes:0 (0.0 B)

eth0      Link encap:Ethernet  HWaddr 00:0C:29:15:4E:3C
          inet addr:172.25.254.10  Bcast:172.25.254.255  Mask:255.255.255.0
          inet6 addr: fe80::20c:29ff:fe15:4e3c/64 Scope:Link
          UP BROADCAST RUNNING MULTICAST  MTU:1500  Metric:1
          RX packets:775962 errors:0 dropped:0 overruns:0 frame:0
          TX packets:28334 errors:0 dropped:1 overruns:0 carrier:0
          collisions:0 txqueuelen:1000
          RX bytes:1155331523 (1.0 GiB)  TX bytes:3775231 (3.5 MiB)

flannel.1 Link encap:Ethernet  HWaddr 46:CA:5F:4F:2C:22
          inet addr:10.244.1.0  Bcast:0.0.0.0  Mask:255.255.255.255
          inet6 addr: fe80::44ca:5fff:fe4f:2c22/64 Scope:Link
          UP BROADCAST RUNNING MULTICAST  MTU:1450  Metric:1
          RX packets:25 errors:0 dropped:0 overruns:0 frame:0
          TX packets:19 errors:0 dropped:17 overruns:0 carrier:0
          collisions:0 txqueuelen:0
          RX bytes:2207 (2.1 KiB)  TX bytes:1958 (1.9 KiB)

lo        Link encap:Local Loopback
          inet addr:127.0.0.1  Mask:255.0.0.0
          inet6 addr: ::1/128 Scope:Host
          UP LOOPBACK RUNNING  MTU:65536  Metric:1
          RX packets:1625 errors:0 dropped:0 overruns:0 frame:0
          TX packets:1625 errors:0 dropped:0 overruns:0 carrier:0
          collisions:0 txqueuelen:1000
          RX bytes:139096 (135.8 KiB)  TX bytes:139096 (135.8 KiB)

/ #
/ # exit
6.资源优先级限制
资源限制会影响pod的Qos Class资源优先级,资源优先级分为Guaranteed > Burstable > BestEffort QoS(Quality of Service)即服务质量
| 资源设定 | QoS 优先级类型 | 说明 |
|---|---|---|
| 资源限定未设定(不写 requests、limits) | BestEffort(尽力而为) | 最低优先级。节点资源紧张时,最先被驱逐杀掉 |
资源限定设定,最大最小不一致 (requests < limits) |
Burstable(突发) | 中间优先级。保证最低资源,允许突发占用到 limits 上限;资源不够时,次于 BestEffort 被驱逐 |
资源限定设定,最大最小完全一致 (requests = limits) |
Guaranteed(有保障) | 最高优先级。节点压力大时最后才会被驱逐,适合核心业务 |
#未设定则默认为BestEffort
#Burstable
cpp
[root@master pod]# vim tastpod.yaml
apiVersion: v1
kind: Pod
metadata:
  labels:
    run: testpod
  name: testpod
spec:
  hostNetwork: true

  containers:
  - image: busybox:latest
    name: busybox
    command:
    - /bin/sh
    - -c
    - sleep 10000
    resources:
      limits:
        cpu: 700m
        memory: 200M
      requests:
        cpu: 500m
        memory: 100M
[root@master pod]# kubectl delete -f tastpod.yaml
pod "testpod" deleted from default namespace
[root@master pod]# kubectl apply -f tastpod.yaml
pod/testpod created
[root@master pod]# kubectl describe pods testpod  | grep "QoS Class:"
QoS Class:                   Burstable
#Guaranteed
cpp
[root@master pod]# vim tastpod.yaml
apiVersion: v1
kind: Pod
metadata:
  labels:
    run: testpod
  name: testpod
spec:
  hostNetwork: true

  containers:
  - image: busybox:latest
    name: busybox
    command:
    - /bin/sh
    - -c
    - sleep 10000
    resources:
      limits:
        cpu: 700m
        memory: 200M
      requests:
        cpu: 700m
        memory: 200M
[root@master pod]# kubectl delete -f tastpod.yaml
pod "testpod" deleted from default namespace
[root@master pod]# kubectl apply -f tastpod.yaml
pod/testpod created
[root@master pod]# kubectl describe pods testpod  | grep "QoS Class:"
QoS Class:                   Guaranteed
7.容器重启规则
#Always 无论什么原因都会从新运行pod
cpp
[root@master pod]# vim tastpod.yaml
apiVersion: v1
kind: Pod
metadata:
  labels:
    run: testpod
  name: testpod
spec:
  hostNetwork: true
  restartPolicy: Always #只要pod停止就重新启动pod

  containers:
  - image: busybox:latest
    name: busybox
    command:
    - /bin/sh
    - -c
    - sleep 30  #设定运行30S后停止

[root@master pod]# kubectl apply -f tastpod.yaml
pod/testpod created
[root@master pod]# kubectl get pods -o wide -w
NAME      READY   STATUS    RESTARTS   AGE   IP              NODE    NOMINATED NODE   READINESS GATES
mysql     2/2     Running   0          21m   10.244.2.37     node2   <none>           <none>
testpod   1/1     Running   0          12s   172.25.254.30   node3   <none>           <none>
testpod   0/1     Completed   0          32s   172.25.254.30   node3   <none>           <none>
testpod   1/1     Running     1 (2s ago)   33s   172.25.254.30   node3   <none>           <none>
testpod   0/1     Completed   1 (31s ago)   62s   172.25.254.30   node3   <none>           <none>
#OnFailure 非正常管关闭会从其pod(比如pod被删除了)
cpp
[root@master pod]# vim tastpod.yaml
  restartPolicy: OnFailure  #非正常停止会重启

[root@master pod]# kubectl apply -f tastpod.yaml
pod/testpod created
[root@master pod]# kubectl get pods -o wide -w
NAME      READY   STATUS    RESTARTS   AGE   IP              NODE    NOMINATED NODE   READINESS GATES
mysql     2/2     Running   0          26m   10.244.2.37     node2   <none>           <none>
testpod   1/1     Running   0          5s    172.25.254.10   node1   <none>           <none>
testpod   0/1     Completed   0          31s   172.25.254.10   node1   <none>           <none>
testpod   0/1     Completed   0          32s   172.25.254.10   node1   <none>           <none>
Never pod关闭后不重启
cpp
[root@master pod]# vim tastpod.yaml
apiVersion: v1
kind: Pod
metadata:
  labels:
    run: testpod
  name: testpod
spec:
  hostNetwork: true
  restartPolicy: Never
  containers:
  - image: busybox:latest
    name: busybox
    command:
    - /bin/sh
    - -c
    - sleep 30

[root@k8s-master pod]# kubectl get pods -o wide  -w
三 .pod的生命周期
INIT 容器
Pod 可以包含多个容器,应用运行在这些容器里面,同时 Pod 也可以有一个或多个先于应用容器启 动的 Init 容器。
Init 容器与普通的容器非常像,除了如下两点:
它们总是运行到完成
init 容器不支持 Readiness,因为它们必须在 Pod 就绪之前运行完成,每个 Init 容器必须运行 成功,下一个才能够运行。
如果Pod的 Init 容器失败,Kubernetes 会不断地重启该 Pod,直到 Init 容器成功为止。但是,如果 Pod 对应的 restartPolicy 值为 Never,它不会重新启动。
INIT 容器的功能
Init 容器可以包含一些安装过程中应用容器中不存在的实用工具或个性化代码。
Init 容器可以安全地运行这些工具,避免这些工具导致应用镜像的安全性降低。
应用镜像的创建者和部署者可以各自独立工作,而没有必要联合构建一个单独的应用镜像。
Init 容器能以不同于Pod内应用容器的文件系统视图运行。因此,Init容器可具有访问 Secrets 的权 限,而应用容器不能够访问。
由于 Init 容器必须在应用容器启动之前运行完成,因此 Init 容器提供了一种机制来阻塞或延迟应用 容器的启动,直到满足了一组先决条件。一旦前置条件满足,Pod内的所有的应用容器会并行启 动。
cpp
[root@master pod]# vim init.yml
apiVersion: v1
kind: Pod
metadata:
  labels:
    run: web1
  name: web1
spec:
  initContainers:
  - name: busybox
    image: busybox:latest
    command:
    - /bin/sh
    - -c
    - "until test -e /testfile;do echo wating for myservice; sleep 2;done"
  containers:
  - image: myapp:v1
    name: web1
  restartPolicy: Always

[root@master pod]# kubectl apply -f init.yml
pod/web1 created
Every 1.0s: kubectl get pods -o wide            master: Tue Aug 25 21:13:26 2026

NAME   READY   STATUS     RESTARTS   AGE   IP            NODE    NOMINATED NODE
  READINESS GATES
web1   0/1     Init:0/1   0          4s    10.244.1.21   node1   <none>
  <none>

#只要没有创建这个testfile文件,pod就一直不会启动,创建才会启动pod
[root@master pod]# kubectl exec -it pods/web1  -c busybox -- /bin/sh
/ #
/ # touch /testfile
/ # command terminated with exit code 137
Every 1.0s: kubectl get pods -o wide            master: Tue Aug 25 21:12:41 2026

NAME   READY   STATUS    RESTARTS   AGE    IP            NODE    NOMINATED NODE
  READINESS GATES
web1   1/1     Running   0          5m4s   10.244.1.20   node1   <none>
  <none>
探针
探针是由 kubelet 对容器执行的定期诊断:
ExecAction:在容器内执行指定命令。如果命令退出时返回码为 0 则认为诊断成功。 TCPSocketAction:对指定端口上的容器的 IP 地址进行 TCP 检查。如果端口打开,则诊断被认为是 成功的。
HTTPGetAction:对指定的端口和路径上的容器的 IP 地址执行 HTTP Get 请求。如果响应的状态码 大于等于200 且小于 400,则诊断被认为是成功的。
每次探测都将获得以下三种结果之一:
成功:容器通过了诊断。
失败:容器未通过诊断。
未知:诊断失败,因此不会采取任何行动。
Kubelet 可以选择是否执行在容器上运行的三种探针执行和做出反应:
livenessProbe:指示容器是否正在运行。如果存活探测失败,则 kubelet 会杀死容器,并且容器将 受到其重启策略的影响。如果容器不提供存活探针,则默认状态为 Success。
readinessProbe:指示容器是否准备好服务请求。如果就绪探测失败,端点控制器将从与 Pod 匹 配的所有 Service 的端点中删除该 Pod 的 IP 地址。初始延迟之前的就绪状态默认为 Failure。如果 容器不提供就绪探针,则默认状态为 Success。
startupProbe: 指示容器中的应用是否已经启动。如果提供了启动探测(startup probe),则禁用所 有其他探测,直到它成功为止。如果启动探测失败,kubelet 将杀死容器,容器服从其重启策略进 行重启。如果容器没有提供启动探测,则默认状态为成功Success。
ReadinessProbe 与 LivenessProbe 的区别
ReadinessProbe 当检测失败后,将 Pod 的 IP:Port 从对应的 EndPoint 列表中删除。 LivenessProbe 当检测失败后,将杀死容器并根据 Pod 的重启策略来决定作出对应的措施
StartupProbe 与 ReadinessProbe、LivenessProbe 的区别
如果三个探针同时存在,先执行 StartupProbe 探针,其他两个探针将会被暂时禁用,直到 pod 满 足 StartupProbe 探针配置的条件,其他 2 个探针启动,如果不满足按照规则重启容器。
另外两种探针在容器启动后,会按照配置,直到容器消亡才停止探测,而 StartupProbe 探针只是 在容器启动后按照配置满足一次后,不在进行后续的探测。
1.Livness存活探针
#没有存活探针时
cpp
[root@k8s-master pod]# kubectl run  testpod --image  myapp:v1  --dry-run=client -o yaml > livness-example.yaml
[root@k8s-master pod]# vim livness-example.yaml
apiVersion: v1
kind: Pod
metadata:
  labels:
    run: webserver
  name: webserver
spec:
  containers:
  - image: myapp:v1
    name: webserver
    command: ["/bin/sh", "-c"]
    args:
    - |
      nginx -g "daemon off;"
      sleep 10000
  restartPolicy: Always

[root@k8s-master pod]# kubectl apply -f livness-example.yaml

#监控程序
[root@k8s-master pod]# watch -n 1 kubectl get pods  -o wide

#测试操作:
[root@k8s-master pod]# kubectl exec  -it  pods/webserver -c webserver  -- /bin/sh
# nginx -s stop

#查看pod的状态仍然是runing,但是访问此pod时访问失败
[root@k8s-node2 ~]# curl 10.244.5.47
curl: (7) Failed to connect to 10.244.5.47 port 80: 拒绝连接
#有存活探针时
cpp
[root@k8s-master pod]# kubectl delete -f livness-example.yaml  --force
kind: Pod
metadata:
  labels:
    run: webserver
  name: webserver
spec:
  containers:
  - image: myapp:v1
    name: testpod
    command: ["/bin/sh", "-c"]
    args:
    - |
      nginx -g "daemon off;"
      sleep 10000
    livenessProbe:
      tcpSocket:
        port: 80
      initialDelaySeconds: 3
      periodSeconds: 1
      timeoutSeconds: 1
  restartPolicy: Always


[root@k8s-master pod]# kubectl get pods  -o wide  -w

[root@k8s-master pod]#  kubectl exec -it pods/webserver -c webserver -- /bin/sh
/ #  nginx -s stop
2026/08/23 03:59:45 [notice] 15#15: signal process started

/ # exit

[root@k8s-master pod]# curl 10.244.5.66
Hello MyApp | Version: v1 | <a href="hostname.html">Pod Name</a>
2.readness 就绪探针
没有就绪探针情况
cpp
[root@k8s-master pod]# vim readness-example.yml
apiVersion: v1
kind: Pod
metadata:
  labels:
    run: webserver
  name: webserver
spec:
  containers:
  - image: myapp:v1
    name: webserver
  restartPolicy: Always

---
apiVersion: v1
kind: Service
metadata:
  labels:
    run: webserver
  name: webserver
spec:
  ports:
  - port: 80
    protocol: TCP
    targetPort: 80
  selector:
    run: webserver

[root@k8s-master pod]# kubectl apply -f readness-example.yml
pod/webserver unchanged
service/webserver created
[root@k8s-master pod]# kubectl describe  svc webserver
Name:                     webserver
Namespace:                default
Labels:                   run=webserver
Annotations:              <none>
Selector:                 run=webserver
Type:                     ClusterIP
IP Family Policy:         SingleStack
IP Families:              IPv4
IP:                       10.102.162.217
IPs:                      10.102.162.217
Port:                     <unset>  80/TCP
TargetPort:               80/TCP
Endpoints:                10.244.5.67:80
Session Affinity:         None
Internal Traffic Policy:  Cluster
Events:                   <none>
cpp
#删除默认发布文件
[root@k8s-master ~]# kubectl exec -it pods/webserver -c webserver -- /bin/sh
/ # cd /usr/share/nginx/
/usr/share/nginx # ls
html
/usr/share/nginx # cd html/
/usr/share/nginx/html # ls
50x.html    index.html
/usr/share/nginx/html # rm -fr index.html
/usr/share/nginx/html # ls
50x.html
/usr/share/nginx/html #

#验证是否在访问service时endpoints中被下架
[root@k8s-master pod]# kubectl describe  svc webserver
Name:                     webserver
Namespace:                default
Labels:                   run=webserver
Annotations:              <none>
Selector:                 run=webserver
Type:                     ClusterIP
IP Family Policy:         SingleStack
IP Families:              IPv4
IP:                       10.102.162.217
IPs:                      10.102.162.217
Port:                     <unset>  80/TCP
TargetPort:               80/TCP
Endpoints:                10.244.5.67:80			#还在
Session Affinity:         None
Internal Traffic Policy:  Cluster
Events:                   <none>
cpp
#业务问题
[root@k8s-master pod]# curl  10.102.162.217
<html>
<head><title>403 Forbidden</title></head>
<body bgcolor="white">
<center><h1>403 Forbidden</h1></center>
<hr><center>nginx/1.12.2</center>
</body>
</html>
#有就绪探针情况
cpp
[root@k8s-master pod]# vim readness-example.yml
apiVersion: v1
kind: Pod
metadata:
  labels:
    run: webserver
  name: webserver
spec:
  containers:
  - image: myapp:v1
    name: webserver
    readinessProbe:
      httpGet:
        path: /index.html
        port: 80
      initialDelaySeconds: 3
      periodSeconds: 2
      timeoutSeconds: 1
  restartPolicy: Always
---
apiVersion: v1
kind: Service
metadata:
  labels:
    run: webserver
  name: webserver
spec:
  ports:
  - port: 80
    protocol: TCP
    targetPort: 80
  selector:
    run: webserver


[root@k8s-master pod]# kubectl get pods  -o wide
NAME        READY   STATUS    RESTARTS   AGE   IP            NODE        NOMINATED NODE   READINESS GATES
webserver   1/1     Running   0          7s    10.244.5.69   k8s-node2   <none>           <none>
[root@k8s-master pod]# kubectl describe  svc webserver
Name:                     webserver
Namespace:                default
Labels:                   run=webserver
Annotations:              <none>
Selector:                 run=webserver
Type:                     ClusterIP
IP Family Policy:         SingleStack
IP Families:              IPv4
IP:                       10.110.248.237
IPs:                      10.110.248.237
Port:                     <unset>  80/TCP
TargetPort:               80/TCP
Endpoints:                10.244.5.69:80
Session Affinity:         None
Internal Traffic Policy:  Cluster
Events:                   <none>


#复现问题
/usr/share/nginx/html # command terminated with exit code 137
[root@k8s-master ~]#
/ # rm -fr /usr/share/nginx/html/index.html
/ # echo timinglee > /usr/share/nginx/html/index.html