零、写在前面
📌 本系列教程完整目录 :ArcGIS JS 系列基础教程(100个项目常用热门功能)
💡 在线示例 :完整可运行的 HTML 示例,无需任何环境配置,可直接在浏览器中打开体验 🗂️ 专栏导航 :收藏 + 关注,专栏文章第一时间送达 ❤️ 一键三连:点赞(给教程充电)+ 评论(提问必回)+ 收藏(下次再看)
一、功能介绍
ArcGIS Maps SDK for JavaScript 的三维场景由三个核心对象协作构建:
- Map(数据容器):管理所有图层和底图,定义地面高程,是整个场景的"数据大脑"
- SceneView(渲染引擎):将 Map 中的数据渲染到网页 DOM 中,控制相机视角、环境光照等视觉表现
- Layer(数据源):承载具体数据------可以是底图切片、矢量要素、3D 模型、高程、图形标记等
三者的关系可以简单理解为:Map 是"仓库"(存数据),Layer 是"货物"(数据源),SceneView 是"展示窗"(渲染出来给用户看)。
理解这三者的分工和协作,是后续学习图层管理、数据交互、空间分析的基础。
二、功能实现
2.1 三层架构
arduino
┌──────────────────────────────────────────────┐
│  SceneView(渲染引擎)                         │
│  • 绑定 DOM 容器 container                     │
│  • 关联 Map → view.map = map                  │
│  • 控制相机 camera / environment               │
│  • 提供交互事件 click / pointer-move           │
├──────────────────────────────────────────────┤
│                ↕ 关联                          │
├──────────────────────────────────────────────┤
│  Map(数据容器)                                │
│  • basemap:底图层(天地图/卫星图等)            │
│  • ground:地面高程 → ElevationLayer            │
│  • layers:业务图层集合 → [...各Layer实例]       │
├──────────────────────────────────────────────┤
│             ↕ 包含                             │
├──────────────────────────────────────────────┤
│  Layer(数据源)                                │
│  • GraphicsLayer:临时图形(标记/绘制)          │
│  • FeatureLayer:矢量要素(可查询/编辑)          │
│  • SceneLayer:3D 场景(建筑/树木模型)          │
│  • TileLayer / ElevationLayer:切片/高程       │
└──────────────────────────────────────────────┘
2.2 Map:数据容器
Map 是场景的"数据核心",通过以下属性组织数据:
javascript
const map = new Map({
    // 1. 底图(basemap)--- 地图背景
    basemap: { baseLayers: [vecLayers.base, vecLayers.anno] },

    // 2. 地面高程(ground)--- 3D 地形
    ground: {
        surface: {
            elevationLayers: [{
                url: "https://.../ChinaTerrain3D/ImageServer/"
            }]
        }
    }
    // 3. 业务图层在 map.layers 中(初始化后通过 map.add() 添加)
});| Map 属性 | 类型 | 说明 |
|---|---|---|
basemap |
`Basemap | { baseLayers, referenceLayers }` |
ground |
Ground |
地面配置,含 surface.elevationLayers 定义地形 |
layers |
Collection<Layer> |
业务图层集合(操作图层,可按索引访问和排序) |
2.3 SceneView:渲染引擎
SceneView 负责将 Map 数据渲染到网页中:
javascript
const view = new SceneView({
    container: "mapContainer",   // ① DOM 容器元素 ID
    map: map,                    // ② 关联的 Map 实例
    camera: {                    // ③ 初始相机视角(可选)
        position: { longitude: 116.397, latitude: 39.917, z: 3000 },
        heading: 0,
        tilt: 50
    },
    environment: {               // ④ 环境设置(可选)
        starsEnabled: true,
        atmosphereEnabled: true
    }
});| SceneView 属性 | 类型 | 说明 |
|---|---|---|
container |
string | HTMLElement | 绑定的 DOM 元素(ID 或直接传入元素) |
map |
Map |
关联的 Map 实例,核心数据来源 |
camera / center / zoom |
Camera | lng,lat | number | 初始视角,二选一 |
environment |
Object | 环境配置:光照、星空、大气等 |
alphaCompositingEnabled |
boolean | 是否启用透明度合成(默认 false) |
2.4 Layer:图层体系
Map 中的图层分为两大类:底图图层 (basemap)和业务图层(operational layers)。
图层添加方式:
javascript
// 方式一:构造时传入(较少用)
const map = new Map({ layers: [layer1, layer2] });

// 方式二:map.add() 动态添加(最常用)
map.add(layer);

// 方式三:map.layers.push() / map.layers.add()
map.layers.add(layer);

// 方式四:map.layers.addMany() 批量添加
map.layers.addMany([layer1, layer2, layer3]);
常用 3D 图层速查:
| 图层类 | 用途 | 数据格式 |
|---|---|---|
TileLayer |
切片底图 | 预切片影像/矢量 |
GraphicsLayer |
临时图形标记 | 程序创建的点/线/面/Mesh |
FeatureLayer |
矢量要素 | FeatureService / GeoJSON |
SceneLayer |
3D 场景模型 | I3S / SLPK |
ElevationLayer |
高程地形 | ImageService |
IntegratedMeshLayer |
集成网格 | 倾斜摄影 SLPK |
2.5 图层操作(可见性、透明度、顺序、移除)
javascript
// 可见性
layer.visible = false;

// 透明度(0=全透明,1=不透明)
layer.opacity = 0.5;

// 调整图层顺序(移到第 0 位=最底层)
map.reorder(layer, 0);

// 移除图层
map.remove(layer);

// 遍历所有业务图层
map.layers.forEach(layer => {
    console.log(layer.title, layer.type);
});
2.6 view.map 运行时替换
view.map 可以在运行时替换整个地图实例(切换场景):
javascript
// 创建另一个 Map
const map2 = new Map({ basemap: "...", ground: "world-elevation" });

// 运行时替换
view.map = map2;
三、功能应用
| 应用场景 | Map 配置 | 涉及 Layer | 说明 |
|---|---|---|---|
| 基础三维浏览 | ground + basemap |
TileLayer(底图)、ElevationLayer(高程) | 地形+底图即可 |
| 城市建筑展示 | ground + layers |
SceneLayer(3D建筑模型) | 叠加建筑图层到地形上 |
| 标注与绘制 | layers 中添加 GraphicsLayer |
GraphicsLayer | 点击标记、测量线、高亮面 |
| 数据查询与编辑 | FeatureLayer 添加到 layers |
FeatureLayer | 点击查询属性、编辑要素 |
| 图层对比分析 | 多图层叠加,控制 visible/opacity |
多个 FeatureLayer + ImageryLayer | 底图切换、透明度对比 |
| 动态数据更新 | GraphicsLayer 的 removeAll()/addMany() |
GraphicsLayer | 实时刷新标记点 |
四、核心代码
📦 完整代码 已保存至
sample/lesson14_map_view_layer.html,可直接在浏览器打开。
html
<!DOCTYPE html>
<html lang="zh-CN">
<head>
    <meta charset="UTF-8">
    <meta name="viewport" content="width=device-width, initial-scale=1.0">
    <title>第14课:Map、View 与 Layer 关系</title>
    <link rel="stylesheet" href="https://js.arcgis.com/5.0/esri/themes/light/main.css">
    <script type="module" src="https://js.arcgis.com/5.0/"></script>
    <style>
        * {
            margin: 0;
            padding: 0;
            box-sizing: border-box;
        }

        body {
            font-family: "Microsoft YaHei", sans-serif;
        }

        #mapContainer {
            width: 100vw;
            height: 100vh;
        }

        .page-title {
            position: absolute;
            top: 20px;
            left: 50%;
            transform: translateX(-50%);
            background: rgba(255, 255, 255, 0.95);
            padding: 10px 24px;
            border-radius: 6px;
            font-size: 18px;
            font-weight: bold;
            z-index: 100;
            box-shadow: 0 2px 8px rgba(0, 0, 0, 0.15);
        }

        .control-panel {
            position: absolute;
            top: 80px;
            right: 20px;
            background: rgba(255, 255, 255, 0.95);
            padding: 16px;
            border-radius: 8px;
            box-shadow: 0 2px 12px rgba(0, 0, 0, 0.15);
            z-index: 100;
            min-width: 300px;
        }

        .control-panel h3 {
            margin: 0 0 8px 0;
            font-size: 14px;
            color: #333;
        }

        .section {
            margin-bottom: 12px;
            padding-bottom: 10px;
            border-bottom: 1px solid #eee;
        }

        .section:last-child {
            border-bottom: none;
            margin-bottom: 0;
        }

        .btn-row {
            display: flex;
            gap: 8px;
            flex-wrap: wrap;
            margin-top: 6px;
        }

        .btn-row button {
            flex: 1;
            min-width: 60px;
            padding: 6px 0;
            border: 1px solid #d9d9d9;
            border-radius: 4px;
            background: white;
            cursor: pointer;
            font-size: 12px;
        }

        .btn-row button:hover {
            border-color: #1890ff;
            color: #1890ff;
        }

        .btn-row button.on {
            background: #1890ff;
            color: white;
            border-color: #1890ff;
        }

        .info-card {
            margin-top: 10px;
            padding: 10px 12px;
            background: #f0f5ff;
            border-radius: 6px;
            border-left: 3px solid #1890ff;
            font-size: 12px;
            line-height: 1.6;
        }

        .info-card .val {
            font-weight: bold;
            color: #1890ff;
        }

        .status-text {
            position: absolute;
            bottom: 20px;
            left: 50%;
            transform: translateX(-50%);
            background: rgba(0, 0, 0, 0.7);
            color: white;
            padding: 8px 20px;
            border-radius: 20px;
            font-size: 13px;
            z-index: 100;
            pointer-events: none;
            white-space: nowrap;
        }
    </style>
</head>
<body>
<h1 class="page-title">第14课:Map、View 与 Layer 关系</h1>

<div class="control-panel">
    <div class="section">
        <h3>🗺️ Map(数据容器)</h3>
        <div class="btn-row">
            <button id="btnGroundShow" class="on">地形:开</button>
            <button id="btnGroundHide">地形:关</button>
        </div>
    </div>

    <div class="section">
        <h3>👁️ View(渲染引擎)</h3>
        <div class="btn-row">
            <button id="btnEnvAtmo" class="on">大气:开</button>
            <button id="btnEnvStars" class="on">星空:开</button>
        </div>
    </div>

    <div class="section">
        <h3>📦 Layer(数据图层)</h3>
        <div class="btn-row">
            <button id="btnAddMarkers">➕ 添加标记层</button>
            <button id="btnRemoveMarkers">➖ 移除标记层</button>
        </div>
        <div class="btn-row">
            <button id="btnLayerVisible">👁 切换可见</button>
            <button id="btnLayerOpacity">🌗 切换透明度</button>
        </div>
    </div>

    <div class="info-card">
        当前图层:<span class="val" id="layerCount">1</span> 个业务图层<br>
        标记层:<span class="val" id="markerStatus">未添加</span>
    </div>
</div>

<div class="status-text" id="statusText">Map=数据容器 | View=渲染引擎 | Layer=数据源</div>

<div id="mapContainer"></div>

<script type="module">
    const Map = await $arcgis.import("@arcgis/core/Map.js");
    const SceneView = await $arcgis.import("@arcgis/core/views/SceneView.js");
    const GraphicsLayer = await $arcgis.import("@arcgis/core/layers/GraphicsLayer.js");
    const Graphic = await $arcgis.import("@arcgis/core/Graphic.js");
    const Point = await $arcgis.import("@arcgis/core/geometry/Point.js");
    const Mesh = await $arcgis.import("@arcgis/core/geometry/Mesh.js");
    const getTianditu = await $arcgis.import("https://openlayers.vip/examples/resources/tianditu.js");
    const ElevationLayer = await $arcgis.import("@arcgis/core/layers/ElevationLayer.js");

    const vecLayers = getTianditu.default({type: "vec_w"});

    // 高程图层(单独存引用,方便控制 visible)
    const elevLayer = new ElevationLayer({
        url: "https://www.geosceneonline.cn/image/rest/services/OpenData/ChinaTerrain3D/ImageServer/"
    });

    // ===== Map:数据容器 =====
    const map = new Map({
        basemap: {baseLayers: [vecLayers.base, vecLayers.anno]},
        ground: {
            surface: {elevationLayers: [elevLayer]}
        }
    });

    // ===== View:渲染引擎 =====
    const view = new SceneView({
        container: "mapContainer",
        map: map,
        camera: {
            position: {longitude: 116.397, latitude: 39.917, z: 3000},
            heading: 30,
            tilt: 50
        }
    });
    window.view = view;

    // 核心建筑层(第1个业务图层)
    const buildingLayer = new GraphicsLayer({
        title: "核心建筑",
        castShadows: true,
        receiveShadows: true
    });

    const box = Mesh.createBox(
        new Point({longitude: 116.397, latitude: 39.917, z: 0}),
        {size: {width: 250, height: 400, depth: 250}}
    );

    buildingLayer.add(new Graphic({
        geometry: box,
        symbol: {
            type: "mesh-3d",
            symbolLayers: [{type: "fill", material: {color: [220, 180, 80, 0.9]}}]
        }
    }));
    map.add(buildingLayer);

    // 标记层(按需添加/移除)
    let markerLayer = null;

    function createMarkerLayer() {
        const layer = new GraphicsLayer({title: "动态标记"});
        for (let i = 0; i < 6; i++) {
            const angle = (i / 6) * Math.PI * 2;
            const r = 0.005;
            layer.add(new Graphic({
                geometry: new Point({
                    longitude: 116.397 + Math.cos(angle) * r,
                    latitude: 39.917 + Math.sin(angle) * r
                }),
                symbol: {
                    type: "point-3d",
                    symbolLayers: [{
                        type: "icon",
                        resource: {primitive: "circle"},
                        size: 14,
                        material: {color: [255, 60, 60]}
                    }]
                }
            }));
        }
        return layer;
    }

    function setStatus(msg) {
        document.getElementById("statusText").textContent = msg;
    }

    function updateInfo() {
        document.getElementById("layerCount").textContent = map.layers.length;
        document.getElementById("markerStatus").textContent = markerLayer ? "已添加" : "未添加";
    }

    view.when(() => {

        view.goTo({
            target: box,
            heading: 0,
            tilt: 35
        }, {
            duration: 1000
        });

        console.log("场景加载完成");
        updateInfo();

        // --- Map 操作 ---
        document.getElementById("btnGroundShow").addEventListener("click", () => {
            elevLayer.visible = true;
            document.getElementById("btnGroundShow").classList.add("on");
            document.getElementById("btnGroundHide").classList.remove("on");
            setStatus("地形已开启 --- Map.ground 控制地面高程");
        });
        document.getElementById("btnGroundHide").addEventListener("click", () => {
            elevLayer.visible = false;
            document.getElementById("btnGroundHide").classList.add("on");
            document.getElementById("btnGroundShow").classList.remove("on");
            setStatus("地形已关闭 --- 地面变为平坦");
        });

        // --- View 操作 ---
        document.getElementById("btnEnvAtmo").addEventListener("click", function () {
            view.environment.atmosphereEnabled = !view.environment.atmosphereEnabled;
            this.classList.toggle("on", view.environment.atmosphereEnabled);
            setStatus("View 大气效果:" + (view.environment.atmosphereEnabled ? "开" : "关"));
        });
        document.getElementById("btnEnvStars").addEventListener("click", function () {
            view.environment.starsEnabled = !view.environment.starsEnabled;
            this.classList.toggle("on", view.environment.starsEnabled);
            setStatus("View 星空显示:" + (view.environment.starsEnabled ? "开" : "关"));
        });

        // --- Layer 操作 ---
        document.getElementById("btnAddMarkers").addEventListener("click", () => {
            if (markerLayer) return;
            markerLayer = createMarkerLayer();
            map.add(markerLayer);
            updateInfo();
            setStatus("标记层已添加 --- map.add(layer) 动态添加数据源");
        });
        document.getElementById("btnRemoveMarkers").addEventListener("click", () => {
            if (!markerLayer) return;
            map.remove(markerLayer);
            markerLayer = null;
            updateInfo();
            setStatus("标记层已移除 --- map.remove(layer) 清理数据源");
        });
        document.getElementById("btnLayerVisible").addEventListener("click", () => {
            buildingLayer.visible = !buildingLayer.visible;
            setStatus("核心建筑层可见性:" + (buildingLayer.visible ? "显示" : "隐藏"));
        });
        document.getElementById("btnLayerOpacity").addEventListener("click", () => {
            buildingLayer.opacity = buildingLayer.opacity === 1 ? 0.3 : 1;
            setStatus("核心建筑层透明度:" + buildingLayer.opacity);
        });
    });
</script>
</body>
</html>
五、在线示例
🔗 在线体验地址(GitHub资源,等待时间较长,或者架梯子) :southjor.github.io/arcgis-exam...
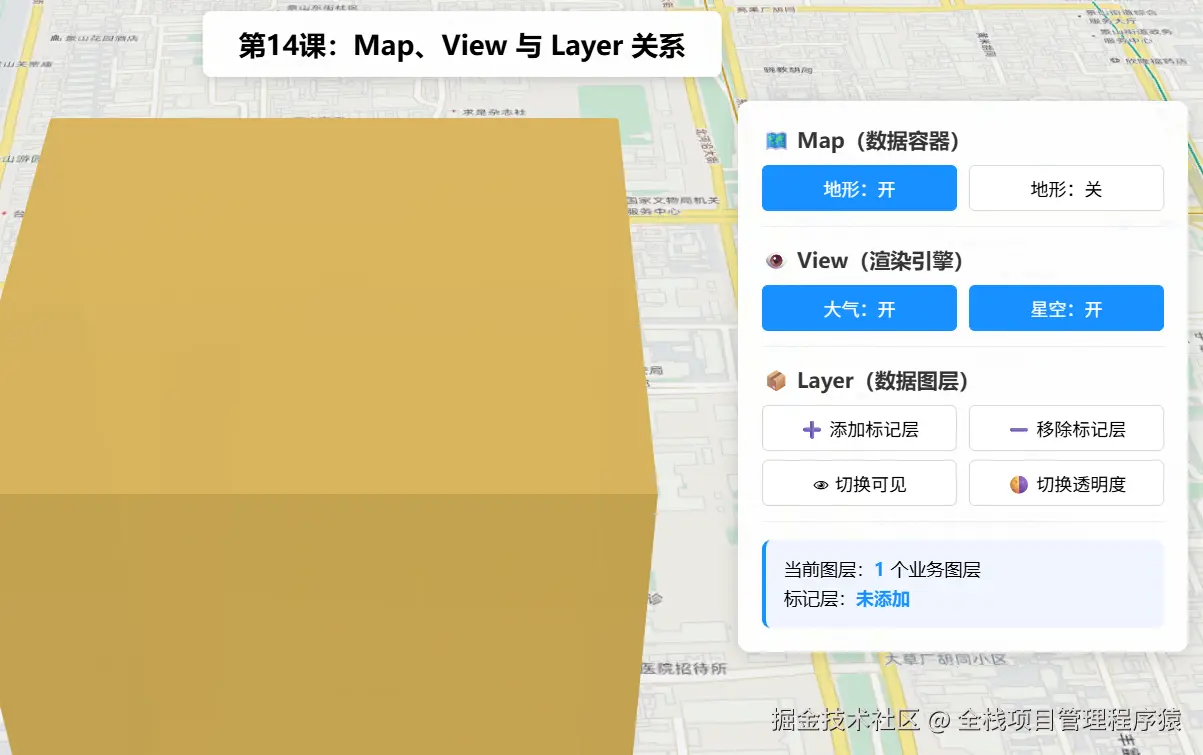
操作说明:
- Map 操作 :点击「地形:开/关」通过
map.ground控制高程图层的可见性- View 操作 :点击「大气:开/关」「星空:开/关」通过
view.environment控制渲染效果- Layer 操作 :点击「添加标记层」通过
map.add()动态添加 GraphicsLayer;「移除标记层」通过map.remove()移除- 点击「切换可见」控制核心建筑层的
visible属性- 点击「切换透明度」在 1.0 和 0.3 之间切换
opacity
六、关键API说明
| API | 所属对象 | 说明 |
|---|---|---|
new Map({ basemap, ground }) |
Map | 创建地图实例,配置底图和地面高程 |
map.add(layer) |
Map | 添加业务图层 |
map.remove(layer) |
Map | 移除图层 |
map.layers |
Map | 图层集合(Collection),支持 forEach/addMany/removeAll |
map.ground.surface.elevationLayers |
Map | 高程图层集合 |
new SceneView({ container, map, camera }) |
SceneView | 创建3D视图 |
view.map |
SceneView | 获取/替换 Map 实例 |
view.environment |
SceneView | 环境配置(光照/星空/大气) |
layer.visible |
Layer | 图层可见性 |
layer.opacity |
Layer | 图层透明度(0~1) |
layer.title |
Layer | 图层名称(调试用) |
七、系列导航
⬅️ 上一篇 :ArcGIS JS 基础教程(13):屏幕坐标与地理坐标互转
💡 小贴士 :记住一句话 ------ Map 只管"有什么数据",View 只管"怎么展示",Layer 只管"数据从哪来"。这种分层设计让代码清晰、易维护:换底图只改 Map.basemap,换视角只调 View.camera,加数据只调 map.add(layer),三者各司其职、互不干扰。