49 Spring
2.01.spring课程的介绍
课程总览:
Spring框架的概述以及Spring基于XML的IOC配置
Spring中基于注解的IOC的案例
Spring中的AOP和基于XML以及注解的配置
Spring中的JdbcTemplate以及Spring对事务的支持、Spring5的新特性
2.02.spring的基本概述
什么是spring?
Spring 是分层的 Java SE/EE 应用 full-stack 轻量级开源框架,以 IOC (Inverse Of Control:控制反转)和 AOP(Aspect Oriented Programming:面向切面编程)为内核提供了展现层 SpringMVC 和持久层 Spring JDBC 以及业务层事务管理等众多的企业级应用技术,还能整合众多著名的第三方框架和类库,逐渐成为使用最多的 JavaEE 企业应用开源框架。
2.03.spring的优势和技术体系
spring的优势
-
方便解耦,简化开发
通过 Spring 提供的 IOC 容器,可以将对象间的依赖关系交由 Spring 进行控制,避免硬编码所造成的过度程序耦合。用户也不必再为了单例模式类、属性文件解析等这些很底层的需求编写代码,可以更专注于上层的应用。
-
AOP 编程的支持
通过 Spring 的AOP功能,方便进行面向切面编程,许多不容易用传统 OOP 实现的功能可以通过 AOP 轻松应付。
-
声明式事务的支持
可将我们从单调烦闷的事务管理代码中解脱出来,通过声明的方式灵活的进行事务的管理,提高开发的效率和质量
-
方便程序的测试
可以用非容器依赖的编程方式进行几乎所有的测试工作,测试不再是昂贵的操作,而是随手可做的事情
-
方便集成各种优秀框架
Spring 可以降低各种框架的使用难度,提供了对各种优秀框架(Struts、Hibernate、Hessian、Quartz等)的直接支持
-
降低 JavaEE API 的使用难度
Spring对 JavaEE API(如JDBC、JavaMail、远程调用等)进行了薄薄的封装层,使这些 API 的使用难度大为降低
-
Java源码是经典学习范例
Spring 的源代码设计精妙、结构清晰、匠心独用,处处体现着大师对 Java 设计模式灵活运用以及对 Java技术的高深造诣。它的源代码无疑是 Java 技术的最佳实践的范例。
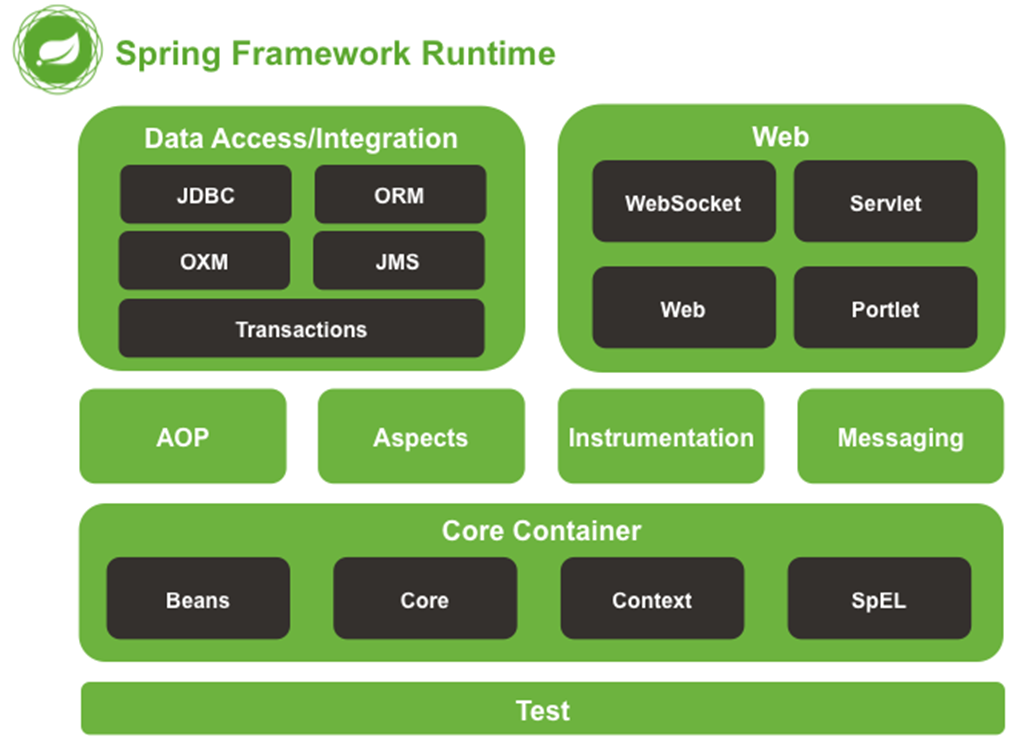
spring的体系
见下图
2.04.程序中的耦合以及基于反射解耦合
程序中的耦合
下面用一个案例来解释,先新建一个 maven 工程:
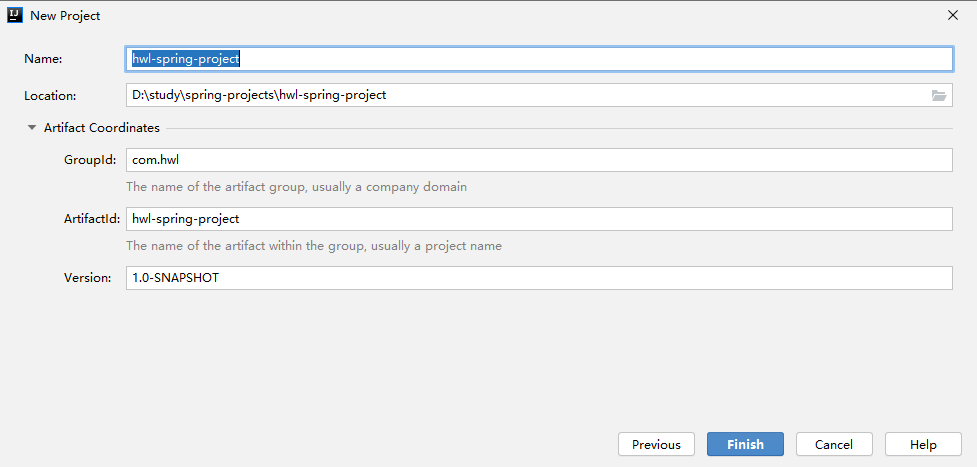
创建好以后,可以把 src 目录删除,因为后面要创建子模块
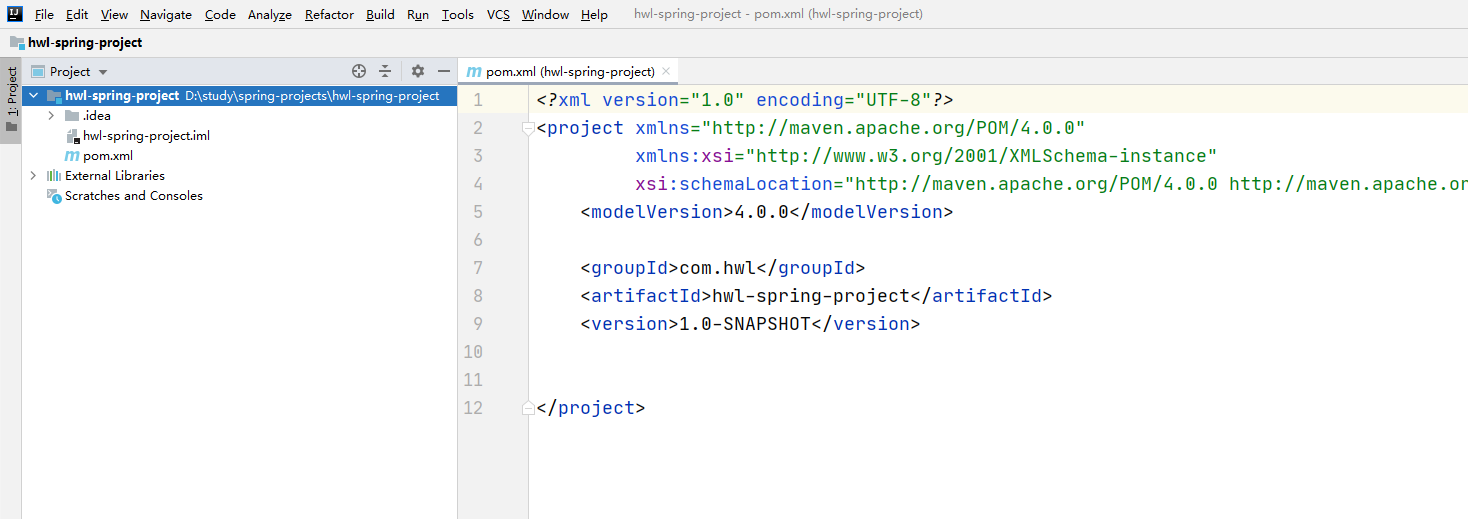
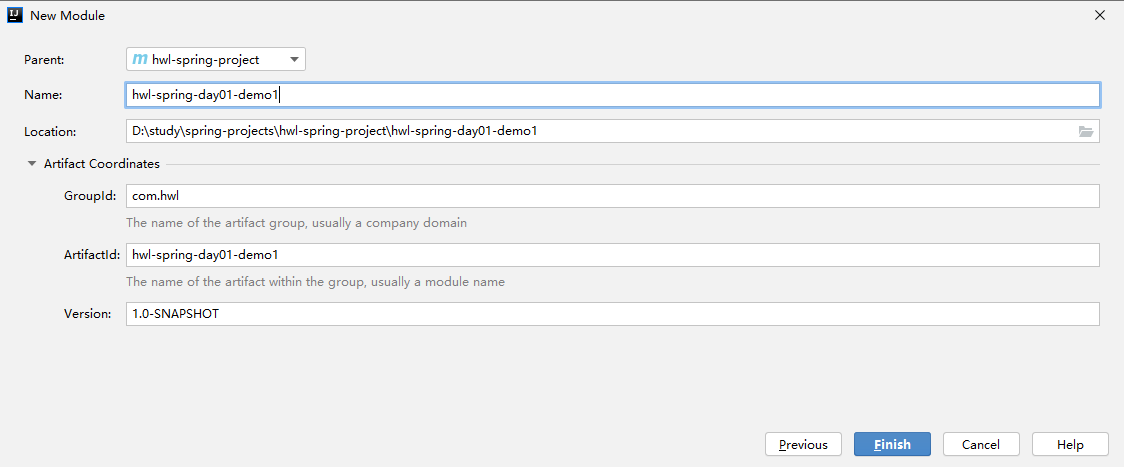
新建一个子模块(不使用骨架)
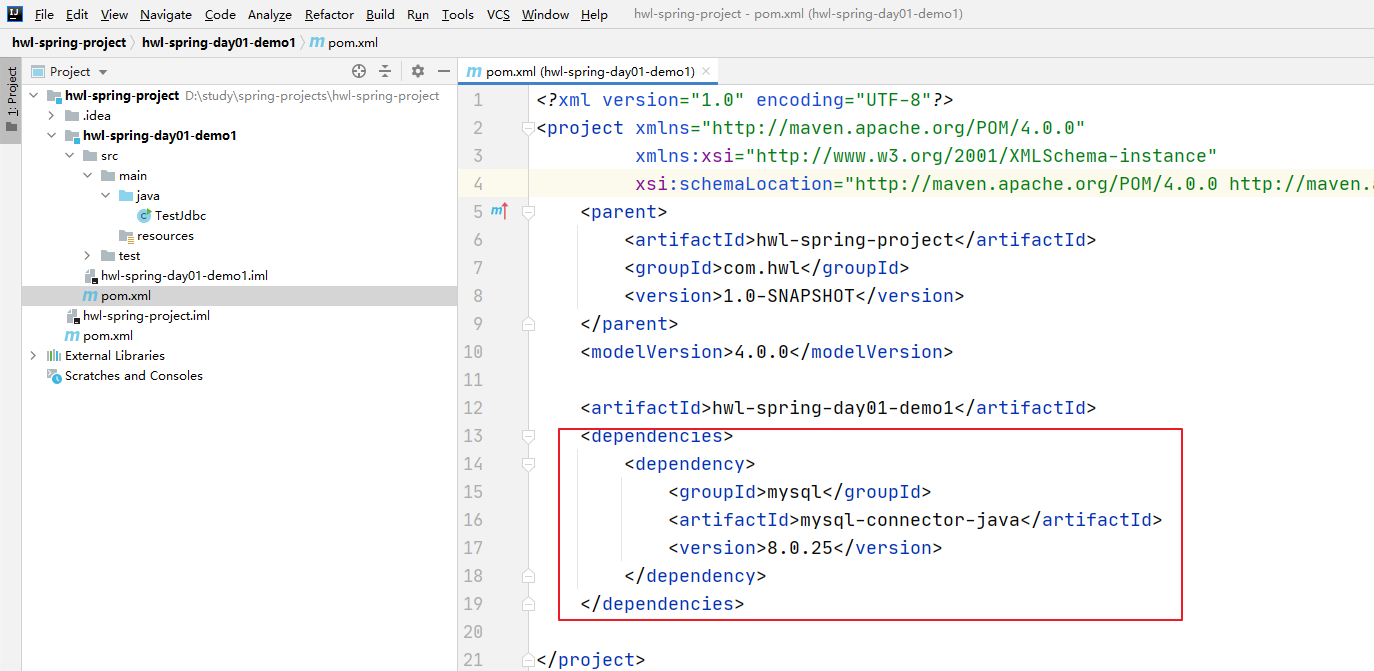
在子模块导入数据库 mysql 依赖:
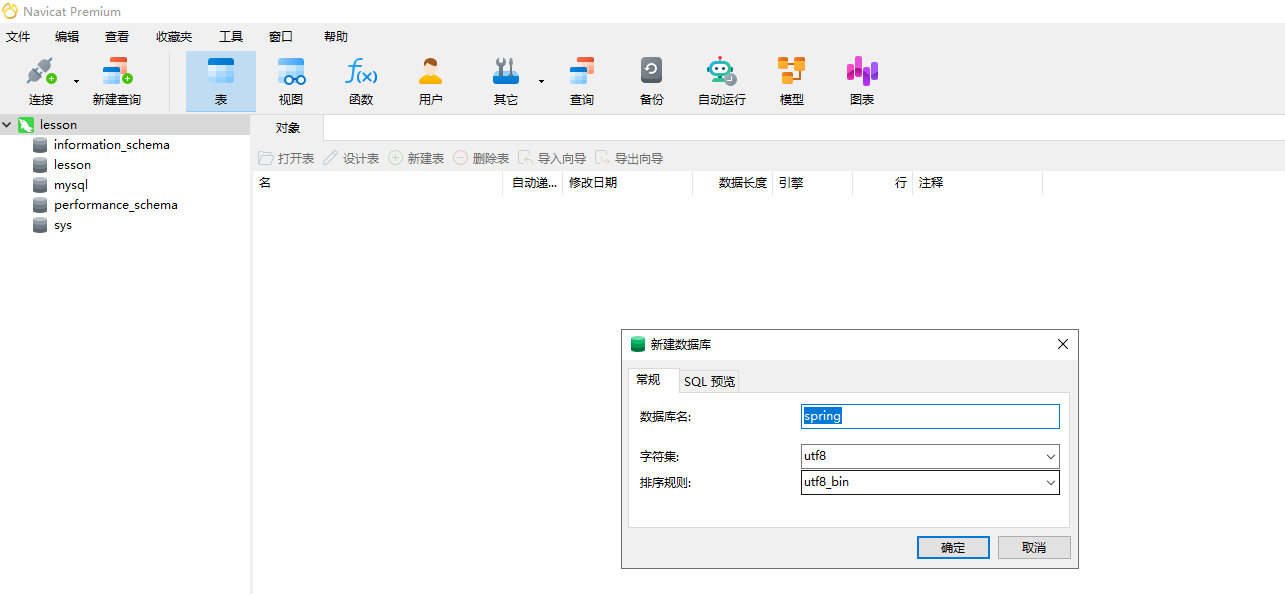
新建一个数据库spring:
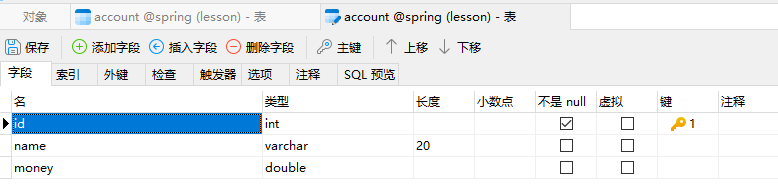
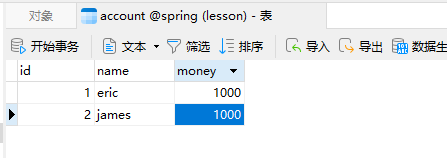
在 spring 数据库中,创建 account 表,并插入数据:
idea 新建 Account 类:
java
package com.hwl.pojo;

//描述账户信息,和数据表进行映射
public class Account {
    private Integer id;
    private String name;
    private Double money;

    public Integer getId() {return id;}

    public void setId(Integer id) {this.id = id;}

    public String getName() {return name;}

    public void setName(String name) {this.name = name;}

    public Double getMoney() {return money;}

    public void setMoney(Double money) {this.money = money;}

    @Override
    public String toString() {
        return "Account{" + "id=" + id + ", name='" + name + '\'' + ", money=" + money + '}';
    }
}
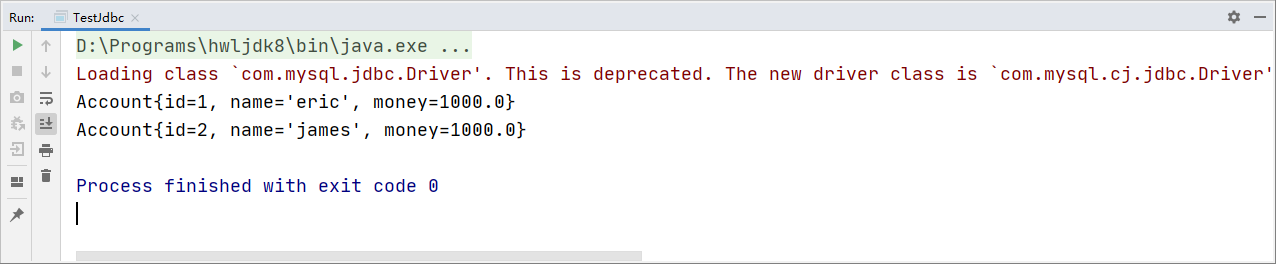
写一个简易的 jdbc 测试程序,查询 MySQL 数据:
java
package com.hwl;
import com.hwl.pojo.Account;
import java.sql.Connection;
import java.sql.DriverManager;
import java.sql.PreparedStatement;
import java.sql.ResultSet;
public class TestJdbc {
    public static void main(String[] args) throws Exception{
        //注册驱动
        DriverManager.registerDriver(new com.mysql.jdbc.Driver());
        //准备连接数据库用到的用户名 密码root
        String username = "root";
        String password = "root";
        String url = "jdbc:mysql://localhost:3306/spring";
        //获取连接对象
        Connection connection = DriverManager.getConnection(url, username, password);
        String sql = "SELECT * from account";
        PreparedStatement preparedStatement = connection.prepareStatement(sql);
        ResultSet resultSet = preparedStatement.executeQuery();
        while (resultSet.next()) {
            Integer id = resultSet.getInt("id");
            String name = resultSet.getString("name");
            Double money = resultSet.getDouble("money");
            Account account = new Account();
            account.setId(id);
            account.setName(name);
            account.setMoney(money);
            System.out.println(account);
        }
        //关闭资源
        resultSet.close();
        preparedStatement.close();
        connection.close();
    }
}
但是如果把 mysql 的驱动注释掉(模拟依赖缺失),编译就会报错:
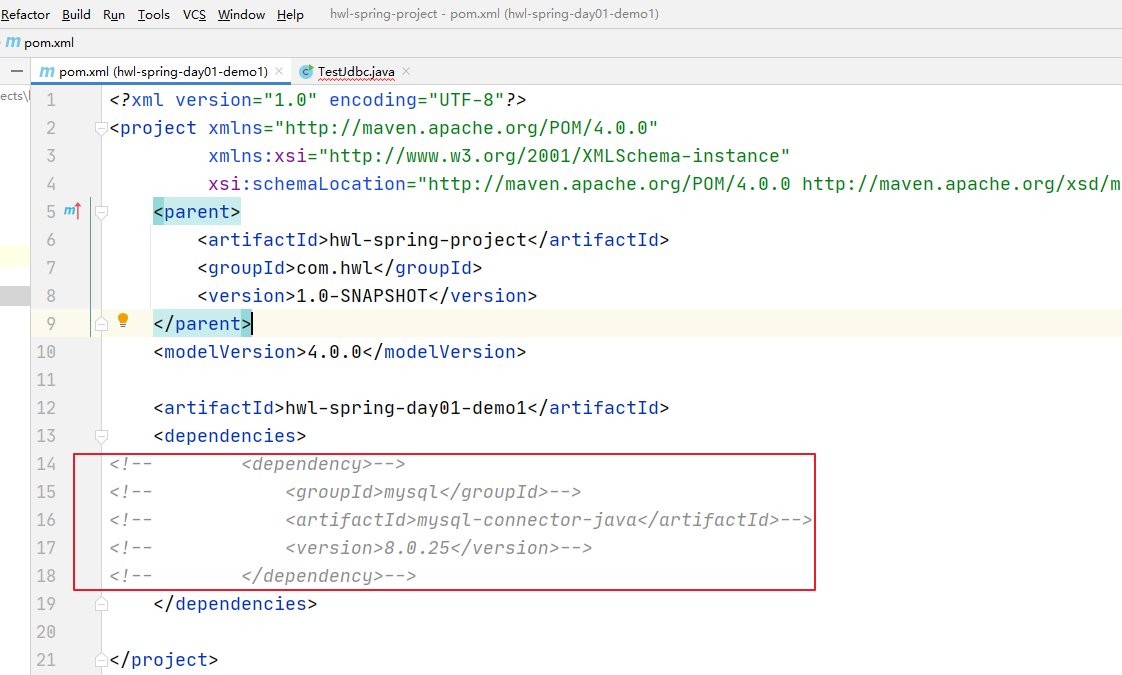
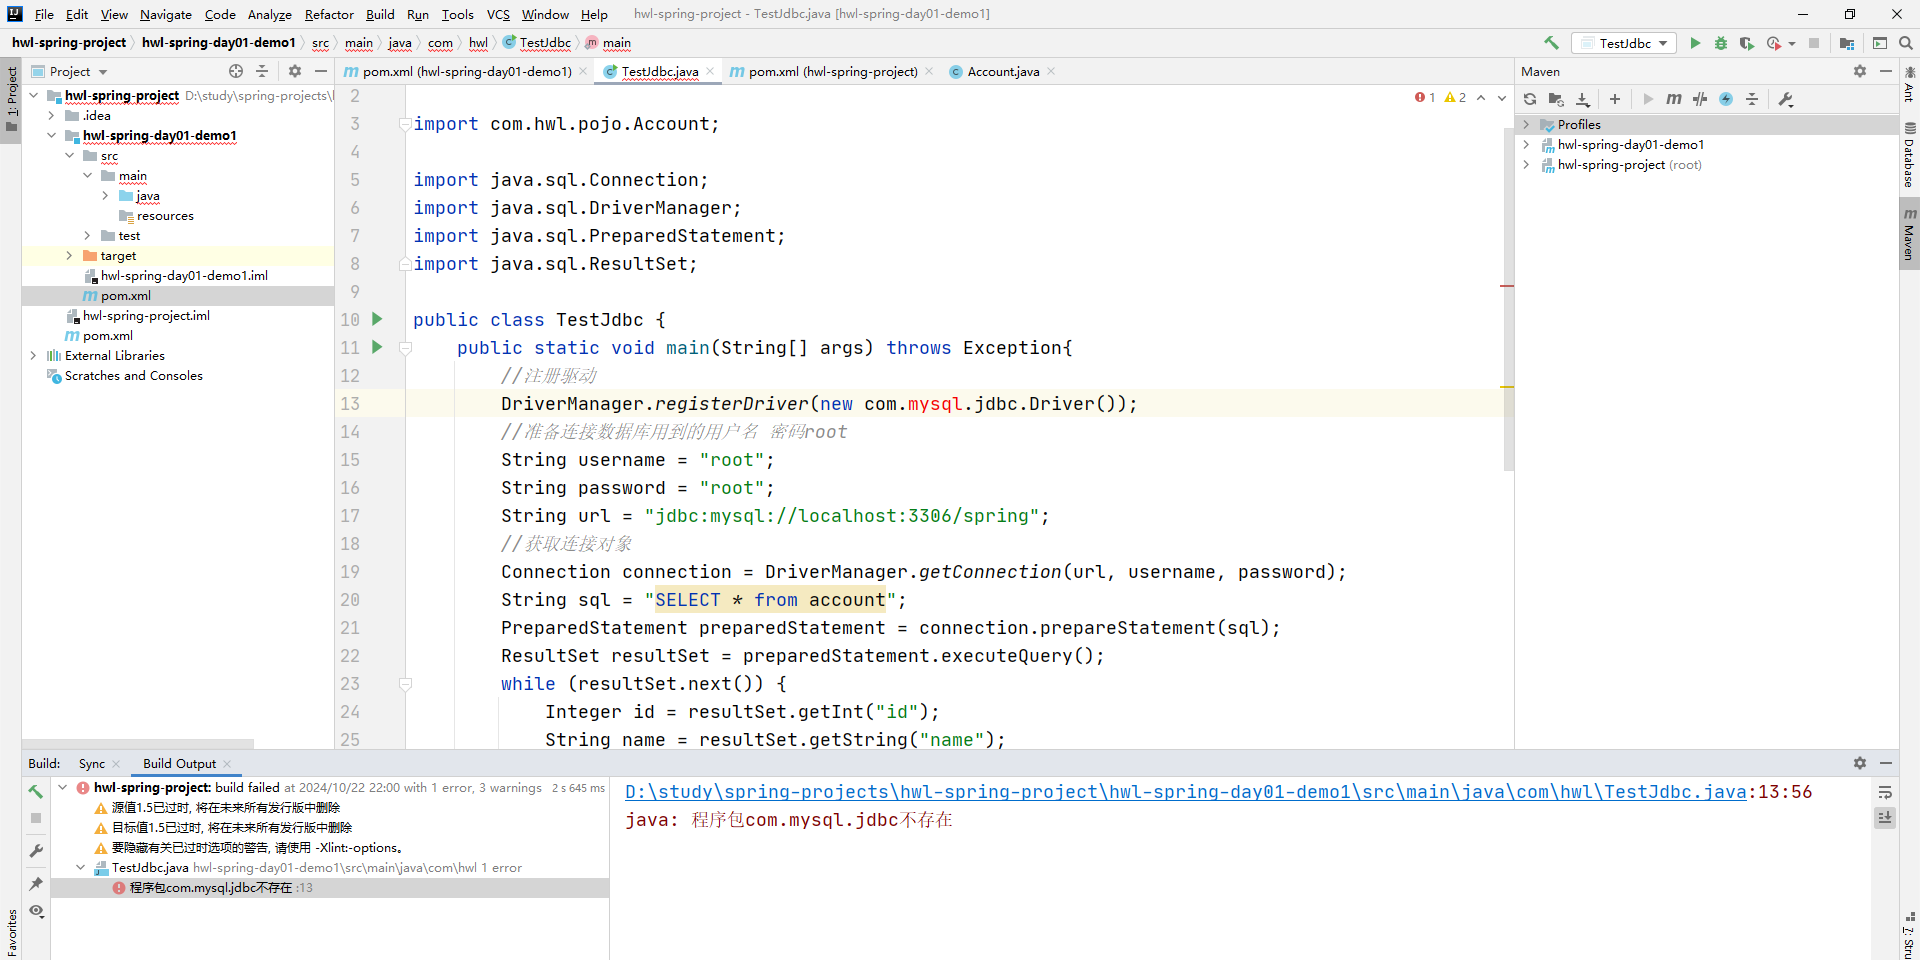
这说明我们的程序有缺陷,如果某个功能出现了问题,但是这个项目中其他功能没问题,一个功能出错就影响到了其他功能的执行
使用反射解耦
什么是耦合?耦合指的是程序间的依赖关系(类的依赖关系,方法的依赖关系)。上面的例子中的耦合就是类与类的依赖关系
注意:我们不能消除程序间的依赖关系,只能尽可能的降低程序的依赖关系。
这种降低程序间的依赖关系就叫做解耦。
如何解耦:在实际开发中,我们应该做到在编译期不依赖,在运行期依赖。
使用反射的机制加载驱动类:
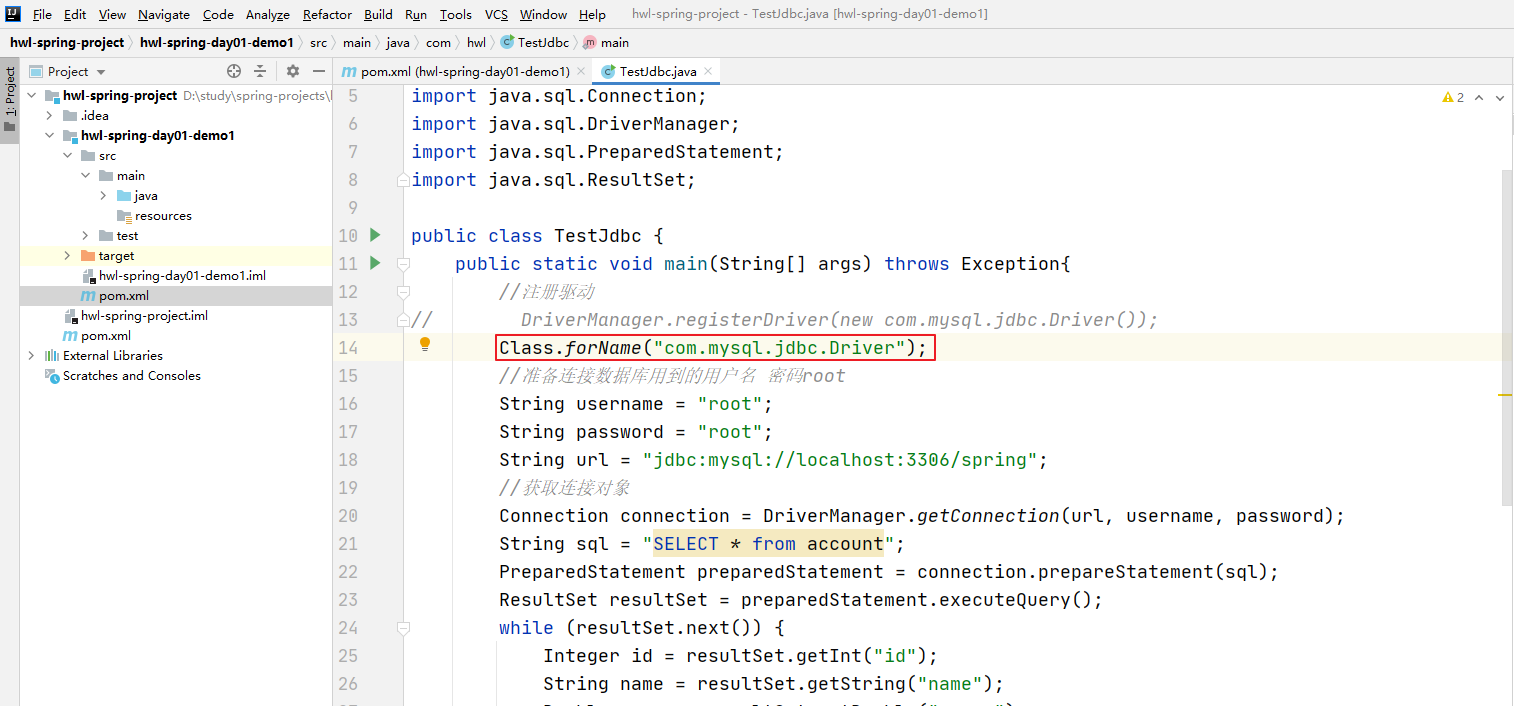
此时重新编译代码,这个时候就不会报错。然后运行试试(此时 pom.xml 的坐标被注释了,在运行时会报异常)。
但是,如果我们现在不使用mysql驱动,换成oracle驱动呢?我们需要在源代码上去将mysql驱动换成oracle驱动,这样修改源代码,违反了项目开发的原则。
怎么解决?
将驱动信息定义在配置信息里面,通过读取配置文件的形式,来获取我们的配置信息。
总结:降低耦合是思路。
- 通过反射的机制,避免使用
new关键字 - 通过读取配置文件的方式来获取资源的全限定名
2.05.程序中的耦合以及基于工厂+反射的方式解耦合
我们模拟一个新增用户的案例
java
public interface AccountDao {
    //新增账户的方法
    public void addAccount();
}
java
public class AccountDaoImpl implements AccountDao {
    public void addAccount() {
        System.out.println("基于jdbc技术新增Account......");
    }
}
java
public interface AccountService {
    public void addAccount();
}
java
public class AccountServiceImpl implements AccountService {
    public void addAccount() {
        AccountDao accountDao = new AccountDaoImpl();
        accountDao.addAccount();
    }
}
测试类:
java
public class TestAccount {
    public static void main(String[] args) {
        AccountService accountService = new AccountServiceImpl();
        accountService.addAccount();
    }
}
此时,如果我们需要一个新的技术,换成 Mybatis,这时候就得去重新创建一个接口
java
public class MybatisAccountDaoImpl implements AccountDao {
    public void addAccount() {
        System.out.println("基于Mybatis技术新增account....");
    }
}
service 也得修改:
java
public class AccountServiceImpl implements AccountService {
    public void addAccount() {
//        AccountDao accountDao = new AccountDaoImpl();
        AccountDao accountDao = new MybatisAccountDaoImpl();
        accountDao.addAccount();
    }
}
因此,目前代码存在的问题:如果出现新的需求,我们需要去修改源代码才能实现。
首先明确几个概念
- Bean:中文名是组件,在 Java 中指的是Dao层、业务层的接口 或者 接口实现
- JavaBean:在Bean的基础上还包括了实体类,但是并不完全等同于实体类,因为实体类只是组件中的一部分
- 工厂:创建 Javabean(创建Dao、业务层实现类的对象)
解决方案
-
需要一个配置文件来配置我们的 Dao 接口实现类和业务类实现类
properties配置文件来管理k=v唯一标识=全限定名(包名 + 类名) -
通过读取配置文件中配置的内容,基于反射的技术创建对象
配置文件的读取
- xml(后期spring框架用的肯定是xml)
- properties(读取更简单,这里先使用这种)
-
定义配置文件
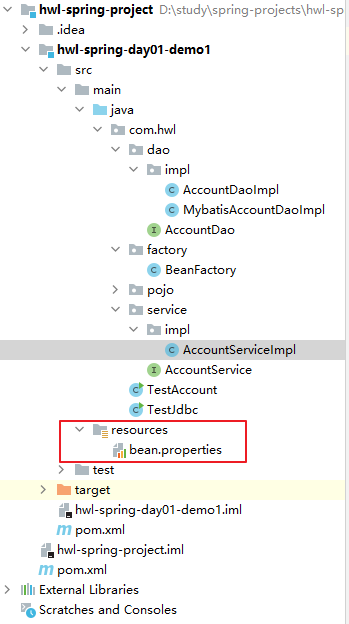
properties
# k=v k就是JavaBean的名称 v就是类的全限定名
accountDao=com.hwl.dao.impl.AccountDaoImpl
mybatisAccountDao=com.hwl.dao.impl.MybatisAccountDaoImpl
accountService=com.hwl.service.impl.AccountServiceImpl- 定义一个工厂类,通过工厂来获取bean
java
package com.hwl.factory;

import java.io.IOException;
import java.io.InputStream;
import java.util.Properties;

/**
 * 工厂类 专门帮助我们创建对象
 */
public class BeanFactory {
    static Properties properties;
    //读取properties里的配置信息
    static {
        try {
            InputStream in = BeanFactory.class.getClassLoader().getResourceAsStream("bean.properties");
            properties = new Properties();
            properties.load(in);
        } catch (IOException e) {
            e.printStackTrace();
        }
    }

    //获取bean的方法
    public static Object getBean(String name){
        try {
            String value = properties.getProperty(name);
            Object o = Class.forName(value).newInstance();
            return o;
        } catch (Exception e) {
            e.printStackTrace();
            throw new RuntimeException(e);
        }
    }
}
service 里面:
java
public class AccountServiceImpl implements AccountService {
    public void addAccount() {
//        AccountDao accountDao = new AccountDaoImpl();
//        AccountDao accountDao = new MybatisAccountDaoImpl();
//        AccountDao accountDao = (AccountDao) BeanFactory.getBean("mybatisAccountDao");
        AccountDao accountDao = (AccountDao) BeanFactory.getBean("accountDao");
        accountDao.addAccount();
    }
}
2.06.优化工厂代码,生成单例bean
对上一节的代码的 service 类里面增加一个打印信息,并在测试类多调用几次:
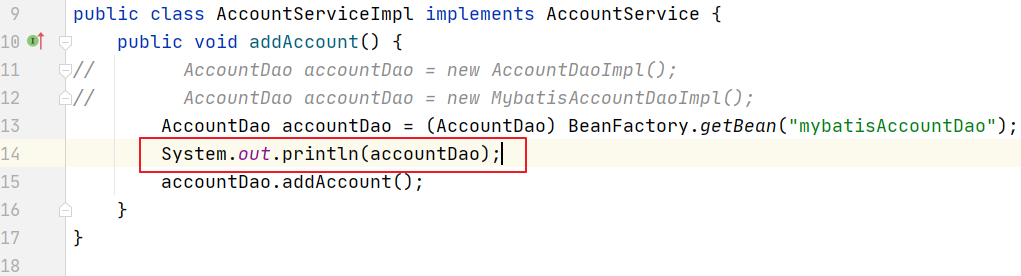
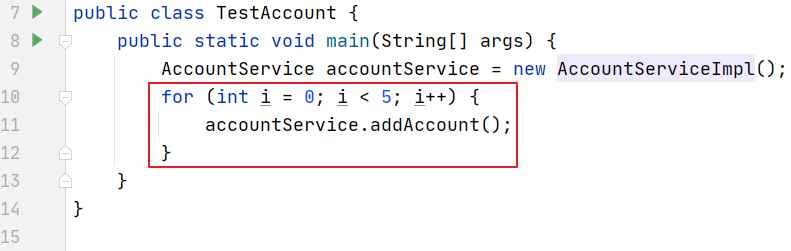
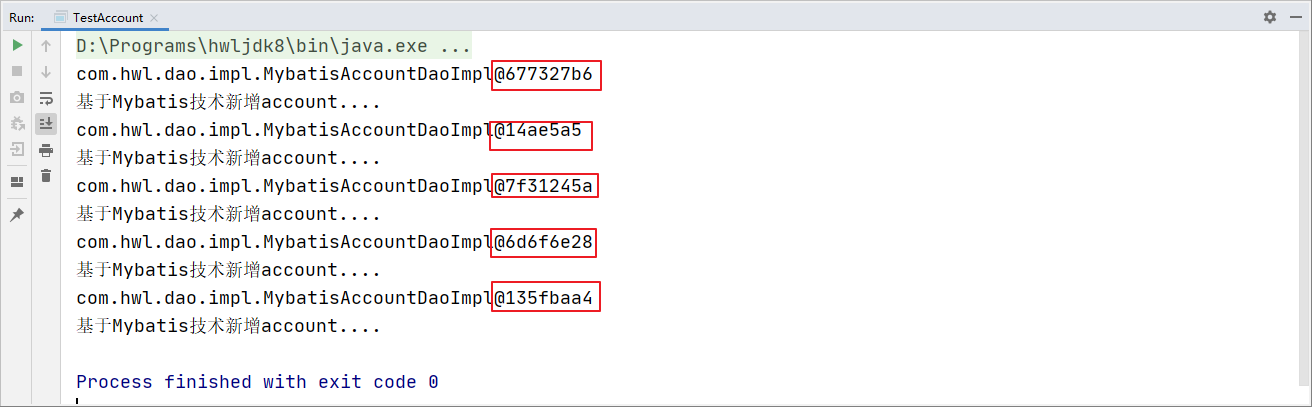
可以看到,accountdao 对象每次都不一样。这说明工厂类 BeanFactory 创建的对象不是单例的,而是多例的。
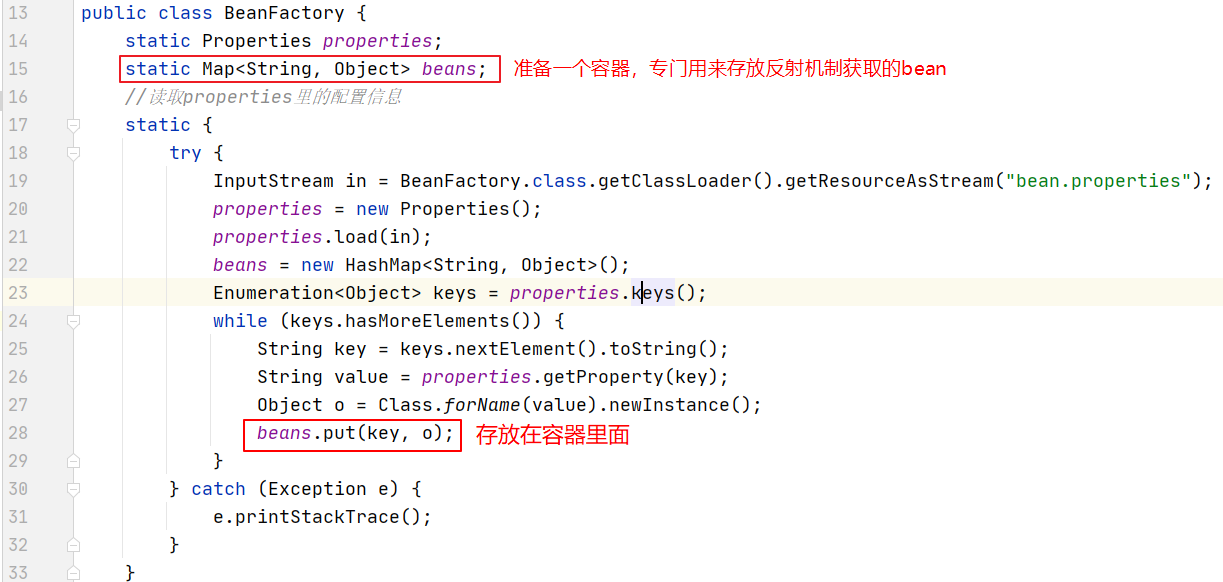
原因:基于反射 创建的对象不存盘,每次用完之后都会被垃圾回收器回收。问题就是:每次调用都会重新创建对象,比较耗时,耗费性能。
接下来对目前的代码进行改造:

2.07.SpringIoC入门入门环境搭建
通过以上的分析,我们创建对象的方式有2种。
第一种:
java
AccountDao dao = new AccountDaoImpl();第二种:
java
AccountDao dao = (AccountDao)BeanFactory.getBean("accountDao");这两种有什么不同?
第一种创建对象的方式是我们主动创建的,控制权在我们手里。但是程序的耦合性高。
第二种创建对象的方式是交给工厂帮我们创建的,控制权交给工厂了。这样降低了程序的耦合性。
但是我们每次都自己通过工厂 + 配置的方式创建对象的过程过于繁琐,那我们看看 Spring 是如何帮我们做的。
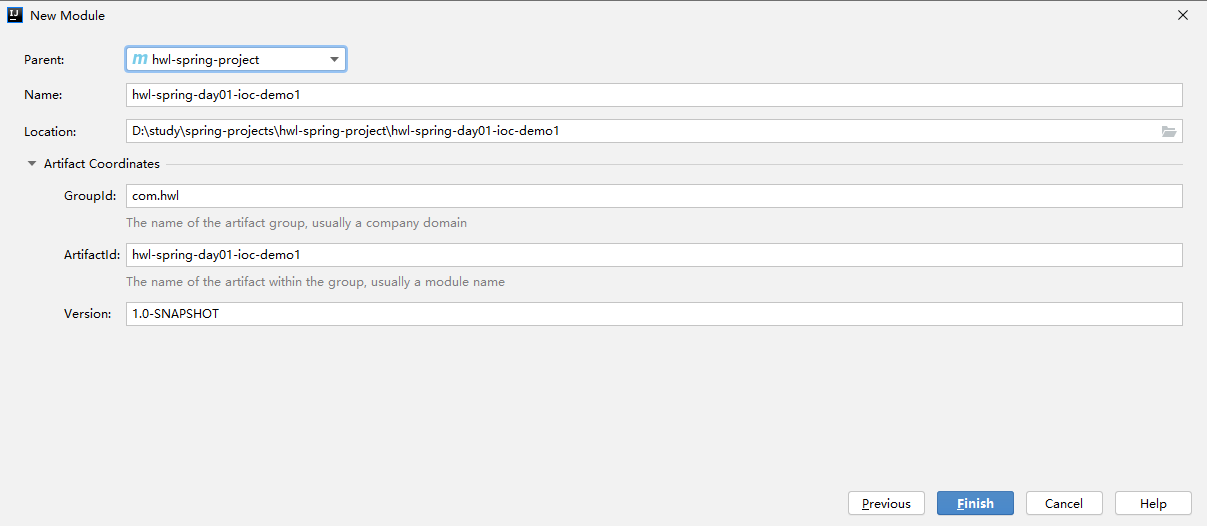
- 创建好模块后,先导入 Spring 的核心依赖:
xml
<dependencies>
    <dependency>
        <groupId>org.springframework</groupId>
        <artifactId>spring-context</artifactId>
        <version>5.2.0.RELEASE</version>
    </dependency>
</dependencies>- 定义 dao、service 的接口以及实现类:
java
public interface AccountDao {
    void addAccount();
}
java
public class AccountDaoImpl implements AccountDao {
    public void addAccount(){
        System.out.println("新增账户的方法被实现了....");
    }
}
java
public interface AccountService {
    void addAccount();
}
java
public class AccountServiceImpl implements AccountService {
    public void addAccount() {
        System.out.println("accountService的add方法被实现了...");
    }
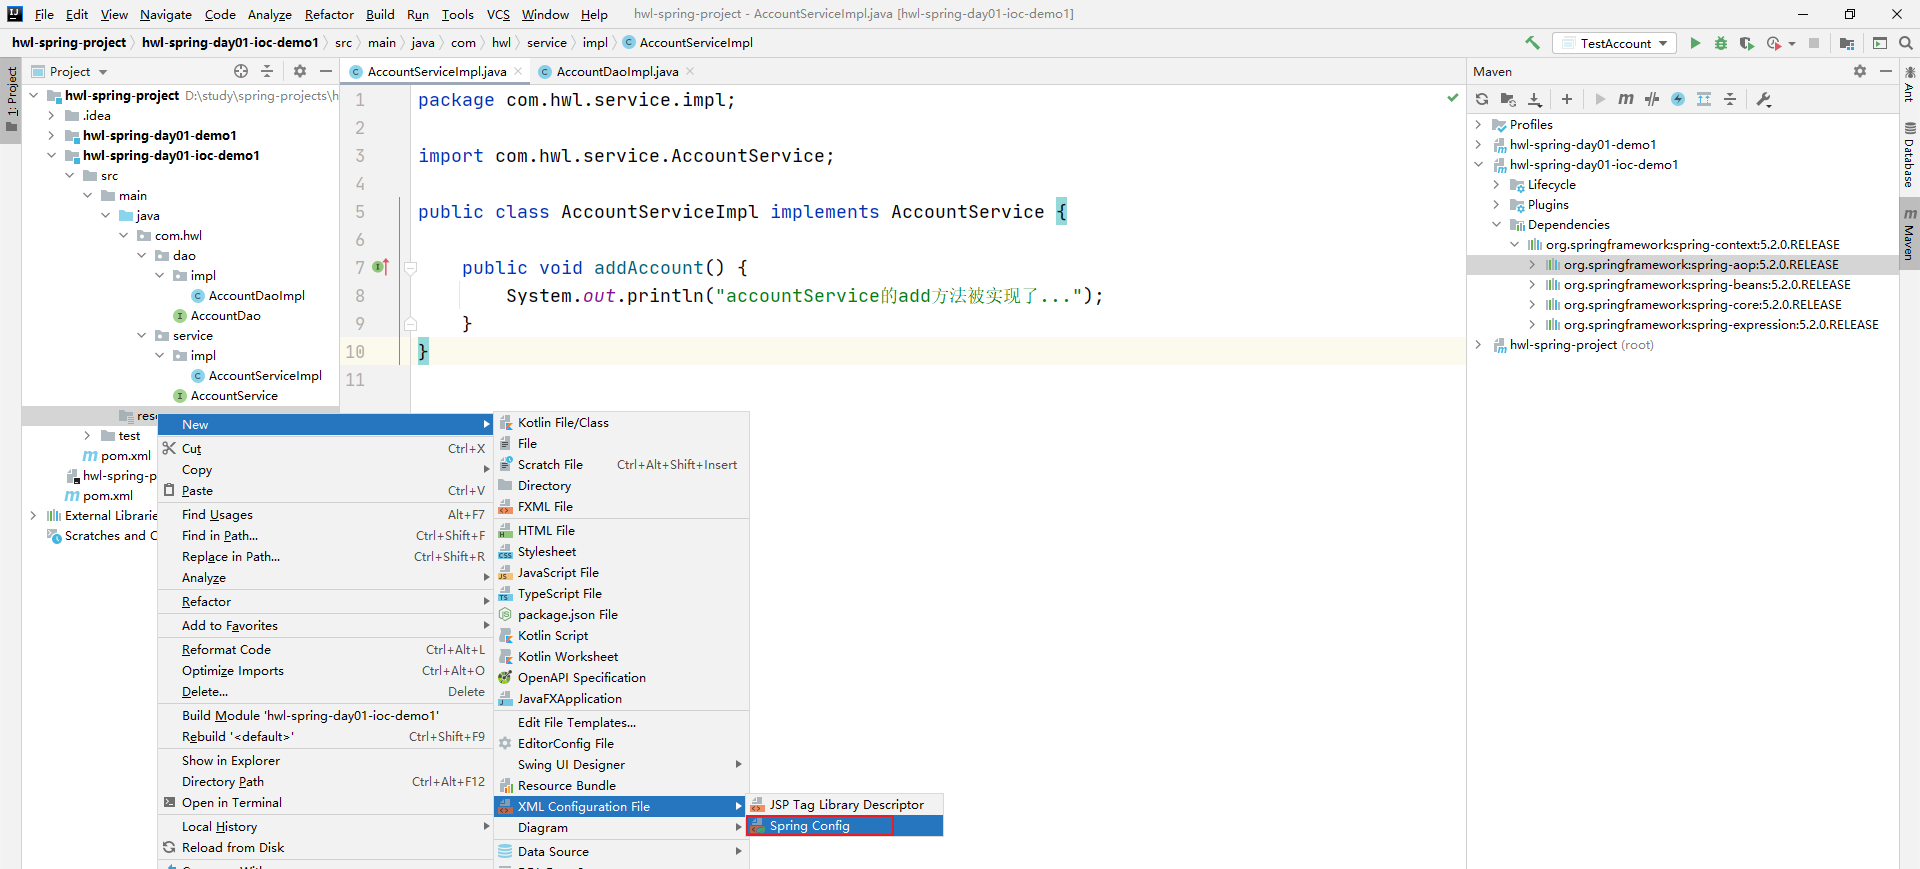
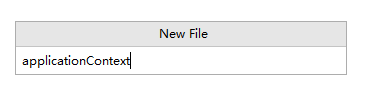
}- 创建 xml 的配置文件,通过bean标签来管理bean
<bean id="" class="">
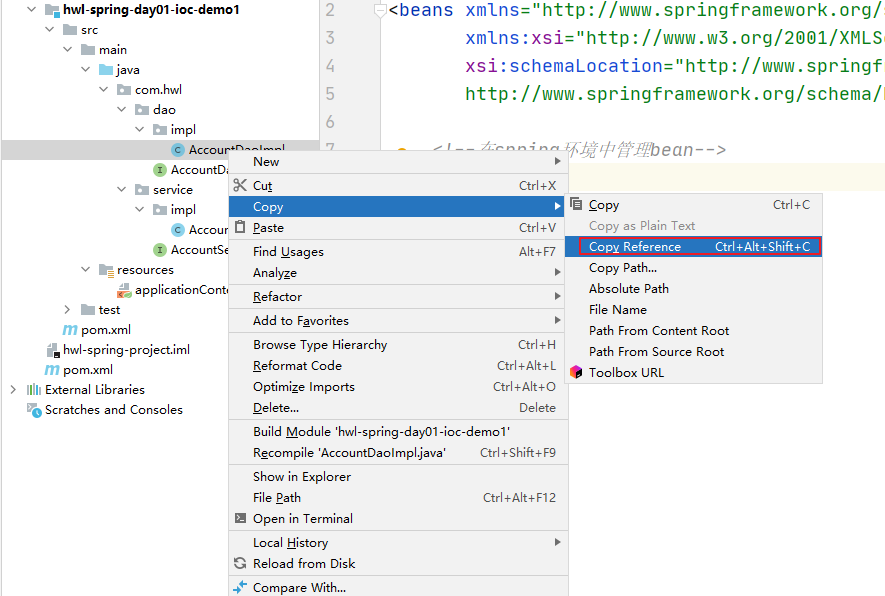
xml
<?xml version="1.0" encoding="UTF-8"?>
<beans xmlns="http://www.springframework.org/schema/beans"
       xmlns:xsi="http://www.w3.org/2001/XMLSchema-instance"
       xsi:schemaLocation="http://www.springframework.org/schema/beans
       http://www.springframework.org/schema/beans/spring-beans.xsd">
    <!--
		在spring环境中管理 bean
        bean标签:就是帮助我们管理bean的标签,将bean放在spring的ioc容器里面去
        id:bean的名称 值任意 但是必须要唯一
        class:bean所属类的全限定名
    -->
    <bean id="accountDao" class="com.hwl.dao.impl.AccountDaoImpl"></bean>
    <bean id="accountService" class="com.hwl.service.impl.AccountServiceImpl"></bean>
</beans>-
获取bean,首先需要初始化 bean 工厂(IOC容器)
javaApplicationContext context = new ClassPathXmlApplicationContext("applicationContext.xml");调用工厂提供的 getBean 方法获取 bean
java
public class TestAccount {
    public static void main(String[] args) {
        //读取spring的配置文件来初始化spring的ioc容器
        ApplicationContext context = new ClassPathXmlApplicationContext("applicationContext.xml");
        //获取bean
        AccountDao accountDao = (AccountDao) context.getBean("accountDao");
        accountDao.addAccount();
        AccountService accountService = (AccountService) context.getBean("accountService");
        accountService.addAccount();
    }
}
2.08.spring中bean工厂的细节
ApplicationContext是 Spring 给我们提供的核心容器。我们可以去查看它的依赖关系。

ApplicationContext和BeanFactory的区别
我们发现 ApplicationContext 继承了 BeanFactory。BeanFactory 才是顶级容器。那么这两个核心的容器有什么区别呢?
ApplicationContext
ApplicationContext 在构建核心容器时,创建对象采取的策略是采用立即加载的方式。也就是说,只要一读取完配置文件马上就创建配置文件中配置的对象。可以演示下:
在 daoImpl 和 serviceImpl 中都添加一个构造器:
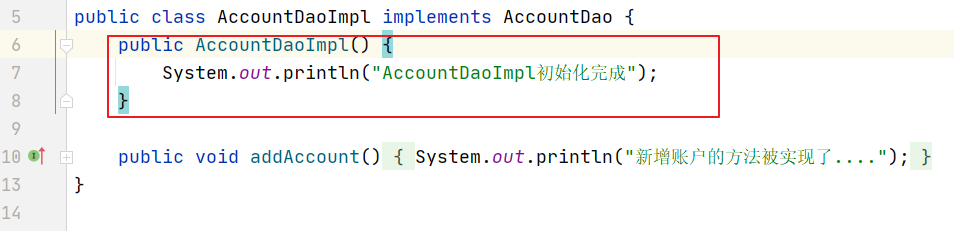

然后在之前写的测试类上打断点:
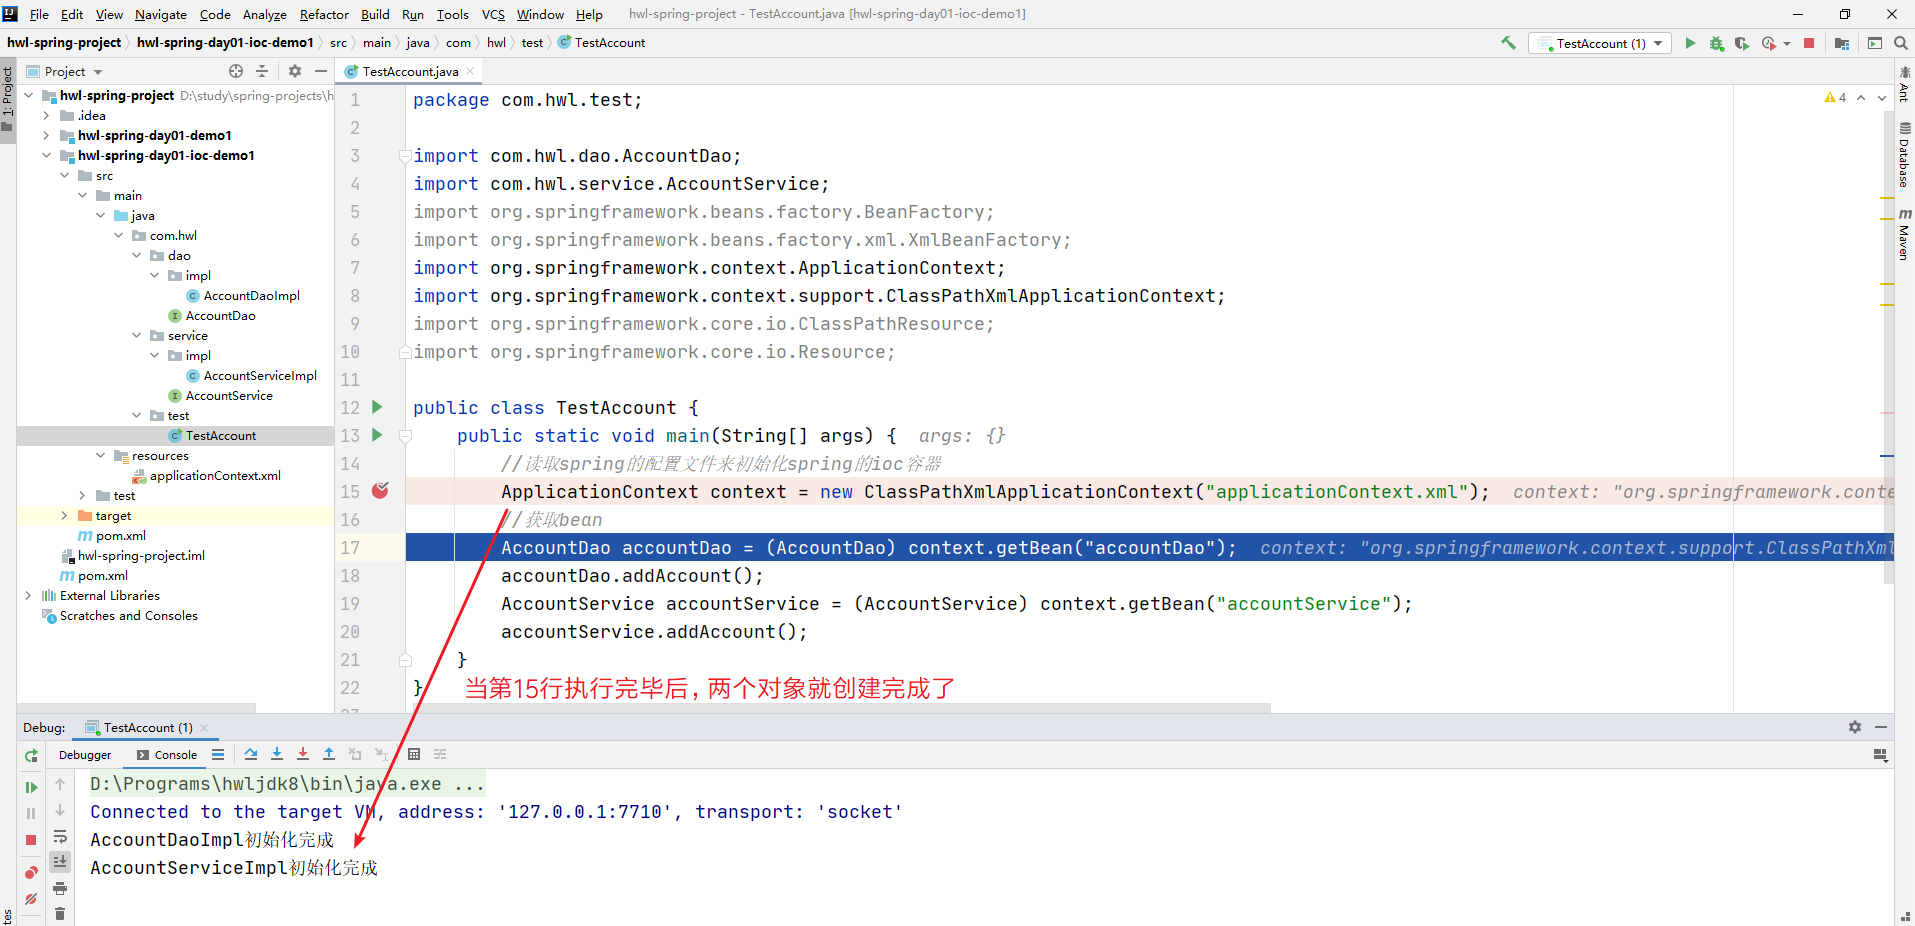
可以看到,当配置文件一旦加载完成,对象就已经创建。
BeanFactory
BeanFactory,在创建核心容器时,创建对象采取的策略是采用延迟加载 的方式,也就是说,什么时候根据 id 获取对象,什么时候才真正的创建对象。
下面演示下,修改刚才的测试类:
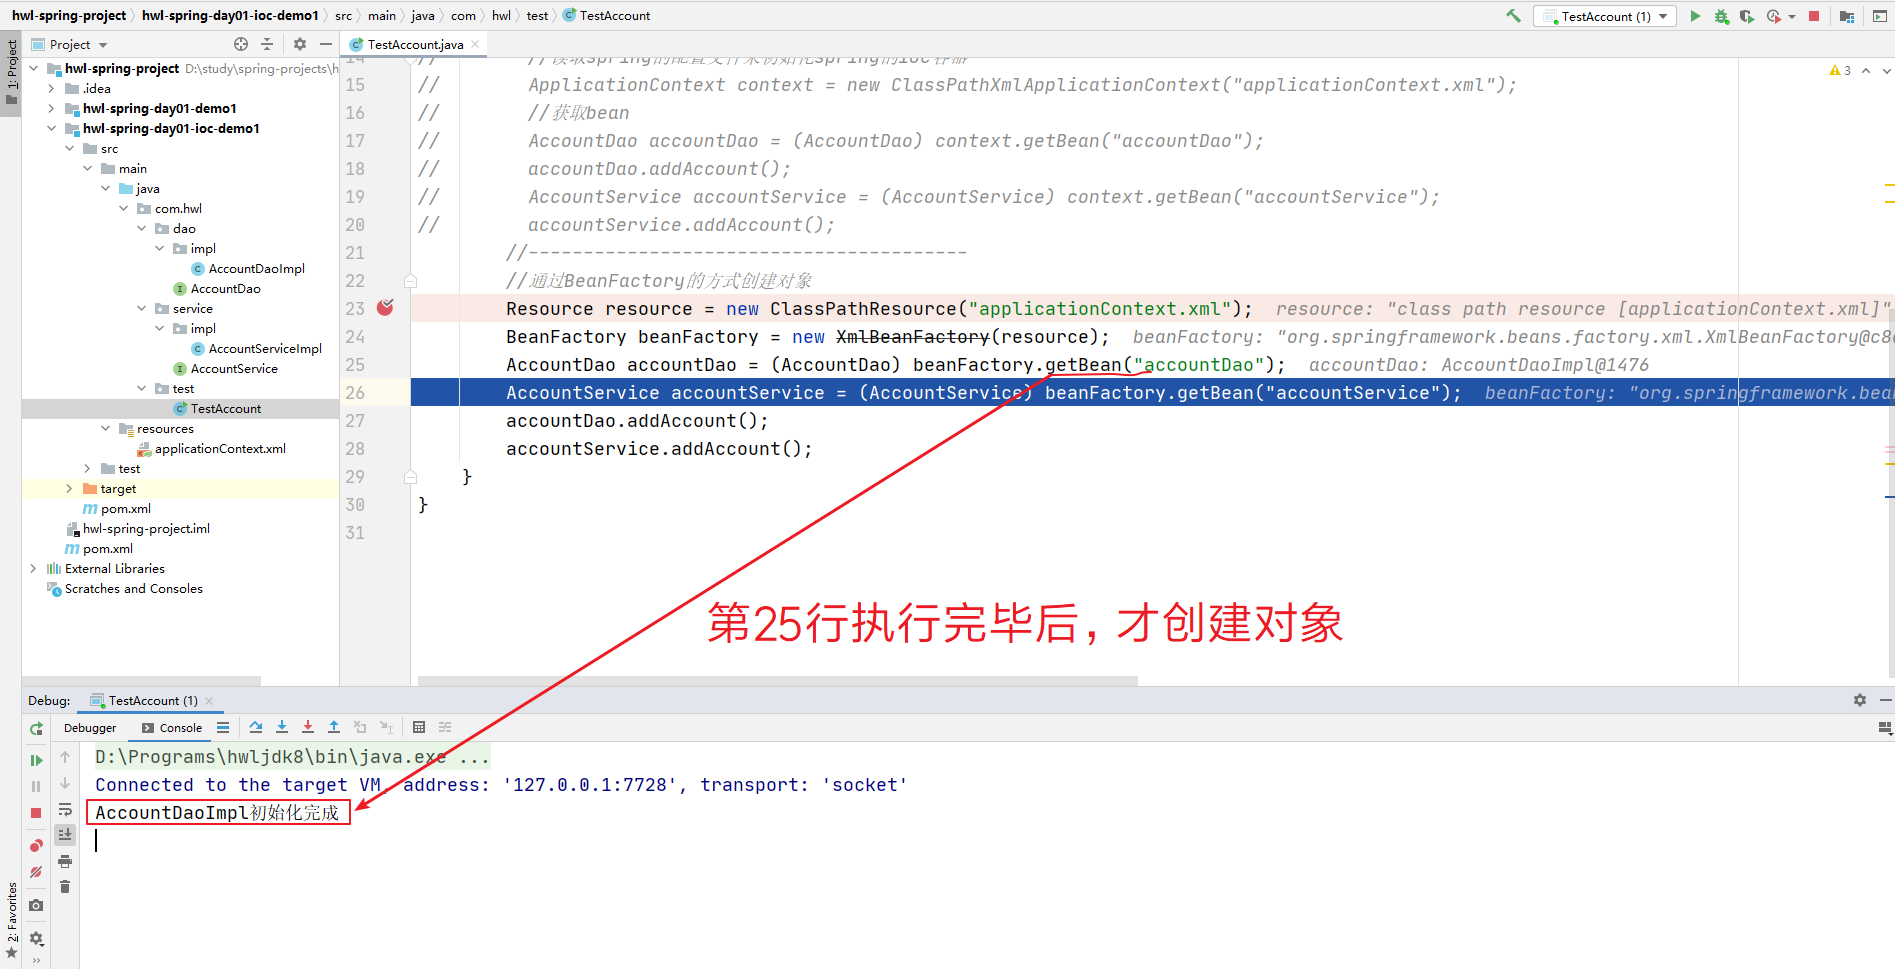
可以看到只有根据 id 创建对象时,才是真正的创建对象。
ApplicationContext的实现类
ApplicationContext 是一个接口,那么它的实现类呢?下面 3 个实现类要知道:
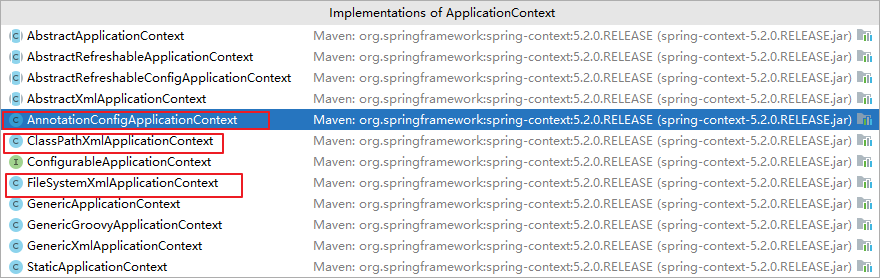
ClassPathXmlApplicationContext:加载类路径下面的 Spring 配置文件FileSystemXmlApplicationContext:加载磁盘绝对路径下面的配置文件(很少用)AnnotationConfigApplicationContext:用于注解环境,创建容器(后面再介绍)
2.09.spring管理bean的方式
为了研究 Spring 对 bean 管理方式,我们重新创建一个工程。
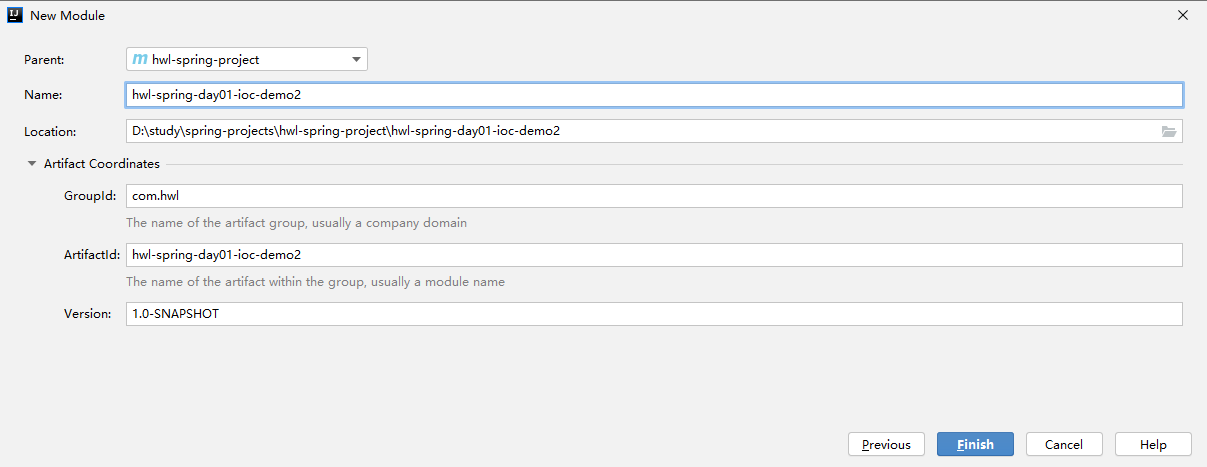
导入依赖:
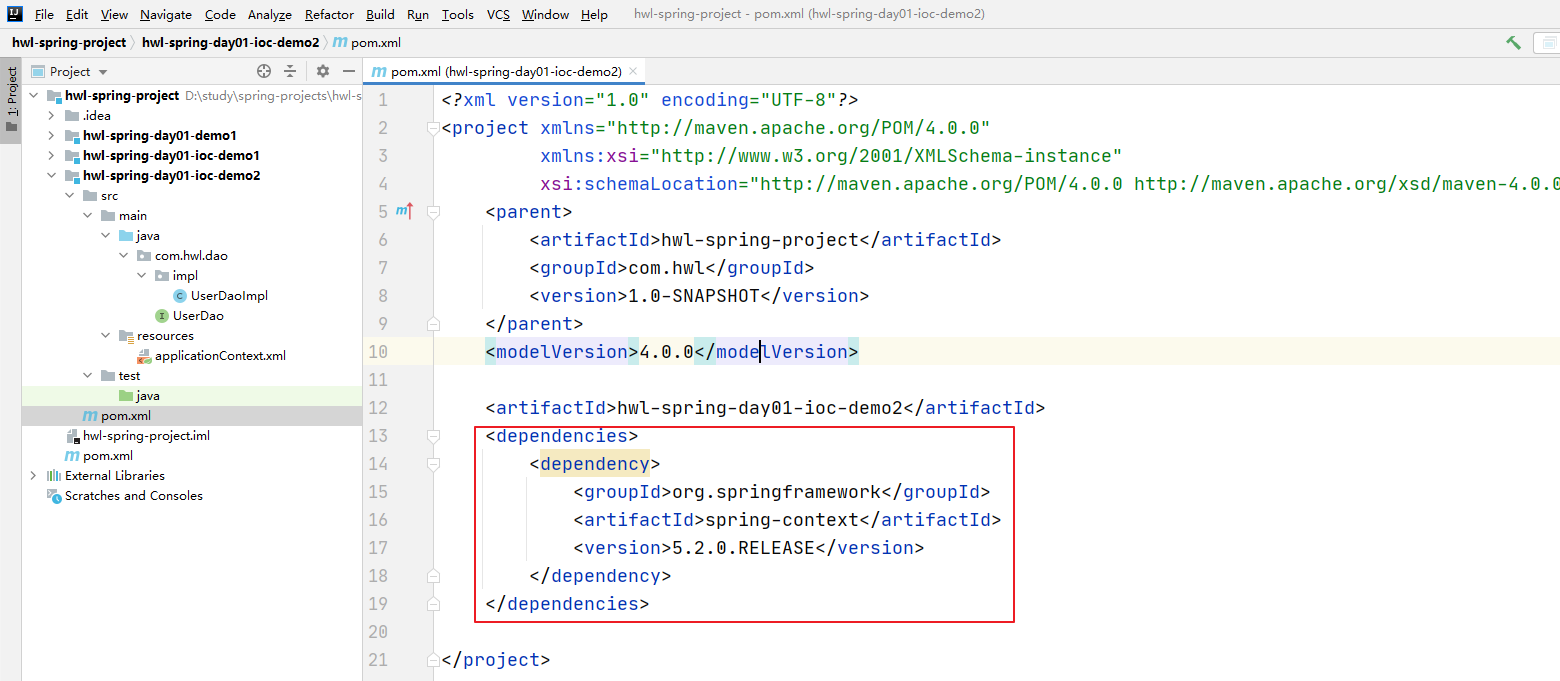
无参构造函数的实例化方式
xml
<?xml version="1.0" encoding="UTF-8"?>
<beans xmlns="http://www.springframework.org/schema/beans"
       xmlns:xsi="http://www.w3.org/2001/XMLSchema-instance"
       xsi:schemaLocation="http://www.springframework.org/schema/beans
       http://www.springframework.org/schema/beans/spring-beans.xsd">
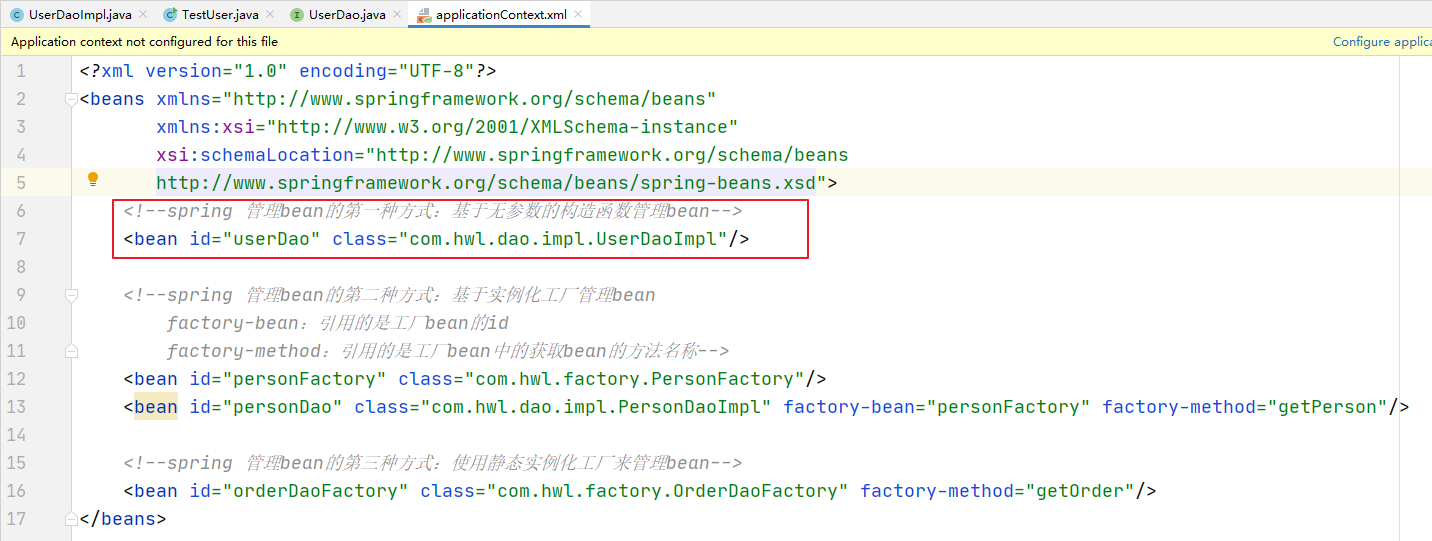
    <!--spring 管理bean的第一种方式:基于无参数的构造函数管理bean-->
    <bean id="userDao" class="com.hwl.dao.impl.UserDaoImpl"></bean>
</beans>
java
public interface UserDao {
    void addUser();
}
java
public class UserDaoImpl implements UserDao {
    public UserDaoImpl() {
        System.out.println("UserDao的无参数构造函数实现了....");
    }

    public void addUser() {
        System.out.println("新增用户的方法实现了.....");
    }
}
测试类:
java
public class TestUser {
    public static void main(String[] args) {
        ApplicationContext context = new ClassPathXmlApplicationContext("applicationContext.xml");
        UserDao userDao = (UserDao) context.getBean("userDao");
    }
}
使用工厂中的普通方法实例化对象
java
public interface PersonDao {
    void addPerson();
}
java
public class PersonDaoImpl implements PersonDao {
    public void addPerson() {
        System.out.println("新增Person的方法被实现了......");
    }
}
工厂类:
java
public class PersonFactory {
    //定义一个方法 方法的返回值就是需要被管理的bean的类型
    public PersonDao getPerson(){
        return new PersonDaoImpl();
    }
}
xml
<?xml version="1.0" encoding="UTF-8"?>
<beans xmlns="http://www.springframework.org/schema/beans"
       xmlns:xsi="http://www.w3.org/2001/XMLSchema-instance"
       xsi:schemaLocation="http://www.springframework.org/schema/beans
       http://www.springframework.org/schema/beans/spring-beans.xsd">
    <!--
        spring 管理bean的第二种方式:基于实例化工厂管理bean
        factory-bean:引用的是工厂bean的id
        factory-method:引用的是工厂bean中的获取bean的方法名称
    -->
    <bean id="personFactory" class="com.hwl.factory.PersonFactory"/>
    <bean id="personDao" class="com.hwl.dao.impl.PersonDaoImpl" factory-bean="personFactory" factory-method="getPerson"/>
</beans>
java
public class TestUser {
    public static void main(String[] args) {
        ApplicationContext context = new ClassPathXmlApplicationContext("applicationContext.xml");
//        UserDao userDao = (UserDao) context.getBean("userDao");
        PersonDao personDao = (PersonDao) context.getBean("personDao");
        personDao.addPerson();
    }
}
使用工厂中的静态方法实例化对象
java
public interface OrderDao {
    void addOrder();
}
java
public class OrderDaoImpl implements OrderDao {
    public void addOrder() {
        System.out.println("新增订单的方法被实现....");
    }
}
java
public class OrderDaoFactory {
    //创建一个静态方法来管理 bean
    public static OrderDao getOrder(){
        return new OrderDaoImpl();
    }
}
xml
<?xml version="1.0" encoding="UTF-8"?>
<beans xmlns="http://www.springframework.org/schema/beans"
       xmlns:xsi="http://www.w3.org/2001/XMLSchema-instance"
       xsi:schemaLocation="http://www.springframework.org/schema/beans
       http://www.springframework.org/schema/beans/spring-beans.xsd">
    <!--spring 管理bean的第三种方式:使用静态实例化工厂来管理bean-->
    <bean id="orderDaoFactory" class="com.hwl.factory.OrderDaoFactory" factory-method="getOrder"/>
</beans>
java
public class TestUser {
    public static void main(String[] args) {
        ApplicationContext context = new ClassPathXmlApplicationContext("applicationContext.xml");
//        UserDao userDao = (UserDao) context.getBean("userDao");
//        PersonDao personDao = (PersonDao) context.getBean("personDao");
        OrderDao orderDao = (OrderDao) context.getBean("orderDaoFactory");
        orderDao.addOrder();
    }
}
2.10.spring中bean的一些细节
在默认情况下,bean 是单例的。我们来测试下(在前面的代码上写):
java
public class TestUser {
    public static void main(String[] args) {
        ApplicationContext context = new ClassPathXmlApplicationContext("applicationContext.xml");
        UserDao userDao1 = (UserDao) context.getBean("userDao");
        UserDao userDao2 = (UserDao) context.getBean("userDao");
        System.out.println(userDao1 == userDao2);
    }
}
java
public class UserDaoImpl implements UserDao {
    public UserDaoImpl() {
        System.out.println("UserDao的无参数构造函数实现了....");
    }

    public void addUser() {
        System.out.println("新增用户的方法实现了.....");
    }
}

说明是 Spring 对于 bean 的管理是单例的。
scope标签(bean的作用域)
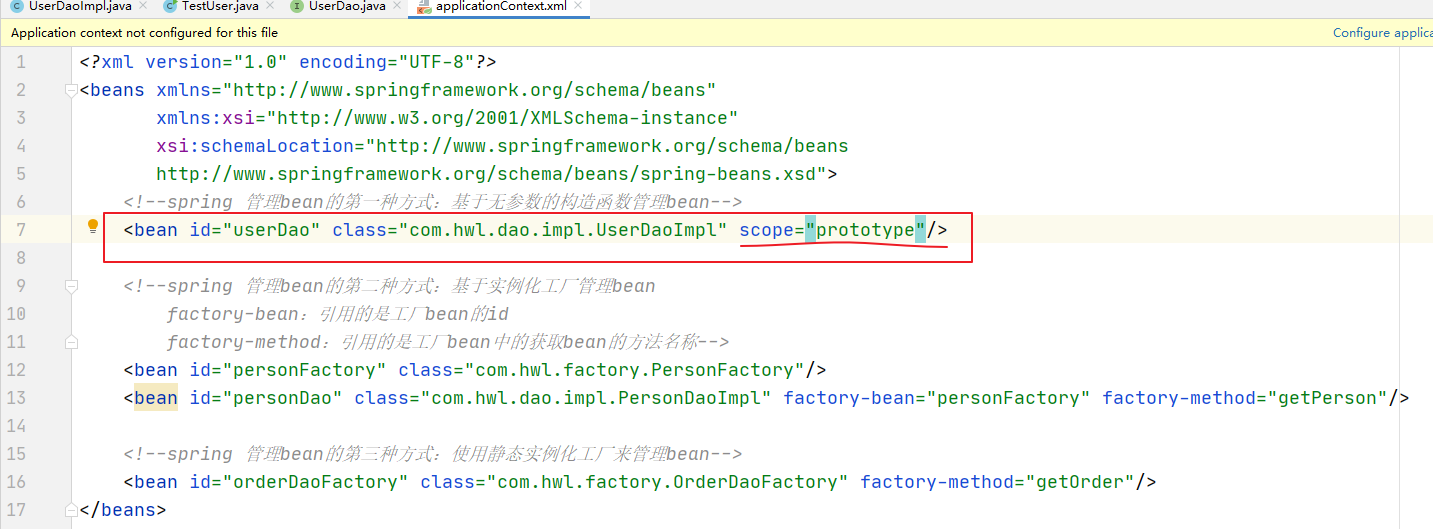
但是如果加一个范围 scope,再次运行:

就变成 false 了。
bean 标签的 scope 属性:作用:用于指定 bean 的作用范围(作用域)
取值: 常用的就是单例的和多例的 singleton:单例的(默认值);prototype:多例的
bean的生命周期
-
init-method:描述 bean 的生命周期中的初始化 bean 的方法 -
destroy-method:描述的 bean 的生命周期中销毁 bean 的方法
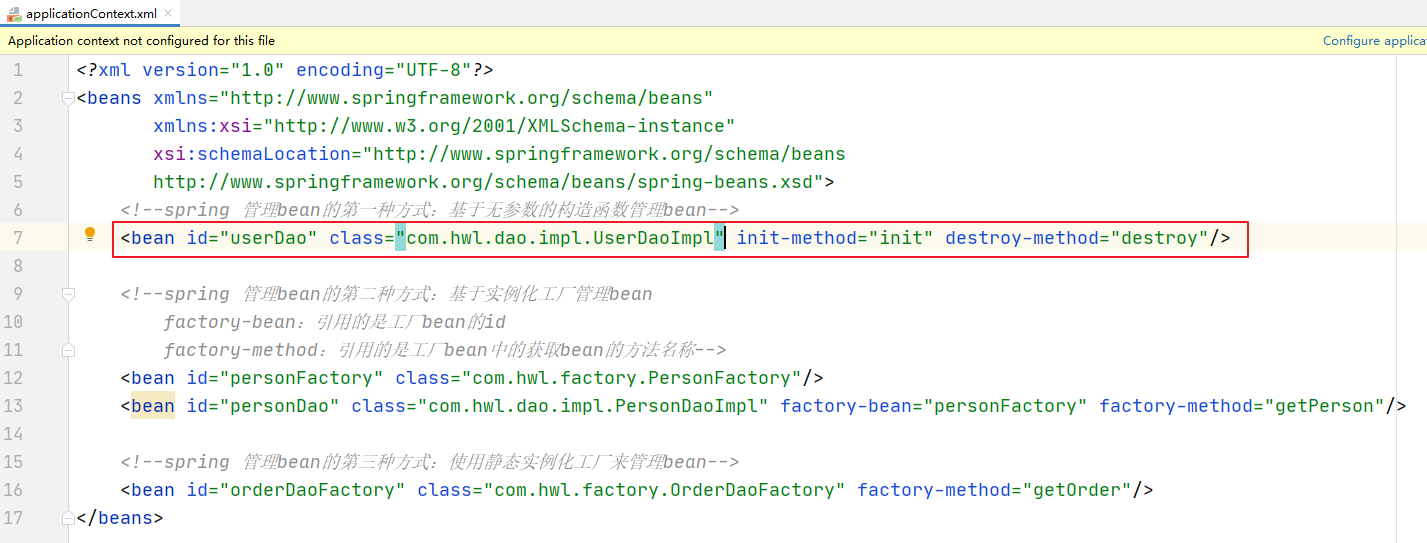
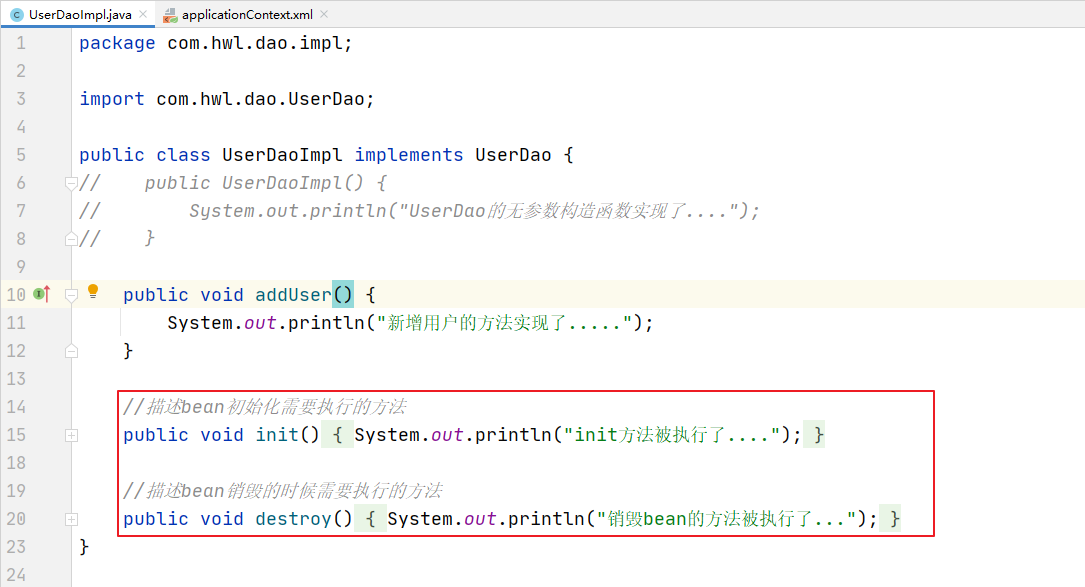
java
public class TestUser {
    public static void main(String[] args) {
        ApplicationContext context = new ClassPathXmlApplicationContext("applicationContext.xml");
        UserDao userDao1 = (UserDao) context.getBean("userDao");
        UserDao userDao2 = (UserDao) context.getBean("userDao");
        ((ClassPathXmlApplicationContext) context).close();
    }
}
2.11.依赖注入--使用set方法完成注入
依赖注入:Dependency Injection(DI),在当前类需要用到其他类的对象,有 Spring 为我们提供,我们只需要在配置文件中说明。
IOC 的作用:降低程序间的耦合(依赖关系)
依赖注入的作用:依赖关系的管理,依赖都交给 Spring 来维护
新建一个模块:
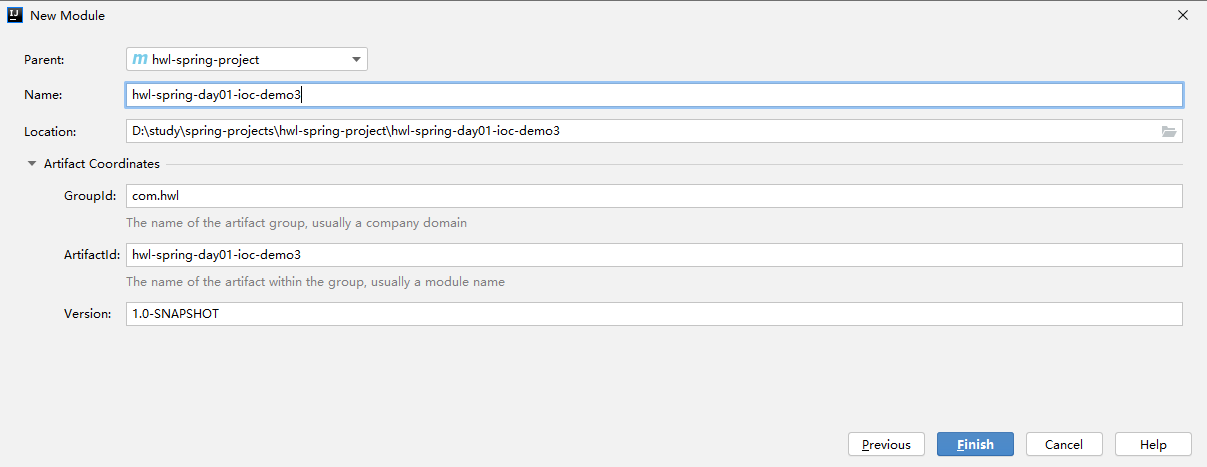
首先依旧是 pom.xml 的 Spring 依赖的引入:
xml
<?xml version="1.0" encoding="UTF-8"?>
<project xmlns="http://maven.apache.org/POM/4.0.0"
         xmlns:xsi="http://www.w3.org/2001/XMLSchema-instance"
         xsi:schemaLocation="http://maven.apache.org/POM/4.0.0 http://maven.apache.org/xsd/maven-4.0.0.xsd">
    <parent>
        <artifactId>hwl-spring-project</artifactId>
        <groupId>com.hwl</groupId>
        <version>1.0-SNAPSHOT</version>
    </parent>
    <modelVersion>4.0.0</modelVersion>

    <artifactId>hwl-spring-day01-ioc-demo3</artifactId>
    <dependencies>
        <dependency>
            <groupId>org.springframework</groupId>
            <artifactId>spring-context</artifactId>
            <version>5.2.0.RELEASE</version>
        </dependency>
    </dependencies>
</project>
java
public class User {
    private String username;
    private Integer age;
    private String address;

    // getter、setter

    @Override
    public String toString() {
        return "User{" + "username='" + username + '\'' + ", age=" + age + ", address='" + address + '\'' + '}';
    }
}applicationContext.xml:
xml
<?xml version="1.0" encoding="UTF-8"?>
<beans xmlns="http://www.springframework.org/schema/beans"
       xmlns:xsi="http://www.w3.org/2001/XMLSchema-instance"
       xsi:schemaLocation="http://www.springframework.org/schema/beans http://www.springframework.org/schema/beans/spring-beans.xsd">
    <!--第一种,默认使用set方法进行注入,使用set方法进行注入的前提是被管理的bean类须提供set方法-->
    <bean id="user" class="com.hwl.pojo.User"/>
</beans>
如果仅仅只是这么写,写一个测试类输出:
java
public class TestUser {
    public static void main(String[] args) {
        ApplicationContext context = new ClassPathXmlApplicationContext("applicationContext.xml");
        User user = (User) context.getBean("user");
        System.out.println(user);
    }
}
修改 applicationContext.xml 为:
xml
<!--
	第一种,默认使用set方法进行注入,使用set方法进行注入的前提是被管理的bean类须提供set方法
    property标签:完成bean的属性的注入
     name:描述bean的属性名称
     value:描述bean的属性值(基本数据类型和字符串的值)
-->
<bean id="user" class="com.hwl.pojo.User">
    <property name="username" value="Vae"/>
    <property name="age" value="18"/>
    <property name="address" value="China"/>
</bean>
更进一步,如果在 User 类加入一个引用的 Car 呢?
首先,新建一个 Car 类,定义属性,以及 set 方法,toString() 方法
java
public class Car {
    private String brand;
    private String type;

    // getter、setter

    @Override
    public String toString() {
        return "Car{" + "brand='" + brand + '\'' + ", type='" + type + '\'' + '}';
    }
}
在原来写的 User 类上加上 Car 属性以及对应的 set 方法,toString():
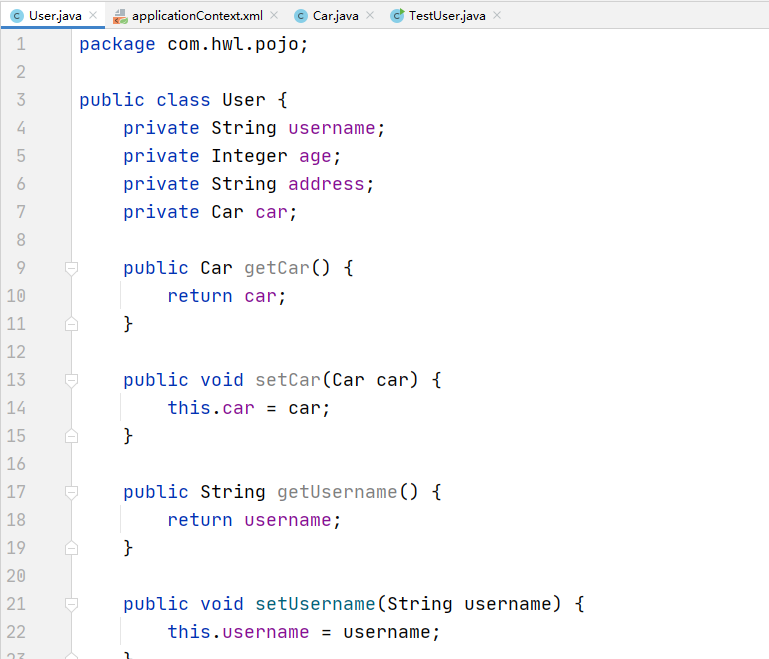
修改 applicationContext.xml:
xml
<!--
	第一种,默认使用set方法进行注入,使用set方法进行注入的前提是被管理的bean类须提供set方法
    property标签:完成bean的属性的注入
     name:描述bean的属性名称
     value:描述bean的属性值(基本数据类型和字符串的值)
     ref:注入的是引用数据类型的值,引用的是另外一个bean的id
-->
<bean id="user" class="com.hwl.pojo.User">
    <property name="username" value="Vae"/>
    <property name="age" value="18"/>
    <property name="address" value="China"/>
    <property name="car" ref="car"/>
</bean>
<bean id="car" class="com.hwl.pojo.Car">
    <property name="brand" value="宝马"/>
    <property name="type" value="BMW540I"/>
</bean>
2.12.依赖注入--使用构造器完成注入
java
public class Emp {
    private Integer id;
    private String name;
    private Integer age;

    public Emp(Integer id, String name, Integer age) {
        this.id = id;
        this.name = name;
        this.age = age;
    }

    // 最好还是把无参构造器补上,因为写了有参构造器,无参构造器自动就覆盖了
    public Emp() { }

    @Override
    public String toString() {
        return "Emp{" + "id=" + id + ", name='" + name + '\'' + ", age=" + age + '}';
    }
}
xml
<!--spring的依赖注入的第二种方式:使用构造函数实现依赖注入-->
<bean id="emp" class="com.hwl.pojo.Emp">
    <constructor-arg name="id" value="1"/>
    <constructor-arg name="name" value="jack"/>
    <constructor-arg name="age" value="25"/>
</bean>
测试类:
java
public class TestUser {
    public static void main(String[] args) {
        ApplicationContext context = new ClassPathXmlApplicationContext("applicationContext.xml");
        Emp emp = (Emp) context.getBean("emp");
        System.out.println(emp);
    }
}
同样的,创建一个新的 Department 类,也在 Emp 类里面当做属性,有参构造器和 toString 方法也都加上:
java
public class Department {
    private Integer id;
    private String name;
    private String location;

    public Department(Integer id, String name, String location) {
        this.id = id;
        this.name = name;
        this.location = location;
    }

    public Department() { }

    @Override
    public String toString() {
        return "Department{" + "id=" + id + ", name='" + name + '\'' + ", location='" + location + '\'' + '}';
    }
}
java
public class Emp {
    private Integer id;
    private String name;
    private Integer age;
    private Department department;

    public Emp(Integer id, String name, Integer age, Department department) {
        this.id = id;
        this.name = name;
        this.age = age;
        this.department = department;
    }

    // 最好还是把无参构造器补上,因为写了有参构造器,无参构造器自动就覆盖了
    public Emp() { }

    @Override
    public String toString() {
        return "Emp{" + "id=" + id + ", name='" + name + '\'' + ", age=" + age + ", department=" + department + '}';
    }
}
xml
<!--
    spring的依赖注入的第二种方式:使用构造器实现依赖注入
    constructor-arg:完成依赖注入 使用的是带参数的构造函数完成
       name:属性名称
       value:属性名称所属的值 必须是基本数据类型和字符串类型的值
       ref:引用数据类型的值
-->
<bean id="emp" class="com.hwl.pojo.Emp">
    <constructor-arg name="id" value="1001"/>
    <constructor-arg name="name" value="Vae"/>
    <constructor-arg name="age" value="38"/>
    <constructor-arg name="department" ref="dep"/>
</bean>
<bean id="dep" class="com.hwl.pojo.Department">
    <constructor-arg name="id" value="514"/>
    <constructor-arg name="name" value="太和音乐集团"/>
    <constructor-arg name="location" value="北京"/>
</bean>
java
public class TestUser {
    public static void main(String[] args) {
        ApplicationContext context = new ClassPathXmlApplicationContext("applicationContext.xml");
        Emp emp = (Emp) context.getBean("emp");
        System.out.println(emp);
    }
}
2.13.依赖注入--复杂类型值的注入(用的少)
这种用的少,了解下即可。
java
package com.hwl.pojo;

import java.util.*;

public class Animal {
    private String[] strs;
    private List<String> list;
    private Set<String> set;
    private Map<String, String> map;
    private Properties pros;

    // getter、setter

    @Override
    public String toString() {
        return "Animal{" + "strs=" + Arrays.toString(strs) + ", list=" + list + ", set=" + set + ", map=" + map + ", pros=" + pros + '}';
    }
}
xml
<!--进行复杂类型值的注入-->
<bean id="animal" class="com.hwl.pojo.Animal">
    <property name="strs">
        <!--注入数组类型的值-->
        <array>
            <value>str1</value>
            <value>str2</value>
            <value>str3</value>
        </array>
    </property>
    <!--注入list类型的值-->
    <property name="list">
        <list>
            <value>list1</value>
            <value>list2</value>
            <value>list3</value>
        </list>
    </property>
    <!--注入set类型的值-->
    <property name="set">
        <set>
            <value>s1</value>
            <value>s2</value>
            <value>s3</value>
        </set>
    </property>
    <!--注入map类型的值-->
    <property name="map">
        <map>
            <entry key="k1" value="v1"/>
            <entry key="k2" value="v2"/>
            <entry key="k3" value="v3"/>
        </map>
    </property>
    <!--注入properties的值-->
    <property name="pros">
        <props>
            <prop key="p1">v1</prop>
            <prop key="p1">v2</prop>
            <prop key="p1">v3</prop>
        </props>
    </property>
</bean>
java
public class TestUser {
    public static void main(String[] args) {
        ApplicationContext context = new ClassPathXmlApplicationContext("applicationContext.xml");
        Animal animal = (Animal) context.getBean("animal");
        System.out.println(animal);
    }
}
2.14.基于XML配置搭建基于IOC案例(小应用)
先在 MySQL 数据库中创建好表,并导入数据:
sql
create table account(
    id int primary key auto_increment,
    name varchar(40),
    money double
)character set utf8 collate utf8_general_ci;
insert into account(name,money) values('eric',1000);
insert into account(name,money) values('james',1000);
insert into account(name,money) values('curry',1000);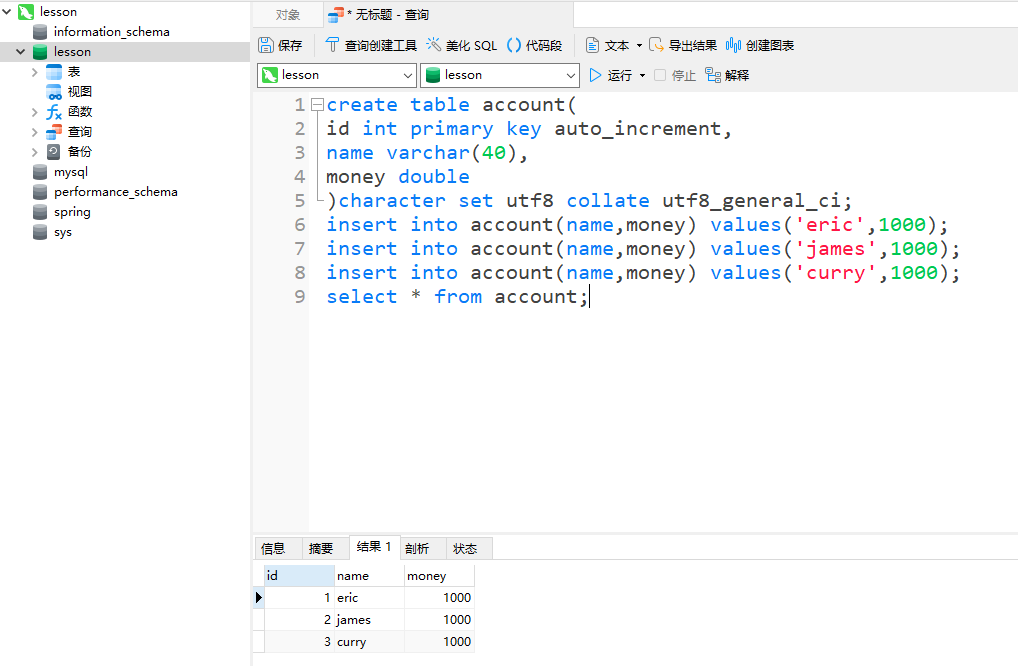
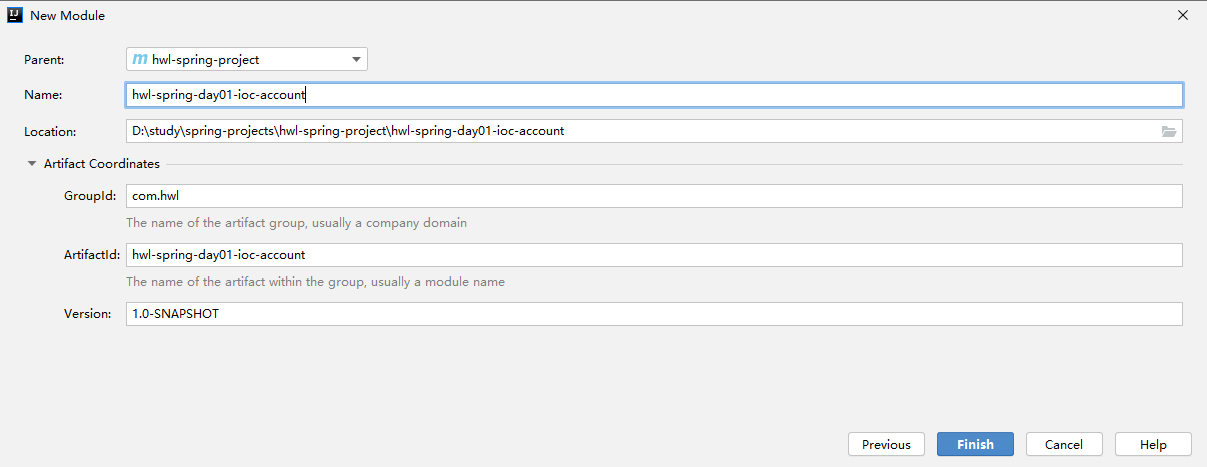
新建子模块:
依旧是先引入需要的依赖:
xml
<?xml version="1.0" encoding="UTF-8"?>
<project xmlns="http://maven.apache.org/POM/4.0.0"
         xmlns:xsi="http://www.w3.org/2001/XMLSchema-instance"
         xsi:schemaLocation="http://maven.apache.org/POM/4.0.0 http://maven.apache.org/xsd/maven-4.0.0.xsd">
    <parent>
        <artifactId>hwl-spring-project</artifactId>
        <groupId>com.hwl</groupId>
        <version>1.0-SNAPSHOT</version>
    </parent>
    <modelVersion>4.0.0</modelVersion>

    <artifactId>hwl-spring-day01-ioc-account</artifactId>
    <dependencies>
        <dependency>
            <groupId>org.springframework</groupId>
            <artifactId>spring-context</artifactId>
            <version>5.2.0.RELEASE</version>
        </dependency>
        <dependency>
            <groupId>commons-dbutils</groupId>
            <artifactId>commons-dbutils</artifactId>
            <version>1.7</version>
        </dependency>
        <dependency>
            <groupId>mysql</groupId>
            <artifactId>mysql-connector-java</artifactId>
            <version>8.0.25</version>
        </dependency>
        <dependency>
            <groupId>c3p0</groupId>
            <artifactId>c3p0</artifactId>
            <version>0.9.1.2</version>
        </dependency>
        <dependency>
            <groupId>junit</groupId>
            <artifactId>junit</artifactId>
            <version>4.13.1</version>
            <scope>test</scope>
        </dependency>
    </dependencies>
</project>
java
public class Account {
    private Integer id;
    private String name;
    private Double money;

    // getter、setter,这里笔记省略

    @Override
    public String toString() {
        return "Account{" + "id=" + id + ", name='" + name + '\'' + ", money=" + money + '}';
    }
}
java
public interface AccountDao {
    // 查询所有账户的信息
    List<Account> findAllAccount();

    // 通过提供的账户id查找账户
    Account findAccountById(Integer accountId);

    // 保存账户信息
    void saveAccount(Account account);

    // 更新账户信息
    void updateAccount(Account account);

    // 删除账户信息
    void deleteAccount(Integer accountId);
}
java
public class AccountDaoImpl implements AccountDao {
    private QueryRunner runner;

    public void setRunner(QueryRunner runner) {
        this.runner = runner;
    }

    public List<Account> findAllAccount() {
        try {
            String sql = "SELECT * FROM account";
            List<Account> accountList = runner.query(sql, new BeanListHandler<Account>(Account.class));
            return accountList;
        } catch (SQLException e) {
            e.printStackTrace();
            throw new RuntimeException(e);
        }
    }

    public Account findAccountById(Integer accountId) {
        try {
            String sql = "SELECT * FROM account where id = ?";
            Account account = runner.query(sql, new BeanHandler<Account>(Account.class), accountId);
            return account;
        } catch (SQLException e) {
            e.printStackTrace();
            throw new RuntimeException(e);
        }
    }

    public void saveAccount(Account account) {
        try {
            String sql = "insert into account(name, money) values (?, ?)";
            runner.update(sql, account.getName(), account.getMoney());
        } catch (SQLException e) {
            e.printStackTrace();
            throw new RuntimeException(e);
        }
    }

    public void updateAccount(Account account) {
        try {
            String sql = "update account set name = ? where id = ?";
            runner.update(sql, account.getName(), account.getId());
        } catch (SQLException e) {
            e.printStackTrace();
            throw new RuntimeException(e);
        }
    }

    public void deleteAccount(Integer accountId) {
        try {
            String sql = "delete from account where id = ?";
            runner.update(sql, accountId);
        } catch (SQLException e) {
            e.printStackTrace();
            throw new RuntimeException(e);
        }
    }
}
java
public interface AccountService {
	// 查询所有账户的信息
    List<Account> findAllAccount();

    // 通过提供的账户id查找账户
    Account findAccountById(Integer accountId);

    // 保存账户信息
    void saveAccount(Account account);

    // 更新账户信息
    void updateAccount(Account account);

    // 删除账户信息
    void deleteAccount(Integer accountId);
}
java
public class AccountServiceImpl implements AccountService {
    private AccountDao accountDao;

    // 写set方法
    public void setAccountDao(AccountDao accountDao) {
        this.accountDao = accountDao;
    }

    public List<Account> findAllAccount() {
        return accountDao.findAllAccount();
    }

    public Account findAccountById(Integer accountId) {
        return accountDao.findAccountById(accountId);
    }

    public void saveAccount(Account account) {
        accountDao.saveAccount(account);
    }

    public void updateAccount(Account account) {
        accountDao.updateAccount(account);
    }

    public void deleteAccount(Integer accountId) {
        accountDao.deleteAccount(accountId);
    }
}
xml
<?xml version="1.0" encoding="UTF-8"?>
<beans xmlns="http://www.springframework.org/schema/beans"
       xmlns:xsi="http://www.w3.org/2001/XMLSchema-instance"
       xsi:schemaLocation="http://www.springframework.org/schema/beans http://www.springframework.org/schema/beans/spring-beans.xsd">
    <!--配置数据源 property:描述的是连接数据库需要用到的用户名、密码、url、驱动类-->
    <bean id="dataSource" class="com.mchange.v2.c3p0.ComboPooledDataSource">
        <property name="driverClass" value="com.mysql.jdbc.Driver"/>
        <property name="jdbcUrl" value="jdbc:mysql://localhost:3306/lesson"/>
        <property name="user" value="root"/>
        <property name="password" value="root"/>
    </bean>
    <!--管理QueryRunner核心对象-->
    <bean id="runner" class="org.apache.commons.dbutils.QueryRunner">
        <constructor-arg name="ds" ref="dataSource"/>
    </bean>
    <!--管理dao-->
    <bean id="dao" class="com.hwl.dao.impl.AccountDaoImpl">
        <property name="runner" ref="runner"/>
     </bean>
    <!--管理service-->
    <bean id="service" class="com.hwl.service.impl.AccountServiceImpl">
        <property name="accountDao" ref="dao"/>
     </bean>
</beans>
测试类:
java
public class AccountTest {
    // 测试查询全部
    @Test
    public void Test01(){
        ApplicationContext context = new ClassPathXmlApplicationContext("applicationContext.xml");
        AccountService accountService = (AccountService) context.getBean("service");
        List<Account> accountList = accountService.findAllAccount();
        for (Account account : accountList) {
            System.out.println(account);
        }
    }

    // 测试按id号查找
    @Test
    public void Test02(){
        ApplicationContext context = new ClassPathXmlApplicationContext("applicationContext.xml");
        AccountService accountService = (AccountService) context.getBean("service");
        Account account = accountService.findAccountById(1);
        System.out.println(account);
    }

    // 测试插入
    @Test
    public void Test03(){
        ApplicationContext context = new ClassPathXmlApplicationContext("applicationContext.xml");
        Account account = new Account();
        account.setName("vae");
        account.setMoney(9999.0);
        AccountService accountService = (AccountService) context.getBean("service");
        accountService.saveAccount(account);
    }

    // 测试修改
    @Test
    public void Test04(){
        ApplicationContext context = new ClassPathXmlApplicationContext("applicationContext.xml");
        Account account = new Account();
        account.setId(4);
        account.setName("yellow");
        AccountService accountService = (AccountService) context.getBean("service");
        accountService.updateAccount(account);
    }
    // 测试删除
    @Test
    public void Test05(){
        ApplicationContext context = new ClassPathXmlApplicationContext("applicationContext.xml");
        AccountService accountService = (AccountService) context.getBean("service");
        accountService.deleteAccount(4);
    }
}
经测试,都是 ok 的。
2.15.使用注解的方式管理bean
先搭建一个基于 xml 的项目:
xml
<dependencies>
    <dependency>
        <groupId>org.springframework</groupId>
        <artifactId>spring-context</artifactId>
        <version>5.2.0.RELEASE</version>
    </dependency>
    <dependency>
        <groupId>junit</groupId>
        <artifactId>junit</artifactId>
        <version>4.13.1</version>
        <scope>test</scope>
    </dependency>
</dependencies>
java
public interface AccountDao {
    void addAccount();
}
java
public class AccountDaoImpl implements AccountDao {
    public void addAccount() {
        System.out.println("新增账户的方法实现了....");
    }
}
java
public interface AccountService {
    void add();
}
java
public class AccountServiceImpl implements AccountService {
    private AccountDao accountDao;

    public void setAccountDao(AccountDao accountDao) {
        this.accountDao = accountDao;
    }

    public void add() {
        accountDao.addAccount();
    }
}
xml
<?xml version="1.0" encoding="UTF-8"?>
<beans xmlns="http://www.springframework.org/schema/beans"
       xmlns:xsi="http://www.w3.org/2001/XMLSchema-instance"
       xsi:schemaLocation="http://www.springframework.org/schema/beans http://www.springframework.org/schema/beans/spring-beans.xsd">
    <bean id="accountDao" class="com.hwl.dao.impl.AccountDaoImpl"></bean>
    <bean id="accountService" class="com.hwl.service.impl.AccountServiceImpl">
        <property name="accountDao" ref="accountDao"/>
    </bean>
</beans>
java
public class TestAccount {
    @Test
    public void Test01(){
        ApplicationContext context = new ClassPathXmlApplicationContext("applicationContext.xml");
        AccountService accountService = (AccountService) context.getBean("accountService");
        accountService.add();
    }
}
@Component注解
现在使用 @Component 注解,记得要加包扫描(<context:component-scan> </context:component-scan>):
xml
<context:component-scan base-package="com.hwl"></context:component-scan>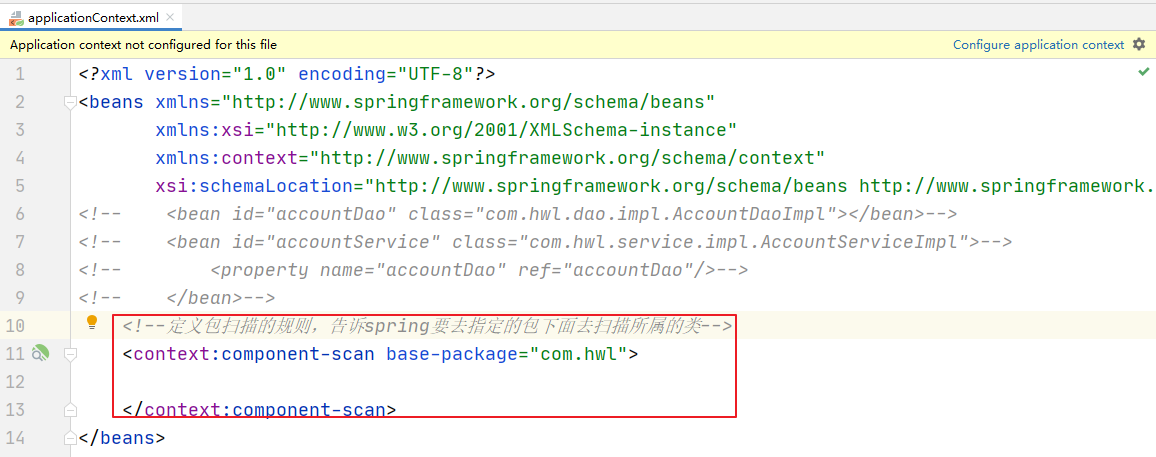
java
@Component
public class AccountDaoImpl implements AccountDao {
    public void addAccount() {
        System.out.println("新增账户的方法实现了....");
    }
}
java
@Component
public class AccountServiceImpl implements AccountService {
	// private AccountDao accountDao;

	// public void setAccountDao(AccountDao accountDao) {
	// 	this.accountDao = accountDao;
	//	}

    public void add() {
		// accountDao.addAccount();
        System.out.println("add方法被实现了。。。。");
    }
}
java
public class TestAccount {
    @Test
    public void Test01(){
        ApplicationContext context = new ClassPathXmlApplicationContext("applicationContext.xml");
        AccountDao accountDao = (AccountDao) context.getBean("accountDaoImpl"); //默认情况下,bean的名称就是类名的名称,且首字母小写
        accountDao.addAccount();
        AccountService accountService = (AccountService) context.getBean("accountServiceImpl");
        accountService.add();
    }
}
由@Component衍生的三个注解
-
@Controller:一般用在表现层。 -
@Service:一般用在业务层。 -
@Repository:一般用在持久层(Dao层)。
以上三个注解他们的作用和属性与 @Component 是一模一样,他们三个是 Spring 框架为我们提供明确的三层使用的注解,使我们的三层对象更加清晰。
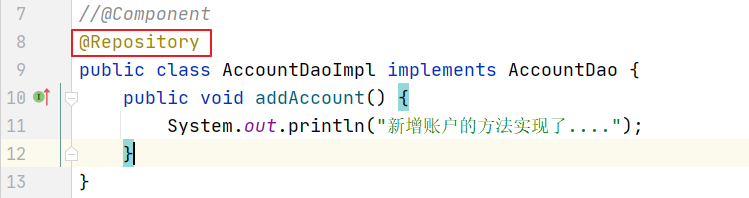
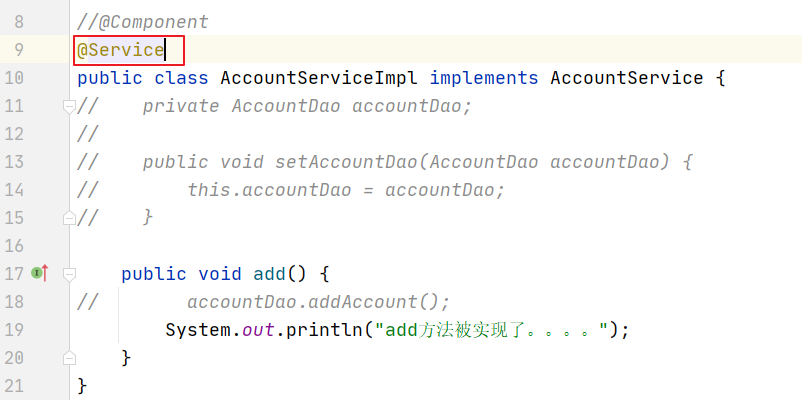
运行,一样可以:

2.16.依赖注入注解--@Autowired
把之前的注释打开:
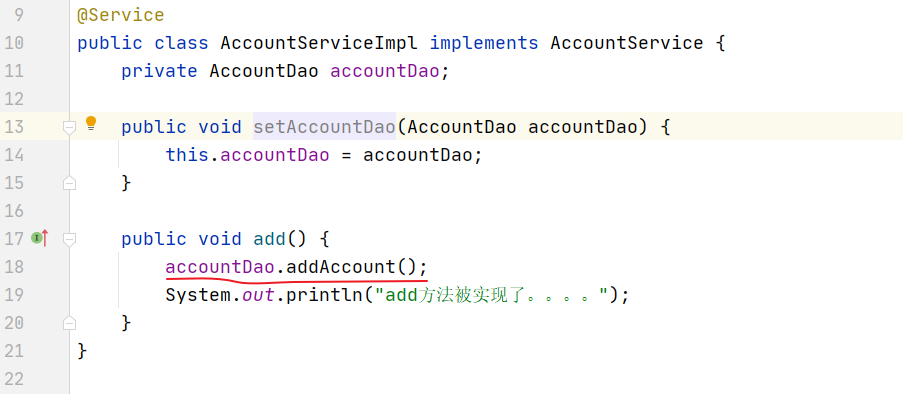
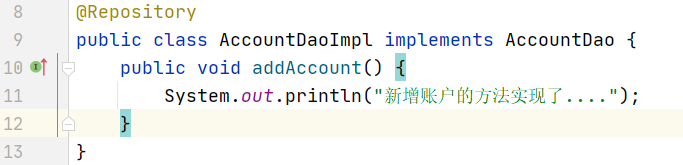
运行测试,报空指针异常:

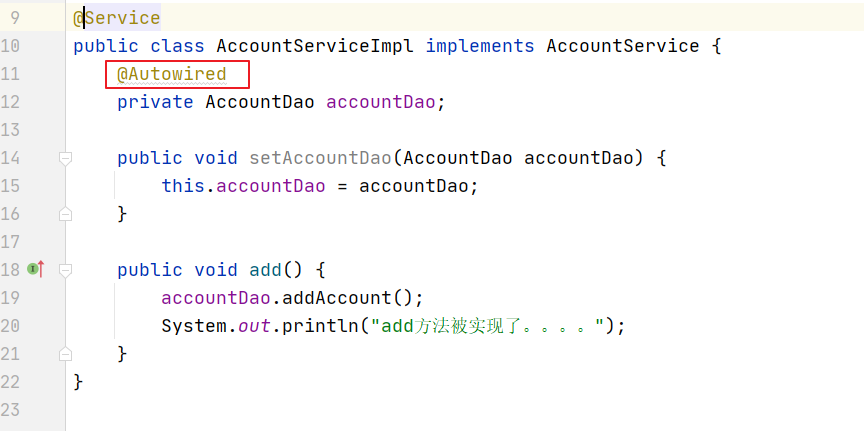
加上一个 @Autowired 注解,再次运行:

就没报错了。为什么呢?是用到了依赖注入
依赖注入的注解
作用:类似于 xml 中的 property 标签或者 constructor-arg 标签。@AutoWired 修饰成员变量。
它注入的原理是先按照类型 进行注入,类型注入成功的前提是IOC容器中必须存在一个唯一的并且数据类型匹配的bean。
如果容器中存在多个 数据类型匹配的 bean。再按照名称 进行注入。名称注入的规则是将 @Autowired 注解修饰的变量的名称和容器中的 bean 的 id 进行匹配,如果匹配成功,说明按照名称注入成功,否则注入失败。
如果再增加一个 AccountDao 的实现类 AccountDaoImpl2,即现在有 2 个是实现类:
java
@Repository
public class AccountDaoImpl implements AccountDao {
    public void addAccount() {
        System.out.println("新增账户的方法实现了....");
    }
}
java
@Repository
public class AccountDaoImpl2 implements AccountDao {
    public void addAccount() {
        System.out.println("accountDao的第二个实现类的方法.....");
    }
}
java
@Service
public class AccountServiceImpl implements AccountService {
    @Autowired  //依赖注入的注解,可以完成bean的自动注入
    AccountDao accountDao;

    public void add() {
        accountDao.addAccount();
    }
}
再运行,就会报错:
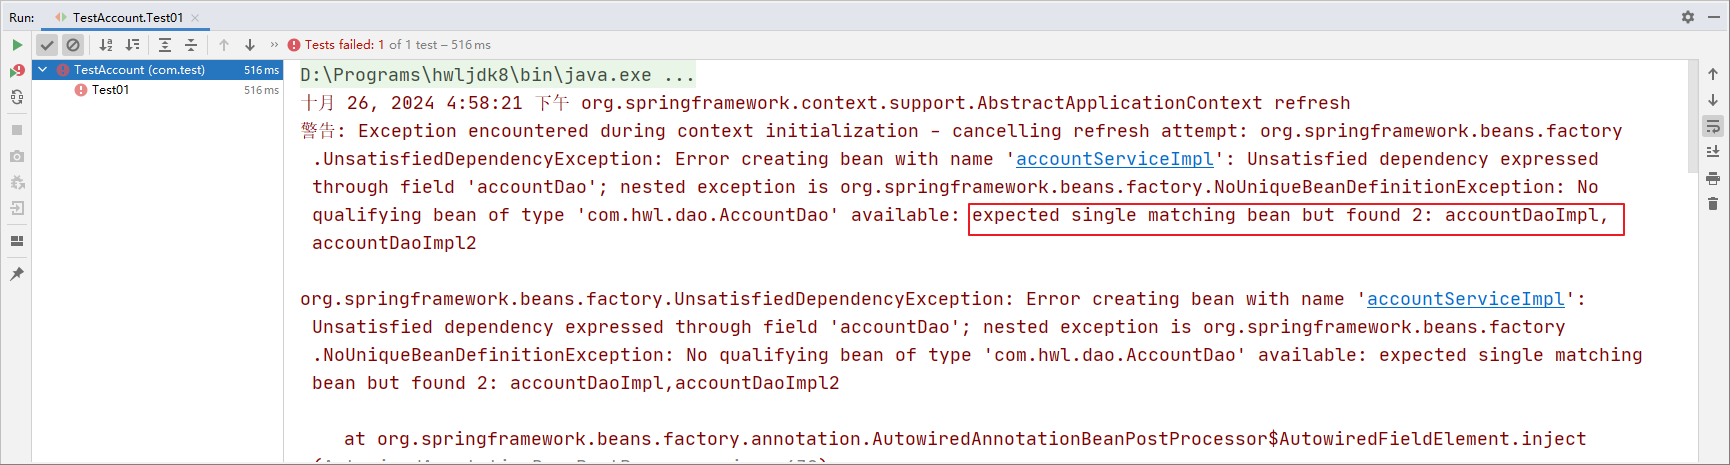
当有多个匹配的时候,就要按照 bean 的名称进行注入,修改 AccountServiceImpl 为:
java
@Service
public class AccountServiceImpl implements AccountService {
    @Autowired  //依赖注入的注解,可以完成bean的自动注入
    AccountDao accountDaoImpl;

    public void add() {
        accountDaoImpl.addAccount();
    }
}
java
@Service
public class AccountServiceImpl implements AccountService {
    @Autowired  //依赖注入的注解,可以完成bean的自动注入
    AccountDao accountDaoImpl2;  //修改名称为类名(首字母小写)

    public void add() {
        accountDaoImpl2.addAccount();
    }
}
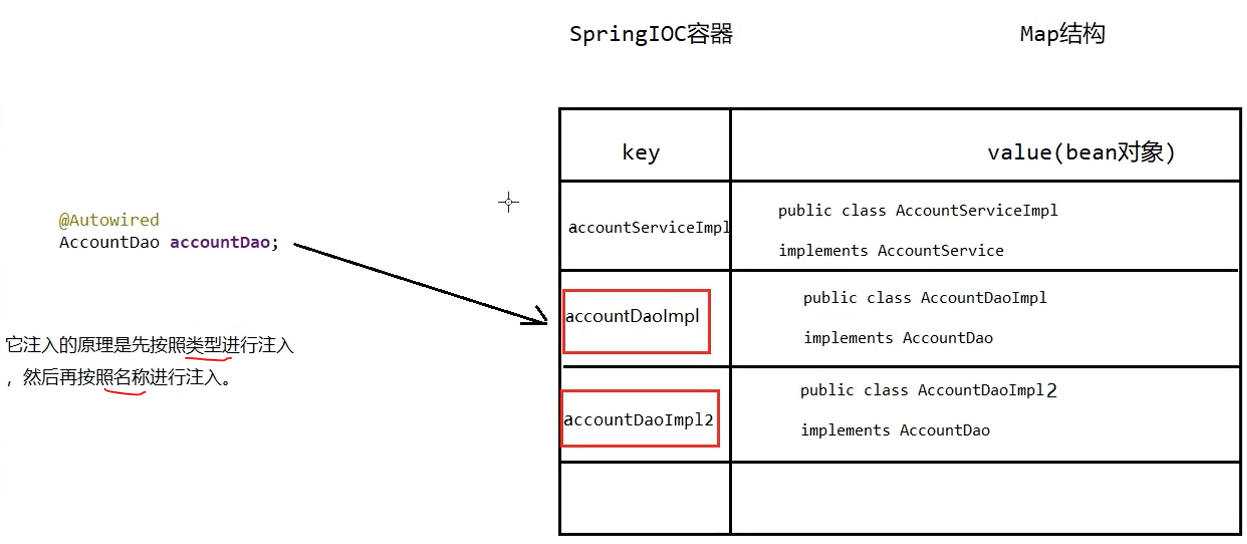
总结:
-
如果有唯一一个匹配时,就直接注入。
-
如果有多个匹配时,首先按照类型筛选出来匹配的对象。
-
然后使用变量名称作为 bean 的 id,然后继续筛选。
-
如果两次筛选后有唯一匹配的,可以注入成功;否则失败。
2.17.依赖注入的其他注解
使用注入数据注解的效果跟在 xml 配置文件中的 bean 标签中写一个标签的作用是一样的。
@Qualifier注解
作用:在按照类型匹配的基础之上再按照名称匹配。它在给类成员注入时不能单独使用 ,必须结合 @Autowired 一起使用(有点鸡肋);但是在给方法参数注入时可以(后面再讨论)。
属性:value:用于指定注入 bean 的 id。
java
@Service
public class AccountServiceImpl implements AccountService {
    @Autowired
    @Qualifier("accountDaoImpl2")
     AccountDao accountDao;

    public void add() {
        accountDao.addAccount();
    }
}
@Resource注解
这个注解并不是 Spring 官方的注解,而是 Java 扩展包 javax 里面的注解
作用:默认的情况下,可以直接按照 bean 的 id 注入。它可以独立使用。
属性:name:用于指定 bean 的 id;type: 按照类型进行注入。
如果既不指定 name 也不指定 type 属性,这时将通过反射机制使用 byName 自动注入策略。
以上三个注解都只能注入其他bean类型的数据 ,而基本类型和String类型无法使用上述注解实现,要用接下来的 @Value 注解。另外,集合类型的注入只能通过XML来实现。
以下3种关于 @Resource 注解的用法都是可以的:
java
@Service
public class AccountServiceImpl implements AccountService {
    @Resource(name = "accountDaoImpl2")  //默认按照名称进行匹配
     AccountDao accountDao;
    public void add() {
        accountDao.addAccount();
    }
}
java
@Service
public class AccountServiceImpl implements AccountService {
    @Resource(type = AccountDao.class, name = "accountDaoImpl2")  //如果按照类型注入,容器中必须存在类型的bean,否则抛异常
     AccountDao accountDao;
    public void add() {
        accountDao.addAccount();
    }
}
java
@Service
public class AccountServiceImpl implements AccountService {
    @Resource(type = AccountDao.class)
    @Qualifier("accountDaoImpl2")  //结合@Qualifier一起使用
     AccountDao accountDao;
    public void add() {
        accountDao.addAccount();
    }
}
总结:
@Resource装配顺序:
- 如果同时指定了
name和type,则从 Spring 上下文中找到唯一匹配的 bean 进行装配,找不到则抛出异常 - 如果指定了
name,则从 Spring 上下文中查找名称(id)匹配的 bean 进行装配,找不到则抛出异常 - 如果指定了
type,则从 Spring 上下文中找到类型匹配的唯一 bean 进行装配,找不到或找到多个,都抛出异常 - 如果既没指定
name,也没指定type,则自动按照byName方式进行装配。
@Resource 的作用相当于 @Autowired,只不过 @Autowired 按 byType 自动注入。
@Value注解注入基本类型数据
作用:用于注入基本类型 和String类型的数据。
属性:value:用于指定数据的值。它也可以使用 Spring 中 SpEL(也就是 Spring 的 EL 表达式)。
SpEL 的写法:${表达式}
比如在 pojo 类里面写一个 Animal 类:
java
package com.hwl.pojo;
import org.springframework.beans.factory.annotation.Value;
import org.springframework.stereotype.Component;

@Component   //进行依赖注入的前提是必须要有IOC的环境,所以要写这个
public class Animal {
    @Value("1001")
    private Integer id;

    @Value("格洛米")
    private String name;

    @Value("黄色")
    private String color;

    @Value("3")
    private Integer age;

    // getter、setter

    @Override
    public String toString() {
        return "Animal{" + "id=" + id + ", name='" + name + '\'' + ", color='" + color + '\'' + ", age=" + age + '}';
    }
}
测试:
java
@Test
public void Test01(){
    ApplicationContext context = new ClassPathXmlApplicationContext("applicationContext.xml");
    Animal animal = (Animal) context.getBean("animal");
    System.out.println(animal);
}
2.18.spring作用域和生命周期相关的注解
@Scope(修饰一个类):
作用:用于指定 bean 的作用范围。类似于 xml 中 bean 标签中的 scope 属性
属性:value:指定范围的取值。常用取值:singleton(单例)、prototype(多例)。
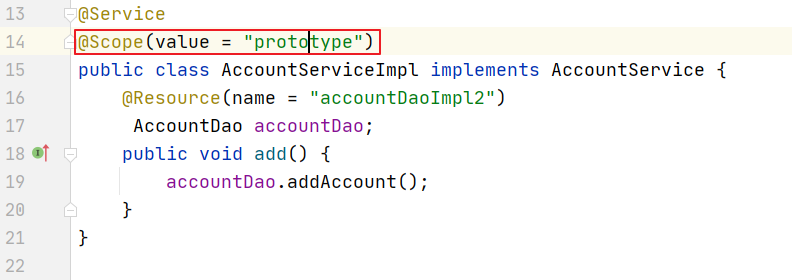
java
public class TestAccount {
    @Test
    public void Test01(){
        ApplicationContext context = new ClassPathXmlApplicationContext("applicationContext.xml");
        AccountService accountServiceImpl = (AccountService) context.getBean("accountServiceImpl");
        AccountService accountServiceImpl2 = (AccountService) context.getBean("accountServiceImpl");
        System.out.println(accountServiceImpl == accountServiceImpl2);
    }
}
生命周期相关的注解的使用与生命周期相关的注解的作用跟在 bean 标签中使用 init-method 和 destroy-method 的作用是一样的。
@PostConstruct、@PreDestroy
在 pojo 类的 Animal 类里面演示:
java
@Component   //进行依赖注入的前提是必须要有IOC的环境,所以要写这个
public class Animal {
    @Value("1001")
    private Integer id;

    @Value("格洛米")
    private String name;

    @Value("黄色")
    private String color;

    @Value("3")
    private Integer age;

    public Integer getId() { return id; }
    public void setId(Integer id) { this.id = id; }
    public String getName() { return name; }
    public void setName(String name) { this.name = name; }
    public String getColor() { return color;}
    public void setColor(String color) { this.color = color; }
    public Integer getAge() { return age; }
    public void setAge(Integer age) { this.age = age; }
    @Override
    public String toString() {
        return "Animal{" + "id=" + id + ", name='" + name + '\'' + ", color='" + color + '\'' + ", age=" + age + '}';
    }

    //bean初始化的方法
    @PostConstruct  // 类似于bean标签中的init-method
    public void init(){
        System.out.println("init方法执行了....");
    }
    //bean销毁的方法
    @PreDestroy  // 类似于bean标签中的destroy-method
    public void destroy(){
        System.out.println("destroy销毁的方法执行了....");
    }
}
java
public class TestAccount {
    @Test
    public void Test01(){
        ApplicationContext context = new ClassPathXmlApplicationContext("applicationContext.xml");
        Animal animal = (Animal) context.getBean("animal");
        ((ClassPathXmlApplicationContext) context).close();
    }
}
2.19.使用注解改造IOC案例
将之前写的2.14节基于XML写的案例,改为用注解实现
还是先把依赖导入进来(直接复制之前的)
xml
<dependencies>
    <dependency>
        <groupId>org.springframework</groupId>
        <artifactId>spring-context</artifactId>
        <version>5.2.0.RELEASE</version>
    </dependency>
    <dependency>
        <groupId>commons-dbutils</groupId>
        <artifactId>commons-dbutils</artifactId>
        <version>1.7</version>
    </dependency>
    <dependency>
        <groupId>mysql</groupId>
        <artifactId>mysql-connector-java</artifactId>
        <version>8.0.25</version>
    </dependency>
    <dependency>
        <groupId>c3p0</groupId>
        <artifactId>c3p0</artifactId>
        <version>0.9.1.2</version>
    </dependency>
    <dependency>
        <groupId>junit</groupId>
        <artifactId>junit</artifactId>
        <version>4.13.1</version>
        <scope>test</scope>
    </dependency>
</dependencies>
之前的项目,也直接copy过来,进行改造,改写的地方如下:
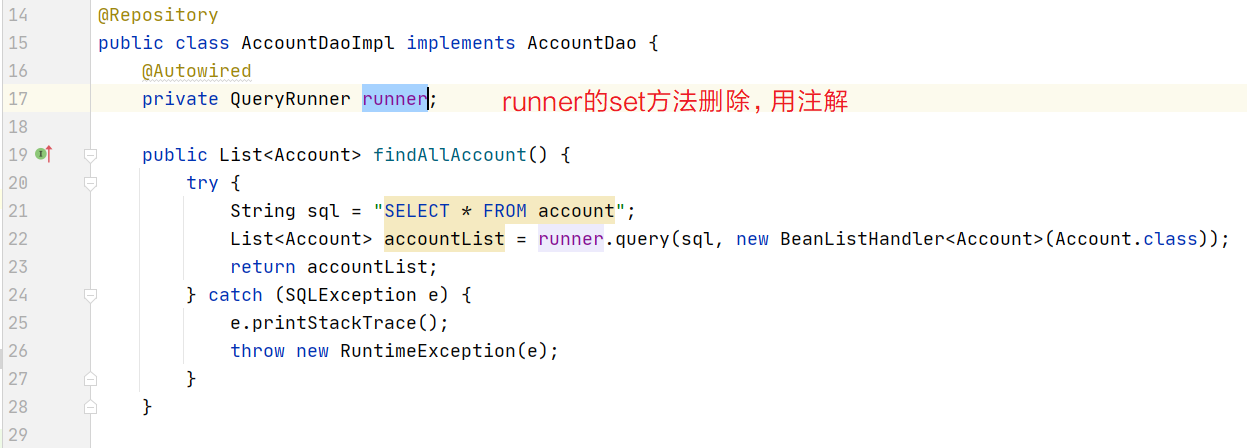
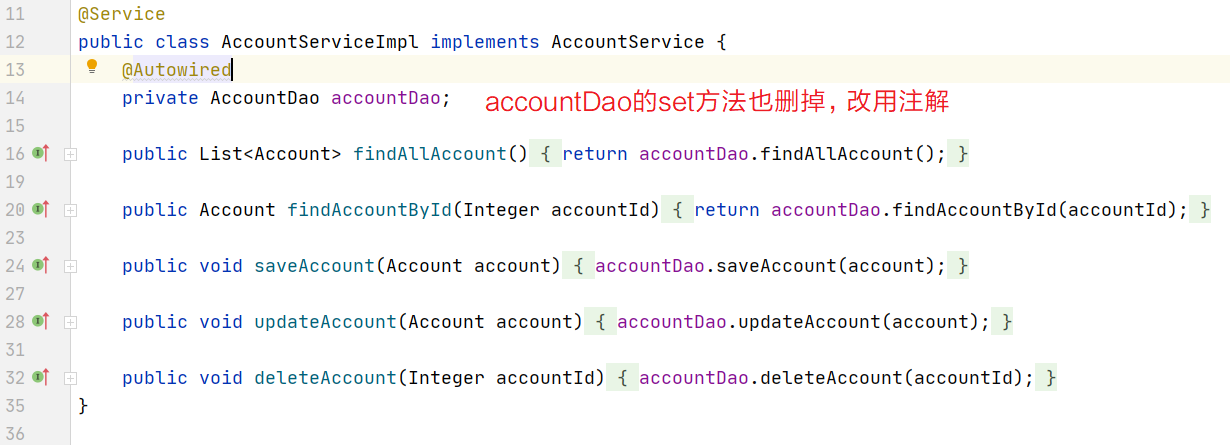
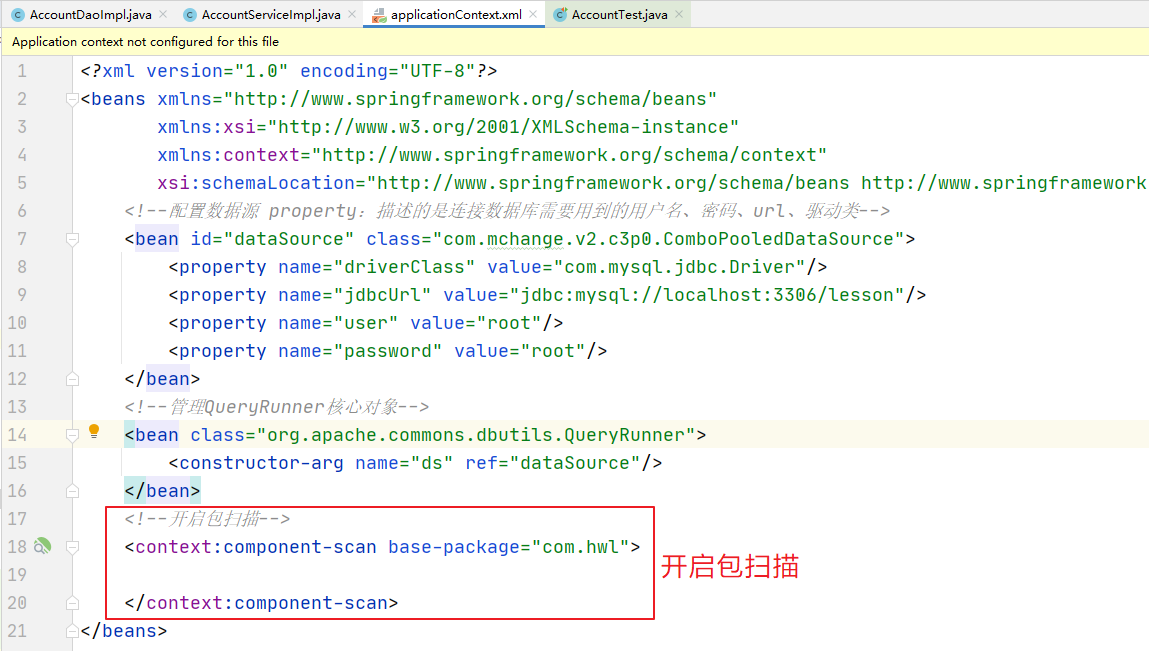
测试类测试下:
java
public class AccountTest {
    @Test
    public void Test01(){
        ApplicationContext context = new ClassPathXmlApplicationContext("applicationContext.xml");
        AccountService accountService = (AccountService) context.getBean("accountServiceImpl");
        List<Account> accountList = accountService.findAllAccount();
        for (Account account : accountList) {
            System.out.println(account);
        }
    }
}
ok~
注意到:applicationContext.xml 中还是有 bean 标签。
使用注解进行 IOC 管理,我们只能管理自己所定义的那些 bean;而别人写的 bean,我们目前还是只能通过传统的 bean 标签,传统的 set方法注入、构造函数注入来完成 bean 的管理。
这个案例就很有代表性,我们可以用注解 + xml 混合开发的方式来维护我们的 IOC 环境和 bean 与 bean 之间的依赖关系。
2.20.使用java配置类改造ioc案例
首先,还可以对上一节的代码进行一个小改进:
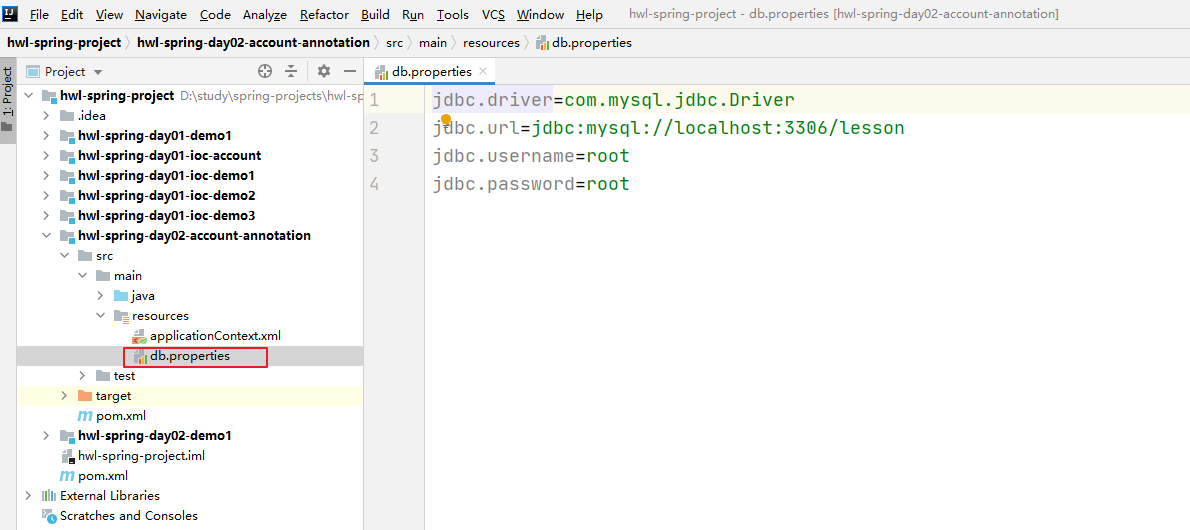
xml
<!--读取properties配置文件里面的信息-->
<context:property-placeholder location="classpath:db.properties"/>

<!--配置数据源 property:描述的是连接数据库需要用到的用户名、密码、url、驱动类-->
<bean id="dataSource" class="com.mchange.v2.c3p0.ComboPooledDataSource">
    <property name="driverClass" value="${jdbc.driver}"/>
    <property name="jdbcUrl" value="${jdbc.url}"/>
    <property name="user" value="${jdbc.username}"/>
    <property name="password" value="${jdbc.password}"/>
</bean>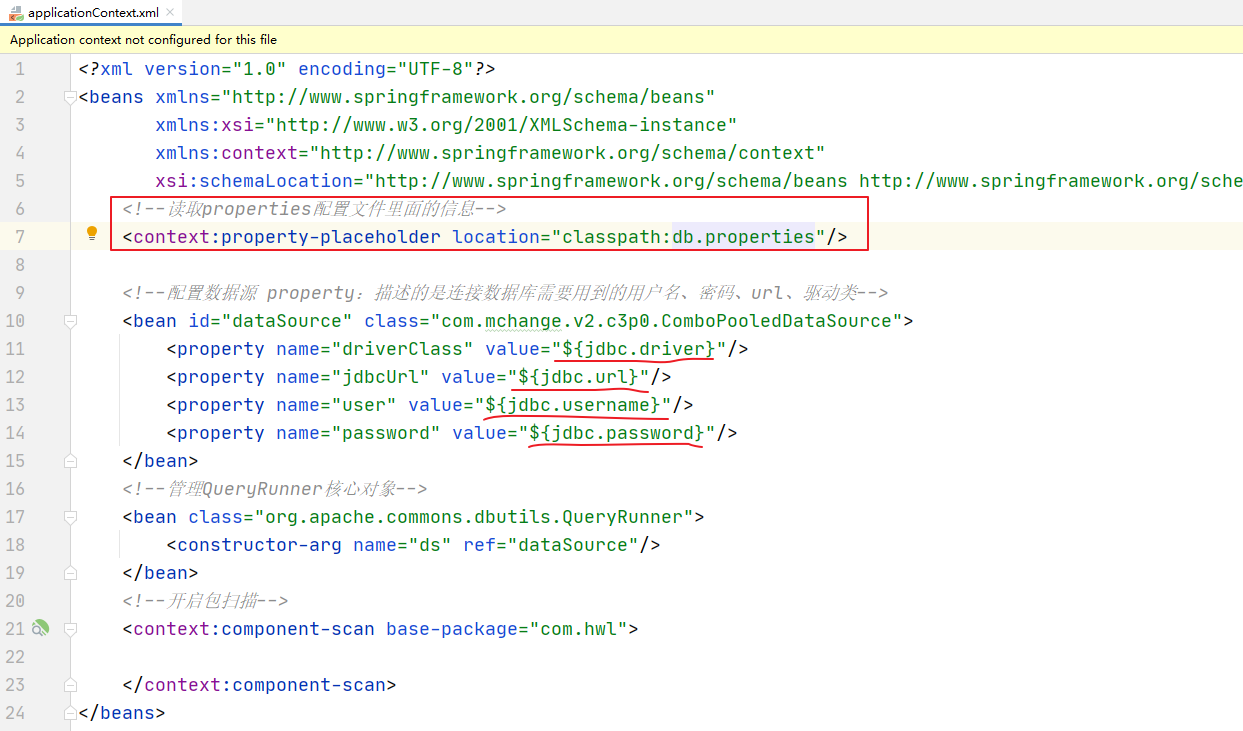
接下来介绍 Java 配置类:
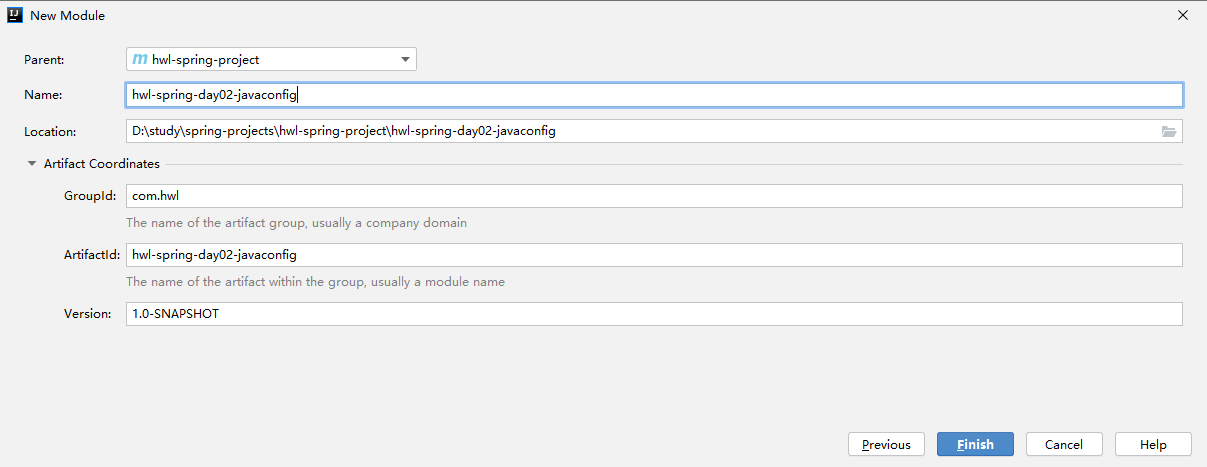
引入相关的依赖(还是前面的):
xml
<dependencies>
    <dependency>
        <groupId>org.springframework</groupId>
        <artifactId>spring-context</artifactId>
        <version>5.2.0.RELEASE</version>
    </dependency>
    <dependency>
        <groupId>commons-dbutils</groupId>
        <artifactId>commons-dbutils</artifactId>
        <version>1.7</version>
    </dependency>
    <dependency>
        <groupId>mysql</groupId>
        <artifactId>mysql-connector-java</artifactId>
        <version>8.0.25</version>
    </dependency>
    <dependency>
        <groupId>c3p0</groupId>
        <artifactId>c3p0</artifactId>
        <version>0.9.1.2</version>
    </dependency>
    <dependency>
        <groupId>junit</groupId>
        <artifactId>junit</artifactId>
        <version>4.13.1</version>
        <scope>test</scope>
    </dependency>
</dependencies>
这次不用 xml 配置了(applicationContext.xml 不要了),写一个新的 SpringConfiguration 配置类
java
@Configuration  // 修饰类 标识当前类是一个配置类 功能类似于applicationContext.xml  另外还有个小细节:当配置类作为AnnotationConfigApplicationContext对象创建的参数时,该注解可以不写(后面介绍)
@ComponentScan(basePackages = "com.hwl")  //开启包扫描  指定扫描com.hwl包及其子包下面的类 功能类似于xml中的<context:component-scan>
public class SpringConfiguration {
    /**
     * @Bean注解 它的功能类似于bean标签。修饰一个方法。方法的返回值就是我们要管理的bean的类型
     * 在默认情况下,如果不指定bean的名称,bean的名称就是方法的名称,要指定的话就通过name属性去指定
     */
    @Bean(name = "dataSource")
    public DataSource dataSource(){
        ComboPooledDataSource dataSource = new ComboPooledDataSource();
        try {
            dataSource.setDriverClass("com.mysql.jdbc.Driver");
            dataSource.setJdbcUrl("jdbc:mysql://localhost:3306/lesson");
            dataSource.setUser("root");
            dataSource.setPassword("root");
        } catch (PropertyVetoException e) {
            e.printStackTrace();
            throw new RuntimeException(e);
        }
        return dataSource;
    }
    /**
     * @Qualifier 可以修饰方法形参 意味着可以从IOC容器中获取指定的bean
     */
    @Bean
    public QueryRunner runner(@Qualifier("dataSource") DataSource dataSource) /*用Qualifier注解去容器中找名为"dataSource"这个bean*/ {
        QueryRunner runner = new QueryRunner(dataSource);
        return runner;
    }
}
其他的文件照样复制过来
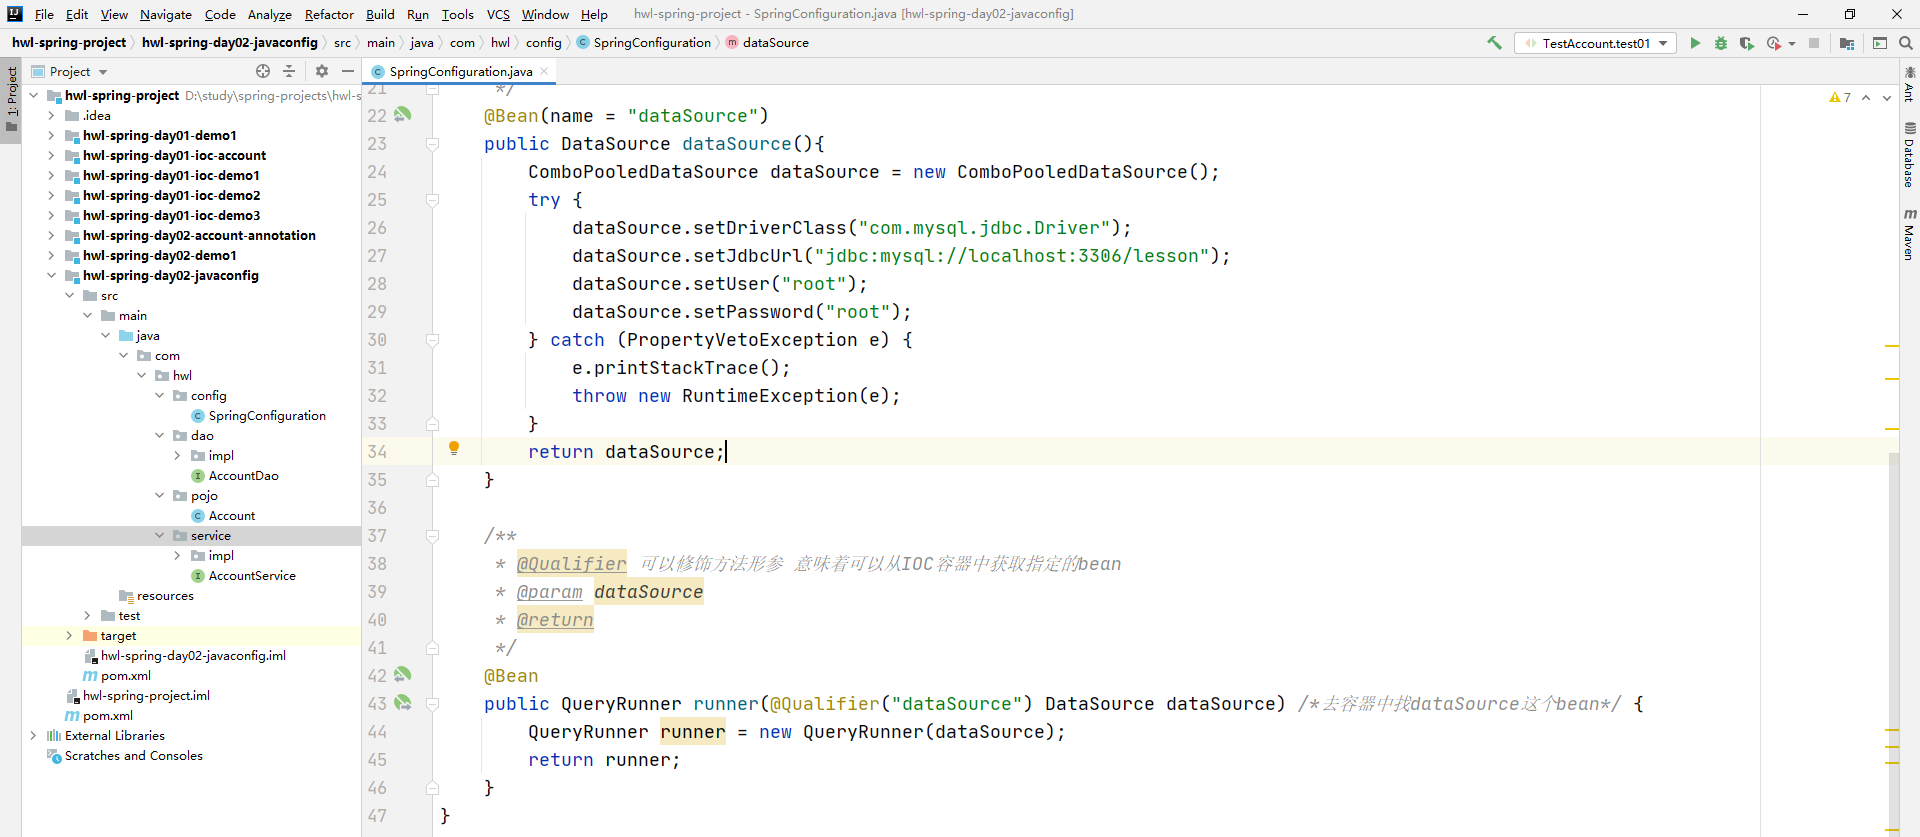
这样外部的 QueryRunner 和 DataSource 就都引入IOC容器了。
测试类:
java
public class TestAccount {
    @Test
    public void test01(){
        ApplicationContext context = new AnnotationConfigApplicationContext(SpringConfiguration.class);  //注意这里用的AnnotationConfigApplicationContext类
        AccountService accountService = (AccountService) context.getBean("accountServiceImpl");  //还是通过首字母小写,其实也可以自定义
        Account account = accountService.findAccountById(1);
        System.out.println(account);
    }
}
2.21.优化java配置类
上一节的代码还是有值得优化的地方,以后还有很多配置类(比如连接数据库的配置类,定义redis相关的配置类,文件上传相关的配置类,消息中间件相关的配置类等),如果全都写在 SpringConfiguration 这一个配置类里面,就违反了职责单一性的原则。可以写很多小的子配置类,再在 SpringConfiguration 里面导入子配置类就可以了。
代码优化如下:
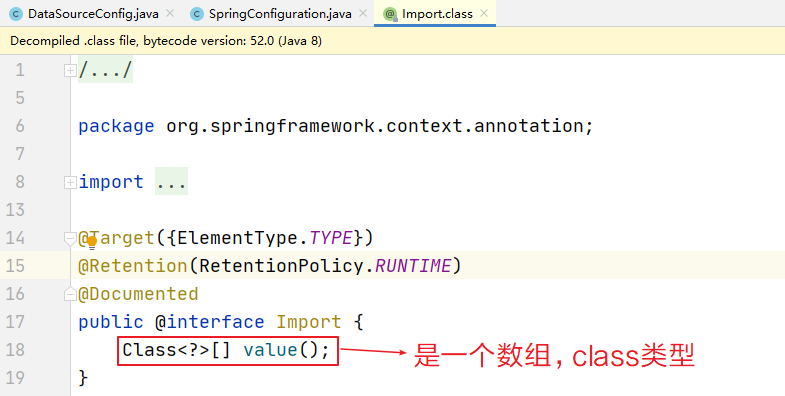
新建一个DataSourceConfig 子配置类 DataSourceConfig,将之前在 SpringConfiguration 里面写的代码都剪切到这里面来。并用 @Import 注解导入。
@Import注解
java
// 子配置类,专门描述数据库相关的配置信息
public class DataSourceConfig {

    @Bean(name = "dataSource")
    public DataSource dataSource(){
        ComboPooledDataSource dataSource = new ComboPooledDataSource();
        try {
            dataSource.setDriverClass("com.mysql.jdbc.Driver");
            dataSource.setJdbcUrl("jdbc:mysql://localhost:3306/lesson");
            dataSource.setUser("root");
            dataSource.setPassword("root");
        } catch (PropertyVetoException e) {
            e.printStackTrace();
            throw new RuntimeException(e);
        }
        return dataSource;
    }

    @Bean
    public QueryRunner runner(@Qualifier("dataSource") DataSource dataSource) /*去容器中找dataSource这个bean*/ {
        QueryRunner runner = new QueryRunner(dataSource);
        return runner;
    }
}
java
@Configuration  //修饰类 标识当前类是一个配置类 功能类似于applicationContext.xml
@ComponentScan(basePackages = "com.hwl")  // 开启包扫描
@Import(value = {DataSourceConfig.class}) // 导入的注解,可以导入子配置类
public class SpringConfiguration {

}
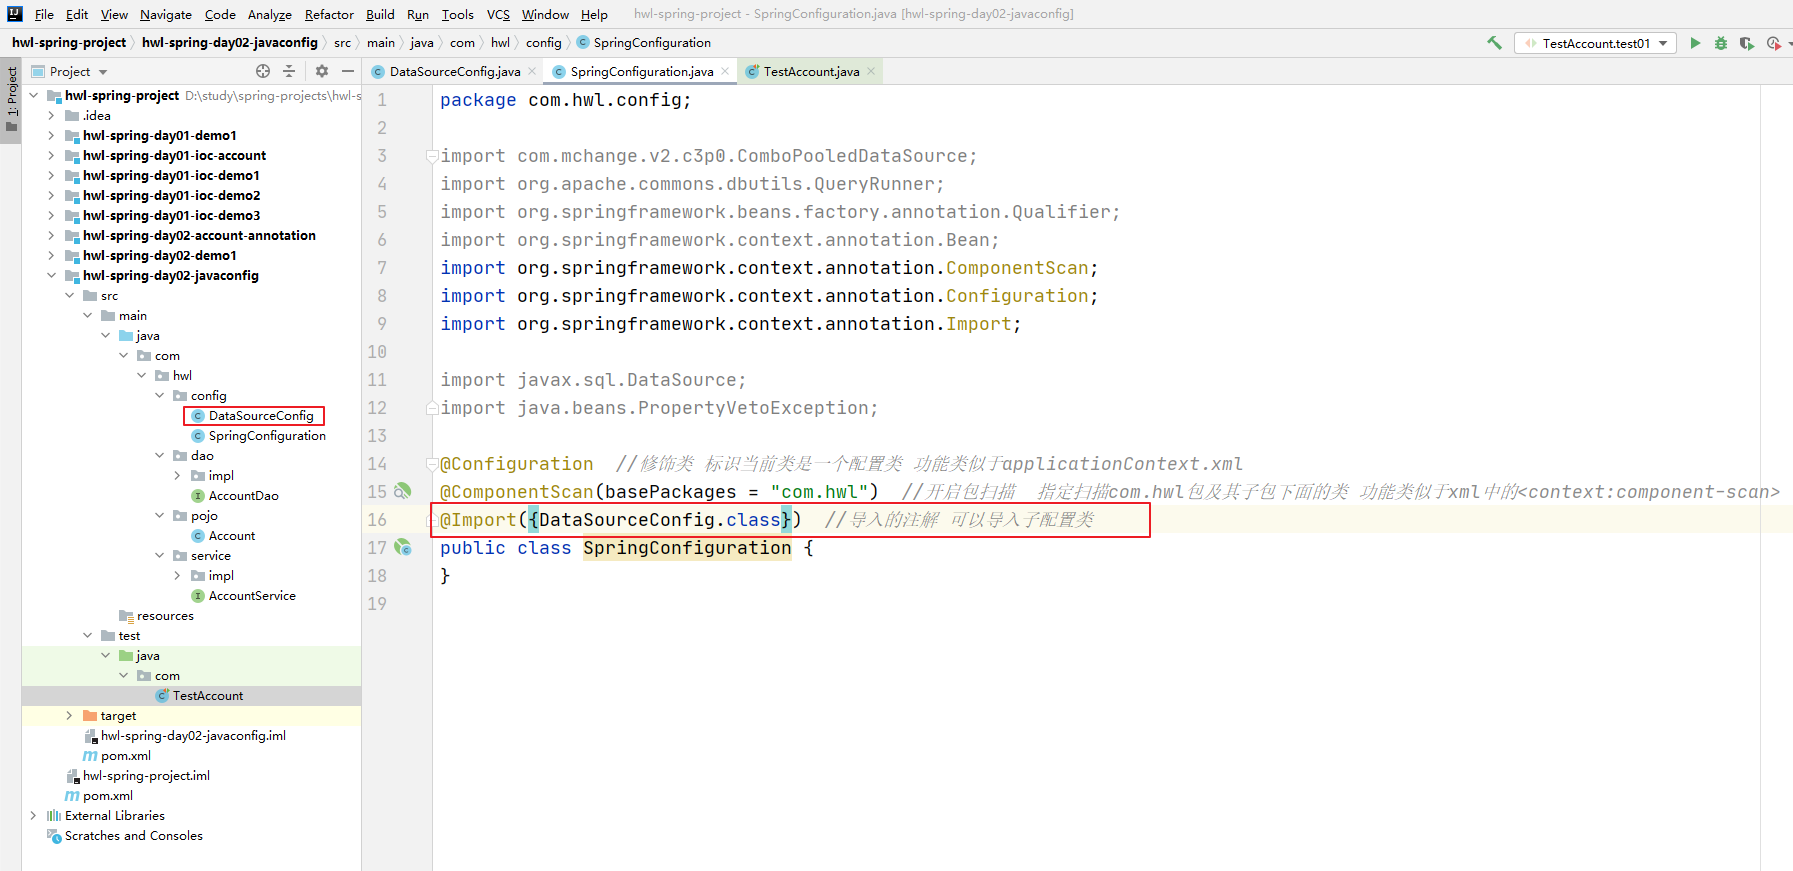
重新运行前面的测试类,依旧ok~

@PropertySource注解
作用:用于指定 properties 文件的位置
属性:value:指定文件的名称和路径
关键字:classpath:表示类路径下
我们注意到,刚才的代码,跟数据库相关的信息写到 Java 代码里面去了,我们可不可以跟以前一样把它独立成 db.properties 呢?是可以的,我们的目标是把连接池对象的配置信息分离出来,如下:
在 resources 文件夹新建 new file:
properties
jdbc.driver=com.mysql.jdbc.Driver
jdbc.url=jdbc:mysql://localhost:3306/lesson
jdbc.username=root
jdbc.password=root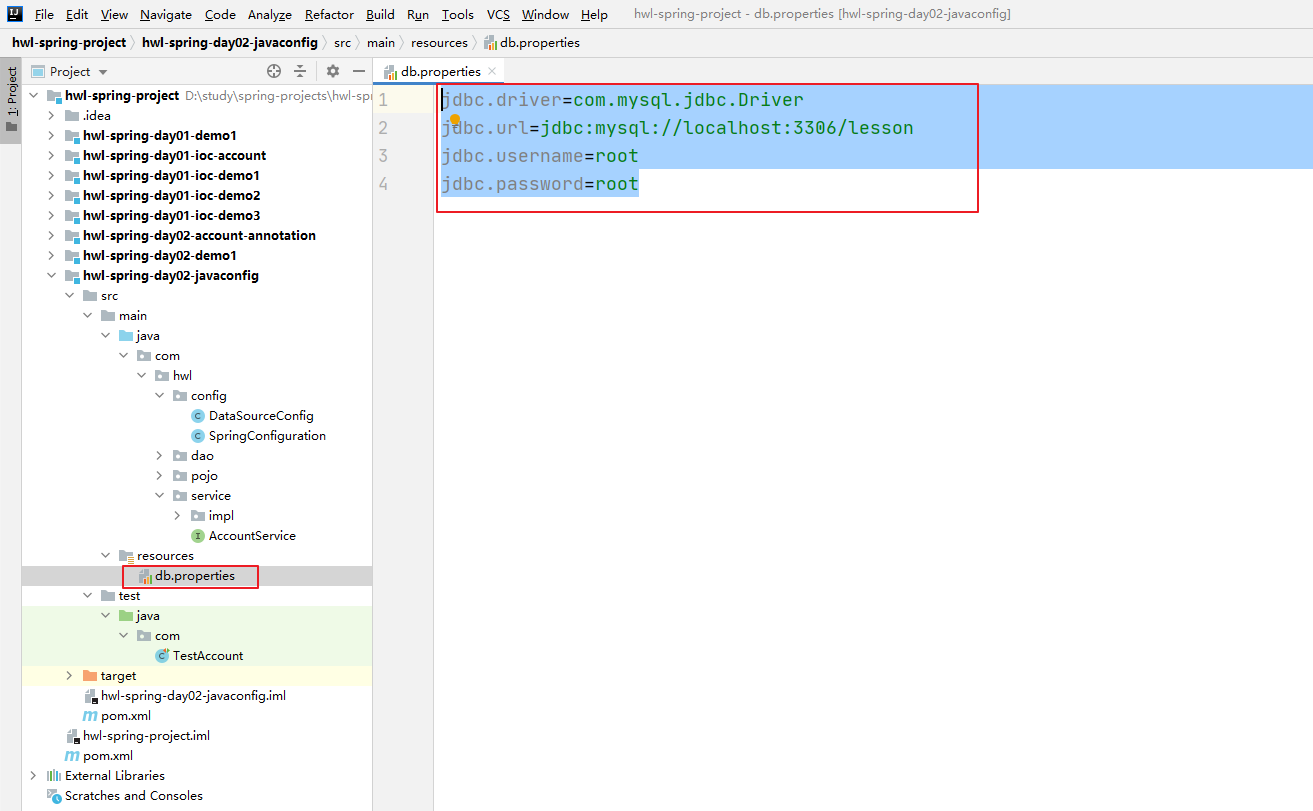
之前的 DataSourceConfig:
java
// 子配置类,专门描述数据库相关的配置信息
@PropertySource("classpath:db.properties")  // 加载类路径下面的properties配置文件
public class DataSourceConfig {
    @Value("${jdbc.driver}")   //使用@Value注解注入,并使用EL表达式
    private String driver;

    @Value("${jdbc.url}")
    private String url;

    @Value("${jdbc.username}")
    private String username;

    @Value("${jdbc.password}")
    private String password;

    /**
     * @return 配置好的 DataSource(ComboPooledDataSource 类型实例)
     * 使用 @Bean 注解将该方法交给 Spring 容器管理,返回值 ComboPooledDataSource
     * 会作为一个名为 "dataSource" 的 Bean 注册到容器中。
     * @Bean 注解功能类似于 XML 配置中的 <bean> 标签,修饰一个方法,方法返回值就是 Bean 实例。
     *  默认情况下,Bean 的名称是方法名;也可以通过 @Bean(name = "xxx") 指定 Bean 名称。
     */
    @Bean(name = "dataSource")
    public DataSource dataSource() {
        ComboPooledDataSource dataSource = new ComboPooledDataSource();
        try {
            dataSource.setDriverClass(driver);
            dataSource.setJdbcUrl(url);
            dataSource.setUser(username);
            dataSource.setPassword(password);
        } catch (PropertyVetoException e) {
            e.printStackTrace();
            throw new RuntimeException(e);
        }
        return dataSource;
    }

    @Bean
    public QueryRunner runner(@Qualifier("dataSource") DataSource dataSource) /*去容器中找dataSource这个bean*/ {
        QueryRunner runner = new QueryRunner(dataSource);
        return runner;
    }
}
再次运行测试:

2.22.关于@Configuration注解的问题
提出一个问题:@Configuration 注解一定需要吗?
答案是:@Configuration 注解加不加都对程序的结果没有影响,不会因为 @Configuration 注解不加而造成 bean 注入失败。
接下来通过一个例子说明 @Configuration 注解加与不加的区别:
在 pojo 里面创建 2 个类 ADataSource 和 BRunner:
java
public class ADataSource {
    public ADataSource() {
        System.out.println("ADataSource创建了....");
    }
}
java
public class BRunner {
    // 传入ADataSource的形参
    public BRunner(ADataSource aDataSource) {
        System.out.println("BRunner创建了...");
    }
}
java
@Configuration
@ComponentScan(basePackages = {"com.hwl"})
public class BeanConfig {
    @Bean
    public ADataSource aDataSource(){
        return new ADataSource();
    }
    @Bean
    public BRunner bRunner(){
        return new BRunner(aDataSource());  // 把aDataSource方法作为形参传进去
    }
}
java
public class TestBean {
    @Test
    public void test01(){
        ApplicationContext context = new AnnotationConfigApplicationContext(BeanConfig.class);
    }
}
运行测试:

若把 BeanConfig 的 @Configuration 注解注释掉,再次运行测试:

可以看到,这时,ADataSource 创建了2次。
原因:
第一次,我们使用 @Bean 注解修饰 aDataSource 方法的时候,会将 ADataSource 交给容器管理(就会调用 ADataSource 的无参构造函数);我们使用@Bean 注解修饰 bRunner 方法的时候,由于需要使用到 ADataSource,这个时候,不用再去重新创建 ADataSource 对象,而是直接从 spring 容器中获取。所以ADataSource 只会创建 1 次。
如果注释掉 @Configuration 注解,ADataSource 创建了 2 次。第一次是把它放到容器中,第二次是创建 bRunner 时,这个时候不会从容器中已经存在的 Bean 去拿,而是直接重新再 new 一次。
2.23.spring整合junit
首先导入依赖:
xml
<!--spring整合junit的依赖-->
<dependency>
    <groupId>org.springframework</groupId>
    <artifactId>spring-test</artifactId>
    <version>5.2.0.RELEASE</version>
</dependency>
java
@RunWith(SpringJUnit4ClassRunner.class) // 测试模板类需要用到一个测试启动器
// 如果有xml配置文件,就这样写:@ContextConfiguration(locations = {"classpath:applicationContext.xml"})
@ContextConfiguration(classes = {SpringConfiguration.class, BeanConfig.class})  //在测试模板类中也引入ioc环境
public class TestJunit {

    @Autowired
    AccountService accountService;

    @Test
    public void test01(){  // 这时就不用写ApplicationContext那句话了
        Account account = accountService.findAccountById(1);
        System.out.println(account);
    }
}
2.24.搭建事务的转账案例(小应用)
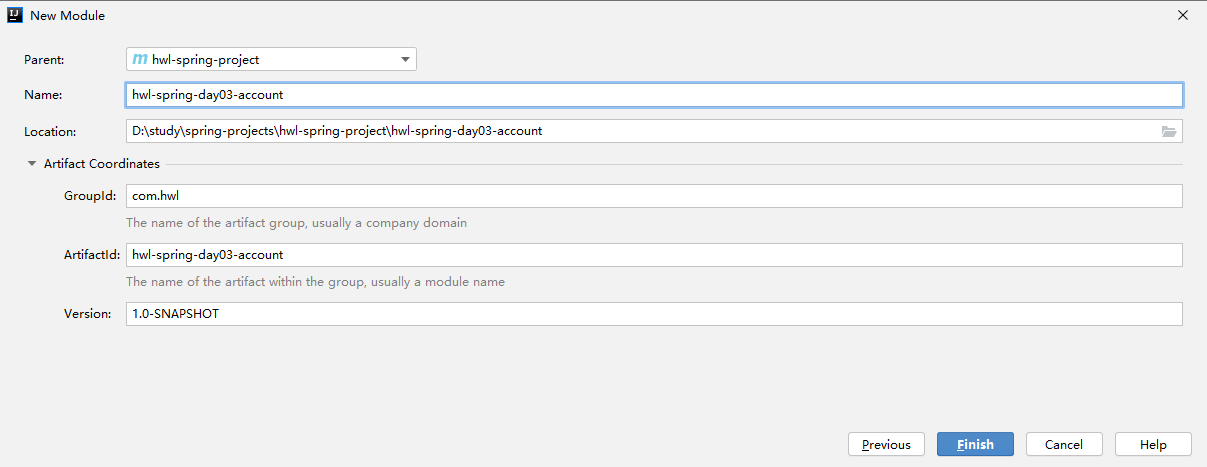
之前所用的依赖拷贝过来:
xml
<dependencies>
    <dependency>
        <groupId>org.springframework</groupId>
        <artifactId>spring-context</artifactId>
        <version>5.2.0.RELEASE</version>
    </dependency>
    <dependency>
        <groupId>commons-dbutils</groupId>
        <artifactId>commons-dbutils</artifactId>
        <version>1.7</version>
    </dependency>
    <dependency>
        <groupId>mysql</groupId>
        <artifactId>mysql-connector-java</artifactId>
        <version>8.0.25</version>
    </dependency>
    <dependency>
        <groupId>c3p0</groupId>
        <artifactId>c3p0</artifactId>
        <version>0.9.1.2</version>
    </dependency>
    <dependency>
        <groupId>junit</groupId>
        <artifactId>junit</artifactId>
        <version>4.13.1</version>
        <scope>test</scope>
    </dependency>
    <!--spring整合junit的依赖-->
    <dependency>
        <groupId>org.springframework</groupId>
        <artifactId>spring-test</artifactId>
        <version>5.2.0.RELEASE</version>
    </dependency>
</dependencies>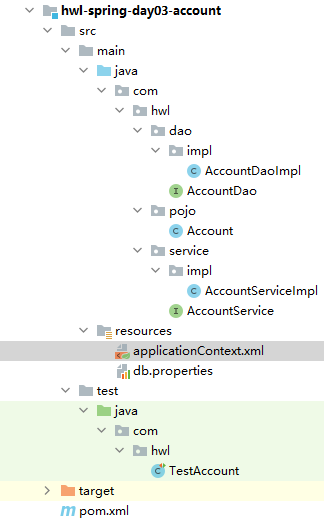
java
public interface AccountService {
    // 转账的方法
    void transfer(String sourceName, String targetName, Double money);
}
java
@Service
public class AccountServiceImpl implements AccountService {

    @Autowired
    private AccountDao accountDao;
    /**
     * 首先判断转出人账户和转入人的账户是否存在,如果存在,继续判断转出人的转账金额是否足够。
     * 如果足够,再执行金额的扣账和入账操作。
     */
    public void transfer(String sourceName, String targetName, Double money) {
        Account sourceAccount = accountDao.findAccountByName(sourceName);
        Account targetAccount = accountDao.findAccountByName(targetName);
        if (sourceAccount != null && targetAccount != null) {
            if (sourceAccount.getMoney() >= money){
                sourceAccount.setMoney(sourceAccount.getMoney() - money);
                targetAccount.setMoney(targetAccount.getMoney() + money);
                accountDao.update(sourceAccount);
                accountDao.update(targetAccount);
            }
        }
    }
}
java
public interface AccountDao {
    Account findAccountByName(String name);
    void update(Account account);
}
java
@Repository
public class AccountDaoImpl implements AccountDao {
    @Autowired
    QueryRunner runner;
    public Account findAccountByName(String name) {
        try {
            String sql = "select * from account where name = ?";
            Account account = runner.query(sql, new BeanHandler<Account>(Account.class), name);
            return account;
        } catch (SQLException e) {
            e.printStackTrace();
            throw new RuntimeException(e);
        }
    }

    public void update(Account account) {
        try {
            String sql = "update account set money = ? where name = ?";
            runner.update(sql, account.getMoney(), account.getName());
        } catch (SQLException e) {
            e.printStackTrace();
            throw new RuntimeException(e);
        }
    }
}
java
public class Account {
    private Integer id;
    private String name;
    private Double money;

    public Integer getId() { return id; }

    public void setId(Integer id) { this.id = id; }

    public String getName() { return name; }

    public void setName(String name) { this.name = name; }

    public Double getMoney() { return money; }

    public void setMoney(Double money) { this.money = money; }

    @Override
    public String toString() {
        return "Account{" + "id=" + id + ", name='" + name + '\'' + ", money=" + money + '}';
    }
}applicationContext.xml:
xml
<?xml version="1.0" encoding="UTF-8"?>
<beans xmlns="http://www.springframework.org/schema/beans"
       xmlns:xsi="http://www.w3.org/2001/XMLSchema-instance"
       xmlns:context="http://www.springframework.org/schema/context"
       xsi:schemaLocation="http://www.springframework.org/schema/beans
       http://www.springframework.org/schema/beans/spring-beans.xsd http://www.springframework.org/schema/context https://www.springframework.org/schema/context/spring-context.xsd">
    <!--开启包扫描-->
    <context:component-scan base-package="com.hwl"> </context:component-scan>
    <!--加载properties配置文件-->
    <context:property-placeholder location="classpath:db.properties"/>
    <!--配置数据源-->
    <bean id="dataSource" class="com.mchange.v2.c3p0.ComboPooledDataSource">
        <property name="driverClass" value="${jdbc.driver}"/>
        <property name="jdbcUrl" value="${jdbc.url}"/>
        <property name="user" value="${jdbc.username}"/>
        <property name="password" value="${jdbc.password}"/>
    </bean>
    <!--配置QueryRunner核心对象-->
    <bean class="org.apache.commons.dbutils.QueryRunner">
        <constructor-arg name="ds" ref="dataSource"/>
    </bean>
</beans>db.properties:
properties
jdbc.driver=com.mysql.jdbc.Driver
jdbc.url=jdbc:mysql://localhost:3306/lesson
jdbc.username=root
jdbc.password=root
测试:
java
@RunWith(SpringJUnit4ClassRunner.class)
@ContextConfiguration(locations = {"classpath:applicationContext.xml"})
public class TestAccount {
    @Autowired
    AccountService accountService;
    @Test
    public void Test01(){
        accountService.transfer("eric", "james", 500.0);
    }
}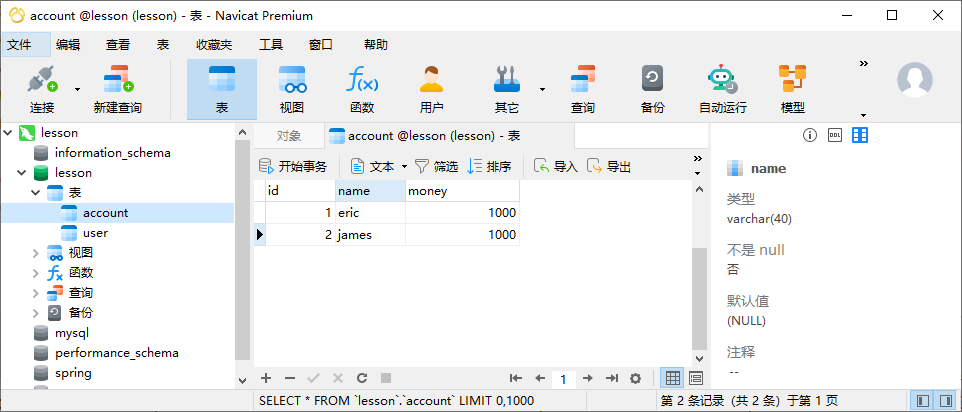

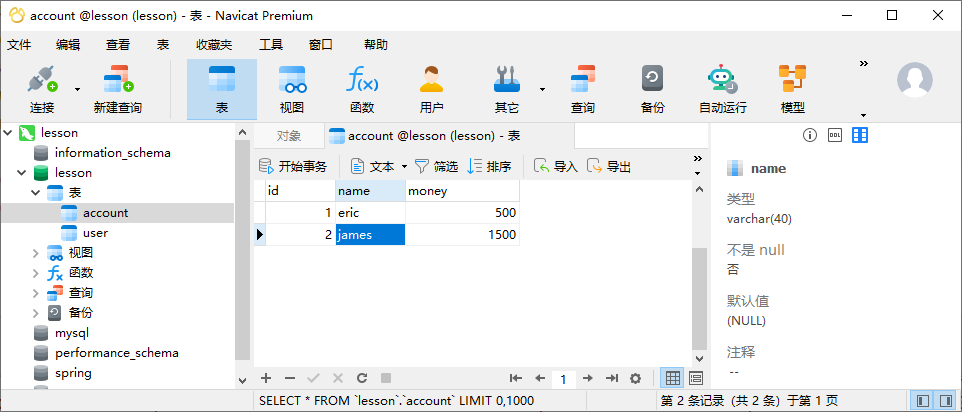
这样就实现了一个基本的转账案例,接着引入数据库中的一个事务问题,先来回顾下相关的知识:
txt
什么是事务:事务指的是一组逻辑操作,这些操作是最小单位不可分割的,这些操作要么全部执行成功,要么全部执行失败。
事务的特性:ACID原则
A:原子性 事务的逻辑操作必须是最小单位 不可分割的。
C:一致性 指的是事务提交前 和事务提交后的数据必须保持一致。
I:隔离性 指的是多个事务之间必须互相独立不能影响。
D:持久性 指的是事务提交之后,数据必须要持久化的保存在数据表里面。
事务的隔离级别:
 读未提交:一个事务读到了另外一个事务没有提交的数据 容易造成脏读的数据
 读已提交:oracle数据库默认的事务隔离级别。解决了脏读数据的出现,但是出现了不可重复读的现象。
 可重复读:mysql默认的事务隔离级别。解决了不可重复读的问题,但是出现了幻读的问题。
 可串行化:解决了所有事务的问题(脏读、不可重复读、幻读的问题)
2.25.手动进行事务控制
对于转账操作的业务类的代码:
java
public void transfer(String sourceName, String targetName, Double money) {
    Account sourceAccount = accountDao.findAccountByName(sourceName);
    Account targetAccount = accountDao.findAccountByName(targetName);
    if (sourceAccount != null && targetAccount != null) {
        if (sourceAccount.getMoney() >= money){
            sourceAccount.setMoney(sourceAccount.getMoney() - money);
            targetAccount.setMoney(targetAccount.getMoney() + money);
            accountDao.update(sourceAccount);
            int i = 10 / 0;
            accountDao.update(targetAccount);
        }
    }
}
如果我们操作数据库的逻辑操作在同一个事务里面,那么这些逻辑操作必须在同一个数据库连接对象里面。
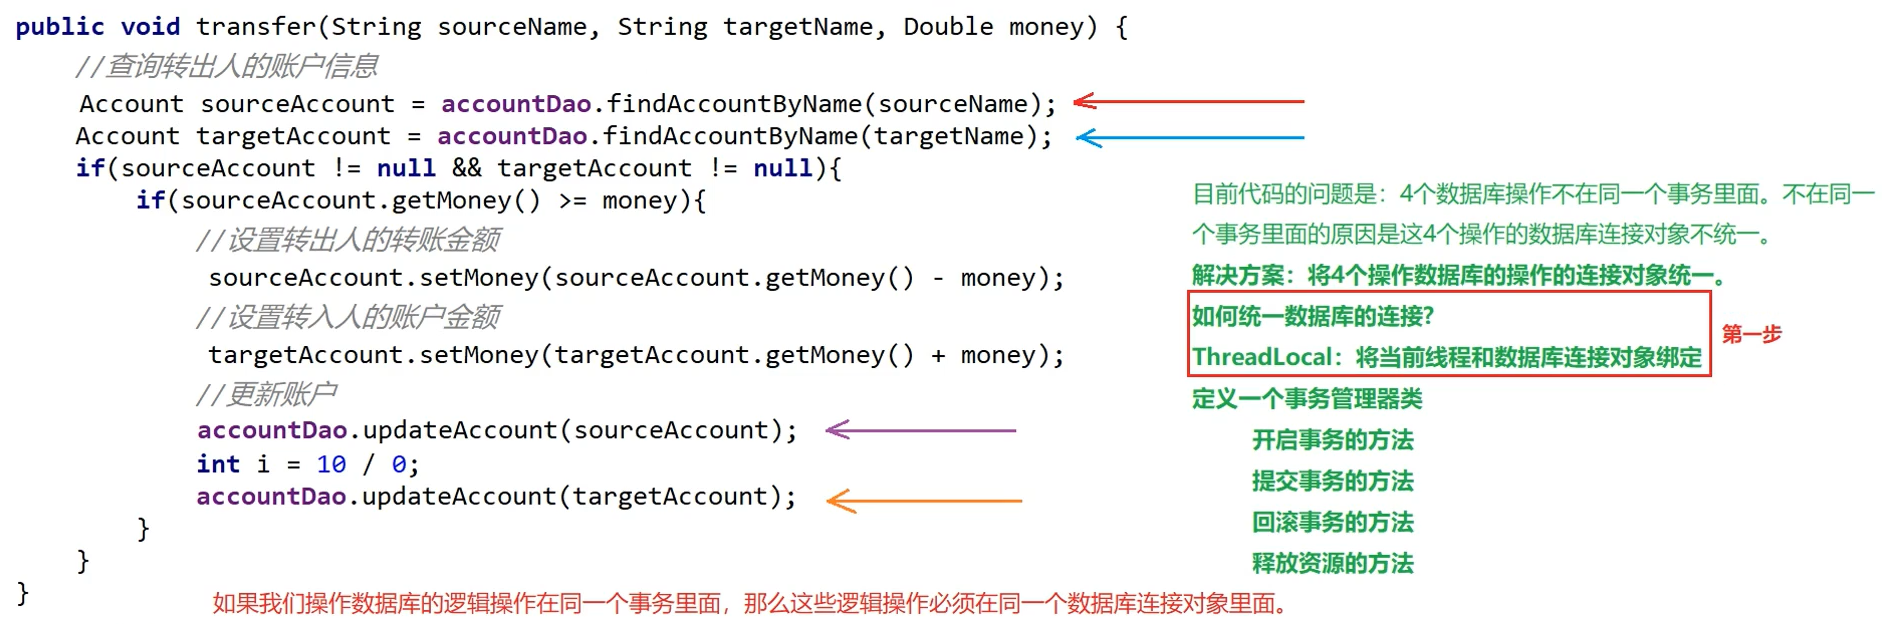
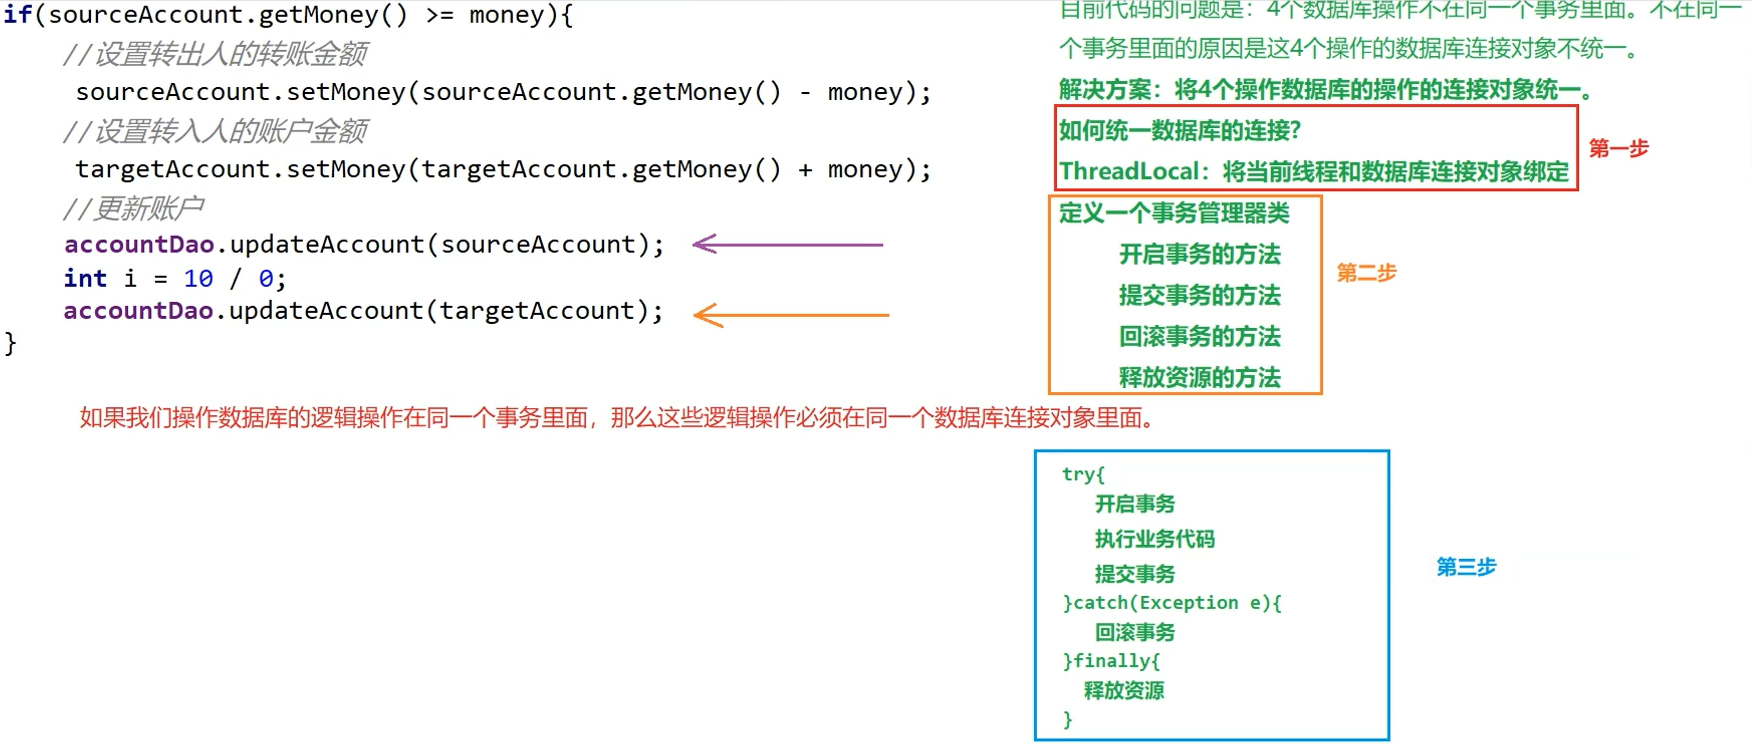
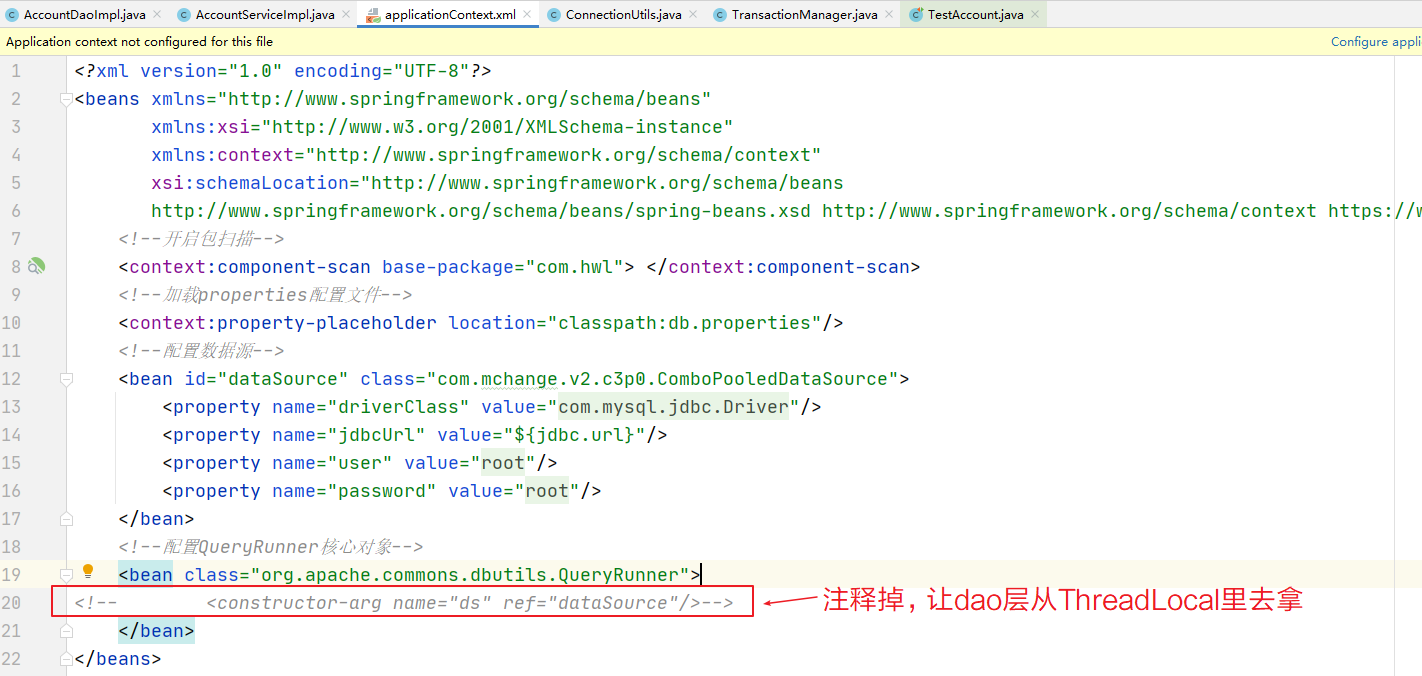
新建一个 utils 包,里面写这两个类(ConnectionUtils、TransactionManager):
java
/**
 * 将当前线程对象和数据库连接对象进行绑定,保证业务类里面的数据库连接对象一直是同一个数据库连接对象
 */
@Component
public class ConnectionUtils {
    @Autowired
    DataSource dataSource;

    private ThreadLocal<Connection> tl = new ThreadLocal();

    //获取数据库连接
    public Connection getConnection(){
        try {
            Connection connection = tl.get();
            if (connection == null) {  //若当前线程对象上面没有绑定数据库连接
                //从数据库连接池里面获取一个连接对象绑定到ThreadLocal上面
                connection = dataSource.getConnection();
                tl.set(connection);
            }
            return connection;
        } catch (SQLException e) {
            e.printStackTrace();
            throw new RuntimeException(e);
        }
    }

    //将当前线程和数据库连接对象解绑
    public void removeConnection(){
        tl.remove();
    }
}
java
/**
 * 事务管理器 里面定义了开启事务 提交事务 回滚事务 释放资源的方法
 */
@Component
public class TransactionManager {
    @Autowired
    ConnectionUtils connectionUtils;
    /**
     * 开启事务的方法 关闭事务的自动提交
     */
    public void beginTransaction(){
        try {
            connectionUtils.getConnection().setAutoCommit(false);
        } catch (SQLException throwables) {
            throwables.printStackTrace();
        }
    }

    /**
     * 提交事务的方法
     */
    public void commit(){
        try {
            connectionUtils.getConnection().commit();
        } catch (SQLException throwables) {
            throwables.printStackTrace();
        }
    }

    /**
     * 回滚事务的方法
     */
    public void rollBack(){
        try {
            connectionUtils.getConnection().rollback();
        } catch (SQLException throwables) {
            throwables.printStackTrace();
        }
    }

    /**
     * 释放资源的方法
     */
    public void release(){
        try {
            connectionUtils.getConnection().close();
        } catch (SQLException throwables) {
            throwables.printStackTrace();
        }
    }
}
业务实现类里加上事务相关的代码:
java
@Service
public class AccountServiceImpl implements AccountService {
    @Autowired
    private AccountDao accountDao;
    @Autowired
    TransactionManager transactionManager;
    /**
     * 首先判断转出人账户和转入人的账户是否存在,如果存在,继续判断转出人的转账金额是否足够。
     * 如果足够,再执行金额的扣账和入账操作。
     * @param sourceName 转出账户的人
     * @param targetName 转入账户的人
     * @param money 转账金额
     */
    public void transfer(String sourceName, String targetName, Double money) {
        /*Account sourceAccount = accountDao.findAccountByName(sourceName);
        Account targetAccount = accountDao.findAccountByName(targetName);
        if (sourceAccount != null && targetAccount != null) {
            if (sourceAccount.getMoney() >= money){
                sourceAccount.setMoney(sourceAccount.getMoney() - money);
                targetAccount.setMoney(targetAccount.getMoney() + money);
                accountDao.update(sourceAccount);
                int i = 10 / 0;
                accountDao.update(targetAccount);
            }
        }*/
        try {
            transactionManager.beginTransaction();
            Account sourceAccount = accountDao.findAccountByName(sourceName);
            Account targetAccount = accountDao.findAccountByName(targetName);
            if (sourceAccount != null && targetAccount != null) {
                if (sourceAccount.getMoney() >= money){
                    sourceAccount.setMoney(sourceAccount.getMoney() - money);
                    targetAccount.setMoney(targetAccount.getMoney() + money);
                    accountDao.update(sourceAccount);
                    int i = 10 / 0;  //设置异常
                    accountDao.update(targetAccount);
                }
            }
            transactionManager.commit();
        } catch (Exception e){
            e.printStackTrace();
            transactionManager.rollBack();
        } finally {
            transactionManager.release();
        }
    }
}
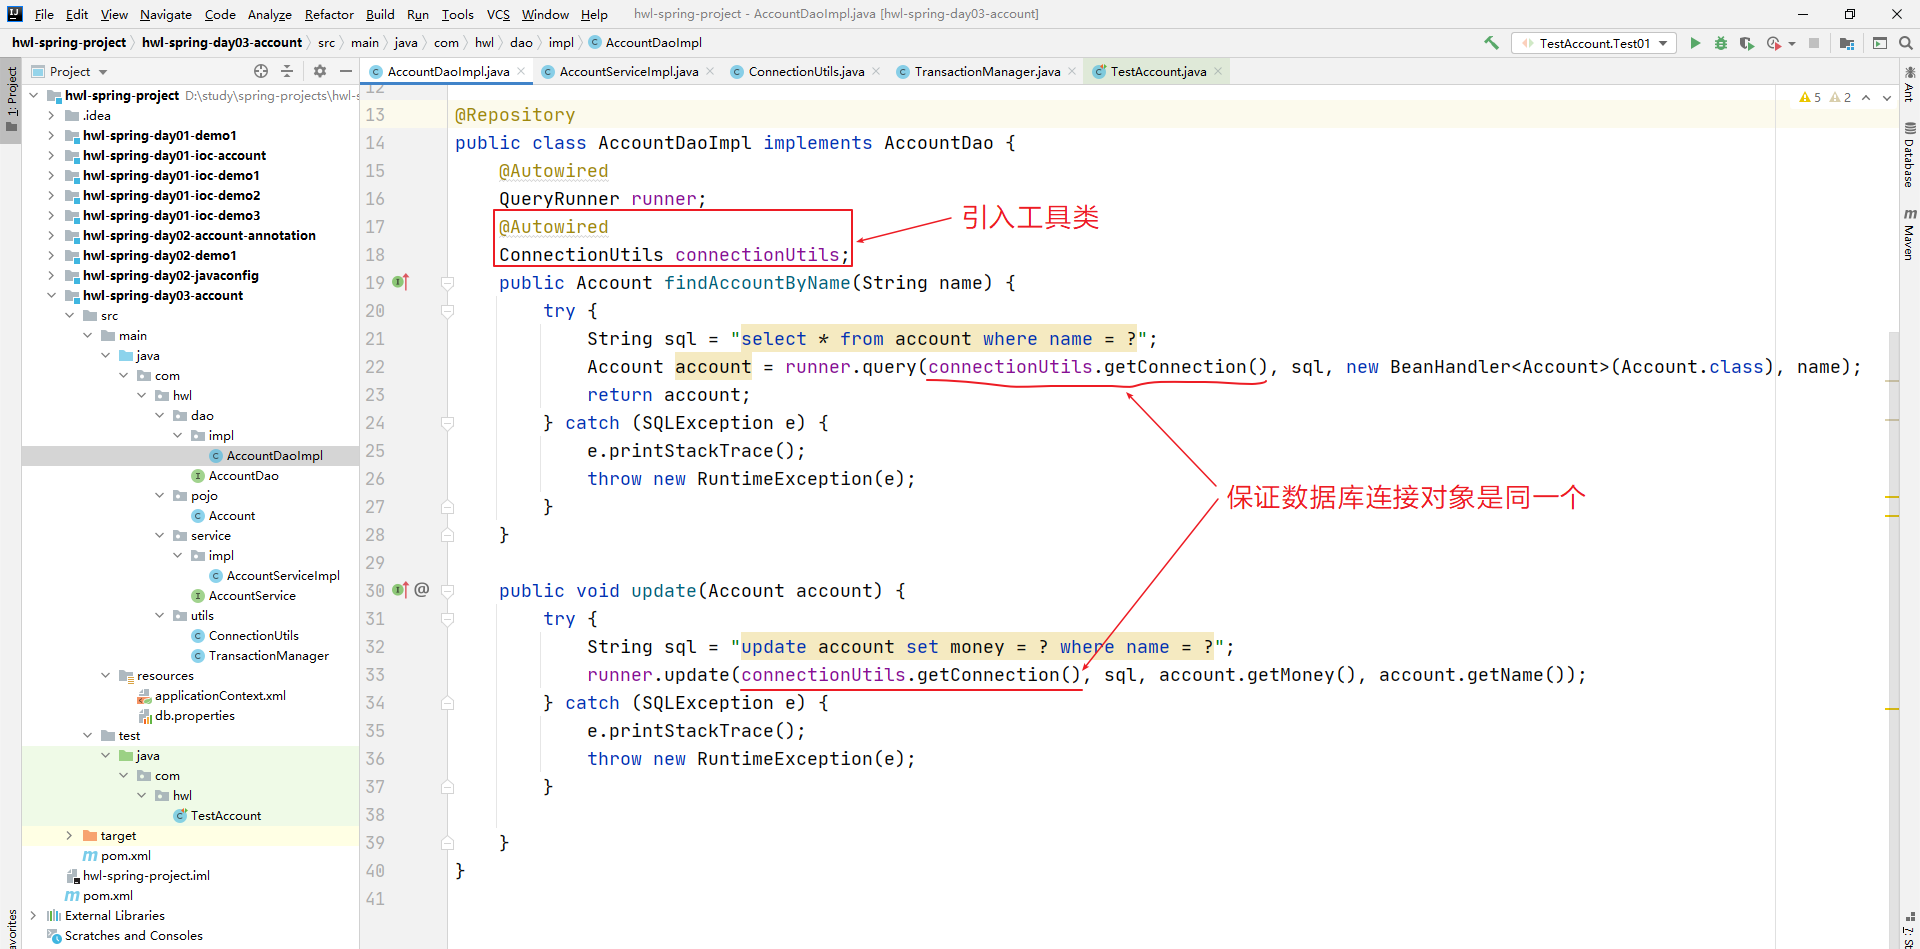
dao层也要做相应的修改:
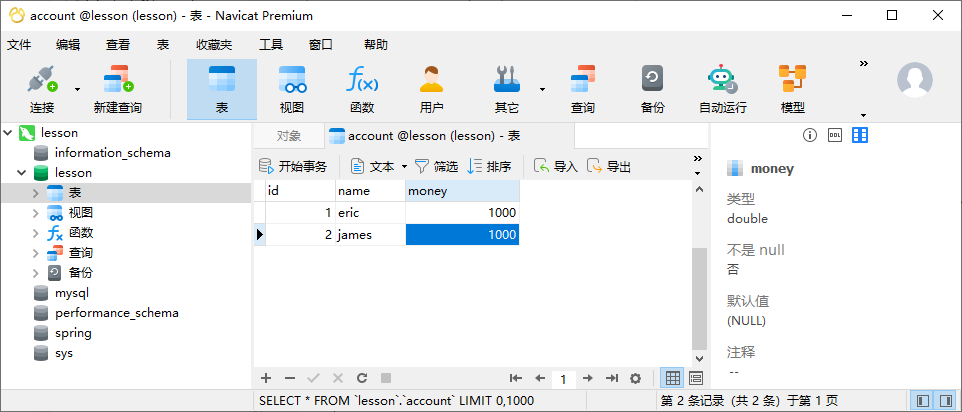
测试:
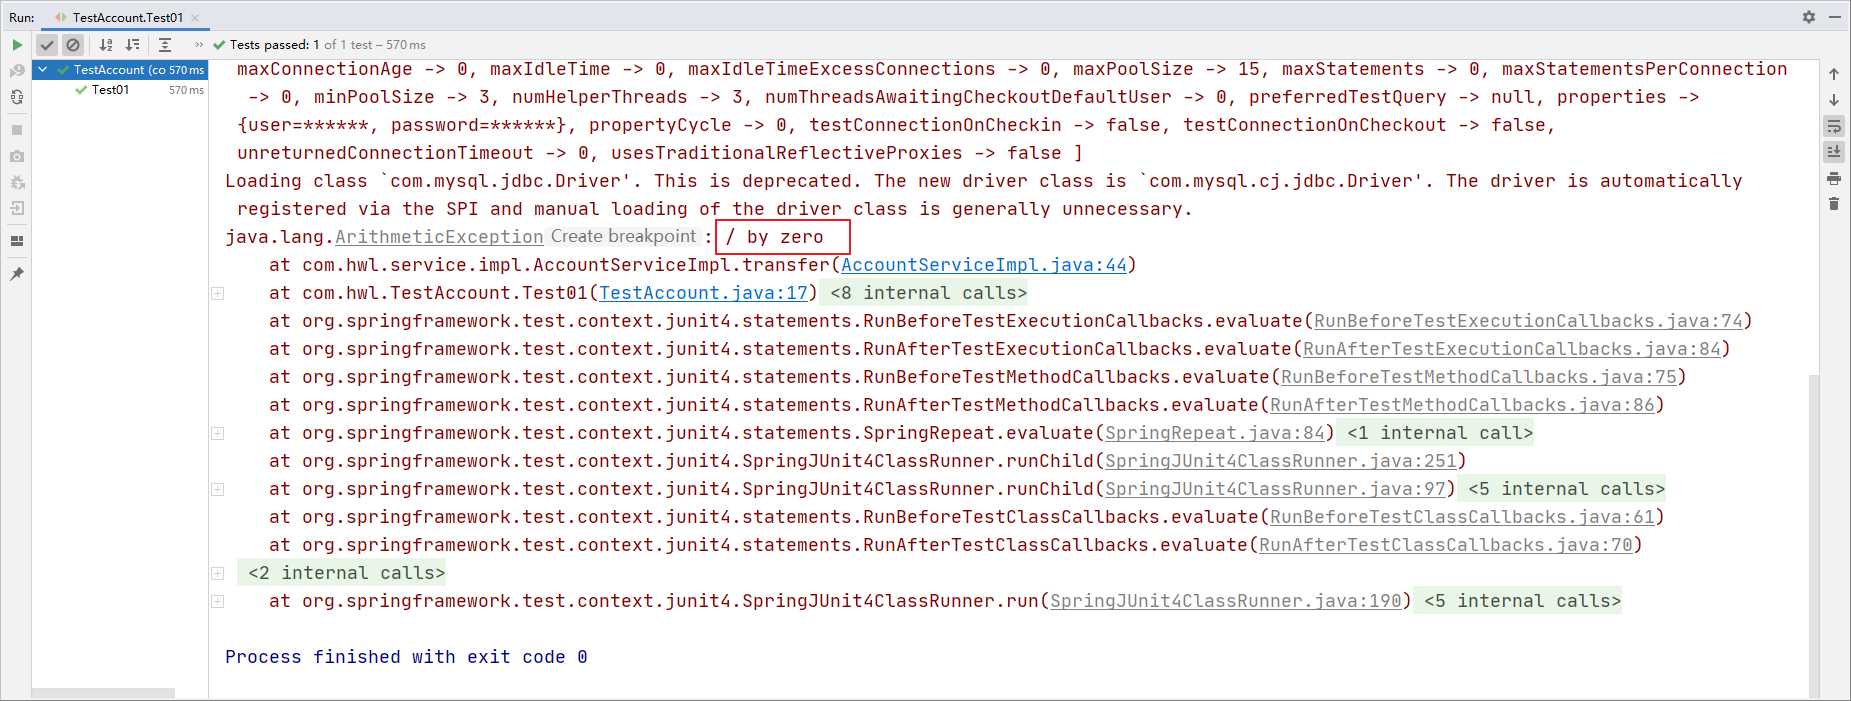
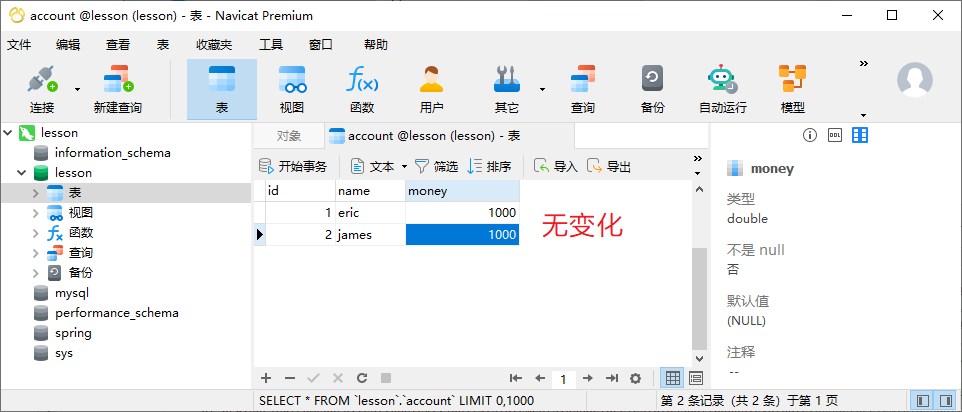
2.26.jdk动态代理
在上一节中的代码里,其实也不好,业务是实现类里面既有业务代码,又有事务代码,二者杂糅在一起,违背了职责单一性原则。
下面介绍下代理
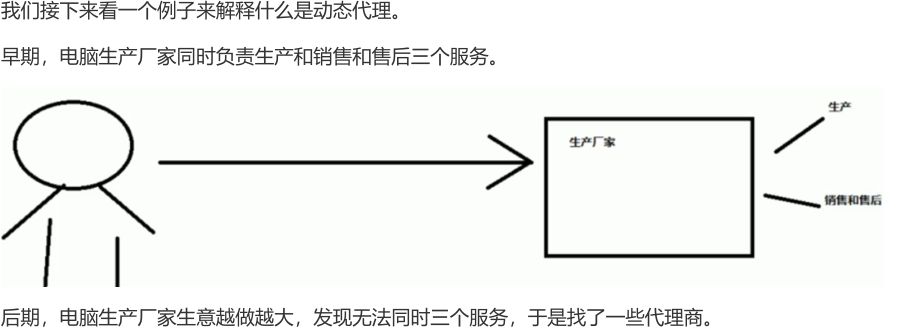
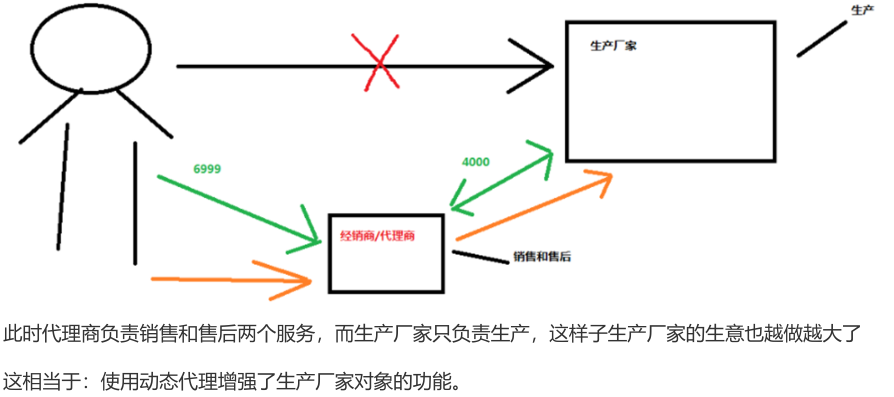
Jdk 动态代理的概念:
-
特点:代理对象在程序的运行过程中创建
-
作用:不修改源码的基础上对方法进行增强
-
分类
- 基于接口的动态代理(本节)Jdk
- 基于子类的动态代理(下一节) cglib
-
基于接口的动态代理
- 涉及的类:
Proxy - 提供者:JDK 官方
- 涉及的类:
-
如何创建代理对象
使用
Proxy类中的newProxyInstance方法 -
创建代理对象的要求:被代理类最少实现一个接口,如果没有则不能使用
newProxyInstance方法的参数:ClassLoader:类加载器
用于加载代理对象字节码的,和被代理对象使用相同的类加载器。是固定写法(写被代理对象的类加载器)。Class[]:字节码数组
用于让代理对象和被代理对象有相同的方法(只要两者都实现了同一个接口,那么两者的方法必然相同,所以我们传接口的字节码文件即可)。固定写法(写接口字节码文件)。InvocationHandler:处理器
用于提供增强的代码,它是让我们写如何处理,我们一般都是写一个接口的实现类。通常情况下都是匿名的内部类,但不是必须的,此接口的实现类都是谁用谁写。
搞清楚动态代理的概念之后,接下来我们开始代码编写。
下面演示案例,新建 module:
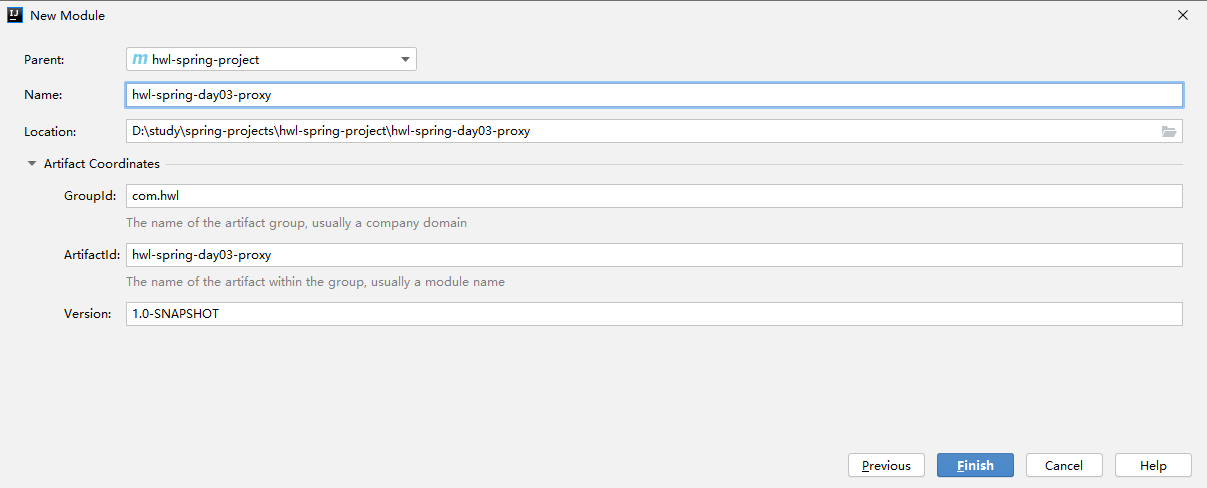
需求:我们可以自己去厂家买电脑,同时也可以让代理帮我们买电脑。让代理买电脑其实就是对我们自己买电脑的增强。
我们可以自己买电脑,也可以让代理帮我们买电脑,那我们索性就把买电脑的方法抽取出来,形成一个接口。
java
public interface ProductDao {
    void buyProduct(String name);
}
java
/**
 * 模拟我们自己手动购买电脑
 */
public class Producer implements ProductDao {
    public void buyProduct(String name) {
        System.out.println(name + "购买了电脑");
    }
}
java
/**
 * 让代理对象帮助我们购买电脑
 */
public class Consumer {
    public static void main(String[] args) {
        //模拟自己购买带电脑
        final Producer producer = new Producer();
        producer.buyProduct("自己");
        //模拟代理对象购买电脑
        /**
         * newProxyInstance →产生代理对象的方法
         *    参数1:接口实现类的类加载器
         *    参数2:字节码数组对象
         *    参数3:真正干活的对象
         */
        ProductDao proxy = (ProductDao) Proxy.newProxyInstance(
                Producer.class.getClassLoader(),
                producer.getClass().getInterfaces(),
                new InvocationHandler() {
                    /**
                     * 对业务方法进行增强的方法
                     * @param proxy 当前代理对象的引用 一般很少用
                     * @param method  当前执行的方法对象
                     * @param args  执行当前方法需要用到的参数
                     * @return 需要被增强的方法的返回值
                     * @throws Throwable
                     */
                    public Object invoke(Object proxy, Method method, Object[] args) throws Throwable {
                        if (method.getName().equals("buyProduct")) {
                            method.invoke(producer, args);
                        }
                        return null;
                    }
                });
        proxy.buyProduct("代理对象");
    }
}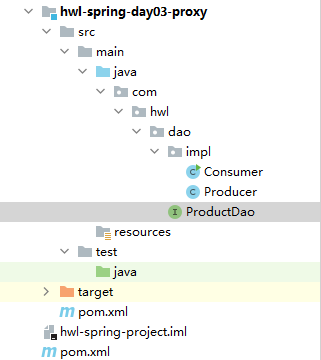

这个代码不是很好懂,多琢磨琢磨。
2.27.使用cglib字节码进行代理
那么我们如何代理一个普通的 Java 类呢?我们可以使用基于子类的动态代理。
刚才使用的基于接口 的动态代理是JDK官方支持的,但是现在要讲的是基于子类的动态代理需要第三方的支持,所以我们先导入依赖,如下:
xml
<dependencies>
    <dependency>
        <groupId>cglib</groupId>
        <artifactId>cglib</artifactId>
        <version>2.1_3</version>
    </dependency>
</dependencies>- 特点:字节码随用随创建,随用随加载
- 作用:不修改源码的基础上对方法增强
- 涉及的类:
Enhancer - 提供者:第三方
cglib库 - 如何创建代理对象:使用
Enhancer类中的create方法 - 创建代理对象的要求:被代理类不是最终类(也就是这个类不能用
final修饰,因为最终类不能创建子类)
java
/**
 * 模拟我们自己购买商品
 */
public class Provider {
    public void buyProduct(String name) {
        System.out.println(name + "购买了笔记本电脑");
    }
}
java
/**
 * 模拟代理对象帮忙购买电脑
 */
public class ProxyObject {
    public static void main(String[] args) {
        //模拟自己购买电脑
        final Provider provider = new Provider();
        provider.buyProduct("自己");

        //模拟代理对象购买电脑
        /**
         * 产生代理对象的方法
         *  参数1:当前代理的类的字节码对象
         *  参数2: 真正干活的对象
         */
        Provider proxy = (Provider) Enhancer.create(Provider.class,
                new MethodInterceptor() {
                    /**
                     * 具体进行增强的方法
                     * @param o 当前代理对象的引用
                     * @param method 代理对象需要进行增强的方法对象
                     * @param objects 代理对象需要增强方法要用到的参数
                     * @param methodProxy 执行方法的代理对象 (一般不用)
                     * @return 和被增强的方法一样的返回值
                     * @throws Throwable
                     */
                    public Object intercept(Object o, Method method, Object[] objects, MethodProxy methodProxy) throws Throwable {
                        if (method.getName().equals("buyProduct")) {
                            method.invoke(provider, objects);
                        }
                        return null;
                    }
                });
        proxy.buyProduct("代理对象");
    }
}
2.28.使用jdk动态代理的技术进行转账事务的控制
那么这里前2节讲动态代理有什么用呢?事务控制也可以动态代理
回到前面的2.25节的转账案例
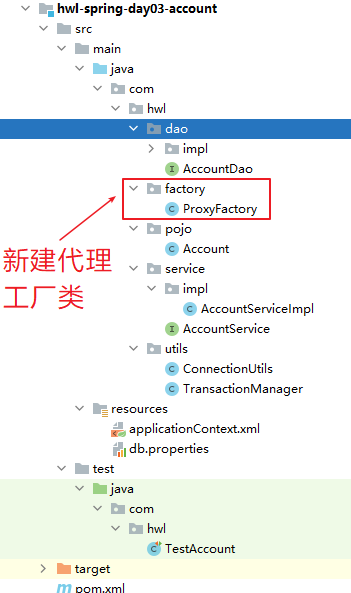
java
/**
 * 代理工厂类 专门帮助我们产生代理对象
 */
public class ProxyFactory {
    @Autowired
    AccountService accountService;
    @Autowired
    TransactionManager transactionManager;

    /**
     * 产生代理对象
     * @return
     */
    public AccountService getAccountService() {
        AccountService proxy = (AccountService) Proxy.newProxyInstance(
                AccountService.class.getClassLoader(),
                accountService.getClass().getInterfaces(),
                new InvocationHandler() {  //这里其实可以用简化的lambda表达式  (proxy, method, args) ->{...}
                    public Object invoke(Object proxy, Method method, Object[] args) throws Throwable {
                        try {
                            if (method.getName().equals("transfer")) {
                                //开启事务
                                transactionManager.beginTransaction();
                                //执行业务操作
                                method.invoke(accountService, args);
                                //提交事务
                                transactionManager.commit();
                            }
                        } catch (Exception e) {
                            //回滚事务
                            transactionManager.rollBack();
                            e.printStackTrace();
                        } finally {
                            //释放资源
                            transactionManager.release();
                        }
                        return null;
                    }
                });
        return proxy;
    }
}
java
@Service
public class AccountServiceImpl implements AccountService {
    @Autowired
    private AccountDao accountDao;

    //这个不需要了
    //@Autowired
    //TransactionManager transactionManager;

    public void transfer(String sourceName, String targetName, Double money) {
        Account sourceAccount = accountDao.findAccountByName(sourceName);
        Account targetAccount = accountDao.findAccountByName(targetName);
        if (sourceAccount != null && targetAccount != null) {
            if (sourceAccount.getMoney() >= money){
                sourceAccount.setMoney(sourceAccount.getMoney() - money);
                targetAccount.setMoney(targetAccount.getMoney() + money);
                accountDao.update(sourceAccount);
                int i = 10 / 0;
                accountDao.update(targetAccount);
            }
        }

        /*try {
            Account sourceAccount = accountDao.findAccountByName(sourceName);
            Account targetAccount = accountDao.findAccountByName(targetName);
            if (sourceAccount != null && targetAccount != null) {
                if (sourceAccount.getMoney() >= money){
                    sourceAccount.setMoney(sourceAccount.getMoney() - money);
                    targetAccount.setMoney(targetAccount.getMoney() + money);
                    accountDao.update(sourceAccount);
                    int i = 10 / 0;
                    accountDao.update(targetAccount);
                }
            }
            transactionManager.commit();
        } catch (Exception e){
            e.printStackTrace();
            transactionManager.rollBack();
        } finally {
            transactionManager.release();
        }*/
    }
}
xml
<?xml version="1.0" encoding="UTF-8"?>
<beans xmlns="http://www.springframework.org/schema/beans"
       xmlns:xsi="http://www.w3.org/2001/XMLSchema-instance"
       xmlns:context="http://www.springframework.org/schema/context"
       xsi:schemaLocation="http://www.springframework.org/schema/beans
       http://www.springframework.org/schema/beans/spring-beans.xsd http://www.springframework.org/schema/context https://www.springframework.org/schema/context/spring-context.xsd">
    <!--开启包扫描-->
    <context:component-scan base-package="com.hwl"> </context:component-scan>
    <!--加载properties配置文件-->
    <context:property-placeholder location="classpath:db.properties"/>
    <!--配置数据源-->
    <bean id="dataSource" class="com.mchange.v2.c3p0.ComboPooledDataSource">
        <property name="driverClass" value="${jdbc.driver}"/>
        <property name="jdbcUrl" value="${jdbc.url}"/>
        <property name="user" value="${jdbc.username}"/>
        <property name="password" value="${jdbc.password}"/>
    </bean>

    <!--配置QueryRunner核心对象-->
    <bean class="org.apache.commons.dbutils.QueryRunner">
        <!-- <constructor-arg name="ds" ref="dataSource"/>-->
    </bean>

    <bean id="proxyFactory" class="com.hwl.factory.ProxyFactory"></bean>
    <!--管理代理对象(基于实例化工厂管理bean)-->
    <bean id="proxy" factory-bean="proxyFactory" factory-method="getAccountService"/>
</beans>
测试:
java
@RunWith(SpringJUnit4ClassRunner.class)
@ContextConfiguration(locations = {"classpath:applicationContext.xml"})
public class TestAccount {
    @Autowired
    @Qualifier("proxy")  //指定获取容器中名为proxy的bean对象
    AccountService accountService;
    @Test
    public void Test01(){
        accountService.transfer("eric", "james", 500.0);
    }
}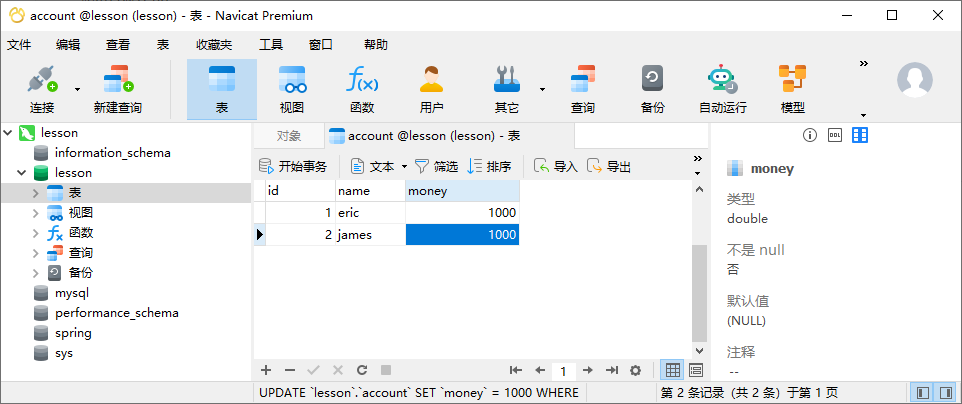
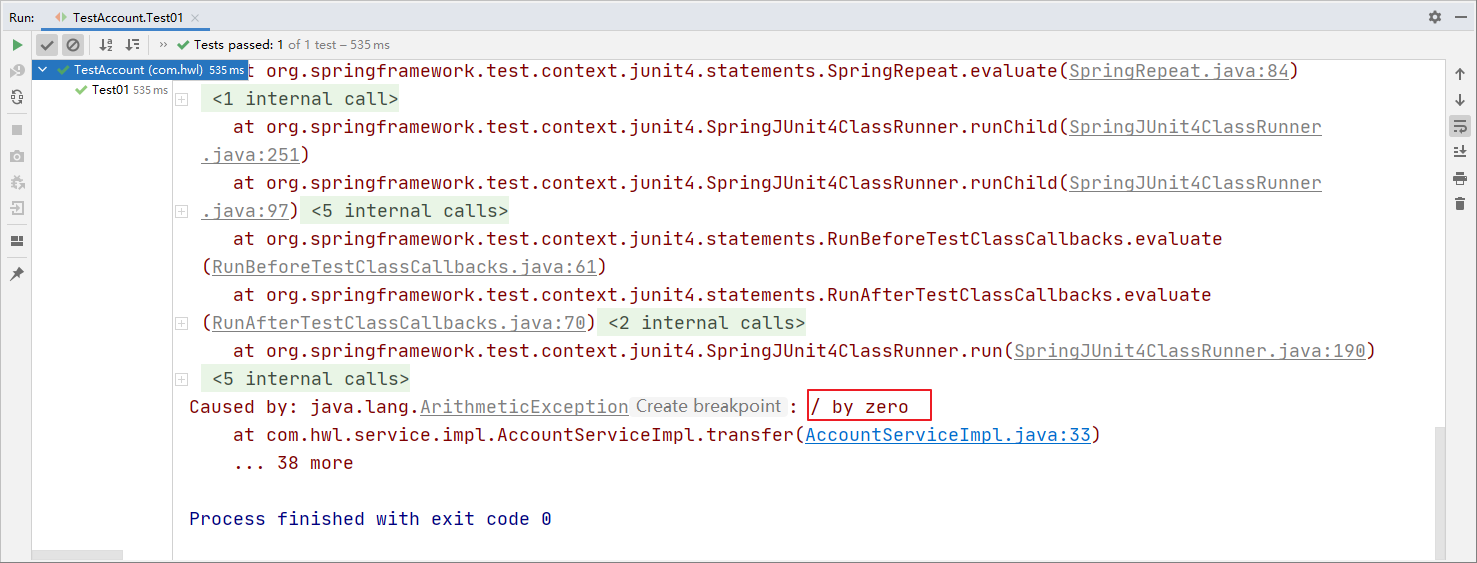
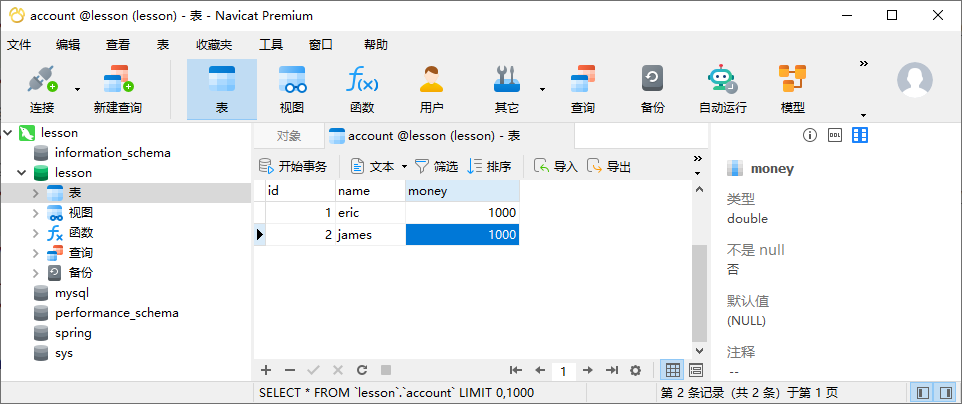
依旧ok,再把设置异常那一行注释掉,测试:
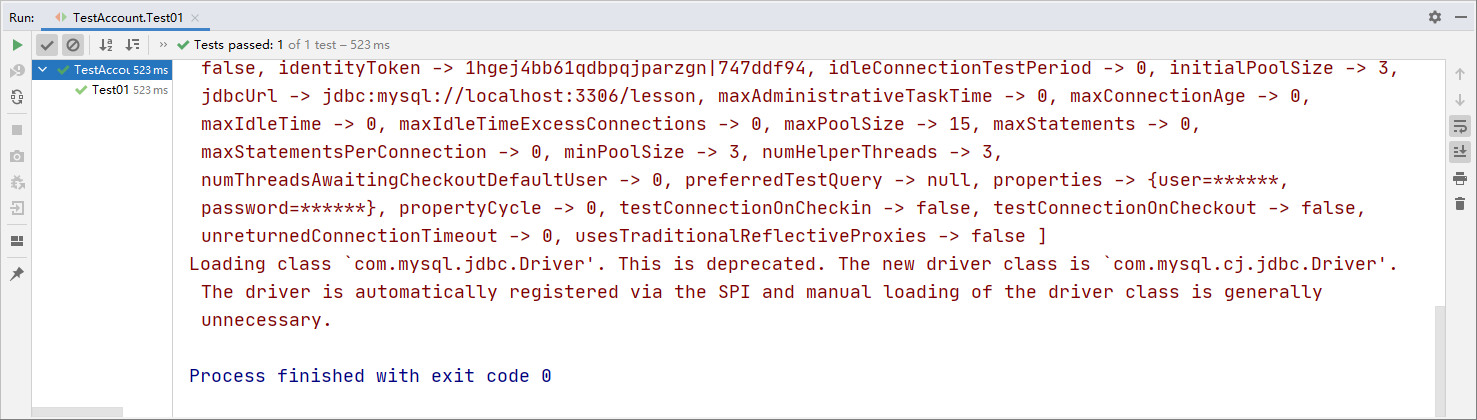
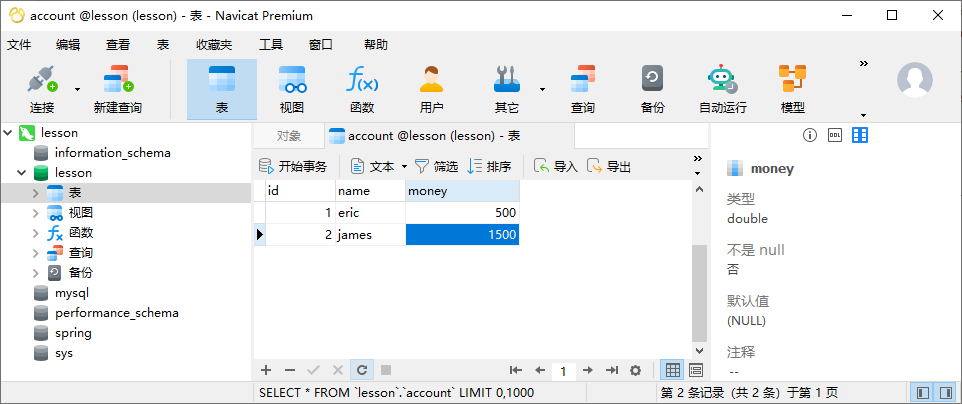
发现我们事务控制成功。
我们的业务层实现类代码变得简单了,但是这种基于 JDK 动态代理生成代理对象进行事务的方法过于繁琐 。我们有没有更好的解决办法?我们可以使用AOP去代替动态代理实现事务控制。
2.29.AOP的基本概念

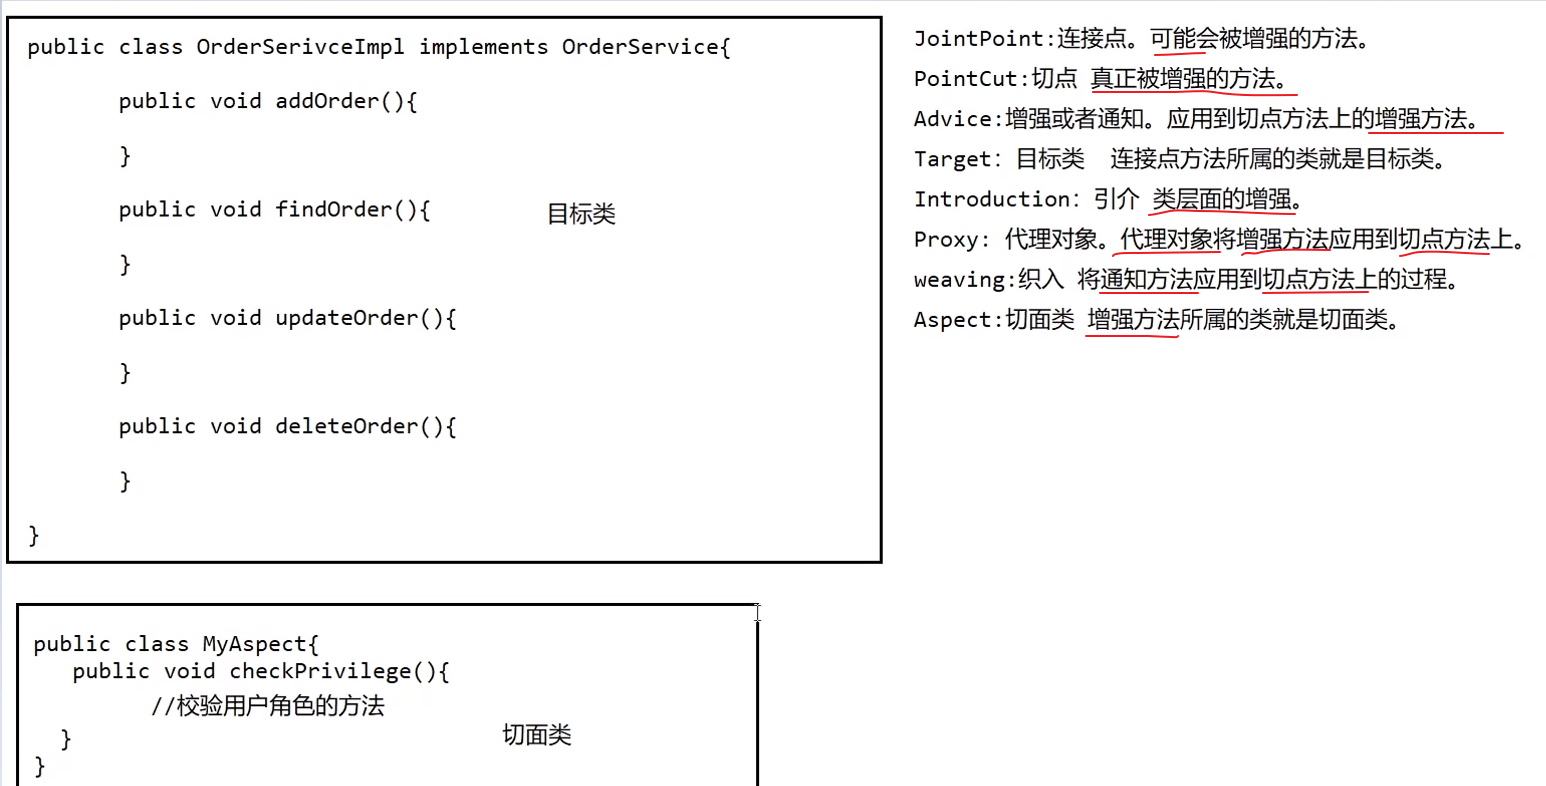
AOP:面向切面编程,AOP 是 OOP 的扩展和延伸,用来解决 OOP 开发中遇到的问题。
AOP 利用的是一种横切技术,解剖开封装的对象内部,并将那些影响多个类的公共行为封装到一个可重用模块,这就是所谓的 Aspect 方面/切面。
所谓的切面,简单点说,就是将那些与业务无关,却为业务模块所共同调用的行为(方法)提取封装,减少系统的重复代码,以达到逻辑处理过程中各部分之间低耦合的隔离效果。
AOP采取横向抽取机制,取代了传统的纵向继承体系重复性代码。
AspectJ简介
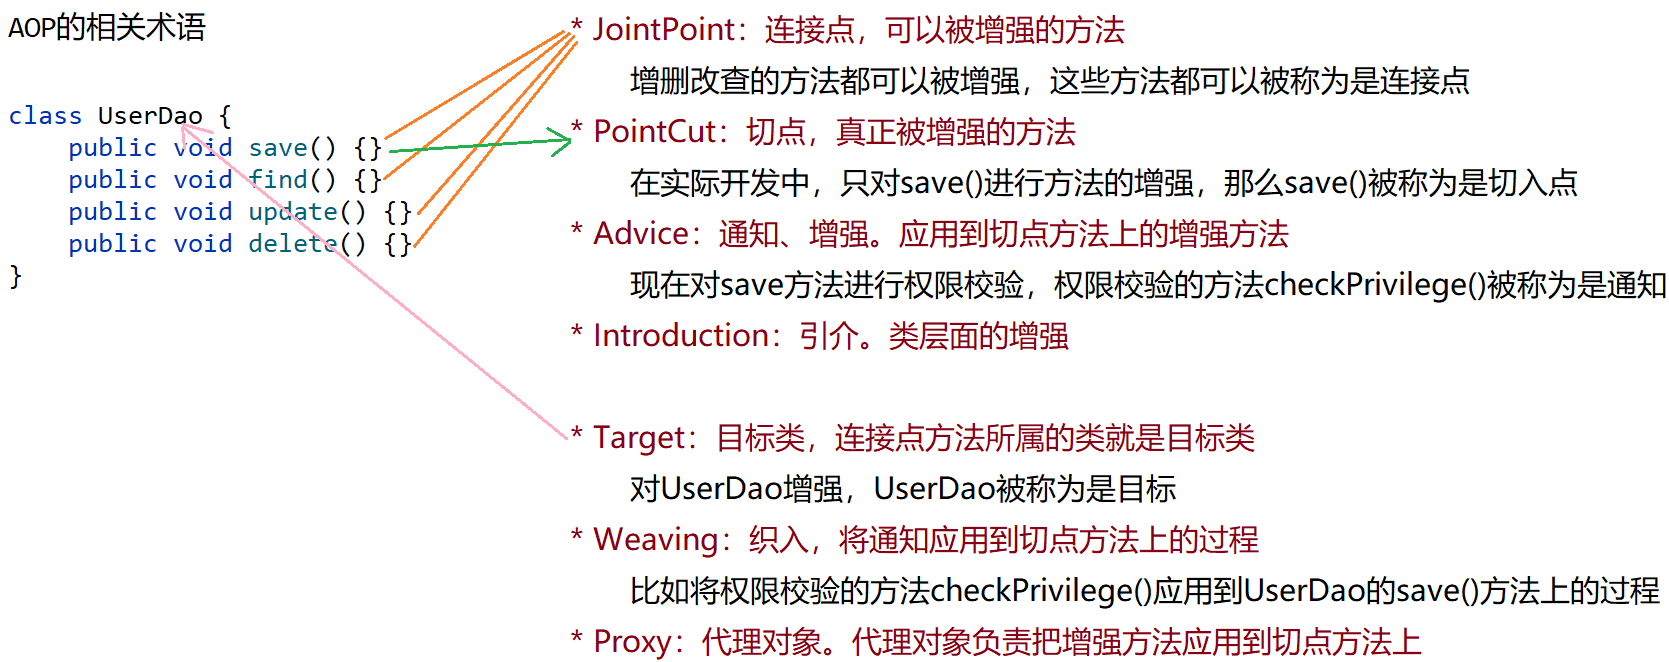
Spring Aop底层采用的是动态代理技术,但是动态代理(Jdk 动态代理,cglib 字节码代理)过于繁琐,于是 Spring 引入了第三方的 AspectJ 框架。
AOP 思想最早是由 AOP 联盟组织提出的。Spring 使用这种思想最好的框架。
Spring 的 AOP 有自己实现的方式(非常繁琐)。AspectJ 是一个 AOP 的框架,Spring 引入 AspectJ 作为自身 AOP 的开发
Spring 有两套 AOP 开发方式:
① Spring传统方式(已弃用)
② Spring基于AspectJ 的AOP的开发(使用)
2.30.基于AspectJ技术搭建AOP的入门案例(xml的方式)
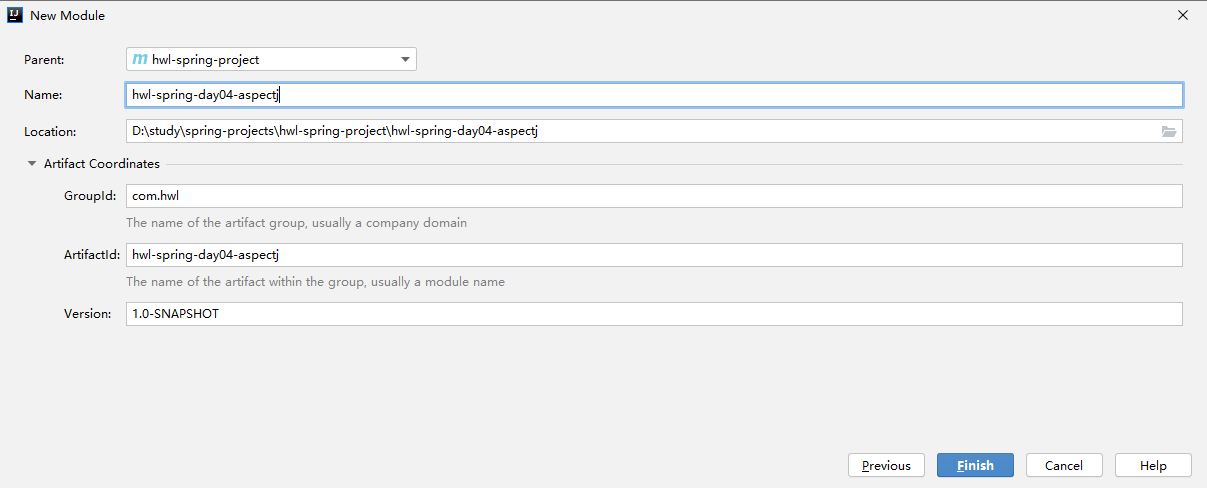
新建 module:
引入aspectj的依赖
xml
<dependencies>
    <!--spring的核心依赖-->
    <dependency>
        <groupId>org.springframework</groupId>
        <artifactId>spring-context</artifactId>
        <version>5.2.0.RELEASE</version>
    </dependency>
    <!--spring整合junit测试的依赖-->
    <dependency>
        <groupId>org.springframework</groupId>
        <artifactId>spring-test</artifactId>
        <version>5.2.0.RELEASE</version>
    </dependency>
    <!--aspectj的依赖-->
    <dependency>
        <groupId>org.aspectj</groupId>
        <artifactId>aspectjweaver</artifactId>
        <version>1.8.7</version>
    </dependency>
    <!--junit的依赖-->
    <dependency>
        <groupId>junit</groupId>
        <artifactId>junit</artifactId>
        <version>4.13</version>
        <scope>test</scope>
    </dependency>
</dependencies>
java
public interface UserService {
    void findAll();

    void addUser();

    void updateUser();

    void deleteUser();
}
编写目标类
java
/**
 * 目标类  这里面的4个方法都是连接点(可能会被增强的方法)
 */
public class UserServiceImpl implements UserService {
    public void findAll() {
        System.out.println("查询用户的方法实现了....");
    }

    public void addUser() {
        System.out.println("新增用户的方法实现了....");
    }

    public void updateUser() {
        System.out.println("修改用户的方法实现了....");
    }

    public void deleteUser() {
        System.out.println("删除用户的方法实现了....");
    }
}
编写切面类
java
/**
 * 切面类
 */
public class MyAspect {
    //权限校验的方法
    public void checkPrivilege(){
        System.out.println("开启了权限校验.....");
    }
}
配置切面(前置通知)
applicationContext.xml:
xml
<?xml version="1.0" encoding="UTF-8"?>
<beans xmlns="http://www.springframework.org/schema/beans"
       xmlns:xsi="http://www.w3.org/2001/XMLSchema-instance" xmlns:aop="http://www.springframework.org/schema/aop"
       xsi:schemaLocation="http://www.springframework.org/schema/beans
       http://www.springframework.org/schema/beans/spring-beans.xsd http://www.springframework.org/schema/aop
       https://www.springframework.org/schema/aop/spring-aop.xsd">
    <!--管理目标类-->
    <bean id="userService" class="com.hwl.service.impl.UserServiceImpl"/>

    <!--管理切面类-->
    <bean id="myAspect" class="com.hwl.aspect.MyAspect"/>

    <!--配置目标类和切面类-->
    <aop:config>
        <!--配置切点(要增强的方法,在这里deleteUser就是一个切点)
             aop:pointcut  配置切点的标签
                id  切点的名称(自定义的,唯一即可)
                expression 切点表达式
                execution 切点表达式的固定写法: 切点方法的形参类型 包名+类名+方法名(参数类型)
                                        * 表示切点方法的返回值任意
                                        (..) 表示切点方法的参数个数、类型任意	-->
        <aop:pointcut id="p1" expression="execution(* com.hwl.service.impl.UserServiceImpl.deleteUser(..))"/>
        <!--配置代理对象,将通知应用到切点方法上
            aop:aspect标签 配置代理对象
            ref 引用切面类的ID
   		-->
        <aop:aspect ref="myAspect">
            <!--  aop:before  前置通知的配置
                  method  增强方法的名称
                  point-ref 引用哪一个切点
 			-->
            <aop:before method="checkPrivilege" pointcut-ref="p1"></aop:before>
        </aop:aspect>
    </aop:config>
</beans>
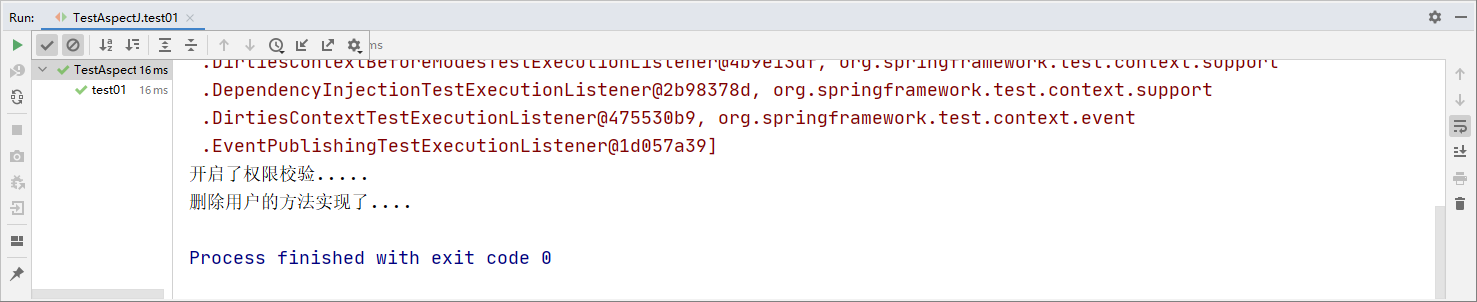
测试
java
@RunWith(SpringJUnit4ClassRunner.class)
@ContextConfiguration(locations = {"classpath:applicationContext.xml"})
public class TestAspectJ {
    @Autowired
    UserService userService;
    @Test
    public void test01(){
        userService.deleteUser();
    }
}
2.31.其他类型的通知
继续演示其他类型的通知的用法
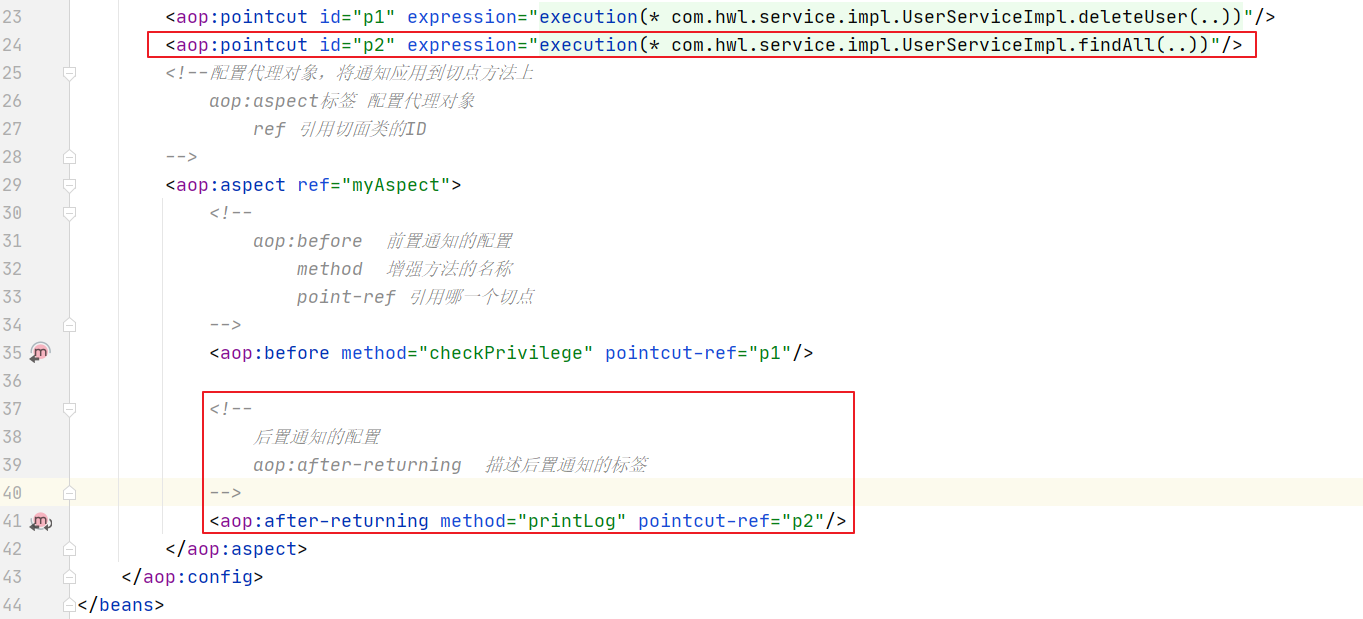
后置通知
切面类MyAspect 里面添加:
java
// 打印日志的方法
public void printLog(){
    System.out.println("开启了日志打印功能");
}
测试:
java
@Test
public void test02() {
    userService.findAll();
}
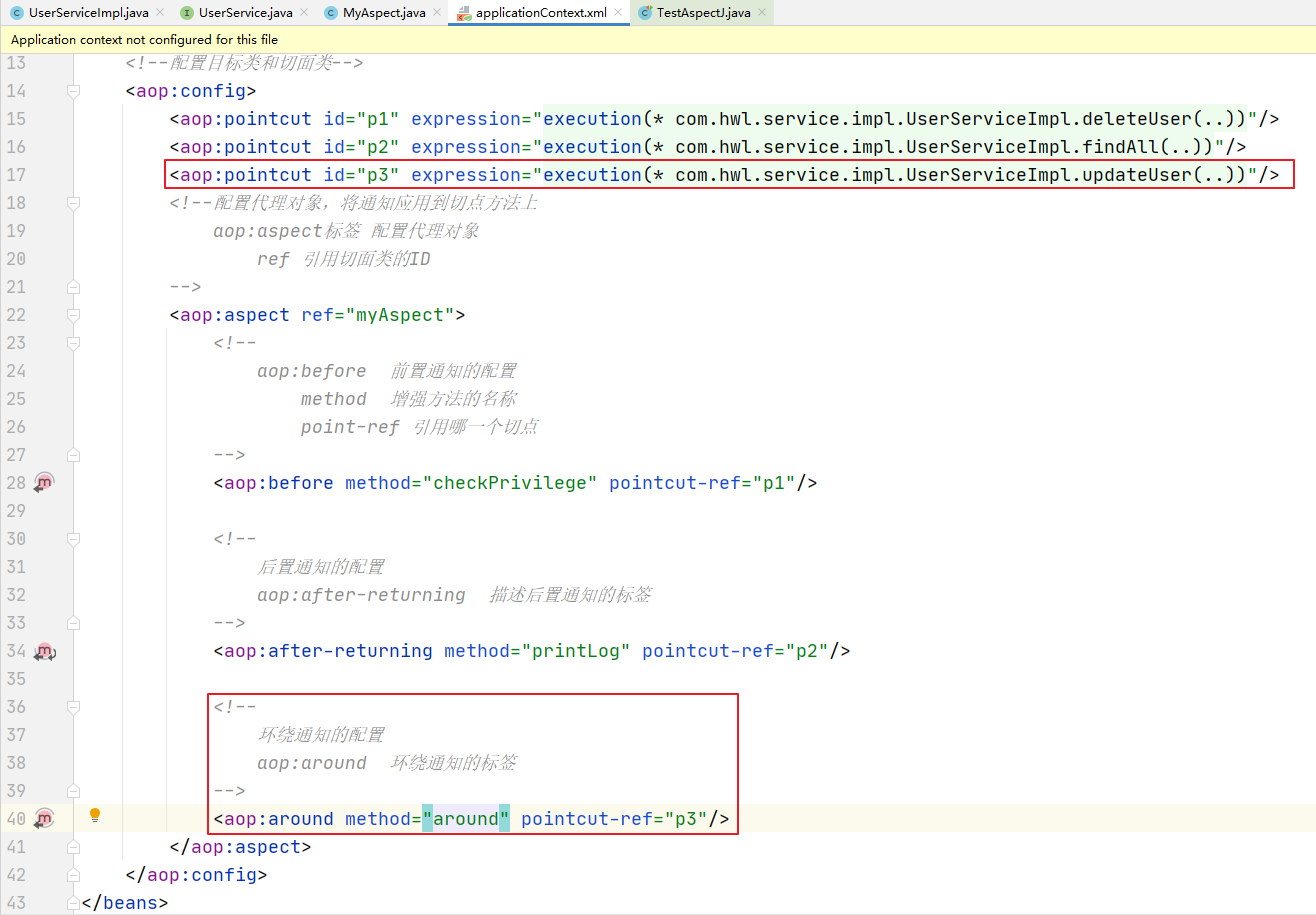
环绕通知
切面类 MyAspect 里面添加:
java
// 开启环绕通知的方法 环绕通知:就是在目标方法前后都执行的方法
public void around(ProceedingJoinPoint joinPoint){
    try {
        System.out.println("开启了环绕通知1");
        joinPoint.proceed();
        System.out.println("开启了环绕通知2");
    } catch (Throwable throwable) {
        throwable.printStackTrace();
    }
}
测试:
java
@Test
public void test03() {
    userService.updateUser();
}
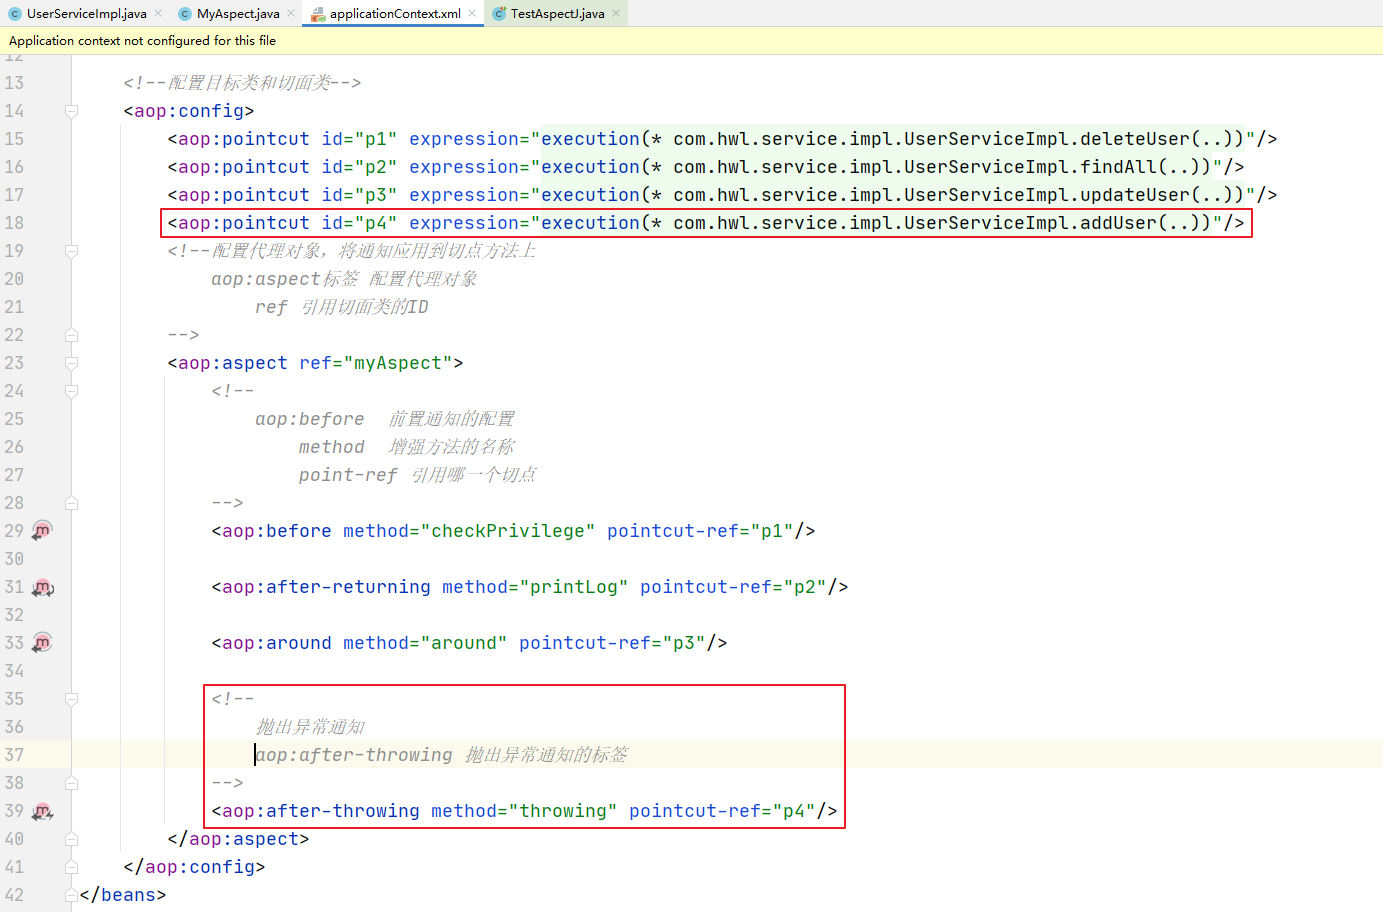
抛出异常通知
java
//抛出异常通知 只有目标方法出现异常之后,才会执行的增强方法
public void throwing(){
    System.out.println("抛出了运行时异常....");
}
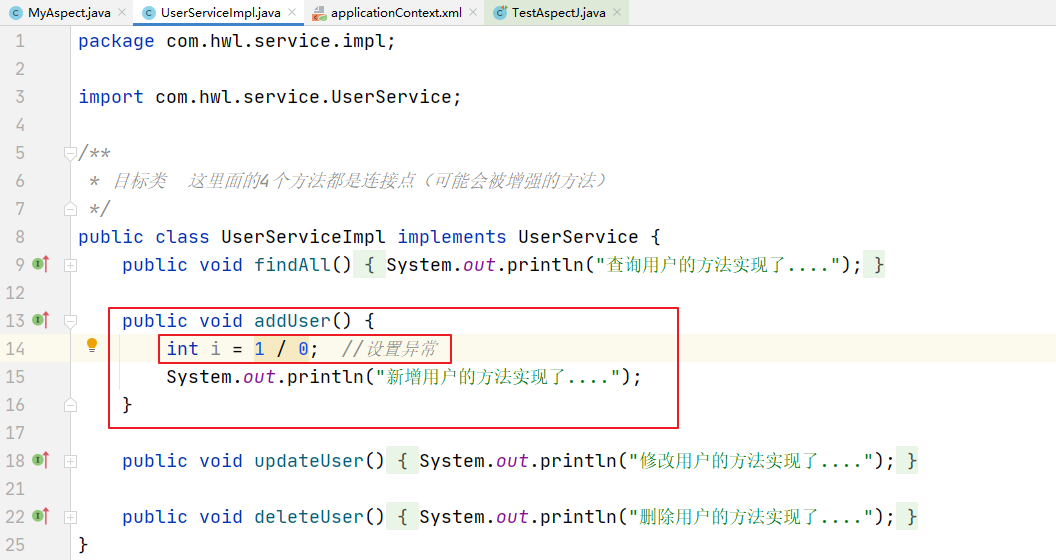
测试:
java
@Test
public void test04() {
    userService.addUser();
}
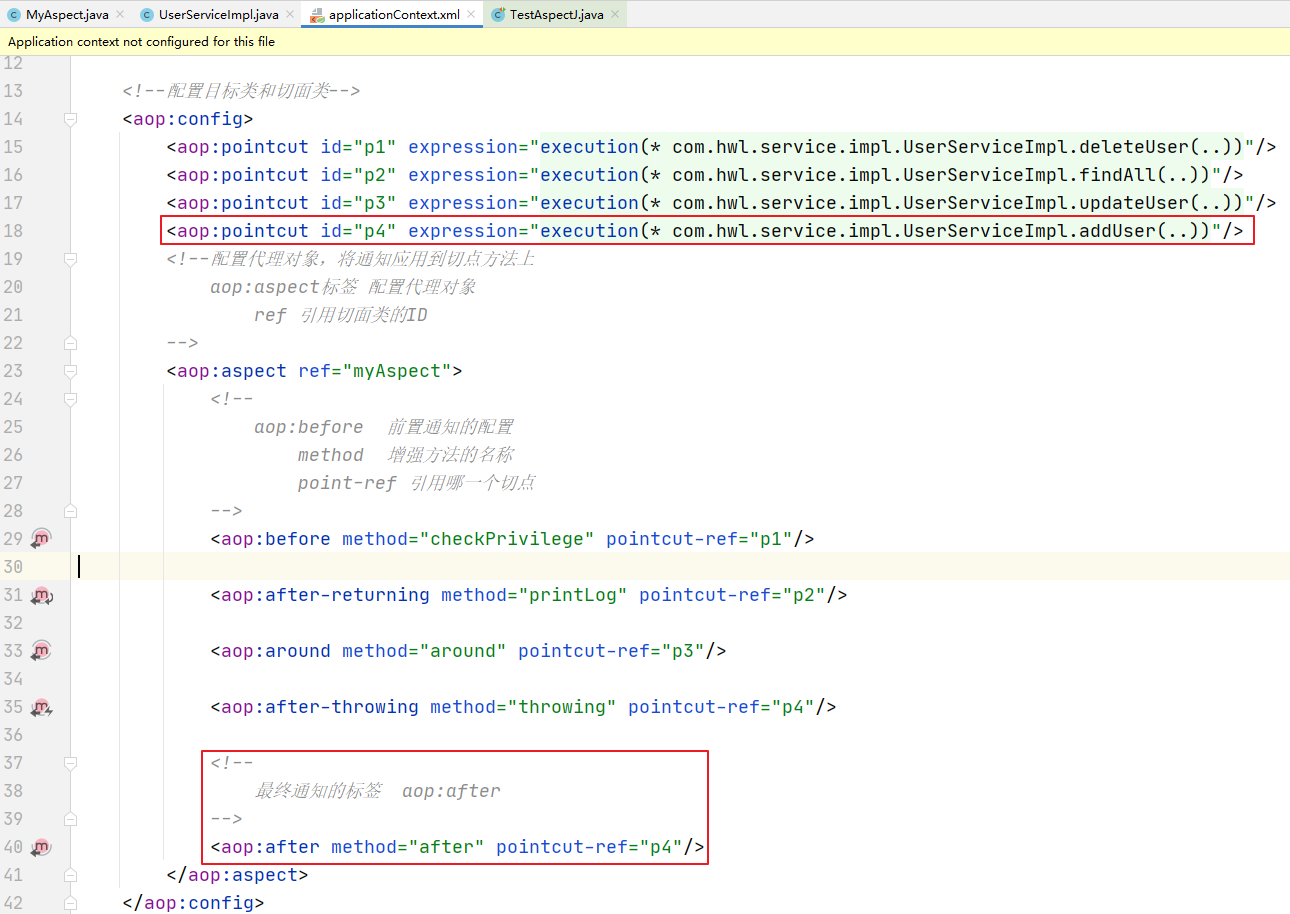
最终通知
java
//最终通知 不管目标方法有没有出现异常 都会执行该增强方法
public void after(){
    System.out.println("最终通知的方法执行了.....");
}
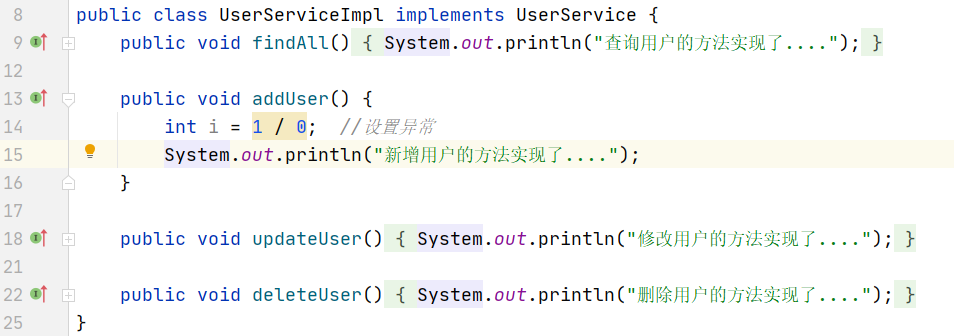
测试类:
java
@Test
public void test04() {
    userService.addUser();
}
若把异常语句int i = 1 / 0;去掉:

可见,不管有没有异常,都要执行该增强方法
2.32.基于注解的方式实现AOP
前面两节介绍的是基于 xml 的方式,搭建 AOP,这一节,换为 注解 的方式
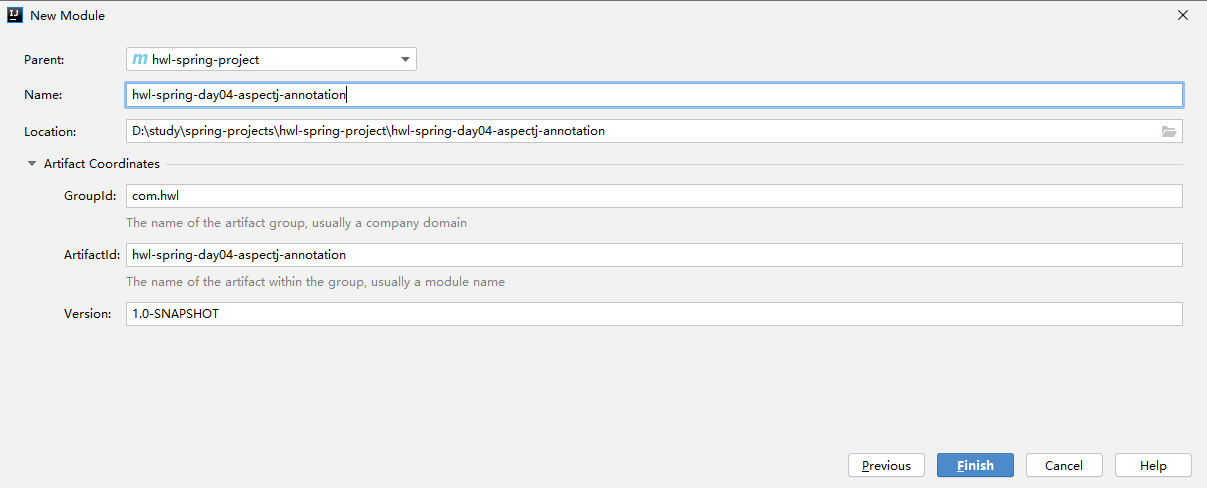
java
@Component
@Aspect  //标识当前类是一个切面类
public class MyAspect {
    //@Before  前置通知的注解
    @Before(value = "execution(* com.hwl.service.impl.UserServiceImpl.deleteUser(..))")
    public void checkPrivilege(){
        System.out.println("开启了权限校验.....");
    }

    //@AfterReturning  后置通知的注解
    @AfterReturning(value = "execution(* com.hwl.service.impl.UserServiceImpl.findAll(..))")
    public void printLog(){
        System.out.println("开启了日志打印功能");
    }

    //@Around 环绕通知的注解
    @Around(value = "execution(* com.hwl.service.impl.UserServiceImpl.updateUser(..))")
    public void around(ProceedingJoinPoint joinPoint){
        try {
            System.out.println("开启了环绕通知1");
            joinPoint.proceed();
            System.out.println("开启了环绕通知2");
        } catch (Throwable throwable) {
            throwable.printStackTrace();
        }
    }

    //@AfterThrowing  抛出异常通知的注解
    @AfterThrowing(value = "execution(* com.hwl.service.impl.UserServiceImpl.addUser(..))")
    public void throwing(){
        System.out.println("抛出了运行时异常....");
    }

    //@After  最终通知的注解
    @After(value = "execution(* com.hwl.service.impl.UserServiceImpl.addUser(..))")
    public void after(){
        System.out.println("最终通知的方法执行了.....");
    }
}
xml
<?xml version="1.0" encoding="UTF-8"?>
<beans xmlns="http://www.springframework.org/schema/beans"
       xmlns:xsi="http://www.w3.org/2001/XMLSchema-instance"
       xmlns:context="http://www.springframework.org/schema/context"
       xmlns:aop="http://www.springframework.org/schema/aop"
       xsi:schemaLocation="http://www.springframework.org/schema/beans
       http://www.springframework.org/schema/beans/spring-beans.xsd http://www.springframework.org/schema/context https://www.springframework.org/schema/context/spring-context.xsd http://www.springframework.org/schema/aop https://www.springframework.org/schema/aop/spring-aop.xsd">
    <!--开启包扫描-->
    <context:component-scan base-package="com.hwl"/>
    <!--开启spring对aop的注解支持,这个必须要有-->
    <aop:aspectj-autoproxy/>
</beans>
java
/**
 * 目标类  这里面的4个方法都是连接点(可能会被增强的方法)
 */
@Service   //添加上注解
public class UserServiceImpl implements UserService {
    public void findAll() {
        System.out.println("查询用户的方法实现了....");
    }

    public void addUser() {
        int i = 1 / 0;  //设置异常
        System.out.println("新增用户的方法实现了....");
    }

    public void updateUser() {
        System.out.println("修改用户的方法实现了....");
    }

    public void deleteUser() {
        System.out.println("删除用户的方法实现了....");
    }
}
测试:
java
@RunWith(SpringJUnit4ClassRunner.class)
@ContextConfiguration(locations = {"classpath:applicationContext.xml"})
public class TestAspectJ {
    @Autowired
    UserService userService;

    @Test
    public void test01() {
        userService.deleteUser();
    }

    @Test
    public void test02() {
        userService.findAll();
    }

    @Test
    public void test03() {
        userService.updateUser();
    }

    @Test
    public void test04() {
        userService.addUser();
    }
}
经测试,没错~
还有另外一种写法:
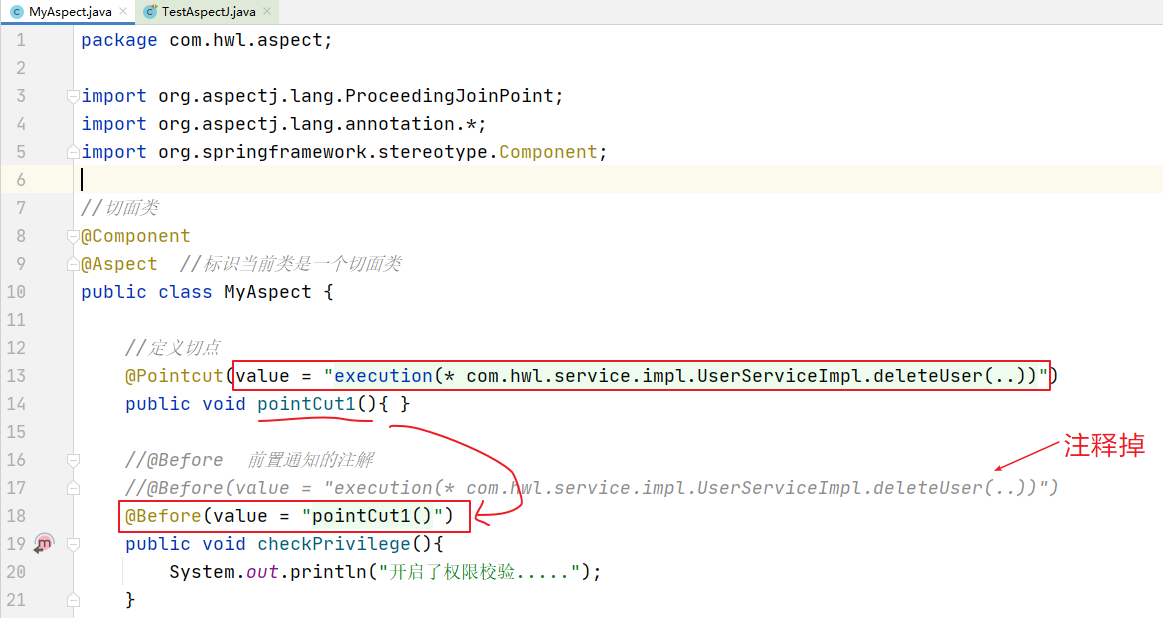
测试:
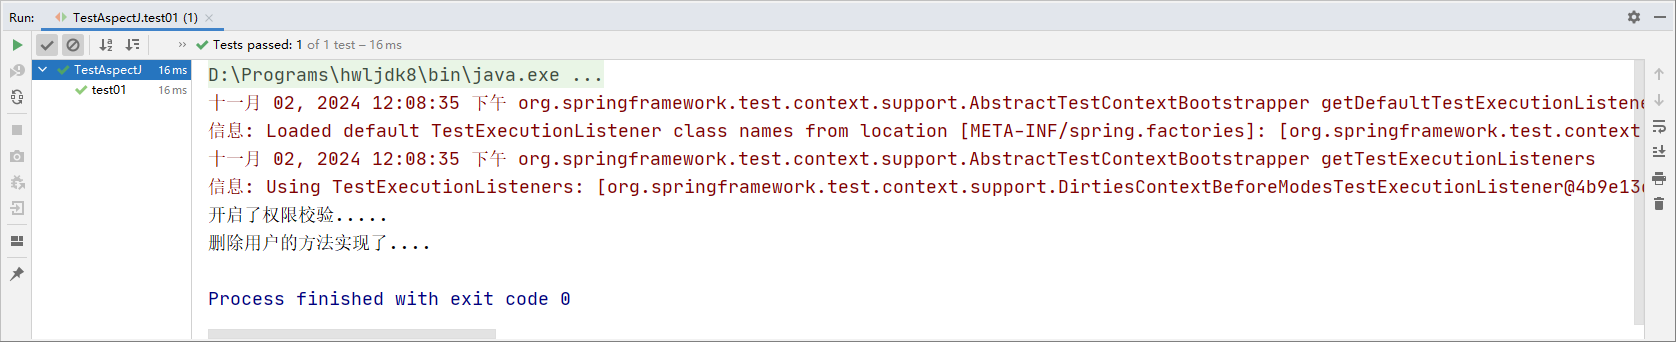
依然可以。
这样做的好处就是可以把切点方法独立出来。
2.33.基于AOP的思想改造转账案例实现事务的控制
接着改进前面的转账案例:
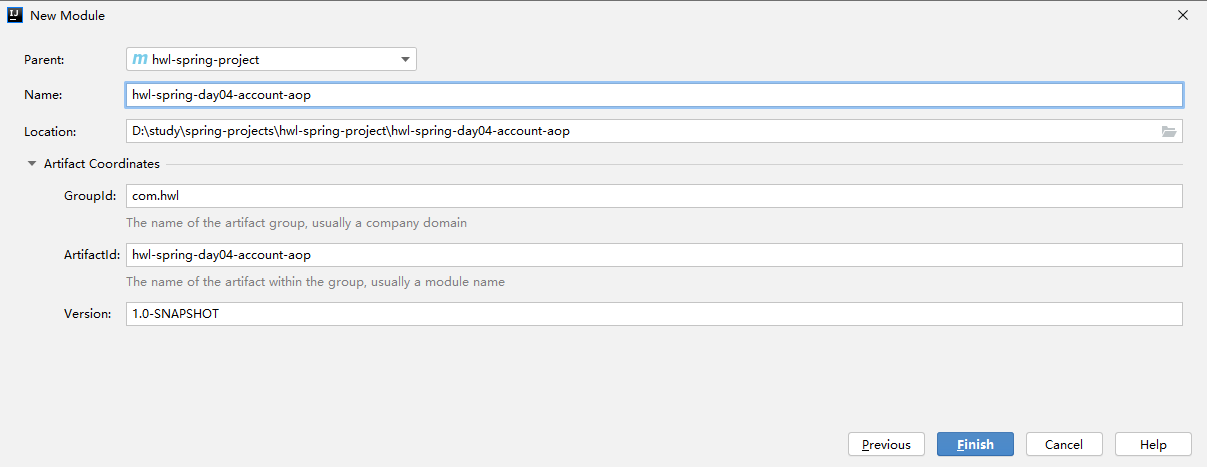
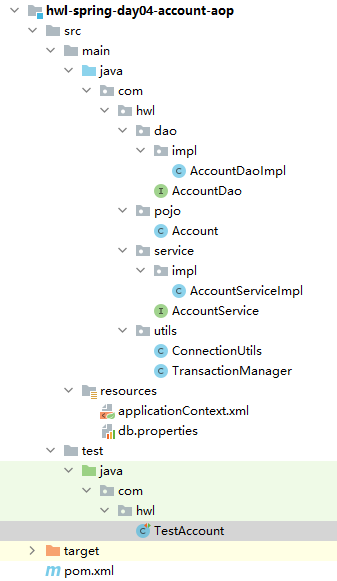
pom.xml里面引入aspectj:
xml
<dependency>
    <groupId>org.aspectj</groupId>
    <artifactId>aspectjweaver</artifactId>
    <version>1.8.7</version>
</dependency>
xml
<?xml version="1.0" encoding="UTF-8"?>
<beans xmlns="http://www.springframework.org/schema/beans"
       xmlns:xsi="http://www.w3.org/2001/XMLSchema-instance"
       xmlns:context="http://www.springframework.org/schema/context"
       xmlns:aop="http://www.springframework.org/schema/aop"
       xsi:schemaLocation="http://www.springframework.org/schema/beans
       http://www.springframework.org/schema/beans/spring-beans.xsd http://www.springframework.org/schema/context https://www.springframework.org/schema/context/spring-context.xsd http://www.springframework.org/schema/aop https://www.springframework.org/schema/aop/spring-aop.xsd">
    <!--开启包扫描-->
    <context:component-scan base-package="com.hwl"/>
    <!--加载properties配置文件-->
    <context:property-placeholder location="classpath:db.properties"/>
    <!--配置数据源-->
    <bean id="dataSource" class="com.mchange.v2.c3p0.ComboPooledDataSource">
        <property name="driverClass" value="${jdbc.driver}"/>
        <property name="jdbcUrl" value="${jdbc.url}"/>
        <property name="user" value="${jdbc.username}"/>
        <property name="password" value="${jdbc.password}"/>
    </bean>

    <!--配置QueryRunner核心对象-->
    <bean class="org.apache.commons.dbutils.QueryRunner"> </bean>

    <!--使用aop的思想 进行事务控制-->
    <aop:config>
        <aop:pointcut id="p1" expression="execution(* com.hwl.service.impl.AccountServiceImpl.transfer(..))"/>
        <aop:aspect ref="transactionManager">
            <!--配置前置通知 开启事务的方法-->
            <aop:before method="beginTransaction" pointcut-ref="p1"/>
            <!--配置后置通知 转账业务方法执行之后 需要执行事务提交-->
            <aop:after-returning method="commit" pointcut-ref="p1"/>
            <!--抛出异常通知-->
            <aop:after-throwing method="rollBack" pointcut-ref="p1"/>
            <!--最终通知 关闭数据库连接的方法 release-->
            <aop:after method="release" pointcut-ref="p1"/>
        </aop:aspect>
    </aop:config>
</beans>
其他代码都不变,详见2.28节
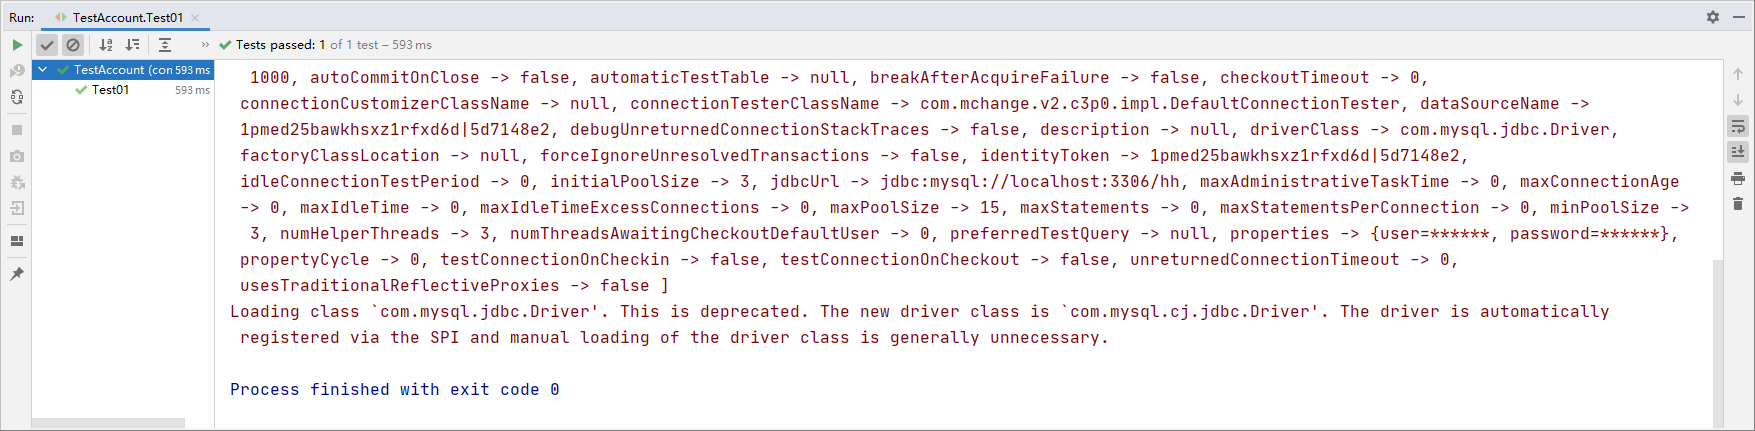
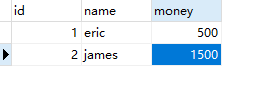
经测试,也OK
2.34.JdbcTemplate的基本概述
Spring 的 JdbcTemplate 是 Spring 框架中对 JDBC(Java Database Connectivity)操作的封装工具,主要目的是让开发者简化数据库访问,避免写很多重复代码,比如连接管理、SQL执行、异常处理等等。JdbcTemplate其实了解下就行了。
简单来说,JdbcTemplate 帮你把这些繁琐的细节都封装好了,你只需要关注:写 SQL + 设置参数 + 处理结果。spring框架为我们提供了很多操作的模板类。
-
操作关系型数据库的:
- JdbcTemplate
- HibernateTemplate
-
操作nosql数据库的:
- RedisTemplate
-
操作消息队列的:
- JmsTemplate
这里我们的主角在spring-jdbc-5.0.2.RELEASE.jar中。除了要导入这个jar包之外,我们还需要导入spring-tx-5.0.2.RELEASE.jar(与事务相关的)。
JdbcTemplate的基本作用:它是用于和数据库交互的,实现数据表的crud操作。
问题:如何创建JdbcTemplate对象?JdbcTemplate又有哪些方法?接下来,就搭建 JdbcTemplate环境
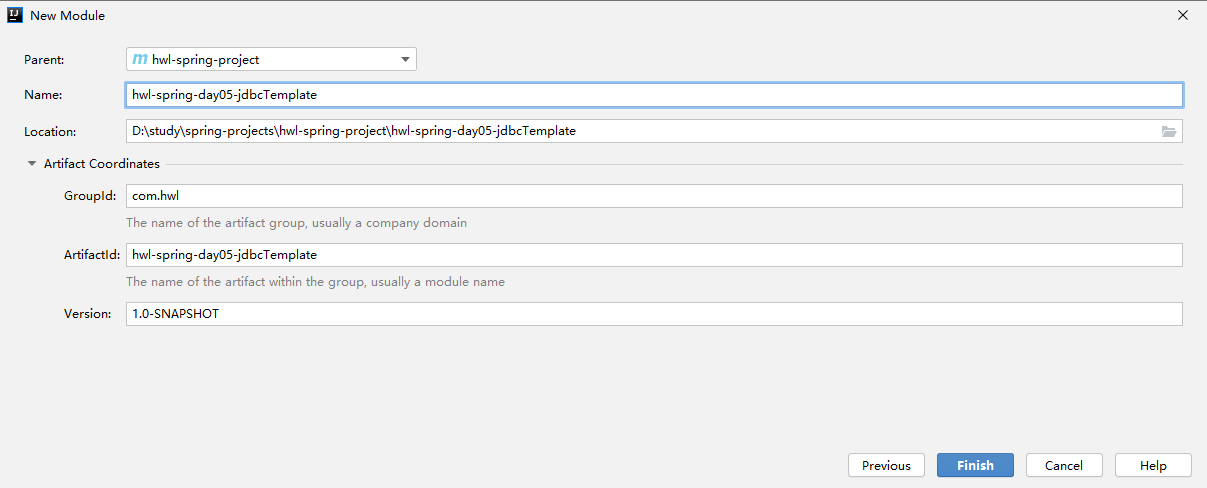
xml
<dependencies>
    <dependency>
        <groupId>org.springframework</groupId>
        <artifactId>spring-context</artifactId>
        <version>5.2.0.RELEASE</version>
    </dependency>
    <dependency>
        <groupId>org.springframework</groupId>
        <artifactId>spring-jdbc</artifactId>
        <version>5.2.0.RELEASE</version>
    </dependency>

    <dependency>
        <groupId>org.springframework</groupId>
        <artifactId>spring-tx</artifactId>
        <version>5.2.0.RELEASE</version>
    </dependency>
    <dependency>
        <groupId>mysql</groupId>
        <artifactId>mysql-connector-java</artifactId>
        <version>8.0.25</version>
    </dependency>
    <dependency>
        <groupId>junit</groupId>
        <artifactId>junit</artifactId>
        <version>4.13.1</version>
        <scope>test</scope>
    </dependency>
    <dependency>
        <groupId>org.springframework</groupId>
        <artifactId>spring-test</artifactId>
        <version>5.2.0.RELEASE</version>
    </dependency>
</dependencies>
java
public class Account {
    private Integer id;
    private String name;
    private Double money;

    public Integer getId() {
        return id;
    }

    public void setId(Integer id) {
        this.id = id;
    }

    public String getName() {
        return name;
    }

    public void setName(String name) {
        this.name = name;
    }

    public Double getMoney() {
        return money;
    }

    public void setMoney(Double money) {
        this.money = money;
    }

    @Override
    public String toString() {
        return "Account{" + "id=" + id + ", name='" + name + '\'' + ", money=" + money + '}';
    }
}
java
public class JdbcTemplateDemo1 {
    public static void main(String[] args) {
        //对于数据源(连接池)的选择有很多:C3P0、DPCP、Druid等等,但是这次我们使用spring集成的数据源。
        DriverManagerDataSource dataSource = new DriverManagerDataSource();
        //设置一些基本信息
        dataSource.setDriverClassName("com.mysql.jdbc.Driver");
        dataSource.setUrl("jdbc:mysql://localhost/lesson");
        dataSource.setUsername("root");
        dataSource.setPassword("root");
        JdbcTemplate jdbcTemplate = new JdbcTemplate(dataSource); //通过构造函数把dataSource传进去
        jdbcTemplate.execute("insert into account(name,money) values('李四',300.0)");
    }
}
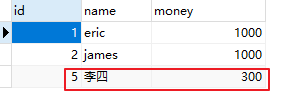
目前代码的问题:
- 通过new的方式管理DriverManagerDataSource和JdbcTemplate,我们应该使用spring的ioc环境帮助我们管理bean
- 在执行sql语句的时候,没有预编译sql语句的过程。直接将值注入,容易造成sql语句注入的问题
2.35.在spring中使用JdbcTemplate
先简单演示下:
applicationContext.xml:
xml
<?xml version="1.0" encoding="UTF-8"?>
<beans xmlns="http://www.springframework.org/schema/beans"
       xmlns:xsi="http://www.w3.org/2001/XMLSchema-instance"
       xsi:schemaLocation="http://www.springframework.org/schema/beans
       http://www.springframework.org/schema/beans/spring-beans.xsd">

    <bean id="dataSource" class="org.springframework.jdbc.datasource.DriverManagerDataSource">
        <property name="driverClassName" value="com.mysql.jdbc.Driver"/>
        <property name="url" value="jdbc:mysql://localhost:3306/lesson"/>
        <property name="username" value="root"/>
        <property name="password" value="root"/>
     </bean>

    <!--配置JdbcTemplate-->
    <bean id="jdbcTemplate" class="org.springframework.jdbc.core.JdbcTemplate">
        <property name="dataSource" ref="dataSource"/>
    </bean>
</beans>
java
//测试类
public class TestJdbcTemplate {
    public static void main(String[] args) {
        ApplicationContext context = new ClassPathXmlApplicationContext("applicationContext.xml");
        JdbcTemplate jdbcTemplate = (JdbcTemplate) context.getBean("jdbcTemplate");
        jdbcTemplate.execute("insert into account(name,money) values('王五',400.0)");
    }
}
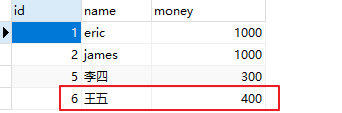
查询所有数据
查看源码,我们发现查询query的方法重载了很多,这里的RowMapper是一个接口,类似于DbUtils里面的BeanListHandler的功能。

我们定义一个类,实现该接口即可:
java
public class MyRowMapper implements RowMapper<Account> {
    public Account mapRow(ResultSet resultSet, int i) throws SQLException {
        int id = resultSet.getInt("id");
        String name = resultSet.getString("name");
        double money = resultSet.getDouble("money");
        Account account = new Account();
        account.setId(id);
        account.setName(name);
        account.setMoney(money);
        return account;
    }
}
然后在查询的时候,我们把这个类的对象传入到方法里面即可
java
/**
 * JdbcTemplate 提供了 2个核心方法
 * query方法:专门执行查询操作的方法
 * update方法:专门执行更新的方法(insert update delete)
 */
@RunWith(SpringJUnit4ClassRunner.class)
@ContextConfiguration(locations = {"classpath:applicationContext.xml"})
public class TestAccount {
    @Autowired
    JdbcTemplate jdbcTemplate;

    //查询数据的操作  查询所有数据
    @Test
    public void Test01() {
        List<Account> accountList = jdbcTemplate.query("select * from account", new MyRowMapper());
        accountList.forEach(account -> System.out.println(account));
        //可简写为:accountList.forEach(System.out::println);
    }
}
查询单条数据
java
//查询操作--根据id查询
@Test
public void test02(){
    List<Account> accountList = jdbcTemplate.query("select * from account where id = ?", new MyRowMapper(), 1);
    accountList.forEach(account -> System.out.println(account));
}
聚合函数查询
java
//聚合函数查询 --统计数据表中的记录
@Test
public void test03(){
    String sql = "select count(*) from account where id > ?";
    Integer count = jdbcTemplate.queryForObject(sql, Integer.class, 1);
    System.out.println(count);
}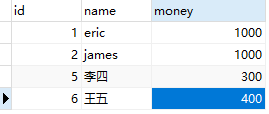

其它操作
其它的操作到dao里面去演示:
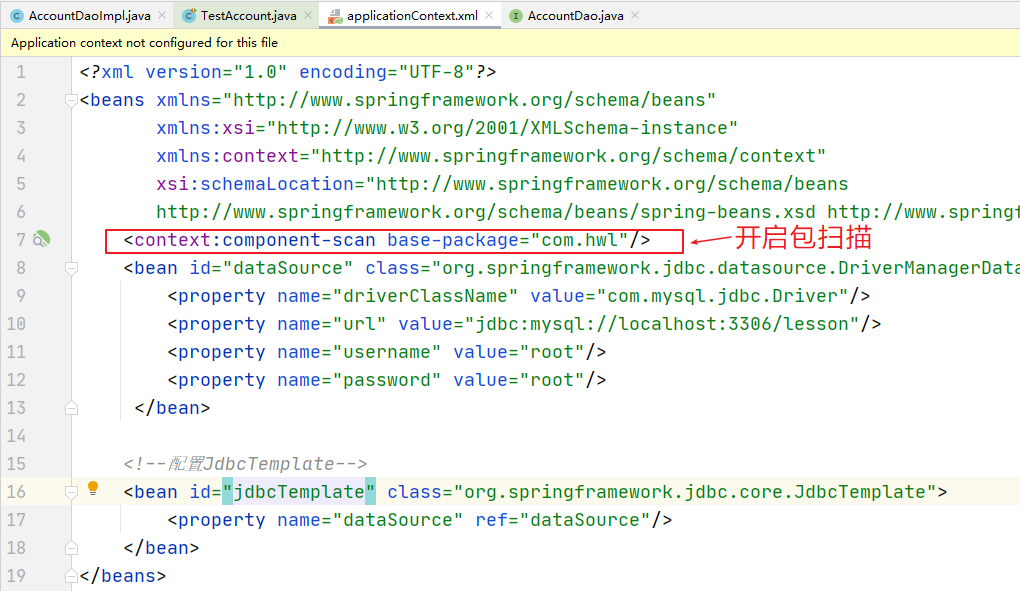
java
public interface AccountDao {
    //根据id查询指定的账户信息
    Account findAccountById(Integer id);

    //新增账户信息
    void addAccount(Account account);

    //修改账号信息
    void updateAccount(Account account);

    //删除账户信息
    void deleteAccountById(Integer id);

}
java
@Component
public class AccountDaoImpl implements AccountDao {
    @Autowired
    JdbcTemplate jdbcTemplate;

    @Override
    public Account findAccountById(Integer id) {
        String sql = "select * from account where id = ?";
        List<Account> accountList = jdbcTemplate.query(sql, new MyRowMapper(), id);
        return accountList.get(0);
    }

    @Override
    public void addAccount(Account account) {
        String sql = "insert into account(name, money) values (?, ?)";
        jdbcTemplate.update(sql, account.getName(), account.getMoney());
    }

    @Override
    public void updateAccount(Account account) {
        String sql = "update account set name = ?, money = ? where id = ?";
        jdbcTemplate.update(sql, account.getName(), account.getMoney(), account.getId());
    }

    @Override
    public void deleteAccountById(Integer id) {
        String sql = "delete from account where id = ?";
        jdbcTemplate.update(sql, id);
    }
}
测试类:
java
@Autowired
AccountDao accountDao;

@Test
public void test04(){
    Account account = accountDao.findAccountById(1);
    System.out.println(account);
}

@Test
public void test05(){
    Account account = new Account();
    account.setName("miller");
    account.setMoney(900.0);
    accountDao.addAccount(account);
}

@Test
public void test06(){
    Account account = new Account();
    account.setId(3);
    account.setName("kerr");
    account.setMoney(900.0);
    accountDao.updateAccount(account);
}

@Test
public void test07(){
    accountDao.deleteAccountById(3);
}
经测试,ok
2.36.spring事务控制--使用编程式事务管理事务
一些概念
前面我们进行了事务的控制,我们发现,我们需要自己去编写事务管理的代码。这是非常繁琐的。其实 Spring 也给我们提供了事务管理的 API。
(1)PlatformTransactionManager:平台事务管理器
- 平台事务管理器:接口,是Spring用于管理事务的真正的对象
DataSourceTransactionManager:底层使用 JDBC 管理事务HibernateTransactionManager:底层使用Hibernate管理事务
(2)TransactionDefinition :事务定义信息
事务定义:用于定义事务的相关的信息,隔离级别、超时信息、传播行为、是否只读。
-
获取事务对象名称:
javaString getName(); -
获取事务隔离级别:
javaint getIsolationLevel(); //Spring提供的事务隔离级别默认跟数据库的隔离级别一致ISOLATION_DEFAULT:默认级别,归属下列的某一种(Spring 的默认级别是数据库的默认级别)ISOLATION_READ_UNCOMMITTED:可以读取未提交的数据ISOLATION_READ_COMMITTED:只能读取已提交数据,解决脏读问题(Oracle 的默认级别)ISOLATION_REPEATABLE_READ:是否读取其它事务提交修改后的数据,解决不可重复读问题(MySQL 的默认级别)ISOLATION_SERIALIZABLE:是否读取其他事务提交添加后的数据,解决幻读问题
-
获取事务传播行为:
javaint getPropagationBehavior();传播行为是指:什么情况下必须要开启事务(增删改),什么情况下可以不开启事务(查)。
REQUIRED:如果当前没有事务,就新建一个事务;如果已经存在一个事务,就加入到该事务中(默认值)SUPPORTS:支持当前事务,如果当前没有事务,就以非事务方式执行(没有事务)MANDATORY:使用当前事务,如果当前没有事务,就抛出异常REQUIRES_NEW:新建一个事务,如果当前存在事务,则挂起当前事务NOT_SUPPORTED:总是以非事务的方式执行,并挂起任何存在的事务NEVER:总是以非事务的方式执行,如果当前存在事务,则抛出异常NESTED:如果当前存在事务,则在嵌套事务中执行;如果当前没有事务,则新建一个事务。
-
获取事务超时时间:
javaint getTimeOut(); //当提交或者回滚达到多长时间就过期。默认值是 -1,没有超时限制。如果有,以秒为单位进行设置。 -
获取事务是否只读:
javaboolean isReadOnly();读写型事务:增加、删除和修改会开启事务
只读型事务:执行查询时,也会开启事务
建议查询时设置为只读
-
事务隔离级别反映事务提交并访问时的处理态度
先搭建好框架
还是先写好之前的代码框架:
xml
<dependencies>
    <dependency>
        <groupId>org.springframework</groupId>
        <artifactId>spring-context</artifactId>
        <version>5.2.0.RELEASE</version>
    </dependency>
    <dependency>
        <groupId>org.springframework</groupId>
        <artifactId>spring-jdbc</artifactId>
        <version>5.0.2.RELEASE</version>
    </dependency>
    <dependency>
        <groupId>mysql</groupId>
        <artifactId>mysql-connector-java</artifactId>
        <version>8.0.25</version>
    </dependency>
    <dependency>
        <groupId>c3p0</groupId>
        <artifactId>c3p0</artifactId>
        <version>0.9.1.2</version>
    </dependency>
    <dependency>
        <groupId>junit</groupId>
        <artifactId>junit</artifactId>
        <version>4.12</version>
        <scope>test</scope>
    </dependency>
    <dependency>
        <groupId>org.springframework</groupId>
        <artifactId>spring-test</artifactId>
        <version>5.0.2.RELEASE</version>
    </dependency>
    <dependency>
        <groupId>org.aspectj</groupId>
        <artifactId>aspectjweaver</artifactId>
        <version>1.8.7</version>
    </dependency>
</dependencies>
xml
<?xml version="1.0" encoding="UTF-8"?>
<beans xmlns="http://www.springframework.org/schema/beans"
       xmlns:xsi="http://www.w3.org/2001/XMLSchema-instance"
       xmlns:context="http://www.springframework.org/schema/context"
       xsi:schemaLocation="http://www.springframework.org/schema/beans
       http://www.springframework.org/schema/beans/spring-beans.xsd
       http://www.springframework.org/schema/context
       https://www.springframework.org/schema/context/spring-context.xsd">

    <context:component-scan base-package="com.hwl"/>

    <bean id="dataSource" class="com.mchange.v2.c3p0.ComboPooledDataSource">
        <property name="driverClass" value="com.mysql.jdbc.Driver"/>
        <property name="jdbcUrl" value="jdbc:mysql://localhost:3306/lesson"/>
        <property name="user" value="root"/>
        <property name="password" value="root"/>
    </bean>
    <bean id="jdbcTemplate" class="org.springframework.jdbc.core.JdbcTemplate">
        <property name="dataSource" ref="dataSource"/>
    </bean>
</beans>
java
public class Account {
    private Integer id;
    private String name;
    private Double money;

    // getter、setter
    @Override
    public String toString() {
        return "Account{" + "id=" + id + ", name='" + name + '\'' + ", money=" + money + '}';
    }
}
java
public class MyRowMapper implements RowMapper<Account> {
    public Account mapRow(ResultSet resultSet, int i) throws SQLException {
        int id = resultSet.getInt("id");
        String name = resultSet.getString("name");
        double money = resultSet.getDouble("money");
        Account account = new Account();
        account.setId(id);
        account.setName(name);
        account.setMoney(money);
        return account;
    }
}
java
public interface AccountDao {
    Account findAccountByName(String name);
    void update(Account account);
}
java
@Repository
public class AccountDaoImpl implements AccountDao {
    @Autowired
    JdbcTemplate jdbcTemplate;

    public Account findAccountByName(String name) {
        String sql = "select * from account where name = ?";
        List<Account> accountList = jdbcTemplate.query(sql, new MyRowMapper(), name);
        return accountList.get(0);
    }

    public void update(Account account) {
        String sql = "update account set money = ? where name = ?";
        jdbcTemplate.update(sql, account.getMoney(), account.getName());
    }
}
java
public interface AccountService {
    // 转账的方法
    void transfer(String sourceName, String targetName, Double money);
}
java
@Service
public class AccountServiceImpl implements AccountService {
    @Autowired
    private AccountDao accountDao;

    public void transfer(String sourceName, String targetName, Double money) {
        Account sourceAccount = accountDao.findAccountByName(sourceName);
        Account targetAccount = accountDao.findAccountByName(targetName);
        if (sourceAccount != null && targetAccount != null) {
            if (sourceAccount.getMoney() >= money) {
                sourceAccount.setMoney(sourceAccount.getMoney() - money);
                targetAccount.setMoney(targetAccount.getMoney() + money);
                accountDao.update(sourceAccount);
//                int i = 1 / 0;
                accountDao.update(targetAccount);
            }
        }
    }
}
测试:
java
@RunWith(SpringJUnit4ClassRunner.class)
@ContextConfiguration(locations = {"classpath:applicationContext.xml"})
public class TestAccount {
    @Autowired
    AccountService accountService;

    @Test
    public void test01() {
        accountService.transfer("eric", "james", 500.0);
    }
}
经测试,ok
增加代码
applicationContext.xml 增加:
xml
<?xml version="1.0" encoding="UTF-8"?>
<beans xmlns="http://www.springframework.org/schema/beans"
       xmlns:xsi="http://www.w3.org/2001/XMLSchema-instance"
       xmlns:context="http://www.springframework.org/schema/context"
       xsi:schemaLocation="http://www.springframework.org/schema/beans
       http://www.springframework.org/schema/beans/spring-beans.xsd
       http://www.springframework.org/schema/context
       https://www.springframework.org/schema/context/spring-context.xsd">
    <!--开启包扫描-->
    <context:component-scan base-package="com.hwl"/>
    <!--管理数据源-->
    <bean id="dataSource" class="com.mchange.v2.c3p0.ComboPooledDataSource">
        <property name="driverClass" value="com.mysql.jdbc.Driver"/>
        <property name="jdbcUrl" value="jdbc:mysql://localhost:3306/lesson"/>
        <property name="user" value="root"/>
        <property name="password" value="root"/>
    </bean>
    <!--管理JdbcTemplate-->
    <bean id="jdbcTemplate" class="org.springframework.jdbc.core.JdbcTemplate">
        <property name="dataSource" ref="dataSource"/>
    </bean>
    <!--配置平台事务管理器-->
    <bean id="transactionManager" class="org.springframework.jdbc.datasource.DataSourceTransactionManager">
        <property name="dataSource" ref="dataSource"/>
    </bean>

    <!--配置事务管理模板-->
    <bean id="transactionTemplate" class="org.springframework.transaction.support.TransactionTemplate">
        <!--注入平台事务管理器-->
        <property name="transactionManager" ref="transactionManager"/>
    </bean>
</beans>
java
@Service
public class AccountServiceImpl implements AccountService {
    @Autowired
    private AccountDao accountDao;

    @Autowired
    TransactionTemplate transactionTemplate;

    public void transfer(final String sourceName, final String targetName, final Double money) {
        //通过这个execute方法进行事务控制
        transactionTemplate.execute(new TransactionCallbackWithoutResult() {
            @Override
            protected void doInTransactionWithoutResult(TransactionStatus transactionStatus) {
                Account sourceAccount = accountDao.findAccountByName(sourceName);
                Account targetAccount = accountDao.findAccountByName(targetName);
                if (sourceAccount != null && targetAccount != null) {
                    if (sourceAccount.getMoney() >= money) {
                        sourceAccount.setMoney(sourceAccount.getMoney() - money);
                        targetAccount.setMoney(targetAccount.getMoney() + money);
                        accountDao.update(sourceAccount);
                        int i = 1 / 0;
                        accountDao.update(targetAccount);
                    }
                }
            }
        });
    }
}
经测试,ok。这种业务代码和事务控制代码依旧杂糅在一起,后面介绍其他的。
2.37.spring事务控制--使用声明式事务管理事务(xml)
xml
<?xml version="1.0" encoding="UTF-8"?>
<beans xmlns="http://www.springframework.org/schema/beans"
       xmlns:xsi="http://www.w3.org/2001/XMLSchema-instance"
       xmlns:context="http://www.springframework.org/schema/context"
       xmlns:tx="http://www.springframework.org/schema/tx" xmlns:aop="http://www.springframework.org/schema/aop"
       xsi:schemaLocation="http://www.springframework.org/schema/beans
       http://www.springframework.org/schema/beans/spring-beans.xsd
       http://www.springframework.org/schema/context
       http://www.springframework.org/schema/context/spring-context.xsd
       http://www.springframework.org/schema/tx
       http://www.springframework.org/schema/tx/spring-tx.xsd
       http://www.springframework.org/schema/aop http://www.springframework.org/schema/aop/spring-aop.xsd">
    <!--开启包扫描-->
    <context:component-scan base-package="com.hwl"/>
    <!--管理数据源-->
    <bean id="dataSource" class="com.mchange.v2.c3p0.ComboPooledDataSource">
        <property name="driverClass" value="com.mysql.jdbc.Driver"/>
        <property name="jdbcUrl" value="jdbc:mysql://localhost:3306/lesson"/>
        <property name="user" value="root"/>
        <property name="password" value="root"/>
    </bean>
    <!--管理JdbcTemplate-->
    <bean id="jdbcTemplate" class="org.springframework.jdbc.core.JdbcTemplate">
        <property name="dataSource" ref="dataSource"/>
    </bean>
    <!--配置平台事务管理器-->
    <bean id="transactionManager" class="org.springframework.jdbc.datasource.DataSourceTransactionManager">
        <property name="dataSource" ref="dataSource"/>
    </bean>
    <!--配置事务的增强-->
    <tx:advice id="txAdvice" transaction-manager="transactionManager">
        <tx:attributes>
            <!--
                指定给哪个方法配置事务
                name:业务方法的名称
                propagation:事务的传播行为
            -->
            <tx:method name="transfer" propagation="REQUIRED"/>
        </tx:attributes>
    </tx:advice>
    <!--配置aop-->
    <aop:config>
        <!--配置切点-->
        <aop:pointcut id="p1" expression="execution(* com.hwl.service.impl.AccountServiceImpl.transfer(..))"/>
        <!--配置代理对象 进行事务增强-->
        <aop:advisor advice-ref="txAdvice" pointcut-ref="p1"/>
    </aop:config>
</beans>
java
@Service
public class AccountServiceImpl implements AccountService {
    @Autowired
    private AccountDao accountDao;

    public void transfer(final String sourceName, final String targetName, final Double money) {
        Account sourceAccount = accountDao.findAccountByName(sourceName);
        Account targetAccount = accountDao.findAccountByName(targetName);
        if (sourceAccount != null && targetAccount != null) {
            if (sourceAccount.getMoney() >= money) {
                sourceAccount.setMoney(sourceAccount.getMoney() - money);
                targetAccount.setMoney(targetAccount.getMoney() + money);
                accountDao.update(sourceAccount);
//                int i = 1 / 0;
                accountDao.update(targetAccount);
            }
        }
    }
}
其他的不变,测试ok
2.38.spring事务控制--使用注解式进行事务控制
xml
<?xml version="1.0" encoding="UTF-8"?>
<beans xmlns="http://www.springframework.org/schema/beans"
       xmlns:xsi="http://www.w3.org/2001/XMLSchema-instance"
       xmlns:context="http://www.springframework.org/schema/context"
       xmlns:tx="http://www.springframework.org/schema/tx" xmlns:aop="http://www.springframework.org/schema/aop"
       xsi:schemaLocation="http://www.springframework.org/schema/beans
       http://www.springframework.org/schema/beans/spring-beans.xsd
       http://www.springframework.org/schema/context
       http://www.springframework.org/schema/context/spring-context.xsd
       http://www.springframework.org/schema/tx
       http://www.springframework.org/schema/tx/spring-tx.xsd
       http://www.springframework.org/schema/aop http://www.springframework.org/schema/aop/spring-aop.xsd">
    <!--开启包扫描-->
    <context:component-scan base-package="com.hwl"/>
    <!--管理数据源-->
    <bean id="dataSource" class="com.mchange.v2.c3p0.ComboPooledDataSource">
        <property name="driverClass" value="com.mysql.jdbc.Driver"/>
        <property name="jdbcUrl" value="jdbc:mysql://localhost:3306/lesson"/>
        <property name="user" value="root"/>
        <property name="password" value="root"/>
    </bean>
    <!--管理JdbcTemplate-->
    <bean id="jdbcTemplate" class="org.springframework.jdbc.core.JdbcTemplate">
        <property name="dataSource" ref="dataSource"/>
    </bean>
    <!--配置平台事务管理器-->
    <bean id="transactionManager" class="org.springframework.jdbc.datasource.DataSourceTransactionManager">
        <property name="dataSource" ref="dataSource"/>
    </bean>
    <!--就用这一句,开启注解对于事务的支持-->
    <tx:annotation-driven transaction-manager="transactionManager"/>
</beans>
java
/**
 * @Transactional 注解既可以放在业务类上面 也可以放在方法上面
 * 如果放在业务类上面,意味着当前业务类中的所有方法都会被事务控制,并且应用的都是同一种事务隔离级别和事务传播行为
 * 如果放在业务方法上面,意味着我们可以对指定的业务方法进行事务控制,并且对不同的业务方法设置不同的事务隔离级别和传播行为
 */
@Service
@Transactional(isolation = Isolation.REPEATABLE_READ, propagation = Propagation.REQUIRED)
public class AccountServiceImpl implements AccountService {
    @Autowired
    private AccountDao accountDao;

    public void transfer(final String sourceName, final String targetName, final Double money) {
        Account sourceAccount = accountDao.findAccountByName(sourceName);
        Account targetAccount = accountDao.findAccountByName(targetName);
        if (sourceAccount != null && targetAccount != null) {
            if (sourceAccount.getMoney() >= money) {
                sourceAccount.setMoney(sourceAccount.getMoney() - money);
                targetAccount.setMoney(targetAccount.getMoney() + money);
                accountDao.update(sourceAccount);
                int i = 1 / 0;
                accountDao.update(targetAccount);
            }
        }
    }
}
经测试,ok。
2.39.spring5新特性--整合日志框架
新功能的基本概述
Spring Framework5.0的最大特点之一是响应式编程(Reactive Programming)。响应式编程核心功能和对响应式 endpoints 的支持可通过 Spring Framework5.0 中获得。重要变动如下列表所示:
-
常规升级
- 对 JDK9 运行时兼容性
- 在 Spring Framework 代码中使用 JDK8 特性
- 响应式编程
- 函数式 Web 框架
- Jigsaw 的 Java 模块化
- 对 Kotlin 支持
- 舍弃的特性
-
基于 java8,兼容 java9
整个 Spring5 框架的代码基于 java8,运行时兼容 jdk9,许多不建议使用的类和方法在代码库中删除。
使用的一些 java8 特性如下:
- 核心Spring接口中的 java 8 static 方法
- 基于 java 8 反射增强的内部代码改进
- 在框架代码中使用函数式编程------lambda表达式和stream流
-
支持响应式编程
响应式编程是Spring Framework 5.0 最重要的功能之一。
微服务通常基于事件通信的架构构建。应用程序被设计为事件(或消息)做出反应。
响应式编程提供了一种可选的编程风格,专注于构建应对事件的应用程序。
虽然java 8 没有内置的响应式编程支持,但有一些框架提供了对响应式编程的支持:
Reactive Streams:尝试定义与语言无关的响应性API
Reactor:Spring Pivotal 团队提供的响应式编程的 java 实现
Spring WebFlux:启用基于响应式编程的 Web 应用程序的开发。提供类似于Spring MVC 的编程模型
-
函数式Web框架
除了响应式特性之外,Spring 5 还提供了一个函数式 Web 框架。函数式 Web 框架提供了使用函数式编程风格来定义endpoints 的功能。
下面介绍本节内容
整合日志框架
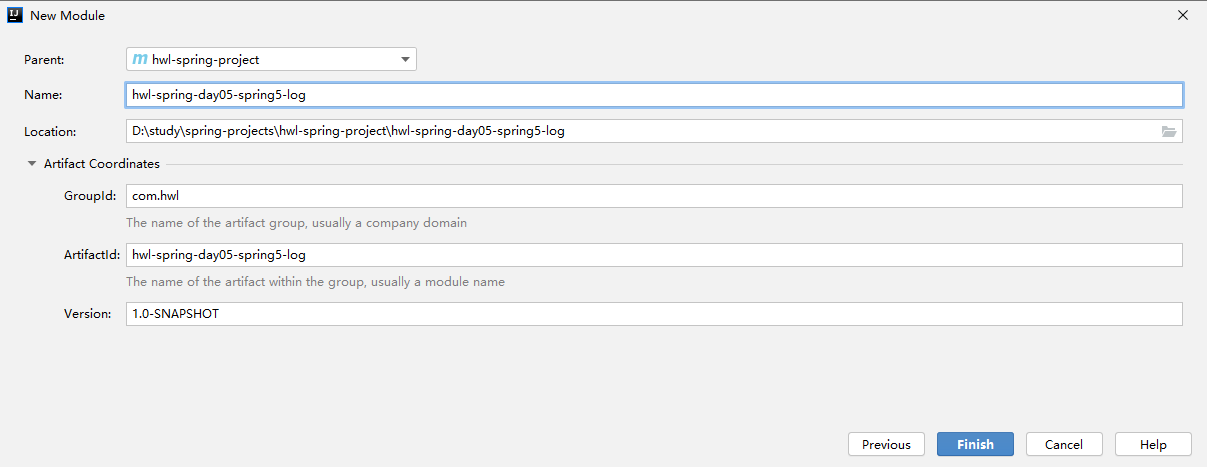
首先还是引入依赖:
xml
<dependencies>
    <dependency>
        <groupId>org.springframework</groupId>
        <artifactId>spring-context</artifactId>
        <version>5.2.0.RELEASE</version>
    </dependency>
    <!--日志依赖-->
    <dependency>
        <groupId>org.apache.logging.log4j</groupId>
        <artifactId>log4j-api</artifactId>
        <version>2.11.2</version>
    </dependency>
    <dependency>
        <groupId>org.apache.logging.log4j</groupId>
        <artifactId>log4j-core</artifactId>
        <version>2.11.2</version>
    </dependency>
    <dependency>
        <groupId>org.apache.logging.log4j</groupId>
        <artifactId>log4j-slf4j-impl</artifactId>
        <version>2.11.2</version>
    </dependency>
    <dependency>
        <groupId>org.slf4j</groupId>
        <artifactId>slf4j-api</artifactId>
        <version>1.7.30</version>
    </dependency>
    <dependency>
        <groupId>junit</groupId>
        <artifactId>junit</artifactId>
        <version>4.13</version>
        <scope>test</scope>
    </dependency>
</dependencies>
log4j2.xml(必须为这个名字):
xml
<?xml version="1.0" encoding="UTF-8" ?>
<!--日志级别以及优先级排序: OFF> FATAL> ERROR> WARN> INFO> DEBUG> TRACE> ALL-->
<!--Configuration后面的 status用于设置 log4j2自身内部的信息输出,可以不设置, 当设置成trace时,可以看到log4j2内部各种详细输出-->
<configuration status="DEBUG">
    <!--先定义所有的 appender-->
    <appenders>
        <!--输出日志信息到控制台-->
        <console name="Console" target="SYSTEM_OUT">
            <!--控制日志输出的格式-->
            <PatternLayout pattern="%d{yyyy-MM-dd HH:mm:ss.SSS} [%t] %-5level %logger{36} - %msg%n"/>
        </console>
    </appenders>
    <!--然后定义 logger,只有定义 logger并引入的 appender,appender才会生效-->
    <!--root:用于指定项目的根日志,如果没有单独指定 Logger,则会使用 root作为默认的日志输出-->
    <loggers>
        <root level="info">
            <appender-ref ref="Console"/>
        </root>
    </loggers>
</configuration>
java
public class TestLog {
    //注意要引入的是slf4j的
    Logger logger = LoggerFactory.getLogger(TestLog.class);

    @Test
    public void test01() {
        logger.info("hello world");
    }
}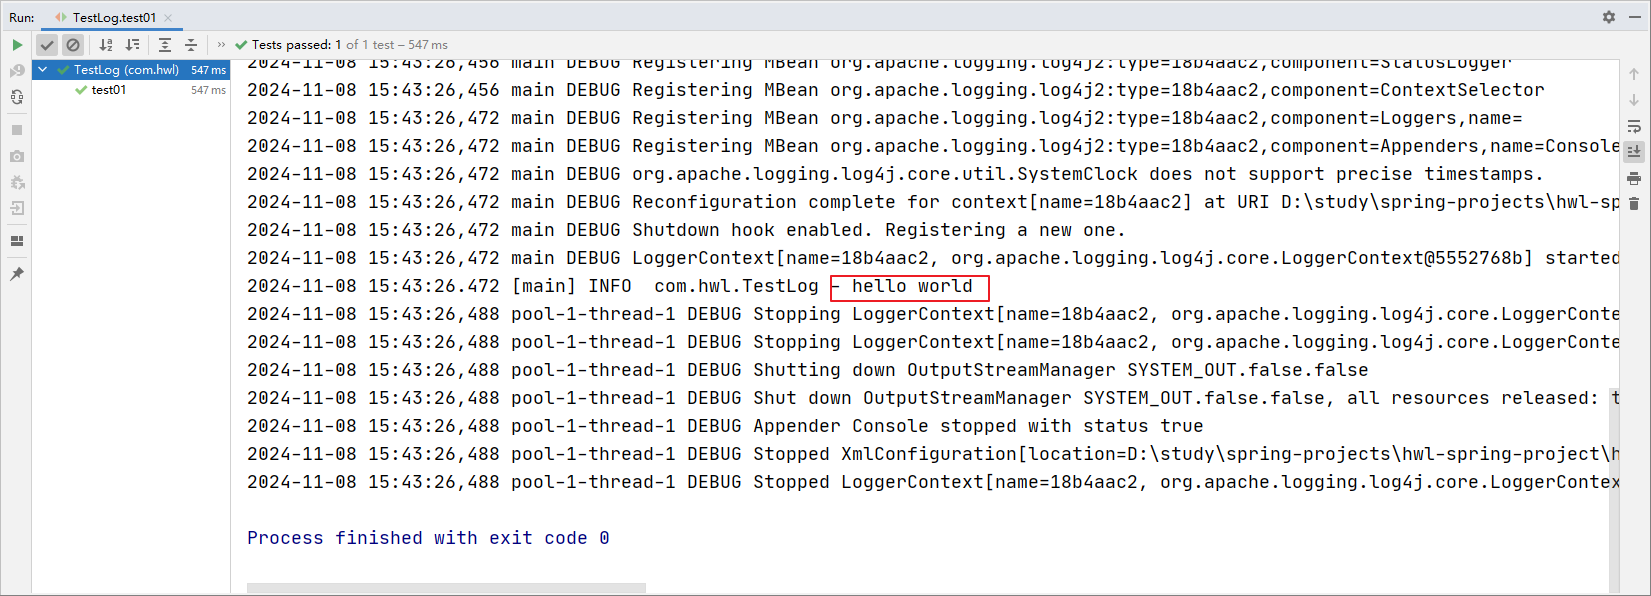
若把log4j2.xml 的 configuration的 status改为"DEBUG":
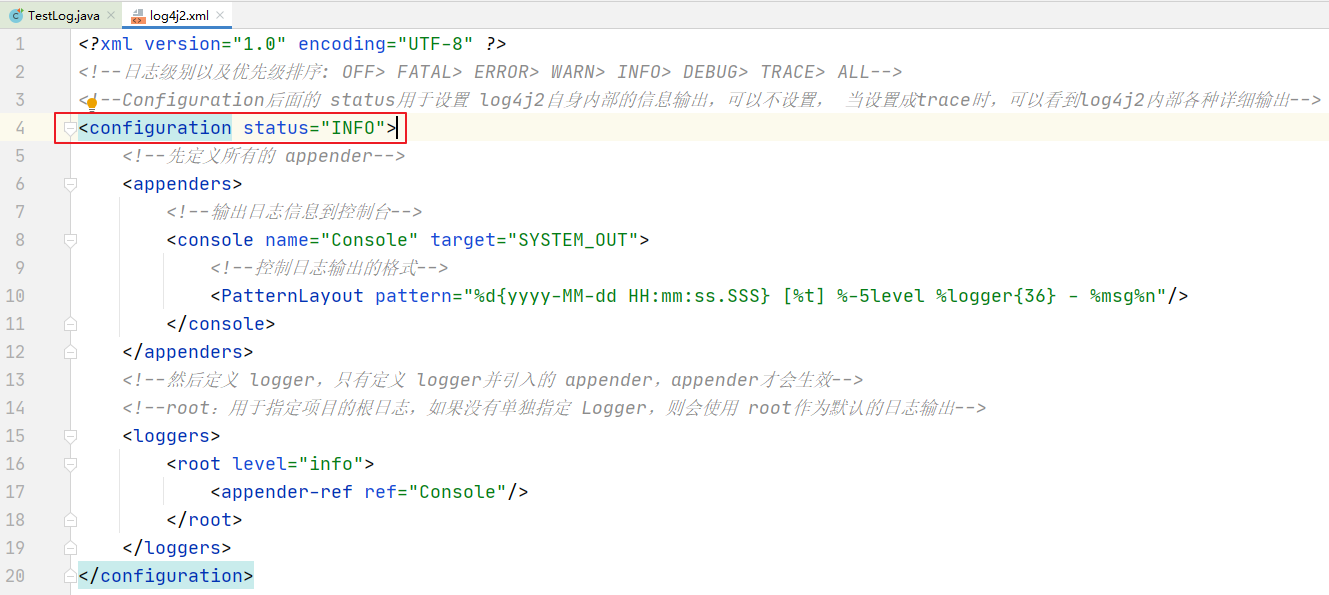

2.40.spring5新特性--@Nullable注解和函数式风格容器的支持
@Nullable注解
@Nullable注解可以使用在方法上面,属性上面,参数上面,表示方法返回可以为空,属性值可以为空,参数值可以为空
-
注解用在方法上面,方法返回值可以为空
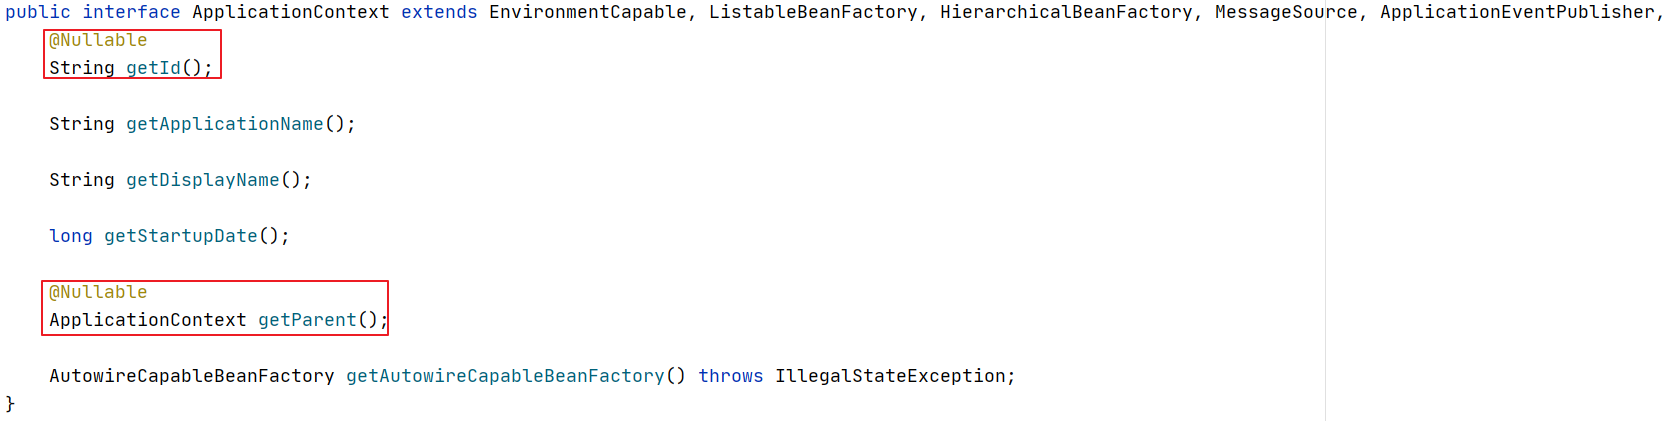
-
注解用在方法参数上面,方法参数可以为空
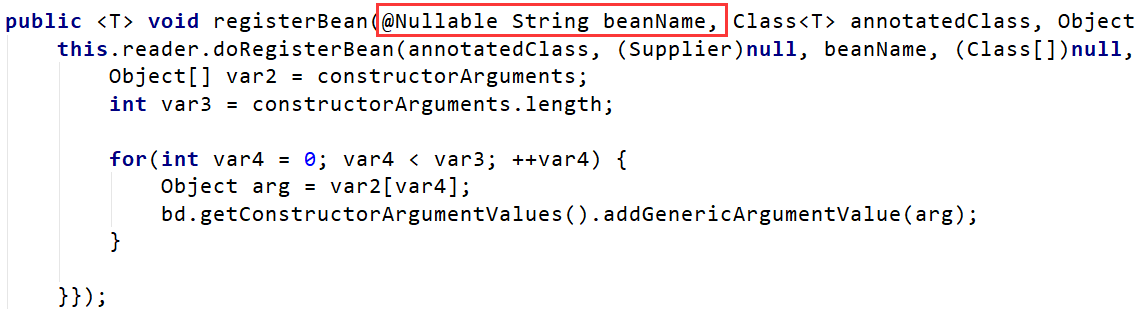
-
注解用在属性上面,属性值可以为空

spring5 核心容器支持函数式风格 GernericApplicationContext
函数式风格创建对象,交给 spring 进行管理
java
@Test
public void testGenericApplicationContext() {
    //1. 创建GenericApplicationContext核心对象
    GenericApplicationContext context = new GenericApplicationContext();
    //2. 刷新一下容器,必须要
    context.refresh();
    //3. 容器注册bean的方法,来注册bean到IOC容器
    context.registerBean("account", Account.class, () -> new Account(1002, "kobe", 500.0));
    //4. 获取容器中注册的bean
    Account account = (Account) context.getBean("account");
    System.out.println(account);
}
2.41.spring5新特性--spring整合junit5
Junit5的框架主要有三个部分组成分别是:Junit Platform + Junit Jupiter + Junit Vintage3
- Junit Platform
其主要作用是在 JVM 上启动测试框架。它定义了一个抽象的 TestEngine API 来定义运行在平台上的测试框架;也就是说其他的自动化测试引擎或开发人员⾃⼰定制的引擎都可以接入 Junit 实现对接和执行。同时还支持通过命令行、Gradle 和 Maven 来运行平台(这对于我们做自动化测试至关重要) - Junit Jupiter
这是 Junit5 的核心,可以看作是承载 Junit4 原有功能的演进,包含了 JUnit 5 最新的编程模型和扩展机制;很多丰富的新特性使 JUnit ⾃动化测试更加方便、功能更加丰富和强大。也是测试需要重点学习的地方;Jupiter 本身也是⼀一个基于 Junit Platform 的引擎实现,对 JUnit 5 而言,JUnitJupiter API 只是另一个 API! - Junit Vintage3
Junit 发展了10数年,Junit 3 和 Junit 4 都积累了大量的⽤用户,作为新一代框 架,这个模块是对JUnit3,JUnit4 版本兼容的测试引擎,使旧版本 junit 的⾃动化测试脚本也可以顺畅运行在 Junit5下,它也可以看作是基于 Junit Platform 实现的引擎范例。
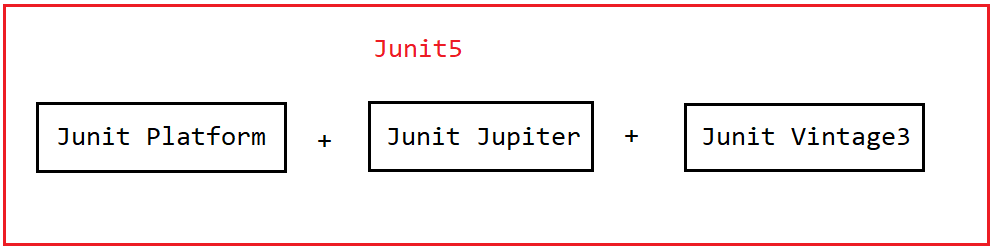
先导入相关依赖:
xml
<!--Junit5-->
<dependency>
    <groupId>org.junit.platform</groupId>
    <artifactId>junit-platform-runner</artifactId>
    <version>1.6.2</version>
</dependency>
<dependency>
    <groupId>org.junit.jupiter</groupId>
    <artifactId>junit-jupiter-api</artifactId>
    <version>5.6.2</version>
    <scope>test</scope>
</dependency>
<dependency>
    <groupId>org.junit.platform</groupId>
    <artifactId>junit-platform-launcher</artifactId>
    <version>1.6.2</version>
    <scope>test</scope>
</dependency>
<dependency>
    <groupId>org.junit.jupiter</groupId>
    <artifactId>junit-jupiter-engine</artifactId>
    <version>5.6.2</version>
    <scope>test</scope>
</dependency>
<dependency>
    <groupId>org.junit.vintage</groupId>
    <artifactId>junit-vintage-engine</artifactId>
    <version>5.6.2</version>
    <scope>test</scope>
</dependency>
<dependency>
    <groupId>org.junit.jupiter</groupId>
    <artifactId>junit-jupiter-params</artifactId>
    <version>5.6.2</version>
    <scope>test</scope>
</dependency>
<dependency>
    <groupId>org.springframework</groupId>
    <artifactId>spring-test</artifactId>
    <version>5.2.0.RELEASE</version>
    <scope>provided</scope>
</dependency>
测试类:
java
//@ExtendWith(SpringExtension.class)
//@ContextConfiguration("classpath:applicationContext.xml")
@SpringJUnitConfig(locations = {"classpath:applicationContext.xml"})  //等价于上面这两个一起用 @ExtendWith + @ContextConfiguration
public class TestJunit5 {
    @Autowired
    AccountService accountService;

    @Test  //@Test 注解 导包一定要是org.junit.jupiter.api.Test;
    public void test01() {
        accountService.transfer("eric", "james", 500.0);
    }
}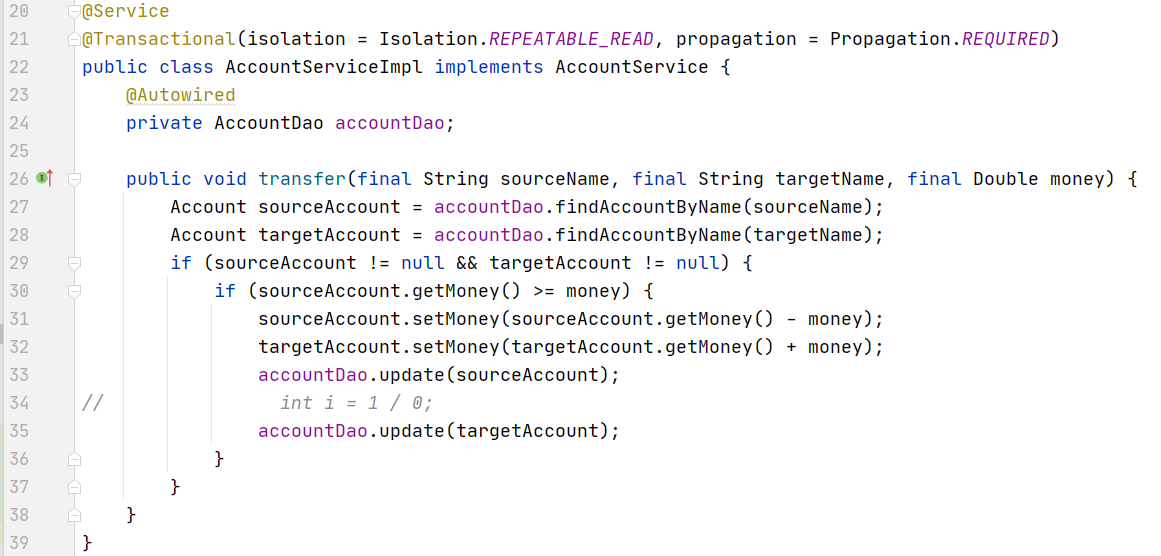
执行前:
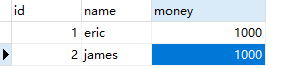
执行后:

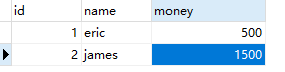
2.42.基于Java实现响应式编程(了解)
Spring Web FLux
Spring Web FLux是 Spring5 添加新的模块,用于web开发的,功能和SpringMVC类似,Webflux使用当前一种比较流行响应式编程出现的框架。
使用传统web框架比如SpringMVC,这些基于Servlet容器,Webflux是一种异步非阻塞的框架,异步非阻塞的框架在Servlet3.1后才支持,核心是基于Reactor的相关API实现的
什么是异步非阻塞?
- 异步和同步、非阻塞和阻塞 两者都是针对对象不一样
- 异步和同步针对调用者 ,调用者发送请求,如果等着对方回应之后才去做其他事情就是同步 ,如果发送请求之后不等着对方回应就去做其他事情就是异步
- 阻塞和非阻塞针对被调用者 ,被调用者受到请求之后,做完请求任务之后才给出反馈就是阻塞 ,受到请求之后马上给出反馈然后再去做事情就是非阻塞
Webflux特点
- 非阻塞式:在有限资源下,提高系统吞吐量和伸缩性,以Reactor为基础实现响应式编程
- 函数式编程:Spring5框架基于java8,Webflux使用java7函数式编程方式实现路由请求
与springmvc比较:
- 两个框架都可以采用注解方式,都运行在Tomcat等容器中
- SpringMVC 采用命令式编程,WebFlux 采用异步响应式编程
响应式编程--java实现
什么是响应式编程?
响应式编程是一种面向数据流和变化传播的编程范式。这意味着可以在编程语言中很方便地表达静态或动态的数据流。而相关的计算模型会自动将变化的值通过数据流进行传播。
例如,在命令式编程环境中,a=b+c表示将表达式的结果赋给a,而之后改变b或c的值不会影响a。但在响应式编程中,a的值会随着b或c的更新而更新。
我们通过Observer接口和Observable类来实现响应式编程。
在实现响应式编程之前,我们首先来认识Observer接口和Observable类。在Java程序中,类Observable和接口Observer 的最大功能就是实现观察者模式。在Java应用中,需要被观察的类必须继承于Observable类 。每个观察者都需要实现Observer接口,其定义如下:
java
public interface Observer{
    //第一个参数表示被观察者示例,第二参数表示修改的内容
    void update(Observable o, Object arg);
}
举例:
例如现在房地产调控比较严格,很多购房者都在关注着房子的价格变化,每当房子价格变化时,所有的购房者都可以观察得到。实际上以上的购房者都属于观察者,他们都在关注着房子的价格。这个观察变化的过程就可以成为观察者模式。
java
/**
 * 被观察的对象,意味着House可以被观察
 */
class House extends Observable {
    private float price;

    public House(float price) {
        this.price = price;
    }

    public House() {
    }

    public float getPrice() {
        return price;
    }

    public void setPrice(float price) {
        //价格发生变化,需要引起观察者的注意
        super.setChanged();  //设置变化点
        super.notifyObservers(price);  //通知观察者  价格发生了变化
        this.price = price;
    }

    @Override
    public String toString() {
        return "房价为" + this.price;
    }
}

//设置House的观察者
class HousePriceObserver implements Observer{
    String name;

    public HousePriceObserver() {
    }

    public HousePriceObserver(String name) {
        this.name = name;
    }

    public void update(Observable o, Object arg) {
        if (arg instanceof Float) {
            System.out.println(this.name + "观察到价格发生变化,价格是:" + arg);
        }
    }
}
java
public class TestObserver {
    public static void main(String[] args) {
        //创建被观察的对象
        House house = new House(10000f);
        //创建观察者对象A
        HousePriceObserver hpo1 = new HousePriceObserver("购房者A");
        //创建观察者对象B
        HousePriceObserver hpo2 = new HousePriceObserver("购房者B");
        //创建观察者对象C
        HousePriceObserver hpo3 = new HousePriceObserver("购房者C");
        house.addObserver(hpo1);
        house.addObserver(hpo2);
        house.addObserver(hpo3);
        System.out.println(house);
        //修改房子价格
        house.setPrice(40000f);
        System.out.println(house);
    }
}
现在我们基于Observable类来实现响应式编程:
java
public class ObserverDemo extends Observable {
    public static void main(String[] args) {
        //创建被观察者对象
        ObserverDemo observer = new ObserverDemo();
        //给被观察者对象添加观察对象
        observer.addObserver((o, arg) -> {
            System.out.println("数据流发生变化");
        });
        observer.addObserver((o, arg) -> {
            System.out.println("收到了被观察者的通知...");
        });
        observer.setChanged();
        observer.notifyObservers();
    }
}
2.43.基于Reacotr实现响应式编程(了解)
响应式编程操作中,Reactor是满足Reactive规范框架。
Reactor有两个核心类,Mono和Flux,这两个类实现接口Publisher,提供丰富操作符。Flux对象实现发布者,返回N个元素;Mono实现发布者,返回0或者1个元素。
Flux和Mono都是数据流的发布者,使用Flux和Mono都可以发出三种数据信号:元素值、错误信号、完成信号,错误信号和完成信号都代表终止信号,终止信号用于告诉订阅者数据流结束了,错误信号终止数据流同时把错误信息传递给订阅者。
演示Flux和Mono:
xml
<dependencies>
    <dependency>
        <groupId>io.projectreactor</groupId>
        <artifactId>reactor-core</artifactId>
        <version>3.1.5.RELEASE</version>
    </dependency>
</dependencies>
java
public class TestReactor {
    public static void main(String[] args) {
        //声明数据流 just方法声明数据流  subscribe  订阅数据流
        Flux.just(1, 2, 3, 4).subscribe(System.out::println);
        Mono.just(1).subscribe(System.out::println);
    }
}
三种信号的特点:
- 错误信号和完成信号都是终止信号,不能共存
- 如果没有发送任何元素值,而是直接发送错误或者完成信号,表示空数据流
- 如果没有错误信号,没有完成信号,表示是无限数据流
调用just或者其它方法只是声明数据流,数据流并没有发出,只有进行订阅(subscribe)之后才会触发数据流,不订阅什么都不会发生
数据流发送之后,有的时候需要经过一道道操作符对数据流进行加工以后,才能订阅到加工之后的数据流。
那么操作符分为哪几种?
第一:map元素映射为新元素
比如在上图中,绿色圆圈的数值代表1,2,3,经过map操作符映射后,映射的规则是平方,最后变成蓝色方块1,4,9。
第二:flatMap元素映射为流
把每个元素转换为流,把转换之后多个流合并为大的流。 大的流合并顺序是不确定的。
2.44.webflux的实现--基于注解编程模型(了解)
2.45.webflux的实现--基于函数式编程模型(了解)
2.46.总结
抓住3个重点:
- ioc
- aop
- spring对事务的支持
- 学有余力的话,对于spring5新特性中的响应式编程有一定的了解