目录
[1~>初识 Git :为什么需要版本控制?](#1~>初识 Git :为什么需要版本控制?)
[1.1 一个令人头疼的场景](#1.1 一个令人头疼的场景)
[1.2 版本控制器:代码的"时光机"](#1.2 版本控制器:代码的"时光机")
[1.3 重要认知:Git 能跟踪什么?](#1.3 重要认知:Git 能跟踪什么?)
[2~>安装 Git](#2~>安装 Git)
[2.1 CentOS / RHEL 系列](#2.1 CentOS / RHEL 系列)
[2.2 Ubuntu / Debian 系列](#2.2 Ubuntu / Debian 系列)
[3~> Git 基本操作------创建 Git 本地仓库](#3~> Git 基本操作——创建 Git 本地仓库)
[3.1 什么是仓库?](#3.1 什么是仓库?)
[3.2 创建本地仓库](#3.2 创建本地仓库)
[3.3 .git 目录揭秘](#3.3 .git 目录揭秘)
[4~>Git基本操作------配置 Git 本地仓库(git config)](#4~>Git基本操作——配置 Git 本地仓库(git config))
[4.1 为什么需要配置?](#4.1 为什么需要配置?)
[4.2 设置用户名和邮箱](#4.2 设置用户名和邮箱)
[4.3 常用配置命令速查](#4.3 常用配置命令速查)
5~>Git基本操作------核心概念:工作区,暂存区,版本库
[5.1 三个区域的定义](#5.1 三个区域的定义)
[5.2 为什么不能直接修改 .git?](#5.2 为什么不能直接修改 .git?)
[5.3 数据流转机制](#5.3 数据流转机制)
[5.4 深入原理:对象库(Objects)](#5.4 深入原理:对象库(Objects))
[6.1 第一步:git add(添加到暂存区)](#6.1 第一步:git add(添加到暂存区))
[6.2 第二步:git commit(提交到版本库)](#6.2 第二步:git commit(提交到版本库))
[6.3 完整示例](#6.3 完整示例)
[6.4 批量添加与单次提交](#6.4 批量添加与单次提交)
[6.5 查看提交历史:git log](#6.5 查看提交历史:git log)
[7.1 提交后的 .git 目录结构](#7.1 提交后的 .git 目录结构)
[7.2 HEAD 与 master 的关系](#7.2 HEAD 与 master 的关系)
[7.3 探索对象库:git cat-file](#7.3 探索对象库:git cat-file)
[7.4 核心文件速查表](#7.4 核心文件速查表)
[7.5 学习建议](#7.5 学习建议)
[8.1 场景演示](#8.1 场景演示)
[8.2 原因分析](#8.2 原因分析)
[8.3 补交 test5](#8.3 补交 test5)
[8.4 关键结论](#8.4 关键结论)
[9~>Git基本操作------修改文件(git status & git diff)](#9~>Git基本操作——修改文件(git status & git diff))
[9.1 Git 管理的是"修改",而非"文件"](#9.1 Git 管理的是"修改",而非"文件")
[9.2 修改 ReadMe 文件](#9.2 修改 ReadMe 文件)
[9.3 查看仓库状态:git status](#9.3 查看仓库状态:git status)
[9.4 查看具体修改:git diff](#9.4 查看具体修改:git diff)
[9.5 提交修改](#9.5 提交修改)
[9.6 关键要点总结](#9.6 关键要点总结)
[10.1 为什么需要版本回退?](#10.1 为什么需要版本回退?)
[10.2 git reset 命令详解](#10.2 git reset 命令详解)
[HEAD 指针说明](#HEAD 指针说明)
[10.3 实战演示:--hard 模式](#10.3 实战演示:--hard 模式)
[10.4 后悔了怎么办?找回"丢失"的版本](#10.4 后悔了怎么办?找回"丢失"的版本)
[方案二:git reflog 救命神器](#方案二:git reflog 救命神器)
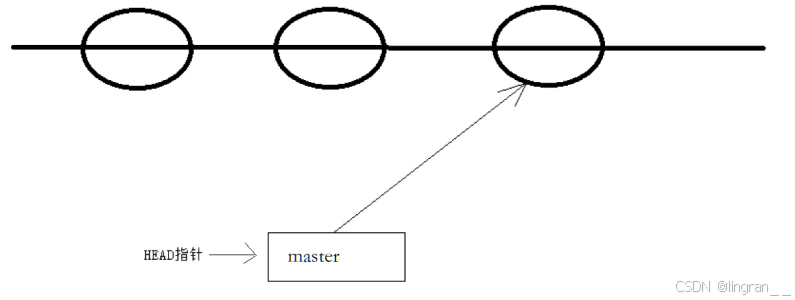
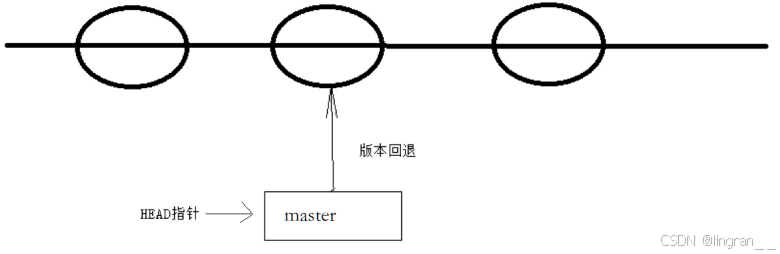
[10.5 回退的本质原理](#10.5 回退的本质原理)
[10.6 关键要点总结](#10.6 关键要点总结)
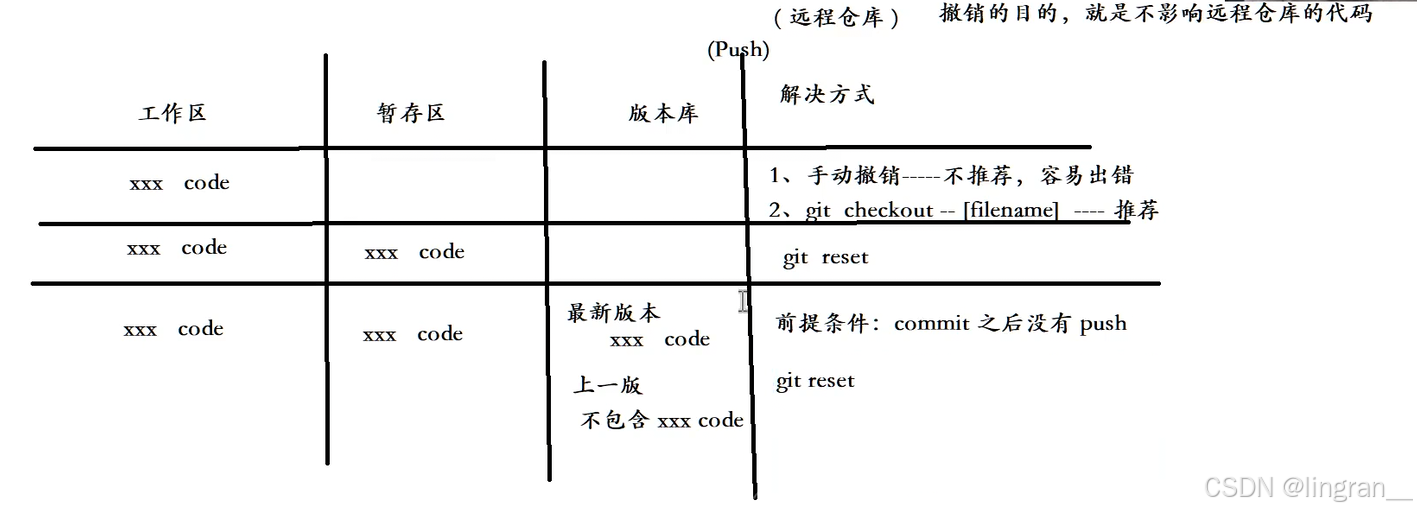
[11.1 情况一:工作区已修改,但未 add](#11.1 情况一:工作区已修改,但未 add)
[11.2 情况二:已 add,但未 commit](#11.2 情况二:已 add,但未 commit)
[11.3 情况三:已 add,且已 commit](#11.3 情况三:已 add,且已 commit)
[11.4 三种情况速查表](#11.4 三种情况速查表)
[11.5 关键提醒](#11.5 关键提醒)
[12.1 方式一:先 rm,再 add,最后 commit](#12.1 方式一:先 rm,再 add,最后 commit)
[12.2 方式二:使用 git rm(推荐)](#12.2 方式二:使用 git rm(推荐))
[12.3 两种方式对比](#12.3 两种方式对比)
[12.4 关键要点](#12.4 关键要点)
[12.5 误删恢复](#12.5 误删恢复)
引言:
这是《Git 完全指南》系列的第一篇。
在软件开发的世界里,代码的演变如同生命的成长------从第一行 "Hello World" 到复杂的业务系统,每一次修改都承载着开发者的思考与尝试。但成长的路上难免有弯路:一个错误的重构、一段冗余的逻辑、甚至整夜的灵感爆发后发现方向全错......
如果没有版本控制,这些"试错"的成本将是毁灭性的。你可能经历过:
- 手动复制
项目-最终版-v8-真的不改了.zip的绝望 - 多人协作时覆盖他人代码的冲突噩梦
- 线上故障后找不到稳定版本回退的手忙脚乱
Git 的诞生改变了这一切。
作为目前全球最主流的分布式版本控制系统,Git 不仅是 Linux 内核开发的基石工具,更已成为每一位开发者的必备技能。它不仅能精准追踪每一行代码的变更历史,让你自由穿梭于任意版本之间;更能支撑千人规模的协作开发,让代码的流动如行云流水。
本系列规划:
| 篇章 | 内容 | 状态 |
|---|---|---|
| (一)本地仓库基础操作 | 安装配置、核心概念、文件操作、版本回退 | 本文 |
| (二)分支管理 | 创建、合并、冲突解决、分支策略 | 待发布 |
| (三)远程操作与团队协作 | 远程仓库、推送拉取、多人工作流 | 待发布 |
| (四)标签管理与版本发布 | 标签操作、版本控制、发布流程 | 待发布 |
| (五)企业级开发模型 | Git Flow、GitHub Flow、CI/CD 集成 | 待发布 |
本文作为系列开篇,将从零开始搭建 Git 本地环境,深入理解 工作区、暂存区、版本库 的三层架构,掌握文件添加、修改、回退、撤销、删除等核心操作。我们不会停留在"背命令"的层面,而是透过 .git 目录的底层机制,真正理解 Git 的设计哲学。
适合人群:希望系统学习 Git 的开发者、准备参与团队协作的新人
环境要求:Linux(CentOS/Ubuntu)或兼容的 Unix-like 系统
1~>初识 Git :为什么需要版本控制?
1.1 一个令人头疼的场景
在日常工作或学习中,你是否经历过这样的困扰?
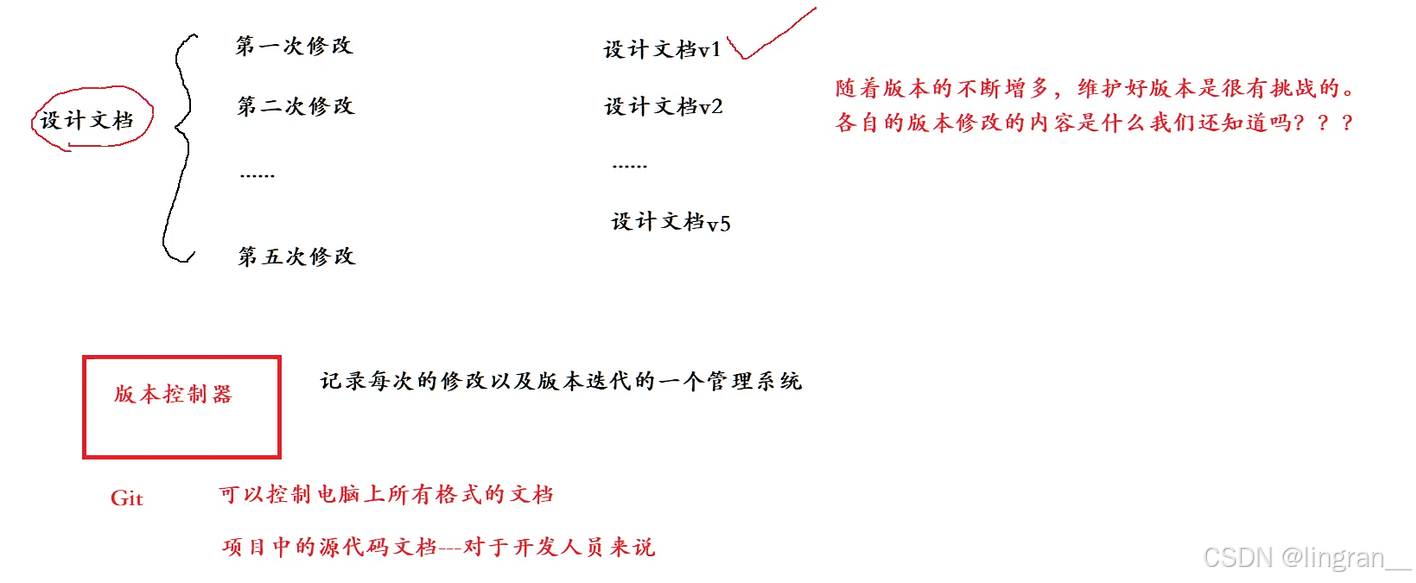
编写文档时,为了防止内容丢失或修改失误后无法恢复,我们不得不手动复制出一个个"备份":
复制
报告-v1.docx
报告-v2.docx
报告-v3.docx
报告-确定版.docx
报告-最终版.docx
报告-最终版(真的).docx
报告-究极进化版.docx
报告-再改我是狗.docx
...每个版本都承载着不同的修改内容,但最终只需要交付一份。问题在于:随着版本数量爆炸式增长,你还能记得每个版本究竟改了什么吗?
代码开发更是如此。 一个项目动辄成百上千个文件,多人协作时冲突频发,没有版本控制简直就是灾难。
1.2 版本控制器:代码的"时光机"
为了优雅地管理这些不同版本的文件,版本控制系统(Version Control System, VCS) 应运而生。
它能帮你:
- 追溯历史:查看文件从创建到现在的每一次改动
- 自由穿梭:随时回退到任意历史版本
- 协同作战:多人同时开发,自动合并修改
- 版本标记:给重要节点打标签(如 v1.0、v2.0)
目前业界最主流的版本控制系统就是 Git。它不仅能管理代码,还能控制任意格式的文件------文档、表格、设计稿,甚至是二进制资源。
Git 小贴士:Git 由 Linux 之父 Linus Torvalds 于 2005 年开发,最初用于管理 Linux 内核源码,如今已成为全球开发者的标配工具。
1.3 重要认知:Git 能跟踪什么?
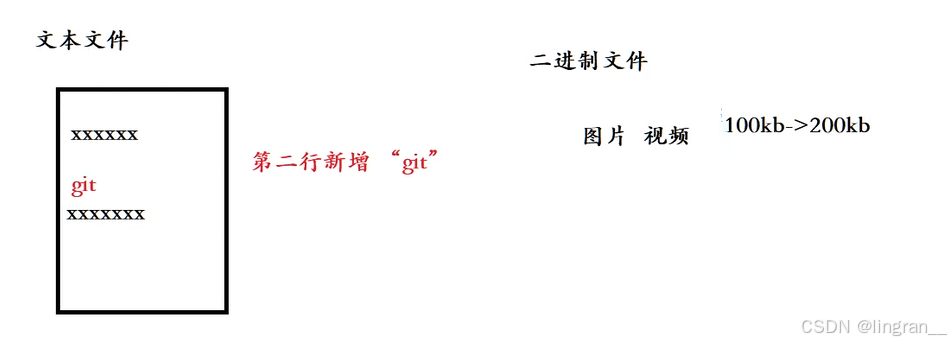
需要明确的是:Git 最擅长跟踪文本文件的变更。
对于 .txt、.md、.py、.java 等文本文件,Git 能精确告诉你:
- 第 5 行添加了单词
"Linux" - 第 8 行删除了单词
"Windows" - 哪个函数被重构了,哪段逻辑被优化了
而对于图片、视频、音频等二进制文件 ,Git 只能记录文件大小的变化(如从 100KB 变为 120KB),但无法知晓具体内容的变化。这是所有版本控制系统的共性限制。
2~>安装 Git
Git 最初在 Linux 平台开发,现已完美支持 Linux、macOS 和 Windows。
2.1 CentOS / RHEL 系列
cpp
[root@VM-0-2-centos ~]# sudo yum -y install git可以用--version看安装的git配置
cpp
[root@VM-0-2-centos ~]# git --version
git version 1.8.3.1
2.2 Ubuntu / Debian 系列
安装指令如下
cpp
sudo apt-get -y install git3~> Git 基本操作------创建 Git 本地仓库
3.1 什么是仓库?
仓库(Repository) 是 Git 进行版本控制的目录。想要对文件进行版本管理,首先得创建一个仓库。
3.2 创建本地仓库
创建一个Git本地仓库对应的命令为 git init ,注意命令要在文件目录下执行,例如:
cpp
[root@VM-0-2-centos gitcode]# ls -la
total 8
drwxr-xr-x  2 root root 4096 Sep  1 08:53 .
dr-xr-x---. 8 root root 4096 Sep  1 08:53 ..
[root@VM-0-2-centos gitcode]# git init
Initialized empty Git repository in /root/gitcode/.git/
[root@VM-0-2-centos gitcode]# ls -la
total 12
drwxr-xr-x  3 root root 4096 Sep  1 08:54 .
dr-xr-x---. 8 root root 4096 Sep  1 08:53 ..
drwxr-xr-x  7 root root 4096 Sep  1 08:54 .git
3.3 .git 目录揭秘
.git 是 Git 的"心脏",切勿手动修改其中的文件,否则可能导致仓库损坏
cpp
[root@VM-0-2-centos gitcode]# tree .git # git仓库内的文件不能改,改了会让仓库出问题
.git
|-- branches
|-- config
|-- description
|-- HEAD
|-- hooks
|   |-- applypatch-msg.sample
|   |-- commit-msg.sample
|   |-- post-update.sample
|   |-- pre-applypatch.sample
|   |-- pre-commit.sample
|   |-- prepare-commit-msg.sample
|   |-- pre-push.sample
|   |-- pre-rebase.sample
|   `-- update.sample
|-- info
|   `-- exclude
|-- objects
|   |-- info
|   `-- pack
`-- refs
    |-- heads
    `-- tags

9 directories, 13 files
重要提醒 :
.git目录就是本地仓库(版本库) 本身,而包含.git的父目录(如gitcode/)是工作区,两者概念不同,后面会详细讲解。
4~>Git基本操作------配置 Git 本地仓库(git config)
4.1 为什么需要配置?
创建仓库后,第一步必须配置用户信息。这很重要,因为每次提交都会记录"谁做的修改",方便团队协作时追溯责任。
4.2 设置用户名和邮箱
配置命令为:
git config命令就可以为我们的仓库设置配置项
cpp
# 全局配置(推荐,适用于本机所有仓库)
git config --global user.name "Your Name"
git config --global user.email "your.email@example.com"

# 局部配置(仅当前仓库有效,需在仓库目录内执行)
git config user.name "Project-Specific Name"
git config user.email "project@example.com"示例:
cpp
$ git config --global user.name "ling-qian_1_0"
$ git config --global user.email "3139198270@qq.com"

$ git config -l          # 查看所有配置
user.name=ling-qian_1_0
user.email=3139198270@qq.com
core.repositoryformatversion=0
core.filemode=true
core.bare=false
core.logallrefupdates=true
4.3 常用配置命令速查
| 操作 | 命令 |
|---|---|
| 查看所有配置 | git config -l |
| 查看全局配置 | git config --global -l |
| 查看某一项配置 | git config user.name |
| 删除全局配置 | git config --global --unset user.name |
| 删除局部配置 | git config --unset user.email |
📝 最佳实践 :个人电脑建议用
--global设置全局身份;公司项目如需区分,可在项目内单独设置局部配置。
5~>Git基本操作------核心概念:工作区,暂存区,版本库
理解 Git 的三层结构,是掌握 Git 的关键。
5.1 三个区域的定义
| 区域 | 说明 | 对应位置 |
|---|---|---|
| 工作区(Working Directory) | 你实际编辑文件的目录 | gitcode/ 目录(除 .git 外) |
| 暂存区(Stage / Index) | 临时存放待提交修改的区域 | .git/index 文件 |
| 版本库(Repository) | Git 存储所有版本历史的地方 | .git/ 目录 |
5.2 为什么不能直接修改 .git?
假设你在 gitcode/ 下创建了 ReadMe 文件:
cpp
[root@VM-0-2-centos gitcode]# > ReadMe
[root@VM-0-2-centos gitcode]# ls -a
.  ..  .git  ReadMe
此时 Git 还不能管理 ReadMe,因为它只是躺在工作区里,与版本库毫无关联。
你可能会想:"把 ReadMe 直接拖进 .git 目录不就行了?" 绝对不行! 手动篡改 .git 内的文件会破坏整个仓库的结构,导致 Git 无法正常工作。
正确的做法是通过 Git 命令,让文件按"规矩"进入版本控制。
5.3 数据流转机制
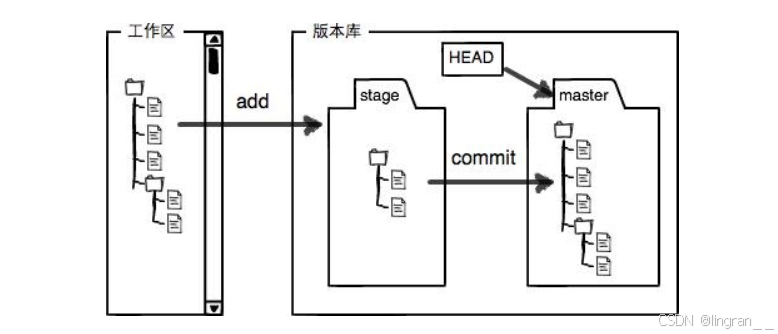
图中左侧为工作区,右侧为版本库。Git 的版本库里存放了很多内容,其中最重要的就是暂存区。
- 创建 Git 版本库时,Git 会自动创建一个唯一的
master分支,以及指向master的指针HEAD(分支和 HEAD 的概念后面再详细讲解) - 对工作区修改(或新增)的文件执行
git add命令时,暂存区目录树的文件索引会被更新 - 执行
git commit提交操作时,master分支会做相应更新,可以简单理解为暂存区的目录树被真正写入版本库中
由此可知 :通过新建或粘贴进目录的文件,并不等同于向仓库新增文件,而只是在工作区新增了文件。必须使用 git add 和 git commit 命令,才能将文件真正添加到仓库中进行管理!
5.4 深入原理:对象库(Objects)
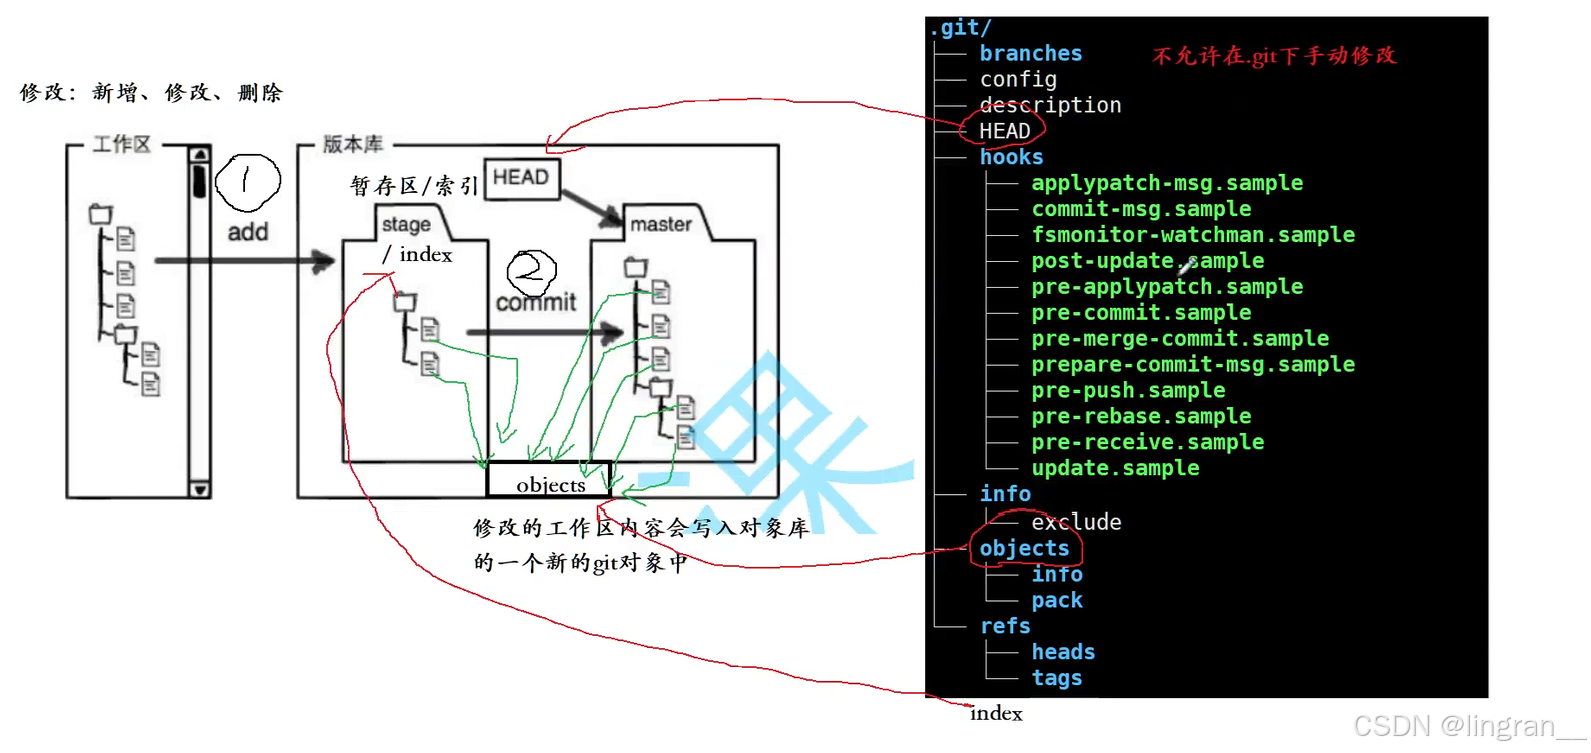
版本库中有一个核心模块------对象库(.git/objects/),它是 Git 实现版本控制的秘密武器。
- 每次
git add:Git 会将工作区的修改内容打包成一个 Git 对象(blob/tree),存入对象库 - 对象库的作用:像档案馆一样,永久保存了文件的所有历史版本
- 暂存区与分支 :暂存区和
master分支存储的不是文件本身,而是指向这些对象的轻量索引
HEAD 指针 :始终指向当前分支(默认 master)的最新提交。通过 HEAD → 分支 → 树对象 → blob 对象,Git 就能还原出任意版本的完整文件。
🎯 核心结论 :新建或粘贴到目录的文件不等于 加入仓库!必须通过
git add→git commit的完整流程,文件才真正被 Git 管理。
6~>Git基本操作------添加文件(场景一)
6.1 第一步:git add(添加到暂存区)
bash
# 添加单个文件
git add ReadMe

# 添加多个文件
git add file1.txt file2.txt

# 添加整个目录(含子目录)
git add src/

# 添加当前目录所有变更
git add .
6.2 第二步:git commit(提交到版本库)
bash
# 提交暂存区的所有内容
git commit -m "这里写提交说明,描述本次修改的内容"

# 提交暂存区的指定文件
git commit file1.txt file2.txt -m "针对性提交说明"
📝 提交信息规范 :
-m后的消息不可省略!良好的提交信息是团队协作的基石。例如:
- ✅
"fix: 修复登录页面的验证码失效问题"- ✅
"feat: 新增用户个人中心页面"- ❌
"test"(过于模糊)- ❌
"123"(毫无意义)
6.3 完整示例
bash
# 1. 创建并编辑文件
$ echo "Hello, Git!" > ReadMe

# 2. 添加到暂存区
$ git add ReadMe

# 3. 提交到版本库
$ git commit -m "feat: 初始化项目,添加 ReadMe 文件"
[master (root-commit) 58d3056] feat: 初始化项目,添加 ReadMe 文件
 1 file changed, 1 insertion(+)
create mode 100644 ReadMe输出解读:
[master (root-commit) 58d3056]:master分支的首次提交(root-commit),提交 ID 为58d30561 file changed:1 个文件被修改1 insertion(+):插入了 1 行内容
6.4 批量添加与单次提交
可以多次 add,一次性 commit:
bash
# 创建多个文件
$ touch test1 test2 test3

# 分批添加到暂存区
$ git add test1 test2
$ git add test3

# 一次性提交所有暂存内容
$ git commit -m "test: 添加三个测试文件"
[master e47c59b] test: 添加三个测试文件
 3 files changed, 0 insertions(+), 0 deletions(-)
 create mode 100644 test1
 create mode 100644 test2
 create mode 100644 test3
6.5 查看提交历史:git log
bash
# 详细历史(默认格式)
$ git log
commit e47c59b38d43f9922836291e783dd3c067d86dfd
Author: ling-qian_1_0 <3139198270@qq.com>
Date:   Tue Sep 1 11:00:06 2026 +0800

    test: 添加三个测试文件

commit 58d3056091b9805d0493ca589daa5aa83dd3ac4f
Author: ling-qian_1_0 <3139198270@qq.com>
Date:   Tue Sep 1 10:45:41 2026 +0800

feat: 初始化项目,添加 ReadMe 文件字段说明:
commit:提交的唯一标识符(Commit ID),由哈希算法生成的 40 位十六进制哈希值Author:提交者(来自user.name和user.email配置)Date:提交时间- 底部空行后:提交说明(commit message)
bash
# 简洁模式(一行显示)
$ git log --pretty=oneline
e47c59b38d43f9922836291e783dd3c067d86dfd test: 添加三个测试文件
58d3056091b9805d0493ca589daa5aa83dd3ac4f feat: 初始化项目,添加 ReadMe 文件
🔍 Commit ID:不是简单的 1、2、3 递增,而是全局唯一的哈希值。你看到的 ID 与我的肯定不同,以你自己生成的为准。
7~>Git基本操作------查看文件与仓库内部结构
提交文件后,我们来观察 .git 目录发生了哪些变化。
7.1 提交后的 .git 目录结构
bash
[root@VM-0-2-centos gitcode]# tree .git
.git
|-- branches
|-- COMMIT_EDITMSG
|-- config
|-- description
|-- HEAD
|-- hooks
|   |-- applypatch-msg.sample
|   |-- commit-msg.sample
|   |-- post-update.sample
|   |-- pre-applypatch.sample
|   |-- pre-commit.sample
|   |-- prepare-commit-msg.sample
|   |-- pre-push.sample
|   |-- pre-rebase.sample
|   `-- update.sample
|-- index                    # ← 新增:暂存区文件
|-- info
|   `-- exclude
|-- logs
|   |-- HEAD
|   `-- refs
|       `-- heads
|           `-- master
|-- objects                  # ← 新增:多个对象目录
|   |-- 0e
|   |   `-- 6b1780b73cd9220ec5073dc64b42f7ad4bd945
|   |-- 58
|   |   `-- d3056091b9805d0493ca589daa5aa83dd3ac4f
|   |-- 8d
|   |   `-- 0e41234f24b6da002d962a26c2495ea16a425f
|   |-- e4
|   |   `-- 7c59b38d43f9922836291e783dd3c067d86dfd
|   |-- e6
|   |   `-- 9de29bb2d1d6434b8b29ae775ad8c2e48c5391
|   |-- fc
|   |   `-- edb6cb43329b05e9c91f16e0ae4dc8d74e0742
|   |-- info
|   `-- pack
`-- refs
    |-- heads
    |   `-- master         # ← 新增:master 分支指针
    `-- tags

18 directories, 24 files与初始化时相比,主要变化:
| 新增/变化项 | 说明 |
|---|---|
index |
暂存区文件,记录待提交的索引 |
objects/ 下的子目录 |
存储具体的 Git 对象(commit、tree、blob) |
refs/heads/master |
master 分支指针,指向最新提交 |
logs/ |
引用日志,记录分支变动历史 |
7.2 HEAD 与 master 的关系
bash
# 查看 HEAD 文件内容
[root@VM-0-2-centos gitcode]# cat .git/HEAD
ref: refs/heads/master

# 查看 master 分支指向的提交 ID
[root@VM-0-2-centos gitcode]# cat .git/refs/heads/master
e47c59b38d43f9922836291e783dd3c067d86dfd

# 与 git log 对照
[root@VM-0-2-centos gitcode]# git log --pretty=oneline
e47c59b38d43f9922836291e783dd3c067d86dfd add 3 test
58d3056091b9805d0493ca589daa5aa83dd3ac4f 测试
master文件中存储的正是最新一次的 commit ID。这说明 commit ID 本身就是 Git 对象库中的一个对象。
7.3 探索对象库:git cat-file
知道了 commit ID,如何在对象库中找到对应内容?
Git 采用 SHA-1 哈希的前两位作为子目录名,剩余 38 位作为文件名 的存储方式。例如 e47c59b... 存储在 objects/e4/7c59b... 路径下。
使用 git cat-file 命令可以查看对象内容:
bash
# 查看 commit 对象(-p 参数以可读格式显示)
[root@VM-0-2-centos gitcode]# git cat-file -p e47c59b38d43f9922836291e783dd3c067d86dfd
tree fcedb6cb43329b05e9c91f16e0ae4dc8d74e0742
parent 58d3056091b9805d0493ca589daa5aa83dd3ac4f
author ling-qian_1_0 <3139198270@qq.com> 1788231606 +0800
committer ling-qian_1_0 <3139198270@qq.com> 1788231606 +0800

add 3 test
commit 对象结构解析:
| 字段 | 含义 |
|---|---|
tree |
指向该提交对应的目录树对象 |
parent |
指向上一次提交的 ID(形成链表结构) |
author |
作者信息及提交时间戳 |
committer |
提交者信息(与 author 可能不同) |
| 空行后 | 提交说明(commit message) |
继续追踪 tree 对象:
bash
# 查看 tree 对象:记录该提交包含的文件及对应 blob
[root@VM-0-2-centos gitcode]# git cat-file -p fcedb6cb43329b05e9c91f16e0ae4dc8d74e0742
100644 blob 8d0e41234f24b6da002d962a26c2495ea16a425f	ReadMe
100644 blob e69de29bb2d1d6434b8b29ae775ad8c2e48c5391	test1
100644 blob e69de29bb2d1d6434b8b29ae775ad8c2e48c5391	test2
100644 blob e69de29bb2d1d6434b8b29ae775ad8c2e48c5391	test3
tree 对象 :存储文件名与 blob 对象的映射关系,以及文件权限模式(如
100644)
最后查看具体的文件内容(blob 对象):
bash
# 查看 ReadMe 文件的内容
[root@VM-0-2-centos gitcode]# git cat-file -p 8d0e41234f24b6da002d962a26c2495ea16a425f
hello git
# ↑ 这就是我们对 ReadMe 做的修改!被 Git 永久记录了下来!
7.4 核心文件速查表
| 文件/目录 | 作用 |
|---|---|
index |
暂存区 ,git add 后更新 |
HEAD |
指针,默认指向 master 分支 |
refs/heads/master |
保存当前 master 分支的最新 commit ID |
objects/ |
对象库,包含所有版本库对象(commit、tree、blob) |
7.5 学习建议
后续学习过程中,建议将常见的 Git 操作与 .git 目录的结构变化对应起来,这样有助于深入理解 Git 的内部流程。例如:
git add→index更新,objects/新增 blobgit commit→objects/新增 commit 和 tree,refs/heads/master更新- 后续学习分支、标签时,也可以对照
refs/目录的变化进行研究!
8~>Git基本操作------添加文件(场景二)
通过前面的学习,我们已经掌握了向仓库添加文件的基本流程,也对工作区、暂存区、版本库有了初步认识。本节再通过一个具体场景,加深对三者关系的理解。
8.1 场景演示
bash
# 1. 创建 test4 并添加到暂存区
[root@VM-0-2-centos gitcode]# touch test4
[root@VM-0-2-centos gitcode]# git add test4

# 2. 创建 test5,但暂不添加
[root@VM-0-2-centos gitcode]# touch test5

# 3. 提交(预期:只提交 test4)
[root@VM-0-2-centos gitcode]# git commit -m "add test4"
[master 28e1ef4] add test4
 1 file changed, 0 insertions(+), 0 deletions(-)
 create mode 100644 test4
观察输出 :1 file changed------只提交了一个文件。但我们不是新增了两个文件吗?
8.2 原因分析
回顾 Git 的工作机制:
| 步骤 | 命令 | 作用范围 |
|---|---|---|
| 添加到暂存区 | git add |
将工作区的指定文件放入暂存区 |
| 提交到版本库 | git commit |
将暂存区的全部内容写入版本库 |
问题所在:
test4:执行了git add test4→ 已进入暂存区 →commit时被提交 ✅test5:只创建了文件,未执行git add→ 还在工作区 →commit时未被提交 ❌
cpp
工作区:test4, test5
         ↓        ↓
      git add    (无操作)
         ↓        ↓
暂存区:test4    [空]
         ↓
      git commit
         ↓
版本库:test4    (test5 遗漏!)
8.3 补交 test5
bash
# 将 test5 添加到暂存区
[root@VM-0-2-centos gitcode]# git add test5

# 再次提交
[root@VM-0-2-centos gitcode]# git commit -m "add test5"
[master 9693dde] add test5
 1 file changed, 0 insertions(+), 0 deletions(-)
 create mode 100644 test5
8.4 关键结论
重要提醒 :
git commit只提交暂存区中的内容,而非工作区的所有文件。工作区中新建或修改的文件,如果未执行
git add,commit时会被自动忽略。
最佳实践:
bash
# 提交前检查状态,确认暂存区内容
git status #用于查看上一次提交之后到现在是否对文件进行过修改

# 或一次性添加所有变更后再提交
git add .
git commit -m "描述信息"
9~>Git基本操作------修改文件(git status & git diff)
9.1 Git 管理的是"修改",而非"文件"
Git 的设计精髓在于:跟踪并管理的是修改,而不是文件本身。
什么是修改?包括但不限于:
- 新增一行内容
- 删除一行内容
- 修改某些字符
- 既删除又添加(混合修改)
- 创建一个新文件
任何变动,在 Git 眼中都是一次修改。
9.2 修改 ReadMe 文件
让我们对 ReadMe 文件进行一次修改:
cpp
# 查看当前文件内容
[root@VM-0-2-centos gitcode]# cat ReadMe
hello git

# 编辑后再次查看(假设已添加一行内容)
[root@VM-0-2-centos gitcode]# cat ReadMe
hello git
hello world
此时,工作区的 ReadMe 与版本库中的 ReadMe 已经不一致。如何查看当前状态?
9.3 查看仓库状态:git status
git status 命令用于查看自上次提交以来,工作区发生了哪些变动。
cpp
[root@VM-0-2-centos gitcode]# cat ReadMe
hello git
hello world
[root@VM-0-2-centos gitcode]# git status
# On branch master
# Changes not staged for commit:
#   (use "git add <file>..." to update what will be committed)
#   (use "git checkout -- <file>..." to discard changes in working directory)
#
#	modified:   ReadMe
#
no changes added to commit (use "git add" and/or "git commit -a")状态解读:
| 提示信息 | 含义 |
|---|---|
On branch master |
当前在 master 分支 |
Changes not staged for commit |
有修改未添加到暂存区 |
modified: ReadMe |
ReadMe 文件被修改 |
no changes added to commit |
暂存区为空,无可提交内容 |
提示 :Git 告诉我们
ReadMe被修改了,但还没有add和commit。
9.4 查看具体修改:git diff
只知道文件被修改还不够,如果能看到具体改了什么,就更放心了。毕竟,三天前写的代码,你可能早就忘了。
git diff 命令用来显示暂存区与工作区的文件差异,采用 Unix 通用的 diff 格式。
常用形式:
| 命令 | 作用 |
|---|---|
git diff [file] |
查看暂存区与工作区的差异 |
git diff HEAD -- [file] |
查看版本库与工作区的差异 |
查看 ReadMe 的改动:
cpp
[root@VM-0-2-centos gitcode]# git diff ReadMe
diff --git a/ReadMe b/ReadMe
index 8d0e412..05fe86c 100644
--- a/ReadMe
+++ b/ReadMe
@@ -1 +1,2 @@
 hello git
+hello world
diff 格式解析:
| 标记 | 含义 |
|---|---|
--- a/ReadMe |
改动前的文件(暂存区/版本库) |
+++ b/ReadMe |
改动后的文件(工作区) |
@@ -1 +1,2 @@ |
-1:改动前第 1 行;+1,2:改动后从第 1 行开始的 2 行 |
hello git |
无符号:上下文,未改动的行 |
+hello world |
+ 号:新增的行 |
总结 :
a是改动前,b是改动后;-表示删除,+表示新增。
9.5 提交修改
确认修改无误后,按流程提交:
cpp
# 1. 查看状态(修改未暂存)
[root@VM-0-2-centos gitcode]# git status
# On branch master
# Changes not staged for commit:
#   (use "git add <file>..." to update what will be committed)
#	modified:   ReadMe
#
no changes added to commit (use "git add" and/or "git commit -a")

# 2. 添加到暂存区
[root@VM-0-2-centos gitcode]# git add ReadMe

# 3. 再次查看状态(已暂存)
[root@VM-0-2-centos gitcode]# git status
# On branch master
# Changes to be committed:
#   (use "git reset HEAD <file>..." to unstage)
#
#	modified:   ReadMe
#

# 4. 提交到版本库
[root@VM-0-2-centos gitcode]# git commit -m "modify ReadMe"
[master 54b86ad] modify ReadMe
 1 file changed, 1 insertion(+)

# 5. 查看最终状态(工作区干净)
[root@VM-0-2-centos gitcode]# git status
# On branch master
nothing to commit, working directory clean状态变化流程:
cpp
修改文件 → git status (not staged) → git add → git status (to be committed)
                                                               ↓
工作区干净 ← git status (clean) ← git commit ← 已暂存
9.6 关键要点总结
| 命令 | 作用 | 使用场景 |
|---|---|---|
git status |
查看仓库整体状态 | 随时检查哪些文件被修改、暂存 |
git diff |
查看具体修改内容 | 提交前确认改动是否正确 |
git add |
将修改加入暂存区 | 准备提交 |
git commit |
将暂存区写入版本库 | 保存版本历史 |
重要 :修改文件后,必须重新执行
git add,再git commit。Git 不会自动跟踪工作区的后续修改。
10~>Git基本操作------版本回退
10.1 为什么需要版本回退?
版本控制的核心价值之一,就是能够回溯历史。如果有一天你发现当前工作出现了严重问题,需要回到某个稳定版本重新开始,版本回退功能就派上用场了。
Git 通过 git reset 命令实现版本回退。需要明确的是:"回退"本质上是修改版本库中的分支指针,工作区和暂存区是否同步回退,由命令参数决定。
10.2 git reset 命令详解
语法格式:
git reset [--soft | --mixed | --hard] [HEAD]三种模式对比
| 参数 | 版本库 | 暂存区 | 工作区 | 使用场景 |
|---|---|---|---|---|
--soft |
回退到指定版本 | 保持不变 | 保持不变 | 仅撤销提交,保留修改内容重新提交 |
--mixed(默认) |
回退到指定版本 | 回退到指定版本 | 保持不变 | 撤销提交和暂存,保留工作区修改 |
--hard |
回退到指定版本 | 回退到指定版本 | 回退到指定版本 | 彻底回退,丢弃所有修改 |
警告 :
--hard模式会强制覆盖工作区内容!如果工作区有未提交的代码,使用后代码将永久丢失。该参数使用前务必确认工作区已保存或无需保留。
HEAD 指针说明
直接指定版本:
- 完整的
commit id(如58d3056091b9805d0493ca589daa5aa83dd3ac4f) - 部分
commit id(如前 7 位58d3056,Git 会自动匹配)
相对位置表示法:
| 写法 | 含义 | 等效写法 |
|---|---|---|
HEAD |
当前版本 | HEAD~0 |
HEAD^ |
上一个版本 | HEAD~1 |
HEAD^^ |
上上一个版本 | HEAD~2 |
HEAD~n |
往上第 n 个版本 | --- |
10.3 实战演示:--hard 模式
查看当前提交历史:
cpp
[root@VM-0-2-centos gitcode]# git log --pretty=oneline
54b86ada8edb56a1e2ec6ae96ca841d38f92f60a modify ReadMe
9693ddea3d03543e6c3f700290a11590c0422eac add test5
28e1ef47aa789077164eec19e892eb7164d6d416 add test4
e47c59b38d43f9922836291e783dd3c067d86dfd add 3 test
58d3056091b9805d0493ca589daa5aa83dd3ac4f 测试
回退到最初的"测试"版本:
[root@VM-0-2-centos gitcode]# git reset --hard 58d3056091b9805d0493ca589daa5aa83dd3ac4f
HEAD is now at 58d3056 测试
查看回退后的历史:
[root@VM-0-2-centos gitcode]# git log --pretty=oneline
58d3056091b9805d0493ca589daa5aa83dd3ac4f 测试
回退成功!现在只剩下最初的提交,后续版本似乎"消失"了。
10.4 后悔了怎么办?找回"丢失"的版本
回退后如果后悔了,想再回到 modify ReadMe 版本,需要知道它的 commit id。但 git log 已经看不到它了:
[root@VM-0-2-centos gitcode]# git log --pretty=oneline
58d3056091b9805d0493ca589daa5aa83dd3ac4f 测试
方案一:终端历史记录
如果运气好的话,可以从之前的终端输出中找到 commit id:
[root@VM-0-2-centos gitcode]# git reset --hard 54b86ada8edb56a1e2ec6ae96ca841d38f92f60a
HEAD is now at 54b86ad modify ReadMe方案二:git reflog 救命神器
Git 贴心地提供了 git reflog 命令,记录本地所有的操作历史:
[root@VM-0-2-centos gitcode]# git reflog
54b86ad HEAD@{0}: reset: moving to 54b86ada8edb56a1e2ec6ae96ca841d38f92f60a
58d3056 HEAD@{1}: reset: moving to 58d3056091b9805d0493ca589daa5aa83dd3ac4f
54b86ad HEAD@{2}: commit: modify ReadMe
9693dde HEAD@{3}: commit: add test5
28e1ef4 HEAD@{4}: commit: add test4
e47c59b HEAD@{5}: commit: add 3 test
58d3056 HEAD@{6}: commit (initial): 测试输出解读:
| 字段 | 含义 |
|---|---|
54b86ad |
操作后 HEAD 指向的 commit id(短格式) |
HEAD@{n} |
HEAD 的第 n 次变动记录 |
reset: moving to ... |
执行的操作类型及目标 |
commit: xxx |
提交说明 |
发现 :
reflog中显示的54b86ad是完整commit id的前 7 位。Git 支持用部分commit id代表目标版本,只要足够唯一即可。
使用短 ID 再次回退:
[root@VM-0-2-centos gitcode]# git reset --hard 54b86ad
HEAD is now at 54b86ad modify ReadMe
10.5 回退的本质原理
Git 的版本回退速度极快,原因在于其内部机制:
┌─────────────┐      ┌─────────────────────┐
│    HEAD     │ ──→  │ refs/heads/master   │
│  (指针)      │      │  (存储最新 commit id) │
└─────────────┘      └─────────────────────┘
                              │
                              ▼
                    ┌─────────────────┐
                    │  commit 对象链    │
                    │  54b86ad → 9693dde │
                    │    ↓              │
                    │  28e1ef4 → ...    │
                    └─────────────────┘
回退的本质 :Git 只是将 refs/heads/master 文件中存储的 commit id 替换为目标版本的 commit id。HEAD 指针始终指向当前分支,分支指针指向特定提交,整个过程就是移动指针,因此速度极快。
10.6 关键要点总结
| 命令 | 作用 | 注意事项 |
|---|---|---|
git reset --soft |
仅回退版本库 | 保留暂存区和工作区,适合重新提交 |
git reset --mixed |
回退版本库和暂存区 | 保留工作区,适合撤销暂存重新整理 |
git reset --hard |
彻底回退所有区域 | 危险操作,会丢失未提交的工作区修改 |
git reflog |
查看操作历史 | 找回"丢失"的 commit id,救命神器 |
安全建议 :日常开发中,优先使用
--mixed(默认)或--soft,慎用--hard。执行--hard前,确保工作区无重要未提交代码,或已做备份。
11~>Git基本操作------撤销修改
写代码时难免会遇到这种情况:写了很长时间,越写越觉得糟糕,想放弃当前修改回到之前的状态。根据修改所处的不同阶段,Git 提供了对应的撤销方案。
11.1 情况一:工作区已修改,但未 add
场景:代码还在工作区,尚未加入暂存区。
错误做法 :手动逐行删除。如果写了三天,你很可能已经忘了自己改过哪些地方,用 git diff 对比后再删,费时费力还容易引入新 bug。
正确做法 :使用 git checkout -- [file] 命令,一键将工作区文件恢复到最近一次 add 或 commit 的状态。
注意 :
--不可省略!省略后命令含义会发生变化(后面会讲到)。当然,也可以用git reset --hard达到同样效果,但后者会同时影响暂存区,需慎用。
示例:
cpp
# 当前文件内容(已添加垃圾代码)
[root@VM-0-2-centos gitcode]# cat ReadMe
hello git
hello world
xxx code

# 撤销工作区修改
[root@VM-0-2-centos gitcode]# git checkout -- ReadMe

# 恢复后的内容
[root@VM-0-2-centos gitcode]# cat ReadMe
hello git
hello world
11.2 情况二:已 add,但未 commit
场景:修改已加入暂存区,但尚未提交到版本库。
解决思路:分两步走
- 先将暂存区的修改撤回工作区
- 再按"情况一"处理工作区的修改
第一步:撤回暂存区
使用 git reset(默认 --mixed 模式),将暂存区内容退回为指定版本,工作区保持不变:
# 编辑并添加文件到暂存区
[root@VM-0-2-centos gitcode]# nano ReadMe
[root@VM-0-2-centos gitcode]# git add ReadMe

# 将暂存区的 ReadMe 撤回工作区
[root@VM-0-2-centos gitcode]# git reset --mixed HEAD ReadMe
warning: --mixed with paths is deprecated; use 'git reset -- <paths>' instead.
Unstaged changes after reset:
M	ReadMe
提示 :Git 提示该用法已废弃,推荐用
git reset -- ReadMe。效果相同:暂存区清空,工作区修改保留。
查看状态确认:
[root@VM-0-2-centos gitcode]# git status
# On branch master
# Changes not staged for commit:
#   (use "git add <file>..." to update what will be committed)
#   (use "git checkout -- <file>..." to discard changes in working directory)
#
#	modified:   ReadMe
#
no changes added to commit (use "git add" and/or "git commit -a")
第二步:撤销工作区修改
[root@VM-0-2-centos gitcode]# git checkout -- ReadMe
[root@VM-0-2-centos gitcode]# cat ReadMe
hello git
hello world
简化方案 :如果确定要彻底放弃所有修改,可以直接用
git reset --hard HEAD,一步完成暂存区和工作区的回退。
11.3 情况三:已 add,且已 commit
场景:修改已提交到本地版本库。
解决方案 :使用 git reset --hard HEAD^ 回退到上一个版本。
前提条件 :尚未推送到远程仓库(未
push)。Git 是分布式版本控制系统,一旦推送到远程,修改就会被他人获取,此时回退会造成协作混乱。
示例:
# 编辑、暂存并提交
[root@VM-0-2-centos gitcode]# nano ReadMe
[root@VM-0-2-centos gitcode]# git add ReadMe
[root@VM-0-2-centos gitcode]# git commit -m "modify ReadMe: xxx code"
[master 9323cbc] modify ReadMe: xxx code
 1 file changed, 1 insertion(+)

# 回退到上一个版本
[root@VM-0-2-centos gitcode]# git reset --hard HEAD^
HEAD is now at 54b86ad modify ReadMe

# 验证回退结果
[root@VM-0-2-centos gitcode]# cat ReadMe
hello git
hello world
替代方案 :也可以用
git reset --soft HEAD^,这样版本库回退了,但暂存区和工作区保留修改,变成"情况二"的状态,方便重新整理后提交。
11.4 三种情况速查表
| 情况 | 修改位置 | 撤销命令 | 效果 |
|---|---|---|---|
未 add |
工作区 | git checkout -- <file> |
工作区恢复到上次 add/commit |
已 add 未 commit |
暂存区 + 工作区 | git reset -- <file> + git checkout -- <file> |
先撤回暂存区,再恢复工作区 |
已 commit 未 push |
版本库 | git reset --hard HEAD^ |
彻底回退到上一个版本 |
11.5 关键提醒
| 注意事项 | 说明 |
|---|---|
-- 不可省略 |
git checkout -- <file> 中省略 -- 会变成切换分支 |
--hard 慎用 |
会强制覆盖工作区,未提交的代码将永久丢失 |
已 push 勿回退 |
推送到远程后回退,会导致团队协作混乱 |
git reflog 可救命 |
即使回退错了,也能通过 reflog 找回 commit id |
12~>Git基本操作------删除文件
在 Git 中,删除也是一种修改操作。我们有两种方式删除文件并同步到版本库。
12.1 方式一:先 rm,再 add,最后 commit
流程:手动删除工作区文件 → 将删除操作添加到暂存区 → 提交到版本库。
bash
# 1. 手动删除工作区文件
[root@VM-0-2-centos gitcode]# rm test5

# 2. 将删除操作同步到暂存区
[root@VM-0-2-centos gitcode]# git add --all .
注意 :删除操作必须使用
git add --all(或-A),普通的git add .不会将删除操作同步到暂存区。
bash
# 3. 提交到版本库
[root@VM-0-2-centos gitcode]# git commit -m "delete test5"
[master a762423] delete test5
 1 file changed, 0 insertions(+), 0 deletions(-)
 delete mode 100644 test5
验证状态:
bash
[root@VM-0-2-centos gitcode]# git status
# On branch master
nothing to commit, working directory clean

[root@VM-0-2-centos gitcode]# git log --pretty=oneline
a762423782a51db4b1a9c1442703a29f64cdfafa delete test5
54b86ada8edb56a1e2ec6ae96ca841d38f92f60a modify ReadMe
9693ddea3d03543e6c3f700290a11590c0422eac add test5
...
发现 :提交日志中出现了
delete mode 100644,说明 Git 记录的是"删除这个文件"的变更,而非真正抹除历史。之前的add test5提交记录依然保留,随时可以回退恢复。
12.2 方式二:使用 git rm(推荐)
流程 :一条命令同时删除工作区和暂存区的文件,无需手动 add。
bash
# 查看当前文件
[root@VM-0-2-centos gitcode]# ls
ReadMe  test1  test2  test3  test4

# 批量删除文件
[root@VM-0-2-centos gitcode]# git rm test1 test2 test3 test4
rm 'test1'
rm 'test2'
rm 'test3'
rm 'test4'
优势 :
git rm自动将删除操作加入暂存区,省去git add步骤。
bash
# 直接提交
[root@VM-0-2-centos gitcode]# git commit -m "delete tests"
[master f7abe74] delete tests
 4 files changed, 0 insertions(+), 0 deletions(-)
 delete mode 100644 test1
 delete mode 100644 test2
 delete mode 100644 test3
 delete mode 100644 test4
验证结果:
bash
[root@VM-0-2-centos gitcode]# git status
# On branch master
nothing to commit, working directory clean

[root@VM-0-2-centos gitcode]# ls
ReadMe

[root@VM-0-2-centos gitcode]# git log --pretty=oneline
f7abe746db499761c98adc56fbb84f870eb5f207 delete tests
a762423782a51db4b1a9c1442703a29f64cdfafa delete test5
54b86ada8edb56a1e2ec6ae96ca841d38f92f60a modify ReadMe
...
12.3 两种方式对比
| 方式 | 命令 | 步骤 | 适用场景 |
|---|---|---|---|
| 手动删除 | rm + git add --all + git commit |
3 步 | 需要精细控制暂存内容时 |
| Git 删除 | git rm + git commit |
2 步 | 日常删除,简洁高效 |
12.4 关键要点
| 要点 | 说明 |
|---|---|
git add --all / -A |
普通 git add . 不会同步删除操作,必须加 --all |
git rm 的优势 |
同时删除工作区和暂存区文件,一步完成 |
| 删除不是抹除 | 提交记录中保留历史,可通过版本回退恢复文件 |
| 批量删除 | git rm 支持多个文件同时删除 |
12.5 误删恢复
如果误删了文件,且尚未提交:
bash
# 方式一:从暂存区恢复(git rm 后未 commit)
git reset HEAD <file>      # 撤回暂存区的删除
git checkout -- <file>     # 从暂存区恢复工作区文件

# 方式二:从版本库恢复(已 commit)
git log --pretty=oneline   # 找到删除前的 commit id
git reset --hard <commit_id>  # 回退到该版本
结语:
至此,我们已经完整走完了 Git 本地操作的核心流程,为后续的学习打下了坚实基础。
从最初的一个 git init 创建空仓库,到理解 工作区 → 暂存区 → 版本库 的数据流转;从第一次 git commit 记录版本,到自如运用 git reset 在历史长河中穿梭;从误删文件的手足无措,到 git reflog 的从容找回------你已经具备了独立使用 Git 管理项目的基础能力。
但 Git 的世界远不止于此。本文所涉及的,只是 Git 庞大体系的本地操作部分。在后续的系列文章中,我们将继续探索:
| 篇章 | 核心内容 |
|---|---|
| (二)分支管理 | git branch、git merge、git rebase,实现并行开发与特性隔离 |
| (三)远程操作与团队协作 | git clone、git push、git pull,连接 GitHub/GitLab 实现多人协作 |
| (四)标签管理与版本发布 | git tag 为发布版本打标记,规范的版本控制流程 |
| (五)企业级开发模型 | Git Flow、GitHub Flow、Trunk-based 等主流开发模式 |
最后,送给你几个 Git 学习的心得:
| 原则 | 说明 |
|---|---|
| 提交要频繁 | 小步快跑,每次提交只做一件事,方便回退和审查 |
| 信息要清晰 | 写好 commit message,三个月后的你会感谢现在的自己 |
| 操作要谨慎 | --hard 前三思,push 前检查,团队协作尤其注意 |
| 原理要理解 | 知道 .git 目录里发生了什么,才能真正驾驭 Git |
练习建议:找一个自己的项目,用本文所学重新初始化仓库,完整走一遍 add → commit → diff → reset → reflog 的流程。实践是最好的老师。
版本控制是软件工程的基石,而 Git 是这座基石上最璀璨的明珠。愿你在代码的时光长河中,既能大胆探索,也能从容回溯。