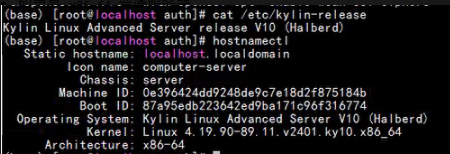
1.操作系统信息:
2.升级步骤
2.1 备份文件
# 备份nginx二进制程序(真实路径)
cp /usr/local/nginx/sbin/nginx /usr/local/nginx/sbin/nginx.bak.$(date +%Y%m%d)

# 备份配置目录
cp -r /usr/local/nginx/conf /usr/local/nginx/conf.bak.$(date +%Y%m%d)

# 备份业务html站点目录
cp -r /usr/local/nginx/html /usr/local/nginx/html.bak.$(date +%Y%m%d)

# 校验配置
nginx -t
2.2 获取旧版本完整编译参数
nginx -V复制输出中 configure arguments: 后面全部一整串参数,后面编译 1.31.4 必须完整复用,保证安装路径、模块、ssl、stream 等和旧环境完全一致。
2.3 安装编译依赖
yum install -y gcc gcc-c++ make pcre pcre-devel zlib zlib-devel openssl openssl-devel2.4 下载nignx-1.31.4源码并解压
cd /usr/local/src
#下载源码包
wget https://nginx.org/download/nginx-1.31.4.tar.gz
tar -zxvf nginx-1.31.4.tar.gz
cd nginx-1.31.4
2.5 configure 配置(粘贴你本机复制的全部旧参数)
不要直接复制下面示例,替换成你 nginx‑V 获取的完整参数
./configure 【粘贴 nginx -V 输出的 configure arguments 全部内容】注意:我这里拿到的参数是以下内容:
./configure --user=www --group=www --prefix=/usr/local/nginx --with-http_stub_status_module --with-http_ssl_module --with-http_v2_module --with-http_gzip_static_module --with-http_sub_module --with-stream --with-stream_ssl_module --with-stream_ssl_preread_module --with-http_realip_module --with-openssl=/root/lnmp2.0-full/src/openssl-1.1.1t --with-openssl-opt='enable-weak-ssl-ciphers'
但是 --with-openssl=/root/lnmp2.0-full/src/openssl-1.1.1t 这一块儿编译的时候,提示路径不存在,所以第二次编译的时候就把这个参数去掉了。
2.6 编译,只 make,严禁 make install !!!
make -j$(nproc)编译完成后,新的 nginx 二进制程序位置:objs/nginx
2.7 重启
#1.查看所有nginx进程
ps aux | grep nginx
#2.强制杀死全部nginx进程
killall -9 nginx
#3.确认pid文件清理
rm -f /usr/local/nginx/logs/nginx.pid
rm -f /usr/local/nginx/logs/nginx.pid.oldbin
#4.现在复制新二进制,不再报文件忙
cp objs/nginx /usr/local/nginx/sbin/nginx
#5.校验配置
nginx -t
#6.启动nginx
/usr/local/nginx/sbin/nginx
#7.验证版本
nginx -v
3.其他命令
3.1 清理当前错误编译产物
cd /usr/local/src/nginx-1.31.4
make clean
3.2 回滚命令
killall -9 nginx
mv /usr/local/nginx/sbin/nginx.bak /usr/local/nginx/sbin/nginx
chmod +x /usr/local/nginx/sbin/nginx
rm -f /usr/local/nginx/logs/nginx.pid*
/usr/local/nginx/sbin/nginx