【FastAPI进阶-Day21】WebSocket实时通讯完整版实战|实时消息推送、在线用户管理、断线重连、后端实时交互
专栏:FastAPI从零到企业级实战(进阶篇)
标签:FastAPI、WebSocket、实时通讯、消息推送、在线聊天、后端进阶
前置阅读:Day1~Day20 基础全套系列
一、前言
前面20天我们完成了 FastAPI 基础 + 工程化 + 上线部署 全套能力。
但传统的 HTTP 接口有一个致命短板:只能客户端主动请求,服务端无法主动推送数据。
在很多业务场景完全不够用:
- 实时消息聊天、站内私信
- 系统实时通知、订单状态变更推送
- 在线人数实时展示、设备状态实时监控
- 日志实时打印、大屏实时数据刷新
想要实现 服务端主动推送、双向实时通讯,必须使用 WebSocket 协议。
FastAPI 原生完美支持 WebSocket,语法简洁、异步高性能、天然支持高并发长连接。本篇从零吃透 FastAPI WebSocket 全套实战能力,最终产出一套可直接用于生产的实时通讯方案,覆盖:
- ✅ 最简 WebSocket 入门 + 断线异常捕获
- ✅ 全局在线连接管理:群发广播、在线人数统计
- ✅ 用户身份绑定:单人专属推送、在线状态管理
- ✅ HTTP 接口主动推送消息到 WebSocket 客户端
- ✅ 前端断线自动重连
Day21 正式开启进阶篇,开干!
二、HTTP 与 WebSocket 核心区别(面试必问)
1. HTTP
- 短连接,一次请求一次响应,连接立即断开
- 只能客户端主动发起请求
- 服务端无法主动推送消息
- 无状态、不保存连接信息
2. WebSocket
- 长连接,一次握手、永久通道、双向通信
- 客户端、服务端均可主动发消息
- 极低延迟,适合实时业务
- 可全局管理在线连接、实现广播、私聊
一张时序图看懂两者区别:
服务端 客户端 服务端 客户端 #mermaid-svg-KWdNEVqQW3EAprkU{font-family:"trebuchet ms",verdana,arial,sans-serif;font-size:16px;fill:#333;}@keyframes edge-animation-frame{from{stroke-dashoffset:0;}}@keyframes dash{to{stroke-dashoffset:0;}}#mermaid-svg-KWdNEVqQW3EAprkU .edge-animation-slow{stroke-dasharray:9,5!important;stroke-dashoffset:900;animation:dash 50s linear infinite;stroke-linecap:round;}#mermaid-svg-KWdNEVqQW3EAprkU .edge-animation-fast{stroke-dasharray:9,5!important;stroke-dashoffset:900;animation:dash 20s linear infinite;stroke-linecap:round;}#mermaid-svg-KWdNEVqQW3EAprkU .error-icon{fill:#552222;}#mermaid-svg-KWdNEVqQW3EAprkU .error-text{fill:#552222;stroke:#552222;}#mermaid-svg-KWdNEVqQW3EAprkU .edge-thickness-normal{stroke-width:1px;}#mermaid-svg-KWdNEVqQW3EAprkU .edge-thickness-thick{stroke-width:3.5px;}#mermaid-svg-KWdNEVqQW3EAprkU .edge-pattern-solid{stroke-dasharray:0;}#mermaid-svg-KWdNEVqQW3EAprkU .edge-thickness-invisible{stroke-width:0;fill:none;}#mermaid-svg-KWdNEVqQW3EAprkU .edge-pattern-dashed{stroke-dasharray:3;}#mermaid-svg-KWdNEVqQW3EAprkU .edge-pattern-dotted{stroke-dasharray:2;}#mermaid-svg-KWdNEVqQW3EAprkU .marker{fill:#333333;stroke:#333333;}#mermaid-svg-KWdNEVqQW3EAprkU .marker.cross{stroke:#333333;}#mermaid-svg-KWdNEVqQW3EAprkU svg{font-family:"trebuchet ms",verdana,arial,sans-serif;font-size:16px;}#mermaid-svg-KWdNEVqQW3EAprkU p{margin:0;}#mermaid-svg-KWdNEVqQW3EAprkU .actor{stroke:hsl(259.6261682243, 59.7765363128%, 87.9019607843%);fill:#ECECFF;}#mermaid-svg-KWdNEVqQW3EAprkU text.actor>tspan{fill:black;stroke:none;}#mermaid-svg-KWdNEVqQW3EAprkU .actor-line{stroke:hsl(259.6261682243, 59.7765363128%, 87.9019607843%);}#mermaid-svg-KWdNEVqQW3EAprkU .innerArc{stroke-width:1.5;stroke-dasharray:none;}#mermaid-svg-KWdNEVqQW3EAprkU .messageLine0{stroke-width:1.5;stroke-dasharray:none;stroke:#333;}#mermaid-svg-KWdNEVqQW3EAprkU .messageLine1{stroke-width:1.5;stroke-dasharray:2,2;stroke:#333;}#mermaid-svg-KWdNEVqQW3EAprkU #arrowhead path{fill:#333;stroke:#333;}#mermaid-svg-KWdNEVqQW3EAprkU .sequenceNumber{fill:white;}#mermaid-svg-KWdNEVqQW3EAprkU #sequencenumber{fill:#333;}#mermaid-svg-KWdNEVqQW3EAprkU #crosshead path{fill:#333;stroke:#333;}#mermaid-svg-KWdNEVqQW3EAprkU .messageText{fill:#333;stroke:none;}#mermaid-svg-KWdNEVqQW3EAprkU .labelBox{stroke:hsl(259.6261682243, 59.7765363128%, 87.9019607843%);fill:#ECECFF;}#mermaid-svg-KWdNEVqQW3EAprkU .labelText,#mermaid-svg-KWdNEVqQW3EAprkU .labelText>tspan{fill:black;stroke:none;}#mermaid-svg-KWdNEVqQW3EAprkU .loopText,#mermaid-svg-KWdNEVqQW3EAprkU .loopText>tspan{fill:black;stroke:none;}#mermaid-svg-KWdNEVqQW3EAprkU .loopLine{stroke-width:2px;stroke-dasharray:2,2;stroke:hsl(259.6261682243, 59.7765363128%, 87.9019607843%);fill:hsl(259.6261682243, 59.7765363128%, 87.9019607843%);}#mermaid-svg-KWdNEVqQW3EAprkU .note{stroke:#aaaa33;fill:#fff5ad;}#mermaid-svg-KWdNEVqQW3EAprkU .noteText,#mermaid-svg-KWdNEVqQW3EAprkU .noteText>tspan{fill:black;stroke:none;}#mermaid-svg-KWdNEVqQW3EAprkU .activation0{fill:#f4f4f4;stroke:#666;}#mermaid-svg-KWdNEVqQW3EAprkU .activation1{fill:#f4f4f4;stroke:#666;}#mermaid-svg-KWdNEVqQW3EAprkU .activation2{fill:#f4f4f4;stroke:#666;}#mermaid-svg-KWdNEVqQW3EAprkU .actorPopupMenu{position:absolute;}#mermaid-svg-KWdNEVqQW3EAprkU .actorPopupMenuPanel{position:absolute;fill:#ECECFF;box-shadow:0px 8px 16px 0px rgba(0,0,0,0.2);filter:drop-shadow(3px 5px 2px rgb(0 0 0 / 0.4));}#mermaid-svg-KWdNEVqQW3EAprkU .actor-man line{stroke:hsl(259.6261682243, 59.7765363128%, 87.9019607843%);fill:#ECECFF;}#mermaid-svg-KWdNEVqQW3EAprkU .actor-man circle,#mermaid-svg-KWdNEVqQW3EAprkU line{stroke:hsl(259.6261682243, 59.7765363128%, 87.9019607843%);fill:#ECECFF;stroke-width:2px;}#mermaid-svg-KWdNEVqQW3EAprkU :root{--mermaid-font-family:"trebuchet ms",verdana,arial,sans-serif;} HTTP:一次请求一次响应,随即断开 WebSocket:一次握手,双向随时互发 请求1响应1请求2响应2握手建立长连接客户端主动发消息服务端主动推送(无需客户端请求)服务端再次推送
核心记忆点:HTTP 是"你问我答",WebSocket 是"打电话"------接通后双方随时说话。
三、FastAPI WebSocket 最简入门示例
无需额外安装依赖,FastAPI 原生内置 WebSocket。
python
from fastapi import FastAPI, WebSocket

app = FastAPI(title="Day21 WebSocket实战")

@app.websocket("/ws")
async def websocket_demo(websocket: WebSocket):
    # 1. 接受客户端连接
    await websocket.accept()
    print("客户端已连接")

    while True:
        # 2. 循环接收客户端消息
        data = await websocket.receive_text()
        print(f"收到客户端消息:{data}")

        # 3. 服务端回复消息
await websocket.send_text(f"服务端已收到:{data}")三步走:accept 接受连接 → 循环 receive 收消息 → send 回消息,就这么简单。
在线测试
先说一个常见误区:很多同学以为 /docs 页面能调试 WebSocket,实际上 /docs 页面只展示普通 HTTP 接口(Swagger 不支持 WebSocket 路由),实测如下图,只能看到 3 个 GET 接口:
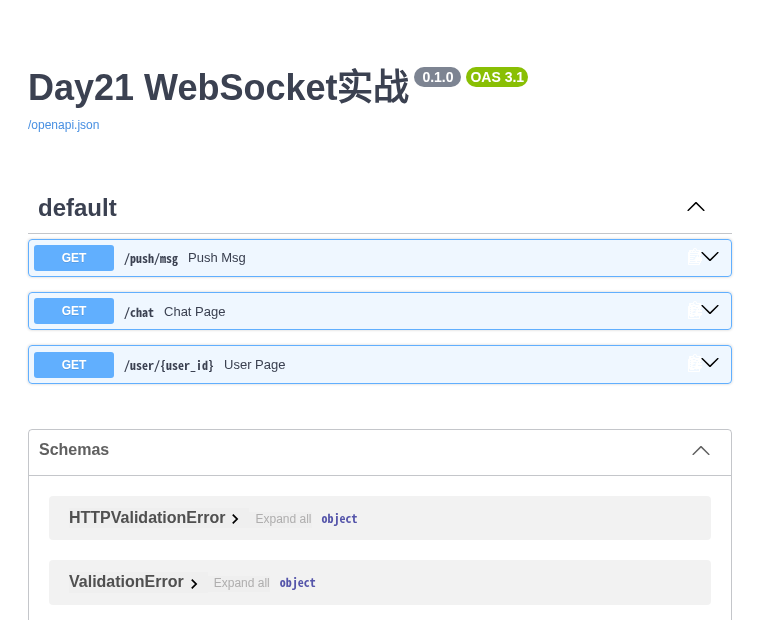
所以测试 WebSocket 要用客户端。装一个 websockets 库(pip install websockets),几行代码搞定:
python
import asyncio
import websockets

async def main():
    async with websockets.connect("ws://127.0.0.1:8000/ws") as ws:
        await ws.send("hello fastapi")
        print("客户端收到:", await ws.recv())

asyncio.run(main())
实际运行输出:
text
客户端收到: 服务端已收到:hello fastapi服务端控制台同步打印:
text
客户端已连接
收到客户端消息:hello fastapi
后面每个实战我们都配了浏览器测试页,不用写代码也能玩。
四、捕获断线异常(生产必备)
客户端关闭页面、断开网络、刷新页面都会触发断开异常,必须捕获,否则服务端直接报错崩日志。
python
from fastapi import FastAPI, WebSocket, WebSocketDisconnect

app = FastAPI()

@app.websocket("/ws")
async def websocket_demo(websocket: WebSocket):
    await websocket.accept()
    try:
        while True:
            data = await websocket.receive_text()
            await websocket.send_text(f"回执:{data}")
    except WebSocketDisconnect:
        # 客户端断开(关页面/断网/刷新)会走到这里
        print("客户端断开连接")
客户端断开后实测服务端日志:
text
客户端已连接
收到客户端消息:hello fastapi
客户端断开连接
异常被优雅捕获,服务稳如老狗。
五、核心实战一:全局在线连接管理
真实项目需要 统一管理所有在线客户端,实现群发、广播、统计在线人数。
python
from fastapi import FastAPI, WebSocket, WebSocketDisconnect
from typing import List

app = FastAPI()

# 全局保存所有在线连接
class ConnectionManager:
    def __init__(self):
        self.active_connections: List[WebSocket] = []

    async def connect(self, websocket: WebSocket):
        await websocket.accept()
        self.active_connections.append(websocket)

    def disconnect(self, websocket: WebSocket):
        if websocket in self.active_connections:
            self.active_connections.remove(websocket)

    async def broadcast(self, message: str):
        # 全员广播消息
        # 拷贝列表 + 异常保护:避免给刚断开的连接发消息时直接报错
        for connection in self.active_connections[:]:
            try:
                await connection.send_text(message)
            except Exception:
                self.disconnect(connection)

manager = ConnectionManager()

@app.websocket("/ws/broadcast")
async def websocket_broadcast(websocket: WebSocket):
    await manager.connect(websocket)
    try:
        while True:
            data = await websocket.receive_text()
            # 全员广播
            await manager.broadcast(f"收到消息:{data}")
    except WebSocketDisconnect:
        manager.disconnect(websocket)
        await manager.broadcast("有用户下线")
踩坑提醒:
broadcast里的异常保护是真实生产坑------多人同时在线时,只要有连接悄悄断开(比如用户直接拔网线),给死连接发消息会抛WebSocketDisconnect,整个广播协程直接挂掉。遍历拷贝列表 + try 兜底,才能稳。
功能说明
- 多浏览器同时连接,任意一端发消息,所有人同步接收
- 用户下线自动广播通知
- 实时在线人数统计:
len(manager.active_connections)
实测效果
配一个极简聊天室测试页(完整代码见文末配套文件 day21.py 的 /chat 页面),开两个浏览器窗口同时连接,左边窗口发一句"大家好,我是客户端A",右边窗口 零延迟同步收到:
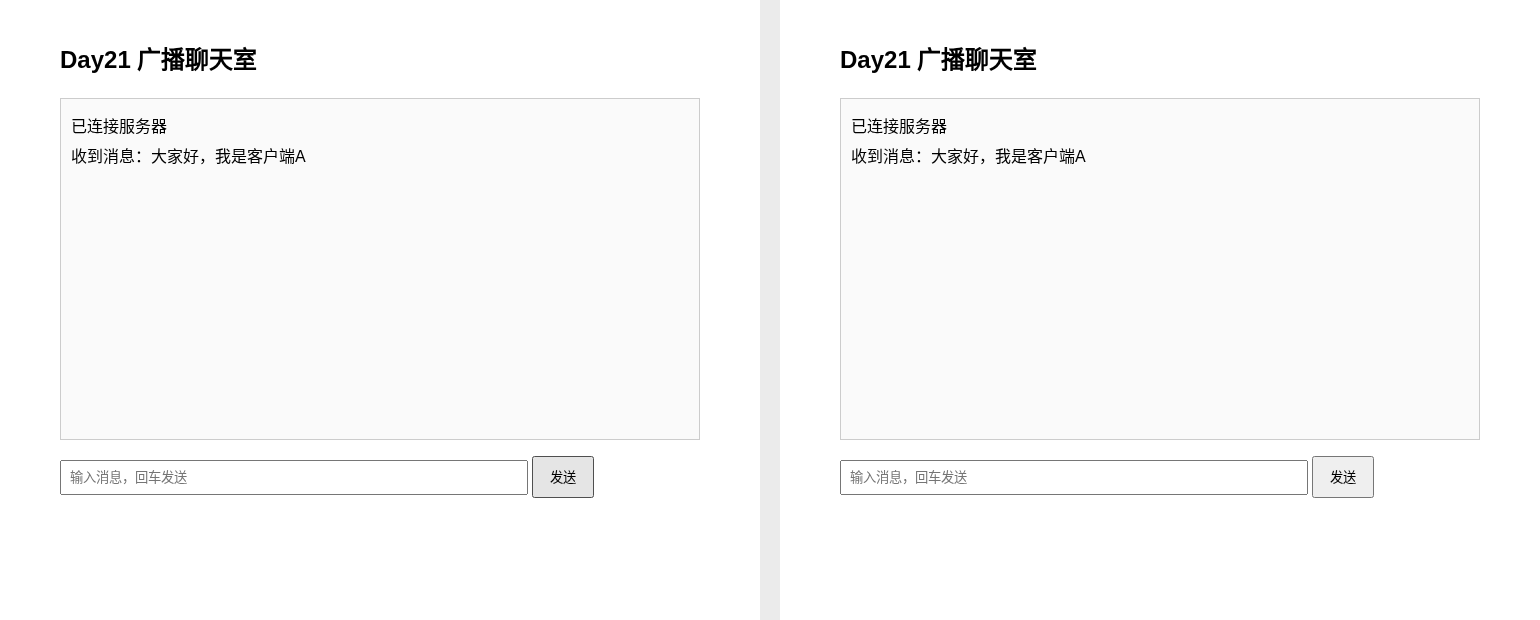
客户端实测输出(两个 Python 客户端同时在线):
text
客户端A收到: 收到消息:大家好,我是客户端A
客户端B收到: 收到消息:大家好,我是客户端A
这就是群聊/全员通知的底层原理。
六、核心实战二:用户身份 + 专属私聊通道
实际业务中,WebSocket 必须绑定用户ID,实现 单人专属推送、用户在线状态。
python
from fastapi import FastAPI, WebSocket, WebSocketDisconnect
from typing import Dict

app = FastAPI()

# 重构连接管理器:按用户ID存储连接
class ConnectionManager:
    def __init__(self):
        # key:用户id, value:WebSocket连接
        self.user_conn: Dict[str, WebSocket] = {}

    async def connect(self, user_id: str, websocket: WebSocket):
        await websocket.accept()
        self.user_conn[user_id] = websocket

    def disconnect(self, user_id: str):
        if user_id in self.user_conn:
            del self.user_conn[user_id]

    async def send_msg_to_user(self, user_id: str, msg: str):
        """指定用户私聊推送"""
        if user_id in self.user_conn:
            await self.user_conn[user_id].send_text(msg)

manager = ConnectionManager()

@app.websocket("/ws/user/{user_id}")
async def websocket_user(websocket: WebSocket, user_id: str):
    await manager.connect(user_id, websocket)
    try:
        while True:
            data = await websocket.receive_text()
            print(f"用户{user_id}发送:{data}")
    except WebSocketDisconnect:
        manager.disconnect(user_id)
HTTP 接口主动推送消息给指定用户
这是业务里 超级常用 的写法:后台业务(订单发货、审核通过、系统告警)触发时,通过普通 HTTP 接口主动把消息推到在线用户的 WebSocket 通道。
python
@app.get("/push/msg")
async def push_msg(user_id: str, msg: str):
    """后台主动给指定用户推送实时消息"""
    await manager.send_msg_to_user(user_id, msg)
    return {"code": 200, "msg": "推送成功"}
实测效果
打开用户 u1001 的专属页面保持长连接,然后调用推送接口:
text
GET /push/msg?user_id=u1001&msg=您的订单已发货接口返回:
text
{"code": 200, "msg": "推送成功"}用户页面 无需刷新、零延迟 直接弹出推送内容:
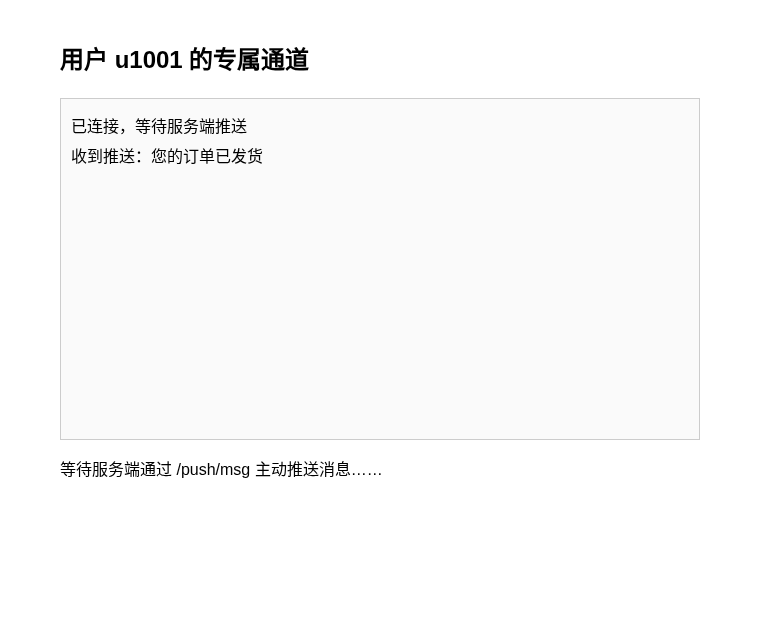
这就是「订单状态变更实时推送」「站内信弹窗提醒」的完整实现链路。
七、前端断线自动重连
服务端断线捕获(第四节)只能保证服务端不崩,用户侧体验要靠前端重连兜底 :网络抖动、手机锁屏、电脑休眠都会让连接断开,前端必须在 onclose 里自动重连。
核心 JS 就这几行(已内置在 /chat 测试页中):
html
<script>
let ws;
function connect() {
  ws = new WebSocket("ws://" + location.host + "/ws/broadcast");
  ws.onopen = () => console.log("已连接服务器");
  ws.onmessage = (e) => console.log(e.data);
  ws.onclose = () => {
    console.log("连接断开,2秒后自动重连");
    setTimeout(connect, 2000);   // 断线自动重连
  };
}
connect();
</script>
要点:
onclose回调里延迟重连,别立即重连,避免服务端故障时雪崩式打满连接- 生产环境建议加 指数退避(2s → 4s → 8s...)+ 最大重试次数
- 重连成功后记得重新上报用户身份(把 user_id 带在 URL 里,如
/ws/user/{user_id}),服务端自动恢复绑定
至此,「服务端断线捕获 + 前端自动重连」双保险闭环,生产可用。
八、运行方式
本篇完整可运行代码在配套文件 day21.py 中,包含全部接口 + 两个浏览器测试页:
bash
pip install fastapi uvicorn websockets
uvicorn day21:app --reload --port 8000| 地址 | 说明 |
|---|---|
/chat |
广播聊天室测试页(多开窗口体验群发 + 断线自动重连) |
/user/{user_id} |
用户专属通道测试页(配合 /push/msg 体验主动推送) |
/push/msg |
HTTP 主动推送接口 |
开两个浏览器窗口访问 /chat 体验广播,再开 /user/u1001 配合 /push/msg 体验专属推送,全程实时无刷新。
九、总结
- HTTP 是"你问我答",WebSocket 是"打电话":一次握手、双向随时互发,是实时业务的地基
- 最简三步走:accept 接连接、循环 receive 收消息、send 回消息
- 断线必须捕获 :
WebSocketDisconnect不捕获,服务端日志直接崩 - ConnectionManager 统一管理在线连接:广播群发、在线人数统计;广播记得给死连接做异常保护
- 按用户ID绑定连接 :
Dict[user_id, WebSocket]实现单人专属推送 - HTTP + WebSocket 联动 :普通接口触发
send_msg_to_user,实现订单/告警/站内信实时推送 - 前端 onclose 自动重连 + 服务端异常捕获,双保险闭环
WebSocket 的核心心法就一句话:连接是资源,要统一管、要能断线兜底、要能按人推送。
十、下期预告
Day22 我们基于本篇全部能力,做一个 WebSocket 聊天室完整项目:多人群聊、好友私聊、在线用户列表、历史消息存储,把零散能力串成可直接写进简历的完整项目。
我们下期见!