一、MyBatis的定义
1.基本概念
MyBatis是一种针对于数据库操作的持久层框架,它与spring无关,它的作用就是简化JDBC,可以说它是针对JDBC的封装,这样我们在spring项目中就能够更方便的操作数据库。
2.回顾JDBC
JDBC是我们在写Java代码时操作数据库的一套流程,它的使用方法为:
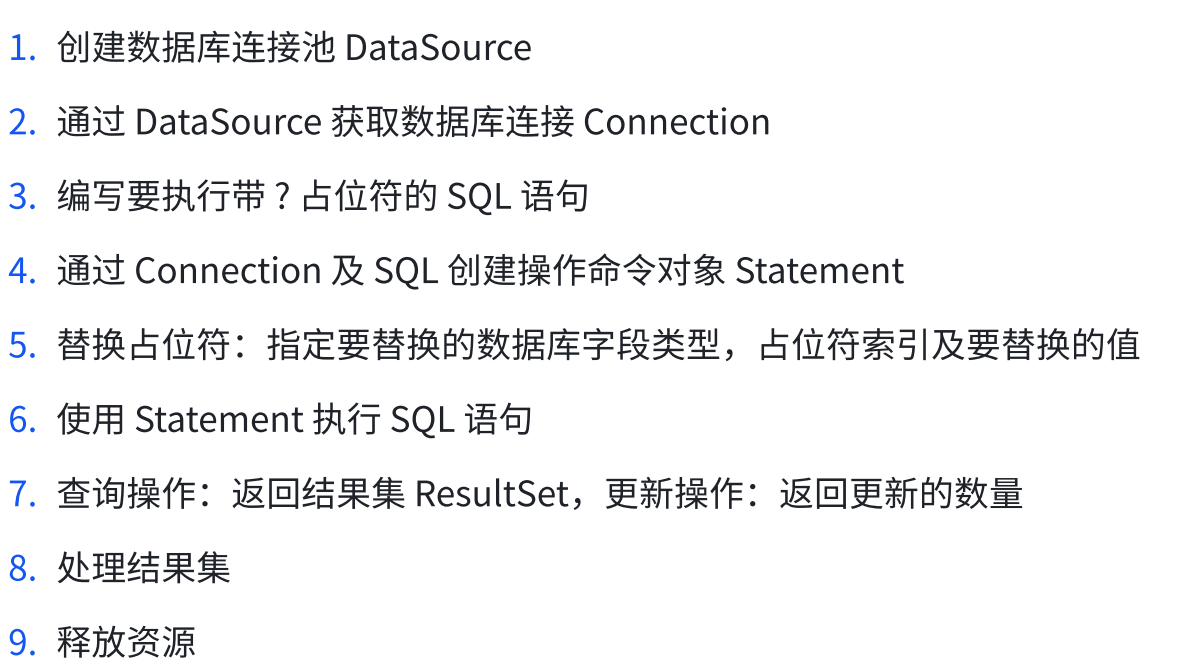
在JDBC编程中有很多共性的地方可以使用配置信息、注解等操作来代替。
首先需要创建一个DataSource对象:
java
private final DataSource dataSource;
public SimpleJdbcOperation(DataSource dataSource){
   this.dataSource = dataSource;
 }
这里的DataSource对象是用来与数据库建立连接的。
其次就是与数据库建立连接并且构建PreparedStatement对象,之后再通过Connection对象创建sql语句,最后通过PreparedStatement对象绑定参数、执行sql语句。
java
public void queryBook() {
    Connection connection = null;
    PreparedStatement stmt = null;
    ResultSet rs = null;
    Book book = null;
    try {
        //获取数据库连接
        connection = dataSource.getConnection();
        //创建语句
        stmt = connection.prepareStatement("select book_name, book_author, book_isbn from soft_bookrack where book_isbn =?");
        //参数绑定
        stmt.setString(1, "9787115417305");
        //执⾏语句
        rs = stmt.executeQuery();
        if (rs.next()) {
            book = new Book();
            book.setName(rs.getString("book_name"));
            book.setAuthor(rs.getString("book_author"));
            book.setIsbn(rs.getString("book_isbn"));
        }
        System.out.println(book);
    } catch (SQLException e) {
        //处理异常信息
    } finally {
        //清理资源
        try {
            if (rs != null) {
                rs.close();
            }
            if (stmt != null) {
                stmt.close();
            }
            if (connection != null) {
                connection.close();
            }
        } catch (SQLException e) {

        }
    }
}
这里stmt的作用有:1.执行预编译的 SQL 语句,2.用setString进行参数绑定,也就是将第一个占位符和某个字符串绑定;3.执行sql语句。
二、使用MyBatis
1.创建一个spring工程
先new一个spring project,之后就是一路创建并且填写组织ID、项目ID等字段(前面以经说过,这里就不再赘述)。
之后再选择Lombok依赖、SpringWeb依赖、MySQL Driver驱动依赖以及MyBatis Framework依赖,就可以创建成功了。
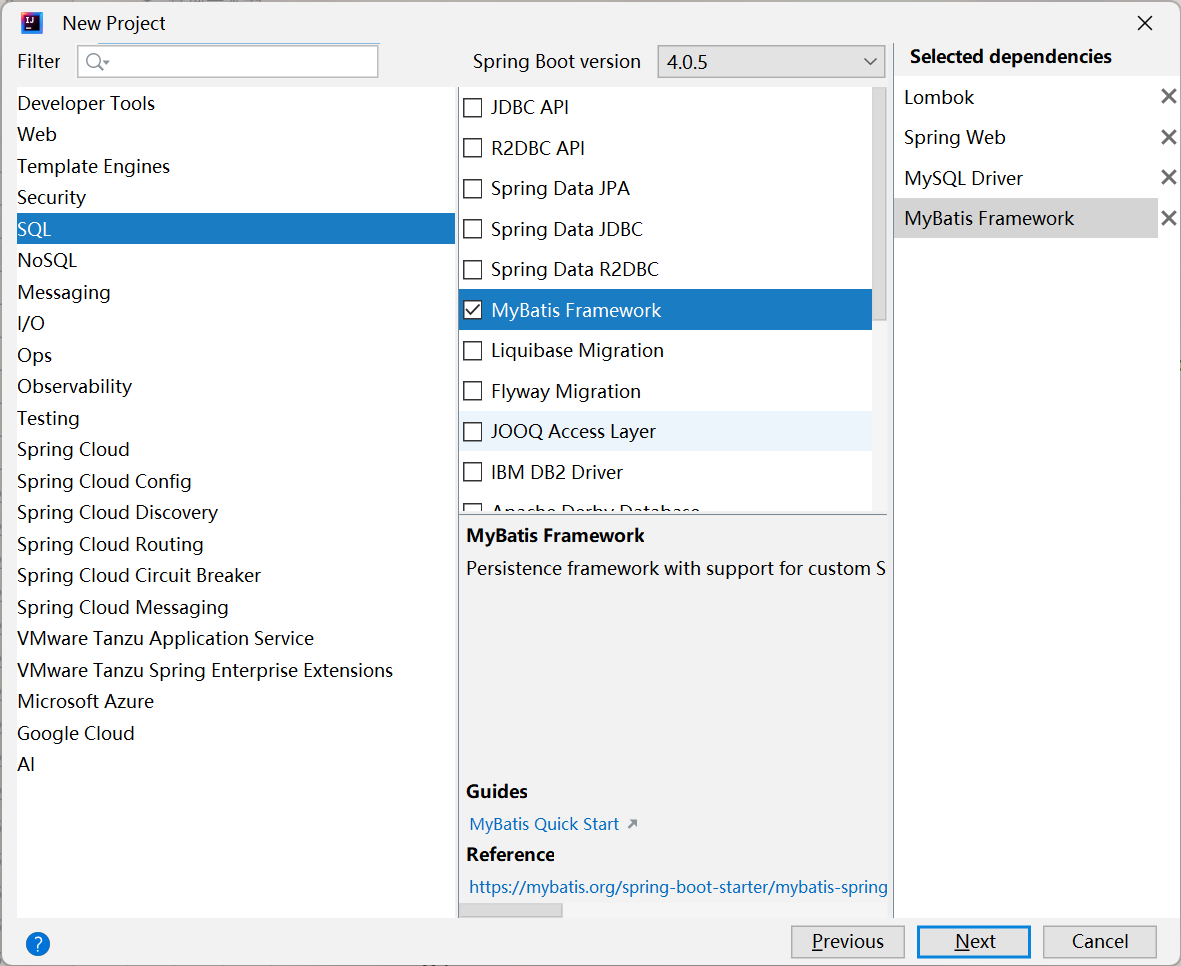
唯一需要注意的点就在这里,剩下的还是删除一些plugin插件。
2.引入关于MyBatis的一些依赖(如果创建工程时没有选择的话)
MyBatis依赖:
XML
<!--       Mybatis 依赖包-->
      <dependency>
         <groupId>org.mybatis.spring.boot</groupId>
         <artifactId>mybatis-spring-boot-starter-test</artifactId>
         <version>4.0.1</version>
         <scope>test</scope>
      </dependency>
MySQL驱动依赖:
XML
<!--mysql驱动包-->
<dependency>
   <groupId>com.mysql</groupId>
   <artifactId>mysql-connector-j</artifactId>
   <scope>runtime</scope>
</dependency>
3.引入数据库连接配置(.YAML)
java
# 数据库连接配置
spring:
  datasource:
#    在这里jdbc可以设置一下数据库名称以及密码等
    url: jdbc:mysql://127.0.0.1:3306/mybatis_test?characterEncoding=utf8&useSSL=false
    username: root
    password: password
    driver-class-name: com.mysql.cj.jdbc.Driver
这里username是数据库用户名,下面password是密码,上面url包含了IP地址和端口号以及数据库名称,后面则是编码方式。
4.使用MyBatis写持久层代码
4.1查找用户信息
首先就是使用注解来查找用户信息,这里的"@Mapper"注解的作用与之前五大注解的作用类似,都是将这个对象交给spring管理,不过这样直接查询有一个不足的地方就是没有将数据库表中以下划线连接的字段与Java代码中的小驼峰形式的字段映射起来,使得这里无法查询到某些字段的数据。
java
@Mapper
public interface UserInfoMapper {
    //直接执行sql查询语句
    @Select("SELECT * FROM `user_info`")
    List<UserInfo> selectList();
}
4.2解决办法
在这里一共有三种解决方法:
1.改变SQL语句,将数据库表中的字段与Java变量关联起来:
java
//通过修改sql语句表示字段和Java属性的映射
    @Select("SELECT id,  username,  `password`,  age,  gender,  phone,  " +
            "delete_flag AS deleteFlag,  create_time AS createTime," +
            "update_time AS updateTime FROM `user_info`")
    List<UserInfo> selectList2();
但是写完之后我们会发现如果每个SQL语句都需要像这样写一大长串,我们的工作量就会很大,因此发明了第二种解决方案。
2.使用@Results 注解实现字段和Java属性的映射:
java
@Results(value = {
            //column就是数据库表中的字段
            @Result(column = "delete_flag",property = "deleteFlag"),
            @Result(column = "create_time",property = "createTime"),
            @Result(column = "update_time",property = "updateTime")
    })
    @Select("SELECT * FROM `user_info`")
    List<UserInfo> selectList3();
使用@Results注解之后看着可读性就比较高了,但是众所周知,程序员要保证效率,这里还有很多共性的地方,因此可以利用注解中的id属性让所有想使用Results注解的语句都能够引用。
使用id属性来使得所有引用@Results的SQL语句都能映射:
java
@Results(id = "BaseMap",value = {
            //column就是数据库表中的字段
            @Result(column = "delete_flag",property = "deleteFlag"),
            @Result(column = "create_time",property = "createTime"),
            @Result(column = "update_time",property = "updateTime")
    })
  @Select("SELECT * FROM `user_info`")
  List<UserInfo> selectList3();
    //将@Result注解变为可以被多个sql语句引用
  @ResultMap(value = "BaseMap")
  @Select("SELECT * FROM `user_info`")
  List<UserInfo> selectList4();
这样既保证了注解引用的准确性又保证了引用注解的效率,但是还是比较麻烦,因此推出了第三种方法-开启驼峰命名。
UserInfoMapper中指定的Results的id不能在其他类中使用。
3.开启驼峰命名(推荐这种写法):
开启驼峰命名可以使得每个使用驼峰命名的属性都能够被字段映射到:
java
mybatis:
  configuration:
    map-underscore-to-camel-case: true #配置驼峰⾃动转换
4.3单元测试
我们在做项目之后,对于这个项目的第一个测试人员就应该是我们程序员自己,因此在写完每个方法之后都可以对这个方法进行测试,这也是单元测试。
创建单元测试类的方法:
需要右键我们自己写完的方法,点击Gennrate,之后选择Test,之后在下面勾选上自己想要测试的方法即可。
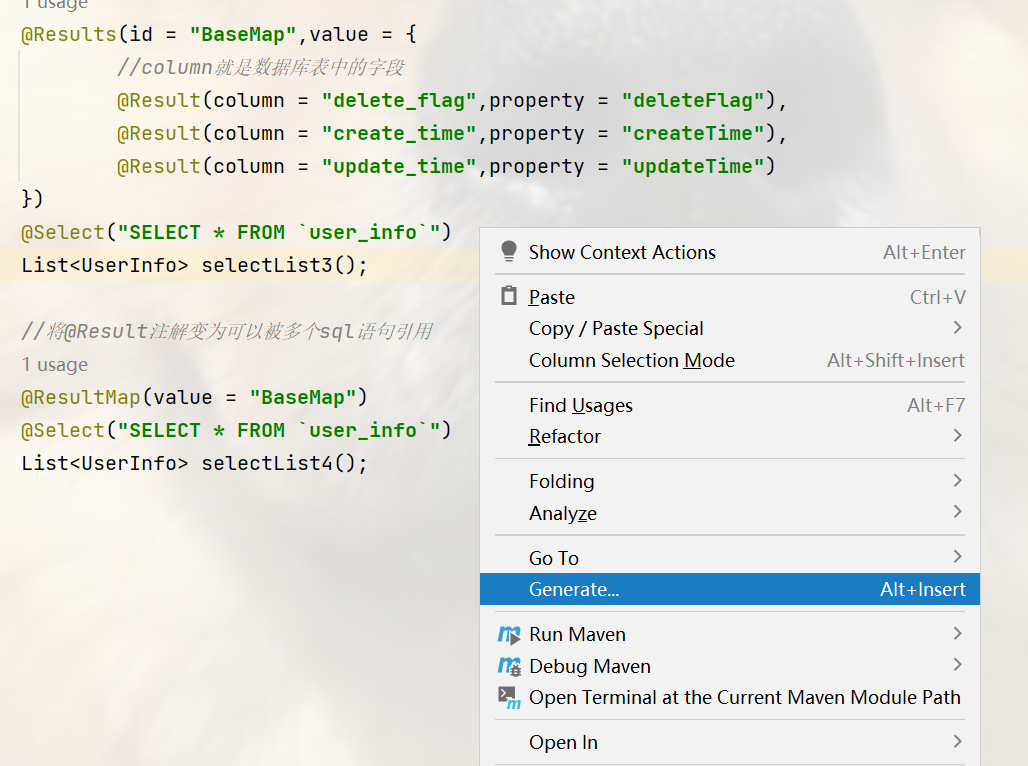
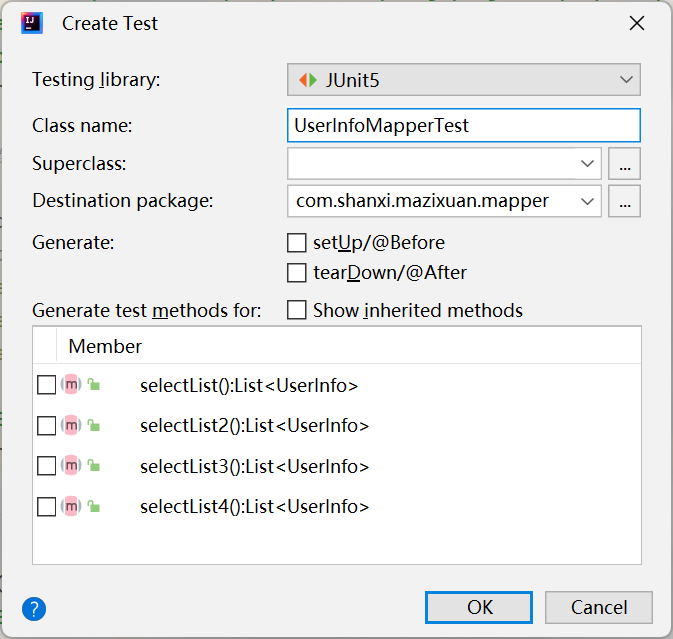
创建之后在test目录下就会多出一个测试类(同一个类中的方法在测试类中也是一一对应的):
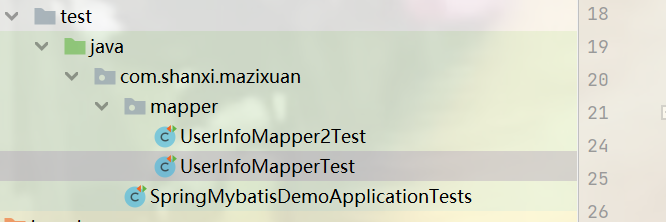
这是idea自动生成测试代码,如果想的话也可以手搓,创建之后记得加上@SpringBootTest注解,方法上也要加上@Test注解。
5.MyBatis的一些基础操作
5.1打印日志
我们在工作时难免需要打印一些日志,使用MyBatis操作数据库时也是如此,因此这里可以引入打印MyBatis日志的配置文件:
java
#    配置打印 MyBatis⽇志
mybatis:
  configuration:
    log-impl: org.apache.ibatis.logging.stdout.StdOutImpl
加上这些配置之后,测试的时候就能看见日志了。
5.2参数传递
在构造SQL语句时,会存在一些情况就是将暂时不想写死的条件用一个占位符代替,比如:
"select book_name, book_author, book_isbn from soft_bookrack where book_isbn =?"
在MyBatis中要传递参数也很简单,就是将"?"改为"#{}"即可。
java
@Mapper
public interface UserInfoMapper2 {
    //传递参数,通过传递一个Integer类型的参数来实现查找
    @Select("select id,username, `password`," +
            " age, gender, phone from user_info where id = #{id} ")
    List<UserInfo> selectById(Integer id);
}
如果只是单个参数的传递,那么这个参数可以是任意名称,即使参数和"#{}"中的内容对不上,JDK也会自动填充,但是如果是多个参数的话就不可以了。
java
//如果只有一个参数,那么可以随意传名称(不建议这么写)
    @Select("select id,username, `password`," +
            " age, gender, phone from user_info where id = #{ada} ")
List<UserInfo> selectById2(Integer id);如果时传递多个参数就不能随意填写了,必须要一一对应,不过对于这种情况,JDK给了一个新的方案,就是使用Param+i(第几个参数,从1开始)来进行参数传递,但是这样的话以后再加入新的传参会很麻烦。
java
@Select("SELECT * FROM `user_info` where age = #{age} and gender = #{gender}")
    List<UserInfo> selectByAgeAndGender(Integer age, Integer gender);

@Select("SELECT * FROM `user_info` where age = #{param1} and gender = #{param2}")
    List<UserInfo> selectByAgeAndGender(Integer age, Integer gender);
传递参数如果不想使用参数的原名,可以使用@Param注解来修改名称。
java
//实在是想改名可以利用@Param注解
    @Select("SELECT * FROM `user_info` where age = #{Age} and gender = #{Gender}")
    List<UserInfo> selectByAgeAndGender2(@Param("Age") Integer age, @Param("Gender") Integer gender);
传递的参数如果是对象的话,传进去的参数可以直接使用对象中的属性名:
java
//如果传递参数是对象的话,那么传递的名称要和对象中的属性名一致
    @Select("SELECT * FROM `user_info` where age = #{age} and password = #{password}")
    List<UserInfo> selectByAgeAndGender3(UserInfo userInfo);
java
@NoArgsConstructor
@Data
public class UserInfo {
    private Integer id;
    private String username;
    private String password;
    private Integer age;
    private Integer gender;
    private String phone;
    private Integer deleteFlag;
    private Date createTime;
    private Date updateTime;

    public UserInfo(String username, String password, Integer age) {
        this.username = username;
        this.password = password;
        this.age = age;
    }
}
如果使用了param注解修改了对象的名称,那么在传递参数时需要用对象.属性名的方式传递参数:
java
//传递参数为对象,并且修改了名称之后,需要在传递属性时变为"名称+属性名"
    @Insert("insert into user_info (username, `password`, age) VALUE(#{use.username}, #{use.password}, #{use.age} )")
    Integer insertUser(@Param("use") UserInfo userInfo);
获取表中的自增id,可以使用@Options注解:
java
//这个注释的作用是插入时获取自增id
    @Options(useGeneratedKeys = true,keyProperty = "id")
    @Insert("insert into user_info (username, `password`, age) VALUE(#{use.username}, #{use.password}, #{use.age} )")
useGeneratedKeys属性的作用就是让 MyBatis 使用 JDBC 的Statement . getGenerate dKeys() 方法获取数据库内部生成的值,并将其赋值给了userInfo对象的id属性,后续可以使用get方法获取到id值。
5.3增删查改操作
java
    //查找数据
    @Select("SELECT * FROM `user_info`")
    List<UserInfo> selectList();
    //增加数据
    @Insert("insert into user_info (username, `password`, age) VALUE(#{use.username}, #{use.password}, #{use.age} )")
    Integer insertUser(@Param("use") UserInfo userInfo);
    //删除数据
    @Delete("delete from user_info where id = #{id}")
    Integer deleteUser(Integer integer);
    //修改数据
    @Update("update user_info set gender = #{gender}, delete_flag = #{deleteFlag}  where id = #{id}")
    Integer updateUser(UserInfo userInfo);
三、使用XML配置文件来实现mybatis开发
1.配置连接字符串和MyBatis
mybatis开发有两种方式,一种是注解,另一种则是使用XML,要使用XML配置文件来实现mybatis开发。
首先就是引入数据库连接配置和设置xml文件识别的文件地址。
XML
# 数据库连接配置
spring:
  application:
    name: spring-mybatis-demo
  datasource:
#    在这里jdbc可以设置一下数据库名称以及密码等
    url: jdbc:mysql://127.0.0.1:3306/mybatis_test?characterEncoding=utf8&useSSL=false
    username: root
    password: mazixuan
    driver-class-name: com.mysql.cj.jdbc.Driver

#    配置打印 MyBatis⽇志
mybatis:
# 配置 mybatis xml 的⽂件路径,在 resources 创建所有表的 xml ⽂件
#  这里的classpath就相当于resources文件夹,mybatis关心xml文件的名字,路径和名称都要一致
  mapper-locations: classpath:mybatis/UserInfoMapperXML.xml
  configuration:
#    配置自动打印日志
    log-impl: org.apache.ibatis.logging.stdout.StdOutImpl
map-underscore-to-camel-case: true #配置驼峰⾃动转换这里mapper-locations:表示的就是识别哪个文件中的sql语句。
2.引入MyBatis依赖和MySQL驱动
这个之前就已经引入过了,不必多说。
XML
<!--       Mybatis 依赖包-->
<dependency>
   <groupId>org.mybatis.spring.boot</groupId>
   <artifactId>mybatis-spring-boot-starter</artifactId>
   <version>4.0.1</version>
</dependency>
XML
<!--mysql驱动包-->
<dependency>
   <groupId>com.mysql</groupId>
   <artifactId>mysql-connector-j</artifactId>
   <scope>runtime</scope>
</dependency>
3.在resource目录下创建.xml文件
这个文件就是存放SQL语句的文件,其中文件名称可以随意,不过一般公司都会有规范,跟着规范来即可,不过要注意这个路径以及名称要与前面MyBatis配置文件中的mapper-locations:后面的路径和名称保持一致。
XML
<?xml version="1.0" encoding="UTF-8"?>
<!DOCTYPE mapper PUBLIC "-//mybatis.org//DTD Mapper 3.0//EN"
        "http://mybatis.org/dtd/mybatis-3-mapper.dtd">
<mapper namespace="com.shanxi.mazixuan.mapper.UserInfoMapperXML">
</mapper>
这里namespace的路径加类名是你开发时使用的持久层接口的路径和类名。
4.写持久层代码
4.1查询语句
Mapper层代码:
java
package com.shanxi.mazixuan.mapper;

import com.shanxi.mazixuan.model.UserInfo;
import lombok.extern.slf4j.Slf4j;
import org.apache.ibatis.annotations.Mapper;
import org.apache.ibatis.annotations.Param;

import java.util.List;


@Mapper
public interface UserInfoMapperXML {
    List<UserInfo> selectList();
}
.xml文件代码(简单的查询语句):
XML
<?xml version="1.0" encoding="UTF-8"?>
<!DOCTYPE mapper PUBLIC "-//mybatis.org//DTD Mapper 3.0//EN"
        "http://mybatis.org/dtd/mybatis-3-mapper.dtd">
<mapper namespace="com.shanxi.mazixuan.mapper.UserInfoMapperXML">
<!--    一个接口只对应一个XML-->
    <select id="selectList" resultType="com.shanxi.mazixuan.model.UserInfo">
        select * from user_info
    </select>
</mapper>
这里可以下载一个名为MyBatisX的一个插件,它能够在写接口时根据方法名猜测配置文件中需要什么标签,比如你的方法名为selectList(),那么它会根据这个名称推断你需要<select>标签来查询数据。
4.2映射键值对
映射sql中的字段与类中的成员变量与注解的类似,1.直接在sql语句中使用as;2.配置使用自动转换驼峰;3.指定映射关系
java
List<UserInfo> selectList2();
List<UserInfo> selectList3(String sort);
转换驼峰和使用as的之前也都有,无非就是在sql中或在配置文件中体现,这里指定映射关系
XML
    <select id="selectList2" resultType="com.shanxi.mazixuan.model.UserInfo">
        SELECT id,  username,  `password`,  age,  gender,  phone,  delete_flag AS deleteFlag,
        create_time AS createTime, update_time AS updateTime FROM `user_info`
    </select>
XML
<resultMap id="BaseMap1" type="com.shanxi.mazixuan.model.UserInfo">
        <id column="id" property="id"></id>
        <result column="delete_flag" property="deleteFlag"></result>
        <result column="create_time" property="createTime"></result>
        <result column="update_time" property="updateTime"></result>
        </resultMap>
    <select id="selectList3" resultMap="BaseMap1">
<!--        使用$符号时需要注意sql注入的问题-->
<!--        可以使用MySQL内置的方法concat方法来处理-->
<!--        select * from user_info Order By id ${sort}-->
        select * from user_info where username like concat('%',#{username},'%')
    </select>
映射时需要注意标签的id和type两个属性,id可以随便起名,type需要指定实体类,也就是model层的对象。
4.3使用xml进行传参
java
    Integer insertUser(UserInfo userInfo);
Integer insertUser2(@Param("userInfo") UserInfo userInfo);xml传参的规则与注解传参一致,不过XML文件中对于空格/换行等是无效的,不影响执行
XML
<!--    使用XML传参与注解传参的规则是一样的-->
    <insert id="insertUser">
        insert into user_info (username, `password`, age) VALUE(#{username}, #{password}, #{age} )
    </insert>

    <insert id="insertUser2" useGeneratedKeys="true" keyProperty="id">
        insert into user_info (username, `password`, age)
        VALUE(#{userInfo.username}, #{userInfo.password}, #{userInfo.age} )
    </insert>
4.4删除和更新
java
    Integer deleteUserById(Integer id);
    Integer updateUser(UserInfo userInfo);
XML
    <delete id="deleteUserById">
        delete from user_info where id = #{id}
    </delete>

    <update id="updateUser">
        update user_info set gender = #{gender}, delete_flag = #{deleteFlag}  where id = #{id}
    </update>
四、多表查询
java
package com.shanxi.mazixuan.mapper;

import com.shanxi.mazixuan.model.ArticleInfo;
import org.apache.ibatis.annotations.Mapper;
import org.apache.ibatis.annotations.Select;

@Mapper
public interface ArticleInfoMapper {
    @Select("select ta.*, tb.username, tb.age from article_info ta " +
            "left join user_info tb on ta.uid = tb.id " +
            "where ta.id= #{id}")
    ArticleInfo queryArticleInfo();
}
针对于多表查询,只能说与单表查询的不同点只在于SQL语句不同,其他的关于MyBatis的使用都是一样的。
五、#{}和${}的区别
1.主要不同点
这两个符号的区别主要在于:
1.#{}是预编译SQL,${}是即使SQL,这一点在运行时的日志中的sql语句有所体现;
2.#{}能够预防SQL注入,${}不能;
3.当传递的参数是String类型时,需要添加'',但是${}不会拼接'',需要程序员在编写SQL时手动加上''。
2.#{}相比于${}的优点
1.性能更好:预编译SQL的性能更高,它编译一次之后会将编译的SQL缓存起来,下次再使用时无需再重复编译和优化SQL的步骤;
2.更安全(防止SQL注入):预编译SQL会先检查一遍SQL语句,如果存在SQL注入会不通过。
3.${}的使用场景
${}在一定的场景下也需要被用到,这也是它没有被优化的原因,比如在排序的场景它就能够被使用到。
java
@Select("select id, username, age, gender, phone, delete_flag, create_time,  update_time "
     +  "from user_info order by id #{sort} ")
List queryAllUserBySort(String sort);
这里使用#{}就会报错,因为编译器会将其中的sort前后加上'',导致sql错误。
4.like查询
java
@Select("select id, username, age, gender, phone, delete_flag, create_time,
  update_time " +
  "from user_info where username like '%#{key}%' ")
 List queryAllUserByLike(String key);
当使用#{}时就会报错,原因也是他会自动加上'',但是使用${}又会存在sql注入的问题,因此可以使用mysql的内置方法concat()来处理,也就是将'%#{key}%'改为concat('%',#{key},'%'),这个方法可以让这三个拼接起来。
六、数据库连接池
在使用MyBatis框架时,用到了数据库连接池,这与常量池以及线程池等类似,是指在创建connection连接时在一个容器中存放几个现成的连接,当需要使用时就从这个池中取,等到释放时还会继续存放进去以便下次使用,这样既提高了效率还减少了网络开销,实现了资源重用。
不过MyBatis框架本身是不提供数据库连接池的,只是有一些组件提供了这个功能,例如:C3P0 、 DBCP 、 Druid 、 Hikari,目前比较流行的是Hikari 和Druid
如果要使用数据库连接池只需要引入依赖和配置文件即可:
XML
<dependency>
  <groupId>com.alibaba</groupId>
  <artifactId>druid-spring-boot-3-starter</artifactId>
  <version>1.2.21</version>
</dependency>
如果spring-boot是2.*版本,使用这个依赖:
XML
<dependency>
  <groupId>com.alibaba</groupId>
  <artifactId>druid-spring-boot-starter</artifactId>
  <version>1.1.17</version>
</dependency>