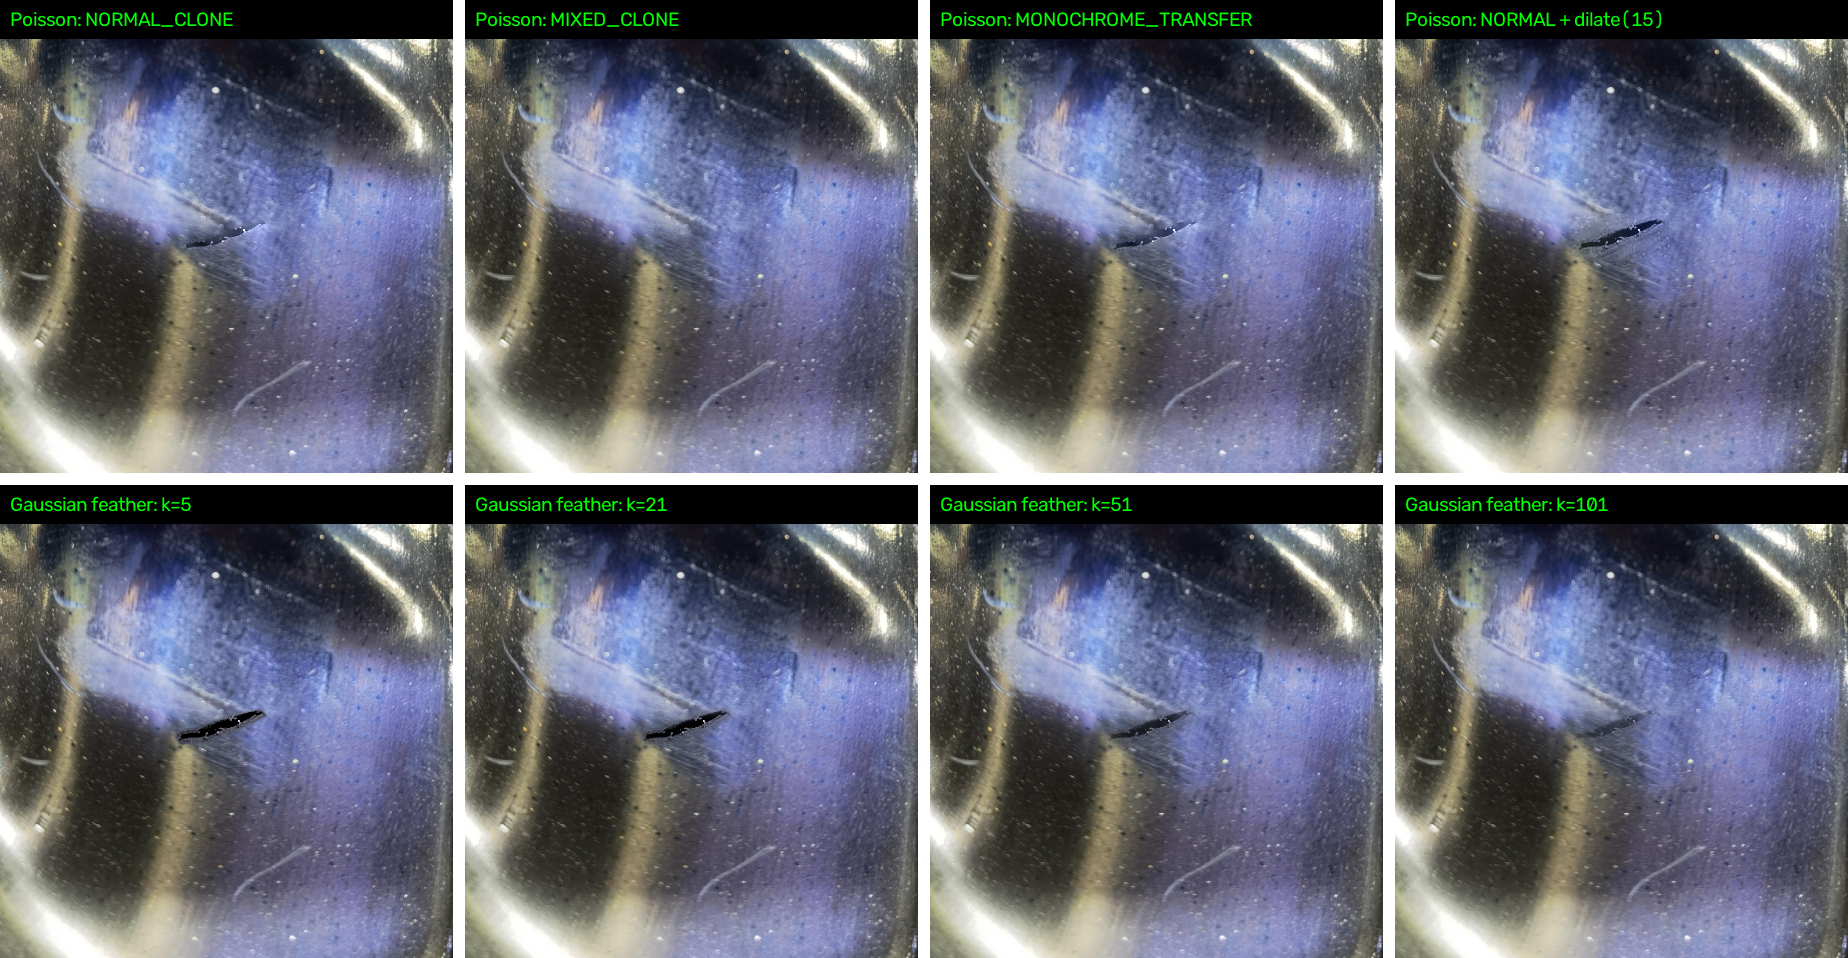
一、前言
本章实验缺陷数据合成方法,目的是为了将常见的一些缺陷能够和正样本图像融合,增加缺陷数据数量,便于后续有监督模型学习训练,主要使用cv2 的泊松融合和高斯羽化融合做无缝融合
二、代码
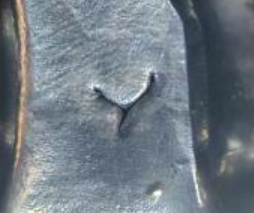
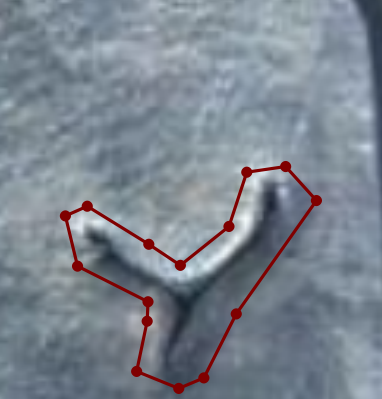
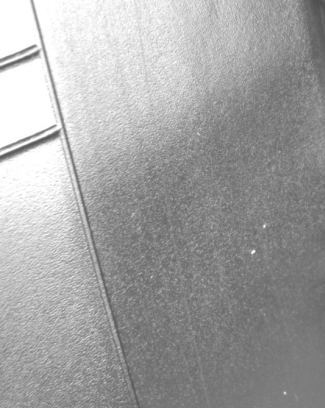
所用缺陷图像和 背景图像如下所示,并且缺陷图像里的缺陷,使用 labelme 绘制多边形区域(保存在同名json文件),使缺陷能够更精确的抠下,不包括冗余部分
crack.png
crack.json , labelme绘制多边形框
bg.png
python
# -*- coding: utf-8 -*-
"""
对比:cv2 泊松融合(seamlessClone) vs 高斯羽化混合
数据:./data/crack.png + labelme json + bg.png
输出:./fusion_compare.png
"""
import os
import cv2
import json
import glob
import numpy as np

DATA_DIR = './data'
OUT_PATH = './fusion_compare.png'


# ---------------- 工具函数 ----------------
def add_title(img, text, bar_h=38, fs=0.65):
    """在图片顶部加一条黑底绿字标题栏"""
    out = img.copy()
    cv2.rectangle(out, (0, 0), (out.shape[1], bar_h), (0, 0, 0), -1)
    cv2.putText(out, text, (10, bar_h - 12),
                cv2.FONT_HERSHEY_SIMPLEX, fs, (0, 255, 0), 1, cv2.LINE_AA)
    return out


def hstack_row(imgs, gap=12):
    """横向拼接(补齐高度)"""
    H = max(im.shape[0] for im in imgs)
    parts = []
    for i, im in enumerate(imgs):
        if im.shape[0] < H:
            pad = np.zeros((H - im.shape[0], im.shape[1], 3), np.uint8)
            im = np.vstack([im, pad])
        parts.append(im)
        if i < len(imgs) - 1:
            parts.append(np.full((H, gap, 3), 255, np.uint8))
    return np.hstack(parts)


def vstack_rows(rows, gap=12):
    """纵向拼接(补齐宽度)"""
    W = max(r.shape[1] for r in rows)
    parts = []
    for i, r in enumerate(rows):
        if r.shape[1] < W:
            pad = np.full((r.shape[0], W - r.shape[1], 3), 255, np.uint8)
            r = np.hstack([r, pad])
        parts.append(r)
        if i < len(rows) - 1:
            parts.append(np.full((gap, W, 3), 255, np.uint8))
    return np.vstack(parts)


# ---------------- 1. 读取数据 ----------------
crack = cv2.imread(os.path.join(DATA_DIR, 'crack.png') ,cv2.IMREAD_GRAYSCALE )
bg    = cv2.imread(os.path.join(DATA_DIR, 'bg.png')  ,cv2.IMREAD_GRAYSCALE  )

crack = cv2.cvtColor(crack, cv2.COLOR_GRAY2BGR)
bg = cv2.cvtColor(bg, cv2.COLOR_GRAY2BGR)

assert crack is not None, 'crack.png 读取失败'
assert bg    is not None, 'bg.png 读取失败'


# 找 labelme json(优先 crack.json,否则取目录里第一个 json)
json_path = os.path.join(DATA_DIR, 'crack.json')
if not os.path.exists(json_path):
    cands = sorted(glob.glob(os.path.join(DATA_DIR, '*.json')))
    if not cands:
        raise FileNotFoundError('未找到 labelme json 文件')
    json_path = cands[0]

with open(json_path, 'r', encoding='utf-8') as f:
    label = json.load(f)

# ---------------- 2. 由多边形生成缺陷 mask ----------------
h, w = crack.shape[:2]
mask = np.zeros((h, w), np.uint8)
for shp in label.get('shapes', []):
    pts = np.round(np.asarray(shp['points'], np.float64)).astype(np.int32)
    cv2.fillPoly(mask, [pts], 255)

if mask.max() == 0:
    raise RuntimeError('json 中未解析到有效多边形')

# ---------------- 3. 裁剪缺陷区域 & 确定目标位置 ----------------
ys, xs = np.where(mask > 0)
x0, y0, x1, y1 = xs.min(), ys.min(), xs.max(), ys.max()

PAD = 80                      # 给羽化留衰减空间(要 > 最大模糊核半径)
x0p, y0p = max(0, x0 - PAD), max(0, y0 - PAD)
x1p, y1p = min(w, x1 + PAD + 1), min(h, y1 + PAD + 1)

patch      = crack[y0p:y1p, x0p:x1p].copy()
mask_patch = mask[y0p:y1p, x0p:x1p].copy()
ph, pw = patch.shape[:2]

# 如果背景比 patch 还小,先放大背景
if bg.shape[0] < ph + 20 or bg.shape[1] < pw + 20:
    s = max((pw + 20) / bg.shape[1], (ph + 20) / bg.shape[0]) * 1.2
    bg = cv2.resize(bg, (int(bg.shape[1] * s), int(bg.shape[0] * s)))

# 目标位置:放到背景图中心
tx = max(0, (bg.shape[1] - pw) // 2)
ty = max(0, (bg.shape[0] - ph) // 2)
center = (tx + pw // 2, ty + ph // 2)   # seamlessClone 用的目标中心点

# ---------------- 4. 泊松融合(不同参数) ----------------
poisson_imgs = []

# 4.1 三种克隆模式
for name, flag in [('NORMAL_CLONE',          cv2.NORMAL_CLONE),
                   ('MIXED_CLONE',           cv2.MIXED_CLONE),
                   ('MONOCHROME_TRANSFER',   cv2.MONOCHROME_TRANSFER)]:
    res = cv2.seamlessClone(patch, bg, mask_patch, center, flag)
    poisson_imgs.append(add_title(res, f'Poisson: {name}'))

# 4.2 NORMAL_CLONE + 膨胀 mask(改变融合区域大小)
kernel = cv2.getStructuringElement(cv2.MORPH_ELLIPSE, (15, 15))
mask_dil = cv2.dilate(mask_patch, kernel)
res = cv2.seamlessClone(patch, bg, mask_dil, center, cv2.NORMAL_CLONE)
poisson_imgs.append(add_title(res, 'Poisson: NORMAL + dilate(15)'))

# ---------------- 5. 高斯羽化(不同模糊核) ----------------
gauss_imgs = []
mask_f = mask.astype(np.float32)

for ks in [5, 21, 51, 101]:
    # 对 mask 做高斯模糊 → 得到 0~1 的 alpha 渐变
    m = cv2.GaussianBlur(mask_f, (ks, ks), 0) / 255.0
    m = m[y0p:y1p, x0p:x1p][..., None]          # 取 patch 对应的 alpha

    roi = bg[ty:ty + ph, tx:tx + pw].astype(np.float32)
    blend = roi * (1.0 - m) + patch.astype(np.float32) * m

    res = bg.copy()
    res[ty:ty + ph, tx:tx + pw] = np.clip(blend, 0, 255).astype(np.uint8)
    gauss_imgs.append(add_title(res, f'Gaussian feather: k={ks}'))

# ---------------- 6. 拼接 & 输出 ----------------
row1 = hstack_row(poisson_imgs)
row2 = hstack_row(gauss_imgs)
canvas = vstack_rows([row1, row2])

cv2.imwrite(OUT_PATH, canvas)
print(f'已保存对比图: {OUT_PATH}')

# 屏幕显示(过大时缩放一下)
show = canvas
max_w = 1600
if show.shape[1] > max_w:
    s = max_w / show.shape[1]
    show = cv2.resize(show, (int(show.shape[1] * s), int(show.shape[0] * s)))

cv2.imshow('Poisson vs Gaussian Feather', show)
cv2.waitKey(0)
cv2.destroyAllWindows()
三、运行结果
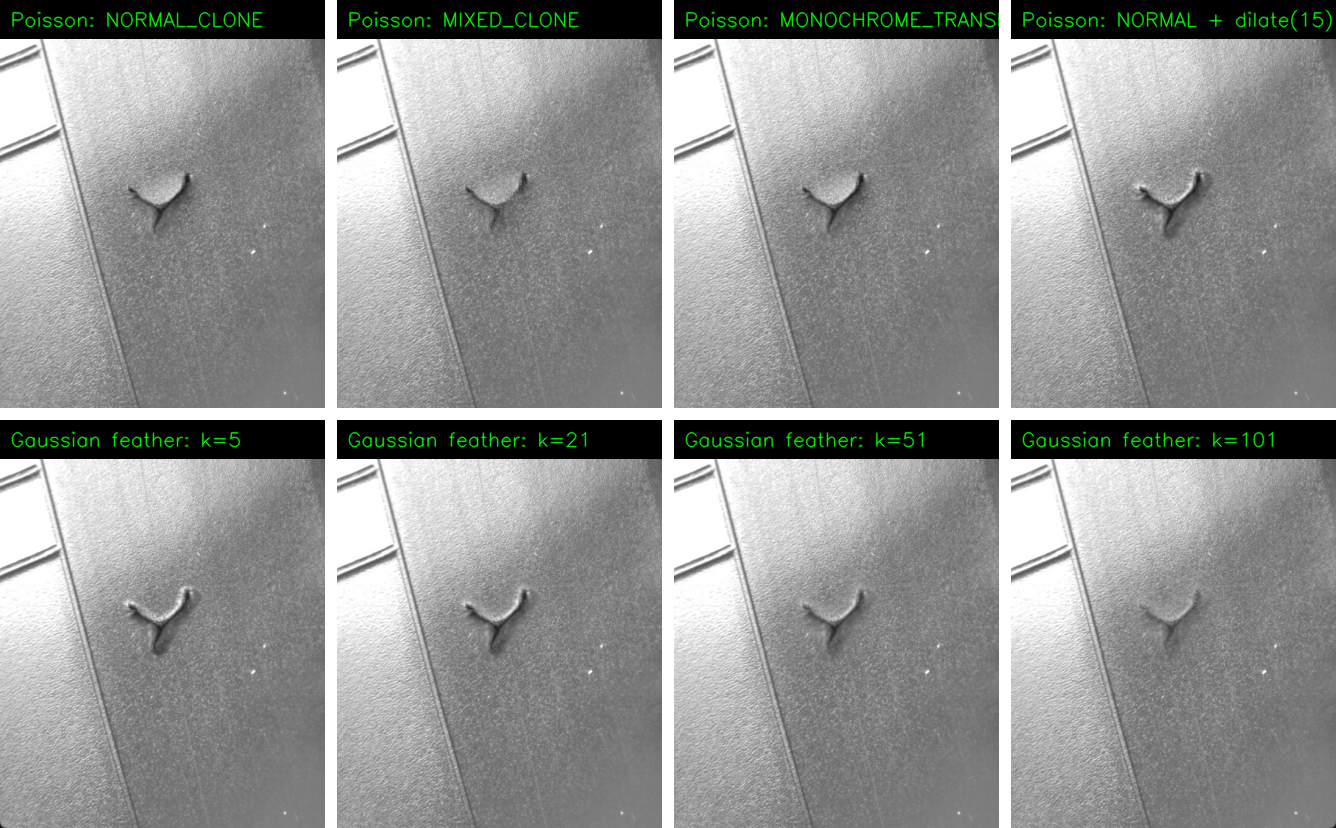
可以看到融合效果不错,当前演示的是 缺陷图像灰度化后和 灰度的背景图像进行融合
四、针对彩色背景图像的融合问题
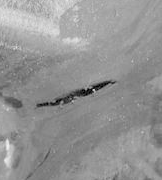
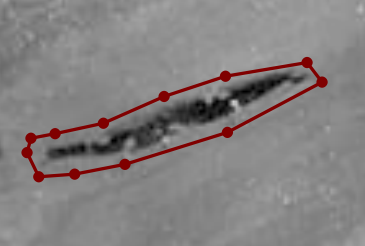
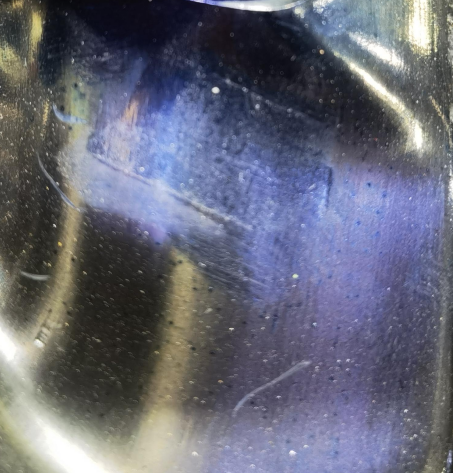
如果背景图像为彩色图像,则需要把 缺陷图像的各个通道的色彩迁移至与背景图像接近,再使用 泊松融合或高斯融合做融合
crack.png
crack.json labelme绘制多边形框
bg.png
五、代码
python
# -*- coding: utf-8 -*-
"""
对比:cv2 泊松融合(seamlessClone) vs 高斯羽化混合
数据:./data/crack.png + labelme json + bg.png
输出:./fusion_compare.png
"""
import os
import cv2
import json
import glob
import numpy as np

DATA_DIR = './data2'
OUT_PATH = './fusion_compare.png'


# ---------------- 工具函数 ----------------
def add_title(img, text, bar_h=38, fs=0.65):
    """在图片顶部加一条黑底绿字标题栏"""
    out = img.copy()
    cv2.rectangle(out, (0, 0), (out.shape[1], bar_h), (0, 0, 0), -1)
    cv2.putText(out, text, (10, bar_h - 12),
                cv2.FONT_HERSHEY_SIMPLEX, fs, (0, 255, 0), 1, cv2.LINE_AA)
    return out


def hstack_row(imgs, gap=12):
    """横向拼接(补齐高度)"""
    H = max(im.shape[0] for im in imgs)
    parts = []
    for i, im in enumerate(imgs):
        if im.shape[0] < H:
            pad = np.zeros((H - im.shape[0], im.shape[1], 3), np.uint8)
            im = np.vstack([im, pad])
        parts.append(im)
        if i < len(imgs) - 1:
            parts.append(np.full((H, gap, 3), 255, np.uint8))
    return np.hstack(parts)


def vstack_rows(rows, gap=12):
    """纵向拼接(补齐宽度)"""
    W = max(r.shape[1] for r in rows)
    parts = []
    for i, r in enumerate(rows):
        if r.shape[1] < W:
            pad = np.full((r.shape[0], W - r.shape[1], 3), 255, np.uint8)
            r = np.hstack([r, pad])
        parts.append(r)
        if i < len(rows) - 1:
            parts.append(np.full((gap, W, 3), 255, np.uint8))
    return np.vstack(parts)

def color_transfer(src, target):
    """
    将 src 的整体色调迁移到 target。
    原理:把 src 每个通道的均值和标准差,映射到 target 对应通道的均值和标准差。
    """
    src = src.astype(np.float32)
    target = target.astype(np.float32)

    # 计算每个通道的均值和标准差
    src_mean, src_std = cv2.meanStdDev(src)
    target_mean, target_std = cv2.meanStdDev(target)

    src_mean = src_mean.reshape(1, 1, 3)
    src_std = src_std.reshape(1, 1, 3)
    target_mean = target_mean.reshape(1, 1, 3)
    target_std = target_std.reshape(1, 1, 3)

    # 防止除零
    src_std = np.where(src_std < 1e-6, 1e-6, src_std)

    # 色彩迁移公式
    result = (src - src_mean) * (target_std / src_std) + target_mean
    result = np.clip(result, 0, 255).astype(np.uint8)
    return result


# ---------------- 1. 读取数据 ----------------
crack = cv2.imread(os.path.join(DATA_DIR, 'crack.png')  )
bg    = cv2.imread(os.path.join(DATA_DIR, 'bg.png')   )

#crack = cv2.cvtColor(crack, cv2.COLOR_GRAY2BGR)
#bg = cv2.cvtColor(bg, cv2.COLOR_GRAY2BGR)

assert crack is not None, 'crack.png 读取失败'
assert bg    is not None, 'bg.png 读取失败'

# 主要增加了下面这一部分白平衡化后色彩迁移的代码
try:
    wb = cv2.xphoto.createGrayworldWB()
    # 饱和度阈值:避免过曝区域干扰白平衡计算,范围 0~1
    wb.setSaturationThreshold(0.9)
    crack_wb = wb.balanceWhite(crack)
except AttributeError:
    print("警告:cv2.xphoto 不可用,请安装 opencv-contrib-python。跳过白平衡。")
    crack_wb = crack.copy()

# 3. 将白平衡后的补丁色调迁移到背景
crack = color_transfer(crack_wb, bg)

# 找 labelme json(优先 crack.json,否则取目录里第一个 json)
json_path = os.path.join(DATA_DIR, 'crack.json')
if not os.path.exists(json_path):
    cands = sorted(glob.glob(os.path.join(DATA_DIR, '*.json')))
    if not cands:
        raise FileNotFoundError('未找到 labelme json 文件')
    json_path = cands[0]

with open(json_path, 'r', encoding='utf-8') as f:
    label = json.load(f)

# ---------------- 2. 由多边形生成缺陷 mask ----------------
h, w = crack.shape[:2]
mask = np.zeros((h, w), np.uint8)
for shp in label.get('shapes', []):
    pts = np.round(np.asarray(shp['points'], np.float64)).astype(np.int32)
    cv2.fillPoly(mask, [pts], 255)

if mask.max() == 0:
    raise RuntimeError('json 中未解析到有效多边形')

# ---------------- 3. 裁剪缺陷区域 & 确定目标位置 ----------------
ys, xs = np.where(mask > 0)
x0, y0, x1, y1 = xs.min(), ys.min(), xs.max(), ys.max()

PAD = 80                      # 给羽化留衰减空间(要 > 最大模糊核半径)
x0p, y0p = max(0, x0 - PAD), max(0, y0 - PAD)
x1p, y1p = min(w, x1 + PAD + 1), min(h, y1 + PAD + 1)

patch      = crack[y0p:y1p, x0p:x1p].copy()
mask_patch = mask[y0p:y1p, x0p:x1p].copy()
ph, pw = patch.shape[:2]

# 如果背景比 patch 还小,先放大背景
if bg.shape[0] < ph + 20 or bg.shape[1] < pw + 20:
    s = max((pw + 20) / bg.shape[1], (ph + 20) / bg.shape[0]) * 1.2
    bg = cv2.resize(bg, (int(bg.shape[1] * s), int(bg.shape[0] * s)))

# 目标位置:放到背景图中心
tx = max(0, (bg.shape[1] - pw) // 2)
ty = max(0, (bg.shape[0] - ph) // 2)
center = (tx + pw // 2, ty + ph // 2)   # seamlessClone 用的目标中心点

# ---------------- 4. 泊松融合(不同参数) ----------------
poisson_imgs = []

# 4.1 三种克隆模式
for name, flag in [('NORMAL_CLONE',          cv2.NORMAL_CLONE),
                   ('MIXED_CLONE',           cv2.MIXED_CLONE),
                   ('MONOCHROME_TRANSFER',   cv2.MONOCHROME_TRANSFER)]:
    res = cv2.seamlessClone(patch, bg, mask_patch, center, flag)
    poisson_imgs.append(add_title(res, f'Poisson: {name}'))

# 4.2 NORMAL_CLONE + 膨胀 mask(改变融合区域大小)
kernel = cv2.getStructuringElement(cv2.MORPH_ELLIPSE, (15, 15))
mask_dil = cv2.dilate(mask_patch, kernel)
res = cv2.seamlessClone(patch, bg, mask_dil, center, cv2.NORMAL_CLONE)
poisson_imgs.append(add_title(res, 'Poisson: NORMAL + dilate(15)'))

# ---------------- 5. 高斯羽化(不同模糊核) ----------------
gauss_imgs = []
mask_f = mask.astype(np.float32)

for ks in [5, 21, 51, 101]:
    # 对 mask 做高斯模糊 → 得到 0~1 的 alpha 渐变
    m = cv2.GaussianBlur(mask_f, (ks, ks), 0) / 255.0
    m = m[y0p:y1p, x0p:x1p][..., None]          # 取 patch 对应的 alpha

    roi = bg[ty:ty + ph, tx:tx + pw].astype(np.float32)
    blend = roi * (1.0 - m) + patch.astype(np.float32) * m

    res = bg.copy()
    res[ty:ty + ph, tx:tx + pw] = np.clip(blend, 0, 255).astype(np.uint8)
    gauss_imgs.append(add_title(res, f'Gaussian feather: k={ks}'))

# ---------------- 6. 拼接 & 输出 ----------------
row1 = hstack_row(poisson_imgs)
row2 = hstack_row(gauss_imgs)
canvas = vstack_rows([row1, row2])

cv2.imwrite(OUT_PATH, canvas)
print(f'已保存对比图: {OUT_PATH}')

# 屏幕显示(过大时缩放一下)
show = canvas
max_w = 1600
if show.shape[1] > max_w:
    s = max_w / show.shape[1]
    show = cv2.resize(show, (int(show.shape[1] * s), int(show.shape[0] * s)))

cv2.imshow('Poisson vs Gaussian Feather', show)
cv2.waitKey(0)
cv2.destroyAllWindows()
六、运行结果