Pillow 图像合成、透明叠加与蒙版处理
图像合成与透明处理是图像处理中的基础操作。通过控制每个像素的可见性和区域选择,可以将多幅图像叠加,创建复杂的图层效果。在 Pillow 中,常用接口包括 blend()、paste()、alpha_composite()、composite(),以及 mask 和 alpha 通道。掌握这些操作有助于构建图层化、局部融合和透明叠加的思路。
1. 图像合成与透明度控制概述
图像合成的核心是对每个像素值进行加权或选择性替换。对两幅图像线性混合可以写作:
Iout(x,y)=αI1(x,y)+(1−α)I2(x,y),α∈0,1 I_{out}(x, y) = \alpha I_1(x, y) + (1-\alpha) I_2(x, y),\quad \alpha \in 0,1 Iout(x,y)=αI1(x,y)+(1−α)I2(x,y),α∈0,1
其中 I1I_1I1 与 I2I_2I2 为两幅图像的像素值,α\alphaα 控制各自贡献比例。引入 mask 或 alpha 通道后,可实现局部控制:
Iout(x,y)=I1(x,y)⋅M(x,y)255+I2(x,y)⋅(1−M(x,y)255) I_{out}(x, y) = I_1(x, y) \cdot \frac{M(x, y)}{255} + I_2(x, y) \cdot \left(1 - \frac{M(x, y)}{255}\right) Iout(x,y)=I1(x,y)⋅255M(x,y)+I2(x,y)⋅(1−255M(x,y))
其中 MMM 为掩码图像灰度值或 alpha 通道。
2. 线性混合:blend()
2.1 原理:线性加权混合
blend() 对两幅大小相同的图像进行线性加权混合,实现平滑过渡。公式表示为:
Iblend(x,y)=αI1(x,y)+(1−α)I2(x,y),α∈0,1 I_{blend}(x, y) = \alpha I_1(x, y) + (1-\alpha) I_2(x, y),\quad \alpha \in 0,1 Iblend(x,y)=αI1(x,y)+(1−α)I2(x,y),α∈0,1
α\alphaα 越大,第一幅图像权重越大,反之则第二幅图像权重更高。
2.2 Pillow接口:blend()
python
from PIL import Image

blend_img = Image.blend(img1, img2, alpha=0.5)
2.3 示例:不同 alpha 的混合效果
python
from PIL import Image, ImageDraw
from skimage import data
import numpy as np
import matplotlib.pyplot as plt
import seaborn as sns

sns.set_theme(style="whitegrid", font="SimHei", rc={"axes.unicode_minus": False})

# 加载示例图像
img1 = Image.fromarray(data.astronaut()).resize((256,256))
img2 = Image.fromarray(data.chelsea()).resize((256,256))

# 多 alpha blend 对比
alphas = [0.0, 0.25, 0.5, 0.75, 1.0]
blend_imgs = [Image.blend(img1, img2, alpha=a) for a in alphas]

plt.figure(figsize=(20,4))
for i, (b, a) in enumerate(zip(blend_imgs, alphas)):
    plt.subplot(1, len(alphas), i+1)
    plt.imshow(b)
    plt.axis('off')
    plt.title(f"alpha={a}")
plt.show()
第一幅图像与第二幅图像的权重可通过 alpha 调整,实现整体过渡。
3. 局部叠加:paste() 与 mask
3.1 原理:掩码控制的局部粘贴
paste() 可将源图像粘贴到目标图像指定区域,并通过 mask 控制局部可见性:
Iout(x,y)={Isrc(x−x0,y−y0),M(x,y)=255Idst(x,y),M(x,y)=0 I_{out}(x, y) = \begin{cases} I_{src}(x - x_0, y - y_0), & M(x, y) = 255 \\ I_{dst}(x, y), & M(x, y) = 0 \end{cases} Iout(x,y)={Isrc(x−x0,y−y0),Idst(x,y),M(x,y)=255M(x,y)=0
其中 IdstI_{dst}Idst 为目标图像,IsrcI_{src}Isrc 为待粘贴图像,MMM 为掩码控制像素是否被替换,(x0,y0)(x_0, y_0)(x0,y0) 为粘贴起点。
3.2 Pillow接口:paste() + mask
python
img1.paste(img2, box=(100,100), mask=mask)3.3 示例:圆形掩码局部叠加
python
img1 = Image.fromarray(data.astronaut()).resize((256,256))  # 目标图像
img2 = Image.fromarray(data.chelsea()).resize((256,256))    # 源图像

# 创建 mask: 白色=显示源像素, 黑色=保留目标像素
mask = Image.new("L", (256,256), 0)
draw = ImageDraw.Draw(mask)
draw.ellipse((50,50,150,150), fill=255)

# 局部粘贴操作
result = img1.copy()
result.paste(img2, (100,100), mask=mask)

# 可视化 mask: 保持原始黑白对比, 白色显示源像素, 黑色显示保留目标像素
mask_visual = np.stack([mask]*3, axis=-1)  # 扩展为RGB, 保持黑白

plt.figure(figsize=(20,5))

plt.subplot(1,4,1)
plt.imshow(img1)
plt.title("目标图像 (保留区域)")
plt.axis('off')

plt.subplot(1,4,2)
plt.imshow(img2)
plt.title("源图像")
plt.axis('off')

plt.subplot(1,4,3)
plt.imshow(mask_visual.astype(np.uint8))
plt.title("Mask 控制区域\n白色=源, 黑色=保留")
plt.axis('off')

plt.subplot(1,4,4)
plt.imshow(result)
plt.title("局部粘贴结果\n仅白色区域替换")
plt.axis('off')
plt.show()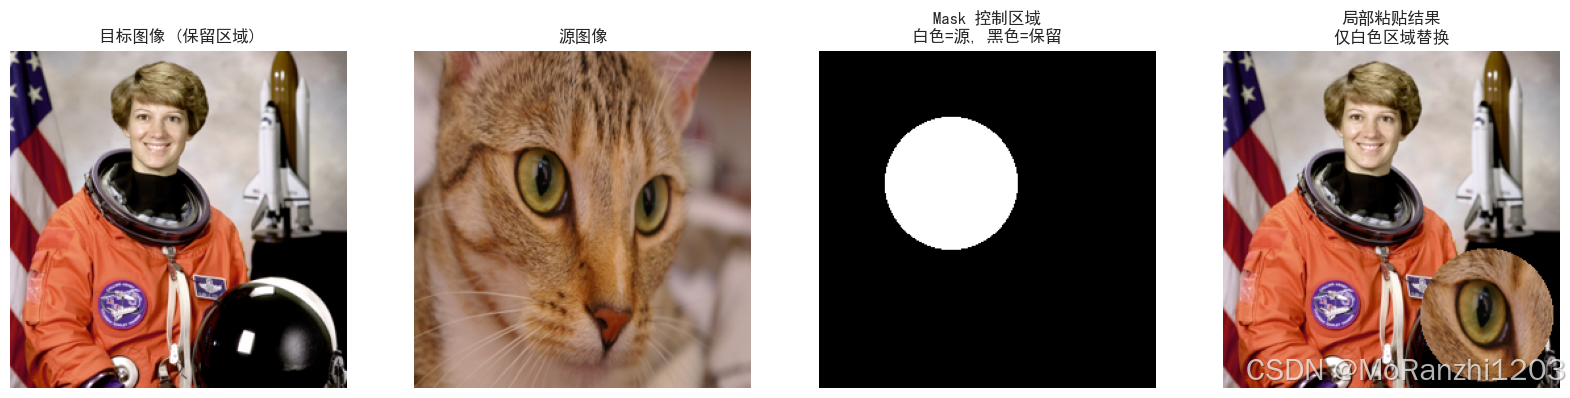
mask 控制局部可见区域,白色取源像素,黑色保留目标像素。
4. RGBA图像的 alpha 叠加:alpha_composite()
4.1 原理:基于 alpha 通道的像素级合成
alpha_composite() 根据 alpha 通道进行像素级混合,适用于半透明图层:
Iout(x,y)=A1(x,y)I1(x,y)+(255−A1(x,y))I2(x,y)255 I_{out}(x, y) = \frac{A_1(x, y) I_1(x, y) + (255-A_1(x, y)) I_2(x, y)}{255} Iout(x,y)=255A1(x,y)I1(x,y)+(255−A1(x,y))I2(x,y)
其中 A1A_1A1 为前景 alpha。
4.2 Pillow 接口:alpha_composite()
python
composite_img = Image.alpha_composite(img1.convert("RGBA"),
                                      img2.convert("RGBA"))
4.3 示例:渐变半透明红蓝图层叠加效果
python
width, height = 256, 256

# 定义平缓渐变函数 (避免过度透明)
def smooth_gradient(x, y, direction='red'):
    if direction == 'red':
        alpha_x = 0.8 * (1 - x / (width - 1)) + 0.2  # 左右渐变范围更平缓
        alpha_y = 0.8 * (y / (height - 1)) + 0.2      # 上下渐变范围更平缓
    else:  # blue
        alpha_x = 0.8 * (x / (width - 1)) + 0.2
        alpha_y = 0.8 * (y / (height - 1)) + 0.2
    return alpha_x * alpha_y

# 创建红色图层
red_array = np.zeros((height, width, 4), dtype=np.uint8)
for y in range(height):
    for x in range(width):
        alpha = int(255 * smooth_gradient(x, y, 'red'))
        red_array[y, x] = [255, 0, 0, alpha]
img_red = Image.fromarray(red_array)

# 创建蓝色图层
blue_array = np.zeros((height, width, 4), dtype=np.uint8)
for y in range(height):
    for x in range(width):
        alpha = int(255 * smooth_gradient(x, y, 'blue'))
        blue_array[y, x] = [0, 0, 255, alpha]
img_blue = Image.fromarray(blue_array)

# alpha_composite 叠加
composite_img = Image.alpha_composite(img_red, img_blue)

# 可视化三个图层
plt.figure(figsize=(15,5))

plt.subplot(1,3,1)
plt.imshow(img_red)
plt.title("红色图层\n左右-上下一致渐变半透明")
plt.axis('off')

plt.subplot(1,3,2)
plt.imshow(img_blue)
plt.title("蓝色图层\n左右-上下一致渐变半透明")
plt.axis('off')

plt.subplot(1,3,3)
plt.imshow(composite_img)
plt.title("渐变半透明红蓝图层叠加效果")
plt.axis('off')

plt.show()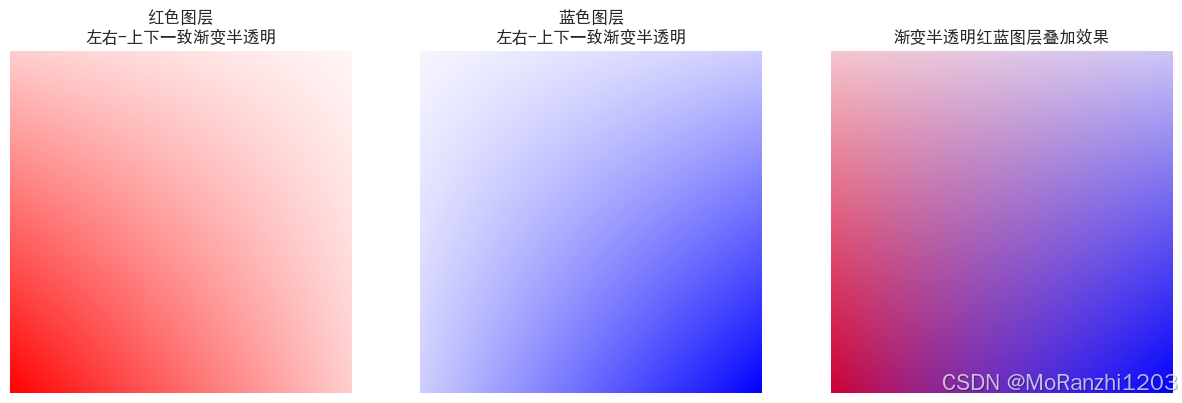
透明通道的控制可确保不同图层在视觉上有自然过渡效果。
5. 基于掩码的像素选择
5.1 原理:mask 控制每个像素选取
composite() 根据 mask 灰度选择每个像素取源图像或目标图像:
Iout(x,y)=I1(x,y)⋅M(x,y)255+I2(x,y)⋅(1−M(x,y)255) I_{out}(x, y) = I_1(x, y) \cdot \frac{M(x, y)}{255} + I_2(x, y) \cdot \left(1 - \frac{M(x, y)}{255}\right) Iout(x,y)=I1(x,y)⋅255M(x,y)+I2(x,y)⋅(1−255M(x,y))
5.2 Pillow接口:composite()
python
composite_img = Image.composite(img1, img2, mask)5.3 示例:半透明合成效果
python
width, height = 256, 256

# 创建目标图像和源图像
img1 = Image.new("RGB", (width, height), "yellow")  # 目标图像
img2 = Image.new("RGB", (width, height), "green")   # 源图像

# 创建 mask: 左上到右下渐变灰度, 中间值 128 表示半透明混合
mask_array = np.zeros((height, width), dtype=np.uint8)
for y in range(height):
    for x in range(width):
        mask_array[y, x] = int(128 * (x/width + y/height) / 1.0)
mask = Image.fromarray(mask_array)

# composite 操作
composite_img = Image.composite(img2, img1, mask)

# 可视化四个图层:目标图像、源图像、mask、合成结果
plt.figure(figsize=(20,5))

plt.subplot(1,4,1)
plt.imshow(img1)
plt.title("目标图像 (保留像素)")
plt.axis('off')

plt.subplot(1,4,2)
plt.imshow(img2)
plt.title("源图像 (选择像素)")
plt.axis('off')

plt.subplot(1,4,3)
plt.imshow(mask, cmap='gray')
plt.title("Mask 图层\n灰度值控制混合比例")
plt.axis('off')

plt.subplot(1,4,4)
plt.imshow(composite_img)
plt.title("mask 控制半透明合成效果")
plt.axis('off')

plt.show()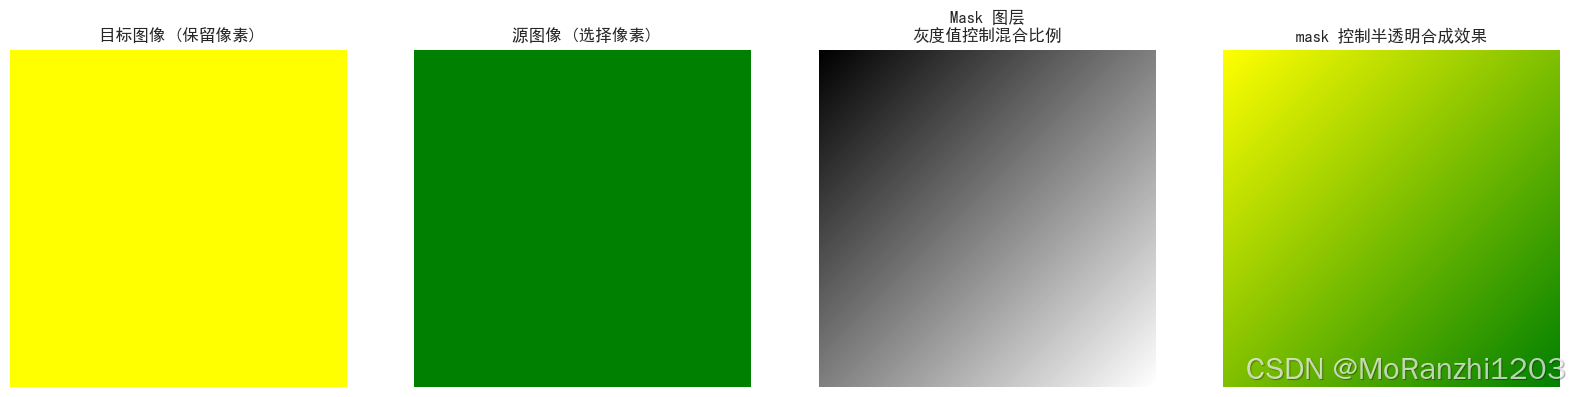
mask 中的灰度值直接决定了每个像素的混合比例。
6. mask 与 alpha 通道结合使用
6.1 原理:区域透明度控制
通过 mask 或 alpha 通道,可对图像局部区域精细控制,实现局部透明、前景提取或图层融合:
Iout=Isrc⋅A255+Idst⋅(1−A255) I_{out} = I_{src} \cdot \frac{A}{255} + I_{dst} \cdot \left(1 - \frac{A}{255}\right) Iout=Isrc⋅255A+Idst⋅(1−255A)
6.2 Pillow接口:paste() 或 alpha_composite()
结合 mask 或 alpha 通道使用 paste() 或 alpha_composite(),可精确控制局部区域的透明叠加。
6.3 示例:mask 与 alpha 叠加结果
python
width, height = 256, 256

# 创建背景图像 (绿色不透明)
img_bg = Image.new("RGBA", (width, height), (0,255,0,255))

# 创建前景图像 (红色半透明)
img_fg = Image.new("RGBA", (width, height), (255,0,0,128))

# 创建渐变 mask: 左上到右下逐渐增强前景透明度
mask_array = np.zeros((height, width), dtype=np.uint8)
for y in range(height):
    for x in range(width):
        mask_array[y, x] = int(255 * ((x/width + y/height)/2) * 0.7 + 50)  # 控制透明度范围
mask = Image.fromarray(mask_array)

# 将 mask 应用到前景图层 alpha 通道上
img_fg_masked = img_fg.copy()
img_fg_masked.putalpha(mask)

# alpha_composite 叠加前景到背景
out_img = Image.alpha_composite(img_bg, img_fg_masked)

# 可视化四个图层:背景、前景 alpha、mask、合成结果
plt.figure(figsize=(25,5))

plt.subplot(1,4,1)
plt.imshow(img_bg)
plt.title("背景图像")
plt.axis('off')

plt.subplot(1,4,2)
plt.imshow(img_fg_masked)
plt.title("前景图像 + alpha")
plt.axis('off')

plt.subplot(1,4,3)
plt.imshow(mask, cmap='gray')
plt.title("Mask 图层")
plt.axis('off')

plt.subplot(1,4,4)
plt.imshow(out_img)
plt.title("mask 与 alpha 叠加结果")
plt.axis('off')

plt.show()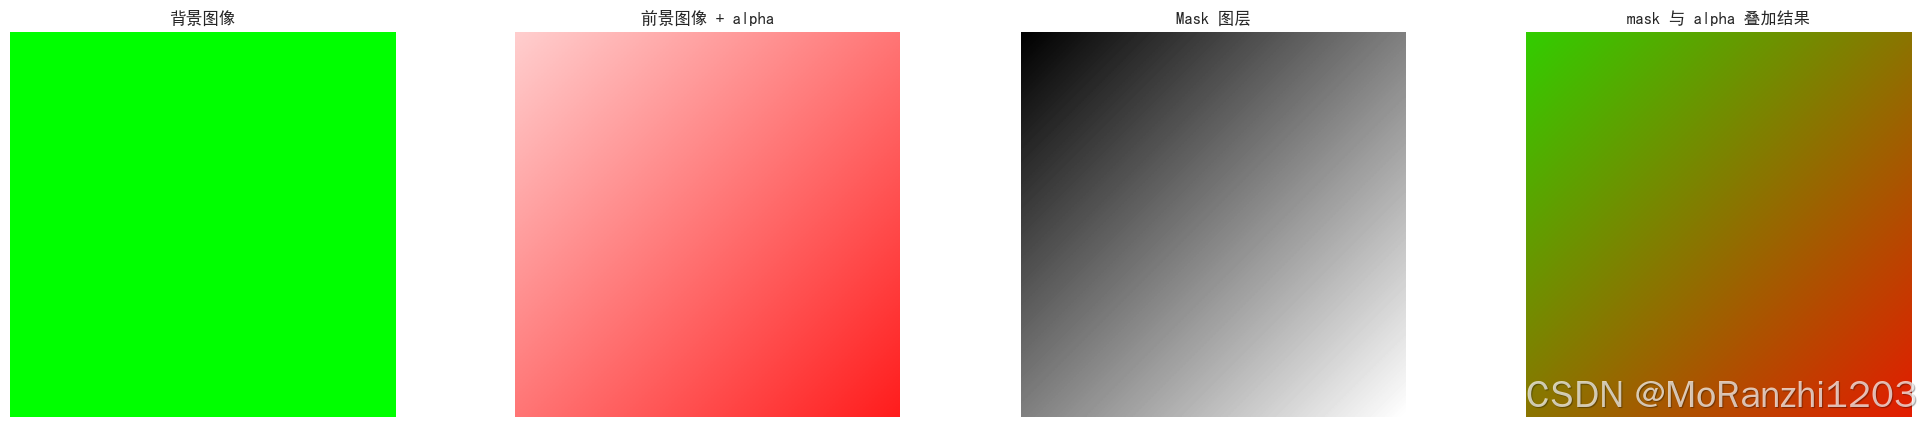
7. 总结
在实际应用中,可以将 Pillow 提供的多种图像处理方法灵活结合,实现更丰富的图层与局部效果:
blend():对整幅图像进行线性过渡,实现平滑的整体融合。paste()+ mask:实现局部区域叠加,可精确控制源图像覆盖目标图像的区域。alpha_composite():对 RGBA 图像进行逐像素叠加,结合 alpha 通道可产生自然渐变和半透明效果。composite():通过掩码控制每个像素选择源或目标图像,实现局部混合。- mask 与 alpha 通道结合:可对每个像素的可见性进行精细控制,实现复杂局部透明和图层融合效果。
结合这些方法,可以完成 多图层叠加、前景提取、局部透明处理 ,并构建复杂的图像合成流程。通过可视化中间结果和 mask,可直观理解每种操作对图像空间和像素的控制效果,从而为 图像增强、特效设计和计算机视觉数据预处理提供坚实基础。