换一种颜色,只能算外观预览。真正的产品选配器,还要能更换组件、切换材质,并让配置清单和价格同步变化。
这一篇继续升级 OrbitDesk:同一台 GLB 智能音箱可以选择三种机身颜色、两种顶部灯环和两种底座材质。每次点击都会直接修改模型节点的 PBR 材质,页面右上角和配置卡同步计算价格,最后还能确认或一键重置方案。
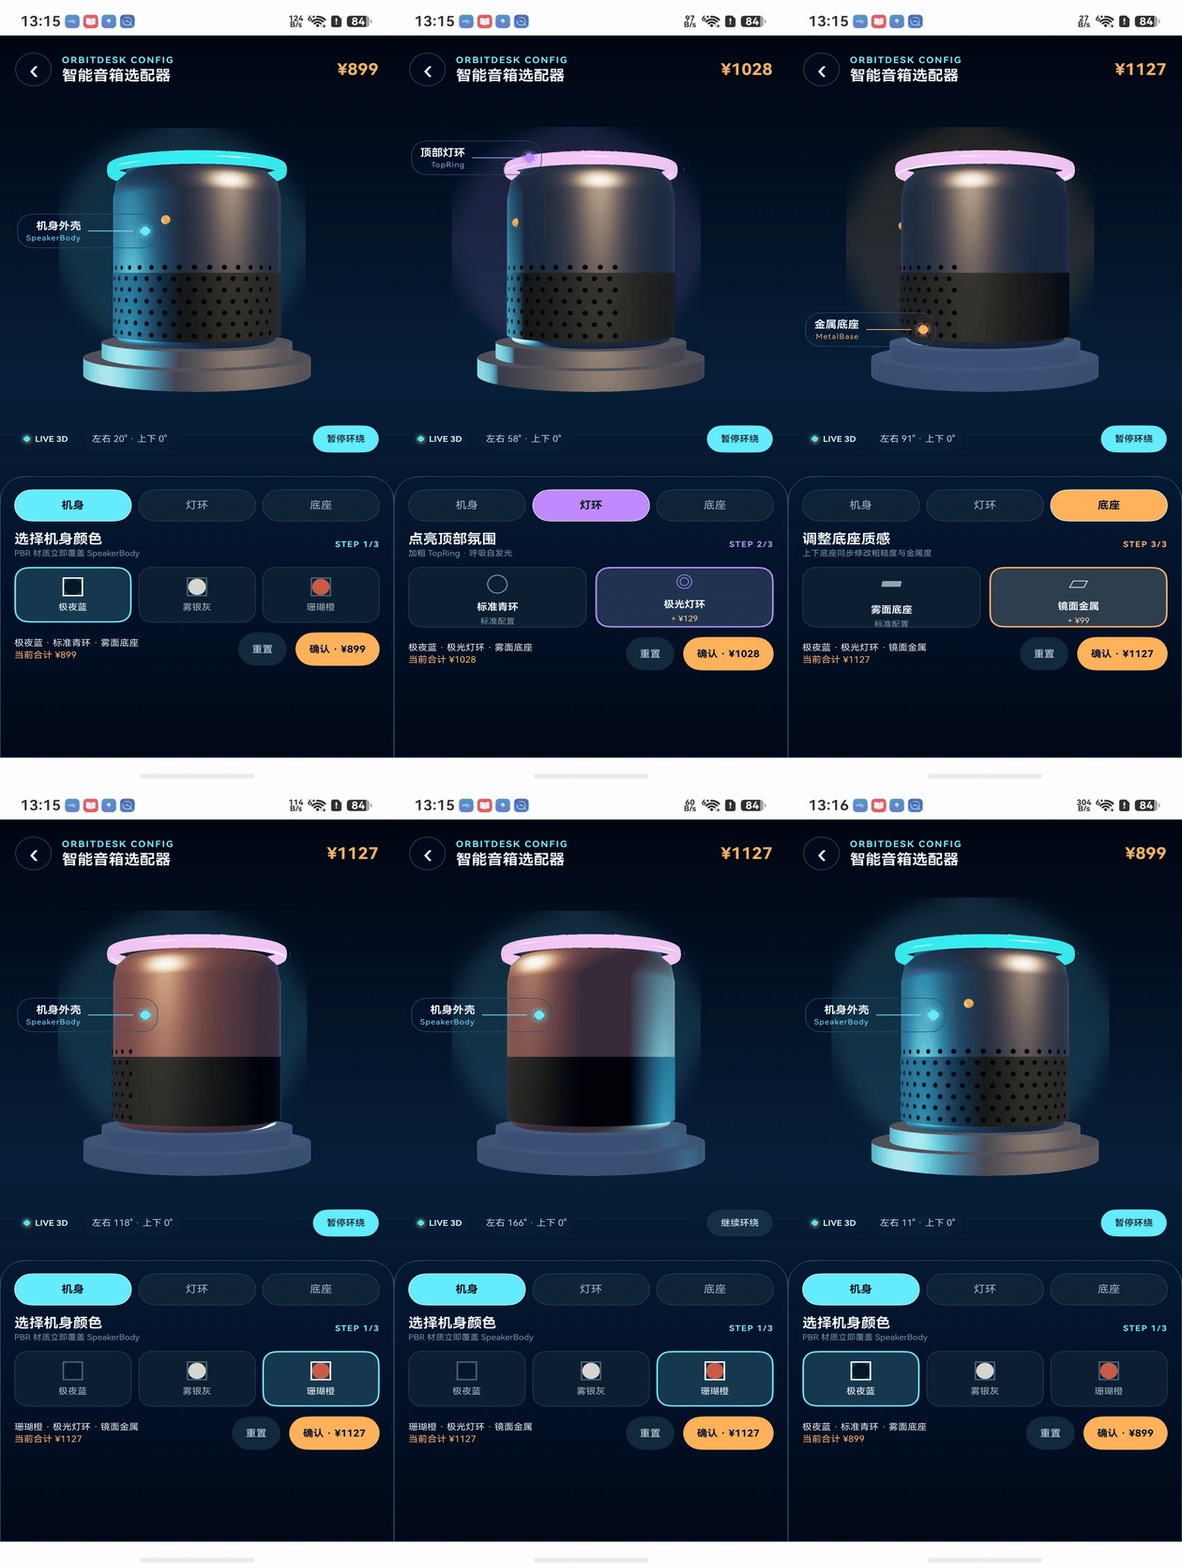
三条交互链路连续演示
先看真实设备上的三个关键动作:换机身/灯环/底座材质、直接拖动 3D 音箱进行上下左右观察、确认后再重置配置。下面三张 GIF 均由真机连续帧编码,循环播放时可以看到模型、选项状态和价格一起变化。
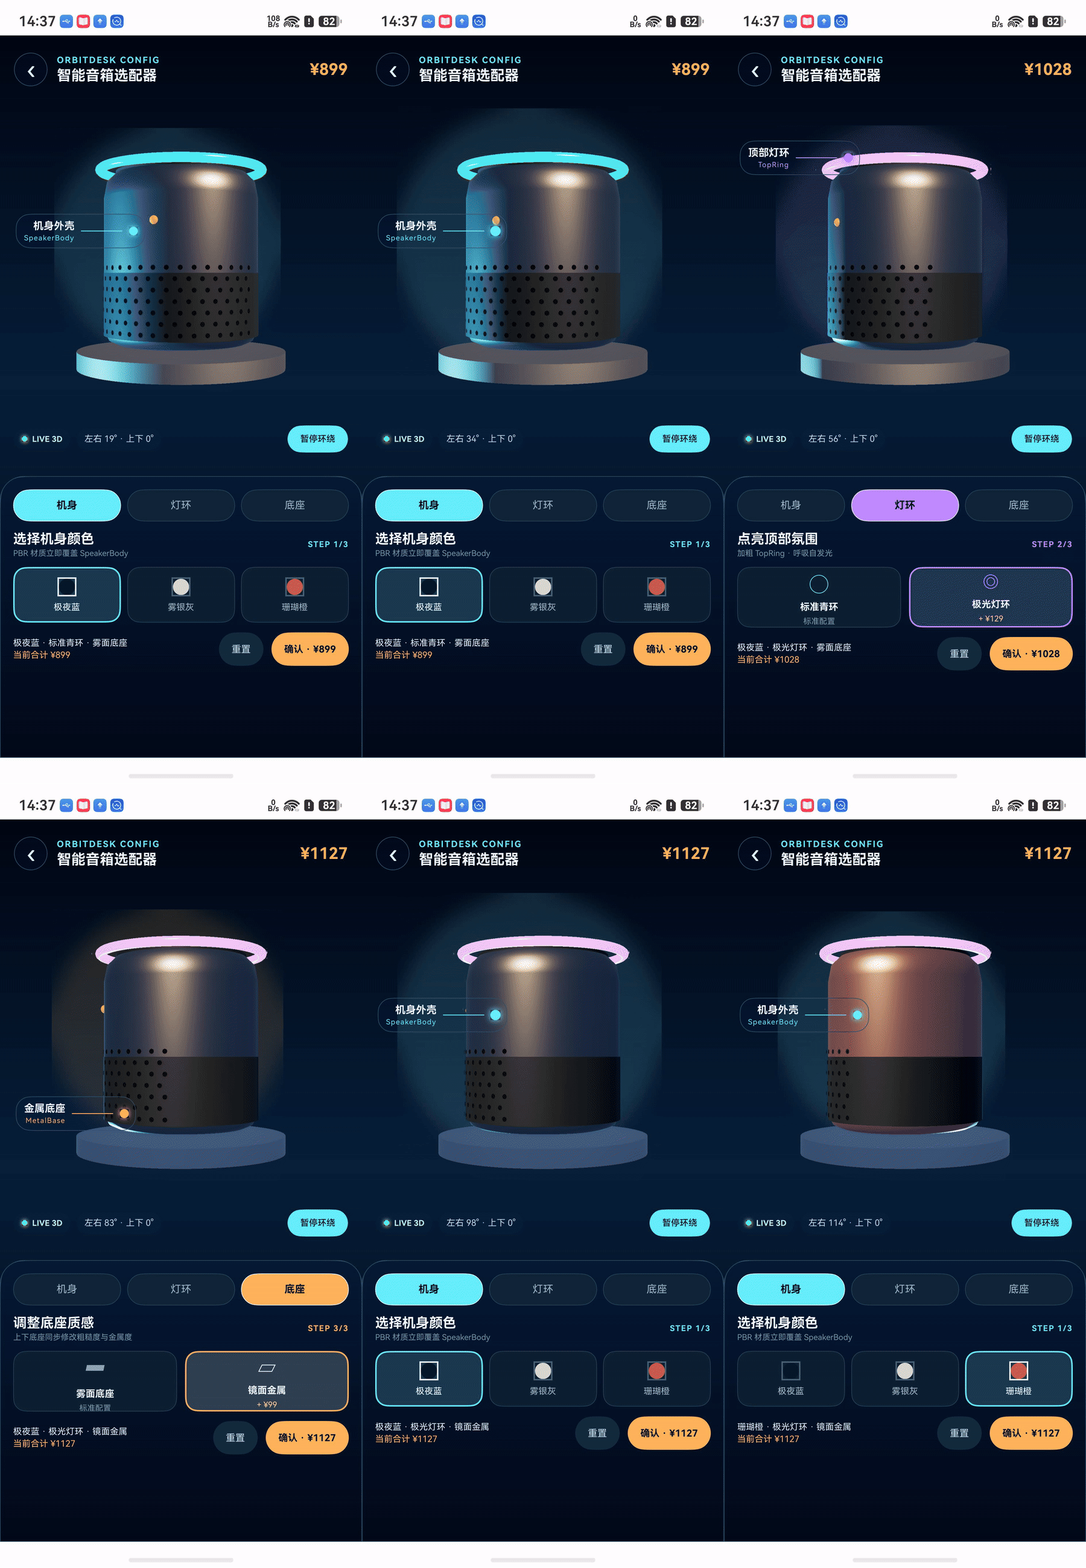
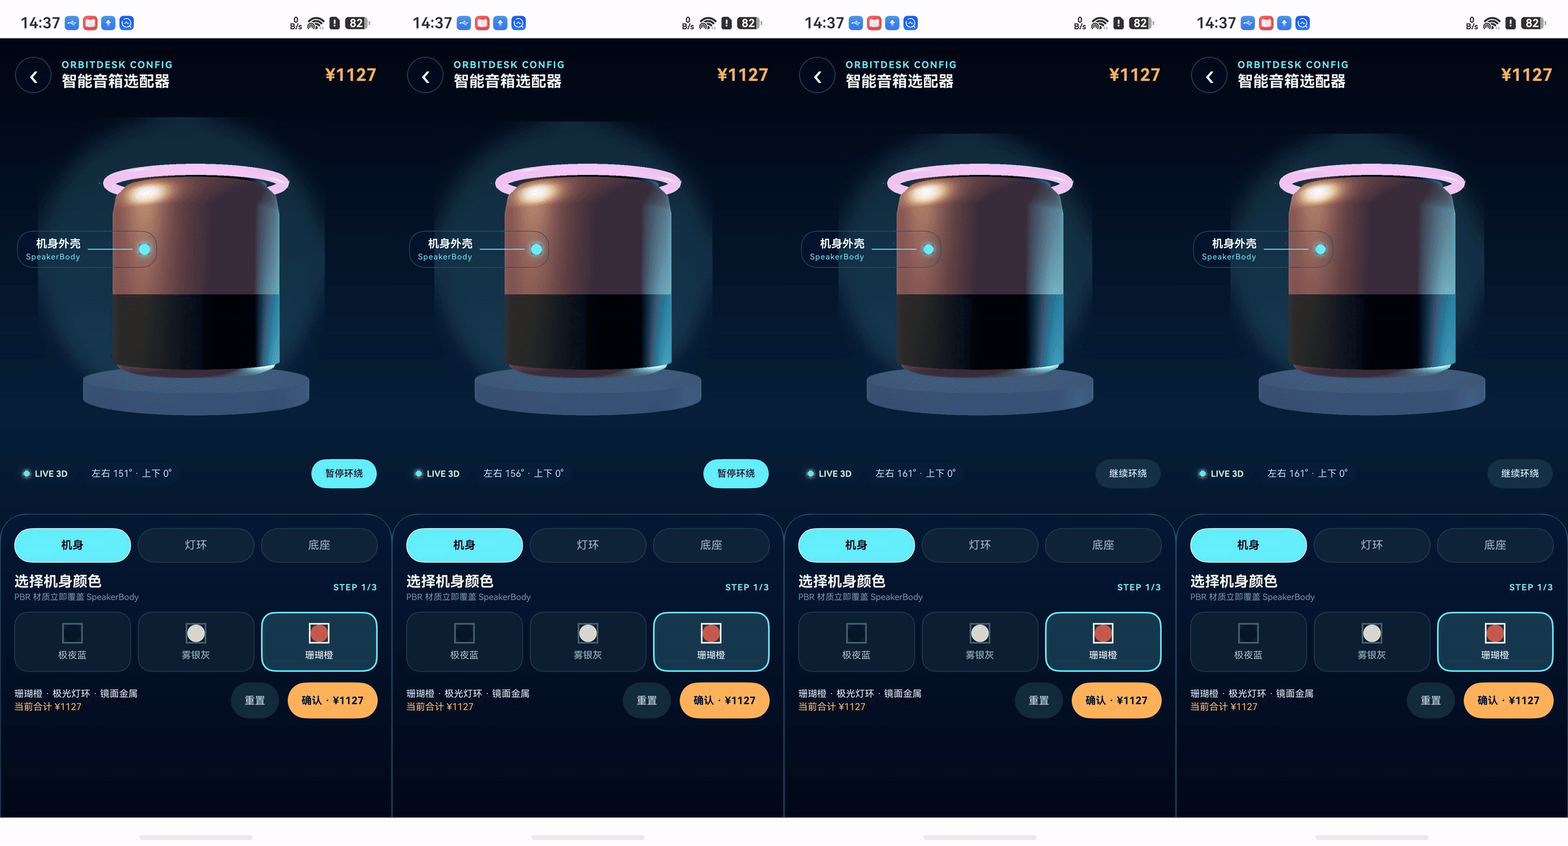
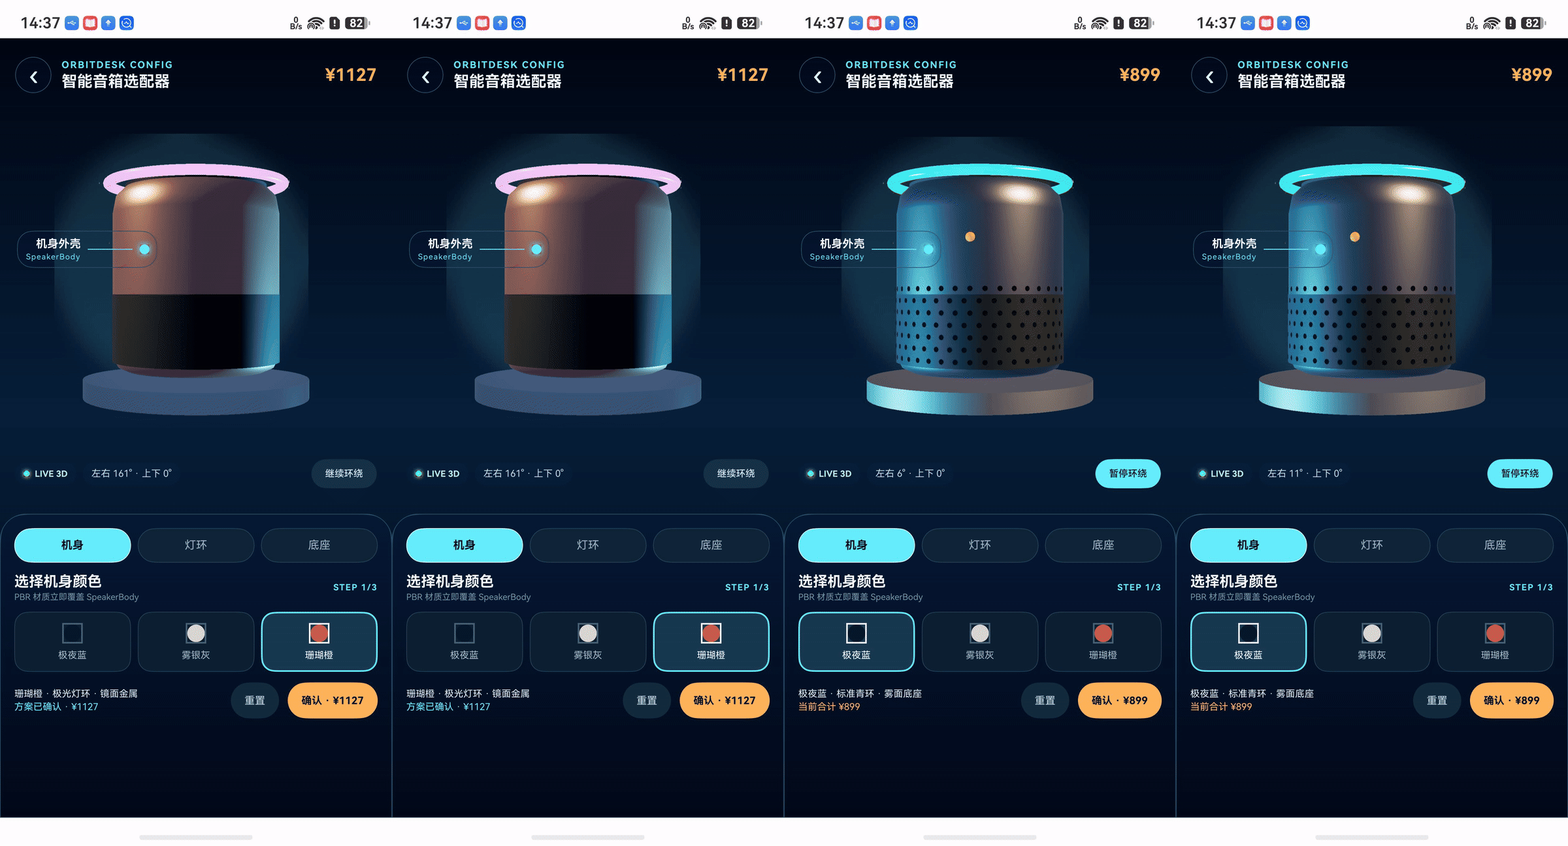
先看完成效果
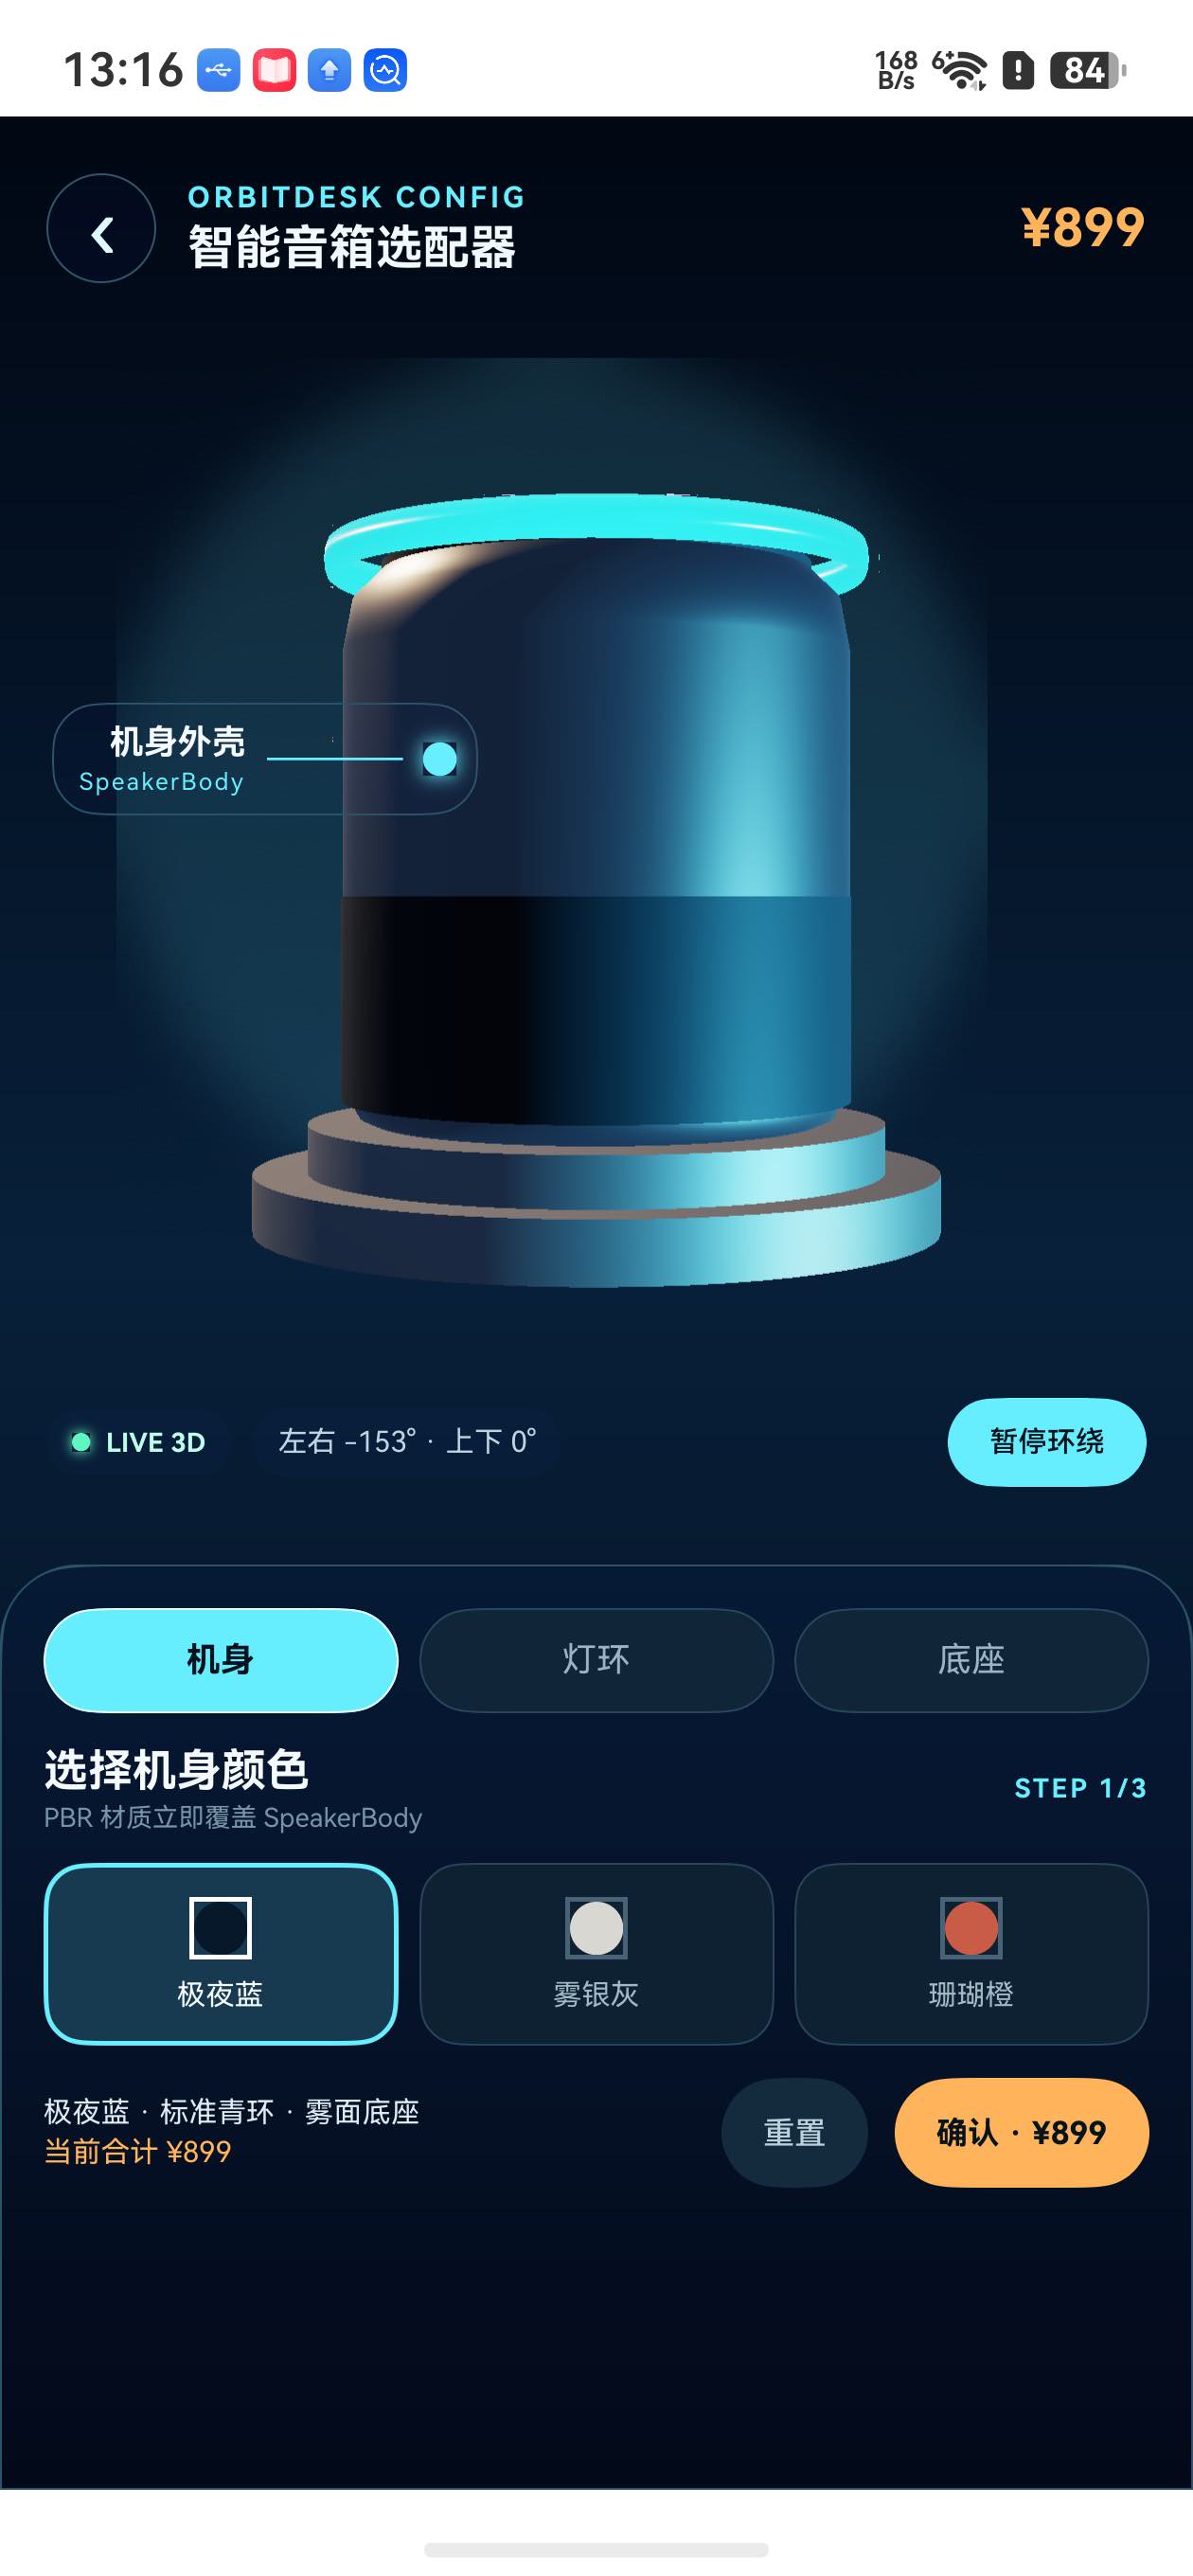
打开页面,智能音箱会在蓝紫渐变灯光中自动环绕。切换"机身、灯环、底座"标签时,发光热点会移动到对应部件,画面同时显示真实的 GLB 节点名;下方只保留当前部件的选项,让视线始终停留在正在变化的 3D 模型上。默认组合为"极夜蓝 + 薄荷青环 + 雾面底座",价格是 ¥899。
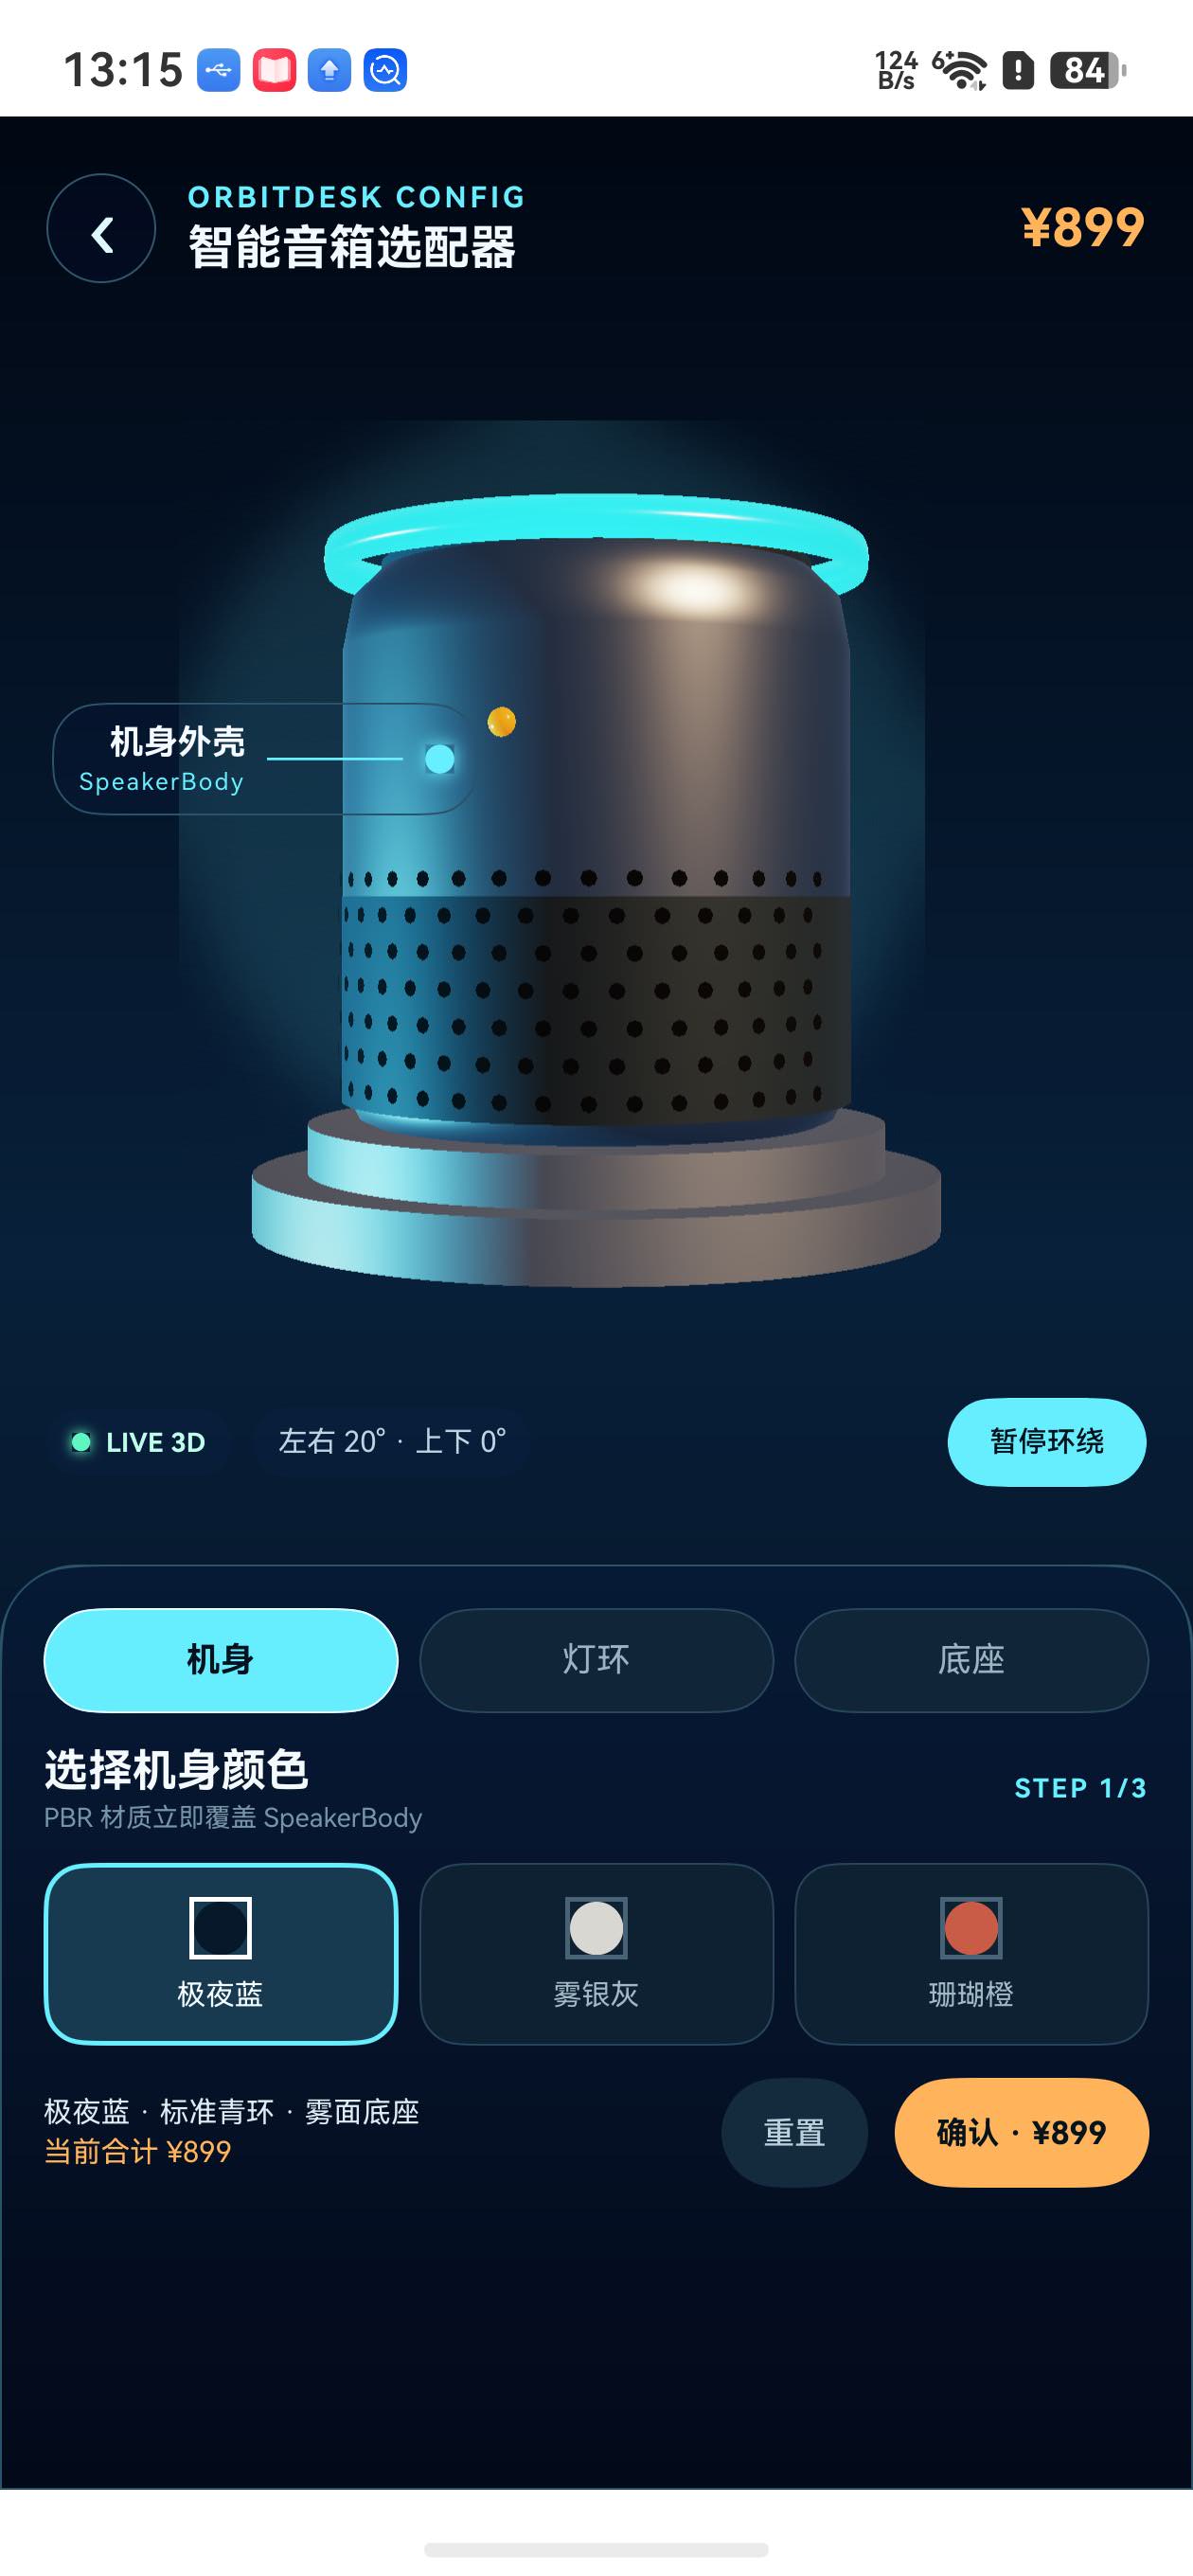
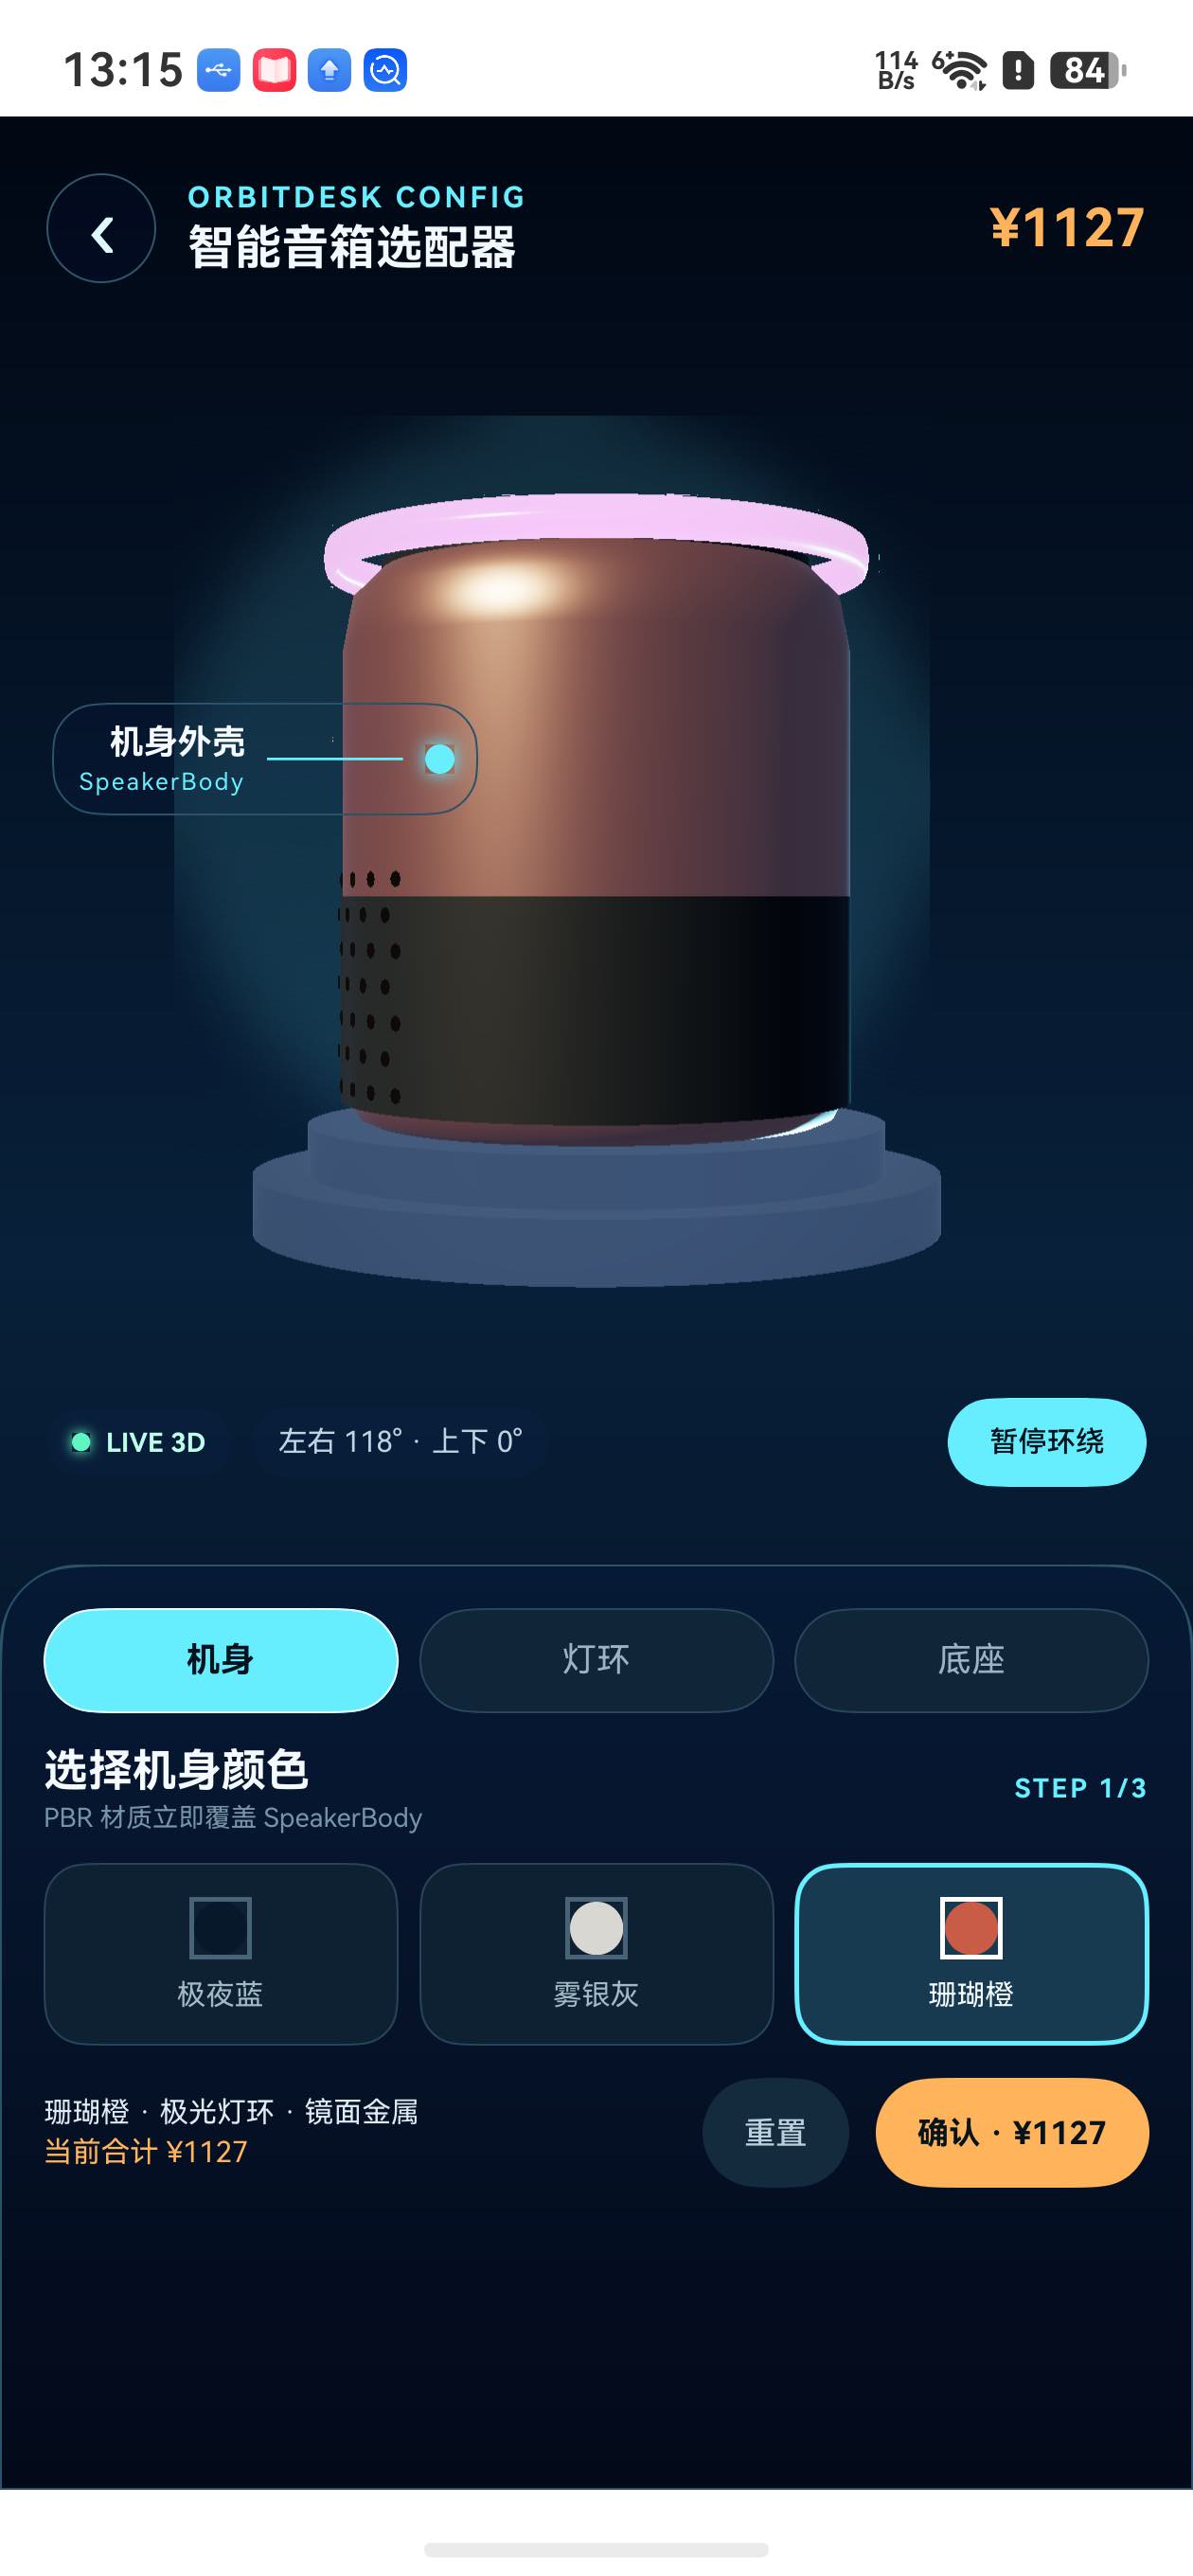
选择珊瑚橙不会增加价格;换成暮光紫环增加 ¥129;再换成镜面金属底座增加 ¥99,最终合计 ¥1127。机身、灯环和底座的变化都直接出现在 3D 模型上。
这次要操作哪些 GLB 节点
项目继续使用本地 orbitdesk_speaker.glb,运行时不需要网络。选配器加载模型后会找到五个关键节点:
OrbitDeskProduct:整台产品的根节点,负责旋转。SpeakerBody:机身外壳,负责颜色切换。TopRing:顶部灯环,负责薄荷青环和暮光紫环切换。MetalBaseUpper:上层底座。MetalBaseLower:下层底座。
其中两个底座节点共用同一个动态材质,这样切换时不会出现上下两层质感不一致的问题。
1. 准备三组产品选项
每项配置同时保存显示名称、价格和材质参数。机身颜色只改变外观,不加价;灯环和底座则带有各自的升级价格。
interface RingOption {
  name: string;
  price: number;
  color: Vec4;
  emissive: number;
}

interface BaseOption {
  name: string;
  price: number;
  color: Vec4;
  roughness: number;
  metallic: number;
}

const RING_OPTIONS: RingOption[] = [
  {
    name: '薄荷青环',
    price: 0,
    color: { x: 0.01, y: 0.86, z: 1.0, w: 1 },
    emissive: 1.8
  },
  {
    name: '暮光紫环',
    price: 129,
    color: { x: 0.68, y: 0.12, z: 1.0, w: 1 },
    emissive: 3.2
  }
];

const BASE_OPTIONS: BaseOption[] = [
  {
    name: '雾面底座',
    price: 0,
    color: { x: 0.23, y: 0.28, z: 0.34, w: 1 },
    roughness: 0.52,
    metallic: 0.56
  },
  {
    name: '镜面金属',
    price: 99,
    color: { x: 0.66, y: 0.72, z: 0.80, w: 1 },
    roughness: 0.12,
    metallic: 0.96
  }
];
粗糙度越低,高光越集中;金属度越高,底座越接近抛光金属。薄荷青环使用 1.8 的自发光强度,暮光紫环提升到 3.2。两种灯环在自动旋转和蓝紫渐变背景中都能保持柔和轮廓,暮光模式会出现明显的紫色光带。
2. 加载 GLB 并找到可配置节点
加载应用内 GLB 时直接使用 $rawfile。场景就绪后递归遍历节点树,并检查目标节点是否真的是 Geometry。
this.scene = await Scene.load($rawfile('orbitdesk_speaker.glb'));
this.factory = this.scene.getResourceFactory();

this.productRoot = this.findNodeByName(
  this.scene.root, 'OrbitDeskProduct');
this.body = this.requireGeometry('SpeakerBody');
this.topRing = this.requireGeometry('TopRing');
this.baseParts = [
  this.requireGeometry('MetalBaseUpper'),
  this.requireGeometry('MetalBaseLower')
];

if (!this.productRoot) {
  throw new Error('GLB 缺少 OrbitDeskProduct 节点');
}
requireGeometry() 把"找节点"和"检查节点类型"合在一起。只要模型资源缺少任意关键部件,页面就会进入加载失败状态,而不是让按钮继续操作空引用。
private requireGeometry(name: string): Geometry {
  const node = this.findNodeByName(this.scene?.root ?? null, name);
  if (!node || node.nodeType !== NodeType.GEOMETRY) {
    throw new Error(`GLB 缺少 ${name} 几何节点`);
  }
  return node as Geometry;
}

private findNodeByName(node: Node | null,
  name: string): Node | undefined {
  if (!node) {
    return undefined;
  }
  if (node.name === name) {
    return node;
  }
  for (let index = 0; index < node.children.count(); index++) {
    const found = this.findNodeByName(
      node.children.get(index), name);
    if (found) {
      return found;
    }
  }
  return undefined;
}
3. 为选项创建动态 PBR 材质
三组配置使用同一个材质创建方法。基础色、粗糙度、金属度和自发光值都来自当前选项。
private async createPbrMaterial(
  name: string,
  color: Vec4,
  roughness: number,
  metallic: number,
  emissive: number
): Promise<MetallicRoughnessMaterial> {
  const material = await this.factory!.createMaterial(
    { name },
    MaterialType.METALLIC_ROUGHNESS
  ) as MetallicRoughnessMaterial;

  material.baseColor.factor = color;
  material.material.factor = {
    x: 1,
    y: roughness,
    z: metallic,
    w: 0.5
  };
  material.emissive.factor = {
    x: color.x * emissive,
    y: color.y * emissive,
    z: color.z * emissive,
    w: 1
  };
  this.materials.push(material);
  return material;
}
机身切换时,把新材质覆盖到 SpeakerBody.mesh.materialOverride:
private async applyBody(index: number): Promise<void> {
  this.forgetMaterial(this.bodyMaterial);
  const option = BODY_OPTIONS[index];
  this.bodyMaterial = await this.createPbrMaterial(
    `ConfigBody_${index}`,
    option.color,
    option.roughness,
    option.metallic,
    0.05
  );
  this.body!.mesh.materialOverride = this.bodyMaterial;
}
灯环不仅替换 TopRing 材质,还把环体沿水平面外扩到 1.18 倍、沿高度方向加粗到 3.4 倍。这里改变的仍是 GLB 中真实的灯环节点,因此环体会跟随产品一起旋转:
private applyRingPresentation(): void {
  if (!this.topRing) {
    return;
  }
  const pulse = this.activeCategory === 1
    ? 1 + Math.sin(this.pulsePhase) * 0.045 : 1;
  this.topRing.scale = {
    x: 1.18 * pulse,
    y: 3.4,
    z: 1.18 * pulse
  };
}
底座则把同一个材质同时交给上下两个节点:
private async applyBase(index: number): Promise<void> {
  this.forgetMaterial(this.baseMaterial);
  const option = BASE_OPTIONS[index];
  this.baseMaterial = await this.createPbrMaterial(
    `ConfigBase_${index}`,
    option.color,
    option.roughness,
    option.metallic,
    0.03
  );
  this.baseParts.forEach((part: Geometry) => {
    part.mesh.materialOverride = this.baseMaterial;
  });
}
切换前先销毁上一份动态材质,再把它从资源数组中移除。连续点击不同方案时,页面始终只保留当前机身、灯环和底座材质。
4. 让选项、模型、摘要和价格同步
三个 @State 索引决定当前方案,价格不单独保存,而是每次根据状态计算:
@State private bodyIndex: number = 0;
@State private ringIndex: number = 0;
@State private baseIndex: number = 0;

private totalPrice(): number {
  return 899 +
    RING_OPTIONS[this.ringIndex].price +
    BASE_OPTIONS[this.baseIndex].price;
}点击暮光紫环后,ringIndex、3D 灯环材质、配置摘要和价格会在同一次操作中更新:
private async switchRing(index: number): Promise<void> {
  this.ringIndex = index;
  this.confirmedText = '';
  await this.applyRing(index);
  hilog.info(DOMAIN, TAG,
    'CONFIG_RING option=%{public}s add=%{public}d price=%{public}d',
    RING_OPTIONS[index].name,
    RING_OPTIONS[index].price,
    this.totalPrice());
}
这样的状态结构不会出现"模型已经换成暮光紫环,摘要还显示薄荷青环"的错位。用户继续修改已确认方案时,确认提示也会自动清空。
5. 让选项直接指向 3D 部件
选配器最怕"按钮在变化,用户却不知道模型改了哪里"。这里把三组配置做成焦点标签:点击机身时热点指向 SpeakerBody,点击灯环时热点抬到 TopRing,点击底座时热点落到 MetalBase。底座在模型中由 MetalBaseUpper 和 MetalBaseLower 两个节点组成,界面用一个名称把它们作为整体呈现。
焦点切换还会清空旧的确认提示,并用一次 280ms 的缩放动画回应点击:
private focusCategory(index: number): void {
  this.activeCategory = index;
  this.confirmedText = '';
  this.pulsePhase = 0;
  this.hotspotScale = 1.14;
  this.getUIContext().animateTo(
    { duration: 280, curve: Curve.EaseOut },
    () => this.hotspotScale = 1
  );
  hilog.info(DOMAIN, TAG,
    'CONFIG_FOCUS category=%{public}s node=%{public}s',
    ['body', 'ring', 'base'][index], this.focusNodeName());
}
完成三项配置后,热点仍然停在当前部件上。用户既能看到珊瑚橙机身、紫色暮光紫环和镜面底座的组合,也能立刻知道这次操作修改了哪个模型节点。
6. 自动环绕与手势接管
模型加载完成后启动定时器,每 50ms 把 OrbitDeskProduct 绕 Y 轴推进 0.5°。角度越过 180° 时回到 -179.5°,因此旋转可以持续进行;热点也会随时间轻微呼吸。
private startAutoSpin(): void {
  if (this.spinTimer !== undefined || !this.productRoot) {
    return;
  }
  this.autoSpin = true;
  this.spinTimer = setInterval(() => {
    this.rotation = this.rotation >= 180
      ? -179.5 : this.rotation + 0.5;
    this.applyRotation(this.rotation);
    this.pulsePhase += 0.12;
    this.hotspotScale = 1 + Math.sin(this.pulsePhase) * 0.08;
    this.applyRingPresentation();
  }, 50);
}
自动展示不会抢走操作权。手指按下模型时先停止定时器,横向位移映射相机环绕,向下拖动最多看到 -16° 的底部视角,向上拖动限制在 +12°,可以实际看到顶部灯环、机身底部和底座下沿,同时避开设备渲染器的极端视角接缝。GLB 产品节点保持静态,避免层级网格在旋转时产生错位。点击"继续环绕"即可恢复自动展示。
PanGesture({ fingers: 1, direction: PanDirection.All, distance: 2 })
  .onActionStart(() => {
    this.stopAutoSpin(true);
    this.dragStartRotation = this.rotation;
    this.dragStartPitch = this.pitch;
  })
  .onActionUpdate((event: GestureEvent) => {
    this.rotation = this.dragStartRotation + event.offsetX * 0.55;
    this.pitch = Math.max(-16, Math.min(12,
      this.dragStartPitch - event.offsetY * 0.16));
    this.applyRotation(this.rotation, this.pitch);
  });
真机画面中的实时角度同时显示左右 yaw 和上下 pitch。向上拖动可看到灯环内侧,向下拖动可看到底座上沿,左右拖动则查看网罩孔和机身分界;手势拖动后自动环绕暂停,按钮恢复后角度再次持续变化。这里改变的是相机球面位置和朝向,产品的 GLB 层级不再被直接旋转。
手势事件先进入待提交角度,页面用 80ms 防抖合并姿态更新,抬手时再提交最终值。这样快速上下拖动不会让渲染线程重复处理同一段位移,真机画面也更稳定。
7. 确认与一键重置
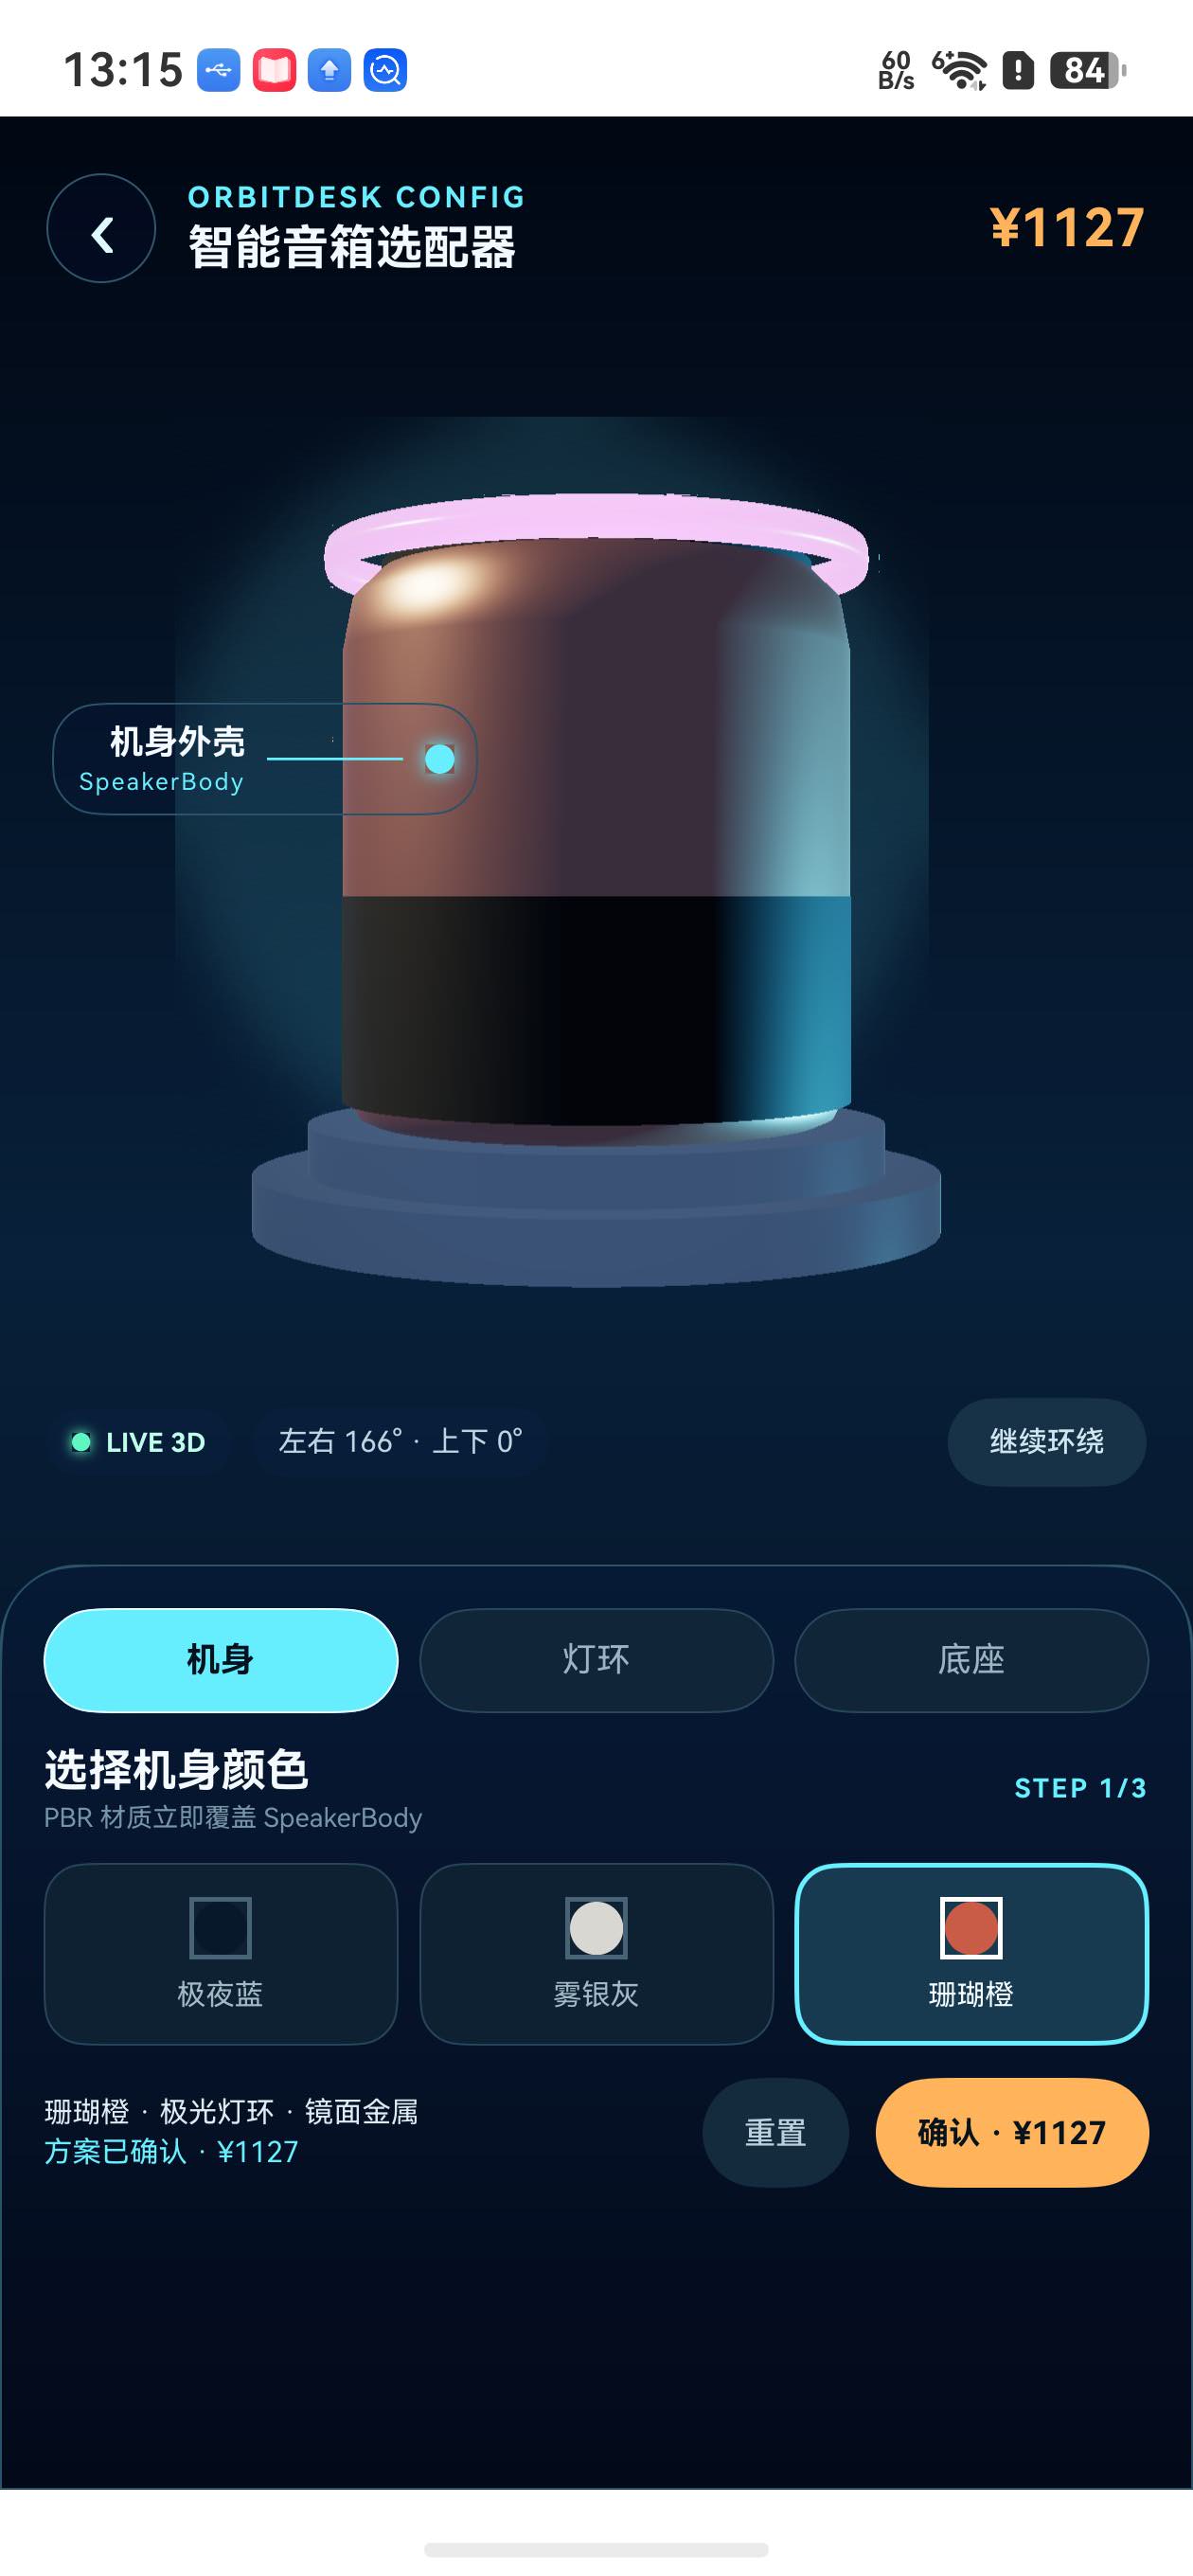
确认配置时,页面保留当前方案,并在摘要下方显示最终价格:
private confirmConfig(): void {
  this.confirmedText = `方案已确认 · ¥${this.totalPrice()}`;
  hilog.info(DOMAIN, TAG,
    'CONFIG_CONFIRM body=%{public}s ring=%{public}s ' +
    'base=%{public}s price=%{public}d',
    BODY_OPTIONS[this.bodyIndex].name,
    RING_OPTIONS[this.ringIndex].name,
    BASE_OPTIONS[this.baseIndex].name,
    this.totalPrice());
}
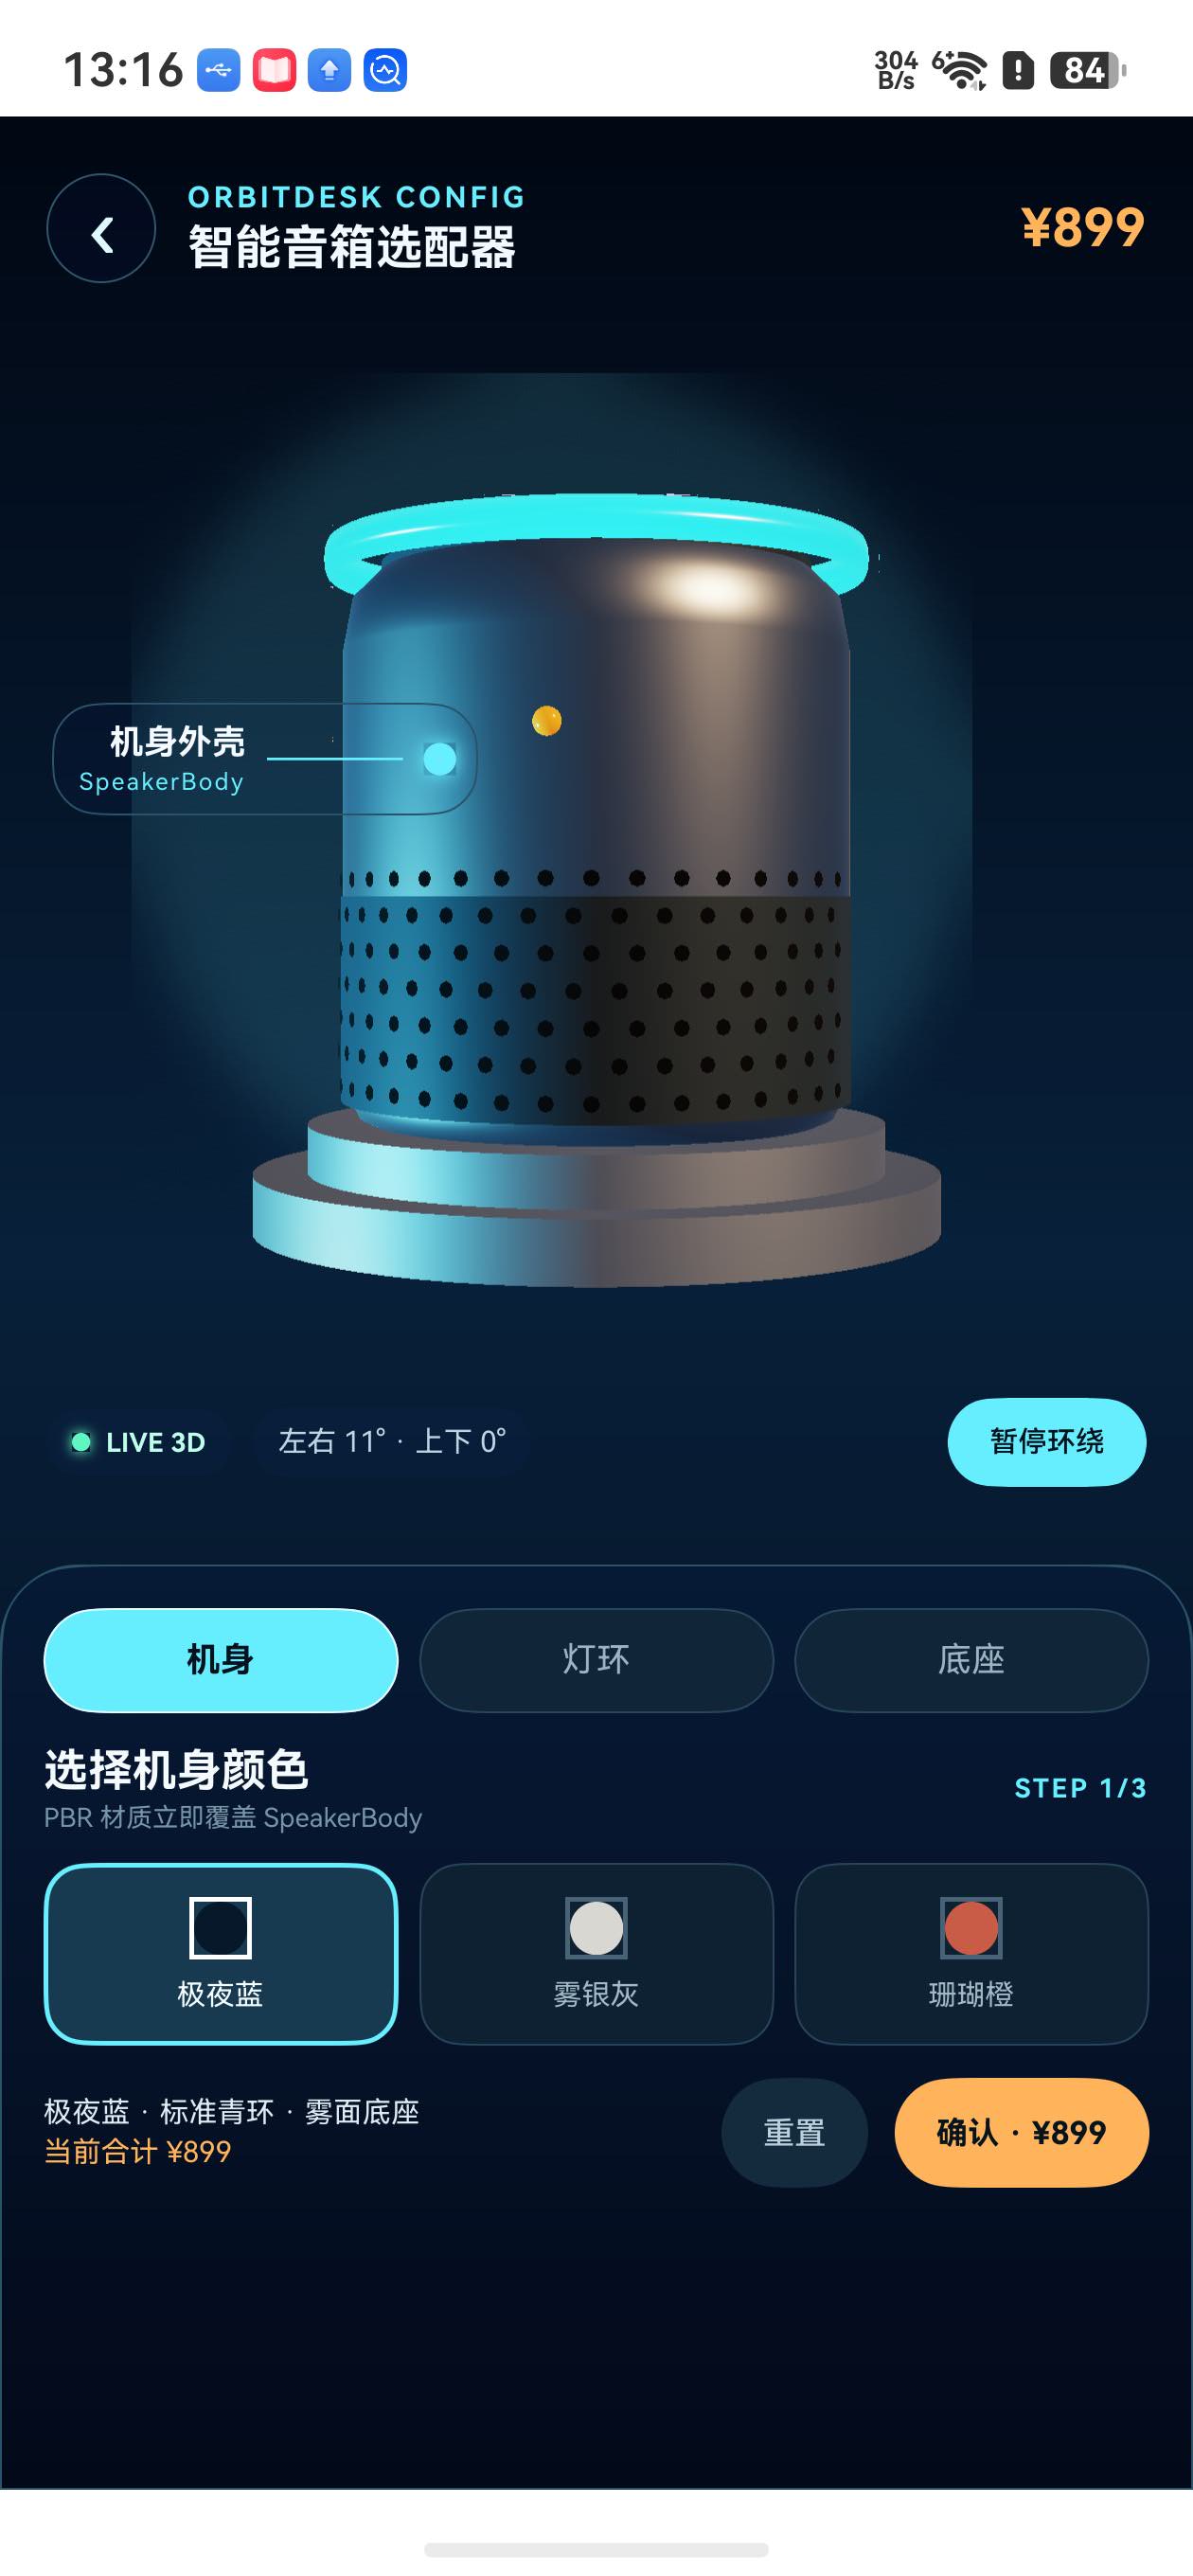
重置会恢复三个默认索引、0° 角度和 ¥899,同时重新应用三份默认材质:
private async resetConfig(): Promise<void> {
  this.bodyIndex = 0;
  this.ringIndex = 0;
  this.baseIndex = 0;
  this.rotation = 0;
  this.confirmedText = '';
  await this.applyBody(0);
  await this.applyRing(0);
  await this.applyBase(0);
  this.applyRotation(0);
}
8. 退出时释放动态材质和场景
选配器会频繁替换材质,因此退出时除了销毁 Scene,还要销毁当前持有的动态材质并清空节点引用。返回按钮和 aboutToDisappear() 共用同一个幂等释放方法。
private releaseScene(): void {
  const hadScene = this.scene ? 1 : 0;
  this.materials.forEach((material: Material) => material.destroy());
  this.scene?.destroy();
  this.materials = [];
  this.bodyMaterial = undefined;
  this.ringMaterial = undefined;
  this.baseMaterial = undefined;
  this.baseParts = [];
  this.body = undefined;
  this.topRing = undefined;
  this.productRoot = undefined;
  this.scene = undefined;
  this.sceneOpt = undefined;
  hilog.info(DOMAIN, TAG,
    'CONFIG_RELEASE scene=%{public}d', hadScene);
}
真机运行记录
本次在 HUAWEI Mate 60 Pro、HarmonyOS 7.0.0.105 上完成运行。下面的日志对应默认加载、部件焦点、三类材质切换、自动环绕的暂停与恢复、确认、重置和退出释放:
CONFIG_READY model=glb nodes=5 body=极夜蓝 ring=薄荷青环 base=雾面底座 price=899
CONFIG_AUTOSPIN running=true
CONFIG_FOCUS category=ring node=TopRing
CONFIG_RING option=暮光紫环 add=129 price=1028
CONFIG_FOCUS category=base node=MetalBase
CONFIG_BASE option=镜面金属 add=99 price=1127
CONFIG_FOCUS category=body node=SpeakerBody
CONFIG_BODY option=珊瑚橙 price=1127
CONFIG_AUTOSPIN running=false degrees=160
CONFIG_CONFIRM body=珊瑚橙 ring=暮光紫环 base=镜面金属 price=1127
CONFIG_AUTOSPIN running=true
CONFIG_RESET price=899
CONFIG_RELEASE scene=1
CONFIG_RELEASE scene=0
OrbitDesk 会用自动环绕主动展示产品,也会在用户触摸时把镜头控制权交出来。每一次部件切换都有热点指向真实节点,材质、价格和配置摘要同步更新。到这里,它已经具备一套 3D 产品选配器应有的浏览、选择、观察、确认和重置体验。