引言
经过上一章的学习,对CI/CD有了一个基本的认识,接下来死记硬背肯定是不行的,马上动起手来,在实践中遇到问题解决问题。
准备工作
我的目标是实现一套相对完整的CI/CD流程:需要准备一个服务器 (我只运行简单的前端项目即可)。一个前端项目 (在部署后能看得出更新后的效果即可),我会在服务器上运行两份我的同一个项目:一份属于"测试环境"、一份属于"生产环境"。我要实现的效果是:在团队开发中,通过"分支保护"和"自动测试"来进行协作的模式。
开始
先在本地将代码写好之后,创建一个github仓库用于存放我们的代码,然后将代码推送到main分支上这些就不赘述了。
CI
接下来要模拟一个团队中最常见的协作方式,就是任何成员要开发的时候 从main分支创建一个新的分支进行开发,保证main分支是最干净的、最可用的状态。成员提交到自己的分支上,创建一个 Draft PR 就可以触发项目中的CI了(前提是原本项目中的.github/workflows/xxx.yml 包含了pull_request才会生效哦)。 那么首先结合上一篇文章先尝试自己做一下CI:
yml
name: frontend CI

on:
    push:
        branches: [main]
    pull_request:
        branches: [main]
    workflow_dispatch

permissions:
    contents: read

jobs:
    build_on_linux:
        runs-on: ubuntu-latest
        timeout-minutes: 10
        steps:
            # 用到的Actions到GitHub的Marketplace里面找
            - name: Checkout code
              uses: actions/checkout@v7
            - name: Set up Node.js
              uses: actions/setup-node@7
              with:
                  node-version: '22'
                  cache: npm
            - name: Install dependencies
              run: npm ci
            - name: Run frontend tests
              run: npm test
            - name: Check types and build frontend
              run: npm run build
好的,到这里整理一下思路,目前做到:push到main、提交PR到main、手动触发,这三种情况能触发我们的workflow。并且这个workflow目前是起到了一个检查代码能否通过测试和打包的作用。
接下来可以进行操作了,开一个新的分支进行修改,然后推送代码,之后提交一个draft PR
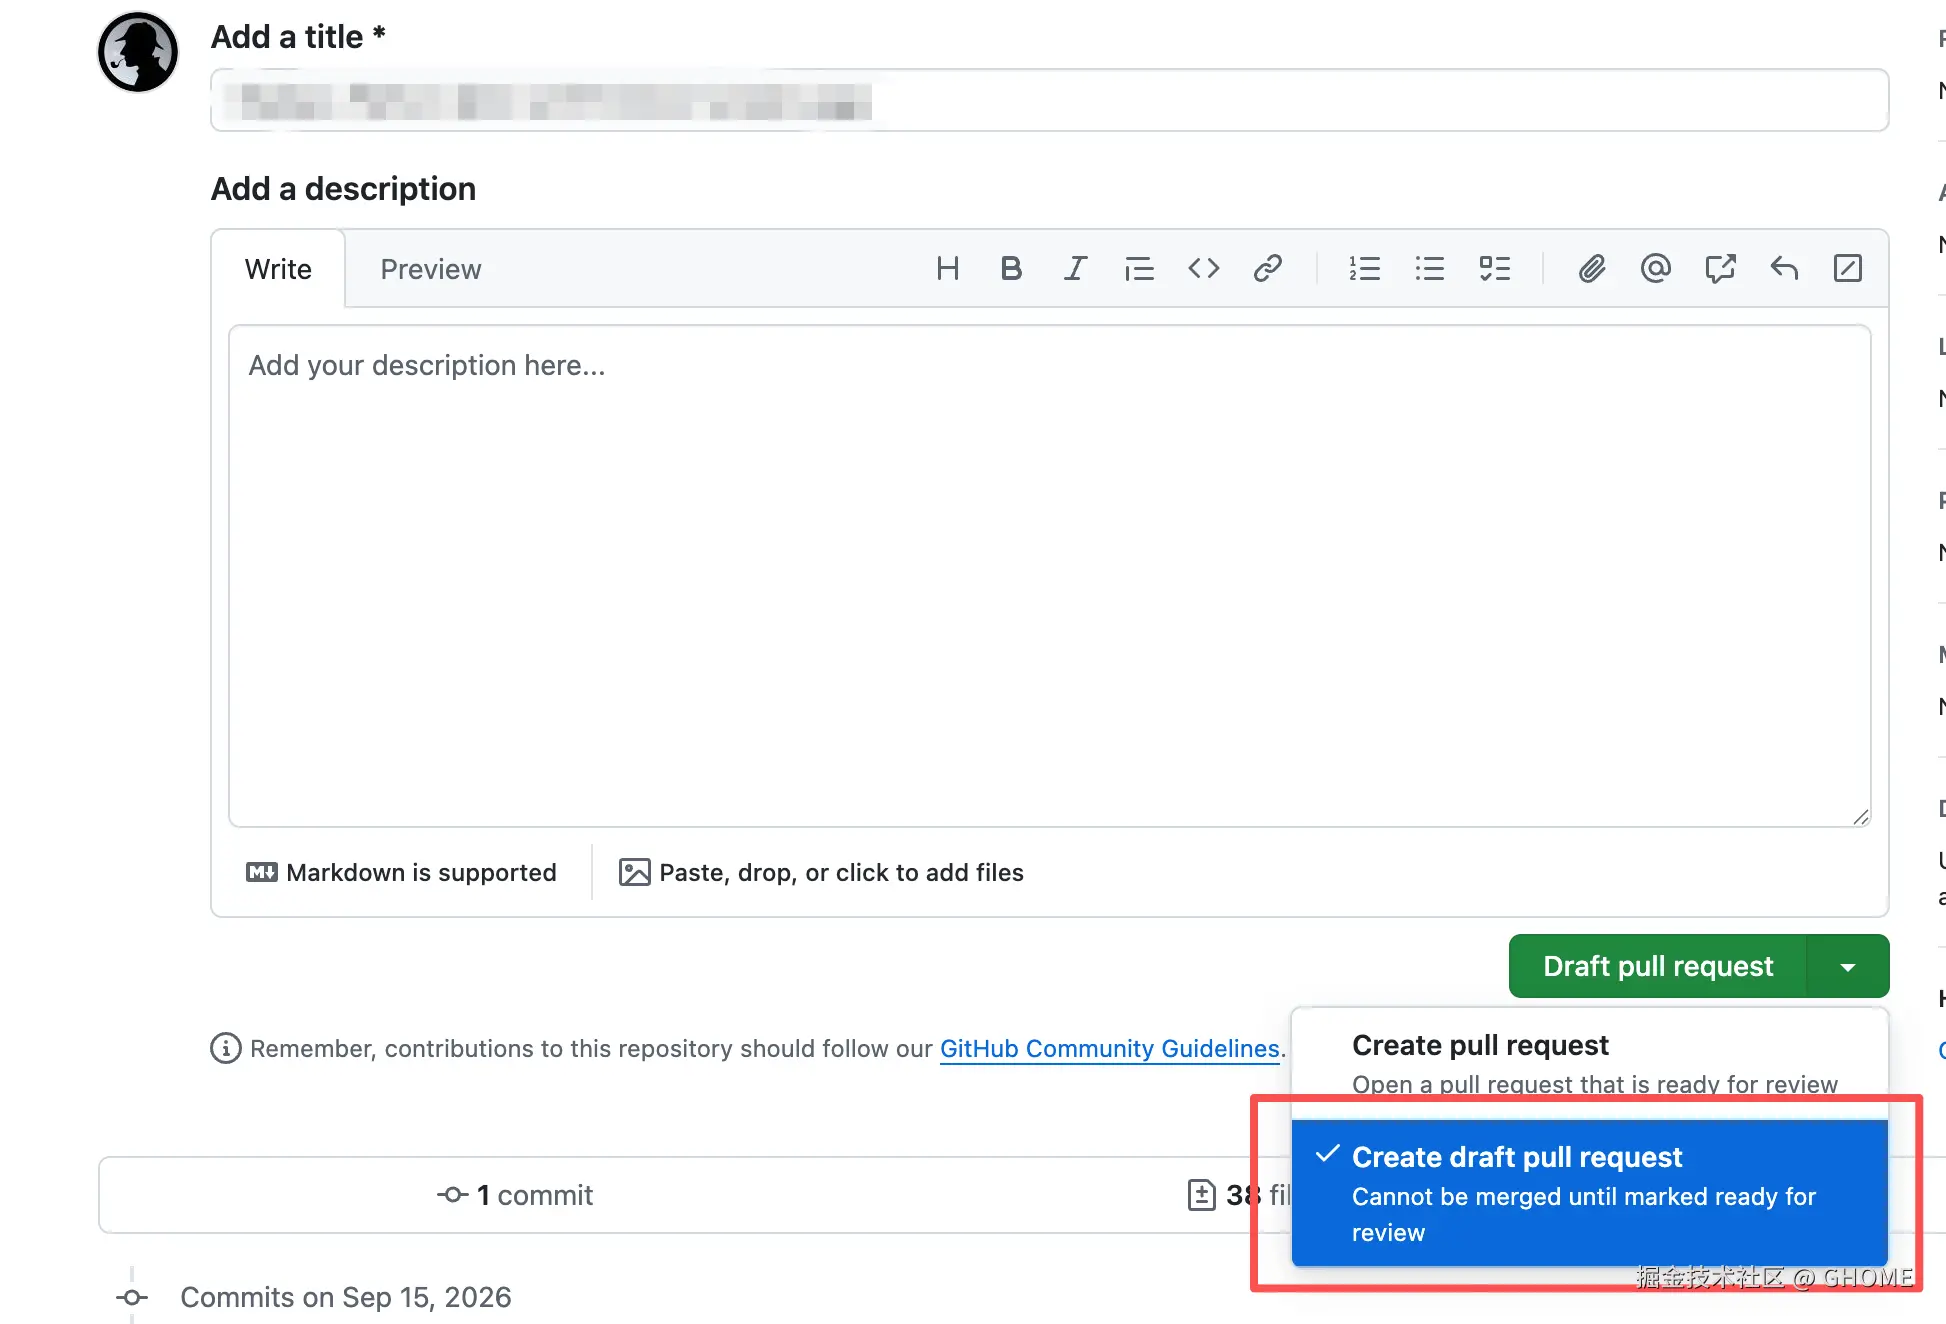 创建之后就可以看到我们的Draft PR,它同样会进行CI检查,在代码还没有完全完成之前,我们可以不用点击"Ready for review"这样管理员就知道我们的分支还在开发中,这样我们后续每次提交代码都会进入这个Draft PR 从而经历CI:
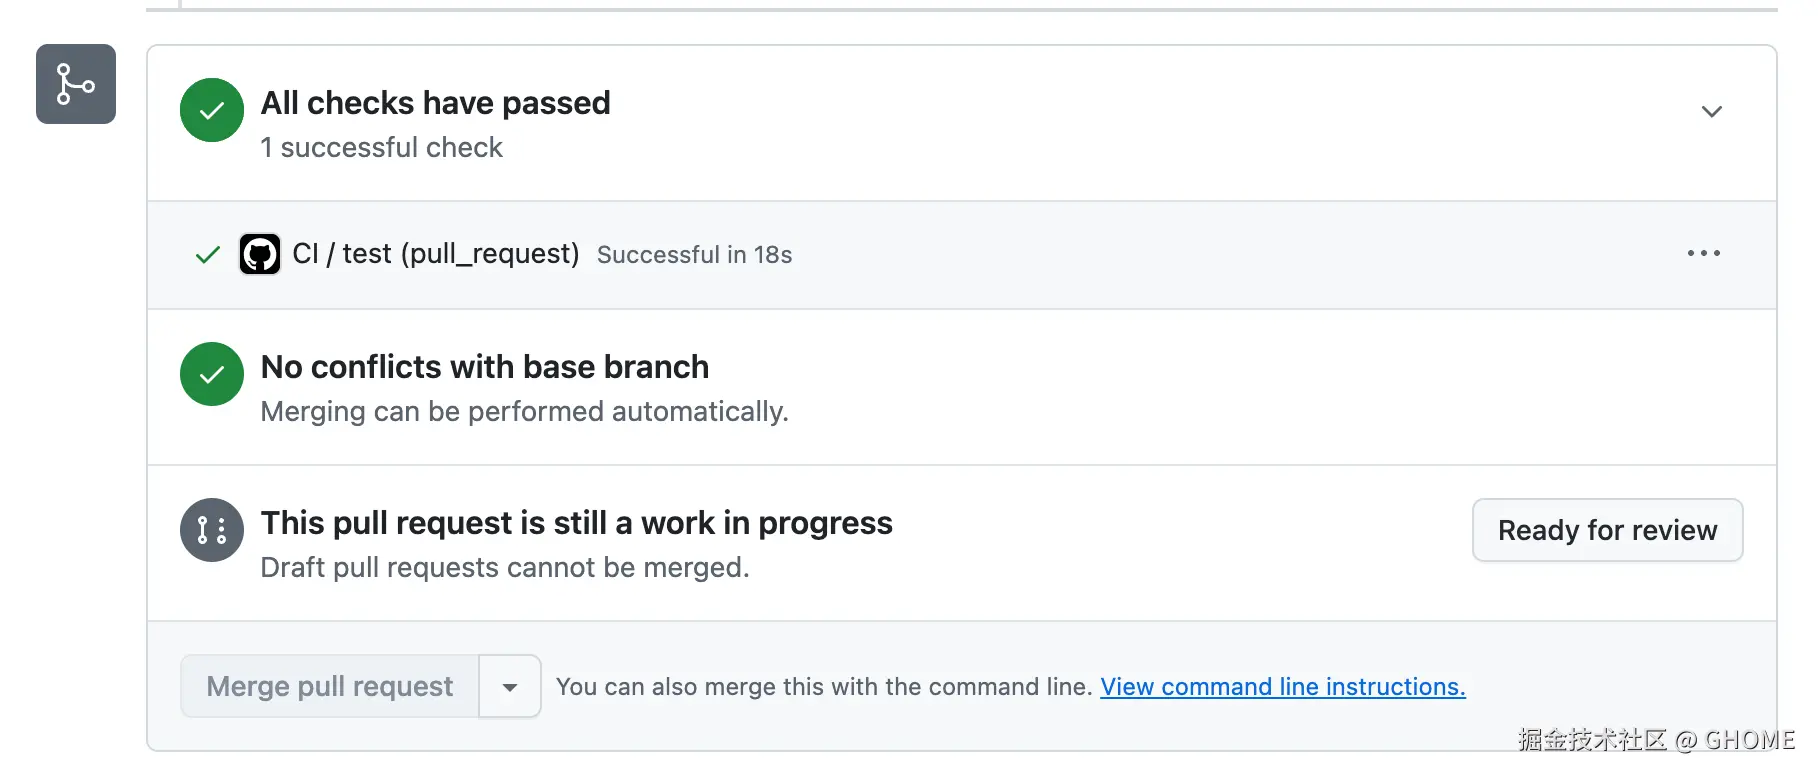
但是除了我们本人账号以外,管理员也是可以手动把我们的Draft PR改为Ready for review的。因此,Draft 的作用是传达 "还在开发,请暂时不要合并" ,并阻止直接合并;它不是只有我们能解除的权限锁。真正约束团队合并行为,需要配置 分支保护 或 Rulesets。
分支保护
分支保护,就是给 main 这样的重要分支设置"代码进入的条件"。 这一步能把我们已经做好的 CI,真正接入团队协作流程。
分支保护(Branch protection)是 GitHub 对指定分支实施的一组限制,用来控制代码如何进入该分支,以及允许对分支执行哪些操作。
例如,可以要求修改必须通过 Pull Request 合并 、指定的 CI 检查必须通过 、必须获得其他成员的审核批准 ,并禁止强制推送或删除分支。
在 CI/CD 流程中,CI 负责执行测试和构建、提供检查结果;分支保护则可以将这些结果设为合并的必要条件,减少未经检查的代码进入主分支的风险。
GitHub 有两种相关设置入口:传统的 Branch protection rules 和较新的 Rulesets(规则集) 。Rulesets 可以将多项规则组合起来,对指定分支统一执行。我们这次使用 Rulesets 即可。 因为我的仓库是公开仓库,可以使用这项功能(私有仓库需要对应的付费套餐)。
配置步骤:
仓库 → Settings → Rules → Rulesets → 点击 New ruleset → New branch ruleset。
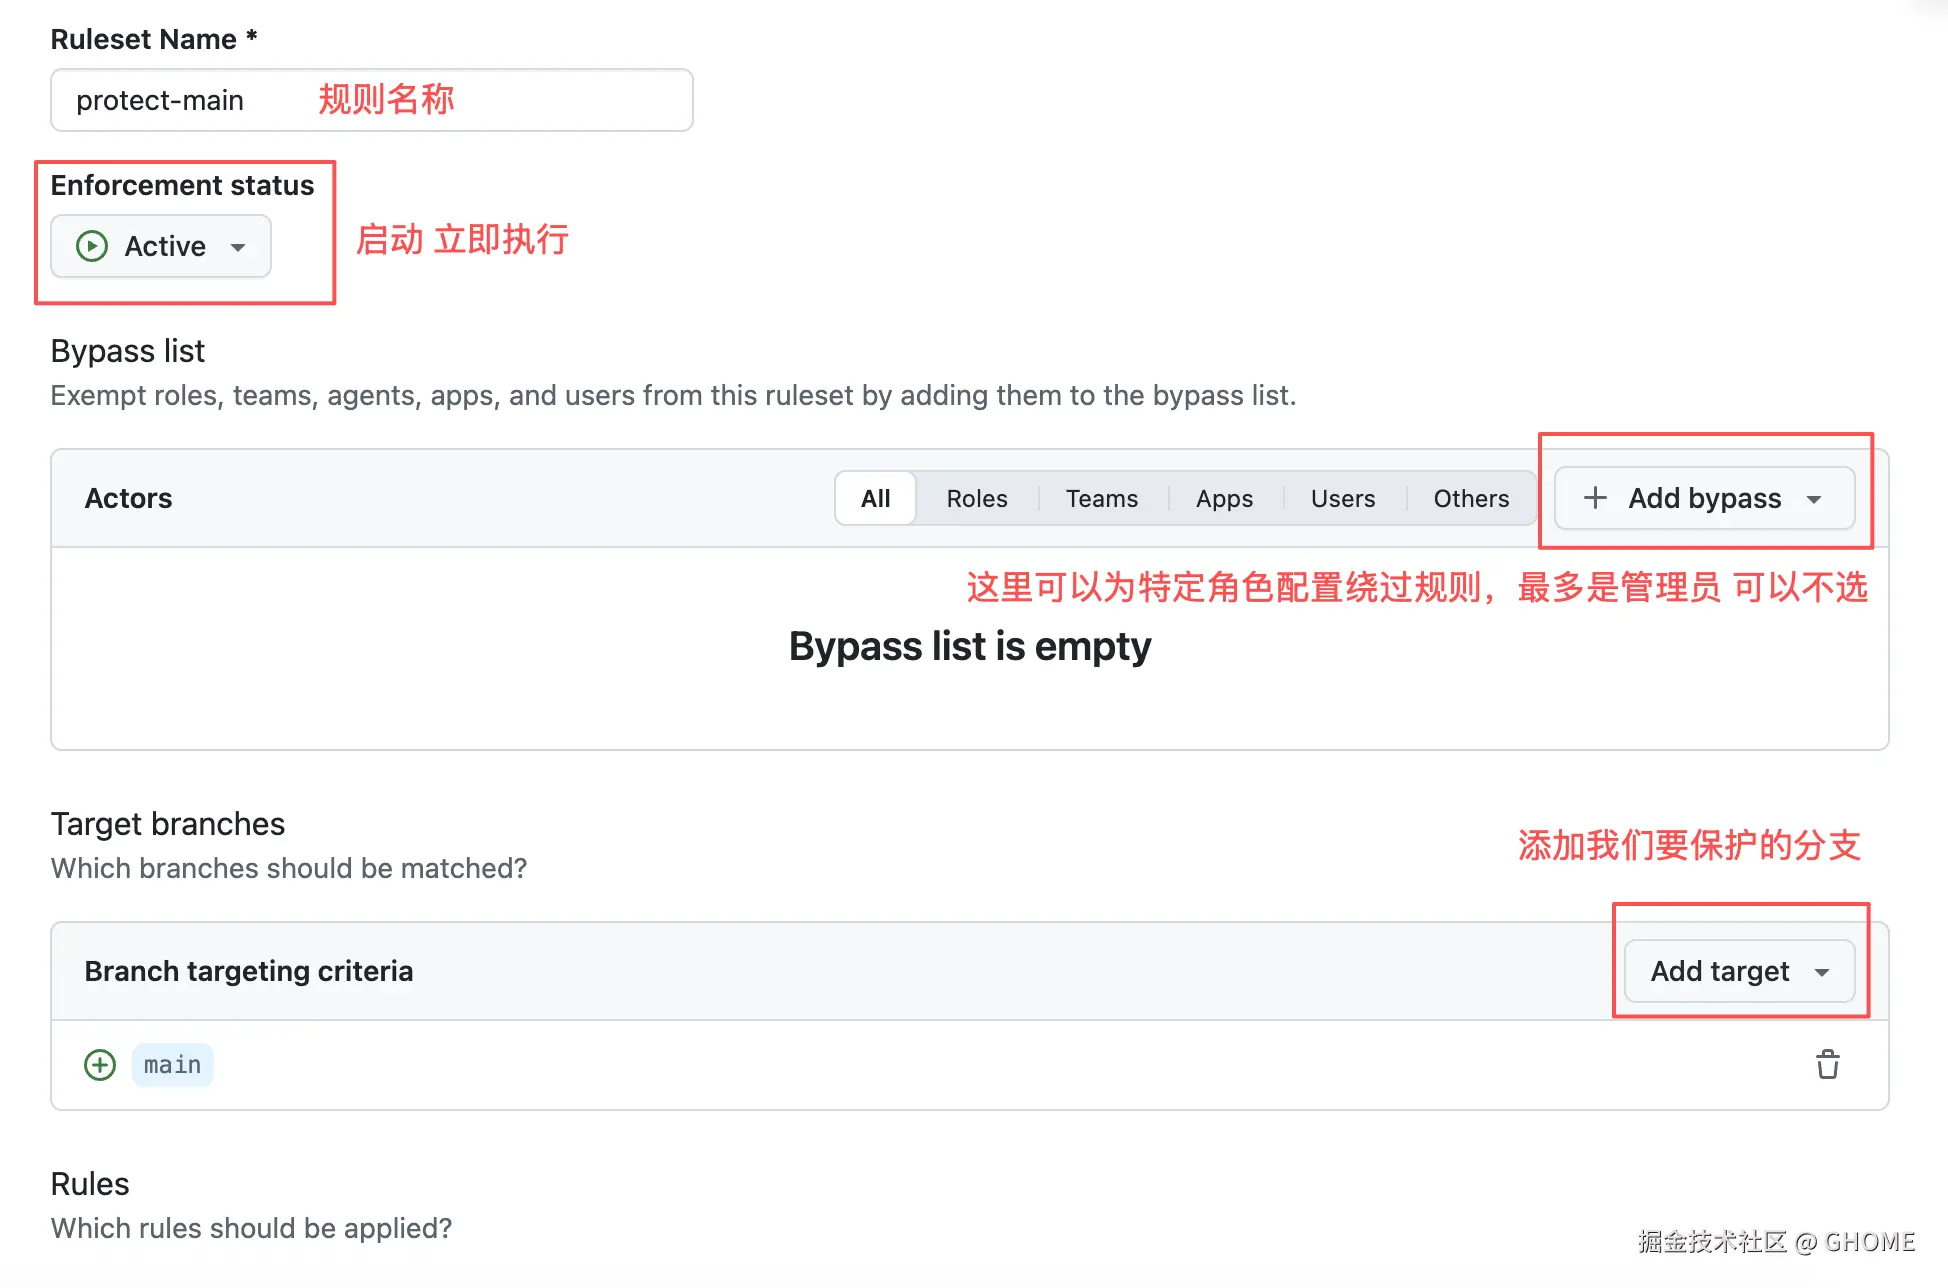
往下滚动配置规则:
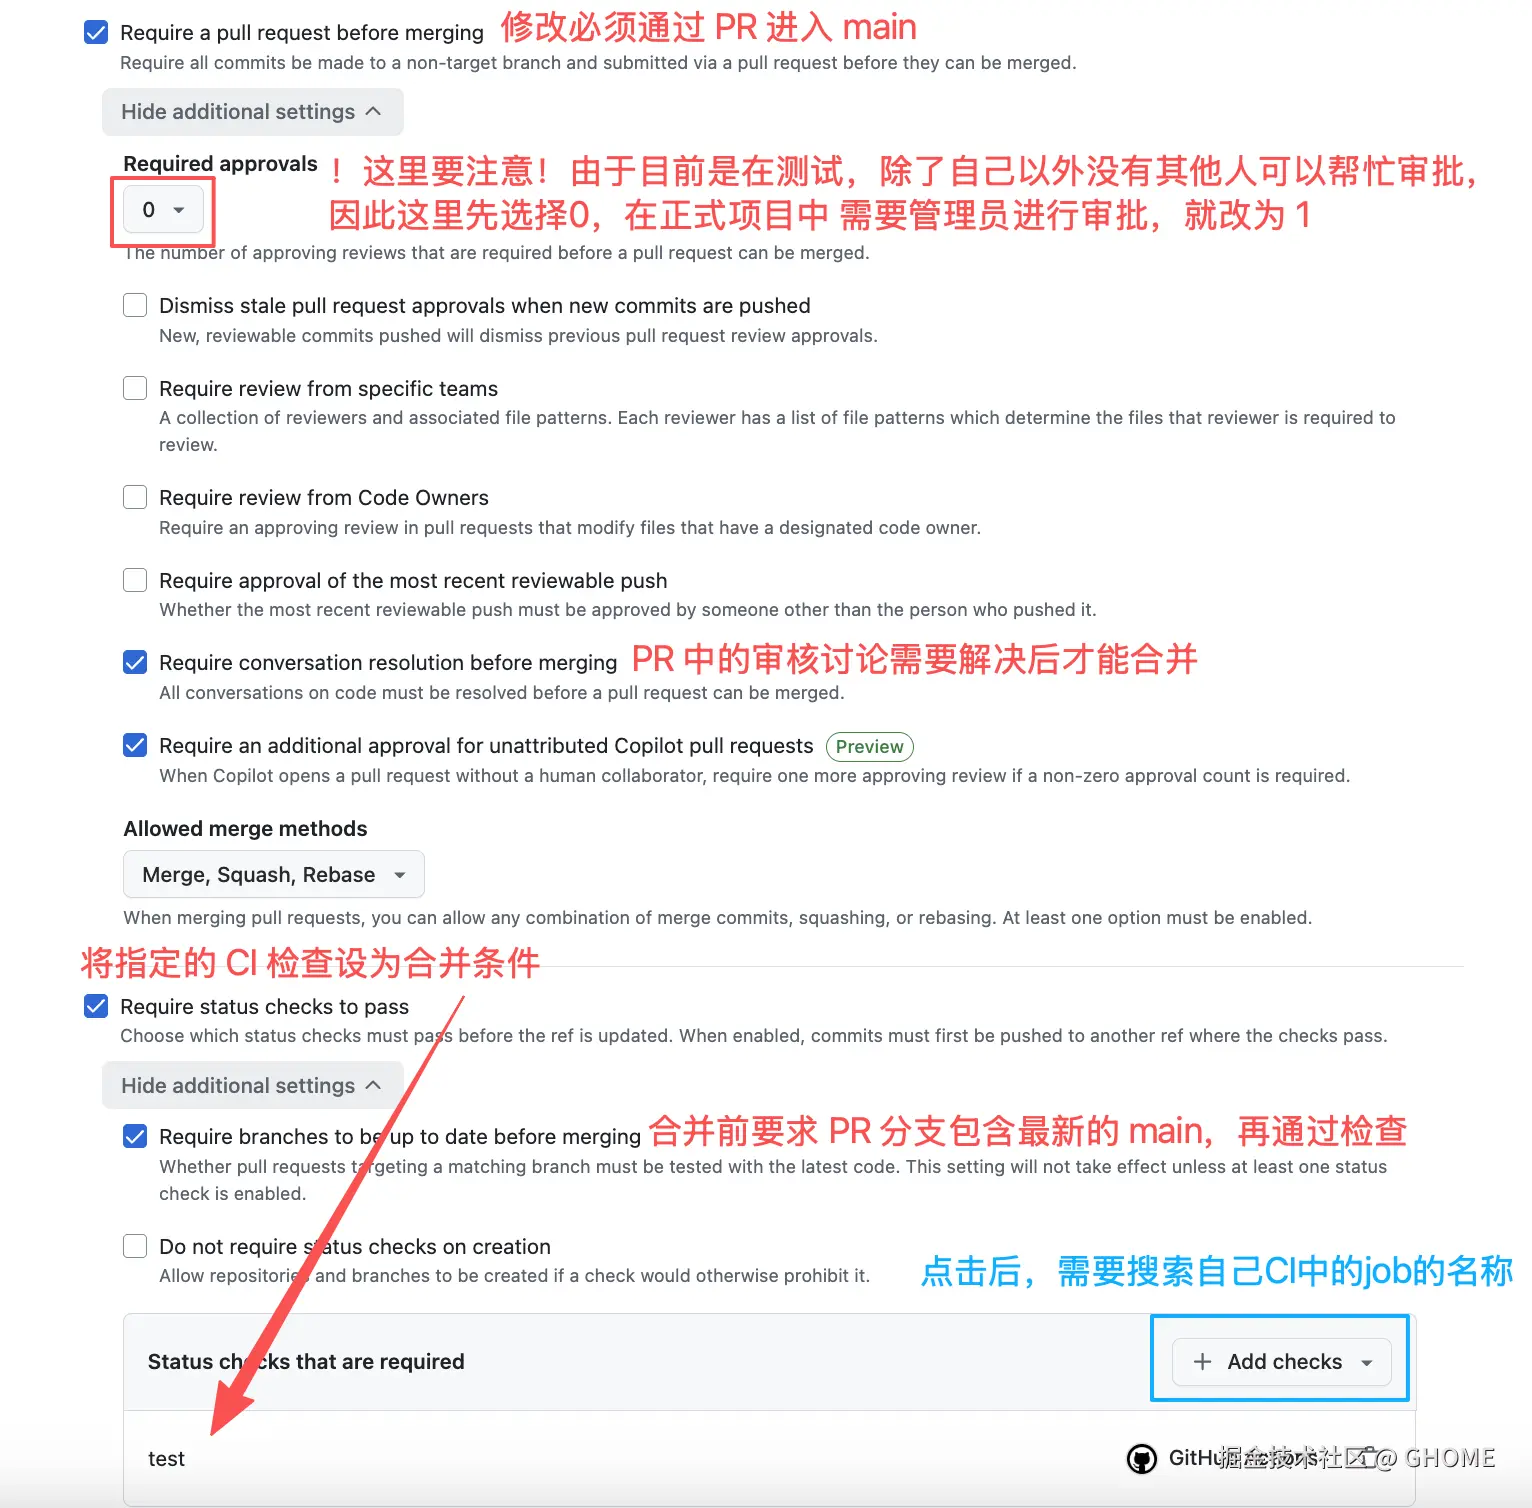
这样创建就可以了!回到PR页面查看自己的合并区域就可以看到现有的PR会受到新规则约束。
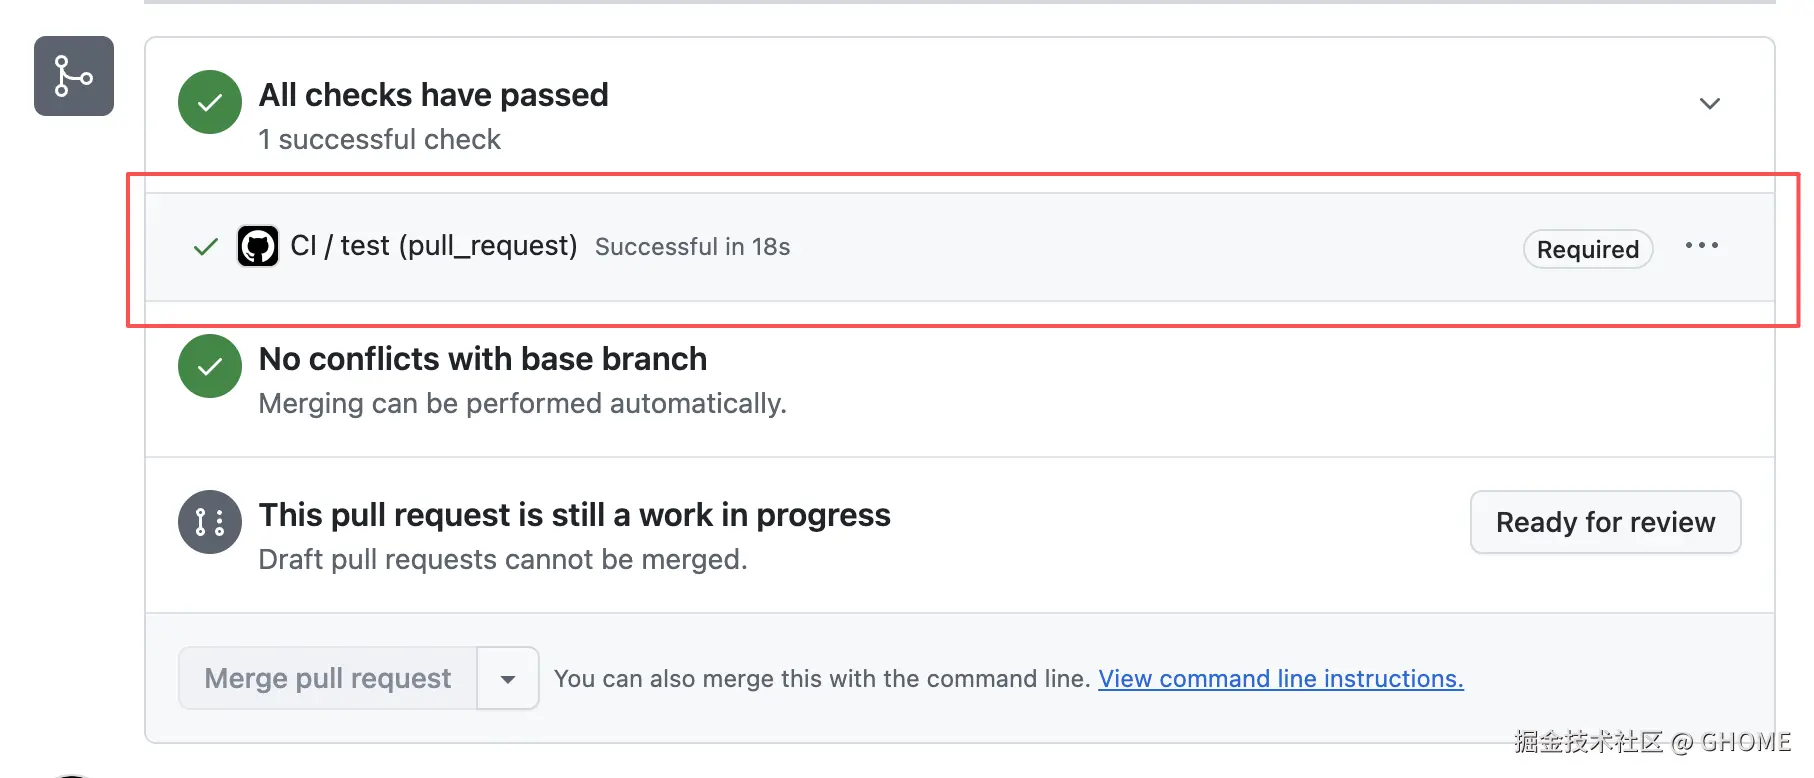
做到这里恭喜我们的CI已经基本完成:
css
功能分支开发
    ↓
创建 Draft PR
    ↓
CI 自动测试和构建
    ↓
标记 Ready for review
    ↓
满足必需检查后合并到 main
    ↓
main 再次运行 CI
当前 CI 只是在 GitHub Actions 的临时 Runner 中完成构建,构建结束后,dist文件不会自动部署到我们的服务器。接下来就要做CD的部分了!
先收个尾,把刚刚Draft PR给"Ready for review",然后"Merge pull request",合并进入main之后看看是否正常触发了CI。
CD
回顾上一篇,CD有两个理解,一个是"持续交付"、一个是"持续部署",两者之间只有一个区别那就是"部署"这个动作需不需要人为审核。从我的视角出发,我会认为这样做比较合适:
- 可以持续部署到测试环境
- 测试通过后,需要人工审核后才上生产环境,因此对于生产环境我会使用"持续交付"的方式
在原本的CI任务中,我的最后一步是进行了一个打包,这一步的产物就可以用来构建。我的项目非常简单,就是一个简单的前端项目,页面显示版本号,这样我测试的时候就可以根据版本号对比检查CI/CD流程有没有成功。
那么第一阶段的CD目标就是:
css
分支合并 到 main
    ↓
CI 测试和构建
    ↓
部署 dist 到 staging
    ↓
访问测试环境
    ↓
检查页面中的版本号
我只有一个服务器,因此我在服务器上运行了两个相同服务 在不同的端口,一个作为staging、一个作为production。
CD:将打包产物上传 Artifact
目前 CI 的 npm run build 会生成 dist,但 Job 结束后 Runner 会被销毁,dist 也就消失了。CD 需要使用这份构建结果,所以要先把它上传为 GitHub Actions Artifact。
我们新建一个分支来修改CI,主要在原本的基础上加上以下步骤:
yml
        # 在npm run build之后
        - name: Upload frontend artifact
        # 只有代码推送到 `main` 分支时,步骤才会执行
        if: github.event_name == 'push' && github.ref == 'refs/heads/main'
        # GitHub 官方 Action,用于保存 Job 生成的文件
        uses: actions/upload-artifact@v7
        with:
          # Artifact 的名称  github.sha: 当前提交的完整提交 SHA
          name: frontend-dist-${{ github.sha }}
          # 上传前端构建目录
          path: dist
          # 找不到 dist 时让步骤失败,避免误以为上传成功
          if-no-files-found: error
          # Artifact 保存 7 天
retention-days: 7在if中的参数可以查看以下文档学习:GitHub Actions 官方:github 上下文、 Git 官方:gitrepository-layout 、 Pro Git 中文版:Git 引用
接下来可以单独推送ci.yml到分支上然后提交Draft PR、合并。分别会看到提交PR的时候不会走最后一步、而合并之后会走到最后一步,可以看到我们设置的artifact.name: frontend-dist-<commit-sha>
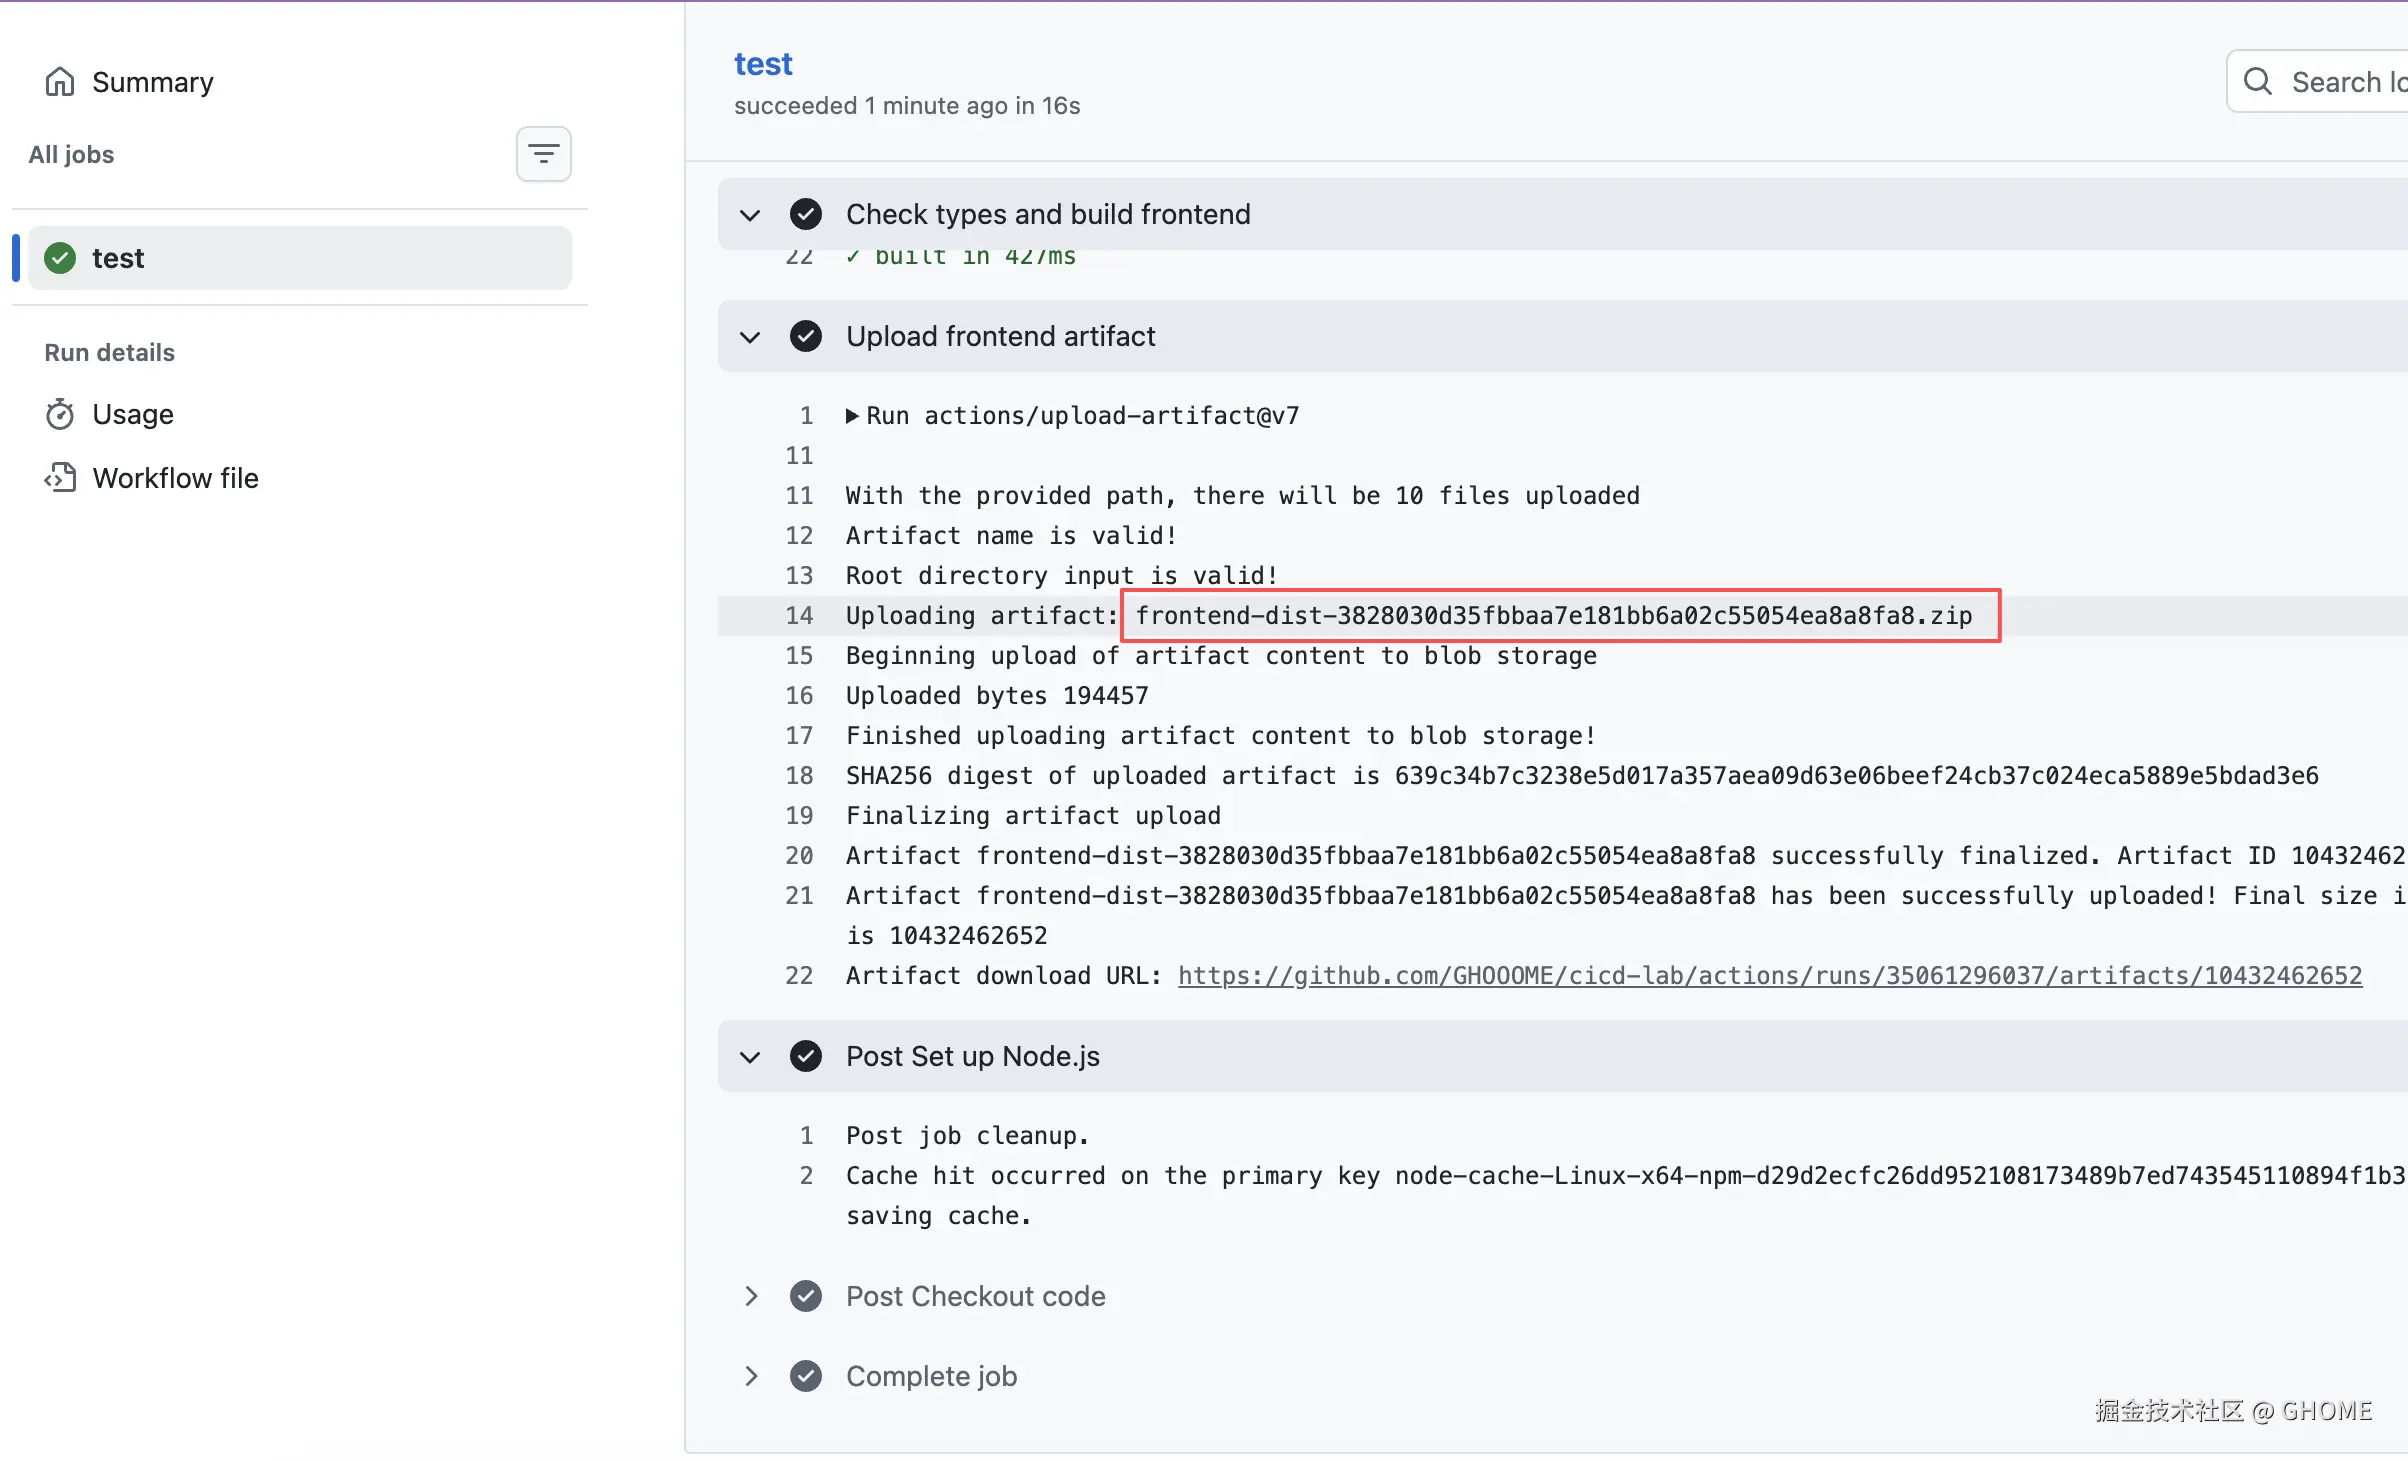
这样就完成了"保存 dist Artifact"(下面的两个Post是Action自带的收尾步骤:处理npm缓存、清理临时认证信息等)。
CD:staging 部署 - Environment
GitHub 需要一个名为 staging 的 Environment(部署环境) ,用于关联部署记录、环境变量、Secrets 和部署规则:
- 打开 仓库 Settings → Environments。
- 点击 New environment ,名称填写
staging。 - 点击 Configure environment。
- Required reviewers 不启用,因为我们的测试环境要自动部署。
- 在 Deployment branches and tags 中选择 Selected branches and tags ,添加规则:类型选 Branch ,名称填写
main,保存。
这项部署分支限制表示:只有来自 main 的运行可以部署到这个 Environment。 它与之前的分支保护各有作用:分支保护控制代码进入 main,Environment 规则控制部署到 staging。
CD:staging 部署 - 配置部署使用的 SSH 身份和 Secrets
我们先明确流程:
markdown
GitHub Actions Runner
    ↓ 使用 SSH 私钥证明身份
EC2 服务器上的部署账号
    ↓
更新 staging
第一步:创建密钥
bash
mkdir -p ~/.ssh

ssh-keygen -t ed25519 \
  -C "github-actions-cicd-lab-staging" \
  -f ~/.ssh/cicd-lab-staging \
-N ""| 参数 | 含义 |
|---|---|
-t ed25519 |
使用 Ed25519 密钥算法 |
-C "..." |
给密钥添加用途说明 |
-f ... |
指定生成文件的位置和名称 |
-N "" |
不设置私钥口令,方便自动化使用 |
命令会生成两个文件:~/.ssh/cicd-lab-staging (私钥 ,放进 GitHub Environment Secret)、~/.ssh/cicd-lab-staging.pub(公钥,后面授权到服务器上的部署账号)
第二步:把私钥存入 staging 的 Secret
进入刚刚创建的 staging Environment,在 Environment secrets 下点击 Add environment secret。名称填写"DEPLOY_SSH_KEY",密钥我用mac可以通过pbcopy < ~/.ssh/cicd-lab-staging命令直接复制到剪贴板。
第三步:添加两个普通变量
仍在 staging 页面,在 Environment variables 下添加:
| Name | Value | 用途 |
|---|---|---|
DEPLOY_HOST |
自己的服务器ip |
EC2 地址 |
DEPLOY_PORT |
22 |
服务器的 SSH 端口 |
IP 和端口属于普通配置,放 Variables;私钥属于凭据,放 Secrets。之后 YAML 的读取方式分别是:
bash
${{ vars.DEPLOY_HOST }}
${{ vars.DEPLOY_PORT }}
${{ secrets.DEPLOY_SSH_KEY }}
在yml的部署job中需要声明
environment: staging才能使用这个 Environment 下的变量和 Secrets。
github这边的配置完成了。
CD:staging 部署 - 服务器配置
有两个方向的身份验证:
| 配置 | 谁验证谁 |
|---|---|
部署私钥 + 服务器上的 authorized_keys |
服务器验证登录者 |
服务器公钥 + 客户端的 known_hosts |
登录者验证服务器 |
第一步:把部署公钥上传到服务器
把刚刚生成的公钥上传到服务器,我存在 /home/ubuntu/cicd-lab-staging.pub。
Bash
CICD_HOST="服务器公网IP"
scp -i 连接服务器密钥 -o StrictHostKeyChecking=yes \
  ~/.ssh/cicd-lab-staging.pub "ubuntu@$CICD_HOST:cicd-lab-staging.pub"
ssh -i 连接服务器密钥 -o StrictHostKeyChecking=yes "ubuntu@$CICD_HOST"
第二步:在服务器上,创建账号并授权公钥
需要为github准备一个用于连接服务器和操作的"服务器账号"用于限定部署命令的执行权限。
Bash
sudo adduser --disabled-password --gecos "" cicd-staging
sudo install -d -m 700 -o cicd-staging -g cicd-staging /home/cicd-staging/.ssh
sed 's/^/restrict /' /home/ubuntu/cicd-lab-staging.pub \
  | sudo tee /home/cicd-staging/.ssh/authorized_keys > /dev/null
sudo chown cicd-staging:cicd-staging /home/cicd-staging/.ssh/authorized_keys
sudo chmod 600 /home/cicd-staging/.ssh/authorized_keys
cicd-staging 是服务器上的 Linux 用户;authorized_keys 列出允许登录这个用户的公钥。restrict 禁用端口转发、交互终端等附加功能,仍允许远程命令和文件上传。账号已存在时,不需要重复创建。
授予 staging 部署目录的写权限,然后退出服务器。
Bash
sudo chown cicd-staging:cicd-staging /opt/cicd-web/environments/staging
sudo install -d -m 755 -o cicd-staging -g cicd-staging \
  /opt/cicd-web/environments/staging/releases
exit
第三步:在自己的电脑上,通过原本的可信连接取得服务器公钥,
Bash
ssh -i 连接服务器密钥 -o StrictHostKeyChecking=yes "ubuntu@$CICD_HOST" \
  'cat /etc/ssh/ssh_host_ed25519_key.pub' \
  | awk -v host="$CICD_HOST" '{print host, $1, $2}' \
  > ~/.ssh/cicd-lab-staging.known_hosts
服务器主机密钥通常在安装 SSH 服务或系统初始化时已生成。这里读取其公钥,保存到 Mac 本地 的 ~/.ssh/cicd-lab-staging.known_hosts。格式是"服务器地址、密钥类型、公钥";通过已有可信连接获取,是我们信任这份公钥的依据。
使用新身份测试登录和目录权限。
Bash
ssh -i ~/.ssh/cicd-lab-staging -o IdentitiesOnly=yes -o BatchMode=yes \
  -o StrictHostKeyChecking=yes \
  -o UserKnownHostsFile="$HOME/.ssh/cicd-lab-staging.known_hosts" \
  "cicd-staging@$CICD_HOST" \
  'id && test -w /opt/cicd-web/environments/staging &&
   test -w /opt/cicd-web/environments/staging/releases &&
   test ! -w /opt/cicd-web/environments/production &&
test ! -w /opt/cicd-web/releases && echo "SSH and deployment permissions OK"'出现最后的成功提示,表示密钥登录、服务器身份验证,以及这几个目录的写权限检查均通过。StrictHostKeyChecking=yes 会拒绝身份未知或不匹配的服务器。
第四步:将连接信息配置到GitHub的staging Environment
| 存储类型 | 名称 | 内容 |
|---|---|---|
| Secret | DEPLOY_SSH_KEY |
部署客户端私钥文件的完整内容 |
| Variable | DEPLOY_HOST |
服务器公网IP |
| Variable | DEPLOY_PORT |
22 |
| Variable | DEPLOY_USER |
cicd-staging |
| Variable | DEPLOY_KNOWN_HOSTS |
第三步生成的文件完整内容 |
在 Mac 的话执行 pbcopy < ~/.ssh/cicd-lab-staging.known_hosts,即可复制内容并粘贴到 DEPLOY_KNOWN_HOSTS。
CD:staging 部署 - 把 CD 接入 Workflow,实现"合并到 main 后自动部署 staging"
第一步:完成部署脚本
以下脚本用于本实验的 Linux 静态前端部署:接收已经构建好的压缩包,将文件发布到 staging,验证发布结果,并在验证失败时恢复上一版本。它依赖本项目的目录结构、release.json 格式和健康检查接口,其他项目需要相应调整。位置在:项目中/ops/deploy-staging.py
python
#!/usr/bin/env python3
"""部署已构建的前端到 staging;失败时恢复之前的版本和环境信息。"""

import fcntl
import hashlib
import json
import os
from pathlib import Path, PurePosixPath
import re
import shutil
import sys
import tarfile
import tempfile
import time
from datetime import datetime, timezone
from urllib.request import Request, urlopen

STAGING_ROOT = Path("/opt/cicd-web/environments/staging")
# 我的staging服务部署在18082端口
STAGING_URL = "http://127.0.0.1:18082"
MAX_BYTES = 50 * 1024 * 1024


def unpack(archive, destination):
    """先验证整个归档,再写文件;不使用会恢复链接或特殊文件的 extractall。"""
    with tarfile.open(archive, "r:gz") as bundle:
        entries, seen, total = [], set(), 0
        for member in bundle:
            path = PurePosixPath(member.name)
            if path.is_absolute() or ".." in path.parts or not (member.isdir() or member.isfile()):
                raise ValueError(f"Unsafe archive entry: {member.name!r}")
            if str(path) == "." and not member.isdir():
                raise ValueError("Archive root must be a directory")
            if path in seen:
                raise ValueError(f"Duplicate archive entry: {member.name!r}")
            seen.add(path)
            total += member.size
            if member.size < 0 or total > MAX_BYTES or len(seen) > 10000:
                raise ValueError("Archive exceeds deployment limits")
            entries.append((member, path))
        for member, path in entries:
            target = destination.joinpath(*path.parts)
            if member.isdir():
                target.mkdir(parents=True, exist_ok=True)
            else:
                target.parent.mkdir(parents=True, exist_ok=True)
                with bundle.extractfile(member) as source, target.open("xb") as output:
                    shutil.copyfileobj(source, output)
                target.chmod(0o644)
        for directory in [destination, *destination.rglob("*")]:
            if directory.is_dir():
                directory.chmod(0o755)


def release_metadata(directory, expected_commit):
    if not (directory / "index.html").is_file():
        raise ValueError("Artifact is missing index.html")
    metadata = json.loads((directory / "release.json").read_text(encoding="utf-8"))
    fields = ("version", "builtAt", "buildId", "commit")
    if not isinstance(metadata, dict) or any(not isinstance(metadata.get(k), str) or not metadata[k] for k in fields):
        raise ValueError("release.json must contain nonempty release fields")
    if metadata["commit"] != expected_commit:
        raise ValueError("Artifact commit does not match the requested commit")
    if not re.fullmatch(r"[A-Za-z0-9][A-Za-z0-9._-]{0,127}", metadata["buildId"]):
        raise ValueError("Invalid buildId")
    if not re.fullmatch(r"\d+\.\d+(?:\.\d+)?", metadata["version"]):
        raise ValueError("Invalid version")
    if datetime.fromisoformat(metadata["builtAt"].replace("Z", "+00:00")).utcoffset() is None:
        raise ValueError("builtAt must include a timezone")
    return metadata


def manifest(directory):
    """相同 buildId 只能复用完全相同的目录,不能覆盖历史版本。"""
    if directory.is_symlink() or not directory.is_dir():
        raise ValueError("Release path must be a real directory")
    result = {}
    for path in directory.rglob("*"):
        name = str(path.relative_to(directory))
        if path.is_symlink() or not (path.is_file() or path.is_dir()):
            raise ValueError(f"Unsupported existing release entry: {name}")
        result[name] = hashlib.sha256(path.read_bytes()).hexdigest() if path.is_file() else None
    return result


def replace_bytes(path, content):
    with tempfile.NamedTemporaryFile(dir=path.parent, prefix=".metadata-", delete=False) as output:
        temporary = Path(output.name)
        try:
            output.write(content)
            output.flush()
            os.fchmod(output.fileno(), 0o644)
            os.replace(temporary, path)
        finally:
            temporary.unlink(missing_ok=True)


def replace_link(path, target):
    with tempfile.TemporaryDirectory(dir=path.parent, prefix=".switch-") as temporary:
        link = Path(temporary) / "current"
        link.symlink_to(target)
        os.replace(link, path)


def verify_http(base_url, metadata, environment):
    def fetch(path):
        request = Request(base_url.rstrip("/") + path, headers={"Cache-Control": "no-cache"})
        with urlopen(request, timeout=2) as response:
            if response.status != 200:
                raise ValueError(f"{path}: expected HTTP 200")
            body = response.read(MAX_BYTES + 1)
            if len(body) > MAX_BYTES:
                raise ValueError("HTTP response is too large")
            return body

    for attempt in range(5):
        try:
            for path in ("/release.json", "/health"):
                if json.loads(fetch(path)) != metadata:
                    raise ValueError(f"{path} does not match this release")
            if json.loads(fetch("/environment.json")) != environment:
                raise ValueError("Runtime environment does not match this deployment")
            if b"<html" not in fetch("/").lower():
                raise ValueError("Home page is not HTML")
            return
        except (OSError, ValueError) as error:
            if attempt == 4:
                raise RuntimeError(f"Staging verification failed: {error}") from error
            time.sleep(1)


def deploy(archive, expected_commit, root=STAGING_ROOT, base_url=STAGING_URL):
    if not re.fullmatch(r"[0-9a-fA-F]{40}", expected_commit):
        raise ValueError("Expected commit must be a full 40-character SHA")
    root = Path(root)
    if root.is_symlink() or not root.is_dir():
        raise ValueError("Staging directory must already exist and cannot be a symlink")
    descriptor = os.open(root / ".deploy.lock", os.O_CREAT | os.O_RDWR | os.O_NOFOLLOW, 0o600)
    with os.fdopen(descriptor, "a") as lock:
        fcntl.flock(lock, fcntl.LOCK_EX)
        releases = root / "releases"
        if releases.is_symlink():
            raise ValueError("Releases directory cannot be a symlink")
        releases.mkdir(mode=0o755, exist_ok=True)
        with tempfile.TemporaryDirectory(dir=releases, prefix=".incoming-") as temporary:
            incoming = Path(temporary)
            unpack(archive, incoming)
            metadata = release_metadata(incoming, expected_commit)
            release = releases / metadata["buildId"]
            if os.path.lexists(release):
                if manifest(release) != manifest(incoming):
                    raise ValueError("buildId already exists with different contents")
            else:
                os.rename(incoming, release)

        current, env_file = root / "current", root / "environment.json"
        if os.path.lexists(current) and not current.is_symlink():
            raise ValueError("current must be a symlink or absent")
        if env_file.is_symlink() or (env_file.exists() and not env_file.is_file()):
            raise ValueError("environment.json must be a regular file or absent")
        previous = os.readlink(current) if current.is_symlink() else None
        old_environment = env_file.read_bytes() if env_file.exists() else None
        environment = {"environment": "staging", "deployedAt": datetime.now(timezone.utc).isoformat()}
        try:
            replace_bytes(env_file, (json.dumps(environment) + "\n").encode())
            replace_link(current, release)
            verify_http(base_url, metadata, environment)
        except BaseException:
            # 恢复链接字符串即可;不要跟随或修改以前共享的版本目录。
            errors = []
            for path, value, restore in ((current, previous, replace_link), (env_file, old_environment, replace_bytes)):
                try:
                    restore(path, value) if value is not None else path.unlink(missing_ok=True)
                except OSError as error:
                    errors.append(str(error))
            if errors:
                raise RuntimeError("Deployment failed; rollback needs attention: " + "; ".join(errors))
            print("Staging verification failed; previous release and environment restored.", file=sys.stderr)
            raise
        print(f"Deployed staging: {metadata['version']} ({metadata['buildId']}), commit={metadata['commit']}")
        return metadata


if __name__ == "__main__":
    if len(sys.argv) != 3:
        sys.exit("Usage: python3 deploy-staging.py FRONTEND.tar.gz EXPECTED_COMMIT")
    try:
        deploy(sys.argv[1], sys.argv[2])
    except Exception as error:
        sys.exit(f"Deployment failed: {error}")
流程是这样:
bash
解压上传的构建产物
→ 核对产物所属的提交
→ 保存到 staging/releases
→ 切换 current 链接
→ 通过 HTTP 检查版本
→ 检查失败则恢复上一版本
第二步:修改CI,加入部署Job
先在现有的test job最后加一个检查步骤:
yml
    - name: Test staging deployment script
      run: python3 -m unittest discover -s ops/tests -v
检查脚本在:项目/ops/tests/test_deploy_staging.py,用于在runner测试"部署脚本的发布、验证和回滚逻辑"
python
"""在临时目录和本机 HTTP 服务中验证发布与回滚,不连接 EC2。"""
import functools
import importlib.util
import io
import json
import os
from pathlib import Path
import tarfile
import tempfile
import threading
import unittest
from http.server import BaseHTTPRequestHandler, ThreadingHTTPServer
from unittest.mock import patch

spec = importlib.util.spec_from_file_location("deploy_staging", Path(__file__).parents[1] / "deploy-staging.py")
deployment = importlib.util.module_from_spec(spec)
spec.loader.exec_module(deployment)
COMMIT = "a" * 40


class StaticHandler(BaseHTTPRequestHandler):
    def __init__(self, *args, root, **kwargs):
        self.root = root
        super().__init__(*args, **kwargs)

    def do_GET(self):
        if self.server.bad_health and self.path == "/health":
            body = b'{}'
        elif self.path == "/environment.json":
            body = (self.root / "environment.json").read_bytes()
        else:
            filename = {"/": "index.html", "/health": "release.json"}.get(self.path, self.path.lstrip("/"))
            body = (self.root / "current" / filename).read_bytes()
        self.send_response(200)
        self.end_headers()
        self.wfile.write(body)

    def log_message(self, *args):
        pass


class DeploymentTests(unittest.TestCase):
    def setUp(self):
        self.temporary = tempfile.TemporaryDirectory()
        self.addCleanup(self.temporary.cleanup)
        self.base = Path(self.temporary.name)
        self.root = self.base / "staging"
        self.root.mkdir()
        self.previous = self.base / "shared-old-release"
        self.previous.mkdir()
        (self.previous / "index.html").write_text("<html>old</html>")
        (self.root / "current").symlink_to(self.previous)
        self.old_environment = b'{"environment":"staging","deployedAt":"old"}\n'
        (self.root / "environment.json").write_bytes(self.old_environment)
        self.server = ThreadingHTTPServer(("127.0.0.1", 0), functools.partial(StaticHandler, root=self.root))
        self.server.bad_health = False
        self.thread = threading.Thread(target=self.server.serve_forever, daemon=True)
        self.thread.start()
        self.addCleanup(self.stop_server)
        self.url = f"http://127.0.0.1:{self.server.server_port}"
        self.metadata = {"version": "1.1", "commit": COMMIT, "builtAt": "2026-09-17T00:00:00Z", "buildId": "aaaaaaa-20260917000000000"}

    def stop_server(self):
        self.server.shutdown()
        self.server.server_close()
        self.thread.join()

    def archive(self, html=b"<html>new</html>", extra=None):
        target = self.base / "artifact.tar.gz"
        with tarfile.open(target, "w:gz") as bundle:
            root_entry = tarfile.TarInfo(".")
            root_entry.type = tarfile.DIRTYPE
            bundle.addfile(root_entry)
            for name, data in {"./index.html": html, "./release.json": json.dumps(self.metadata).encode(), "./assets/app.js": b"console.log('1.1')"}.items():
                entry = tarfile.TarInfo(name)
                entry.size = len(data)
                bundle.addfile(entry, io.BytesIO(data))
            if extra is not None:
                bundle.addfile(extra, io.BytesIO(b"x") if extra.isfile() else None)
        return target

    def run_deploy(self, archive=None, commit=COMMIT):
        return deployment.deploy(archive or self.archive(), commit, self.root, self.url)

    def assert_original(self):
        self.assertEqual(os.readlink(self.root / "current"), str(self.previous))
        self.assertEqual((self.root / "environment.json").read_bytes(), self.old_environment)
        self.assertEqual((self.previous / "index.html").read_text(), "<html>old</html>")

    def test_success_and_identical_retry(self):
        archive = self.archive()
        self.assertEqual(self.run_deploy(archive), self.metadata)
        self.assertEqual(self.run_deploy(archive), self.metadata)
        release = self.root / "releases" / self.metadata["buildId"]
        self.assertEqual((self.root / "current").resolve(), release.resolve())
        self.assertEqual((release / "index.html").stat().st_mode & 0o777, 0o644)
        self.assertEqual((release / "assets").stat().st_mode & 0o777, 0o755)

    def test_failed_http_restores_both_original_link_and_metadata(self):
        self.server.bad_health = True
        with patch.object(deployment.time, "sleep"), self.assertRaisesRegex(RuntimeError, "verification failed"):
            self.run_deploy()
        self.assert_original()

    def test_wrong_commit_does_not_switch(self):
        with self.assertRaisesRegex(ValueError, "commit does not match"):
            self.run_deploy(commit="b" * 40)
        self.assert_original()

    def test_existing_build_cannot_be_overwritten(self):
        self.run_deploy()
        with self.assertRaisesRegex(ValueError, "different contents"):
            self.run_deploy(self.archive(html=b"<html>changed</html>"))
        self.assertEqual((self.root / "current" / "index.html").read_bytes(), b"<html>new</html>")

    def test_path_traversal_is_rejected(self):
        entry = tarfile.TarInfo("../../../outside")
        entry.size = 1
        with self.assertRaisesRegex(ValueError, "Unsafe archive"):
            self.run_deploy(self.archive(extra=entry))
        self.assert_original()
        self.assertFalse((self.base / "outside").exists())

    def test_symlink_is_rejected(self):
        entry = tarfile.TarInfo("./assets/outside")
        entry.type = tarfile.SYMTYPE
        entry.linkname = str(self.previous)
        with self.assertRaisesRegex(ValueError, "Unsafe archive"):
            self.run_deploy(self.archive(extra=entry))
        self.assert_original()


if __name__ == "__main__":
    unittest.main()
然后再写一个job,与原本的test平级,学习一些新的参数:
concurrency:控制同组任务的执行和等待(比如控制同名组的任务串行,不会打断上一个任务)env:把配置传给步骤运行的程序,在不同层级配置辐射范围不同(Step->Job->Workflow,优先级同理)
yml
    deploy_staging:
    runs-on: ubuntu-latest
    timeout-minutes: 10
    # 等待测试和构建成功
    needs: test
    # 只在推送到main时部署
    if: github.event_name == 'push' && github.ref == 'refs/heads/main'
    # 配置的测试环境
    environment: staging

    # 同一时间只运行一个 staging 部署,不中断正在切换版本的任务
    concurrency:
      group: deploy-staging
      cancel-in-progress: false # 已经开始的部署继续做完,不被新任务打断

    env:
      DEPLOY_HOST: ${{ vars.DEPLOY_HOST }}
      DEPLOY_PORT: ${{ vars.DEPLOY_PORT }}
      DEPLOY_USER: ${{ vars.DEPLOY_USER }}

    steps:
      # 获取仓库中的部署脚本;前端文件来自下面下载的 Artifact
      - name: Checkout deployment script
        uses: actions/checkout@v7
        with:
          persist-credentials: false

      - name: Download frontend artifact
        uses: actions/download-artifact@v7
        with:
          name: frontend-dist-${{ github.sha }}
          path: dist

      - name: Configure SSH
        env:
          DEPLOY_SSH_KEY: ${{ secrets.DEPLOY_SSH_KEY }}
          DEPLOY_KNOWN_HOSTS: ${{ vars.DEPLOY_KNOWN_HOSTS }}
        run: |
          # 检查必填变量
          : "${DEPLOY_HOST:?Missing DEPLOY_HOST}"
          : "${DEPLOY_PORT:?Missing DEPLOY_PORT}"
          : "${DEPLOY_USER:?Missing DEPLOY_USER}"
          : "${DEPLOY_SSH_KEY:?Missing DEPLOY_SSH_KEY}"
          : "${DEPLOY_KNOWN_HOSTS:?Missing DEPLOY_KNOWN_HOSTS}"

          # 新文件默认仅当前用户能访问
          umask 077
          mkdir -p "$RUNNER_TEMP/staging-ssh"
          printf '%s\n' "$DEPLOY_SSH_KEY" > "$RUNNER_TEMP/staging-ssh/key"
          printf '%s\n' "$DEPLOY_KNOWN_HOSTS" > "$RUNNER_TEMP/staging-ssh/known_hosts"

          # staging 是这份 SSH 配置中的连接别名
          cat > "$RUNNER_TEMP/staging-ssh/config" <<EOF
          Host staging
            HostName $DEPLOY_HOST
            User $DEPLOY_USER
            Port $DEPLOY_PORT
            IdentityFile $RUNNER_TEMP/staging-ssh/key
            UserKnownHostsFile $RUNNER_TEMP/staging-ssh/known_hosts
            IdentitiesOnly yes
            BatchMode yes
            StrictHostKeyChecking yes
            ConnectTimeout 10
            ServerAliveInterval 30
            ServerAliveCountMax 3
          EOF

      - name: Upload and deploy staging
        run: |
          ssh_config="$RUNNER_TEMP/staging-ssh/config"
          upload_id="${GITHUB_RUN_ID}-${GITHUB_RUN_ATTEMPT}"

          # 把已经下载好的 dist 打包,便于一次传输
          tar -czf "$RUNNER_TEMP/frontend.tar.gz" -C dist .
          ssh -F "$ssh_config" staging "mkdir -p incoming/$upload_id"
          scp -F "$ssh_config" \
            "$RUNNER_TEMP/frontend.tar.gz" \
            ops/deploy-staging.py \
            "staging:incoming/$upload_id/"

          # SSH 会将远程脚本的退出状态传回来:验证失败,Job 就失败
          # trap 在远程命令结束时清理本次上传的临时文件
          ssh -F "$ssh_config" staging \
            "trap 'rm -rf -- incoming/$upload_id' EXIT; python3 incoming/$upload_id/deploy-staging.py incoming/$upload_id/frontend.tar.gz '$GITHUB_SHA'"

      - name: Clean up local SSH files
        if: always()
        run: |
          rm -rf -- "$RUNNER_TEMP/staging-ssh"
          rm -f -- "$RUNNER_TEMP/frontend.tar.gz"
然后!对代码做一些改动让自己能够看出来更新(我是将页面上的版本号从1.0改为1.1),接下来就是激动人心的提交PR 合并环节:
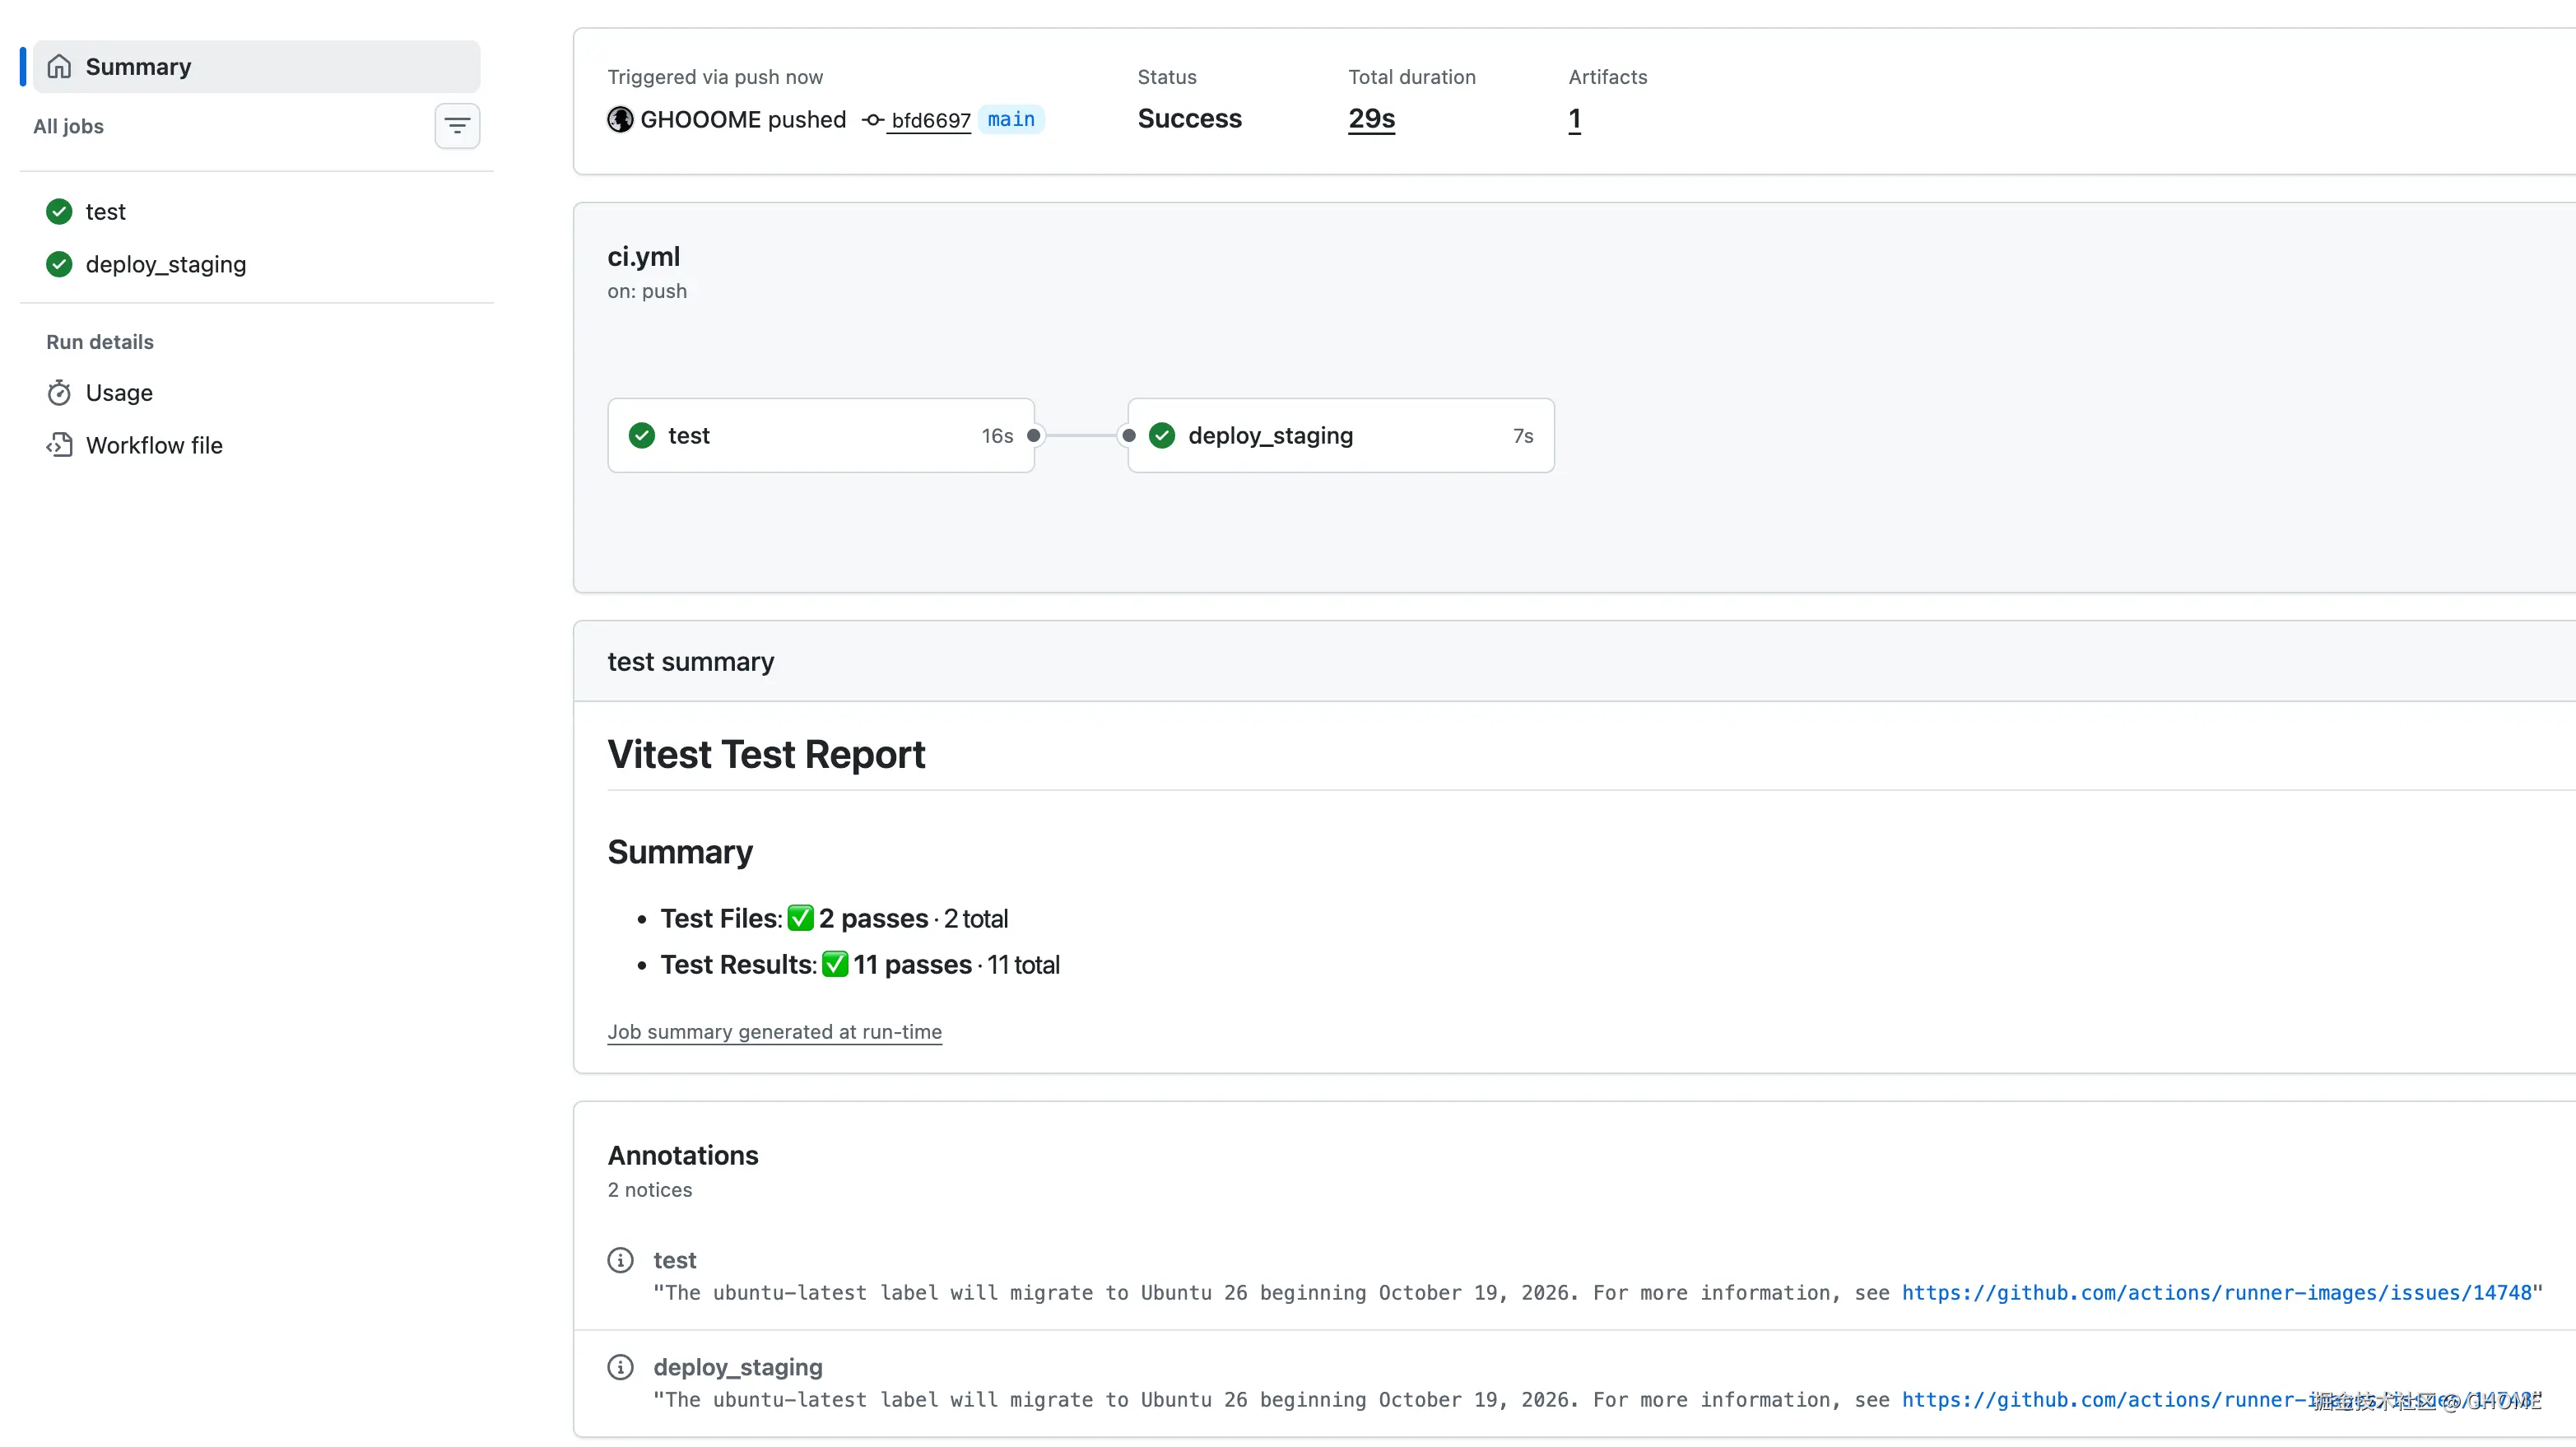
那么我看到自己的项目:

这样子,【CD:staging自动部署】就完成啦。接下来的目标是:production的人工确认发布。
CD:production 人工确认部署
首先在仓库创建production的环境
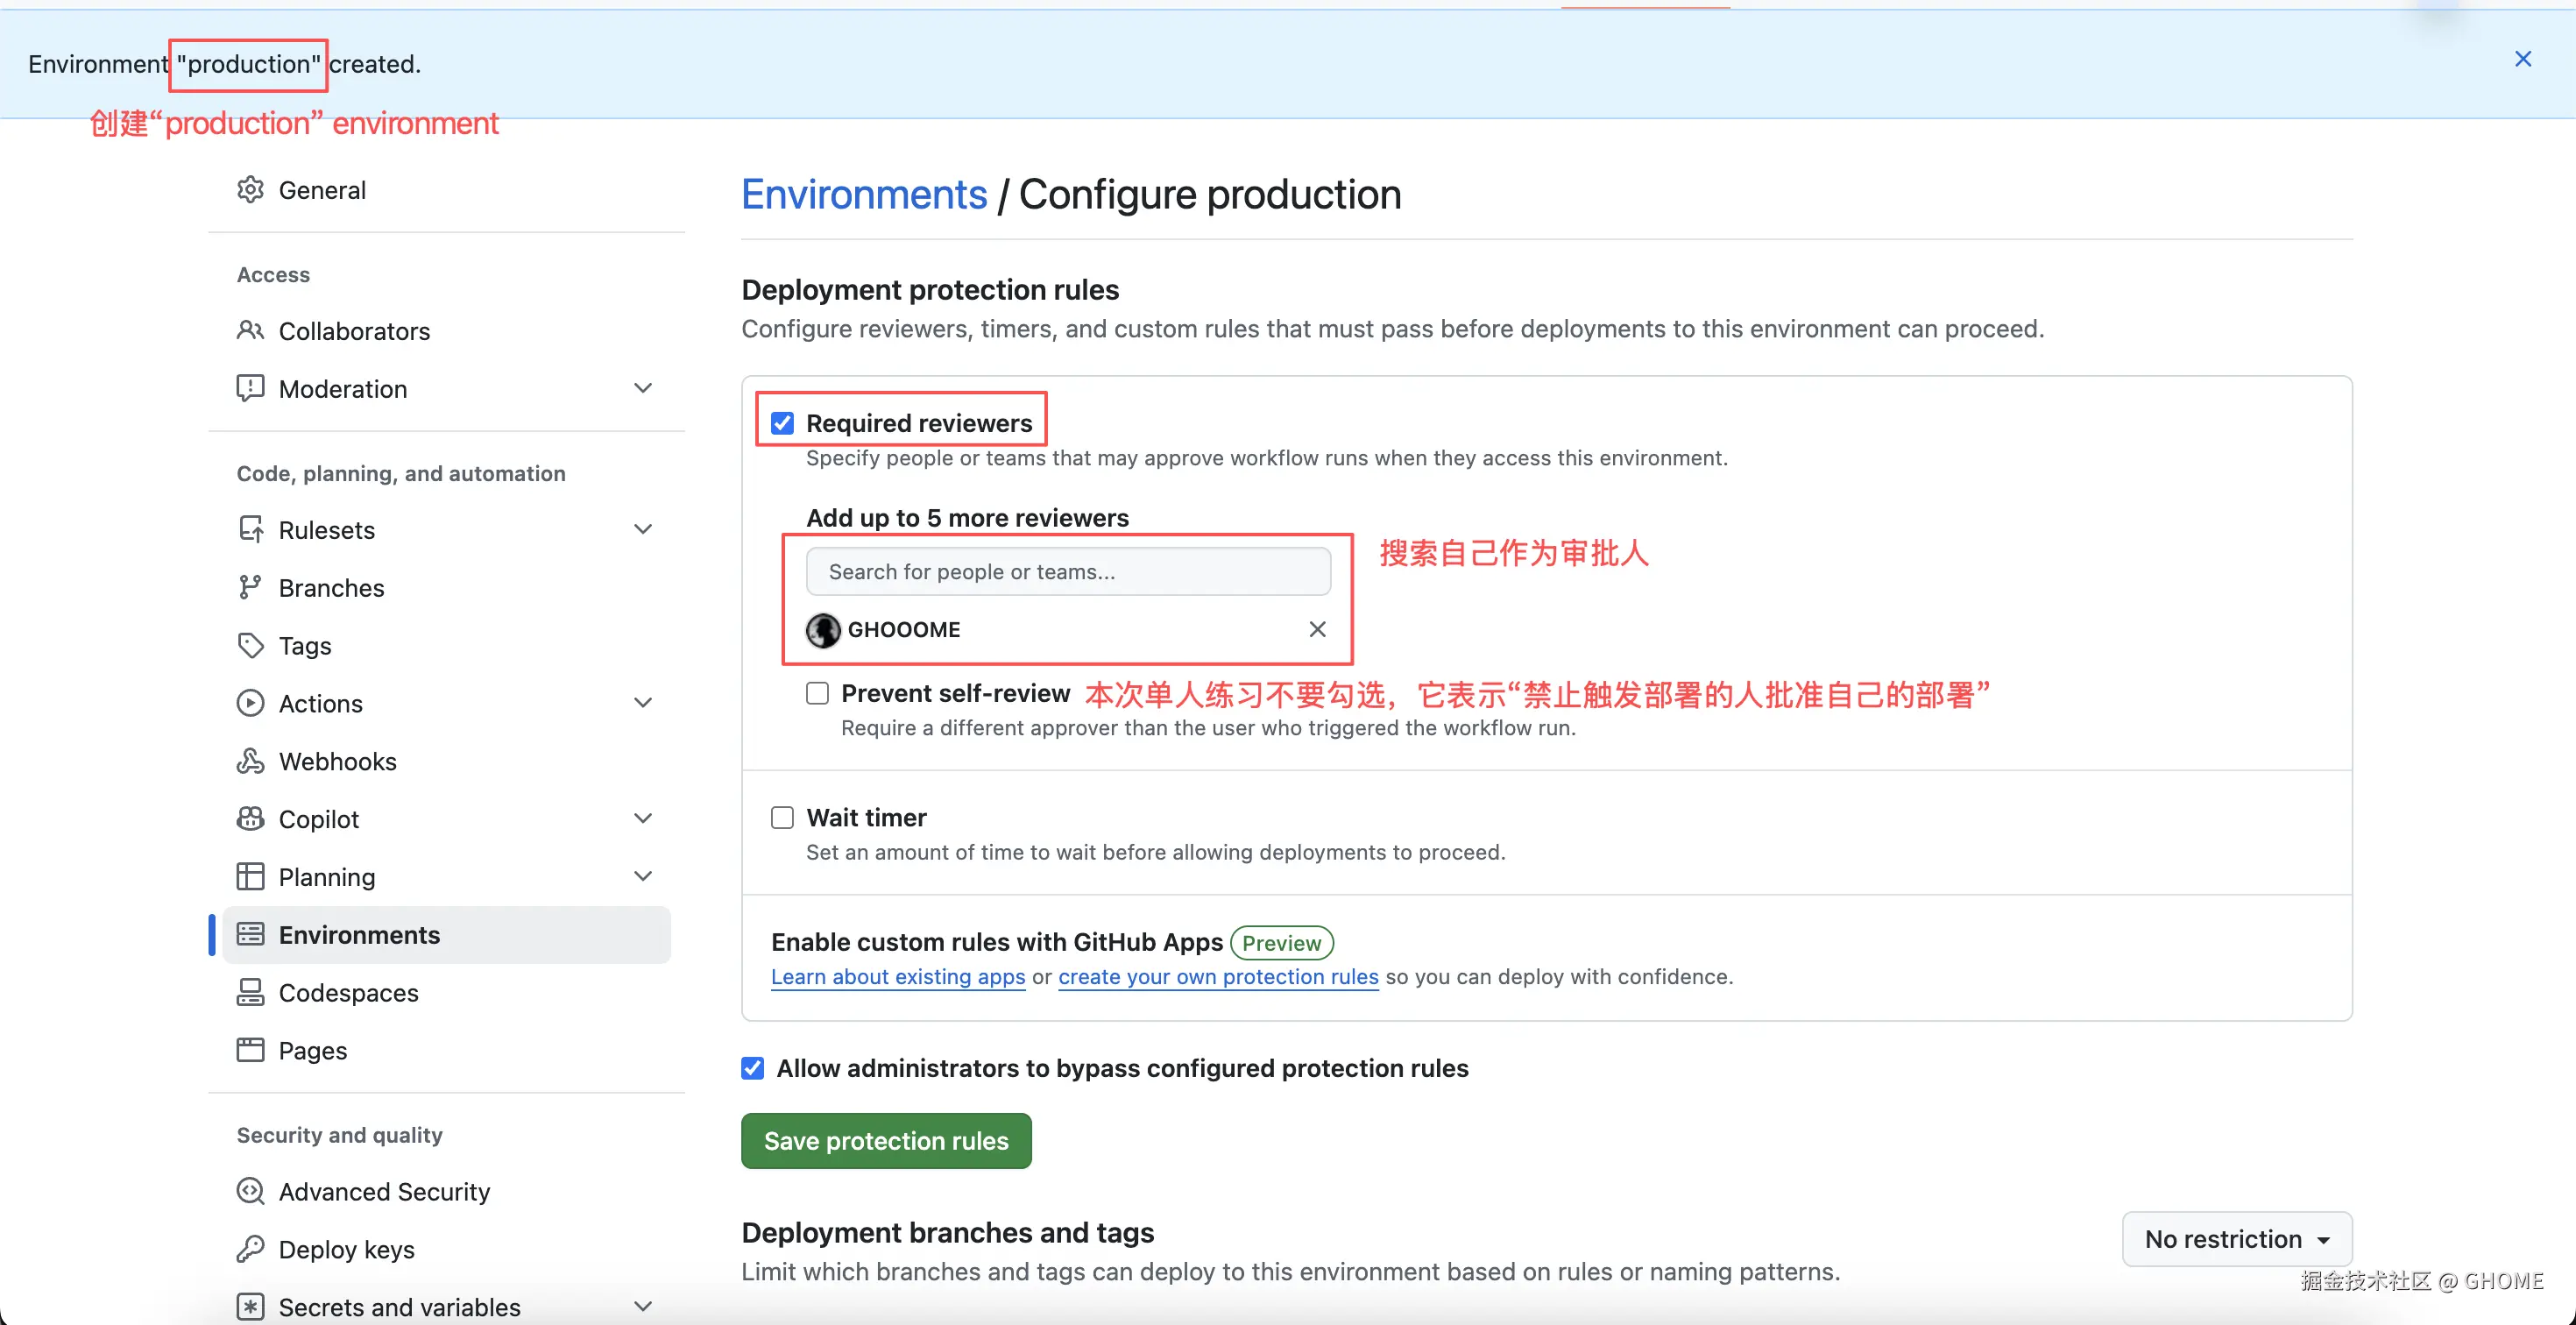
下面的Deployment branches and tags选择Selected branches and tags ,添加类型为 Branch 、名称为 main 的规则。然后依旧为production配置密钥:
第一步:生成密钥
Bash
ssh-keygen -t ed25519 \
  -C "github-actions-cicd-lab-production" \
  -f ~/.ssh/cicd-lab-production \
-N ""| 文件 | 用途 |
|---|---|
~/.ssh/cicd-lab-production |
私钥,交给 GitHub Actions |
~/.ssh/cicd-lab-production.pub |
公钥,稍后授权到服务器 |
第二步:把私钥保存到production Environment
在终端执行 pbcopy < ~/.ssh/cicd-lab-production 复制私钥,然后到production Environment中添加secret:
-
Name :
DEPLOY_SSH_KEY -
Secret:粘贴刚复制的私钥,然后保存。
第三步:上传公钥并登陆服务器,在服务器上创建账号、授权公钥和目录
上传公钥并登录服务器:
Bash
CICD_HOST="服务器公网IP"

# 使用原来的管理员身份,上传新公钥
scp -i 服务器密钥 -o StrictHostKeyChecking=yes \
  ~/.ssh/cicd-lab-production.pub \
  ubuntu@服务器公网IP:cicd-lab-production.pub

# 登录服务器,接下来配置账号
ssh -i 服务器密钥 -o StrictHostKeyChecking=yes \
  "ubuntu@$CICD_HOST"
在服务器上执行:创建账号、授权公钥和目录:
Bash
# 创建部署账号,不启用密码登录
sudo adduser --disabled-password --gecos "" cicd-production

# 创建 SSH 配置目录
sudo install -d -m 700 -o cicd-production -g cicd-production \
  /home/cicd-production/.ssh

# 允许持有对应私钥的客户端登录,限制端口转发等附加功能
sed 's/^/restrict /' /home/ubuntu/cicd-lab-production.pub \
  | sudo tee /home/cicd-production/.ssh/authorized_keys > /dev/null

# 设置授权文件的所有者和访问权限
sudo chown cicd-production:cicd-production \
  /home/cicd-production/.ssh/authorized_keys
sudo chmod 600 /home/cicd-production/.ssh/authorized_keys

# 授予 production 目录的写权限
sudo chown cicd-production:cicd-production \
  /opt/cicd-web/environments/production

# 创建 production 专用的版本存放目录
sudo install -d -m 755 -o cicd-production -g cicd-production \
  /opt/cicd-web/environments/production/releases

# 退出服务器
exit
第四步:测试新账号
Bash
ssh -i ~/.ssh/cicd-lab-production \
  -o IdentitiesOnly=yes -o BatchMode=yes \
  -o StrictHostKeyChecking=yes \
  -o UserKnownHostsFile="$HOME/.ssh/cicd-lab-staging.known_hosts" \
  "cicd-production@$CICD_HOST" \
  'whoami &&
   test -w /opt/cicd-web/environments/production/releases &&
   test ! -w /opt/cicd-web/environments/staging &&
   echo "Production SSH and permissions OK"'
这里仍使用 cicd-lab-staging.known_hosts,因为我的staging和production在同个服务器上,它记录的是服务器身份,与登录哪个用户无关。我刚核对过,服务器主机公钥没有变化。
第五步:将连接服务器的信息填进production environment
在production Environment中添加Add environment variable:
| Name | Value |
|---|---|
DEPLOY_HOST |
你的服务器公网 IP |
DEPLOY_PORT |
22 |
DEPLOY_USER |
cicd-production |
DEPLOY_KNOWN_HOSTS |
执行pbcopy < ~/.ssh/cicd-lab-staging.known_hosts命令复制到剪贴板 |
我这里虽然hosts的文件名包含staging,但是是因为我的staging和production在同个服务器上,它的内容记录的是服务器身份所以可共用。
第六步:添加第三个Job:deploy_production
完成之后,流程就会变成: 测试和构建 → 自动部署 staging → 等你批准 → 部署 production
好的重新开一个分支,在项目创建部署脚本 目录/ops/deploy-production.py
python
#!/usr/bin/env python3
"""生产部署入口:固定 production 配置,复用 staging 已验证的发布和回滚逻辑。"""

from pathlib import Path
import runpy
import sys

PRODUCTION_ROOT = Path("/opt/cicd-web/environments/production")
PRODUCTION_URL = "http://127.0.0.1:18083"
shared = runpy.run_path(str(Path(__file__).with_name("deploy-staging.py")))


def deploy(archive, expected_commit, root=PRODUCTION_ROOT, base_url=PRODUCTION_URL):
    return shared["deploy"](
        archive, expected_commit, root, base_url, environment="production"
    )


if __name__ == "__main__":
    if len(sys.argv) != 3:
        sys.exit("Usage: python3 deploy-production.py FRONTEND.tar.gz EXPECTED_COMMIT")
    try:
        deploy(sys.argv[1], sys.argv[2])
    except Exception as error:
        sys.exit(f"Deployment failed: {error}")
在原本的ci.yml中添加 production Job:
yml
  deploy_production:
    runs-on: ubuntu-latest
    timeout-minutes: 10
    # staging 成功后,才轮到 production
    needs: deploy_staging
    if: github.event_name == 'push' && github.ref == 'refs/heads/main'
    # 关联 production Environment
    environment: production

    concurrency:
      group: deploy-production
      cancel-in-progress: false

    env:
      DEPLOY_HOST: ${{ vars.DEPLOY_HOST }}
      DEPLOY_PORT: ${{ vars.DEPLOY_PORT }}
      DEPLOY_USER: ${{ vars.DEPLOY_USER }}

    steps:
      - name: Checkout deployment script
        uses: actions/checkout@v7
        with:
          # 不保留 checkout 使用的 Git 登录凭据
          persist-credentials: false

      - name: Download frontend artifact
        uses: actions/download-artifact@v7
        with:
          # 与 staging 使用同一次 Workflow 的同名产物,不重新构建
          name: frontend-dist-${{ github.sha }}
          path: dist

      - name: Configure SSH
        env:
          DEPLOY_SSH_KEY: ${{ secrets.DEPLOY_SSH_KEY }}
          DEPLOY_KNOWN_HOSTS: ${{ vars.DEPLOY_KNOWN_HOSTS }}
        run: |
          : "${DEPLOY_HOST:?Missing DEPLOY_HOST}"
          : "${DEPLOY_PORT:?Missing DEPLOY_PORT}"
          : "${DEPLOY_USER:?Missing DEPLOY_USER}"
          : "${DEPLOY_SSH_KEY:?Missing DEPLOY_SSH_KEY}"
          : "${DEPLOY_KNOWN_HOSTS:?Missing DEPLOY_KNOWN_HOSTS}"

          umask 077
          mkdir -p "$RUNNER_TEMP/production-ssh"
          printf '%s\n' "$DEPLOY_SSH_KEY" > "$RUNNER_TEMP/production-ssh/key"
          printf '%s\n' "$DEPLOY_KNOWN_HOSTS" > "$RUNNER_TEMP/production-ssh/known_hosts"

          cat > "$RUNNER_TEMP/production-ssh/config" <<EOF
          Host production
            HostName $DEPLOY_HOST
            User $DEPLOY_USER
            Port $DEPLOY_PORT
            IdentityFile $RUNNER_TEMP/production-ssh/key
            UserKnownHostsFile $RUNNER_TEMP/production-ssh/known_hosts
            IdentitiesOnly yes
            BatchMode yes
            StrictHostKeyChecking yes
            ConnectTimeout 10
            ServerAliveInterval 30
            ServerAliveCountMax 3
          EOF

      - name: Upload and deploy production
        run: |
          ssh_config="$RUNNER_TEMP/production-ssh/config"
          upload_id="${GITHUB_RUN_ID}-${GITHUB_RUN_ATTEMPT}"

          tar -czf "$RUNNER_TEMP/frontend.tar.gz" -C dist .
          ssh -F "$ssh_config" production "mkdir -p incoming/$upload_id"
          # 两个 Python 文件要一起上传,production 入口会加载共享逻辑
          scp -F "$ssh_config" \
            "$RUNNER_TEMP/frontend.tar.gz" \
            ops/deploy-staging.py \
            ops/deploy-production.py \
            "production:incoming/$upload_id/"

          ssh -F "$ssh_config" production \
            "trap 'rm -rf -- incoming/$upload_id' EXIT; python3 incoming/$upload_id/deploy-production.py incoming/$upload_id/frontend.tar.gz '$GITHUB_SHA'"

      - name: Clean up local SSH files
        # 即使前面失败,也尝试执行这个步骤
        if: always()
        run: |
          rm -rf -- "$RUNNER_TEMP/production-ssh"
          rm -f -- "$RUNNER_TEMP/frontend.tar.gz"
一切就绪,我这边继续将我的前端页面上的版本号提升0.1之后 将代码推送到分支然后提交PR 进行合并,就可以看到test通过之后自动部署staging而留下production让我们审批后才部署:
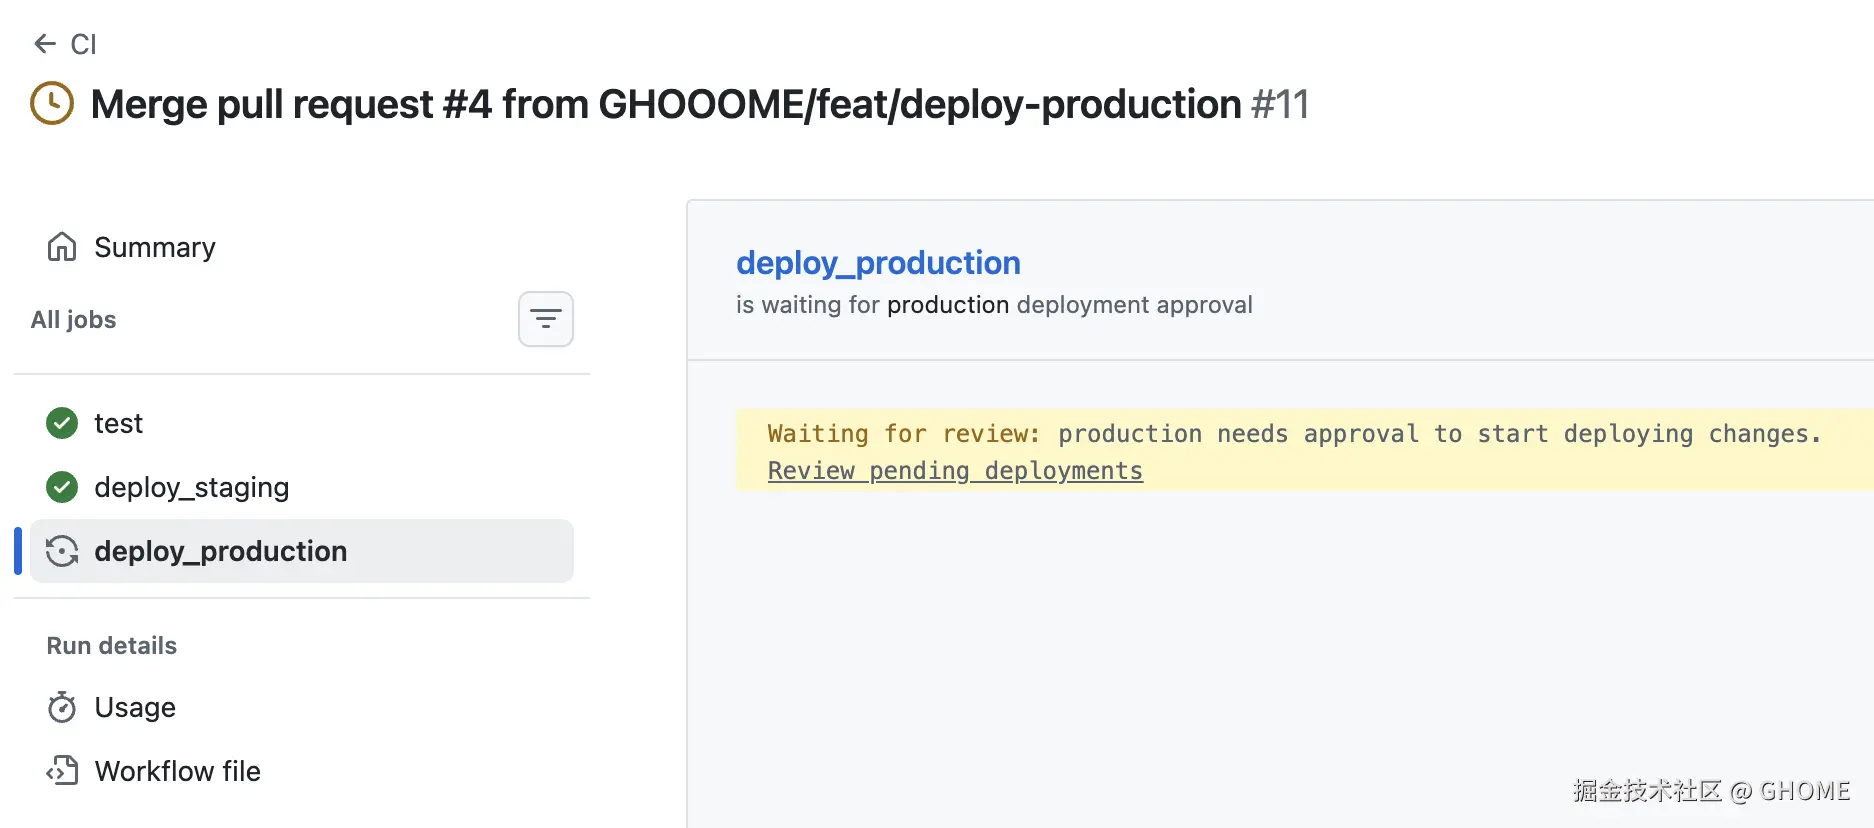
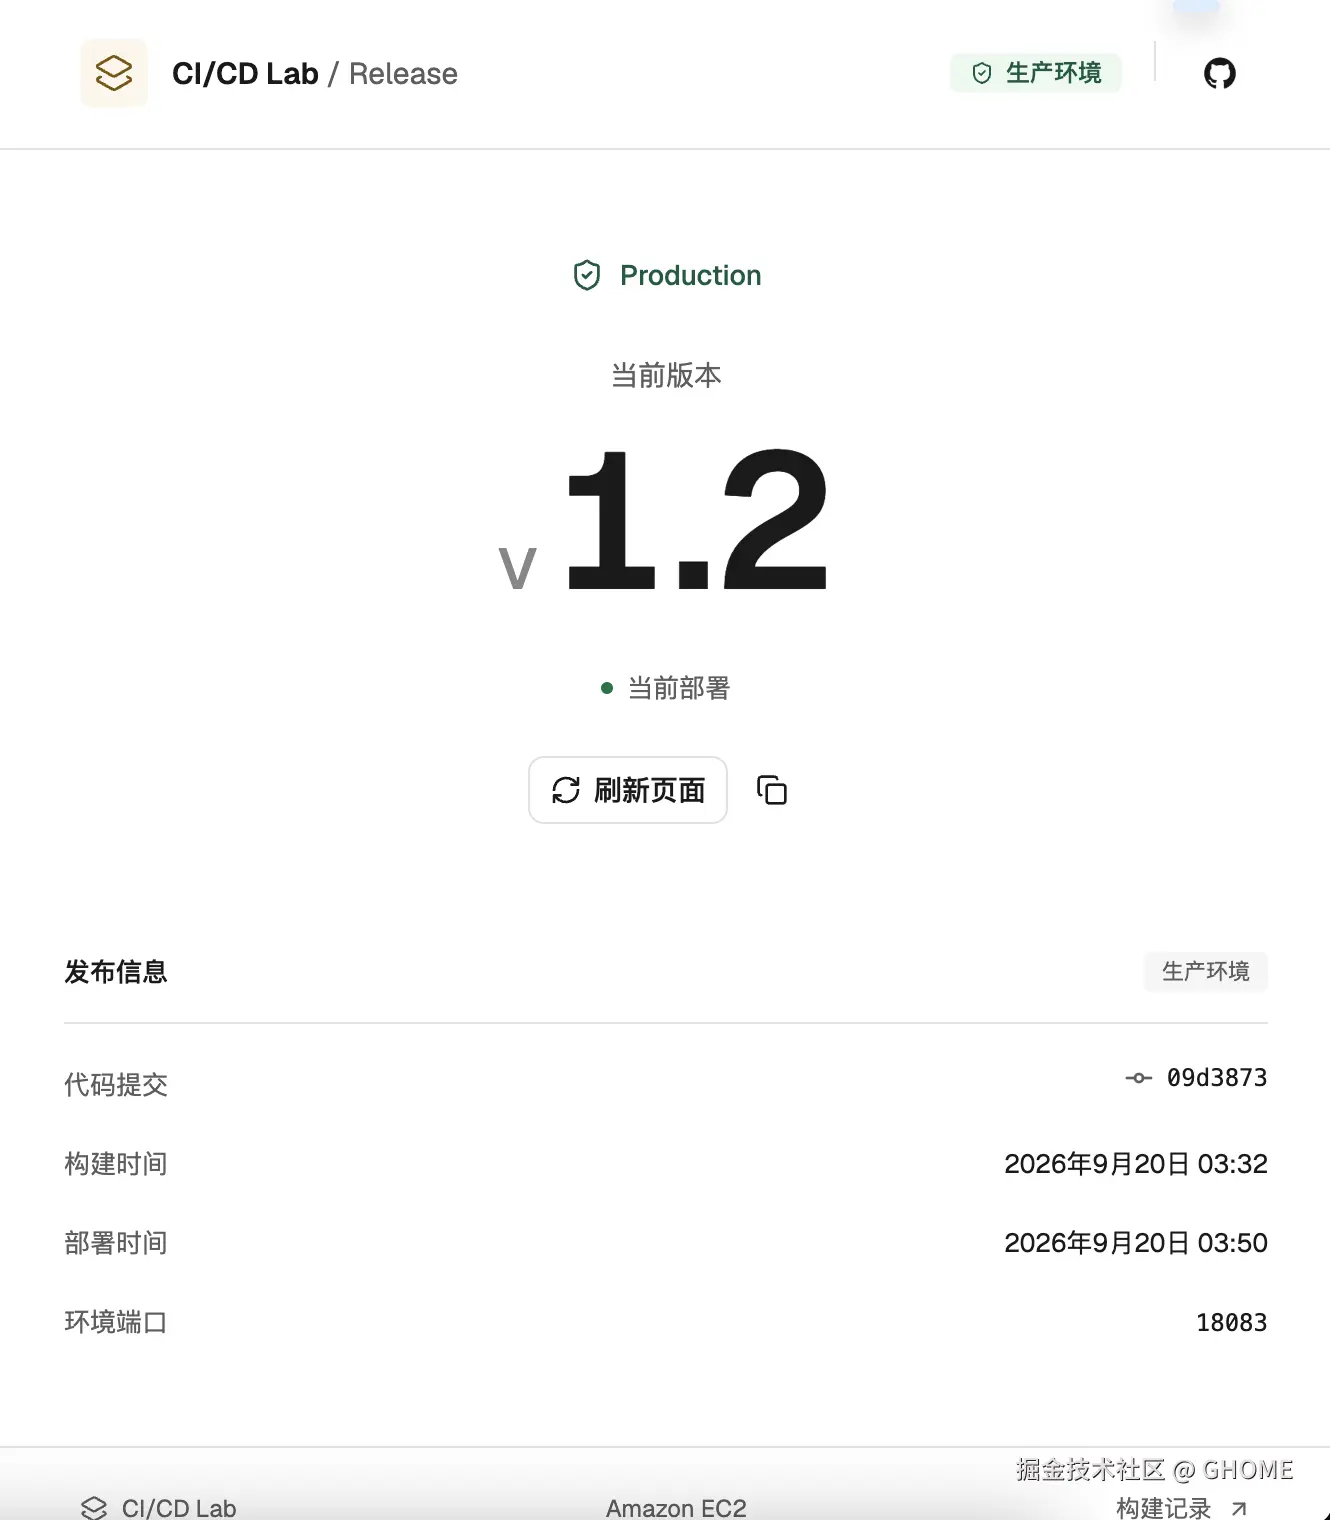
只需要点击其中的"Review pending deployments"勾选 production ,点击 Approve and deploy ,等 deploy_production 变绿后,就代表production更新完毕了 可以进入自己的正式环境页面查看效果。我这边自己的生产环境就更新完毕啦:
部署回滚
在我们完成了自动部署和审核部署之后,还需要考虑一个问题,那就是:新版本上线后发现有问题,把服务恢复到之前可用的版本。我现在的脚本只在部署时 检查服务。我们接下来要增加的是:即使没有提交代码,也定时检查服务是否正常。
第一步:开启 GitHub Actions 的失败邮件通知
进入GitHub > settings > Notifications > System > Actions 勾选Email、Only notify for failed workflows(只通知失败的运行,避免每次成功都发邮件) 然后保存。
第二步:到项目中创建独立的监控 Workflow 创建 .github/workflows/monitor.yml,把下面的文件放进去。它是独立文件,不追加到原来的 ci.yml。
yml
name: Service monitor

on:
  # 自动检查:每小时的第 7、22、37、52 分钟,默认按 UTC 计算
  schedule:
    - cron: '7,22,37,52 * * * *'
  # 手动检查,也可选择模拟一次失败以验证邮件通知
  workflow_dispatch:
    inputs:
      simulate_failure:
        description: '模拟监控失败以测试邮件(不修改服务)'
        type: boolean
        required: false
        default: false

# 不读写 GitHub 仓库/API;SSH 使用另外配置的密钥
permissions: {}

jobs:
  check_services:
    # 手动运行也请选择 main,和 staging 的分支限制保持一致
    if: github.ref == 'refs/heads/main'
    runs-on: ubuntu-latest
    timeout-minutes: 3
    environment:
      # 复用 staging 的 SSH 配置;因为我的staging和production在同一服务器,通过不同端口区分,后面会讲如果在不同服务器的做法
      name: staging
      # 读取环境配置,但不把每次监控记成一次部署
      deployment: false

    env:
      DEPLOY_HOST: ${{ vars.DEPLOY_HOST }}
      DEPLOY_PORT: ${{ vars.DEPLOY_PORT }}
      DEPLOY_USER: ${{ vars.DEPLOY_USER }}

    steps:
      - name: Configure SSH
        env:
          DEPLOY_SSH_KEY: ${{ secrets.DEPLOY_SSH_KEY }}
          DEPLOY_KNOWN_HOSTS: ${{ vars.DEPLOY_KNOWN_HOSTS }}
        run: |
          : "${DEPLOY_HOST:?Missing DEPLOY_HOST}"
          : "${DEPLOY_PORT:?Missing DEPLOY_PORT}"
          : "${DEPLOY_USER:?Missing DEPLOY_USER}"
          : "${DEPLOY_SSH_KEY:?Missing DEPLOY_SSH_KEY}"
          : "${DEPLOY_KNOWN_HOSTS:?Missing DEPLOY_KNOWN_HOSTS}"

          umask 077
          mkdir -p "$RUNNER_TEMP/monitor-ssh"
          printf '%s\n' "$DEPLOY_SSH_KEY" > "$RUNNER_TEMP/monitor-ssh/key"
          printf '%s\n' "$DEPLOY_KNOWN_HOSTS" > "$RUNNER_TEMP/monitor-ssh/known_hosts"

          cat > "$RUNNER_TEMP/monitor-ssh/config" <<EOF
          Host monitor
            HostName $DEPLOY_HOST
            User $DEPLOY_USER
            Port $DEPLOY_PORT
            IdentityFile $RUNNER_TEMP/monitor-ssh/key
            UserKnownHostsFile $RUNNER_TEMP/monitor-ssh/known_hosts
            IdentitiesOnly yes
            BatchMode yes
            StrictHostKeyChecking yes
            ConnectTimeout 10
            ServerAliveInterval 15
            ServerAliveCountMax 2
          EOF

      - name: Check staging and production
        run: |
          # REMOTE 中的命令在服务器执行,所以 127.0.0.1 指服务器自身
          ssh -F "$RUNNER_TEMP/monitor-ssh/config" monitor 'bash -se' <<'REMOTE'
          status=0
          for target in staging:18082 production:18083; do
            environment="${target%%:*}"
            port="${target##*:}"
            for path in /health /; do
              if code=$(curl --noproxy '*' --fail --silent --show-error \
                --connect-timeout 3 --max-time 10 \
                --output /dev/null --write-out '%{http_code}' \
                "http://127.0.0.1:$port$path") && [ "$code" = 200 ]; then
                echo "OK: $environment $path HTTP $code"
              else
                echo "FAILED: $environment $path HTTP ${code:-unknown}"
                status=1
              fi
            done
          done
          # 即使其中一个请求失败,也检查完其他请求再返回整体结果
          exit "$status"
          REMOTE

      - name: Simulate failure for email test
        if: ${{ inputs.simulate_failure }}
        run: |
          echo "::error::这是人工选择的通知演练;没有修改或停止服务。"
          exit 1

      - name: Clean up SSH files
        if: always()
run: rm -rf -- "$RUNNER_TEMP/monitor-ssh"| 配置或命令 | 含义 |
|---|---|
schedule |
按时间触发,不需要有人 push。这里每小时检查 4 次。 |
cron: '7,22,37,52 * * * *' |
从第7分钟开始,每15分钟检查一次,7是为了避开整点附近可能繁忙的时段 |
workflow_dispatch.inputs |
给手动运行按钮增加一个可选输入。本例是"模拟失败"复选框,默认不选。 |
environment.name: staging |
从 staging Environment 取得已有 SSH 参数和密钥。它不代表只能检查 staging,因为我们production是需要人工审核的,如果设置production就做不到自动检查。 |
environment.deployment: false |
使用环境变量和 Secret,但不创建部署记录;仍需遵守适用的环境保护规则。 |
curl |
发送 HTTP 请求,类似浏览器打开一个地址。我们只检查能否得到 HTTP 200。 |
--connect-timeout 3 / --max-time 10 |
单次请求连接最多等 3 秒,整个请求最多等 10 秒。 |
--output /dev/null / --write-out '%{http_code}' |
丢弃响应正文,只取状态码。--fail 让 HTTP 4xx/5xx 也返回失败。 |
exit 0 / exit 1 |
告诉调用者命令成功或失败。SSH 会把服务器命令的退出状态传回 runner。 |
更加细致的区分
由于我们在production环境中做了"需要人工审核"的配置,因此独立自动监控如果使用这个环境 则每次监控都需要人工审核。上面的例子是因为我的staging和production都部署在同一服务器不同端口,因此用过staging环境就可以进入,如果说正常工作环境下 部署在不同服务器,那么应该另外创建独立的环境monitoring-production用于production的自动监控。
好的,将监控yml合并到主分支后,就可以在Actions中看到了,可以手动触发一次看看效果(不要勾选"模拟监控失败")
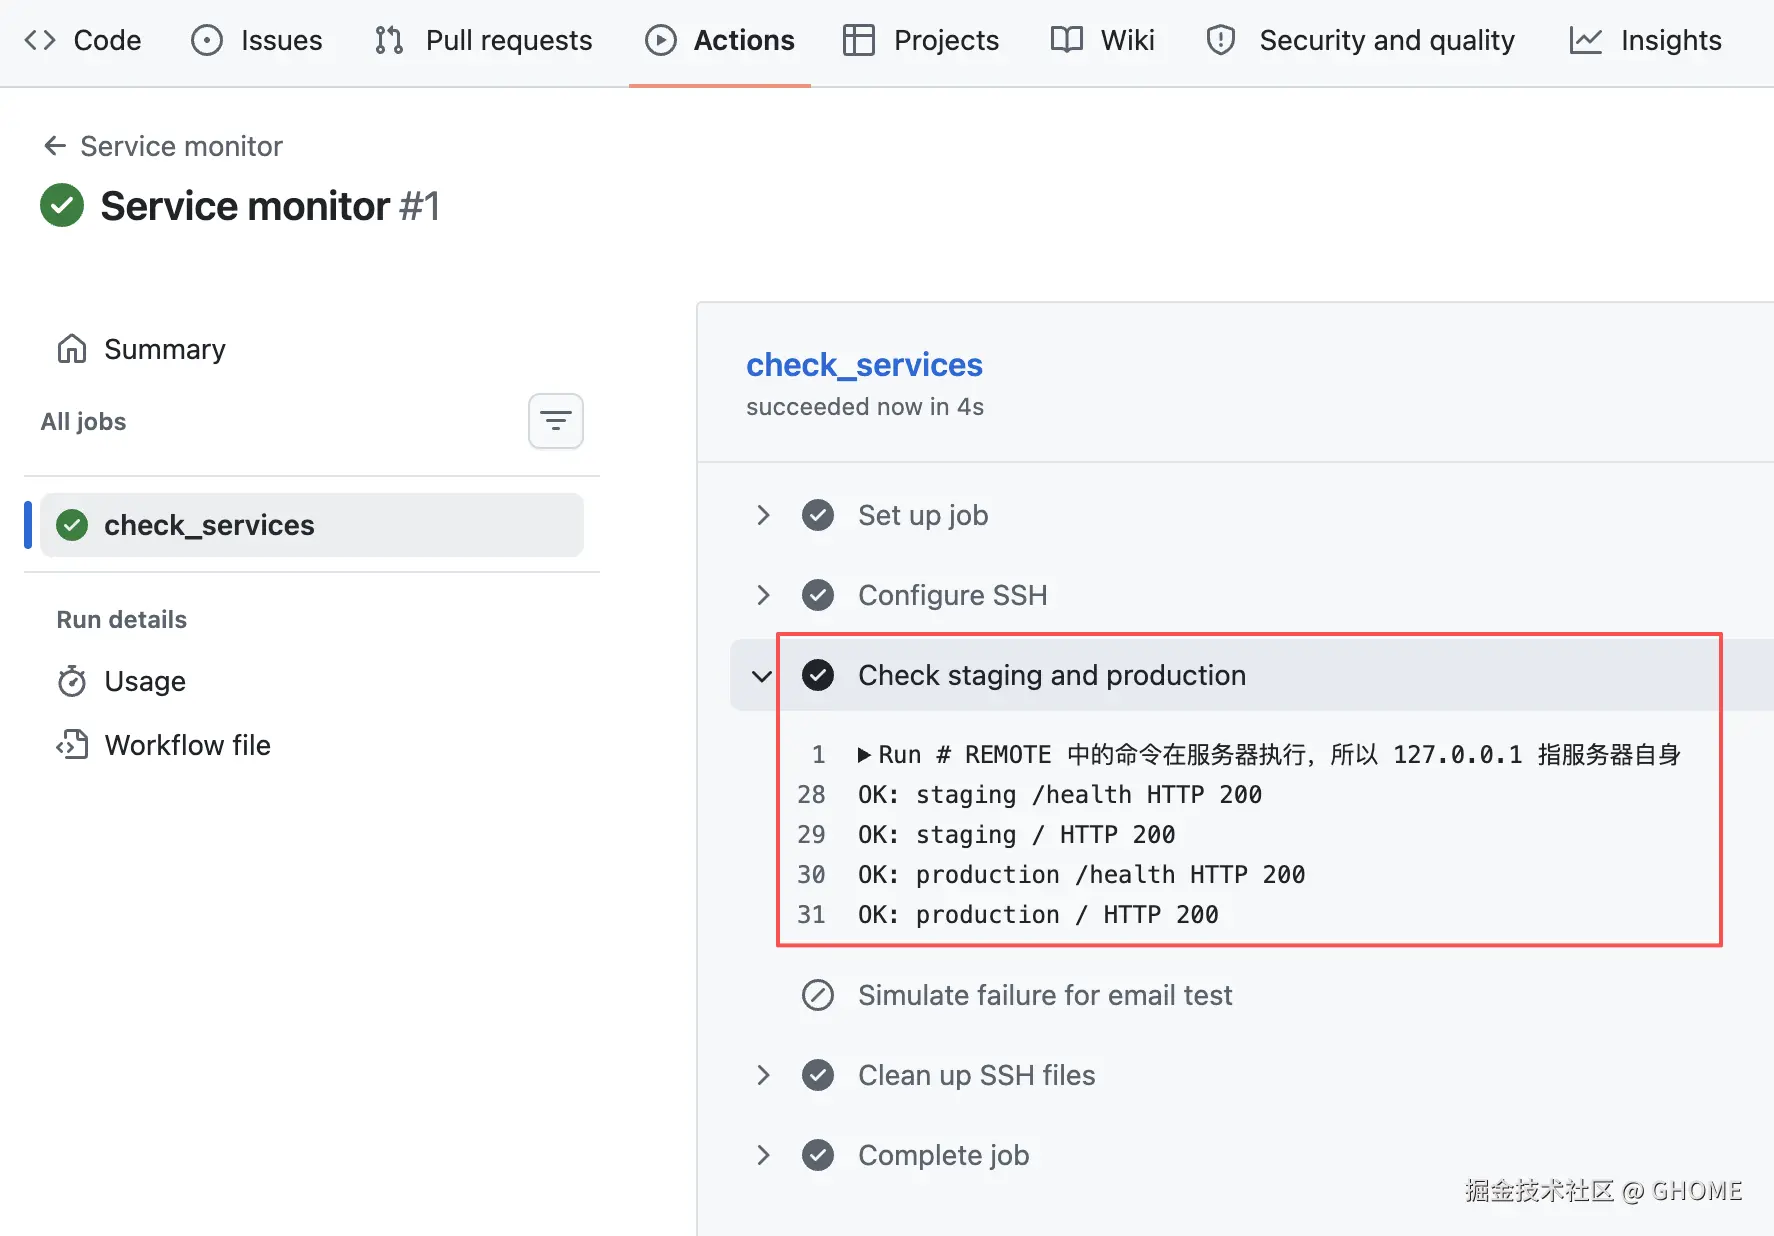
我们配置的是每小时第 7、22、37、52 分钟,实际执行可能有延迟。确认成功后,可以勾选"模拟失败"的情况再运行一次,验证失败邮件能否收到:
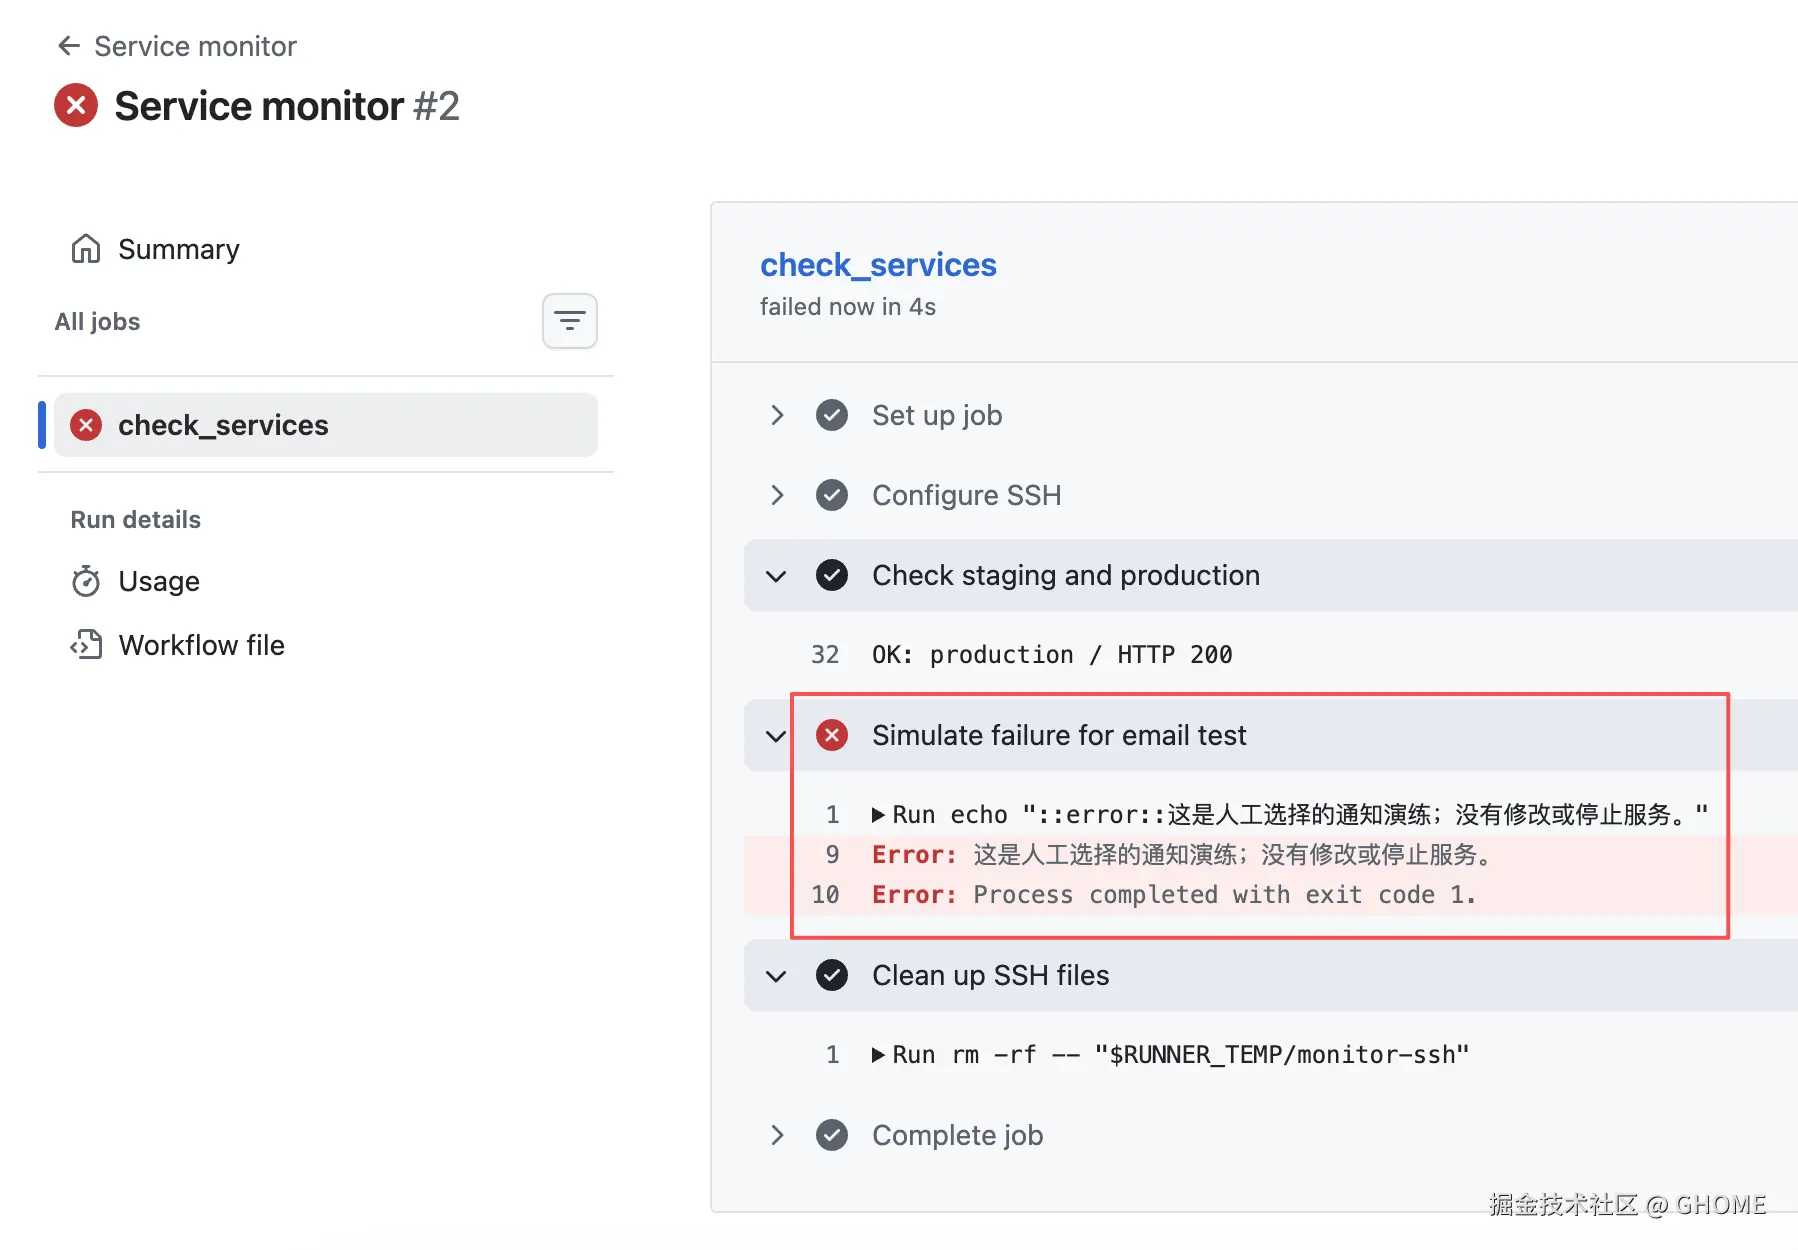
我这边是已经成功收到邮件了,会有一点点的延迟。