这篇文章的目标将是从原理到实践速通大模型 SFT ,讲解监督微调的原理,并通过一个实际的例子的来实现将 base 模型通过监督微调变成实际可用的 Chat 模型 (这里以 Plamo3-nict-base-8b模型为例)。
一)SFT(监督微调)处在大模型的哪个阶段?
大模型的诞生需要经过很多阶段,第一步就是预训练 Pre-training阶段;在预训练阶段的大模型经历的事情是用海量无标注文本、书籍、网页、代码做自监督学习,任务就是**预测下一个 token,**永远再猜句子的下一个字接什么。
1.1 预训练阶段
大模型经历预训练 Pre-training阶段得到的是 base 模型
此时的base模型是一个博览群书的书呆子,知识很多,但听不懂人话,当你提问他会顺着文字乱续写。
看效果:
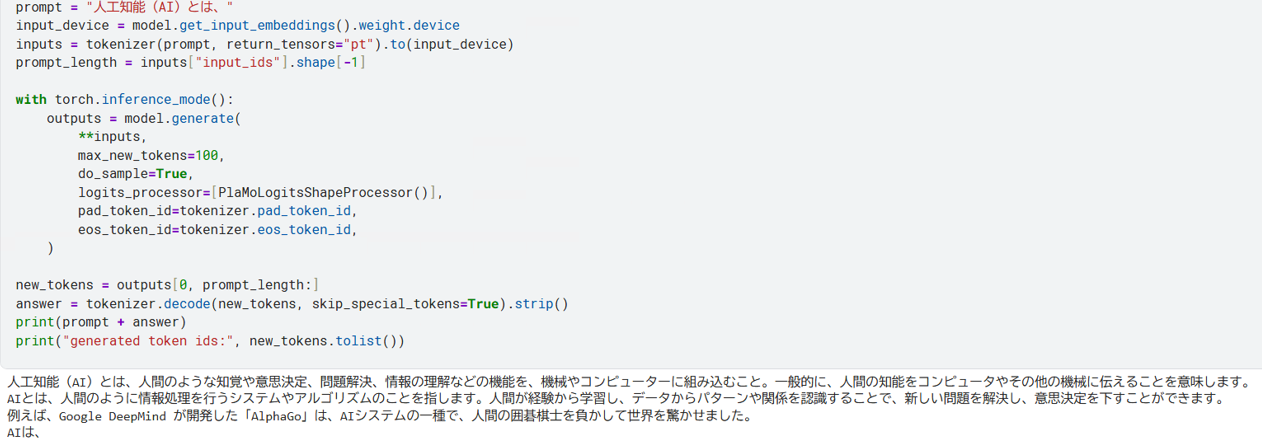
++实验模型++++Plamo3-nict-base-8b++
当问题输入大模型后,模型给出的回答其实是再顺着句子再一直往下接 token ,直到模型认为应该结束了,即停止下来。此时的模型处于base阶段,不具备回答问题的能力。
1.2 SFT 监督微调阶段
SFT 监督微调阶段要做的事情就是将 base 模型 进化到 Chat 模型,是的模型能够按着人类的问题来给出答案。
一句话解释监督微调阶段干的事:
用高质量【指令/问题 - 标准答案】配对数据训练,也就是人工写好的问答样例。教会模型遵循人类指令,学会问答格式,知道用户提问要给出完整回答而不是随便续写。
看效果:

++实验模型++++SFT后的Plamo3-nict-base-8b++
此时对模型输入问题 日本の首都は何ですか
模型就可以正常回答问题了,而不是在做文字接龙,一直的预测下一个 token 。
1.3 偏好对齐(RLHF / DPO,后对齐)
这个阶段不详细讨论,主要是让模型的回答更符合人类的偏好,基本上可以总结为以下三个步骤
- 收集人类偏好数据:同一个 prompt 让模型生成多条回答,人工排序选出好坏
- 训练奖励模型 RM:学习人类打分偏好,自动评估回答质量
- 强化学习优化(PPO / DPO):用奖励模型持续优化 SFT 模型,优先输出有用、诚实、无害的回答
看效果:
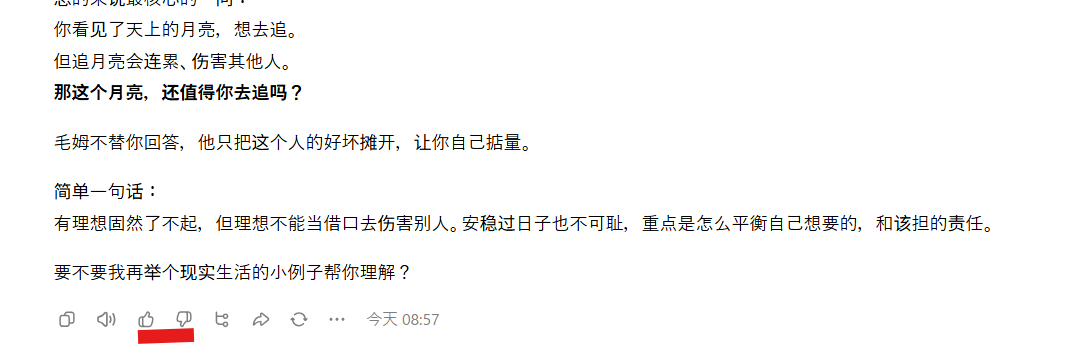
++实验模型++++豆包免费版++
类似于上述这张图片展示的例子,当 AI 给出回答后,我们可以点击赞同或者否定来表示自己对于回答风格的偏好,这个点赞和否定记录是会被对应的 AI 训练师收集起来的,这个数据就是被收集用于偏好对齐训练。
二)SFT 实际如何实现
本来想先介绍实现理论,但是为了还原自己的学习路径,从实操出发,再到理论会更容易理解,学习起来也不会枯燥,所以这篇文章我们从实操出发。
2.1 准备base模型
实验环境 kaggle 免费T4GPU notebook 环境下进行如下操作
第一步:对 base 模型进行 SFT 训练,首先第一步是要有一个base模型,我这里以 Plamo3-nict-base-8b 为例
可以跳过,简单补充
PLaMo3-nict-base-8b (pfnet/plamo-3-nict-8b-base)是日本 PFN 与 NICT 联合发布的 PLaMo3 系列 81 亿参数日文优先开源预训练基座大模型,采用 Samba 变体 Transformer 架构,基于约 6 万亿日英双语 token 训练,日文处理能力突出,单卡可部署;它属于原生基座模型,无法直接对话,多用于 LoRA 微调、日文文档处理、日英互译等二次开发场景。
python
# 安装依赖

%pip install -q --upgrade "transformers==4.57.1" accelerate peft bitsandbytes datasets sentencepiece

print("安装完成")
在正式下载模型之前,需要去自己的 huggingface 账号上获取下载权限的密钥,同时上huggingface 官网进入 pfnet/plamo-3-nict-8b-base 模型的所在位置获取该公司的下载授权,这一步授权很快,几乎不用等待。授权完成后,你的 huggingface 账号就获得了该模型的下载权限。
python
# huggingface 授权

from huggingface_hub import login
from huggingface_hub import whoami

login("hf_VtBEXXXXXXXXXXXXXXXXXXXqQR")
print(whoami())
以 NF4 量化加载 8B Base,并将完整解码层均衡分布到两张 T4 GPU
python
import gc
from accelerate import init_empty_weights
from transformers import AutoConfig, AutoModelForCausalLM, AutoTokenizer, BitsAndBytesConfig

MODEL_ID = "pfnet/plamo-3-nict-8b-base"
MAX_MEMORY = {0: "13GiB", 1: "13GiB"}
tokenizer = AutoTokenizer.from_pretrained(MODEL_ID, trust_remote_code=True)
if tokenizer.pad_token is None:
    tokenizer.pad_token = tokenizer.eos_token
tokenizer.padding_side = "right"
config = AutoConfig.from_pretrained(MODEL_ID, trust_remote_code=True)
with init_empty_weights():
    model_skeleton = AutoModelForCausalLM.from_config(config, trust_remote_code=True)
no_split_module_classes = sorted({
    child.__class__.__name__
    for module in model_skeleton.modules() if isinstance(module, torch.nn.ModuleList)
    for child in module.children()
})
if not no_split_module_classes:
    raise RuntimeError("无法自动识别 PLaMo 解码层类型。")
model_skeleton.__class__._no_split_modules = no_split_module_classes
del model_skeleton
gc.collect()
torch.cuda.empty_cache()
quantization_config = BitsAndBytesConfig(
    load_in_4bit=True,
    bnb_4bit_quant_type="nf4",
    bnb_4bit_compute_dtype=torch.float16,
    bnb_4bit_use_double_quant=True,
)
model = AutoModelForCausalLM.from_pretrained(
    MODEL_ID,
    config=config,
    quantization_config=quantization_config,
    device_map="balanced",
    max_memory=MAX_MEMORY,
    low_cpu_mem_usage=True,
    trust_remote_code=True,
)
model.config.use_cache = False
used_devices = {str(device) for device in model.hf_device_map.values()}
normalized_devices = {device.removeprefix("cuda:") for device in used_devices}
print("No-split classes:", no_split_module_classes)
print("Devices used:", sorted(used_devices))
print("Device map:", model.hf_device_map)
assert "cpu" not in used_devices and "disk" not in used_devices, "模型发生 CPU/disk offload,无法按当前方案训练。"
assert {"0", "1"}.issubset(normalized_devices), "模型未同时使用两张 GPU。"
此时下载下来的就是 base 模型,现在的模型还不具备回答问题的能力,但是仍然可以对模型进行输入。模型也能给出输出。
python
base_prompt = "who are you"
input_device = model.get_input_embeddings().weight.device
base_inputs = tokenizer(base_prompt, return_tensors="pt").to(input_device)
with torch.inference_mode():
    base_outputs = model.generate(
        **base_inputs,
        max_new_tokens=64,
        do_sample=False,
        repetition_penalty=1.1,
        pad_token_id=tokenizer.eos_token_id,
    )
base_new_tokens = base_outputs[0, base_inputs["input_ids"].shape[1]:]
print("Base model answer:\n", tokenizer.decode(base_new_tokens, skip_special_tokens=True))
输入是 who are you ;请观察输出:
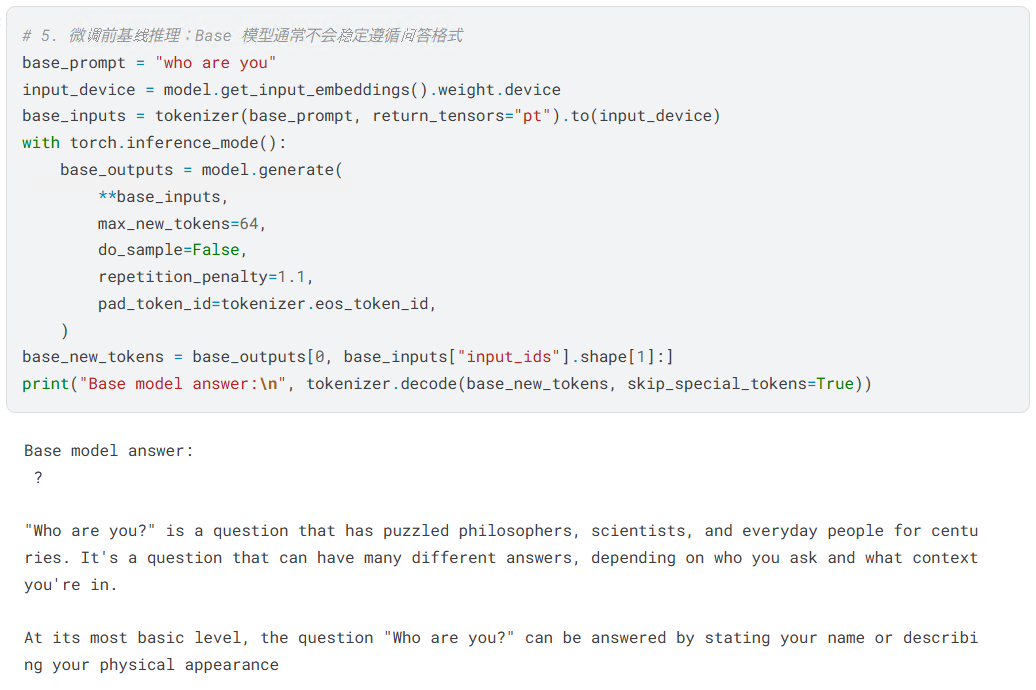
base 模型在做的完完全全是在做文字接龙,直到模型自己觉得该结束了就结束。
2.2 准备高质量【指令/问题 - 标准答案】配对数据训练
以下就是一个一个示例数据,最主要的部分是 messages 部分,因为这里才是模型真正会看见的地方,同时要注意数据的准备一定要按着角色进行,当然了以下也仅仅是一个示例,你也可以把 assistant 叫做 AI 。
python
{
"messages":[

    {
        "role":"user",
        "content":"通信断時はフェイルセーフで停止します。"
    },

    {
        "role":"assistant",
        "content":"通信が失われた場合、安全側の状態になるよう設備を停止させます。"
    }

],

"metadata":{
        "id":"jp_industry_0049",
        "category":"building_industrial_automation",
        "subcategory":"fail_safe",
        "source_type":"synthetic",
        "source":"ai_generated",
        "language":"ja"
    }
}
我这里大约准备了 1000 多条这种类似的数据,将其存储在 .jsonl 文件中,如下所示。
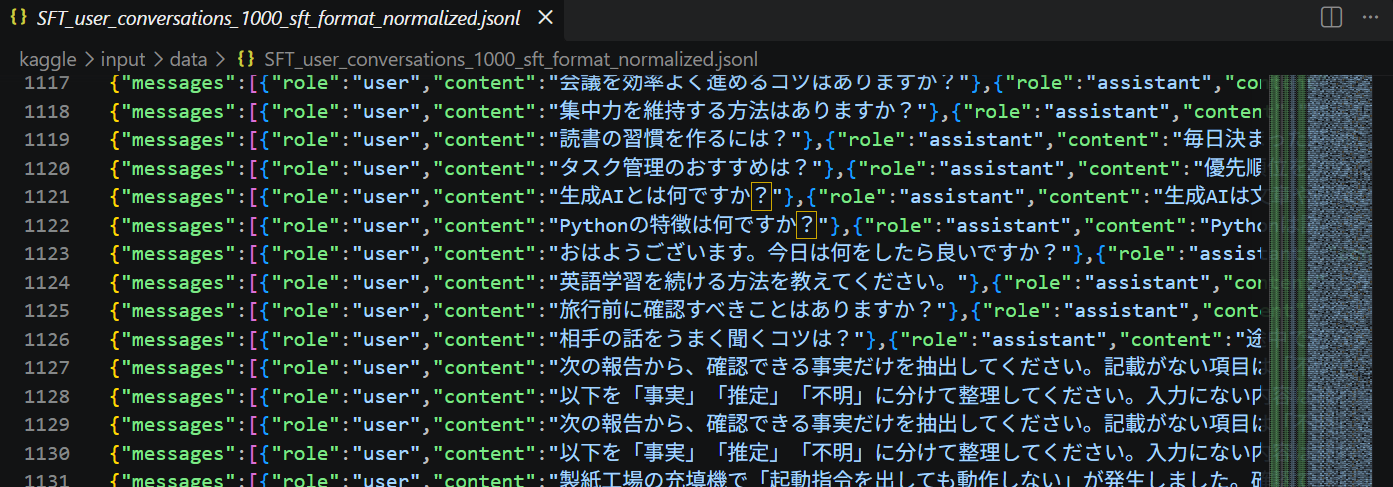
将整理好的训练数据上传至 kaggle 平台中的数据集部分,然后运行如下代码,从 JSONL 文件中读取 messages 格式的日文 Chat 数据
python
from pathlib import Path
from datasets import load_dataset

TRAIN_FILE = Path("/kaggle/input/datasets/cxxxai/dataset-test-1000-truedata-2/user_conversations_1000_with_knowledge.jsonl")
if not TRAIN_FILE.is_file():
    raise FileNotFoundError(
        f"未找到训练数据:{TRAIN_FILE.resolve()}。在 Kaggle 中请将 TRAIN_FILE 改为 /kaggle/input/<dataset>/... 路径。"
    )

dataset = load_dataset("json", data_files={"train": str(TRAIN_FILE)}, split="train")
allowed_roles = {"system", "user", "assistant"}
for example_index, example in enumerate(dataset):
    messages = example.get("messages")
    if not isinstance(messages, list) or not messages:
        raise ValueError(f"第 {example_index + 1} 条数据的 messages 必须是非空列表。")
    for message_index, message in enumerate(messages):
        if not isinstance(message, dict):
            raise ValueError(f"第 {example_index + 1} 条数据的第 {message_index + 1} 条 message 必须是对象。")
        role = message.get("role")
        content = message.get("content")
        if role not in allowed_roles:
            raise ValueError(f"第 {example_index + 1} 条数据包含无效 role:{role!r}。")
        if not isinstance(content, str) or not content.strip():
            raise ValueError(f"第 {example_index + 1} 条数据包含空 content。")
    if not any(message["role"] == "assistant" for message in messages):
        raise ValueError(f"第 {example_index + 1} 条数据没有 assistant 消息,无法计算训练 loss。")

print("Training examples:", len(dataset))
print(dataset[0]["messages"])
构造 messages 训练特征:只让 assistant 内容参与 loss。其实说白了,就是模型在训练的时候,更新模型参数的主要依据就是 loss 函数,对 loss 函数求偏微分,从而确定参数更新方向,而实际影响loss的,只有模型输出答案和标准答案之间的距离,而标准答案就只是 assistant 的内容。
python
from transformers import DataCollatorForSeq2Seq

MAX_LENGTH = 1024
BOS_ID = tokenizer.bos_token_id
EOS_ID = tokenizer.eos_token_id
if EOS_ID is None:
    raise RuntimeError("Tokenizer 没有 eos_token_id,无法构造训练样本。")

ROLE_PREFIXES = {
    "system": "System: ",
    "user": "User:",
    "assistant": "Assistant:",
}
LINE_BREAK_IDS = tokenizer("\n", add_special_tokens=False)["input_ids"]

def tokenize_chat(example, example_index):
    input_ids = [BOS_ID] if BOS_ID is not None else []
    labels = [-100] * len(input_ids)
    for message in example["messages"]:
        role = message["role"]
        prefix_ids = tokenizer(ROLE_PREFIXES[role], add_special_tokens=False)["input_ids"]
        content_ids = tokenizer(message["content"], add_special_tokens=False)["input_ids"]
        if role == "assistant":
            message_ids = prefix_ids + content_ids + [EOS_ID]
            message_labels = [-100] * len(prefix_ids) + content_ids + [EOS_ID]
        else:
            message_ids = prefix_ids + content_ids + LINE_BREAK_IDS
            message_labels = [-100] * len(message_ids)
        input_ids.extend(message_ids)
        labels.extend(message_labels)

    if len(input_ids) > MAX_LENGTH:
        raise ValueError(
            f"第 {example_index + 1} 条数据为 {len(input_ids)} tokens,超过 MAX_LENGTH={MAX_LENGTH}。"
        )
    if not any(label != -100 for label in labels):
        raise ValueError(f"第 {example_index + 1} 条数据没有可监督的 assistant token。")
    return {
        "input_ids": input_ids,
        "attention_mask": [1] * len(input_ids),
        "labels": labels,
    }

tokenized_dataset = dataset.map(
    tokenize_chat,
    with_indices=True,
    remove_columns=dataset.column_names,
    load_from_cache_file=False,
    desc="Tokenizing messages",
)
sequence_lengths = [len(sample["input_ids"]) for sample in tokenized_dataset]
for sample in tokenized_dataset:
    assert len(sample["input_ids"]) == len(sample["attention_mask"]) == len(sample["labels"])
data_collator = DataCollatorForSeq2Seq(
    tokenizer=tokenizer,
    padding=True,
    label_pad_token_id=-100,
    return_tensors="pt",
)
test_batch = data_collator([tokenized_dataset[0], tokenized_dataset[1]])
print({name: tuple(tensor.shape) for name, tensor in test_batch.items()})
print("Token length min/mean/max:", min(sequence_lengths), sum(sequence_lengths) / len(sequence_lengths), max(sequence_lengths))
print("Supervised tokens:", (test_batch["labels"] != -100).sum(dim=1).tolist())
2.3 开始微调训练
这里采用的微调训练策略是使用QLoRA。这是微调训练中的一种非常常用的技术,对于微调阶段有以下几种方法
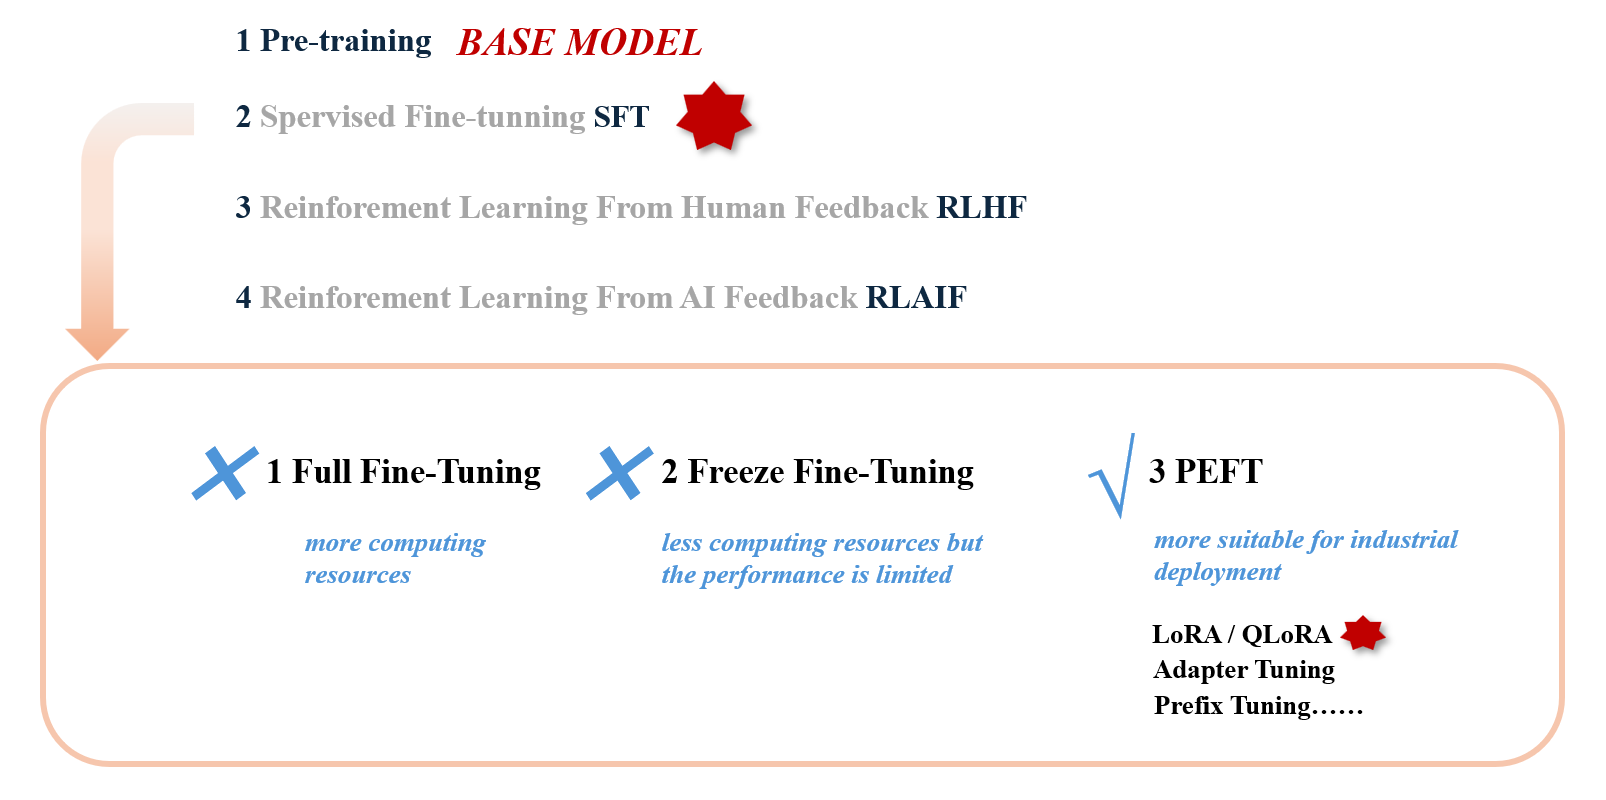
此次实验选用的就是QLoRA,至于QLoRA是什么可以不管,先跑起来再说。
python
from peft import LoraConfig, PeftModel, get_peft_model, prepare_model_for_kbit_training

if isinstance(model, PeftModel):
    raise RuntimeError("LoRA 已挂载;请重启 Session 后按顺序运行每个单元一次。")
linear_4bit_names = {name.split(".")[-1] for name, module in model.named_modules() if isinstance(module, bnb.nn.Linear4bit)}
plamo_target_order = ("qkv_proj", "o_proj", "gate_up_proj", "down_proj")
target_modules = [name for name in plamo_target_order if name in linear_4bit_names]
if not {"qkv_proj", "o_proj"}.issubset(target_modules):
    raise RuntimeError(f"未找到 PLaMo 注意力投影层;可用 4-bit 层为:{sorted(linear_4bit_names)}")
model = prepare_model_for_kbit_training(
    model,
    use_gradient_checkpointing=True,
    gradient_checkpointing_kwargs={"use_reentrant": False},
)
lora_config = LoraConfig(
    r=16,
    lora_alpha=32,
    target_modules=target_modules,
    lora_dropout=0.05,
    bias="none",
    task_type="CAUSAL_LM",
)
model = get_peft_model(model, lora_config)
model.config.use_cache = False
model.is_parallelizable = True
model.model_parallel = True
if hasattr(model, "enable_input_require_grads"):
    model.enable_input_require_grads()
else:
    def make_inputs_require_grad(module, inputs, output):
        output.requires_grad_(True)
    model.get_input_embeddings().register_forward_hook(make_inputs_require_grad)
trainable_parameters = [(name, parameter) for name, parameter in model.named_parameters() if parameter.requires_grad]
assert trainable_parameters and all("lora_" in name for name, _ in trainable_parameters), "发现 LoRA 以外的可训练参数。"
print("4-bit Base modules:", sorted(linear_4bit_names))
print("LoRA target modules:", target_modules)
print("Trainable dtypes:", sorted({str(parameter.dtype) for _, parameter in trainable_parameters}))
model.print_trainable_parameters()
可以跳过,这里是对QLoRA的补充
我们先看 LoRA 如何工作。LoRA 不修改原始大模型参数,而是在原模型旁边并联一个低秩矩阵(A × B),最终输出 = 原模型输出 + LoRA 输出。训练时只更新 LoRA 矩阵,原模型保持冻结,从而用极少参数完成大模型微调。
那 QLoRA 呢?
LoRA 是冻结大模型,只训练小补丁;QLoRA 是先把大模型压缩成 4bit 再冻结,然后训练这个小补丁,显存更省。这也是为什么一开始加载 base 模型的时候选择 4bit 量化加载它。


运行如下代码,就开始训练了
python
from transformers import Trainer, TrainingArguments

training_args = TrainingArguments(
    output_dir="/kaggle/working/plamo-3-nict-8b-qlora-checkpoints",
    per_device_train_batch_size=1,
    gradient_accumulation_steps=4,
    learning_rate=2e-4,
    num_train_epochs=2,
    logging_steps=3,
    save_strategy="steps",
    save_steps=250,
    save_total_limit=2,
    fp16=True,
    optim="paged_adamw_8bit",
    gradient_checkpointing=True,
    gradient_checkpointing_kwargs={"use_reentrant": False},
    max_grad_norm=0.3,
    warmup_ratio=0.03,
    lr_scheduler_type="cosine",
    report_to="none",
    remove_unused_columns=False,
    seed=20260724,
    data_seed=20260724,
)
model.train()
probe_batch = data_collator([tokenized_dataset[0]])
probe_batch = {name: tensor.to(input_device) for name, tensor in probe_batch.items()}
probe_loss = model(**probe_batch).loss
assert probe_loss.requires_grad and probe_loss.grad_fn is not None, "loss 未连接到 LoRA 梯度图,请重新运行第 6 个单元。"
print("Gradient probe passed; loss:", float(probe_loss.detach()))
del probe_loss, probe_batch
trainer = Trainer(
    model=model,
    args=training_args,
    train_dataset=tokenized_dataset,
    data_collator=data_collator,
)
train_result = trainer.train()
print(train_result.metrics)
训练完成后我们再对模型进行输入,看下能得到什么
python
# 11. 使用当前已经训练好的 Adapter 进行 Chat 推理
# 注意:必须与训练时的 ROLE_PREFIXES 格式完全一致
import torch
model.config.use_cache = True
model.eval()
question = """日本の首都はなんですか"""
USER_PREFIX = "User:"
ASSISTANT_PREFIX = "Assistant:"
# 与训练时保持一致:
# BOS + 用户前缀 + 用户内容 + 换行 + 助手前缀
input_ids = []
if tokenizer.bos_token_id is not None:
input_ids.append(tokenizer.bos_token_id)
input_ids += tokenizer(USER_PREFIX,add_special_tokens=False,)["input_ids"]
input_ids += tokenizer(question,add_special_tokens=False,)["input_ids"]
input_ids += tokenizer("\n",add_special_tokens=False,)["input_ids"]
input_ids += tokenizer(ASSISTANT_PREFIX,add_special_tokens=False,)["input_ids"]
input_ids = torch.tensor([input_ids],dtype=torch.long,)
attention_mask = torch.ones_like(input_ids)
input_device = model.get_input_embeddings().weight.device
input_ids = input_ids.to(input_device)
attention_mask = attention_mask.to(input_device)
with torch.inference_mode():
outputs = model.generate(
input_ids=input_ids,
attention_mask=attention_mask,
max_new_tokens=64,
do_sample=False,
repetition_penalty=1.1,
eos_token_id=tokenizer.eos_token_id,
pad_token_id=tokenizer.pad_token_id
if tokenizer.pad_token_id is not None
else tokenizer.eos_token_id,
)
new_tokens = outputs[0, input_ids.shape[1]:]
answer = tokenizer.decode(
new_tokens,
skip_special_tokens=True,
).strip()
print("Question:")
print(question)
print("\nQLoRA model answer:")
print(answer) 至此,模型经过 SFT 后,模型就可以进行回答用户问题了。
三)总结
通过本文的实践,我们完成了从 Base 模型到 Chat 模型 的完整 SFT 流程。首先了解了大模型从预训练(Pre-training)、监督微调(SFT)到偏好对齐(RLHF/DPO)的整体生命周期,然后以 PLaMo-3-NICT-8B-Base 为例,使用 Kaggle 免费 T4 GPU 环境完成了 QLoRA 微调实验。
在这个过程中,最重要的收获并不是成功运行了一套训练代码,而是可以理解了 SFT 的本质:
SFT 并不是给模型增加新的能力,而是利用高质量的「指令 - 答案」数据,让 Base 模型学会按照人类期望的方式组织和输出已有知识。
同时我们也理解了 QLoRA 的核心思想:
将大模型参数以 4bit 量化后冻结,仅训练少量 LoRA 参数,从而大幅降低显存消耗,使个人开发者也能够在有限硬件条件下完成大模型微调。
值得注意的是,SFT 只是大模型应用开发的起点,而不是终点。模型最终效果往往更多地取决于训练数据质量,而不是训练轮数或参数规模。相比不断调整超参数,构建高质量、高覆盖度、符合目标场景的数据集通常能够带来更明显的收益。
对于制造业知识传承、设备故障分析、技术文档整理等垂直领域场景而言,SFT 能够让通用 Base 模型逐渐具备行业表达方式、业务术语理解能力以及特定任务的输出风格。这也是当前行业大模型落地最常见、最具性价比的方案之一。
希望通过这篇文章,能够帮助初学者建立对大模型训练流程的整体认知,并亲手完成自己的第一次 SFT 实践。当你成功跑通这一流程后,实际上已经迈出了从"大模型使用者"到"大模型开发者"的第一步。接下来,可以进一步探索 RAG、DPO、Agent、Benchmark 评测等方向,逐步构建真正适用于业务场景的 AI 系统。🚀