6.主从复制和读写分离
文章目录
主从复制 核心原理
必须记住 3 个核心组件
- binlog(二进制日志) ------ 主库
- IO 线程 ------ 从库
- SQL 线程 ------ 从库
完整流程(一步一步,逐句理解)
- 主库执行增删改(insert/update/drop)
- MySQL 把这些操作记录到 binlog 日志文件
- 从库的 IO 线程连接主库,请求 binlog
- 主库的 dump 线程把 binlog 发给从库
- 从库 IO 线程将内容写到本地 relay log(中继日志)
- 从库 SQL 线程读取中继日志,重放 SQL 语句
- 两个 Yes 代表正常:IO_Running、SQL_Running
- 从库数据和主库完全一致
使用目标:数据冗余和灾难恢复;提升并发能力、避免锁冲突。
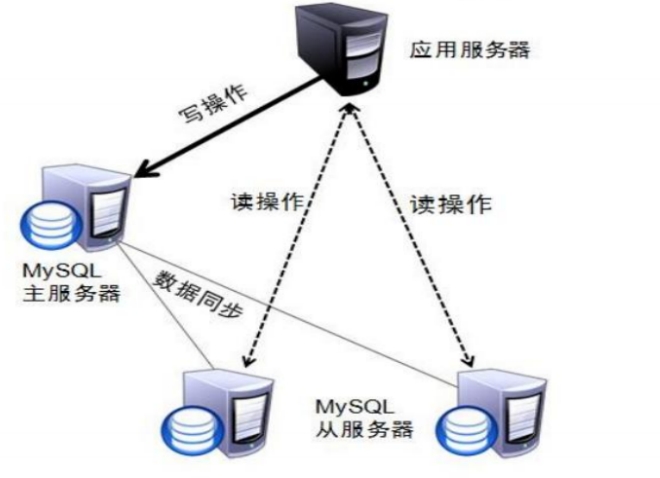
MySQL读写分离原理
-
只在主服务器上写,只在从服务器上读
-
主数据库处理事务性查询,从数据库处理SELECT查询
-
数据库复制用于将事务性查询的变更同步到集群中的从数据库
-
读写分离方案
- 基于程序代码内部实现
- 基于中间代理层实现
- MySQL-Proxy
- Amoeba
- mycat
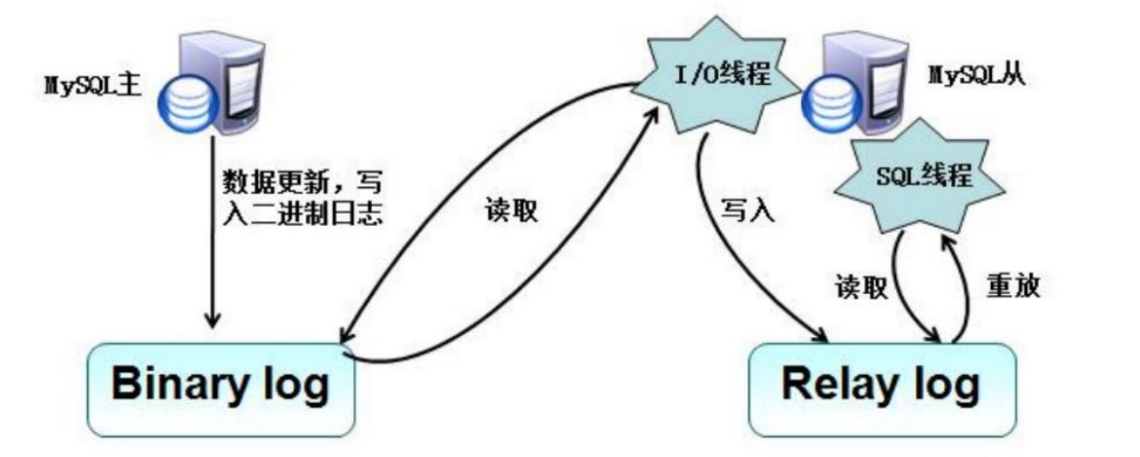
- 在每个事务更新数据完成之前,Master将这些改变记录进二进制日志。写入二进制日志完成后,Master通知存储引擎提交事务。
- Slave将Master 的 Binary log复制到其中继日志(Relay log)。首先,Slave开始一个工作线程-I/0线程,I/0线程在Master上打开一个普通的连接,然后开始Binlog dump process。Binlog dump process从Master 的二进制日志中读取事件,如果已经跟上Master,它会睡眠并等待Master产生新的事件。I/0线程将这些事件写入中继日志。
- SQL slave thread(SQL从线程)处理该过程的最后一步。SQL线程从中继日志读取事件,并重放其中的事件而更新Slave数据,使其与Master中的数据保持一致。只要该线程与I/0线程保持一致,中继日志通常会位于0S的缓存中,所以中继日志的开销很小。复制过程有一个很重要的限制,即复制在Slave上是串行化的,也就是说Master上的并行更新操作不能在Slave上并行操作。
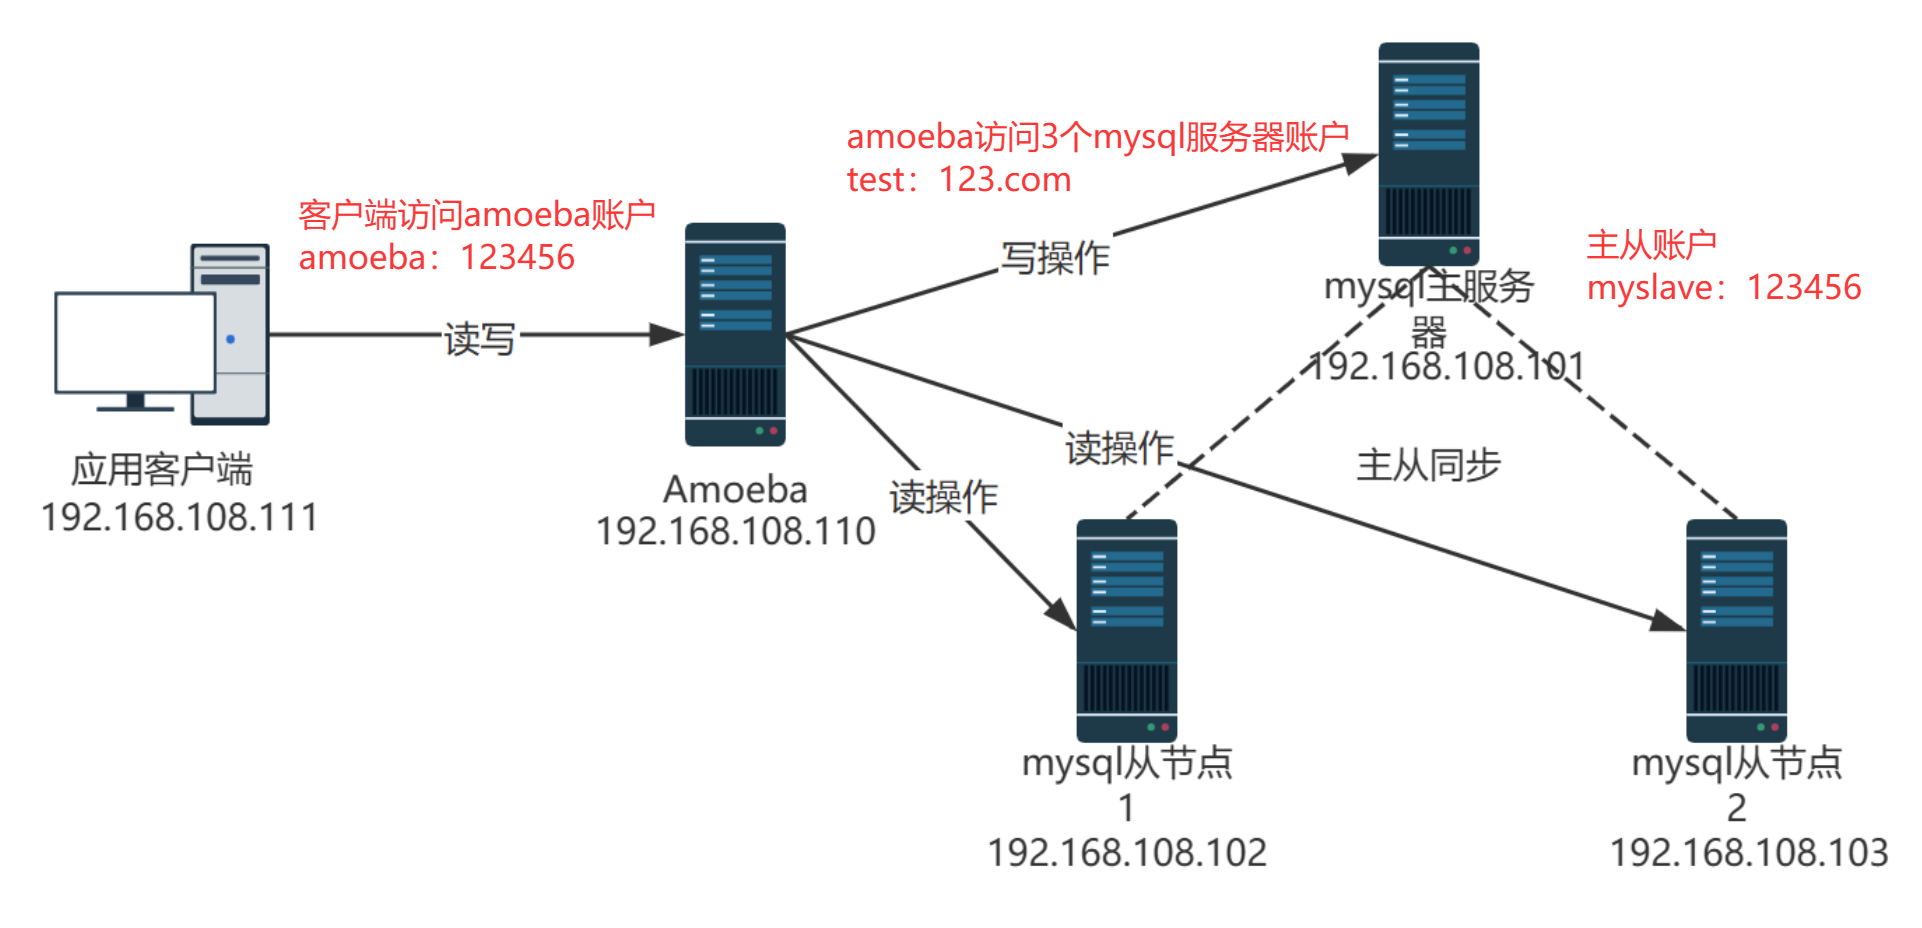
实验拓扑图
使用Centos-7-template模板克隆产生应用客户端和amoeba
使用mysql模板克隆产生mysql主服务器,mysql从节点1,mysql从节点2
根据下表,将IP地址,主机名更改好
| 主机名 | IP地址 | 作用 |
|---|---|---|
| mysql-master | 192.168.108.101 | mysql主服务器 |
| mysql-slave01 | 192.168.108.102 | mysql从节点1 |
| mysql-slave02 | 192.168.108.103 | mysql从节点2 |
| amoeba | 192.168.108.110 | amoeba |
| mysql-client | 192.168.108.111 | 应用客户端 |
时间同步
通过时间戳实现业务的一致性
bash
# 所有节点
ntpdate ntp.aliyun.com
date -R

systemctl disable firewalld --now
setenforce 0
如果出现故障:使用此方法,对时完成后,无法重启mysqld服务
原因:之前在windows端使用navicat连接过mysql
解决:pkill -9 mysql;systemctl restart mysqld
mysql主从服务器配置
mysql主服务器配置
bash
[root@mysql-master ~]# vim /etc/my.cnf
server-id = 11                                #三台myslq id不能一致
log-bin = master-bin                         #主服务器日志文件
log-slave-updates = true                     #从服务器更新二进制日志

[root@mysql-master ~]# systemctl restart mysqld

[root@mysql-master ~]# mysql -u root -p
Enter password:
Welcome to the MySQL monitor.  Commands end with ; or \g.
Your MySQL connection id is 7
Server version: 5.7.17-log Source distribution

Copyright (c) 2000, 2016, Oracle and/or its affiliates. All rights reserved.

Oracle is a registered trademark of Oracle Corporation and/or its
affiliates. Other names may be trademarks of their respective
owners.

Type 'help;' or '\h' for help. Type '\c' to clear the current input statement.

mysql> GRANT REPLICATION SLAVE ON *.* TO 'myslave'@'192.168.108.%' IDENTIFIED BY '123456';
Query OK, 0 rows affected, 1 warning (0.01 sec)

mysql> FLUSH PRIVILEGES;
Query OK, 0 rows affected (0.00 sec)

mysql> show master status;
+-------------------+----------+--------------+------------------+-------------------+
| File              | Position | Binlog_Do_DB | Binlog_Ignore_DB | Executed_Gtid_Set |
+-------------------+----------+--------------+------------------+-------------------+
| master-bin.000001 |      604 |              |                  |                   |
+-------------------+----------+--------------+------------------+-------------------+
1 row in set (0.00 sec)

#检查有没有master-bin.000001
[root@mysql-master ~]# ls /usr/local/mysql/data
auto.cnf        ibdata1      ib_logfile1  master-bin.000001  mysql               sys
ib_buffer_pool  ib_logfile0  ibtmp1       master-bin.index   performance_schema
mysql从服务器配置
mysql-slave01,mysql-slave02都要做如下操作
bash
#主从是克隆的要做这个操作,否则UUID一致
# mysql-slave
[root@mysql-slave01 ~]# systemctl stop mysqld
[root@mysql-slave01 ~]# rm -f /usr/local/mysql/data/auto.cnf
[root@mysql-slave01 ~]# systemctl start mysqld

[root@mysql-slave01 ~]# vim /etc/my.cnf
server-id = 22                                     #另外一台为23
relay-log = relay-log-bin                          #从主服务器上同步日志文件记录到本地
relay-log-index = slave-relay-bin.index           #定义relay-log的位置和名称

[root@mysql-slave01 ~]# systemctl restart mysqld

[root@mysql-slave01 ~]# mysql -u root -p
Enter password:
Welcome to the MySQL monitor.  Commands end with ; or \g.
Your MySQL connection id is 3
Server version: 5.7.17 Source distribution

Copyright (c) 2000, 2016, Oracle and/or its affiliates. All rights reserved.

Oracle is a registered trademark of Oracle Corporation and/or its
affiliates. Other names may be trademarks of their respective
owners.

Type 'help;' or '\h' for help. Type '\c' to clear the current input statement.

mysql> change master to master_host='192.168.108.101',master_user='myslave',master_password='123456',master_log_file='master-bin.000001',master_log_pos=604;              #master_log_file,master_log_pos与前面查询的相同
Query OK, 0 rows affected, 2 warnings (0.03 sec)

mysql> start slave;
Query OK, 0 rows affected (0.02 sec)

mysql> show slave status\G;
*************************** 1. row ***************************
               Slave_IO_State: Waiting for master to send event
                  Master_Host: 192.168.108.101
                  Master_User: myslave
                  Master_Port: 3306
                Connect_Retry: 60
              Master_Log_File: master-bin.000001
          Read_Master_Log_Pos: 604
               Relay_Log_File: relay-log-bin.000002
                Relay_Log_Pos: 321
        Relay_Master_Log_File: master-bin.000001
             Slave_IO_Running: Yes                  #Yes
            Slave_SQL_Running: Yes                  #Yes
              Replicate_Do_DB:
          Replicate_Ignore_DB:
           Replicate_Do_Table:
       Replicate_Ignore_Table:
      Replicate_Wild_Do_Table:
  Replicate_Wild_Ignore_Table:
                   Last_Errno: 0
                   Last_Error:
                 Skip_Counter: 0
          Exec_Master_Log_Pos: 604
              Relay_Log_Space: 526
              Until_Condition: None
               Until_Log_File:
                Until_Log_Pos: 0
           Master_SSL_Allowed: No
           Master_SSL_CA_File:
           Master_SSL_CA_Path:
              Master_SSL_Cert:
            Master_SSL_Cipher:
               Master_SSL_Key:
        Seconds_Behind_Master: 0
Master_SSL_Verify_Server_Cert: No
                Last_IO_Errno: 0
                Last_IO_Error:
               Last_SQL_Errno: 0
               Last_SQL_Error:
  Replicate_Ignore_Server_Ids:
             Master_Server_Id: 11
                  Master_UUID: 5d895caf-a1e0-11f0-b3ec-000c29866c0f
             Master_Info_File: /usr/local/mysql/data/master.info
                    SQL_Delay: 0
          SQL_Remaining_Delay: NULL
      Slave_SQL_Running_State: Slave has read all relay log; waiting for more updates
           Master_Retry_Count: 86400
                  Master_Bind:
      Last_IO_Error_Timestamp:
     Last_SQL_Error_Timestamp:
               Master_SSL_Crl:
           Master_SSL_Crlpath:
           Retrieved_Gtid_Set:
            Executed_Gtid_Set:
                Auto_Position: 0
         Replicate_Rewrite_DB:
                 Channel_Name:
           Master_TLS_Version:
1 row in set (0.00 sec)

ERROR:
No query specified

#mysql-slave02
[root@mysql-slave02 ~]# systemctl stop mysqld
[root@mysql-slave02 ~]# rm -f /usr/local/mysql/data/auto.cnf
[root@mysql-slave02 ~]# systemctl start mysqld

[root@mysql-slave02 ~]# vim /etc/my.cnf
server-id = 23
relay-log = relay-log-bin
relay-log-index = slave-relay-bin.index

[root@mysql-slave02 ~]# systemctl restart mysqld

[root@mysql-slave02 ~]# mysql -u root -p
Enter password:
Welcome to the MySQL monitor.  Commands end with ; or \g.
Your MySQL connection id is 3
Server version: 5.7.17 Source distribution

Copyright (c) 2000, 2016, Oracle and/or its affiliates. All rights reserved.

Oracle is a registered trademark of Oracle Corporation and/or its
affiliates. Other names may be trademarks of their respective
owners.

Type 'help;' or '\h' for help. Type '\c' to clear the current input statement.

mysql> change master to master_host='192.168.108.101',master_user='myslave',master_password='123456',master_log_file='master-bin.000001',master_log_pos=604;
Query OK, 0 rows affected, 2 warnings (0.04 sec)

mysql> start slave;
Query OK, 0 rows affected (0.01 sec)

mysql> show slave status\G;
*************************** 1. row ***************************
               Slave_IO_State: Waiting for master to send event
                  Master_Host: 192.168.108.101
                  Master_User: myslave
                  Master_Port: 3306
                Connect_Retry: 60
              Master_Log_File: master-bin.000001
          Read_Master_Log_Pos: 604
               Relay_Log_File: relay-log-bin.000002
                Relay_Log_Pos: 321
        Relay_Master_Log_File: master-bin.000001
             Slave_IO_Running: Yes
            Slave_SQL_Running: Yes
              Replicate_Do_DB:
          Replicate_Ignore_DB:
           Replicate_Do_Table:
       Replicate_Ignore_Table:
      Replicate_Wild_Do_Table:
  Replicate_Wild_Ignore_Table:
                   Last_Errno: 0
                   Last_Error:
                 Skip_Counter: 0
          Exec_Master_Log_Pos: 604
              Relay_Log_Space: 526
              Until_Condition: None
               Until_Log_File:
                Until_Log_Pos: 0
           Master_SSL_Allowed: No
           Master_SSL_CA_File:
           Master_SSL_CA_Path:
              Master_SSL_Cert:
            Master_SSL_Cipher:
               Master_SSL_Key:
        Seconds_Behind_Master: 0
Master_SSL_Verify_Server_Cert: No
                Last_IO_Errno: 0
                Last_IO_Error:
               Last_SQL_Errno: 0
               Last_SQL_Error:
  Replicate_Ignore_Server_Ids:
             Master_Server_Id: 11
                  Master_UUID: 5d895caf-a1e0-11f0-b3ec-000c29866c0f
             Master_Info_File: /usr/local/mysql/data/master.info
                    SQL_Delay: 0
          SQL_Remaining_Delay: NULL
      Slave_SQL_Running_State: Slave has read all relay log; waiting for more updates
           Master_Retry_Count: 86400
                  Master_Bind:
      Last_IO_Error_Timestamp:
     Last_SQL_Error_Timestamp:
               Master_SSL_Crl:
           Master_SSL_Crlpath:
           Retrieved_Gtid_Set:
            Executed_Gtid_Set:
                Auto_Position: 0
         Replicate_Rewrite_DB:
                 Channel_Name:
           Master_TLS_Version:
1 row in set (0.00 sec)

ERROR:
No query specified
mysql-slave01,mysql-slave02查询结果如下
<img src="https://aka.doubaocdn.com/s/pFMghvmrry" alt="image-20251013222601673" style="zoom:50%;" / />
验证主从同步
sql
# 主服务器上:
[root@mysql-master ~]# mysql -uroot -phuawei
mysql> create database school;
Query OK, 1 row affected (0.01 sec)
mysql> use school;

CREATE TABLE student (
id int UNSIGNED AUTO_INCREMENT PRIMARY KEY,
name VARCHAR(20) NOT NULL,
age tinyint UNSIGNED,
#height DECIMAL(5,2),
gender ENUM('M','F') default 'M'
)ENGINE=InnoDB AUTO_INCREMENT=10 DEFAULT CHARSET=utf8mb4;

mysql> insert student (name,age)values('路飞',20);

# 去从服务器上 show databases;
[root@mysql-slave01 ~]# mysql -uroot -phuawei
mysql> select * from school.student;
+----+--------+------+--------+
| id | name   | age  | gender |
+----+--------+------+--------+
| 10 | 路飞   |   20 | M      |
+----+--------+------+--------+
1 row in set (0.00 sec)
amoeba服务器
读写分离 核心原理
基于 主从复制:
-
主库写入数据 → 自动同步到从库
-
应用程序收到 SQL:
- insert/update/delete → 走主库
- select → 走从库
bash应用程序 ↓ 读写中间件(或代码判断) ↓ ------------------------------------------------------ 写 → Master(主库) 读 → Slave 1 Slave 2 Slave 3 ------------------------------------------------------从库可以有 1 台、2 台、多台,共同分担查询压力
主从复制保证数据一致
读写分离保证性能扩容
Amoeba 是一款基于 Java 开发的 MySQL 数据库代理中间件 ,核心定位是SQL 路由 ,帮你在应用与 MySQL 之间实现读写分离、负载均衡、高可用,对应用透明、配置简单,是早期企业实现 MySQL 读写分离的主流方案。
- 角色:应用 ↔ Amoeba ↔ MySQL 主从集群,Amoeba 是中间 "SQL 路由器"。
- 核心能力 :自动识别 SQL 类型,写(INSERT/UPDATE/DELETE)走主库,读(SELECT)走从库,并对从库做负载均衡。
- 依赖前提 :必须先搭好 MySQL 主从复制,Amoeba 只负责路由,不负责数据同步。
- 优势 :零代码侵入、配置基于 XML(比 MySQL Proxy 的 Lua 简单)、轻量易运维。
工作流程(读写分离)
-
应用连接 Amoeba 代理(默认端口 8066),而非直接连 MySQL。
-
Amoeba 解析 SQL:
- 写操作 → 转发到配置的 主库池(writePool)。
- 读操作 → 转发到配置的 从库池(readPool),并按轮询 / 权重做负载均衡。
-
主从复制保证从库数据与主库一致,应用无感知。
核心组件(配置文件)
Amoeba 核心配置在 $AMOEBA_HOME/conf/ 下,共 7 个,最关键 2 个:
| 配置文件 | 作用 |
|---|---|
| amoeba.xml | 代理核心配置:端口、认证、读写池、路由规则、线程池 |
| dbServers.xml | 定义后端 MySQL 节点(主 / 从)、连接信息、连接池 |
路由规则(读写分离核心)
在 amoeba.xml 中配置:
writePool:指定写操作转发的主库节点池。readPool:指定读操作转发的从库节点池(多从库自动轮询)。- 规则优先级:
readPools/writePools>defaultPools。
bash
#普通linux克隆得出amoeba
[root@amoeba ~]# hostnamectl set-hostname amoeba
[root@amoeba ~]# systemctl stop firewalld.service
[root@amoeba ~]# setenforce 0

[root@amoeba ~]# chmod +x jdk-6u14-linux-x64.bin
[root@amoeba ~]# ./jdk-6u14-linux-x64.bin
到yes的时候,输入yes按enter

[root@amoeba ~]# mv jdk1.6.0_14/ /usr/local/jdk1.6

[root@amoeba ~]# vim /etc/profile
最下面加
export JAVA_HOME=/usr/local/jdk1.6                   #java家目录
export CLASSPATH=$CLASSPATH:$JAVA_HOME/lib:$JAVA_HOME/jre/lib             #类环境和jre
export PATH=$JAVA_HOME/lib:$JAVA_HOME/jre/bin/:$PATH:$HOME/bin
export AMOEBA_HOME=/usr/local/amoeba                  #指定amoeba路径
export PATH=$PATH:$AMOEBA_HOME/bin

[root@amoeba ~]# source /etc/profile

[root@amoeba ~]# mkdir /usr/local/amoeba

[root@amoeba ~]# tar zxvf amoeba-mysql-binary-2.2.0.tar.gz -C /usr/local/amoeba/

[root@amoeba ~]# chmod -R 755 /usr/local/amoeba/

#执行结果显示amoeba start|stop说明安装成功
[root@amoeba ~]# /usr/local/amoeba/bin/amoeba
amoeba start|stop
在三台mysql上添加权限开放给amoeba访问
bash
#amooba访问数据库的账号
#mysql-master
mysql> grant all on *.* to test@'192.168.108.%' identified by '123.com';

#mysql-slave01
mysql> grant all on *.* to test@'192.168.108.%' identified by '123.com';

#mysql-slave02
mysql> grant all on *.* to test@'192.168.108.%' identified by '123.com';
回到amoeba服务器
bash
[root@amoeba ~]# cd /usr/local/amoeba/
[root@amoeba amoeba]# vim conf/amoeba.xml
---30行--
 <property name="user">amoeba</property           #客户端访问amoeba账号
----32行---------
 <property name="password">123456</property>        #客户端访问ameoba密码

---117和120-去掉注释-
 115行 <property name="defaultPool">master</property>
 116
 117
 118行<property name="writePool">master</property>
 119行<property name="readPool">slaves</property>
 120

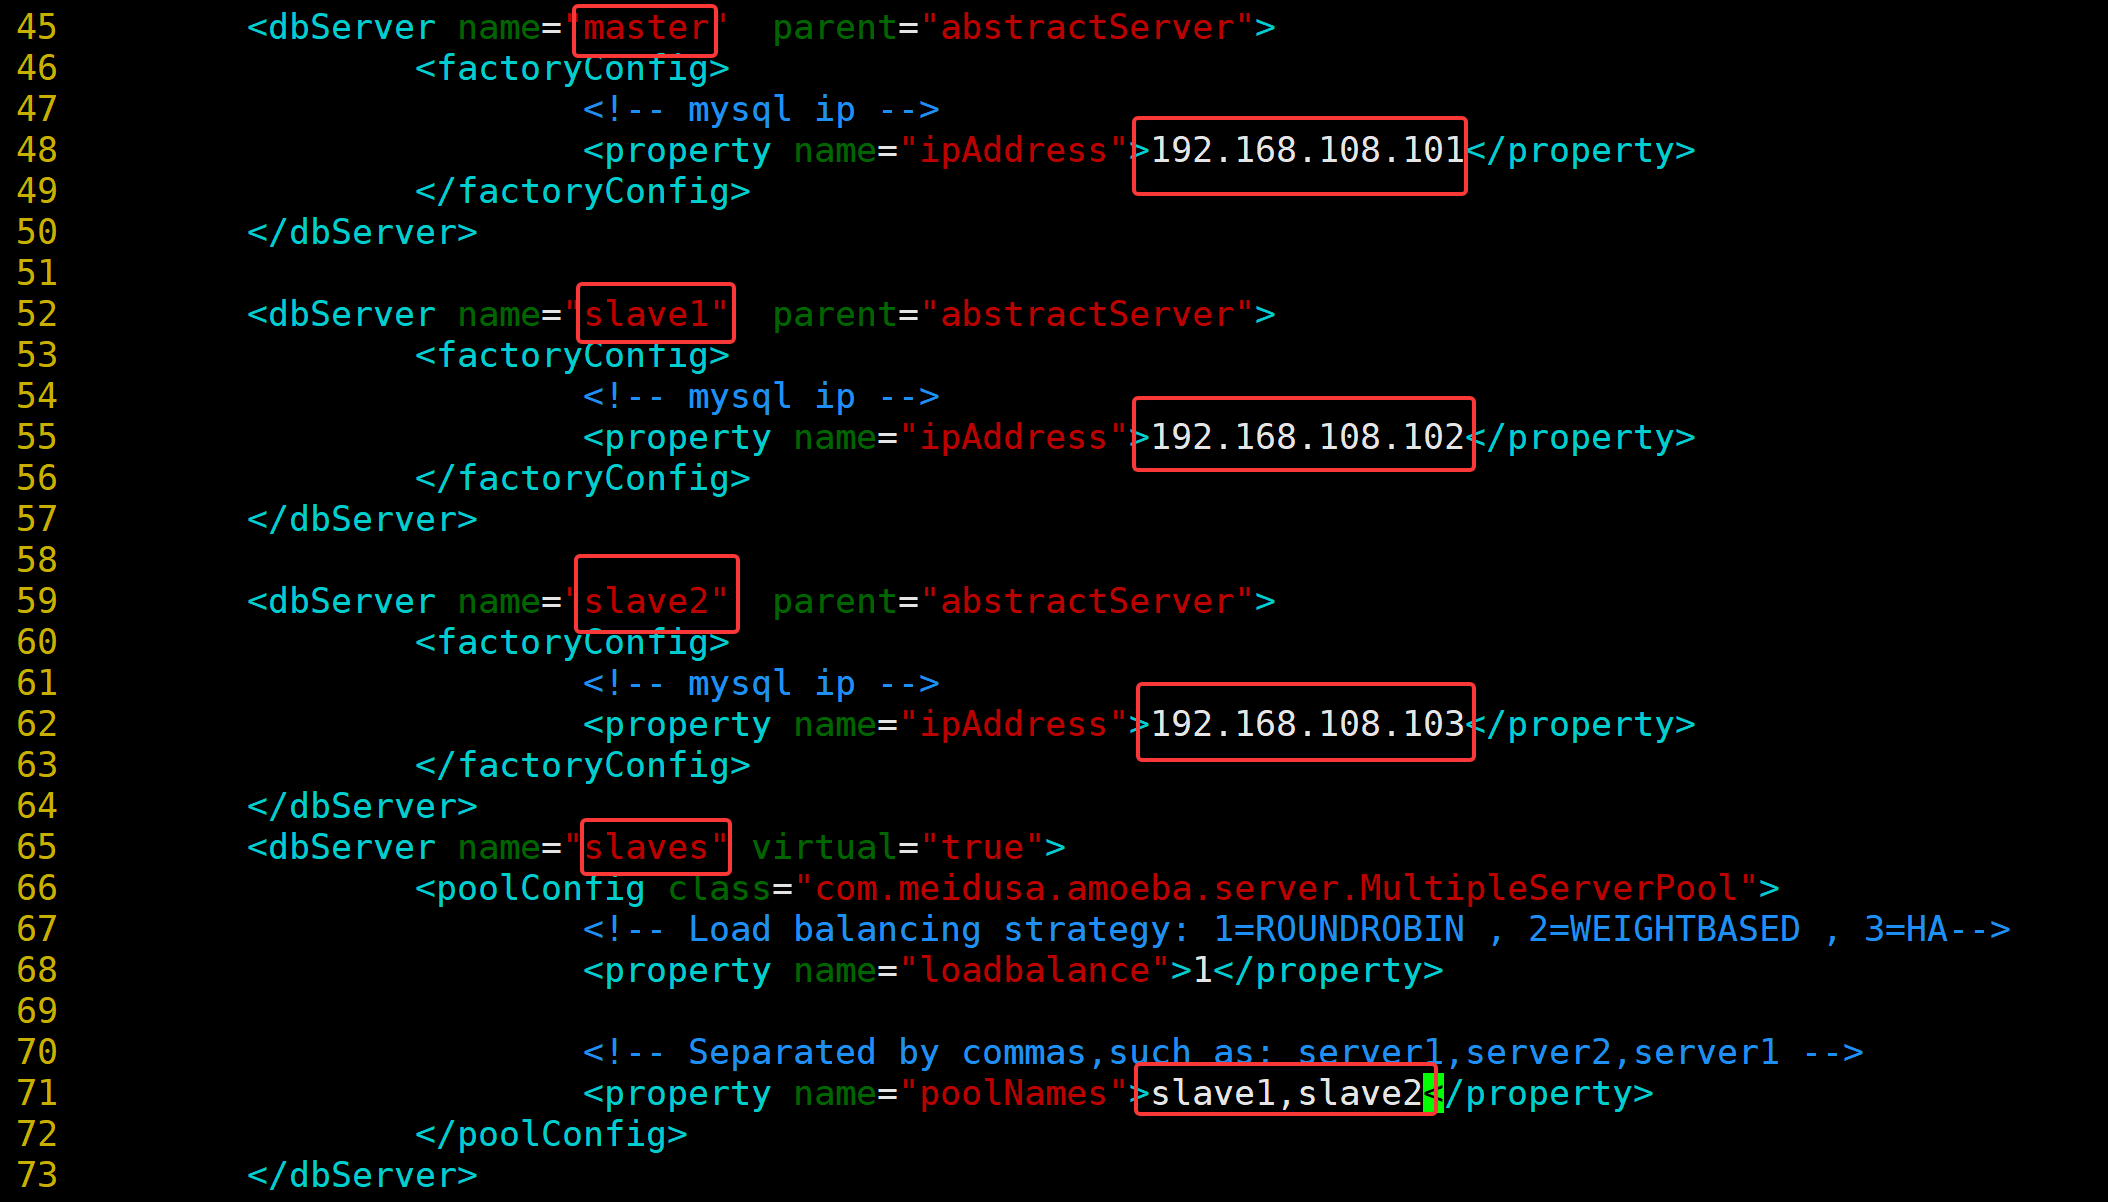
[root@amoeba amoeba]# vim conf/dbServers.xml         #数据库配置
---23--注意!!!(mysql5.7,默认没有test数据库所以需要修改为mysql数据库)-(mysql5.5直接忽略)--
<!-- mysql schema -->
<property name="schema">mysql</property>

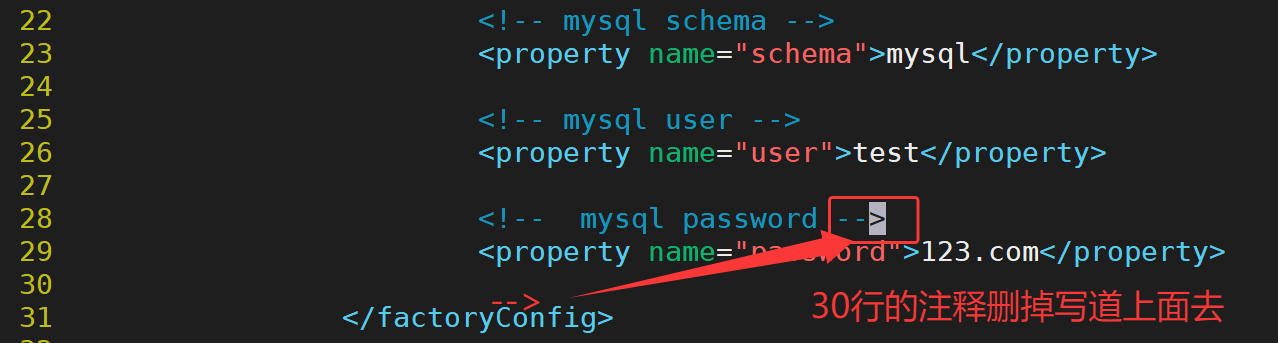
--25行到30行,第30行-->移动到28行后面
 25                         <!-- mysql user -->
 26                         <property name="user">test</property>
 27
 28                         <!--  mysql password -->
 29                         <property name="password">123.com</property>
 30

-----45到50行主服务器地址---
45行<dbServer name="master"  parent="abstractServer">
48行<property name="ipAddress">192.168.108.101</property>
--52到57行从服务器主机名-
52行<dbServer name="slave1"  parent="abstractServer">
--55-从服务器地址-
55 <property name="ipAddress">192.168.108.102</property>
 ---52到57行复制一份在58行后面
原52行<dbServer name="slave2"  parent="abstractServer">
--55-从服务器地址-
原55 <property name="ipAddress">192.168.108.103</property>

 ---仅跟在上面的配置后面,multiPool行(本来就有,修改)
 <dbServer name="slaves" virtual="true">
 <poolConfig class="com.meidusa.amoeba.server.MultipleServerPool   #不改

<property name="poolNames">slave1,slave2</property>
 </poolConfig>           #不改

[root@amoeba ~]# /usr/local/amoeba/bin/amoeba start&
[1] 33499

[root@amoeba ~]# netstat -anpt | grep java
tcp6       0      0 :::8066                 :::*                    LISTEN      33499/java
tcp6       0      0 127.0.0.1:21128         :::*                    LISTEN      33499/java
tcp6       0      0 192.168.108.110:41754   192.168.108.101:3306    ESTABLISHED 33499/java
tcp6       0      0 192.168.108.110:41722   192.168.108.102:3306    ESTABLISHED 33499/java
tcp6       0      0 192.168.108.110:36956   192.168.108.103:3306    ESTABLISHED 33499/java
vim conf/dbServers.xml 结果如下
测试客户端
bash
[root@mysql-client ~]# yum install -y mysql
[root@mysql-client ~]# mysql -u amoeba -p123456 -h 192.168.108.110 -P8066     #连接amoeba服务器,8086端口在amoeba上执行netstat -anpt|grep java看
Welcome to the MariaDB monitor.  Commands end with ; or \g.
Your MySQL connection id is 927449563
Server version: 5.1.45-mysql-amoeba-proxy-2.2.0

Copyright (c) 2000, 2018, Oracle, MariaDB Corporation Ab and others.

Type 'help;' or '\h' for help. Type '\c' to clear the current input statement.

MySQL [(none)]>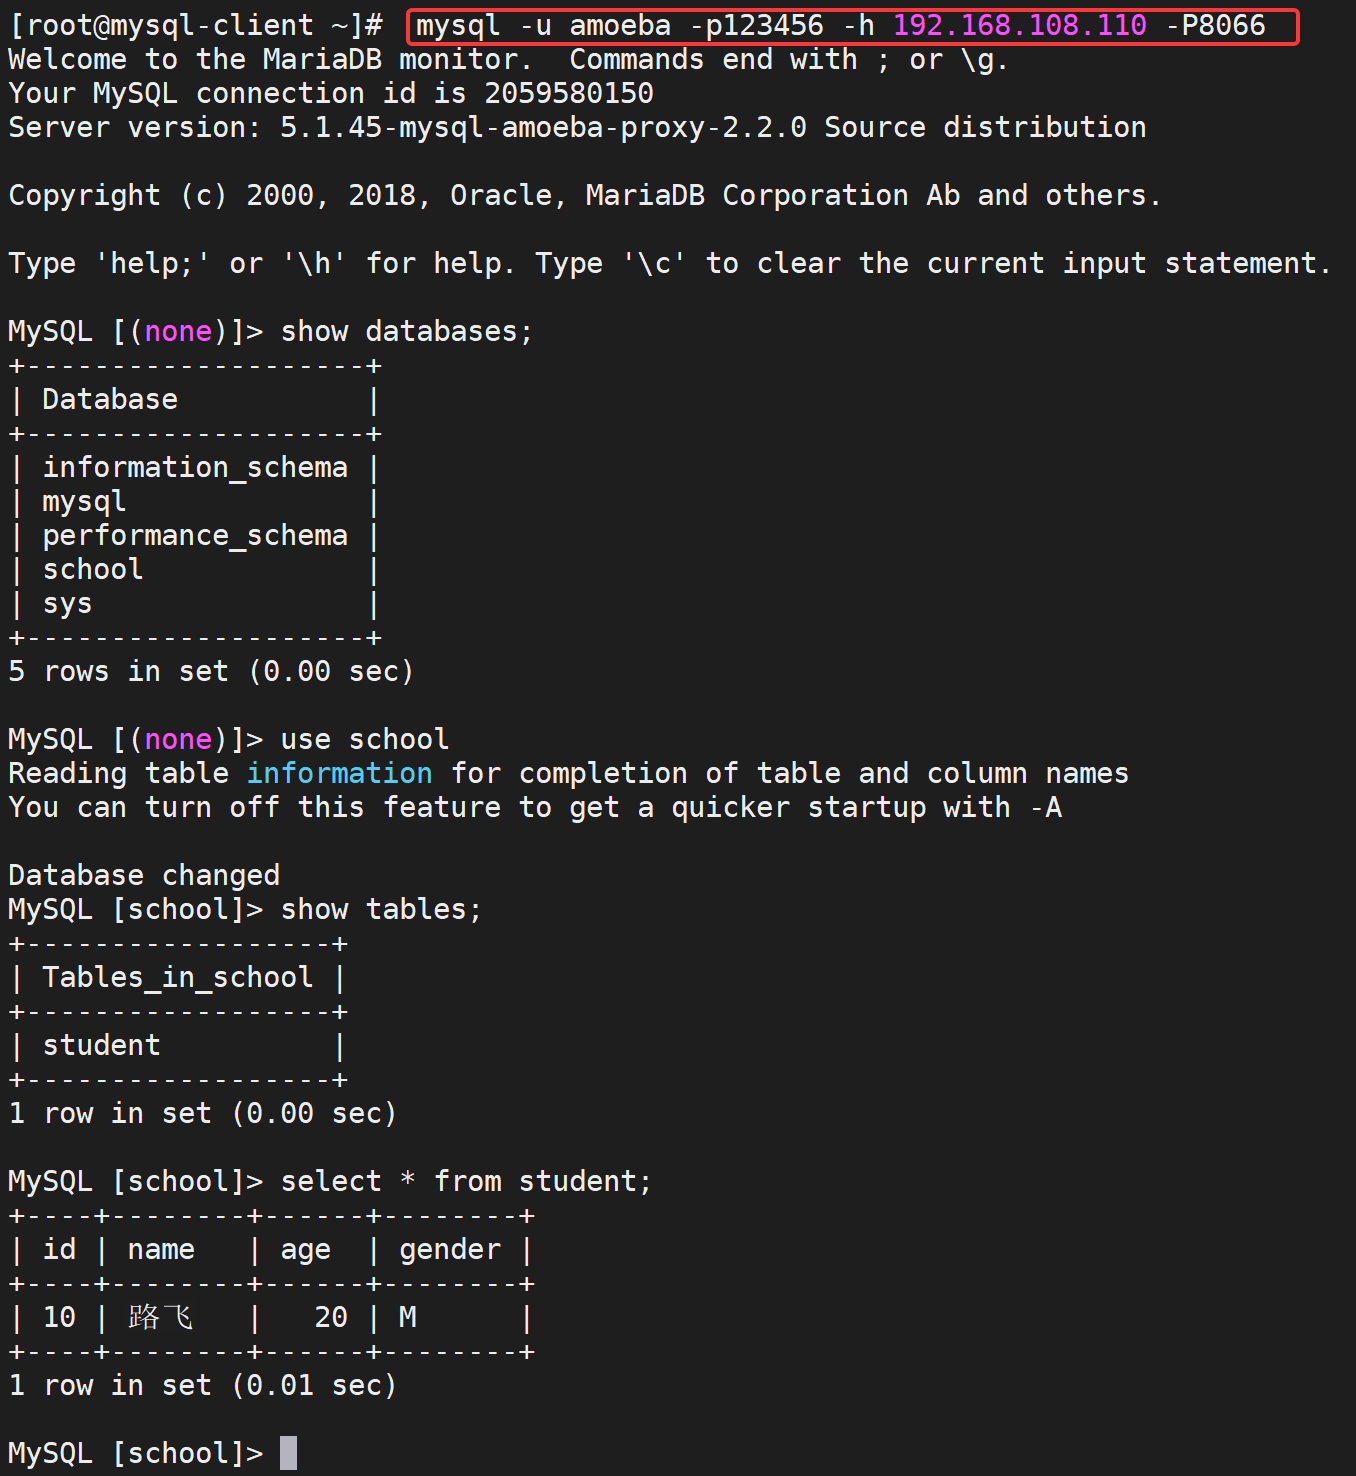
在MASTER上
bash
[root@mysql-master ~]# mysql -u root -p
Enter password:
Welcome to the MySQL monitor.  Commands end with ; or \g.
Your MySQL connection id is 10
Server version: 5.7.17-log Source distribution

Copyright (c) 2000, 2016, Oracle and/or its affiliates. All rights reserved.

Oracle is a registered trademark of Oracle Corporation and/or its
affiliates. Other names may be trademarks of their respective
owners.

Type 'help;' or '\h' for help. Type '\c' to clear the current input statement.

mysql> use school;
Reading table information for completion of table and column names
You can turn off this feature to get a quicker startup with -A

Database changed
mysql> insert student (name,age)values('鸣人',20);
Query OK, 1 row affected (0.00 sec)

#此时会同步
#mysql-slave01
mysql> select * from student;
+----+--------+------+--------+
| id | name   | age  | gender |
+----+--------+------+--------+
| 10 | 路飞  |   20 | M      |
| 11 | 鸣人   |   20 | M      |
+----+--------+------+--------+
2 rows in set (0.00 sec)

#mysql-slave02
mysql> select * from student;
+----+--------+------+--------+
| id | name   | age  | gender |
+----+--------+------+--------+
| 10 | 路飞  |   20 | M      |
| 11 | 鸣人   |   20 | M      |
+----+--------+------+--------+
2 rows in set (0.00 sec)
在两台从上
bash
# mysql-slave01
mysql> stop slave;

# mysql-slave02
mysql> stop slave;
在客户端上插入数据,内容不会同步
bash
#mysql-client上添加,由于不会同步,只有mysql-master192.168.108.101节点有该记录
# mysql-client
MySQL [school]> insert student (name,age)values('卡卡西',30);
在mysql-slave01上
bash
#mysql-slave01
mysql> use school;
mysql> insert student (name,age)values('卡卡西',31);
mysql-slave02上
bash
# mysql-slave02
mysql> use school;
mysql> insert student (name,age)values('卡卡西',32);
验证主从复制
在mysql-slave01和mysql-slave02上查看
bash
# mysql-slave01
mysql> select * from student;
+----+-----------+------+--------+
| id | name      | age  | gender |
+----+-----------+------+--------+
| 10 | 路飞      |   20 | M      |
| 11 | 鸣人      |   20 | M      |
| 12 | 卡卡西    |   31 | M      |
+----+-----------+------+--------+
3 rows in set (0.00 sec)

#mysql-slave02
mysql> select * from student;
+----+-----------+------+--------+
| id | name      | age  | gender |
+----+-----------+------+--------+
| 10 | 路飞      |   20 | M      |
| 11 | 鸣人      |   20 | M      |
| 12 | 卡卡西    |   32| M      |
+----+-----------+------+--------+
3 rows in set (0.00 sec)
并没有将客户端写入的insert student (name,age)values('卡卡西',30);同步
在mysq-master上查看内容发现写入成功:
bash
# mysql-master
mysql> select * from student;
+----+-----------+------+--------+
| id | name      | age  | gender |
+----+-----------+------+--------+
| 10 | 路飞      |   20 | M      |
| 11 | 鸣人      |   20 | M      |
| 12 | 卡卡西    |   30 | M      |
+----+-----------+------+--------+
3 rows in set (0.00 sec)
验证读写分离
在客户端上测试,第一次会向从服务器1读数,据-第二次会向从2读取
bash
#mysql-client
MySQL [(none)]> select * from school.student;
+----+-----------+------+--------+
| id | name      | age  | gender |
+----+-----------+------+--------+
| 10 | 路飞      |   20 | M      |
| 11 | 鸣人      |   20 | M      |
| 12 | 卡卡西    |   31 | M      |
+----+-----------+------+--------+
3 rows in set (0.02 sec)

MySQL [(none)]> select * from school.student;
+----+-----------+------+--------+
| id | name      | age  | gender |
+----+-----------+------+--------+
| 10 | 路飞      |   20 | M      |
| 11 | 鸣人      |   20 | M      |
| 12 | 卡卡西    |   32 | M      |
+----+-----------+------+--------+
3 rows in set (0.00 sec)
#都是从从节点读取的,读写分离,由实验结果可知:客户端的读取内容会从mysql-slave01和mysql-slave02上轮询得到。