**摘要:**本文介绍如何在 Qt Creator 中使用 CMake 与 vcpkg 管理 Qt 项目依赖,涵盖环境准备、工具链配置、第三方库安装与集成,帮助开发者实现依赖自动化管理与跨平台构建。
- 一键管理依赖:vcpkg 自动下载、编译并安装第三方库,无需手动配置库路径。
- 三步完成配置:安装 VS、Qt 与 vcpkg,在 Qt Creator 中指定 CMAKE_TOOLCHAIN_FILE,通过 find_package 引入库。
- 开箱即用集成:CMakeLists.txt 统一管理构建配置,配合 windeployqt 自动部署 Qt 运行库。
目录
- 1. 为什么选择 CMake + vcpkg 组合
- 2. 环境准备
- 2.1 安装 VS、Qt 与 Qt Creator
- 2.2 安装 vcpkg
- 3. 在 Qt Creator 中配置 vcpkg
- 4. 使用案例
- 5. 总结
1. 为什么选择 CMake + vcpkg 组合
在 Qt 开发中,CMake 已经成为官方推荐的构建系统,而 vcpkg 则是微软推出的跨平台 C++ 包管理器。两者结合,可以让 Qt 项目的依赖管理、构建配置和跨平台编译变得更加高效和可维护。
使用 CMake + vcpkg 的主要优势包括:
- 依赖管理自动化:vcpkg 可以自动下载、编译和安装第三方库,无需手动配置库路径。
- 构建配置清晰:CMake 通过 CMakeLists.txt 集中管理编译选项、源文件和链接库。
- 跨平台支持:同一套 CMakeLists.txt 可以在 Windows、Linux 和 macOS 上构建。
- 与 Qt Creator 无缝集成:Qt Creator 原生支持 CMake 项目,配合 vcpkg 工具链可以开箱即用。
2. 环境准备
2.1 安装 VS、Qt 与 Qt Creator
从对应官网下载并安装 VS、Qt 5,安装时勾选对应的编译器套件(如 MinGW 或 MSVC)。Qt Creator 会随 Qt 安装包一起提供,也可以单独安装最新版本。这里我使用的是 Qt 5.15.2 + VS2022。
2.2 安装 vcpkg
vcpkg 相关请看我的上一篇博客 Windows 与 Linux 下 vcpkg 的安装部署指南_windows下建议先安装vcpkg-CSDN博客
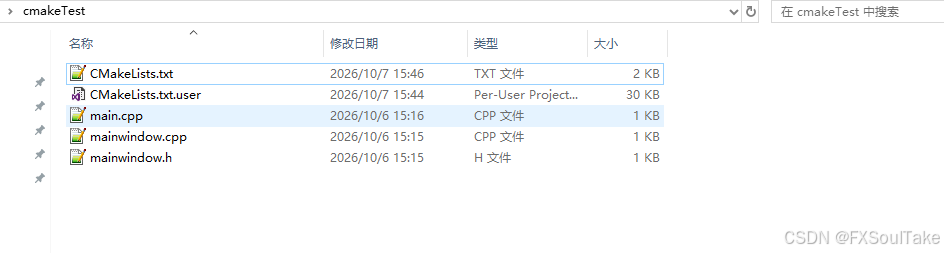
先创建一个最简单的工程。目录结构如下:
CMakeLists.txt
cmake
set(VCPKG_APPLOCAL_DEPS OFF CACHE BOOL "Disable vcpkg auto dll copy" FORCE)
# 独立安装目录:E:/Project/cmakeTest/install(构建时勾选 install 目标即自动输出到此处)
set(CMAKE_INSTALL_PREFIX "${CMAKE_BINARY_DIR}/install" CACHE PATH "Install directory" FORCE)
cmake_minimum_required(VERSION 3.16)
project(MyQtApp VERSION 0.1 LANGUAGES CXX)
if(MSVC)
# MSVC: 源码采用UTF-8,执行输出不转码
add_compile_options(/utf-8)
endif()
set(CMAKE_CXX_STANDARD 17)
set(CMAKE_CXX_STANDARD_REQUIRED ON)
Qt自动工具
set(CMAKE_AUTOMOC ON)
set(CMAKE_AUTOUIC ON)
set(CMAKE_AUTORCC ON)
Find Qt5
find_package(Qt5 REQUIRED COMPONENTS Core Widgets)
源码文件
set(SOURCES
main.cpp
mainwindow.cpp
mainwindow.h
)
add_executable(MyQtApp
${SOURCES}
)
Qt链接
target_link_libraries(MyQtApp PRIVATE
Qt5::Core
Qt5::Widgets
)
========== vcpkg库:nlohmann_json simdjson ==========
find_package(nlohmann_json CONFIG REQUIRED)
target_link_libraries(MyQtApp PRIVATE nlohmann_json::nlohmann_json)
find_package(simdjson CONFIG REQUIRED)
target_link_libraries(MyQtApp PRIVATE simdjson::simdjson)
========== Windows 配置 ==========
if(WIN32)
# 隐藏控制台窗口
set_target_properties(MyQtApp PROPERTIES
WIN32_EXECUTABLE TRUE
LINK_FLAGS "/SUBSYSTEM:WINDOWS"
)
# 拷贝simdjson dll到构建目录(本地调试用),生成器表达式自动区分Debug/Release
add_custom_command(TARGET MyQtApp POST_BUILD
COMMAND ${CMAKE_COMMAND} -E copy_if_different
$<TARGET_FILE:simdjson::simdjson>
$<TARGET_FILE_DIR:MyQtApp>
COMMENT "Copy simdjson dll"
)
# ========== 安装打包:install/bin 下仅包含 exe 与运行所需库,无中间编译文件 ==========
install(TARGETS MyQtApp RUNTIME DESTINATION bin)
# simdjson dll($<TARGET_FILE> 自动选择当前配置对应的 dll)
install(FILES $<TARGET_FILE:simdjson::simdjson> DESTINATION bin)
# Qt 运行库与插件:通过 windeployqt 自动部署(Qt5Core/Gui/Widgets + platforms 等插件)
get_target_property(_qmake_exe Qt5::qmake IMPORTED_LOCATION)
if(_qmake_exe)
get_filename_component(_qt_bin_dir "${_qmake_exe}" DIRECTORY)
find_program(WINDEPLOYQT_EXECUTABLE windeployqt HINTS "${_qt_bin_dir}")
endif()
if(WINDEPLOYQT_EXECUTABLE)
install(CODE "
message(STATUS \"Deploying Qt runtime with windeployqt ...\")
execute_process(
COMMAND \"${WINDEPLOYQT_EXECUTABLE}\"
$<$<CONFIG:Debug>:--debug>
$<$<NOT:$<CONFIG:Debug>>:--release>
--no-compiler-runtime --no-translations
--no-system-d3d-compiler --no-opengl-sw
\"\${CMAKE_INSTALL_PREFIX}/bin/MyQtApp.exe\"
RESULT_VARIABLE _wqt_result
OUTPUT_VARIABLE _wqt_output
ERROR_VARIABLE _wqt_output
)
if(NOT _wqt_result EQUAL 0)
message(FATAL_ERROR \"windeployqt failed: \${_wqt_output}\")
endif()
")
else()
message(WARNING "windeployqt not found; Qt DLLs will be copied manually")
install(FILES
$<TARGET_FILE:Qt5::Core>
$<TARGET_FILE:Qt5::Gui>
$<TARGET_FILE:Qt5::Widgets>
DESTINATION bin
)
endif()
endif()3. 在 Qt Creator 中配置 vcpkg
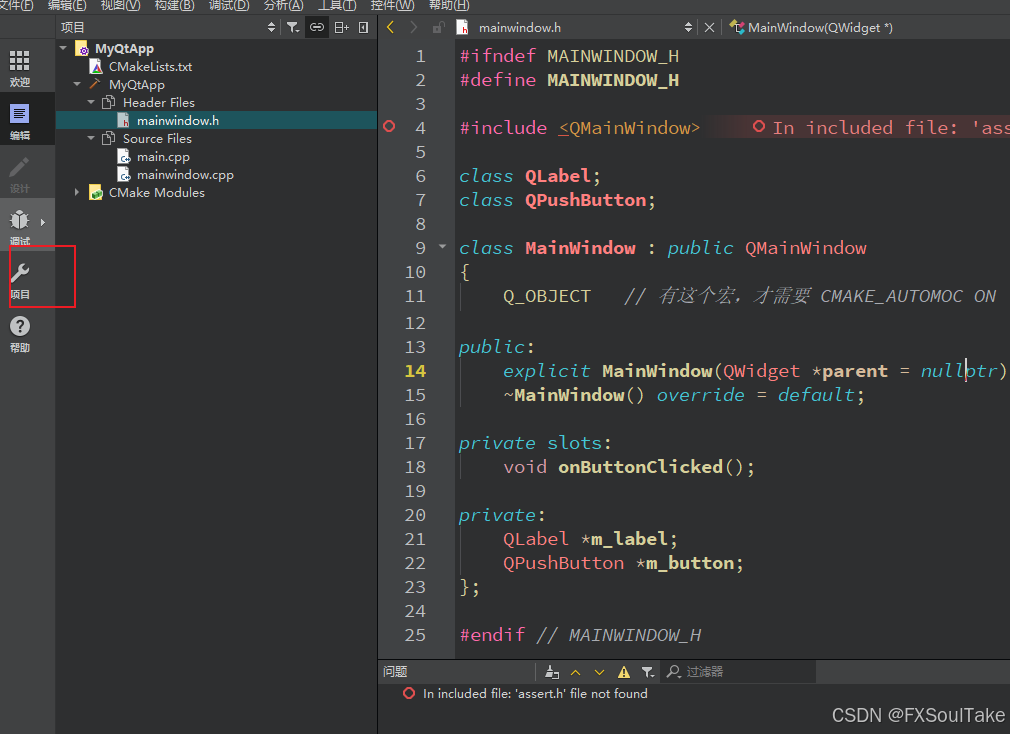
打开刚刚的工程,选择"项目"
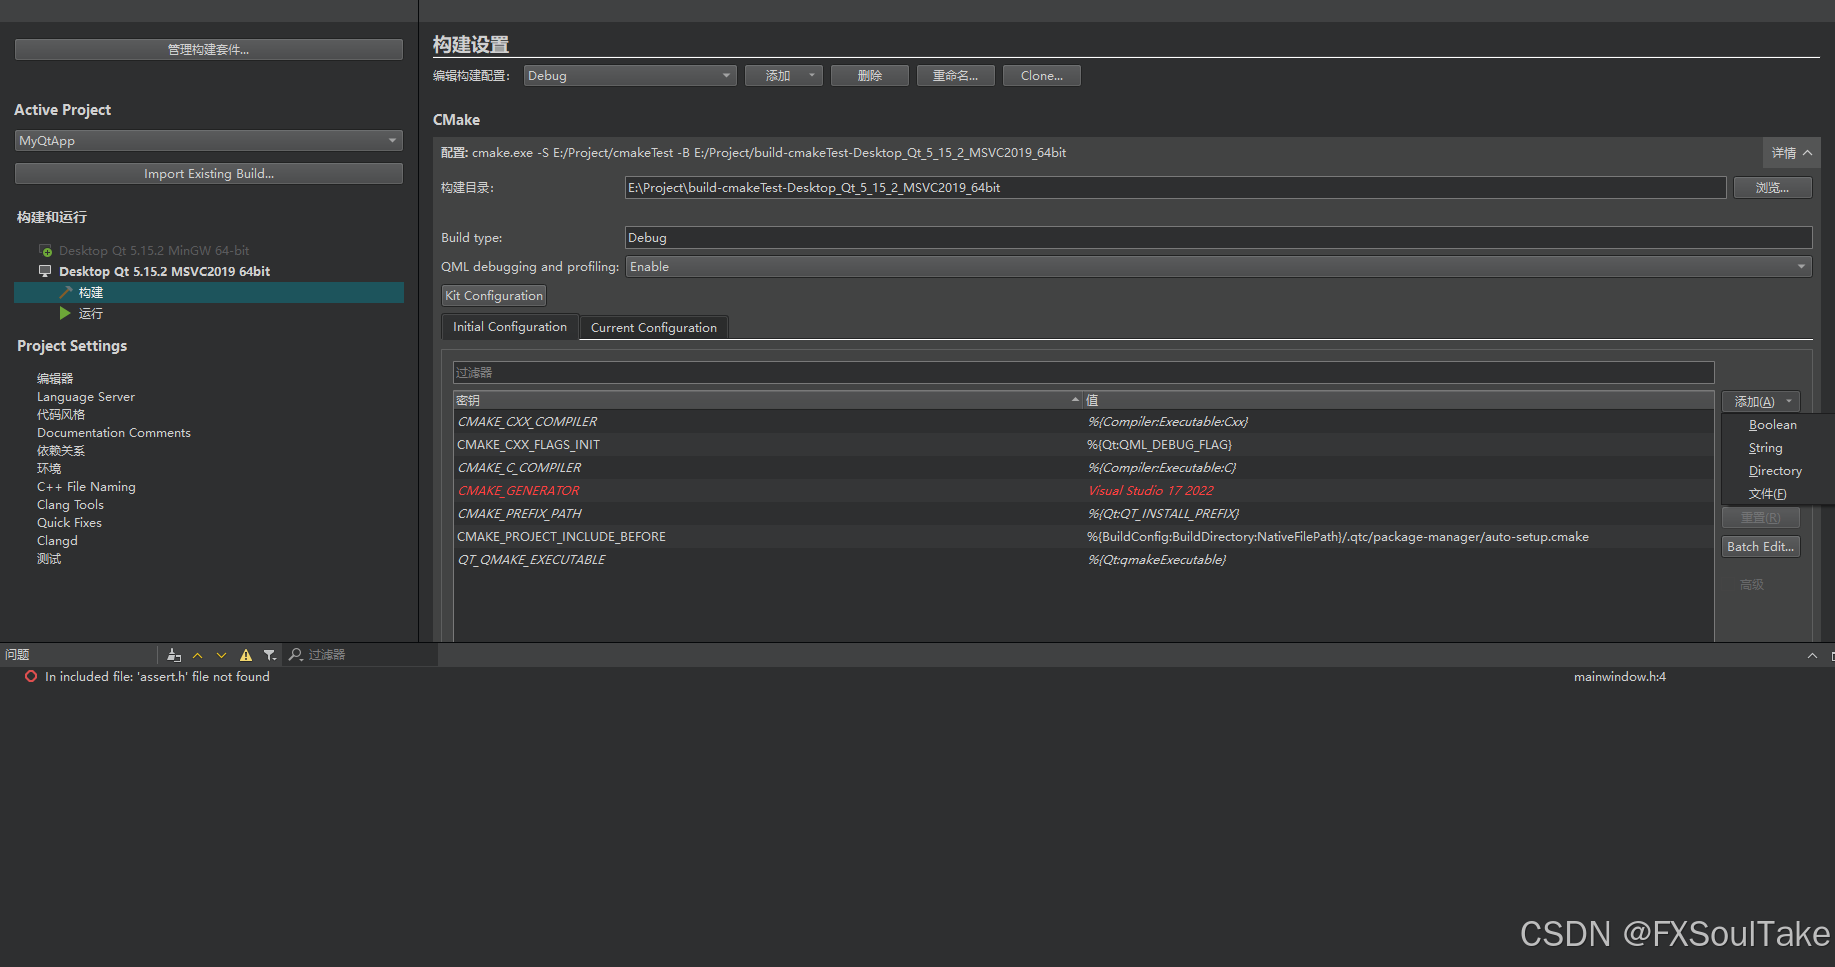
"添加""文件"
命名为""CMAKE_TOOLCHAIN_FILE"
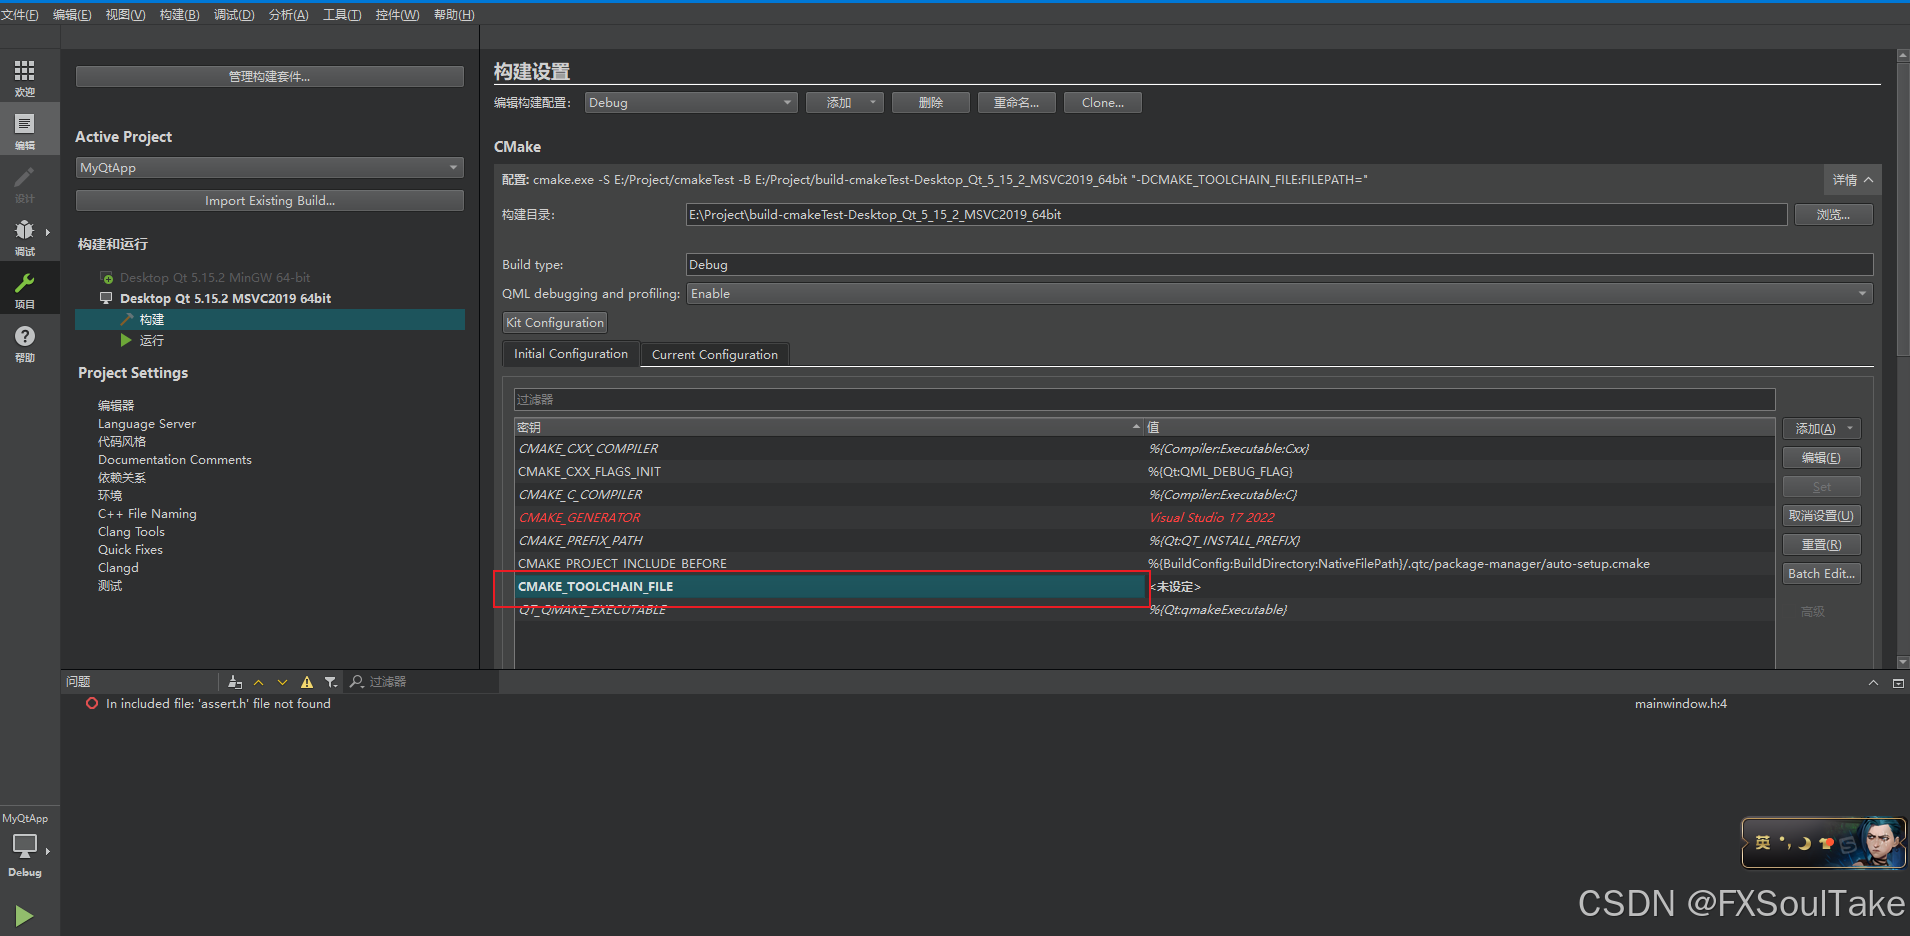
选择vcpkg中对应文件vcpkg.cmake
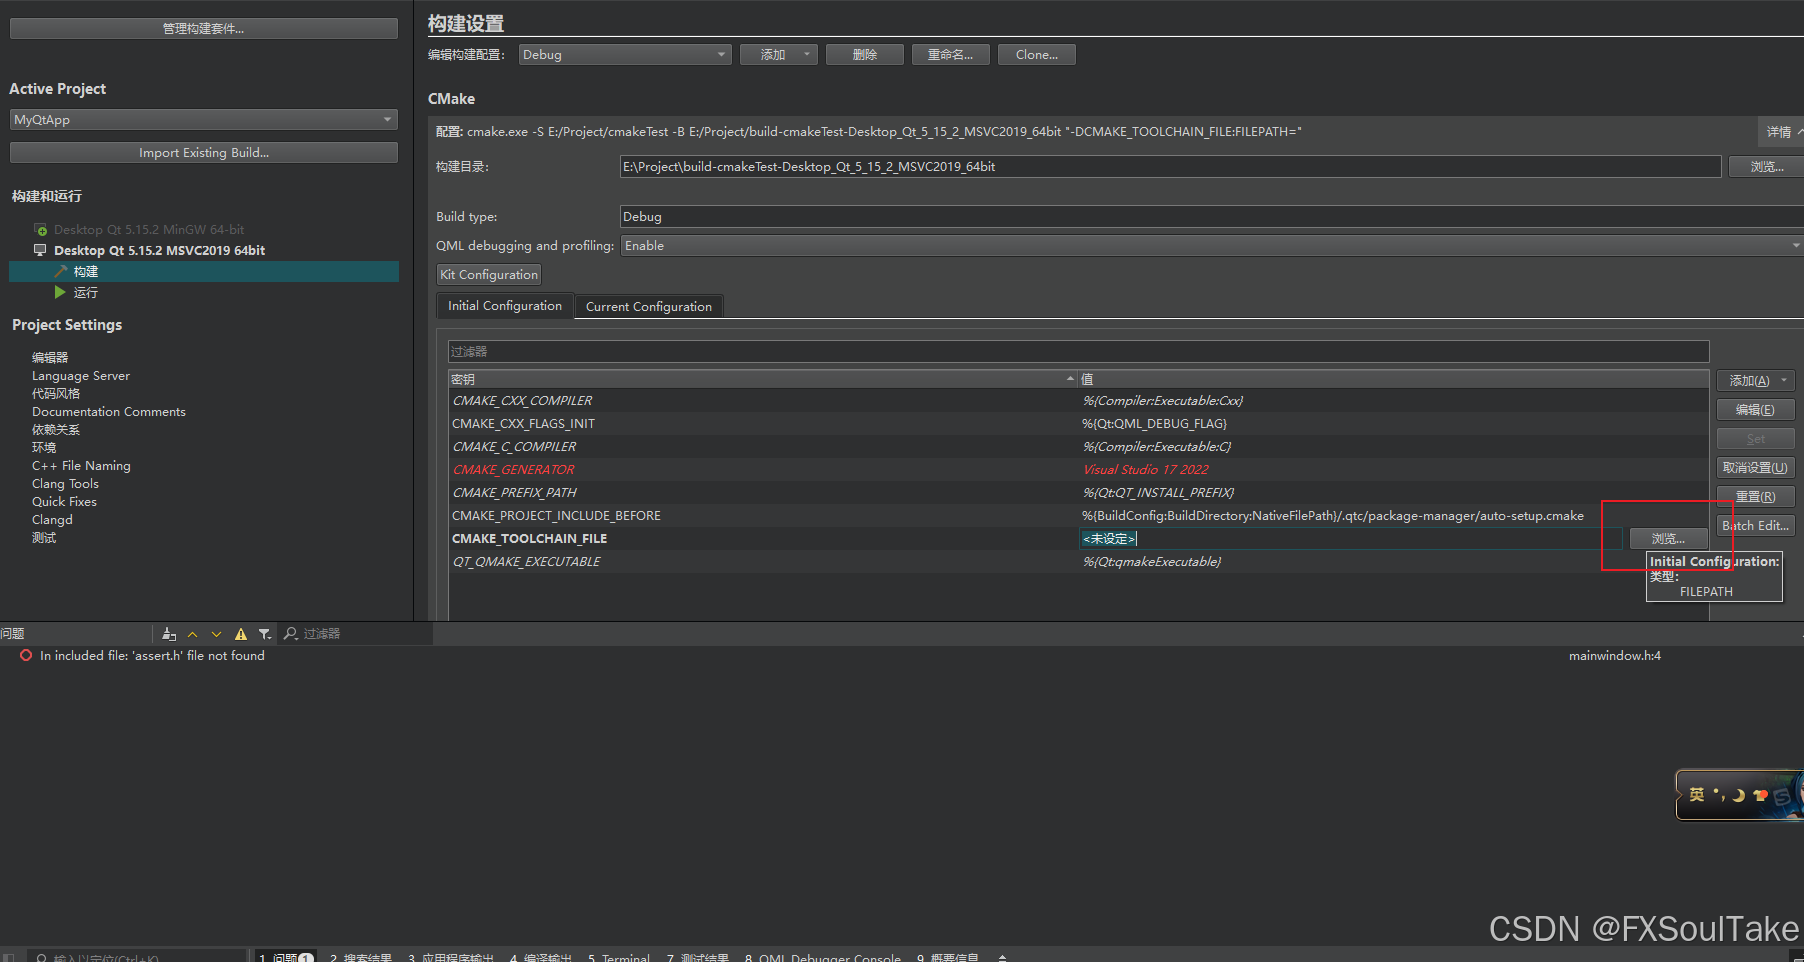
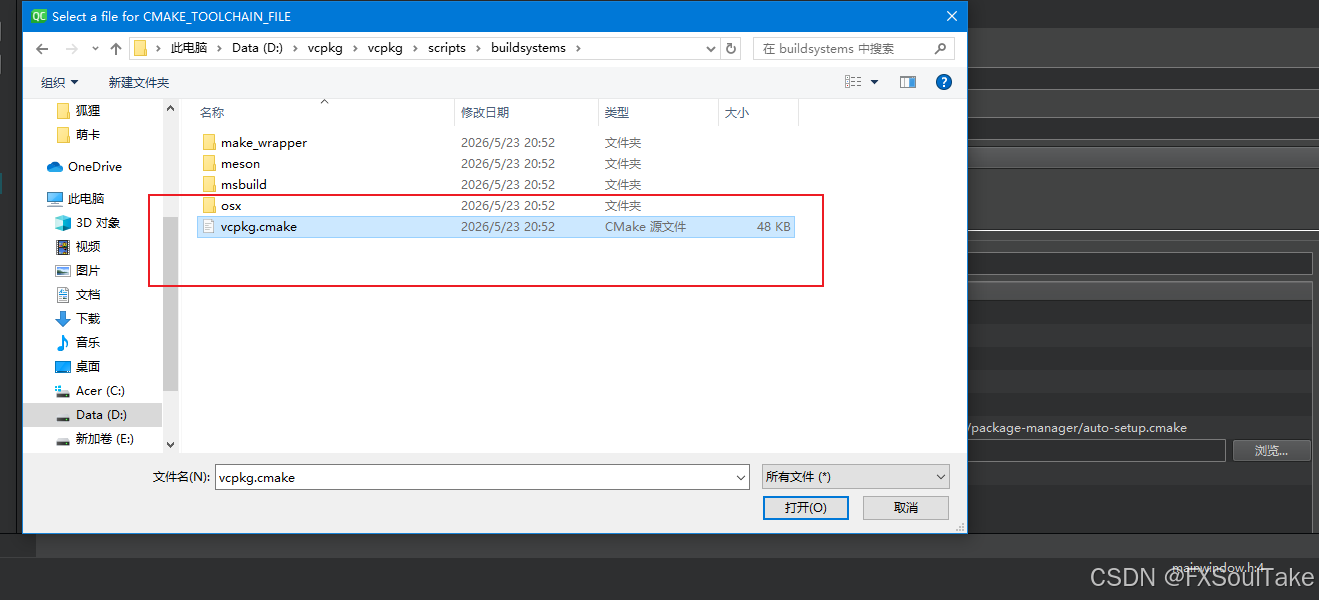
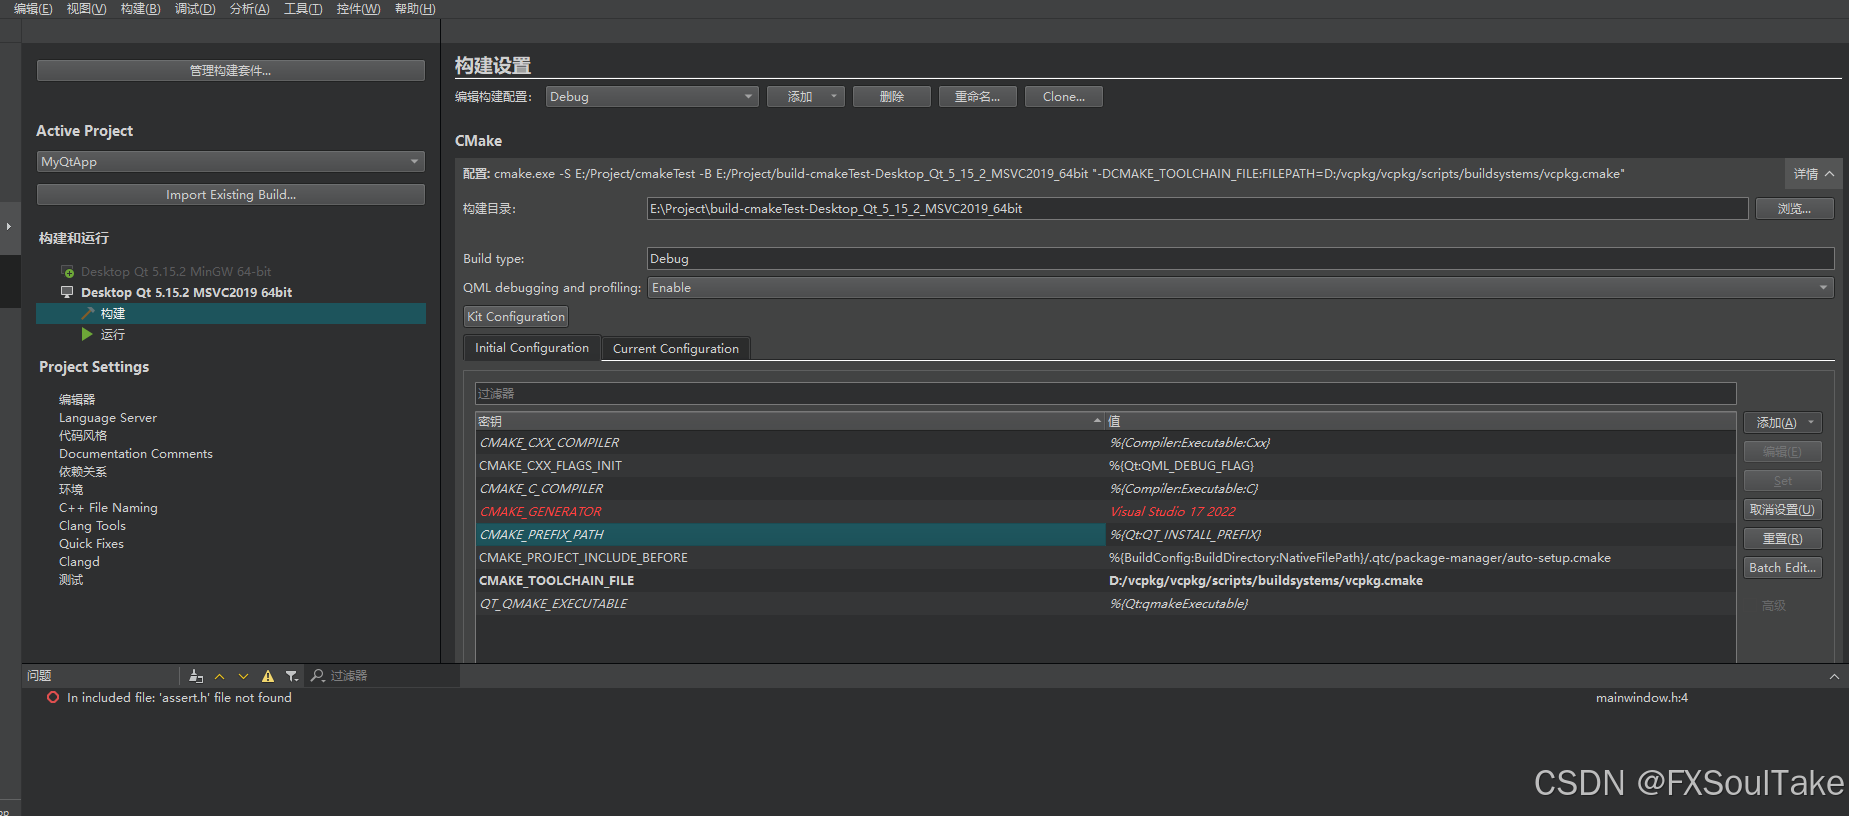
点击对应按钮
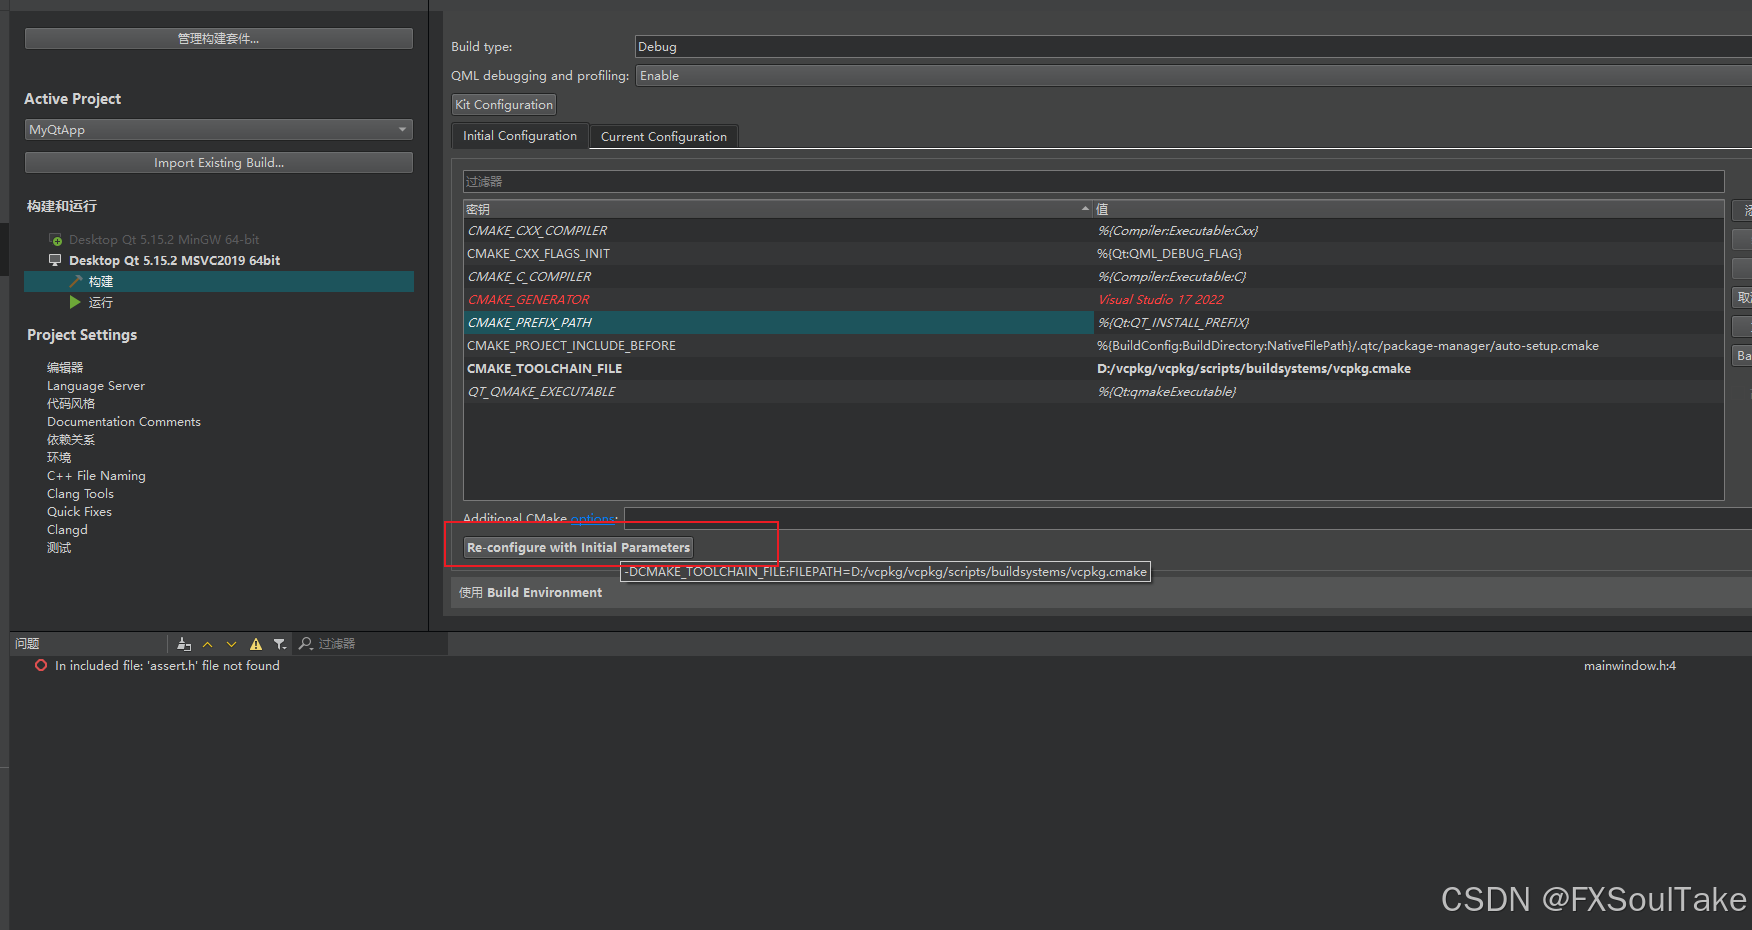
4.使用案例
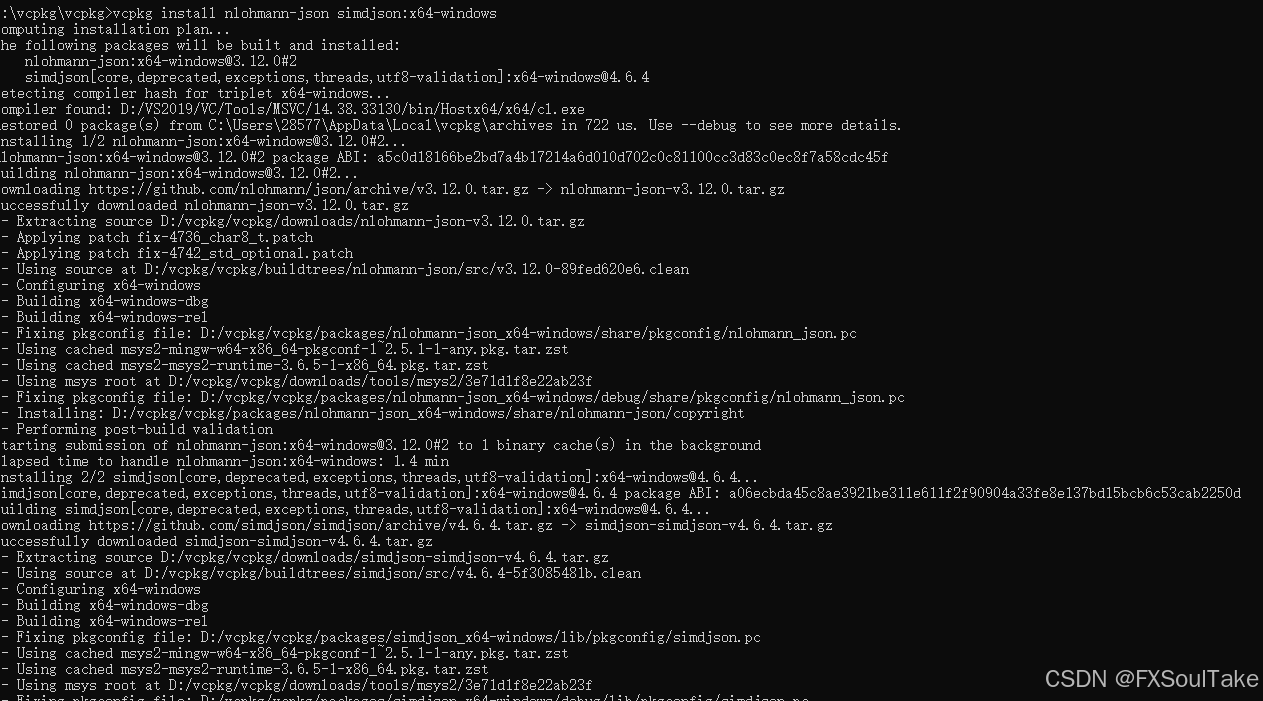
比如我要在我的项目中使用第三方库 nlohmann-json + simdjson,先要使用 vcpkg 安装对应第三方库:
vcpkg install nlohmann-json simdjson:x64-windows
等待安装完成
写一个简单的使用 nlohmann-json 和 simdjson 的例子
关键点引入对应库文件在CM阿珂LIst.txt中以下几处
引入对应库
cpp
# ========== vcpkg库:nlohmann_json simdjson ==========
find_package(nlohmann_json CONFIG REQUIRED)
target_link_libraries(MyQtApp PRIVATE nlohmann_json::nlohmann_json)
find_package(simdjson CONFIG REQUIRED)
target_link_libraries(MyQtApp PRIVATE simdjson::simdjson)
头文件
cpp
#ifndef MAINWINDOW_H
#define MAINWINDOW_H
#include <QMainWindow>
class QLabel;
class QPushButton;
class MainWindow : public QMainWindow {
    Q_OBJECT
public:
    explicit MainWindow(QWidget *parent = nullptr);
    ~MainWindow() override = default;
private slots:
    void onButtonClicked();
private:
QLabel *m_label;
QPushButton *m_button;
};
#endif // MAINWINDOW_H
源文件
cpp
#include "mainwindow.h"
#include <QDebug>
#include <QLabel>
#include <QPushButton>
#include <QVBoxLayout>
#include <QWidget>
#include <string>
// 引入两个json库
#include <nlohmann/json.hpp>
#include <simdjson.h>
// 别名,方便写代码
using json = nlohmann::json;
MainWindow::MainWindow(QWidget *parent) : QMainWindow(parent) {
setWindowTitle("Qt + nlohmann-json + simdjson");
resize(500, 320);
// 中心部件
QWidget *central = new QWidget(this);
setCentralWidget(central);
// 布局
QVBoxLayout *layout = new QVBoxLayout(central);
// 标签
m_label = new QLabel("点击按钮:nlohmann构造JSON,simdjson解析", central);
m_label->setAlignment(Qt::AlignCenter);
m_label->setWordWrap(true); // 自动换行
layout->addWidget(m_label);
// 按钮
m_button = new QPushButton("执行JSON示例", central);
layout->addWidget(m_button);
// 连接信号槽
connect(m_button, &QPushButton::clicked, this,
&MainWindow::onButtonClicked);
}
void MainWindow::onButtonClicked() {
// ========== 1. nlohmann-json 组装JSON对象 ==========
json obj;
obj["username"] = "张三";
obj["age"] = 28;
obj["isVip"] = true;
obj["hobbies"] = {"编程", "阅读", "跑步"};
// 序列化为带缩进的json字符串
std::string jsonStr = obj.dump(4);
qDebug() << "【nlohmann生成的JSON】:\n" << QString::fromStdString(jsonStr);
// ========== 2. simdjson 快速解析上面生成的json字符串 ==========
simdjson::dom::parser parser;
simdjson::dom::element doc;
auto err = parser.parse(jsonStr).get(doc);
if (err) {
m_label->setText("simdjson解析失败!");
qDebug() << "simdjson parse error:" << simdjson::error_message(err);
return;
}
// ========== 修复重点:加上 .value() ==========
std::string name = std::string(doc["username"].get_string().value());
int age = static_cast<int>(doc["age"].get_int64().value());
bool isVip = doc["isVip"].get_bool().value();
// 读取数组 hobbies
std::vector<std::string> hobbies;
for (auto hobby : doc["hobbies"]) {
hobbies.push_back(std::string(hobby.get_string().value()));
}
// ========== 3. 展示到界面 ==========
QString uiText =
QString("解析结果:\n用户名:%1\n年龄:%2\nVIP:%3\n爱好:")
.arg(QString::fromStdString(name))
.arg(age)
.arg(isVip ? "是" : "否");
for (const auto &h : hobbies) { uiText += QString::fromStdString(h) + " "; }
m_label->setText(uiText);
}勾选对应生成目录
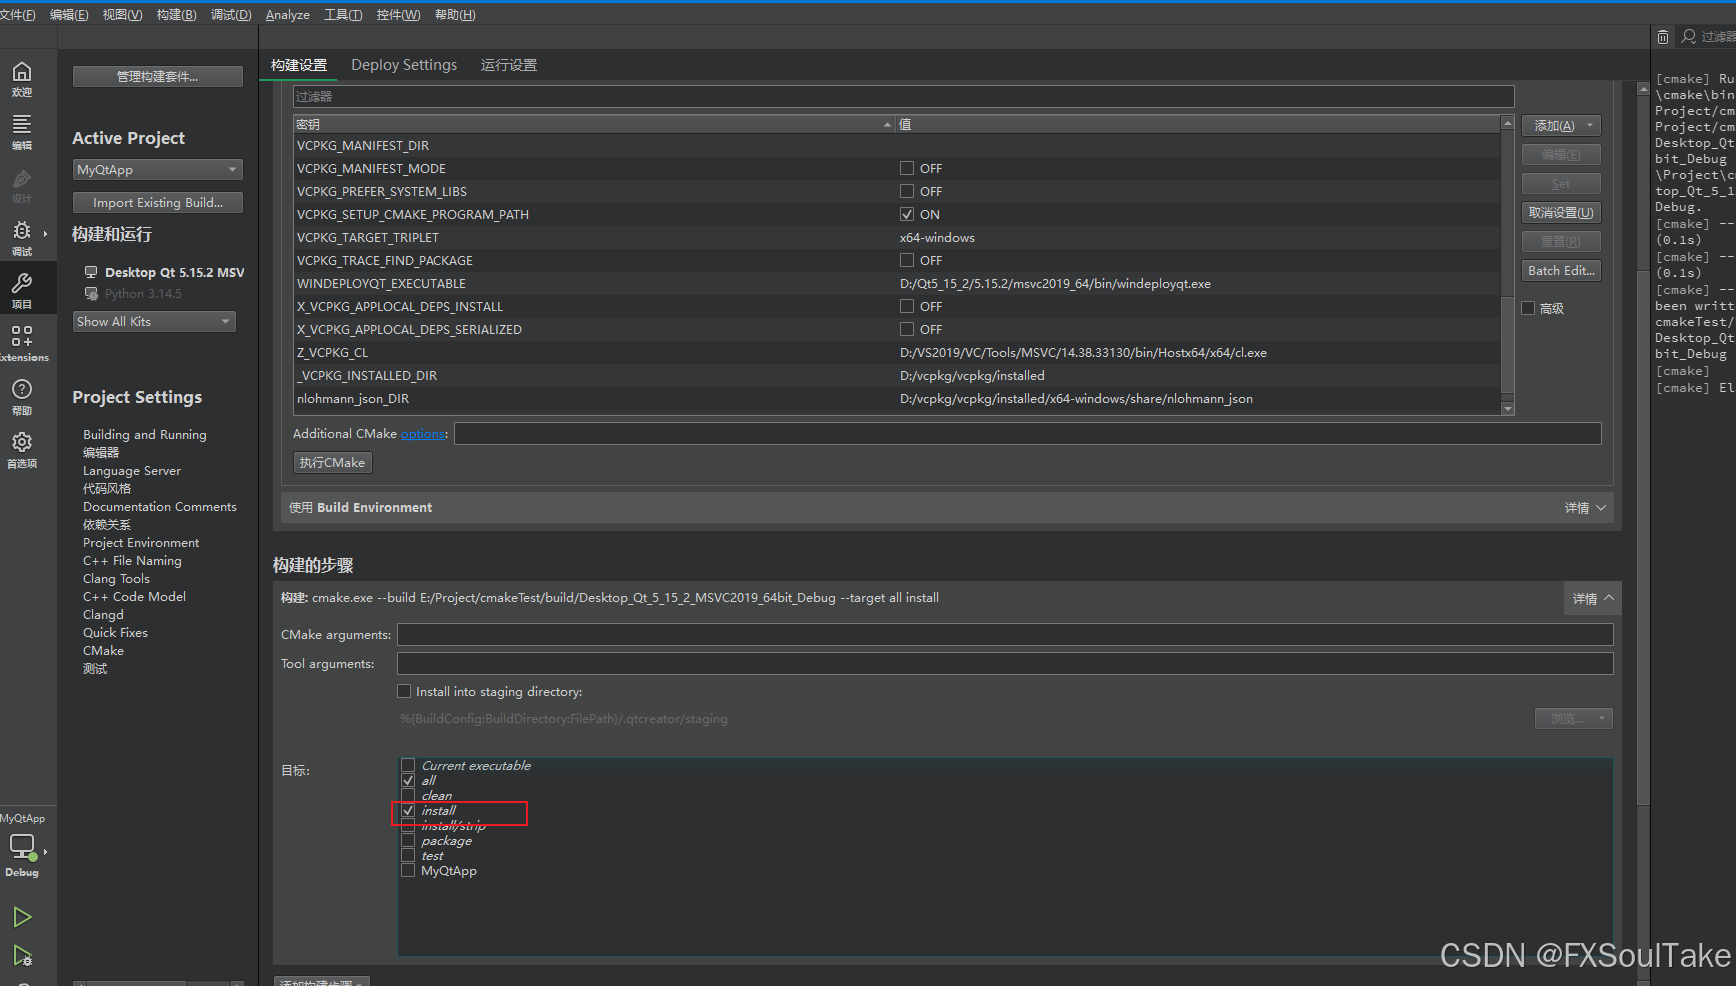
依次"执行CMake""重新构建"
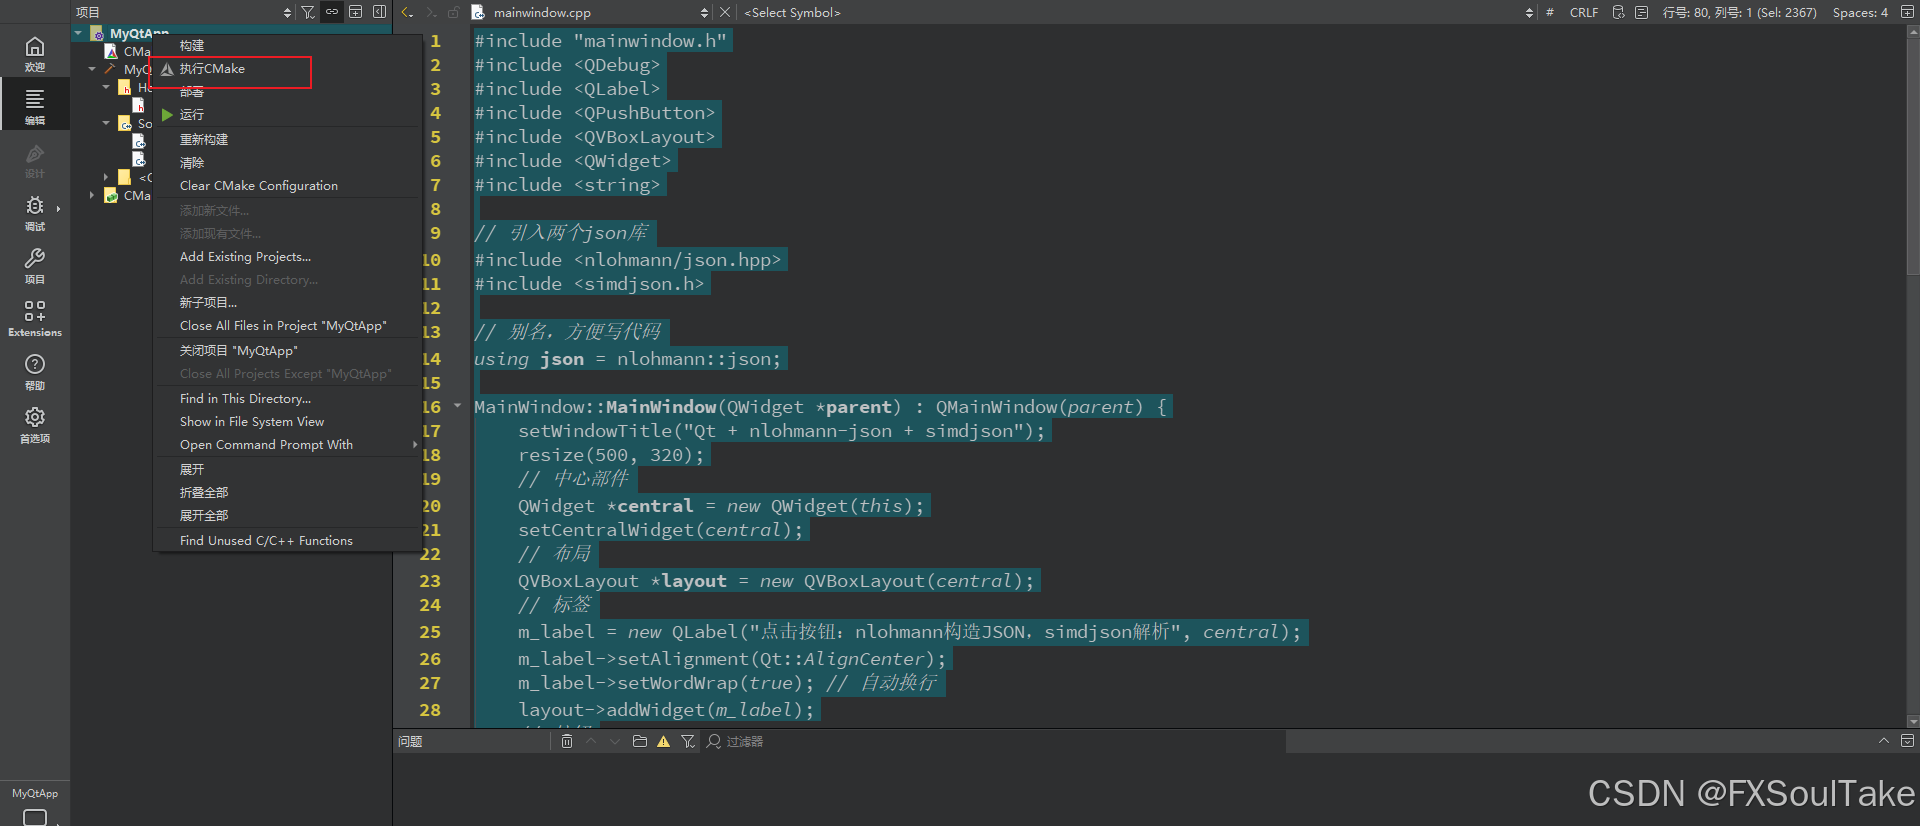
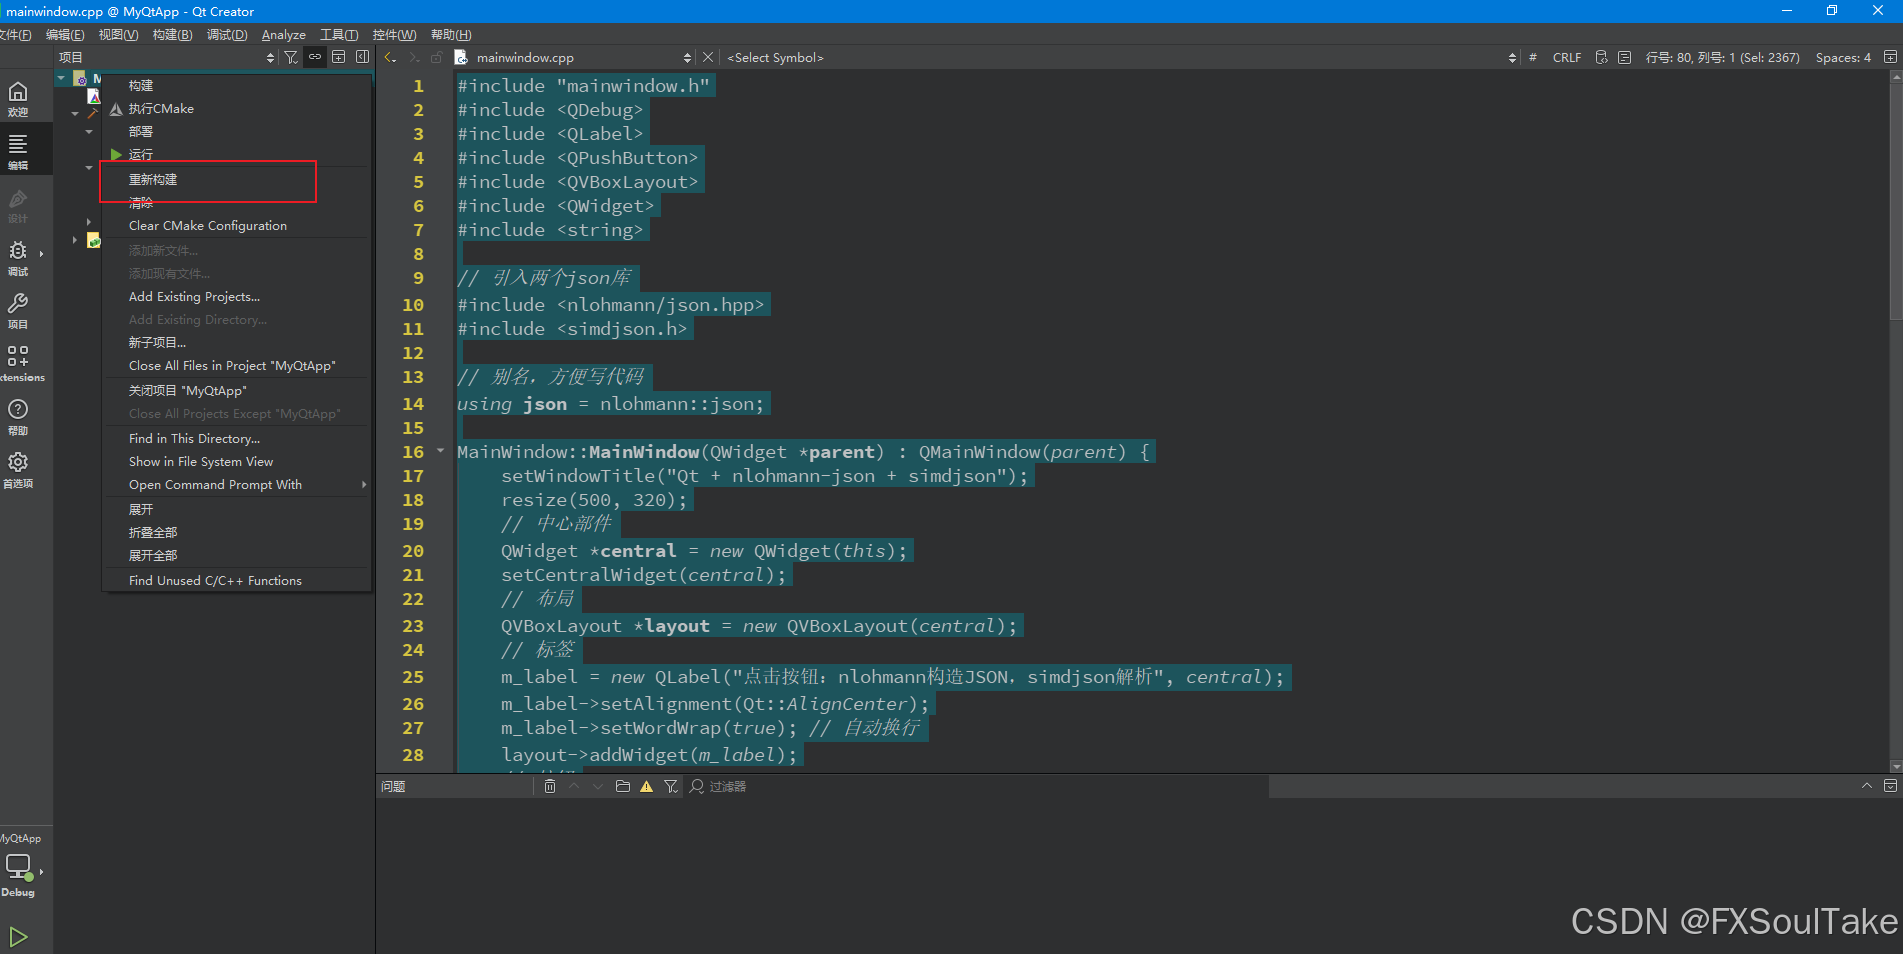
等待编译完成,所有生成文件将会生成在对应install下的bin目录
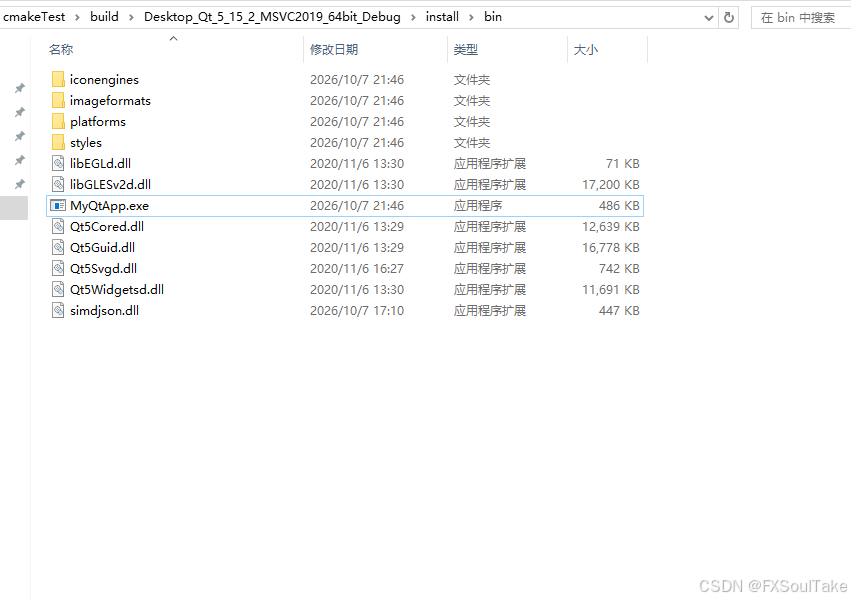
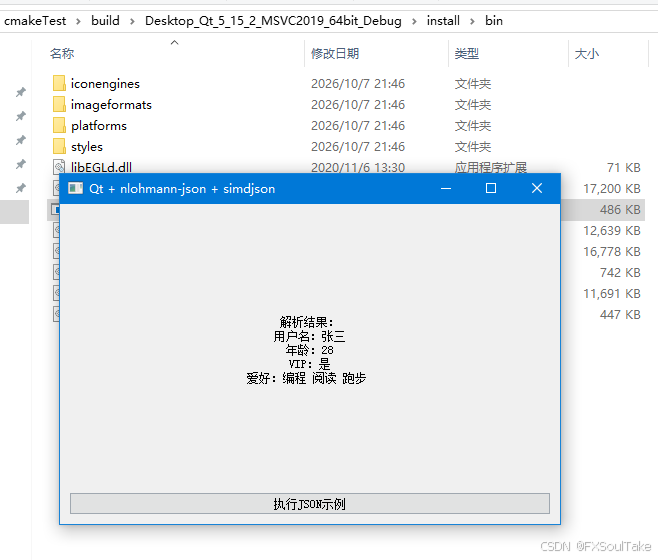
点击对应exe即可运行
5. 总结
CMake + vcpkg 的组合为 Qt 开发带来了显著的效率提升。核心优势在于:vcpkg 自动完成第三方库的下载、编译与安装,CMake 则通过 CMakeLists.txt 统一管理构建配置,两者配合让依赖管理和跨平台编译变得简单可靠。