第一章:本地 Agent 与 Vue 3 流式全栈实战
定位 :第一章(基础全栈实战)
今日目标 :从零跑通本地 Ollama 私有化大模型,攻克 Vercel AI SDK 7.x 的连环陷阱,掌握防范模型"自作主张捏造参数"的防御性设计,搭建 Node 原生 SSE 推流服务,并用 Vue 3 极简组件化实现像 ChatGPT 一样的流式打字与工具交互界面。
涉及技术栈 :Node.js / TypeScript / Ollama (
qwen3.5:4b) / Vercel AI SDK 7.x / Zod / Vue 3 / Vite
目录
- [第一章:本地 Agent 与 Vue 3 流式全栈实战](#第一章:本地 Agent 与 Vue 3 流式全栈实战)
- 目录
- [1. 本章目标与最终效果](#1. 本章目标与最终效果)
- [2. 环境准备与依赖安装](#2. 环境准备与依赖安装)
- [2.1 准备本地模型(Ollama)](#2.1 准备本地模型(Ollama))
- [2.2 安装项目依赖](#2.2 安装项目依赖)
- [3. 从零手写第一个终端 Agent(index.ts)](#3. 从零手写第一个终端 Agent(index.ts))
- [4. AI SDK 7.x 四大破坏性陷阱排查实录](#4. AI SDK 7.x 四大破坏性陷阱排查实录)
- [5. 重点攻坚:Agent 边界防守与防范参数捏造](#5. 重点攻坚:Agent 边界防守与防范参数捏造)
- [5.1 现场复现](#5.1 现场复现)
- [5.2 为什么会这样?](#5.2 为什么会这样?)
- [5.3 规范的 Agent 应该返回什么?](#5.3 规范的 Agent 应该返回什么?)
- [5.4 构筑三层防御体系](#5.4 构筑三层防御体系)
- [6. 终端流式进阶:streamText 与 fullStream 事件监听(stream.ts)](#6. 终端流式进阶:streamText 与 fullStream 事件监听(stream.ts))
- [7. 后端开发:Node 原生 SSE 流式服务(server.ts)](#7. 后端开发:Node 原生 SSE 流式服务(server.ts))
- [8. 前端工程配置与 Vite 代理搭建](#8. 前端工程配置与 Vite 代理搭建)
- [8.1 配置文件:
vite.config.mts](#8.1 配置文件:vite.config.mts) - [8.2 入口页面:
index.html与src/main.ts](#8.2 入口页面:index.html 与 src/main.ts)
- [8.1 配置文件:
- [9. 前端通信层:手写 useStreamChat(深度攻克 Proxy 响应式陷阱)](#9. 前端通信层:手写 useStreamChat(深度攻克 Proxy 响应式陷阱))
- [10. 前端表现层:四大极简组件逐个拆解编写](#10. 前端表现层:四大极简组件逐个拆解编写)
- [10.1 工具状态卡片(
src/components/ToolBadge.vue)](#10.1 工具状态卡片(src/components/ToolBadge.vue)) - [10.2 单条消息气泡(
src/components/ChatMessage.vue)](#10.2 单条消息气泡(src/components/ChatMessage.vue)) - [10.3 输入控制框(
src/components/ChatInput.vue)](#10.3 输入控制框(src/components/ChatInput.vue)) - [10.4 主界面布局与自动平滑滚动(
src/App.vue)](#10.4 主界面布局与自动平滑滚动(src/App.vue))
- [10.1 工具状态卡片(
- [11. 端到端联调运行与验证](#11. 端到端联调运行与验证)
- 总结与第二章预告
1. 本章目标与最终效果
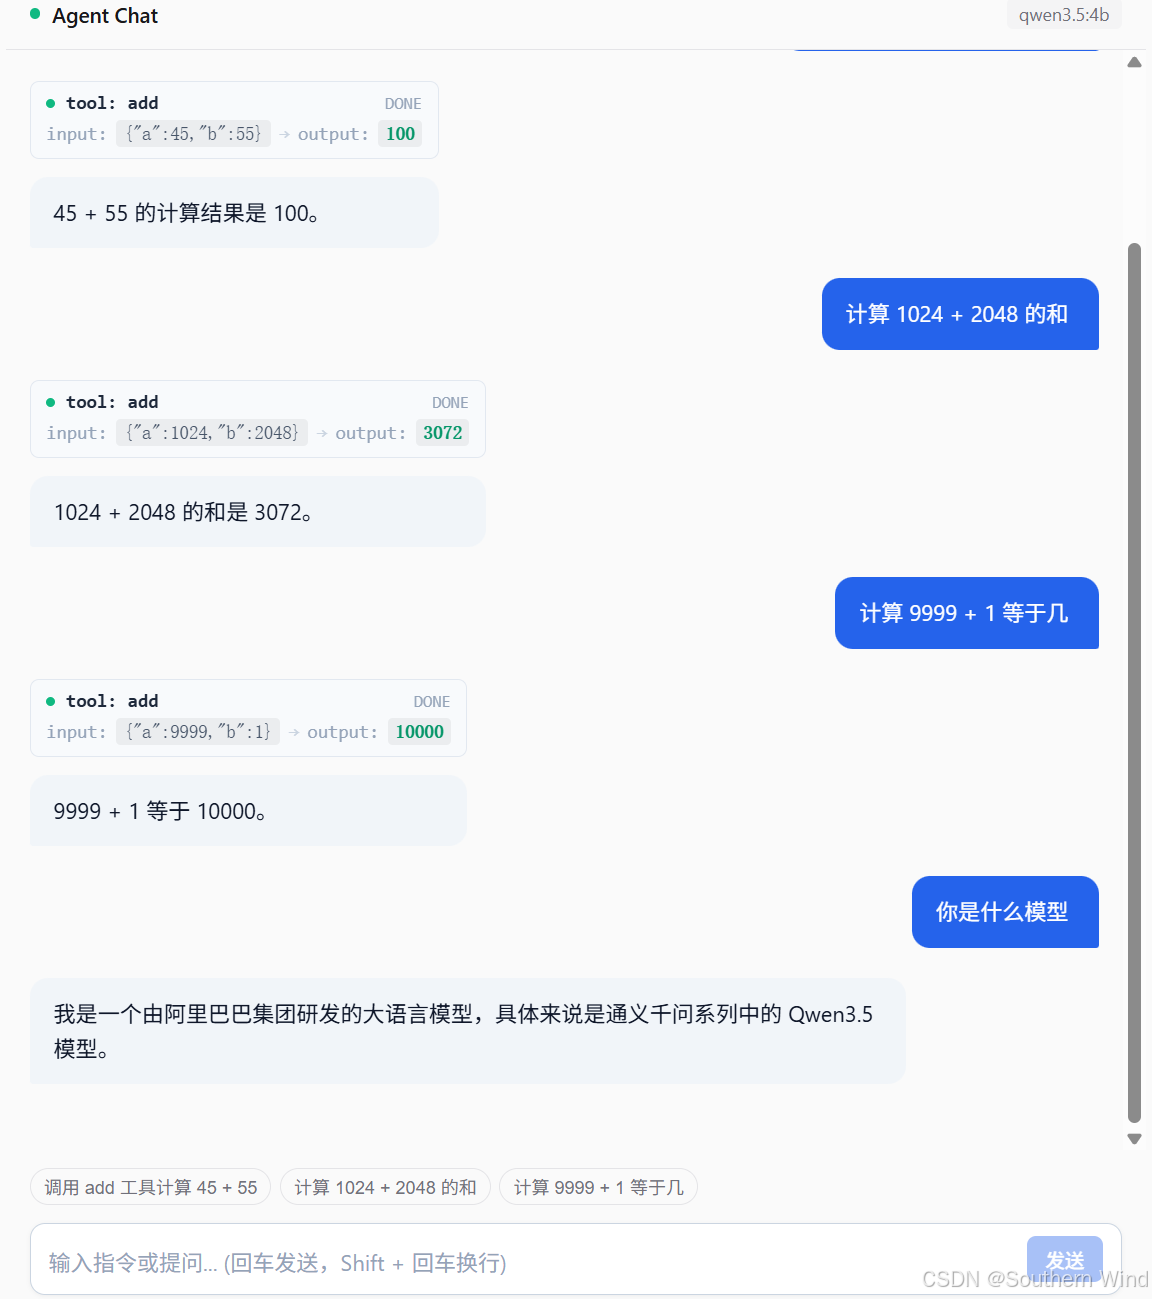
在今天这篇文档中,我们将一起完成一个完整的闭环产品:
- 模型端:完全运行在本地(离线私有、零 API 成本);
- 推理端:能自主决定何时调用计算工具,何时正常闲聊拒答,不瞎编参数;
- 传输端:通过 Server-Sent Events (SSE) 将思考状态、工具调用与文字 Token 逐字推流;
- 前端界面:极简规范的 Vue 3 组件化界面,实时展示工具执行状态微动画与打字机输出。
2. 环境准备与依赖安装
2.1 准备本地模型(Ollama)
确保本地已安装 Ollama,并在终端中拉取轻量且支持工具调用的模型:
bash
ollama run qwen3.5:4b模型拉取成功并测试能对话后,按 Ctrl + D 退出交互即可。
2.2 安装项目依赖
在项目根目录中执行命令安装全栈依赖:
bash
# 核心后端依赖
pnpm add ai @ai-sdk/openai zod

# 前端 Vue 3 与开发构建工具
pnpm add vue
pnpm add -D vite @vitejs/plugin-vue typescript tsx @types/node
各个包的职责说明:
ai:Vercel AI SDK 核心库,负责 Agent 推理循环(Loop)编排与状态流转;@ai-sdk/openai:OpenAI 协议提供商,用来无缝对接 Ollama 的 OpenAI 兼容接口(/v1);zod:负责声明工具入参的 Schema,并做严格的运行时类型推导;tsx:免编译直接运行 TypeScript 脚本;vue&vite:标准的前端工程化单文件组件(SFC)框架与构建工具。
3. 从零手写第一个终端 Agent(index.ts)
在根目录下创建 index.ts,手写一个基础版的 Agent:
typescript
import { createOpenAI } from '@ai-sdk/openai';
import { generateText, tool, stepCountIs } from 'ai';
import { z } from 'zod';

// 1. 初始化客户端,指向本地 Ollama
const ollama = createOpenAI({
  baseURL: 'http://localhost:11434/v1',
  apiKey: 'ollama', // 本地运行填占位符即可
});

async function run() {
  // 2. 发起 Agent 任务
  const response = await generateText({
    model: ollama.chat('qwen3.5:4b'),
    temperature: 0,
    stopWhen: stepCountIs(3), // 允许最多执行 3 步 Agent 循环
    system: '你是一个严格执行计算的助手。拿到工具计算结果后,必须在最终回复中用一句话明确写出答案数值。',
    tools: {
      // 3. 定义加法工具
      add: tool({
        description: '计算两个数字相加',
        inputSchema: z.object({
          a: z.coerce.number().describe('第一个加数'),
          b: z.coerce.number().describe('第二个加数'),
        }),
        execute: async ({ a, b }) => {
          const sum = a + b;
          console.log(`[工具执行成功] ${a} + ${b} = ${sum}`);
          return sum;
        },
      }),
    },
    prompt: '调用 add 工具计算 45 + 55,然后告诉我最终答案是多少。',
  });

  console.log('模型文本输出:', response.text);
  console.log('Agent 计算结果:', response.toolResults[0]?.output);
}

run().catch(console.error);
测试运行:
bash
pnpm exec tsx index.ts4. AI SDK 7.x 四大破坏性陷阱排查实录
在写上述代码时,如果参考了网上旧教程,你会踩到以下 4 个"破坏性更新"大坑:
- 陷阱 1:
parameters改成了inputSchema- 现象 :参数拿到
undefined,输出NaN或"45" + "55" = "4555"。 - 原因 :AI SDK 7.x 只认
inputSchema。写parameters会导致 SDK 给模型发送空参数对象{},模型不知道字段名只能瞎猜。
- 现象 :参数拿到
- 陷阱 2:
maxSteps废弃改用stopWhen- 现象:工具算完了,但模型不生成自然语言总结。
- 原因 :旧版
maxSteps: 3在 7.x 中被静默忽略,默认停机规则是 1 步。模型调用完工具后直接停机。必须显式写stopWhen: stepCountIs(3)。
- 陷阱 3:工具结果读取属性重命名
- 原因 :从
step.toolResults[0].result统一更名为了response.toolResults[0]?.output。
- 原因 :从
- 陷阱 4:连接端点协议
- 原因 :工厂方法
ollama('model')默认去调不兼容的/v1/responses。连接 Ollama 必须显式写ollama.chat('model')。
- 原因 :工厂方法
5. 重点攻坚:Agent 边界防守与防范参数捏造
5.1 现场复现
如果在输入框输入:
text
调用 add 工具我是一个大帅比模型居然会自作主张调用工具:
text
tool: add
input: {"a": 1, "b": 1}
output: 2
模型回复: 1加1等于2。
5.2 为什么会这样?
- 关键词强制激活:端侧小模型对"调用 add 工具"这几个字过敏,强行进入工具调用决策分支;
- 必填约束下的强迫交差(幻觉) :Schema 标记了
required: ['a', 'b']。模型找不到数字,为了强行交差,脑补了通用数字默认值1和1; - 两阶段推理闭环:拿到工具返回的 2,第二轮理直气壮地说"1加1等于2"。
5.3 规范的 Agent 应该返回什么?
绝不应该调用工具! 应该闲聊响应并礼貌引导:
"哈哈,您确实很帅!不过加法计算需要两个具体的数字。如果您想计算,请告诉我具体数字(例如:45 + 55)。"
5.4 构筑三层防御体系
在 System Prompt 中注入负向约束规则,并在工具描述中增加门槛:
typescript
system: `你是一个智能计算助手。
规则:
1. 仅当用户明确提供了需要计算的两个具体数字时,才允许调用 add 工具。
2. 如果用户没有提供具体数字、数字不完整、或者在闲聊/开玩笑(例如"调用 add 工具我是一个大帅比"),严禁臆造或编造虚假数字参数调用工具!
3. 当缺少具体数字或处于闲聊状态时,直接用自然语言友好回答并引导用户提供具体的计算数值。`,
tools: {
  add: tool({
    description: '计算两个数字相加。仅当用户明确给出了两个具体数值时才允许调用。',
    inputSchema: z.object({
      a: z.coerce.number().describe('第一个具体的加数'),
      b: z.coerce.number().describe('第二个具体的加数'),
    }),
    execute: async ({ a, b }) => a + b,
  }),
}
实测优化后效果 :输入同样的问题,工具调用次数为 0,模型幽默回应并耐心给出正确的调用示范。
6. 终端流式进阶:streamText 与 fullStream 事件监听(stream.ts)
为了解决模型思考时几秒钟的黑盒卡顿感,新建 stream.ts 升级为流式输出:
typescript
import { createOpenAI } from '@ai-sdk/openai';
import { streamText, tool, stepCountIs } from 'ai';
import { z } from 'zod';

const ollama = createOpenAI({
  baseURL: 'http://localhost:11434/v1',
  apiKey: 'ollama',
});

async function run() {
  const result = streamText({
    model: ollama.chat('qwen3.5:4b'),
    temperature: 0,
    stopWhen: stepCountIs(3),
    system: `你是一个智能计算助手。
规则:
1. 仅当用户明确提供了需要计算的两个具体数字时,才允许调用 add 工具。
2. 如果用户没有提供具体数字、数字不完整、或者在闲聊/开玩笑,严禁臆造或编造虚假数字参数调用工具!
3. 当缺少具体数字或处于闲聊状态时,直接用自然语言友好回答并引导用户提供具体的计算数值。`,
    tools: {
      add: tool({
        description: '计算两个数字相加。仅当用户明确给出了两个具体数值时才允许调用。',
        inputSchema: z.object({
          a: z.coerce.number().describe('第一个加数'),
          b: z.coerce.number().describe('第二个加数'),
        }),
        execute: async ({ a, b }) => a + b,
      }),
    },
    prompt: '调用 add 工具计算 45 + 55,然后告诉我最终答案是多少。',
  });

  // fullStream 实时按顺序派发事件
  for await (const part of result.fullStream) {
    if (part.type === 'tool-call') {
      console.log(`[工具调用触发] 工具: ${part.toolName}, 参数:`, part.input);
    } else if (part.type === 'tool-result') {
      console.log(`[工具执行完毕] 工具: ${part.toolName}, 结果:`, part.output);
    } else if (part.type === 'text-delta') {
      process.stdout.write(part.text); // 打字机实时吐字
    }
  }
}

run().catch(console.error);
7. 后端开发:Node 原生 SSE 流式服务(server.ts)
新建 server.ts,使用 Node 原生 http 模块对外暴露 POST /api/chat SSE 接口:
typescript
import { createServer } from 'node:http';
import { readFileSync, existsSync } from 'node:fs';
import { resolve } from 'node:path';
import { createOpenAI } from '@ai-sdk/openai';
import { streamText, tool, stepCountIs } from 'ai';
import { z } from 'zod';

const ollama = createOpenAI({
  baseURL: 'http://localhost:11434/v1',
  apiKey: 'ollama',
});

const server = createServer(async (req, res) => {
  // 跨域支持
  res.setHeader('Access-Control-Allow-Origin', '*');
  res.setHeader('Access-Control-Allow-Methods', 'GET, POST, OPTIONS');
  res.setHeader('Access-Control-Allow-Headers', 'Content-Type');

  if (req.method === 'OPTIONS') {
    res.writeHead(204);
    res.end();
    return;
  }

  // 流式对话接口 POST /api/chat
  if (req.url === '/api/chat' && req.method === 'POST') {
    let body = '';
    req.on('data', (chunk) => { body += chunk; });
    req.on('end', async () => {
      try {
        const { prompt } = JSON.parse(body || '{}');

        // 核心:设置 SSE 响应头
        res.writeHead(200, {
          'Content-Type': 'text/event-stream; charset=utf-8',
          'Cache-Control': 'no-cache, no-transform',
          'Connection': 'keep-alive',
        });

        const result = streamText({
          model: ollama.chat('qwen3.5:4b'),
          temperature: 0,
          stopWhen: stepCountIs(3),
          system: `你是一个智能计算助手。
规则:
1. 仅当用户明确提供了需要计算的两个具体数字时,才允许调用 add 工具。
2. 如果用户没有提供具体数字、数字不完整、或者在闲聊/开玩笑,严禁臆造或编造虚假数字参数调用工具!
3. 当缺少具体数字或处于闲聊状态时,直接用自然语言友好回答并引导用户提供具体的计算数值。`,
          tools: {
            add: tool({
              description: '计算两个数字相加。仅当用户明确给出了两个具体数值时才允许调用。',
              inputSchema: z.object({
                a: z.coerce.number().describe('第一个加数'),
                b: z.coerce.number().describe('第二个加数'),
              }),
              execute: async ({ a, b }) => a + b,
            }),
          },
          prompt: prompt || '调用 add 工具计算 45 + 55,然后告诉我最终答案是多少。',
        });

        // 将 fullStream 转化为 SSE 规范的 data: JSON\n\n
        for await (const part of result.fullStream) {
          if (part.type === 'tool-call') {
            res.write(`data: ${JSON.stringify({ type: 'tool-call', name: part.toolName, input: part.input })}\n\n`);
          } else if (part.type === 'tool-result') {
            res.write(`data: ${JSON.stringify({ type: 'tool-result', name: part.toolName, output: part.output })}\n\n`);
          } else if (part.type === 'text-delta') {
            res.write(`data: ${JSON.stringify({ type: 'text-delta', text: part.text })}\n\n`);
          }
        }

        res.write('data: [DONE]\n\n');
        res.end();
      } catch (err: any) {
        res.write(`data: ${JSON.stringify({ type: 'error', error: err.message })}\n\n`);
        res.end();
      }
    });
    return;
  }

  // 静态构建产物托管(支持 dist/)
  const distDir = resolve(__dirname, 'dist');
  if (req.url === '/' && req.method === 'GET') {
    const indexPath = resolve(distDir, 'index.html');
    if (existsSync(indexPath)) {
      res.writeHead(200, { 'Content-Type': 'text/html; charset=utf-8' });
      res.end(readFileSync(indexPath, 'utf-8'));
      return;
    }
  }

  res.writeHead(404);
  res.end('Not Found');
});

const PORT = 3000;
server.listen(PORT, () => {
  console.log(`Server listening on http://localhost:${PORT}`);
});
8. 前端工程配置与 Vite 代理搭建
8.1 配置文件:vite.config.mts
配置前端将 /api 请求代理转发到后端的 3000 端口,解决本地开发跨域:
typescript
import { defineConfig } from 'vite';
import vue from '@vitejs/plugin-vue';

export default defineConfig({
  plugins: [vue()],
  server: {
    port: 5173,
    proxy: {
      '/api': {
        target: 'http://localhost:3000',
        changeOrigin: true,
      },
    },
  },
});
8.2 入口页面:index.html 与 src/main.ts
index.html:
html
<!DOCTYPE html>
<html lang="zh-CN">
  <head>
    <meta charset="UTF-8" />
    <meta name="viewport" content="width=device-width, initial-scale=1.0" />
    <title>Agent Chat</title>
  </head>
  <body>
    <div id="app"></div>
    <script type="module" src="/src/main.ts"></script>
  </body>
</html>src/main.ts:
typescript
import { createApp } from 'vue';
import App from './App.vue';

createApp(App).mount('#app');
9. 前端通信层:手写 useStreamChat(深度攻克 Proxy 响应式陷阱)
新建 src/types/chat.ts 声明强类型:
typescript
export interface ToolCall {
  name: string;
  input: Record<string, any>;
  status: 'running' | 'done';
  output?: any;
}

export interface Message {
  id: string;
  role: 'user' | 'assistant';
  content: string;
  tools?: ToolCall[];
  isStreaming?: boolean;
}
新建 src/composables/useStreamChat.ts,重点攻克两个致命坑:
- Vue 3 响应式丢失 :必须用
reactive<Message>({ ... })创建助手消息,否则修改其content不会触发视图更新; - Windows CRLF 切分 :必须用
buffer.split(/\r?\n/),否则\r会导致切分失败,数据全滞留在缓冲区。
typescript
import { ref, reactive } from 'vue';
import type { Message } from '../types/chat';

export function useStreamChat() {
  const isStreaming = ref(false);
  const messages = ref<Message[]>([
    {
      id: 'init-msg',
      role: 'assistant',
      content: '你好,我是本地 Agent 助手。请直接输入问题,或让我调用工具计算。',
      tools: [],
      isStreaming: false,
    },
  ]);

  let abortController: AbortController | null = null;

  const sendMessage = async (rawPrompt: string) => {
    const prompt = rawPrompt.trim();
    if (!prompt || isStreaming.value) return;

    messages.value.push({
      id: `user-${Date.now()}`,
      role: 'user',
      content: prompt,
      tools: [],
    });

    // 关键:必须用 reactive()
    const assistantMsg = reactive<Message>({
      id: `assistant-${Date.now()}`,
      role: 'assistant',
      content: '',
      tools: [],
      isStreaming: true,
    });
    messages.value.push(assistantMsg);
    isStreaming.value = true;

    abortController = new AbortController();

    try {
      const response = await fetch('/api/chat', {
        method: 'POST',
        headers: { 'Content-Type': 'application/json' },
        body: JSON.stringify({ prompt }),
        signal: abortController.signal,
      });

      if (!response.body) throw new Error('浏览器不支持流式读取');

      const reader = response.body.getReader();
      const decoder = new TextDecoder('utf-8');
      let buffer = '';

      while (true) {
        const { value, done } = await reader.read();
        if (done) break;

        buffer += decoder.decode(value, { stream: true });
        // 正则切分兼容 CRLF 和 LF
        const lines = buffer.split(/\r?\n/);
        buffer = lines.pop() || '';

        for (const line of lines) {
          const trimmed = line.trim();
          if (!trimmed.startsWith('data:')) continue;
          const payload = trimmed.slice(5).trim();
          if (!payload || payload === '[DONE]') continue;

          try {
            const event = JSON.parse(payload);
            if (event.type === 'tool-call') {
              assistantMsg.tools?.push({
                name: event.name,
                input: event.input,
                status: 'running',
              });
            } else if (event.type === 'tool-result') {
              const currentTool = assistantMsg.tools?.find((t) => t.name === event.name);
              if (currentTool) {
                currentTool.status = 'done';
                currentTool.output = event.output;
              }
            } else if (event.type === 'text-delta') {
              assistantMsg.content += event.text; // 触发打字机视图重绘
            }
          } catch {}
        }
      }
    } catch (err: any) {
      if (err.name === 'AbortError') {
        assistantMsg.content += '\n[已中止生成]';
      } else {
        assistantMsg.content += `\n[请求异常]: ${err.message}`;
      }
    } finally {
      assistantMsg.isStreaming = false;
      isStreaming.value = false;
      abortController = null;
    }
  };

  const stopGeneration = () => {
    abortController?.abort();
  };

  return { messages, isStreaming, sendMessage, stopGeneration };
}
10. 前端表现层:四大极简组件逐个拆解编写
10.1 工具状态卡片(src/components/ToolBadge.vue)
负责在气泡上方展示工具名称、入参、呼吸状态指示灯与返回值:
html
<script setup lang="ts">
import type { ToolCall } from '../types/chat';
defineProps<{ tool: ToolCall }>();
</script>

<template>
  <div :class="['tool-badge', tool.status]">
    <div class="tool-header">
      <span class="indicator"></span>
      <span class="tool-name">tool: {{ tool.name }}</span>
      <span class="tool-status">{{ tool.status === 'running' ? 'running' : 'done' }}</span>
    </div>
    <div class="tool-details">
      <span class="param-label">input:</span>
      <code>{{ JSON.stringify(tool.input) }}</code>
      <template v-if="tool.status === 'done'">
        <span class="divider">→</span>
        <span class="param-label">output:</span>
        <code class="output">{{ tool.output }}</code>
      </template>
    </div>
  </div>
</template>

<style scoped>
.tool-badge {
  font-size: 0.78rem;
  font-family: ui-monospace, SFMono-Regular, monospace;
  border-radius: 6px;
  padding: 0.45rem 0.65rem;
  margin-bottom: 0.35rem;
  background: #f8fafc;
  border: 1px solid #e2e8f0;
  color: #475569;
  display: flex;
  flex-direction: column;
  gap: 0.25rem;
}
@media (prefers-color-scheme: dark) {
  .tool-badge { background: #18181b; border-color: #27272a; color: #a1a1aa; }
}
.tool-header { display: flex; align-items: center; gap: 0.45rem; }
.indicator { width: 6px; height: 6px; border-radius: 50%; background: #94a3b8; }
.running .indicator { background: #2563eb; animation: pulse 1.5s infinite; }
.done .indicator { background: #10b981; }
@keyframes pulse { 0%, 100% { opacity: 1; } 50% { opacity: 0.4; } }
.tool-name { font-weight: 600; color: #1e293b; }
@media (prefers-color-scheme: dark) { .tool-name { color: #f4f4f5; } }
.tool-status { margin-left: auto; font-size: 0.7rem; color: #94a3b8; text-transform: uppercase; }
.tool-details { display: flex; align-items: center; gap: 0.35rem; flex-wrap: wrap; }
.param-label { color: #94a3b8; }
code { background: rgba(0, 0, 0, 0.05); padding: 0.1rem 0.3rem; border-radius: 3px; }
@media (prefers-color-scheme: dark) { code { background: rgba(255, 255, 255, 0.08); } }
.output { color: #059669; font-weight: 600; }
@media (prefers-color-scheme: dark) { .output { color: #34d399; } }
.divider { color: #cbd5e1; }
</style>
10.2 单条消息气泡(src/components/ChatMessage.vue)
挂载工具卡片、渲染对话气泡与末尾打字机光标:
html
<script setup lang="ts">
import type { Message } from '../types/chat';
import ToolBadge from './ToolBadge.vue';
defineProps<{ message: Message }>();
</script>

<template>
  <div :class="['message-row', message.role]">
    <div class="message-content">
      <div v-if="message.tools && message.tools.length > 0" class="tool-list">
        <ToolBadge v-for="(tool, index) in message.tools" :key="index" :tool="tool" />
      </div>
      <div v-if="message.content || message.isStreaming" class="bubble">
        {{ message.content }}
        <span v-if="message.isStreaming" class="typing-cursor"></span>
      </div>
    </div>
  </div>
</template>

<style scoped>
.message-row { display: flex; margin-bottom: 1.25rem; }
.message-row.user { justify-content: flex-end; }
.message-row.assistant { justify-content: flex-start; }
.message-content { max-width: 82%; display: flex; flex-direction: column; }
.tool-list { display: flex; flex-direction: column; gap: 0.25rem; margin-bottom: 0.4rem; }
.bubble {
  padding: 0.75rem 1rem;
  border-radius: 12px;
  font-size: 0.92rem;
  line-height: 1.6;
  white-space: pre-wrap;
  word-break: break-word;
}
.user .bubble { background: #2563eb; color: #ffffff; border-bottom-right-radius: 2px; }
.assistant .bubble { background: #f1f5f9; color: #0f172a; border-bottom-left-radius: 2px; }
@media (prefers-color-scheme: dark) {
  .assistant .bubble { background: #1e293b; color: #f1f5f9; border: 1px solid #334155; }
}
.typing-cursor {
  display: inline-block;
  width: 4px;
  height: 14px;
  background: currentColor;
  margin-left: 2px;
  vertical-align: middle;
  animation: blink 0.9s infinite;
}
@keyframes blink { 0%, 100% { opacity: 1; } 50% { opacity: 0.4; } }
</style>
10.3 输入控制框(src/components/ChatInput.vue)
回车发送、Shift+换行,生成中动态切换为红色的"停止"按钮:
html
<script setup lang="ts">
import { ref } from 'vue';

const props = defineProps<{ disabled?: boolean; isStreaming?: boolean }>();
const emit = defineEmits<{ (e: 'send', text: string): void; (e: 'stop'): void }>();

const text = ref('');

const handleSubmit = () => {
  const content = text.value.trim();
  if (!content || props.disabled) return;
  text.value = '';
  emit('send', content);
};

const handleKeydown = (e: KeyboardEvent) => {
  if (e.key === 'Enter' && !e.shiftKey) {
    e.preventDefault();
    handleSubmit();
  }
};
</script>

<template>
  <div class="input-wrapper">
    <textarea
      v-model="text"
      placeholder="输入指令或提问... (回车发送,Shift + 回车换行)"
      :disabled="disabled"
      @keydown="handleKeydown"
      rows="1"
    ></textarea>

    <div class="actions">
      <button
        v-if="!isStreaming"
        class="btn send-btn"
        :disabled="!text.trim() || disabled"
        @click="handleSubmit"
      >
        发送
      </button>
      <button
        v-else
        class="btn stop-btn"
        @click="emit('stop')"
      >
        停止
      </button>
    </div>
  </div>
</template>

<style scoped>
.input-wrapper {
  display: flex;
  align-items: flex-end;
  gap: 0.5rem;
  background: #ffffff;
  border: 1px solid #cbd5e1;
  border-radius: 10px;
  padding: 0.5rem 0.75rem;
  box-shadow: 0 1px 3px rgba(0, 0, 0, 0.05);
}
@media (prefers-color-scheme: dark) {
  .input-wrapper { background: #18181b; border-color: #27272a; box-shadow: 0 1px 3px rgba(0, 0, 0, 0.3); }
}
.input-wrapper:focus-within { border-color: #2563eb; }
textarea {
  flex: 1; border: none; background: transparent; outline: none; resize: none;
  font-family: inherit; font-size: 0.92rem; color: inherit; line-height: 1.5;
  min-height: 24px; max-height: 120px;
}
textarea::placeholder { color: #94a3b8; }
.btn {
  border: none; border-radius: 6px; font-size: 0.82rem; font-weight: 500;
  padding: 0.35rem 0.75rem; cursor: pointer; transition: all 0.15s;
}
.send-btn { background: #2563eb; color: #ffffff; }
.send-btn:hover:not(:disabled) { background: #1d4ed8; }
.send-btn:disabled { opacity: 0.4; cursor: not-allowed; }
.stop-btn { background: #ef4444; color: #ffffff; }
.stop-btn:hover { background: #dc2626; }
</style>
10.4 主界面布局与自动平滑滚动(src/App.vue)
html
<script setup lang="ts">
import { ref, nextTick, watch } from 'vue';
import { useStreamChat } from './composables/useStreamChat';
import ChatMessage from './components/ChatMessage.vue';
import ChatInput from './components/ChatInput.vue';

const { messages, isStreaming, sendMessage, stopGeneration } = useStreamChat();
const chatContainerRef = ref<HTMLDivElement | null>(null);

const scrollToBottom = async () => {
  await nextTick();
  if (chatContainerRef.value) {
    chatContainerRef.value.scrollTop = chatContainerRef.value.scrollHeight;
  }
};

watch(
  () => messages.value.map((m) => m.content + JSON.stringify(m.tools)),
  () => scrollToBottom(),
  { deep: true }
);

const suggestions = [
  '调用 add 工具计算 45 + 55',
  '计算 1024 + 2048 的和',
  '计算 9999 + 1 等于几',
];
</script>

<template>
  <div class="app-layout">
    <header class="app-header">
      <div class="logo">
        <span class="status-pulse"></span>
        <span class="title">Agent Chat</span>
      </div>
      <div class="model-tag">qwen3.5:4b</div>
    </header>

    <main class="message-feed" ref="chatContainerRef">
      <div class="feed-inner">
        <ChatMessage v-for="msg in messages" :key="msg.id" :message="msg" />
      </div>
    </main>

    <footer class="app-footer">
      <div class="footer-inner">
        <div v-if="!isStreaming" class="quick-tags">
          <button v-for="sug in suggestions" :key="sug" class="tag-btn" @click="sendMessage(sug)">
            {{ sug }}
          </button>
        </div>
        <ChatInput
          :disabled="isStreaming"
          :is-streaming="isStreaming"
          @send="sendMessage"
          @stop="stopGeneration"
        />
      </div>
    </footer>
  </div>
</template>

<style>
*, *::before, *::after { box-sizing: border-box; margin: 0; padding: 0; }
body {
  font-family: -apple-system, BlinkMacSystemFont, "Segoe UI", Roboto, sans-serif;
  background-color: #fafafa; color: #18181b; -webkit-font-smoothing: antialiased;
}
@media (prefers-color-scheme: dark) {
  body { background-color: #09090b; color: #f4f4f5; }
}
</style>

<style scoped>
.app-layout { display: flex; flex-direction: column; height: 100vh; max-width: 760px; margin: 0 auto; }
.app-header {
  height: 48px; display: flex; align-items: center; justify-content: space-between;
  padding: 0 1rem; border-bottom: 1px solid #e4e4e7;
}
@media (prefers-color-scheme: dark) { .app-header { border-color: #27272a; } }
.logo { display: flex; align-items: center; gap: 0.5rem; }
.status-pulse { width: 7px; height: 7px; border-radius: 50%; background-color: #10b981; }
.title { font-size: 0.88rem; font-weight: 600; }
.model-tag { font-size: 0.75rem; color: #71717a; background: #f4f4f5; padding: 0.15rem 0.5rem; border-radius: 4px; }
@media (prefers-color-scheme: dark) { .model-tag { background: #18181b; color: #a1a1aa; } }
.message-feed { flex: 1; overflow-y: auto; padding: 1.5rem 1rem; }
.feed-inner { display: flex; flex-direction: column; }
.app-footer { padding: 0.75rem 1rem 1.25rem; }
.footer-inner { display: flex; flex-direction: column; gap: 0.5rem; }
.quick-tags { display: flex; gap: 0.35rem; overflow-x: auto; padding-bottom: 0.25rem; }
.tag-btn {
  background: transparent; border: 1px solid #e4e4e7; color: #71717a; font-size: 0.75rem;
  padding: 0.2rem 0.55rem; border-radius: 9999px; cursor: pointer; white-space: nowrap; transition: all 0.15s;
}
@media (prefers-color-scheme: dark) { .tag-btn { border-color: #27272a; color: #a1a1aa; } }
.tag-btn:hover { border-color: #a1a1aa; color: #18181b; }
@media (prefers-color-scheme: dark) { .tag-btn:hover { color: #f4f4f5; } }
</style>
11. 端到端联调运行与验证
在 package.json 中配置便捷启动脚本:
json
"scripts": {
  "serve": "tsx server.ts",
  "dev": "vite",
  "build": "vite build"
}
避坑提醒 :不要命名为
pnpm server!因为pnpm server是 pnpm 的内置命令行,会被拦截静默退出。请使用pnpm serve。
总结与第二章预告
总结:
- 我们掌握了私有化大模型在本地运行 Agent 的全链路流程;
- 搞懂了 AI SDK 7.x 的版本陷阱,知道了
inputSchema和stopWhen的必要性; - 构筑了防止模型"幻觉编造假参数"的三层防御体系;
- 掌握了现代前端使用原生 Fetch 消费 SSE 数据流,以及避开 Vue 3 Proxy 响应式脱靶的关键技巧。
预告:
在今天的单工具 Agent 基础之上,后面我们将进入进阶实战:
👉 《第二章:多工具协同与复杂任务链》
- 让模型同时掌握"四则运算"、"实时天气查询"、"系统时间感知"三大工具;
- 深度解析模型的多工具路由策略(Tool Selection);
- 实现工具之间的相互串联(例如:"查询现在几点并加上 5 个小时" -> 时间工具先返回,再由计算工具接力计算)。