2026 版
Node.js 开发者转 Python
包含完整 CRUD 实战
这篇文章专门写给有 Node.js、Express、NestJS 开发经验,但刚开始学习 Python FastAPI 的开发者。
核心思路:不从 Python 基础语法开始讲,而是直接拿 Node.js 对比 FastAPI,让你用熟悉的开发思维快速上手。
学完这篇文章,你将能够:
- 理解 FastAPI、Express、NestJS 的关系。
- 使用 Python 创建 HTTP API 服务。
- 掌握 GET、POST、PUT、DELETE 请求。
- 理解 Python 类型注解、Pydantic 数据校验。
- 使用 SQLite 实现真正的数据库 CRUD。
- 学会项目目录组织、异步编程、接口文档和测试。
一、FastAPI 到底是什么?
先看一个概念:
FastAPI 是一个使用 Python 编写的现代 Web API 框架。
如果你以前使用过 Express,那么可以这样理解:
| Node.js 生态 | Python 生态 | 作用 |
|---|---|---|
| Node.js | Python | 运行环境 |
| npm / pnpm | pip / uv | 包管理 |
| Express | FastAPI | Web API 框架 |
| NestJS | FastAPI + 分层架构 | 组织后端业务 |
| TypeScript | Python 类型注解 | 类型声明 |
| Zod / class-validator | Pydantic | 数据校验 |
| Prisma / TypeORM | SQLModel / SQLAlchemy | ORM |
| nodemon | fastapi dev | 开发热重载 |
| Swagger | FastAPI 内置 OpenAPI | API 文档 |
FastAPI 有几个非常实用的特点:
- 代码简洁: 不需要大量配置就可以创建 API。
- 自动参数校验: 请求参数类型不对,框架自动返回错误。
- 自动生成 API 文档: 不需要额外安装 Swagger。
- 支持 async / await: 可以处理异步 I/O 操作。
- 类型提示友好: VS Code、PyCharm 等编辑器可以获得良好的自动补全。
FastAPI 基于 Starlette 和 Pydantic,数据库层不绑定特定 ORM,可以按项目需求选择。
GitHub
+1
二、Express 和 FastAPI 代码对比
先不安装环境,直接看代码。
Node.js + Express
JavaScript
javascript
import express from "express";

const app = express();

app.get("/hello", (req, res) => {
  res.json({
    message: "Hello World"
  });
});

app.listen(3000, () => {
  console.log("Server running");
});
Python + FastAPI
Python
csharp
from fastapi import FastAPIapp = FastAPI()@app.get("/hello")def hello(): return { "message": "Hello World" } 两个框架做的是同一件事:接收 /hello 请求,返回 JSON。
主要区别:
- Express 通过
app.get()注册回调。 - FastAPI 使用
@app.get()装饰器定义路由。 - Express 通过
res.json()返回数据。 - FastAPI 直接
returnPython 字典,框架会自动转换为 JSON。
可以把 @app.get() 理解为 Express 的路由注册语法。
三、搭建 FastAPI 开发环境
这里以 macOS 为例,Windows 和 Linux 的开发流程基本一致。
1. 检查 Python
打开终端:
css
python3 --version建议使用 Python 3.12 或更新的稳定版本。本文代码使用 Python 3.10+ 的类型语法。
2. 安装 uv
如果你熟悉 pnpm,那么建议了解一下 uv。
它是一个 Python 项目与依赖管理工具,可以帮助你创建虚拟环境、安装依赖、锁定版本和运行程序。
macOS 使用 Homebrew 安装:
brew install uv检查:
css
uv --version3. 创建项目
直接复制执行:
csharp
# 创建 Python 项目
uv init fastapi-demo --bare

# 进入项目
cd fastapi-demo

# 安装 FastAPI 和标准开发依赖
uv add "fastapi[standard]"

# 检查环境
uv run python --version
这和 Node.js 中的以下操作非常相似:
bash
mkdir express-demo
cd express-demo

npm init -y
npm install express
官方也推荐使用 uv 创建项目、管理依赖和运行 FastAPI。
GitHub
+1
4. 认识目录
csharp
fastapi-demo/
├── .venv/           # Python 虚拟环境
├── .python-version   # Python 版本(如有)
├── pyproject.toml    # 类似 package.json
├── uv.lock           # 类似 pnpm-lock.yaml
└── main.py           # 程序入口(下一步创建)
其中:
pyproject.toml:项目名称、依赖、配置。uv.lock:记录锁定的依赖版本。.venv:项目隔离的 Python 环境。main.py:FastAPI 入口文件。
可以把 .venv 理解为 Node 开发时的项目依赖隔离环境,不过它不等同于 node_modules。
四、创建第一个 FastAPI 服务
在项目根目录创建 main.py:
csharp
from fastapi import FastAPIapp = FastAPI( title="我的第一个 FastAPI 项目", description="Node.js 开发者学习 FastAPI", version="1.0.0")@app.get("/")def index(): return { "code": 200, "message": "FastAPI 启动成功", "data": { "framework": "FastAPI", "language": "Python" } }运行:
arduino
uv run fastapi dev main.py终端将启动开发服务器,通常访问地址为 http://127.0.0.1:8000。
打开浏览器:
arduino
http://127.0.0.1:8000返回:
css
{
  "code": 200,
  "message": "FastAPI 启动成功",
  "data": {
    "framework": "FastAPI",
    "language": "Python"
  }
}
FastAPI 最方便的功能:自动生成 API 文档
Swagger UI 接口文档
自动生成
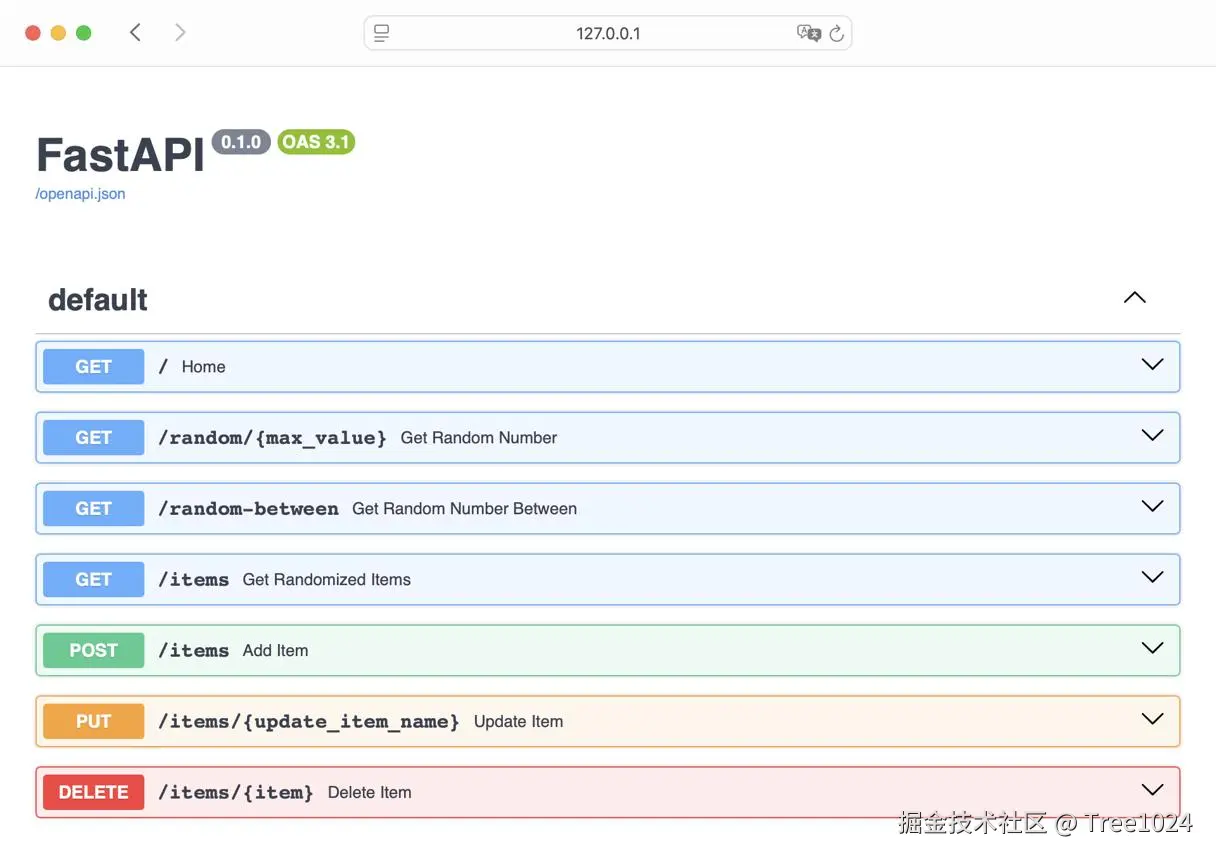
FastAPI 的 Swagger UI 文档界面示意
复制地址
启动后可以访问三个地址:
| 地址 | 用途 |
|---|---|
/docs |
Swagger UI,支持在线调试 |
/redoc |
ReDoc API 文档 |
/openapi.json |
OpenAPI 接口描述 |
这一点对于开发前后端分离项目很方便。
五、学习 FastAPI 路由
对于写过 Express 的开发者,路由几乎没有学习成本。
1. GET 请求
Express:
javascript
app.get("/users", (req, res) => {
  res.json(["张三", "李四"]);
});
FastAPI:
kotlin
@app.get("/users")def get_users(): return ["张三", "李四"]2. POST 请求
FastAPI 推荐使用 Pydantic 模型定义请求体:
python
from pydantic import BaseModelclass UserCreate(BaseModel): name: str age: int@app.post("/users")def create_user(user: UserCreate): return { "message": "创建成功", "user": user }前端请求:
php
await fetch("http://127.0.0.1:8000/users", {
  method: "POST",
  headers: {
    "Content-Type": "application/json"
  },
  body: JSON.stringify({
    name: "张三",
    age: 25
  })
});
你可以把:
python
class UserCreate(BaseModel): name: str age: int理解为 TypeScript 的接口类型声明加上运行时的 Zod 数据校验。
当传入:
json
{
  "name": "张三",
  "age": "abc"
}
FastAPI 会检测到 age 不能解析为整数,并返回 HTTP 422 校验错误。
这意味着很多以前在 Express 中需要手动编写的参数校验逻辑,可以直接交给 Pydantic。
3. 路径参数
Express:
ini
app.get("/users/:id", (req, res) => {
  const id = Number(req.params.id);
  res.json({ id });
});
FastAPI:
python
@app.get("/users/{id}")def get_user(id: int): return {"id": id}访问:
bash
GET /users/100返回:
json
{"id": 100}id: int 表示该参数必须能够解析成整数。
4. Query 查询参数
Express:
ini
app.get("/search", (req, res) => {
  const keyword = req.query.keyword;
  res.json({ keyword });
});
FastAPI:
kotlin
@app.get("/search")def search(keyword: str = ""): return { "keyword": keyword }访问:
ini
GET /search?keyword=python返回:
json
{"keyword": "python"}5. PUT 和 DELETE
python
@app.put("/users/{id}")def update_user(id: int, user: UserCreate): return { "id": id, "user": user }@app.delete("/users/{id}")def delete_user(id: int): return { "message": f"用户 {id} 已删除" }到这里你已经掌握 FastAPI 最基本的路由开发。
六、Python 语法:Node.js 开发者只需要先掌握这些
| JavaScript / TypeScript | Python |
|---|---|
const name = "Tom" |
name = "Tom" |
let age = 20 |
age = 20 |
function add(a, b) {} |
def add(a, b): |
console.log("Hello") |
print("Hello") |
true / false |
True / False |
null |
None |
a === b |
a == b |
!value |
not value |
a && b |
a and b |
| `a | |
array.map(...) |
列表推导式或 map() |
try / catch |
try / except |
import x from "x" |
import x / from x import y |
Python 使用缩进组织代码
JavaScript:
javascript
function getName(name) {
  if (name) {
    return name;
  }
  return "Unknown";
}
Python:
kotlin
def get_name(name): if name: return name return "Unknown"Python 没有 {} 包围代码块,而是使用缩进。
建议统一使用四个空格。
Python 类型注解
TypeScript:
typescript
function add(a: number, b: number): number {
  return a + b;
}
Python:
php
def add(a: int, b: int) -> int: return a + b需要注意:Python 的类型注解默认不会像 TypeScript 编译器那样进行强制静态检查。 FastAPI 会根据声明的接口参数类型执行验证和转换,而普通 Python 函数则不会自动验证类型。
Python 类
TypeScript:
typescript
class User {
  constructor(
    public name: string,
    public age: number
  ) {}
}
Python:
python
class User: def __init__(self, name: str, age: int): self.name = name self.age = ageself 类似 JavaScript 类中的 this。
理解这些语法后,阅读大部分 FastAPI 入门代码不会太困难。
七、实战:开发一个真正的用户管理 API
前面只是基本路由。接下来我们做一个可以运行的项目。
实现的功能包括:
- 新增用户
- 查询用户列表
- 查询单个用户
- 修改用户
- 删除用户
- SQLite 数据库存储
- 自动生成接口文档
这相当于一个简化版的 Express + Prisma 用户管理系统。
1. 安装数据库依赖
这里使用 SQLModel。
它结合了 SQLAlchemy 和 Pydantic,既能描述数据库表,也能支持类型校验。FastAPI 官方的 SQL 数据库教程也使用 SQLModel 作为示例。
FastAPI
+1
在刚才的项目目录执行:
csharp
uv add sqlmodelSQLite 是 Python 自带支持的数据库,入门阶段不需要安装 MySQL 或 PostgreSQL。
2. 创建完整项目代码
把 main.py 替换为以下代码。这是一套完整、可运行的 CRUD 示例。
sql
from contextlib import asynccontextmanagerfrom typing import Annotatedfrom fastapi import Depends, FastAPI, HTTPException, Queryfrom pydantic import BaseModel, ConfigDict, Fieldfrom sqlmodel import ( Field as SQLField, Session, SQLModel, create_engine, select,)# ========== 1. 数据库配置 ==========sqlite_url = "sqlite:///./database.db"engine = create_engine( sqlite_url, connect_args={"check_same_thread": False})# ========== 2. 数据库表 ==========class User(SQLModel, table=True): id: int | None = SQLField( default=None, primary_key=True ) name: str age: int email: str本例为了方便入门,把所有逻辑放在一个文件中。数据库的 email 暂时只验证最小长度,并没有做邮箱格式校验或唯一性约束,后面可以进一步完善。
3. 启动项目
执行:
arduino
uv run fastapi dev main.py第一次启动后,项目目录会新增:
csharp
fastapi-demo/
├── .venv/
├── pyproject.toml
├── uv.lock
├── main.py
└── database.db
database.db 就是 SQLite 数据库文件。
4. 测试 CRUD
直接访问:
arduino
http://127.0.0.1:8000/docs也可以使用终端测试。
创建用户
arduino
curl -X POST http://127.0.0.1:8000/users \
  -H "Content-Type: application/json" \
  -d '{
    "name": "张三",
    "age": 25,
    "email": "zhangsan@example.com"
  }'
预期返回:
perl
{
  "id": 1,
  "name": "张三",
  "age": 25,
  "email": "zhangsan@example.com"
}
继续测试:
查询用户列表
arduino
curl http://127.0.0.1:8000/users
查询指定用户
arduino
curl http://127.0.0.1:8000/users/1
修改用户年龄
json
curl -X PATCH http://127.0.0.1:8000/users/1 \
  -H "Content-Type: application/json" \
  -d '{"age": 26}'
删除用户
arduino
curl -X DELETE http://127.0.0.1:8000/users/1
至此,一个真正将数据保存到数据库中的 REST API 已经完成。
5. 理解数据库代码
如果以前用过 Prisma,这段逻辑应该很好理解。
| SQLModel / FastAPI | Prisma / Node.js |
|---|---|
session.add(user) |
prisma.user.create() 的部分操作 |
session.commit() |
提交数据库事务 |
session.refresh(user) |
从数据库刷新对象 |
session.get(User, id) |
prisma.user.findUnique() |
select(User) |
prisma.user.findMany() |
session.delete(user) |
prisma.user.delete() 的部分操作 |
注意,ORM 的接口并不是一一对应。SQLModel 使用显式 Session 管理事务,而 Prisma Client 通常把创建、更新等操作封装成方法调用。
八、理解 Depends:FastAPI 的依赖注入
你可能注意到代码里有:
ini
SessionDep = Annotated[ Session, Depends(get_session)]这是什么?
可以把它理解成:每次请求进入路由时,FastAPI 自动准备一个数据库 Session,路由执行结束后再关闭它。
一次请求中的数据库依赖生命周期
在 Express 中,我们可能手动获取数据库连接并释放:
dart
app.get("/users", async (req, res) => {
  const users = await prisma.user.findMany();
  res.json(users);
});
在 FastAPI 中,常见写法是:
less
@app.get("/users")def get_users(session: SessionDep): return session.exec(select(User)).all()不必在每个路由中重复编写创建和关闭 Session 的代码。
Depends() 不只用于数据库,也可以管理:
- JWT 用户认证
- 登录权限判断
- 配置读取
- 公共参数处理
- 服务对象注入
它在 FastAPI 中非常重要。
九、async / await:和 Node.js 有什么区别?
对于 Node.js 开发者,这也是必须理解的部分。
Node.js 异步代码
csharp
async function getUser() {
  const response = await fetch(
    "https://example.com/api/user"
  );

  return await response.json();
}
FastAPI 异步代码
csharp
import httpx@app.get("/external-user")async def get_external_user(): async with httpx.AsyncClient() as client: response = await client.get( "https://example.com/api/user" ) response.raise_for_status() return response.json()需要先安装:
csharp
uv add httpx这里的 https://example.com/api/user 是演示地址,并不是可用的真实 API。
两者的 async / await 编写体验相似,但运行时机制并不完全相同。
什么时候用 async def?
| 场景 | 建议 |
|---|---|
| 异步 HTTP 请求 | async def |
| 异步数据库驱动 | async def |
| WebSocket | async def |
| 同步 SQLModel Session | 普通 def |
| 同步文件库或同步 SDK | 通常使用普通 def |
| 大量 CPU 密集计算 | 独立进程或任务执行器 |
重要:不是所有 FastAPI 路由都应该写成 async def。
FastAPI 可以把普通同步路由放在线程池执行。对于同步数据库调用,通常使用 def 更合适。
如果在 async def 路由中直接执行长时间的同步阻塞操作,反而可能阻塞事件循环。
十、配置跨域 CORS
你以前使用 Vue、React 调用 Express API 时,应该用过 cors。
Express:
php
import cors from "cors";

app.use(cors({
  origin: ["http://localhost:5173"]
}));
FastAPI:
css
from fastapi.middleware.cors import CORSMiddlewareapp.add_middleware( CORSMiddleware, allow_origins=["http://localhost:5173"], allow_credentials=True, allow_methods=["*"], allow_headers=["*"],)把这段代码放到创建 app 后的位置即可。
这样就允许本地 Vite 前端从 http://localhost:5173 访问 FastAPI。
生产环境应配置实际允许的前端域名,不要随意开放所有来源。
十一、实际开发应该怎样组织目录?
前面我们将路由、数据库、业务代码全部放进 main.py,方便学习,但真正开发时不建议这样组织。
如果你熟悉 NestJS,可以直接采用类似的模块化目录。
推荐的 FastAPI 项目结构
markdown
fastapi-demo/
├── app/
│   ├── __init__.py
│   ├── main.py
│   │
│   ├── api/
│   │   ├── __init__.py
│   │   └── users.py
│   │
│   ├── models/
│   │   ├── __init__.py
│   │   └── user.py
│   │
│   ├── schemas/
│   │   ├── __init__.py
│   │   └── user.py
│   │
│   ├── services/
│   │   ├── __init__.py
│   │   └── user_service.py
│   │
│   ├── repositories/
│   │   ├── __init__.py
│   │   └── user_repository.py
│   │
│   ├── core/
│   │   └── config.py
│   │
│   └── db/
│       └── database.py
│
├── tests/
│   └── test_users.py
│
├── .env
├── .gitignore
├── pyproject.toml
└── uv.lock
对应 NestJS:
| FastAPI | NestJS | 职责 |
|---|---|---|
main.py |
main.ts |
程序入口 |
api/users.py |
users.controller.ts |
路由 |
services/ |
*.service.ts |
业务逻辑 |
repositories/ |
Repository | 数据访问 |
schemas/ |
dto/ |
请求、响应校验 |
models/ |
entities/ |
数据库实体 |
core/config.py |
ConfigModule | 环境配置 |
Depends() |
依赖注入机制 | 注入依赖 |
APIRouter:类似 Express Router
例如 app/api/users.py:
csharp
from fastapi import APIRouterrouter = APIRouter( prefix="/users", tags=["用户管理"])@router.get("/")def get_users(): return [ {"id": 1, "name": "张三"}, {"id": 2, "name": "李四"} ]在 app/main.py 中注册:
javascript
from fastapi import FastAPIfrom app.api.users import router as users_routerapp = FastAPI()app.include_router(users_router)启动:
arduino
uv run fastapi dev app/main.py这样你就把路由模块单独拆分出来了。
更大型的项目可以继续分成 Controller(API 层)、Service(业务层)、Repository(数据访问层)。
不过 FastAPI 没有要求你必须遵守 NestJS 的分层模式,简单项目不必过度设计。
十二、FastAPI 怎么写接口测试?
熟悉 Node.js 的你可能使用过 Jest、Vitest 或 Supertest。
Python 生态里可以使用 pytest,FastAPI 还提供了方便的 TestClient。
先安装:
sql
uv add --dev pytest创建 test_main.py:
csharp
from fastapi import FastAPIfrom fastapi.testclient import TestClientapp = FastAPI()@app.get("/hello")def hello(): return {"message": "Hello"}client = TestClient(app)def test_hello(): response = client.get("/hello") assert response.status_code == 200 assert response.json() == { "message": "Hello" }执行:
arduino
uv run pytest -v这个例子用于学习 HTTP 接口断言。实际项目中应该从应用模块导入 app,并为 CRUD 测试准备独立的测试数据库,避免影响开发数据。
十三、常用命令速查
建议收藏这张表,以后开发时经常会用到。
| Node.js | Python + uv |
|---|---|
npm init -y |
uv init --bare |
npm install express |
uv add "fastapi[standard]" |
npm install axios |
uv add httpx |
npm install -D vitest |
uv add --dev pytest |
npm uninstall axios |
uv remove httpx |
npm install |
uv sync |
npm run dev |
uv run fastapi dev main.py |
npm test |
uv run pytest |
node app.js |
uv run python app.py |
生产环境可以使用:
arduino
uv run fastapi run main.py这是生产运行模式,但真实部署时还需要配置反向代理、HTTPS、进程管理、日志、数据库迁移和健康检查等。
十四、FastAPI、Express、NestJS,究竟怎么选?
| 对比 | Express | NestJS | FastAPI |
|---|---|---|---|
| 语言 | JavaScript / TS | TypeScript | Python |
| 学习成本 | 低 | 中 | 低至中 |
| 项目结构 | 自由 | 规范化 | 自由 |
| 类型校验 | 需要额外方案 | DTO 等方案 | Pydantic |
| Swagger | 通常需要配置 | 需要集成 | 自动生成 |
| AI / ML 生态 | 可以集成 | 可以集成 | Python 生态优势明显 |
| 大型业务系统 | 可以 | 适合 | 可以 |
| 异步 I/O | 支持 | 支持 | 支持 |
对于你这种已经有 Node.js 开发经验的程序员,我建议:
如果是常规企业后台、业务系统和已经成熟的 TypeScript 技术栈,继续使用 NestJS 没问题。
如果要开发 AI Agent、RAG 知识库、Ollama 模型接口、数据处理或者机器学习服务,FastAPI 值得优先学习。
不是 FastAPI 天生比 NestJS 更适合所有后端业务,而是 Python 的 AI 相关工具链非常丰富,可以减少跨语言调用的成本。
十五、实战进阶:FastAPI + Ollama
例如,你希望用 FastAPI 包装一个本地模型接口,让 React、Vue 或其他 Agent 应用统一调用。
假设你的本机已启动 Ollama,并已经下载了一个可用模型,就可以采用下面这种架构:
FastAPI 作为本地 AI 服务的 HTTP 接口层
安装 HTTP 客户端:
csharp
uv add httpx创建 ai_server.py:
python
import httpxfrom fastapi import FastAPI, HTTPExceptionfrom pydantic import BaseModelapp = FastAPI(title="本地 AI 服务")class ChatRequest(BaseModel): message: str model: str@app.post("/chat")async def chat(payload: ChatRequest): try: async with httpx.AsyncClient( timeout=120 ) as client: response = await client.post( "http://127.0.0.1:11434/api/chat", json={ "model": payload.model, "messages": [ { "role": "user", "content": payload.message } ], "stream": False } ) response.raise_for_status()启动:
arduino
uv run fastapi dev ai_server.py调用:
arduino
curl -X POST http://127.0.0.1:8000/chat \
  -H "Content-Type: application/json" \
  -d '{
    "message": "介绍一下 FastAPI",
    "model": "llama3.2"
  }'
这里的 llama3.2 只是示例模型名称,必须先通过 ollama list 确认本机存在对应模型。这个示例采用非流式输出,方便理解;后续可以改成 SSE 流式响应。
实际对外部署时,还需要增加用户认证、模型白名单、超时控制和限流等安全机制。
十六、建议学习路线
如果目标是从 Node.js 转向 FastAPI 开发,可以按下面的顺序学习。
FastAPI 学习进度
0 / 6 已完成
第 1 阶段:Python 基础
变量、函数、类、类型注解、异常、async/await
第 2 阶段:FastAPI 基础
路由、请求参数、Pydantic、HTTP 错误、Swagger
第 3 阶段:数据库
SQLite、PostgreSQL、SQLModel、SQLAlchemy、事务
第 4 阶段:工程化
APIRouter、Depends、环境配置、pytest、Alembic 迁移
第 5 阶段:权限与部署
JWT、用户权限、Docker、Nginx、日志、监控
第 6 阶段:AI 项目实战
FastAPI + Ollama + RAG + Agent + SSE 流式响应
十七、推荐的官方学习资料
- FastAPI 官方文档 --- 路由、依赖注入、中间件、认证与部署。
- uv 官方文档 --- Python 环境和依赖管理。
- Pydantic 官方文档 --- 数据类型与验证。
- SQLModel 官方文档 --- 数据库 ORM。
- FastAPI 官方全栈模板 --- PostgreSQL、Docker、React 等完整工程化参考。
总结
作为 Node.js 开发者,你可以记住下面五句话:
- FastAPI 类似 Express,但更强调 Python 类型注解和自动数据校验。
- Pydantic 可以理解为 Python 中的 DTO + Zod。
- SQLModel 可以理解为 Python 生态中的 ORM 工具之一。
- Depends 是 FastAPI 很重要的依赖注入机制。
- uv 可以作为 Python 项目中类似 pnpm 的依赖和运行管理工具。
你已经具备 HTTP、REST API、数据库、异步编程等后端开发基础,不需要从零重新学习后端设计。主要需要适应 Python 语法、Pydantic、依赖注入以及 Python 的运行和包管理方式。