目录
[一、MyBatis XML 配置文件](#一、MyBatis XML 配置文件)
[1.1 配置连接字符串和 MyBatis](#1.1 配置连接字符串和 MyBatis)
[1.2 添加 Mapper 接口](#1.2 添加 Mapper 接口)
[1.3 XML 的配置](#1.3 XML 的配置)
[1.4 使用技巧](#1.4 使用技巧)
[二、CRUD 具体实现](#二、CRUD 具体实现)
[2.1 增加(Insert)](#2.1 增加(Insert))
[2.2 删除(Delete)](#2.2 删除(Delete))
[2.4 查询(Select)](#2.4 查询(Select))
在 Spring Boot 项目中,MyBatis 有两种常见的开发方式:注解 和 XML。注解适合简单的 SQL,而 XML 更适合编写复杂的动态 SQL。本文将带你从零开始,完整梳理 MyBatis XML 的开发流程,涵盖配置、Mapper 接口编写、XML 映射文件以及增删改查的具体实现。
一、MyBatis XML 配置文件
MyBatis 的开发有两种方式:注解 和 XML。本文重点讲解 XML 方式。
1.1 配置连接字符串和 MyBatis
这一步需要进行两项设置:数据库连接字符串 和 MyBatis 的 XML 文件配置。
方式一:application.properties
spring.datasource.url=jdbc:mysql://127.0.0.1:3306/lottery_system?characterEncoding=utf8&useSSL=false
# 连接数据库的⽤⼾名
spring.datasource.username=root
# 连接数据库的密码
spring.datasource.password=123456

## MyBatis ##
# 配置驼峰⾃动转换
mybatis.configuration.map-underscore-to-camel-case=true
# 配置mybatis xml的⽂件路径,在 resources/mapper 创建所有表的 xml ⽂件
mybatis.mapper-locations=classpath:mapper/*.xml
方式二:application.yml
# 数据库连接配置
spring:
  datasource:
    url: jdbc:mysql://127.0.0.1:3306/mybatis_test?characterEncoding=utf8&useSSL=false
    username: root
    password: root
    driver-class-name: com.mysql.cj.jdbc.Driver

# 配置 mybatis xml 的⽂件路径,在 resources/mapper 创建所有表的 xml ⽂件
mybatis:
  mapper-locations: classpath:mapper/**Mapper.xml
1.2 添加 Mapper 接口
创建一个实体接口并加上@Mapper 接口,声明是数据库的接口
java
@Mapper
public interface BookInfoMapper {
    Integer updateBook(@Param("bookInfo") BookInfo bookInfo);
}
1.3 XML 的配置
给 xml 开头添加配置文件,只需要修改里面 namespace 里面的路径,改为和自己 @Mapper 声明的接口的路径就可以:
XML
<?xml version="1.0" encoding="UTF-8"?>
<!DOCTYPE mapper PUBLIC "-//mybatis.org//DTD Mapper 3.0//EN"
        "http://mybatis.org/dtd/mybatis-3-mapper.dtd">
<mapper namespace="com_yuyuan_book.mapper.BookInfoMapper">

</mapper>
1.4 使用技巧
直接在接口使用 alt + enter 调出 Generate statement
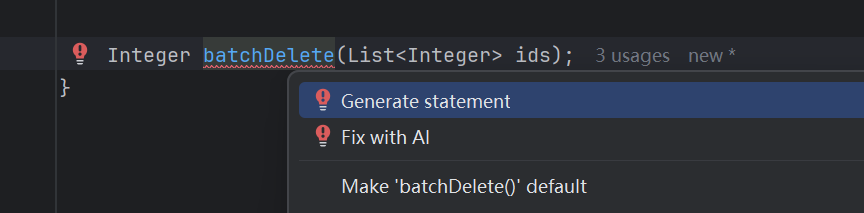
然后点击 Generate statement,会跳出 4 个选项,自己选择自己要写的类型就好,是修改还是查询还是删除还是插入。
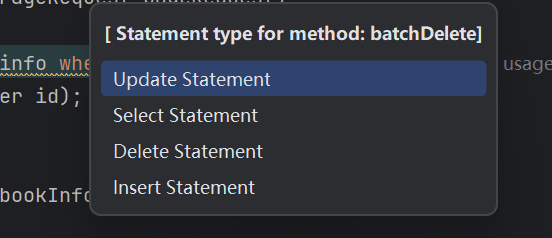
我选择 update Statement ,在对应的 xml 文件里面就会有这一行,就可以写入我们的数据库语句还有我们的动态sql了。
二、CRUD 具体实现
2.1 增加(Insert)
UserInfoMapper 接口:
java
Integer insertUser(UserInfo userInfo);UserInfoMapper.xml实现:
XML
<insert id="insertUser">
        insert into userinfo (username, `password`, age, gender, phone)
        values (#{username}, #{password}, #{age},#{gender},#{phone})
    </insert>
也可以使用 @Param 设置参数名称,是放在 Mapper 接口下的函数的参数那里
XML
Integer insertUser(@Param("userInfo") UserInfo userInfo);返回自增 id
返回定义不变,Mapper.xml实现设置 userGeneratedKeys 和 keyProperty 属性
- useGeneratedKeys="true" :作用:开启获取数据库自增主键
- keyProperty="id":作用:拿到主键赋值给实体类哪个属性。
XML
<insert id="insertUser" useGeneratedKeys="true" keyProperty="id">
    insert into user_info (username, `password`, age, gender, phone) values
    (#{userInfo.username},#{userInfo.password},#{userInfo.age},#
    {userInfo.gender},#{userInfo.phone})
 </insert>
2.2 删除(Delete)
UserInfoMapper 接口:
XML
Integer updateUser(UserInfo userInfo);UserInfoMapper.xml 实现:
XML
<update id="updateUser">
    update user_info set username=#{username} where id=#{id}
</update>
2.4 查询(Select)
使用 XML 的方式查询也存在那三个问题的解决方法:
-
起别名
-
结果映射
-
开启驼峰自动转换
1. 起别名的解决方法
XML
<select id="queryAllUser" resultMap="BaseMap">
    select id, username,`password`, age, gender, phone, delete_flag as deleteFlag,
    create_time as createTime, update_time as updateTime from user_info
</select>
2. 结果映射
Mapper.xml:
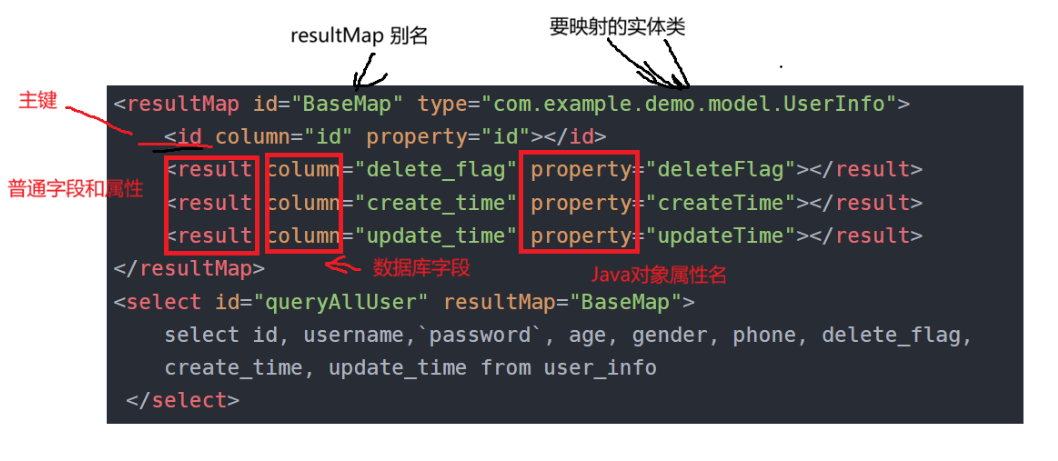
XML
<resultMap id="BaseMap" type="com.example.demo.model.UserInfo">
    <id column="id" property="id"></id>
    <result column="delete_flag" property="deleteFlag"></result>
    <result column="create_time" property="createTime"></result>
    <result column="update_time" property="updateTime"></result>
</resultMap>
<select id="queryAllUser" resultMap="BaseMap">
    select id, username,`password`, age, gender, phone, delete_flag,
    create_time, update_time from user_info
 </select>