简介
boost::fiber是一类用户级线程,也就是纤程。其提供的例子与实际生产环境相距较远,本文将对其进行一定的改造,将其能够投入到生产环境。
同时由于纤程是具有传染性的,使用纤程的代码里也全部要用纤程封装,本文将对一些组件进行简单封装。
fiber封装
boost::fiber支持设置pthread和fiber的比例是1:n还是m:n,同时也支持设置调度方式是随机调度还是抢占调度。
本文中选择使用抢占式调度,并且是m:n的比例,这种选择适用面更加广。
既然pthread和fiber比例是m:n,那么这个m一般等于逻辑核数量,也就是需要设置fiber调度的线程控制在大小为固定的线程池中。fiber中抢占式调度方式也要求固定的线程池数量,外部前程加入时,可能会影响抢占式调度,即不能在外部线程中调用fiber,不然这个线程就加入到了fiber调度的pthread中了。
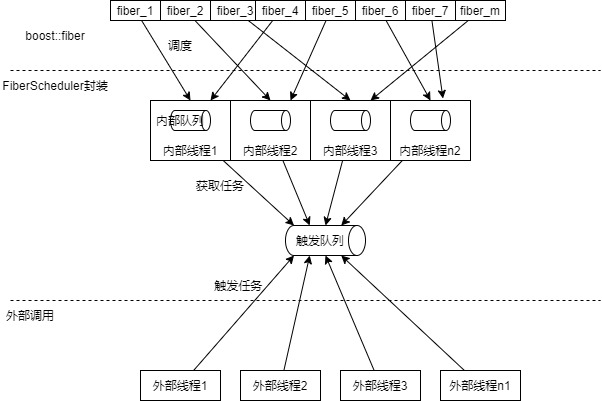
这时,需要一个设置一个队列,外部线程往这个队列中添加任务;内部线程池从队列中取任务,同时触发fiber,在fiber中可以继续触发fiber。触发队列、内部队列、工作线程、外部线程的关系如下图所示:
运行逻辑被装箱到一个任务中,然后被添加到任务队列,这一步利用模板和上转型实现,代码如下:
|---------------------------------------------------------------------------------------------------------|------------------------------------------------------------------------------------------------------------------------------------------------------------------------------------------------------------------------------------------------------------------------------------------------------------------------------------------------------------------------------------------------------------------------------------------------------------------------------------------------------------------------------------------------------------------------------------------------------------------------------------------------------------------------------------------------------------------------------------------------------------------------------------------------------------------------------------------------------------------------------------------|
| 1 2 3 4 5 6 7 8 9 10 11 12 13 14 15 16 17 18 19 20 21 22 23 24 25 26 27 28 29 30 31 32 33 34 35 | class IFiberTask { public: IFiberTask() = default; virtual ~IFiberTask() = default; IFiberTask(const IFiberTask& rhs) = delete; IFiberTask& operator=(const IFiberTask& rhs) = delete; IFiberTask(IFiberTask&& other) = default; IFiberTask& operator=(IFiberTask&& other) = default; virtual void execute() = 0; public: inline static std::atomic_size_t fibers_size {0}; }; template <typename Func> class FiberTask: public IFiberTask { public: explicit FiberTask(Func&& func) :func_{std::move(func)} { } ~FiberTask() override = default; FiberTask(const FiberTask& rhs) = delete; FiberTask& operator=(const FiberTask& rhs) = delete; FiberTask(FiberTask&& other) noexcept = default; FiberTask& operator=(FiberTask&& other) noexcept = default; void execute() override { fibers_size.fetch_add(1); func_(); fibers_size.fetch_sub(1); } private: Func func_; }; |
IFiberTask是任务基类,不可拷贝;FiberTask是模板类,成员变量func_存储算子。使用IFiberTask类指针指向特化后的FiberTask对象,这时就实现的装箱操作,调用execute时,实际调用了子类的execute,触发封装的func_对象。
外部队列基于boost::fibers::buffered_channel实现,这是一个支持并发的队列,队列的元素类型为std::tuple<boost::fibers::launch, std::unique_ptr>,其中tuple第一元素存储任务的触发形式,进入队列还是立即触发。
接着是任务装箱,代码如下:
|------------------------------------------------------------------------------------|----------------------------------------------------------------------------------------------------------------------------------------------------------------------------------------------------------------------------------------------------------------------------------------------------------------------------------------------------------------------------------------------------------------------------------------------------------------------------------------------------------------------------------------------------------------------------------------------------------------------------------------------------------------------------------------------------------------------------------------------------------------------------------------------------------------------------------------------------------------------------------------------------------------------------------------------------------------------------------------------------------------------|
| 1 2 3 4 5 6 7 8 9 10 11 12 13 14 15 16 17 18 19 20 21 22 23 24 25 26 27 28 | template<typename Func, typename... Args> auto Submit(boost::fibers::launch launch_policy, Func&& func, Args&&... args) { // 捕获lambda极其参数 auto capture = [func = std::forward<Func>(func), args = std::make_tuple(std::forward<Args>(args)...)]() mutable { return std::apply(std::move(func), std::move(args)); }; // 任务的返回值类型 using task_result_t = std::invoke_result_t<decltype(capture)>; // 该任务packaged_task的 using packaged_task_t = boost::fibers::packaged_task<task_result_t()>; // 创建任务对象 packaged_task_t task {std::move(capture)}; // 装箱到FiberTask中 using task_t = fiber::FiberTask<packaged_task_t>; // 获取packaged_task的future auto result_future = task.get_future(); // 添加到buffered_channel中 auto status = work_queue_.push( std::make_tuple(launch_policy, std::make_unique<task_t>(std::move(task)))); if (status != boost::fibers::channel_op_status::success) { return std::optional<std::decay_t<decltype(result_future)>> {}; } return std::make_optional(std::move(result_future)); } |
代码中,先捕获lambda表达式及其参数,获取返回值类型并添加到packaged_task中,然后装箱到FiberTask中,使用packaged_task获取future并返回,FiberTask对象添加到队列中,使用IFiberTask的指针指向这个对象,实现装箱操作。
接着是内部任务触发的逻辑,首先创建一个线程池,每个线程注册调度器,接着从队列中获取任务,触发fiber。
工作线程的执行函数如下:
|------------------------------------------|----------------------------------------------------------------------------------------------------------------------------------------------------------------------------------------------------------------------------------------------------------------------------------------------------------------------------------------------------------------------------------------------------------------------------------------------------------------------------------------|
| 1 2 3 4 5 6 7 8 9 10 11 12 13 14 | // 注册调度算法为抢占式调度 boost::fibers::use_scheduling_algorithm<boost::fibers::algo::work_stealing>(threads_size_, true); // 创建task类型 auto task_tuple = typename decltype(work_queue_)::value_type {}; // 从队列中获取任务 while(boost::fibers::channel_op_status::success == work_queue_.pop(task_tuple)) { // 解包 auto& [launch_policy, task_to_run] = task_tuple; // 触发 fiber并detach boost::fibers::fiber(launch_policy, [task = std::move(task_to_run)]() { task->execute(); }).detach(); } |
抢占式调度在注册时需要指定线程池大小,这时不能在外部线程中调用fiber,因为调用fiber的时候会把该线程添加到fiber调度的线程中,也就调整了fiber的worker线程数量。
以上代码实现了fiber触发器、任务队列、工作线程池等逻辑。
理论上可以创建多个fiber调度组件对象,每个组件根据自己的需要设置资源情况。
但实际应用中,还是建议使用一个全局调度组件,因为当A调度器中的任务依赖B调度器的任务的同时,就会出现阻塞工作线程,影响实际性能。
下面封装一个全局调度器,提供递交任务的接口和结束调度的接口:
|------------------------------------------------------------------------------|-------------------------------------------------------------------------------------------------------------------------------------------------------------------------------------------------------------------------------------------------------------------------------------------------------------------------------------------------------------------------------------------------------------------------------------------------------------------------------------------------------------------------------------------------------------------------------------------------------------------------------------------------------------------------------------------------------|
| 1 2 3 4 5 6 7 8 9 10 11 12 13 14 15 16 17 18 19 20 21 22 23 24 25 26 | class DefaultPool { private: static auto* Pool() { const static size_t size = std::thread::hardware_concurrency(); static fiber::FiberPool pool(size, size*8); return &pool; } public: template<typename Func, typename... Args> static auto SubmitJob(boost::fibers::launch launch_policy, Func &&func, Args &&... args) { return Pool()->Submit(launch_policy, std::forward<Func>(func), std::forward<Args>(args)...); } template<typename Func, typename... Args> static auto SubmitJob(Func &&func, Args &&... args) { return Pool()->Submit(std::forward<Func>(func), std::forward<Args>(args)...); } static void Close() { Pool()->CloseQueue(); } private: DefaultPool() = default; }; |
其他组件封装
上面对boost::fiber进行封装,得到一个能投入生产环境的调度器。
但是仅仅是这些是不够的,毕竟对于生产环境中的服务而言,外部服务、中间件的依赖是不能少的。
纤程是具有传染性的,对于外部组件提供的sdk,发送请求并进行同步等待会阻塞纤程对应的工作线程,影响整套机制。
为此,需要对现有的组件进行封装,对于同步接口,需要使用线程池配合fiber::promise;对于异步接口,可以改造成fiber::promise、future机制。下面介绍几种常用组件的fiber封装。
redis客户端封装
同步接口加线程池的方式将同步接口改造成异步接口的方案,存在较大的安全隐患。
线程池的容量不可控,当流量突然增加时,需要大量线程去等待,从而耗尽线程池资源,造成任务大量积压,服务崩溃。
而扩大线程池数量,又消耗了大量的资源。
综上,对于fiber化封装,还是建议采用异步接口。hiredis库支持异步接口,redis_plus_plus库对hiredis进行了c++封装,同时也提供了异步接口,本节将面向这个接口进行改造。
redis提供了挺多的接口,这里只对del、get、set三个接口做个示范:
|------------------------------------------------------------------------------------------------------------------------------------------------------|------------------------------------------------------------------------------------------------------------------------------------------------------------------------------------------------------------------------------------------------------------------------------------------------------------------------------------------------------------------------------------------------------------------------------------------------------------------------------------------------------------------------------------------------------------------------------------------------------------------------------------------------------------------------------------------------------------------------------------------------------------------------------------------------------------------------------------------------------------------------------------------------------------------------------------------------------------------------------------------------------------------------------------------------------------------------------------------------------------------------------------------------------------------------------------------------------------------------------------------------------------------------------------------------------------------------------------------------------------------------------------------------------------|
| 1 2 3 4 5 6 7 8 9 10 11 12 13 14 15 16 17 18 19 20 21 22 23 24 25 26 27 28 29 30 31 32 33 34 35 36 37 38 39 40 41 42 43 44 45 46 47 48 49 50 | template<typename Type> using Promise = boost::fibers::promise<Type>; template<typename Type> using Future = boost::fibers::future<Type>; Future<long long > Del(const StringView &key) { auto promise = std::make_unique<Promise<long long >>(); auto future = promise->get_future(); // 在回调函数中对promise赋值 redis_.del(key, [promise =promise.release()](sw::redis::Future<long long > &&fut) mutable { try { promise->set_value(fut.get()); } catch (...) { promise->set_exception(std::current_exception()); } delete promise; }); return future; } Future<OptionalString> Get(const StringView &key) { auto promise = std::make_unique<Promise<OptionalString>>(); auto future = promise->get_future(); // 在回调函数中对promise赋值 redis_.get(key, [promise = promise.release()](sw::redis::Future<OptionalString> &&fut) mutable { try { promise->set_value(fut.get()); } catch (...) { promise->set_exception(std::current_exception()); } delete promise; }); return future; } Future<bool> Set(const StringView &key, const StringView &val) { auto promise = std::make_unique<Promise<bool>>(); auto future = promise->get_future(); // 在回调函数中对promise赋值 redis_.set(key, val, [promise = promise.release()](sw::redis::Future<bool> &&fut) mutable { try { promise->set_value(fut.get()); } catch (...) { promise->set_exception(std::current_exception()); } delete promise; }); return future; } |
注意,redis_plus_plus对每个回调函数通过模板进行判断,因此无法使用mutable+移动捕获promise,只能使用指针赋值的方式实现。redis_plus_plus在1.3.6以后的版本才有回调函数机制,之前的版本不支持。
上面原理是,创建fiber的promise和future,然后让redis的回调函数中捕获promise,并在promise中对数据进行赋值。而外部使用fiber的future进行等待,并不会阻塞工作线程。
grpc客户端封装
跟上面的redis客户端类似,这里也建议对grpc的异步客户端进行改造,支持fiber的promise、future机制。
grpc的异步客户端需要牵扯到grpc::CompletionQueue,里面实现了一套poll engine,需要绑定一个线程去进行epoll_wait操作。首先定义一个GrpcClient类,包含四个成员变量、两个成员函数,如下所示:
|------------------------------------------------------|-----------------------------------------------------------------------------------------------------------------------------------------------------------------------------------------------------------------------------------------------------------------------------------------------------------------------------------------------------------------------------------------|
| 1 2 3 4 5 6 7 8 9 10 11 12 13 14 15 16 17 18 | class GrpcClient { public: explicit GrpcClient(const ClientOption& option); ~GrpcClient(); // 对外提供的接口 Future<meta::HelloResponse> Call(const meta::HelloRequest& request); private: // worker线程执行的逻辑 void Work(); private: std::unique_ptr<grpc::CompletionQueue> completion_queue_; std::thread worker_; std::shared_ptr<grpc::Channel> channel_; gpr_timespec timespec_{}; }; |
异步客户端分为三个部分逻辑,第一个是请求发送(Call函数),第二个是io线程批量处理,第三个是外部等待Future。
为了能够让io线程里给Promise进行赋值,需要Call函数中将Promise及其相关上下文传递到io线程中,这里定义一个上下文结构体:
|---------------------|---------------------------------------------------------------------------------------------------------------------------------------------------------------------------------------------------------------------------------|
| 1 2 3 4 5 6 | struct CallData { grpc::ClientContext context; // grpc上下文 Promise<meta::HelloResponse> promise; // Promise对象 grpc::Status status; // grpc调用状态 meta::HelloResponse response; // 相应包 }; |
Call函数中的逻辑如下:
|------------------------------------|------------------------------------------------------------------------------------------------------------------------------------------------------------------------------------------------------------------------------------------------------------------------------------------------------------------------------------------------------------------------------------------------------------------------|
| 1 2 3 4 5 6 7 8 9 10 11 12 | // 创建上下文对象 auto data = new CallData; // 设置超时时间 data->context.set_deadline(timespec_); // 创建桩 meta::HelloService::Stub stub(channel_); auto future = data->promise.get_future(); // 异步调用,添加到完成队列中 auto rpc = stub.Asynchello(&data->context, request, completion_queue_.get()); // 绑定response、status,并将上下文对象作为tag传下去 rpc->Finish(&data->response, &data->status, reinterpret_cast<void*>(data)); return future; |
data对象在该函数中创建,在Work函数中释放,不存在内存泄漏问题。
grpc的异步稍微有点麻烦,发送之后,还要绑定数据。
接着是Work线程中的逻辑了:
|------------------------------------------------------------|-----------------------------------------------------------------------------------------------------------------------------------------------------------------------------------------------------------------------------------------------------------------------------------------------------------------------------------------------------------------------------------------------------------------------------|
| 1 2 3 4 5 6 7 8 9 10 11 12 13 14 15 16 17 18 19 20 | CallData* data = nullptr; bool ok = false; // 获取状态完毕的数据 while (completion_queue_->Next((void**)&data, &ok)) { // 判断队列是否已经结束 if (!ok) { break; } // 如果grpc状态ok,则赋值 if (data->status.ok()) { data->promise.set_value(std::move(data->response)); } else { // 否则设置异常 data->promise.set_exception(std::make_exception_ptr( std::runtime_error(data->status.error_message()))); } // 删除数据 delete data; data = nullptr; } |
调用完成队列的Next函数会阻塞,如果队列中存在状态达到最终状态的数据,则返回一条。从完成对于中取到的数据的顺序与入队顺序不同。
上面两个函数组合实现了Future获取和Promise赋值的操作,使得grpc客户端能在fiber中使用。
参考
- fiberpool代码
- 生产环境使用fiber
- grpc异步客户端
- hiredis
- 生产环境使用boost::fiber