#平滑升级
kill -USR2 <PID号>
//查看nginx版本
-
[root@l1 logs]# nginx -v //查看nginx版本 -
nginx version: nginx/1.26.0 -
[root@l1 logs]#
安装一个1.25版本实验一下
-
[root@l2 ~]# cd /opt/ -
[root@l2 opt]#

bash
[root@l2 opt]# ls

nginx-1.25.5.tar.gz nginx-1.26.0.tar.gz rh
进行初始化配置
bash
[root@l2 opt]# systemctl disable --now firewalld.service

Removed symlink /etc/systemd/system/multi-user.target.wants/firewalld.service.

Removed symlink /etc/systemd/system/dbus-org.fedoraproject.FirewallD1.service.

[root@l2 opt]# setenforce 0

[root@l2 opt]# vim /etc/selinux/config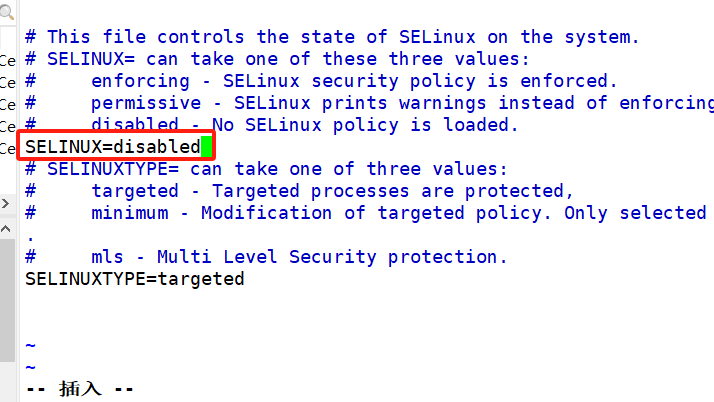
安装软件包
bash
[root@l2 opt]# df

文件系统 1K-块 已用 可用 已用% 挂载点

devtmpfs 1913548 0 1913548 0% /dev

tmpfs 1930628 0 1930628 0% /dev/shm

tmpfs 1930628 12528 1918100 1% /run

tmpfs 1930628 0 1930628 0% /sys/fs/cgroup

/dev/mapper/centos-root 38770180 5714188 33055992 15% /

/dev/sda1 1038336 191100 847236 19% /boot

tmpfs 386128 12 386116 1% /run/user/42

tmpfs 386128 0 386128 0% /run/user/0

[root@l2 opt]# mount /dev/sr0 /mnt

mount: /dev/sr0 写保护,将以只读方式挂载

[root@l2 opt]# yum -y install pcre-devel zlib-devel openssl-devel gcc gcc-c++ make

//安装软件包
创建用户
[root@l2 opt]# useradd -M -s /sbin/nolongin nginx编译安装Nginx
bash
[root@l2 opt]# cd /opt/

[root@l2 opt]# ls

nginx-1.25.5.tar.gz nginx-1.26.0.tar.gz rh

[root@l2 opt]# tar xf nginx-1.25.5.tar.gz //解压

[root@l2 opt]# cd nginx-1.25.5/

[root@l2 nginx-1.25.5]#
bash
./configure \

--prefix=/usr/local/nginx \

--user=nginx \

--group=nginx \

--with-http_stub_status_module
bash
[root@l2 nginx-1.25.5]# ./configure --prefix=/usr/local/nginx --user=nginx --group=nginx --with-http_stub_status_module --with-http_ssl_module

//指定安装路径,指定运行用户,运行组 ,开启模块,htps协议[root@l2 nginx-1.25.5]# make && make install设置软链接,可以直接调用nginx命令来进行管理
bash
[root@l2 nginx-1.25.5]# cd /usr/local/nginx/

[root@l2 nginx]# ls sbin/

nginx

[root@l2 nginx]# ln -s /usr/local/nginx/sbin/nginx /usr/local/sbin/

[root@l2 nginx]#

[root@l2 nginx]# /usr/local/nginx/sbin/nginx //运行

[root@l2 nginx]#


[root@l2 nginx]# cd /usr/lib/systemd/system

[root@l2 system]# vim nginx.service

[root@l2 system]#


[Unit]

Description=nginx

After=network.target


[Service]

Type=forking

PIDFile=/usr/local/nginx/logs/nginx.pid

ExecStart=/usr/local/nginx/sbin/nginx

ExecReload=/bin/kill -s HUP $MAINPID

ExecStop=/bin/kill -s QUIT $MAINPID

PrivateTmp=true


[Install]

WantedBy=multi-user.target


[root@l2 system]# chmod 754 /lib/systemd/system/nginx.service

[root@l2 system]#
启动nginx服务
bash
/usr/local/nginx/sbin/nginx


netstat -lntp | grep 80
查看pid进程号
-
[root@l2 ~]# cat /usr/local/nginx/logs/nginx.pid -
14039 -
[root@l2 ~]#
查看版本
bash
[root@l2 ~]# nginx -v

nginx version: nginx/1.25.5
bash
[root@l2 ~]# netstat -lntp | grep 80

tcp 0 0 0.0.0.0:80 0.0.0.0:* LISTEN 14039/nginx: master

//已在运行
升级
新版本升级:
tar -zxvf nginx-1.xx.xx.tar.gz
cd nginx-1.xx.xx
./configure \
--prefix=/usr/local/nginx \
--user=nginx \
--group=nginx \
--with-http_stub_status_module
--with-http_ssl_module
bash
[root@l2 ~]# cd /opt/

[root@l2 opt]# ls

nginx-1.25.5 nginx-1.25.5.tar.gz nginx-1.26.0.tar.gz rh

[root@l2 opt]# tar xf nginx-1.26.0.tar.gz

[root@l2 opt]#

[root@l2 opt]# ls

nginx-1.25.5 nginx-1.26.0 rh

nginx-1.25.5.tar.gz nginx-1.26.0.tar.gz

[root@l2 opt]# cd nginx-1.26.0/

[root@l2 nginx-1.26.0]#
bash
[root@l2 nginx-1.26.0]# ls

auto CHANGES.ru configure html man src

CHANGES conf contrib LICENSE README

[root@l2 nginx-1.26.0]# ./configure --prefix=/usr/local/nginx --user=nginx --group=nginx --with-http_stub_status_module --with-http_ssl_module

//做配置
bash
[root@l2 nginx-1.26.0]# make -j 2

//进行编译
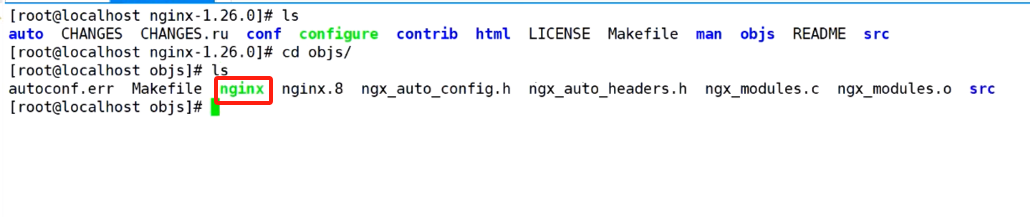
nginx文件做个替换
bash
[root@l2 objs]# cd /usr/local/nginx/sbin/

[root@l2 sbin]# ls

nginx

[root@l2 sbin]# mv nginx nginx_old //做个备份

[root@l2 sbin]#


[root@l2 sbin]# cp /opt/nginx-1.26.0/objs/nginx ./

[root@l2 sbin]# ls

nginx nginx_old

[root@l2 sbin]#


[root@l2 sbin]# cd /opt/nginx-1.26.0/

[root@l2 nginx-1.26.0]# ls

auto CHANGES.ru configure html Makefile objs src

CHANGES conf contrib LICENSE man README

[root@l2 nginx-1.26.0]#
升级
bash
[root@l2 sbin]# cd /opt/nginx-1.26.0/

[root@l2 nginx-1.26.0]# ls

auto CHANGES.ru configure html Makefile objs src

CHANGES conf contrib LICENSE man README


[root@l2 nginx-1.26.0]# make upgrade //升级

/usr/local/nginx/sbin/nginx -t

nginx: the configuration file /usr/local/nginx/conf/nginx.conf syntax is ok

nginx: configuration file /usr/local/nginx/conf/nginx.conf test is successful

kill -USR2 `cat /usr/local/nginx/logs/nginx.pid`

sleep 1

test -f /usr/local/nginx/logs/nginx.pid.oldbin

kill -QUIT `cat /usr/local/nginx/logs/nginx.pid.oldbin`

[root@l2 nginx-1.26.0]#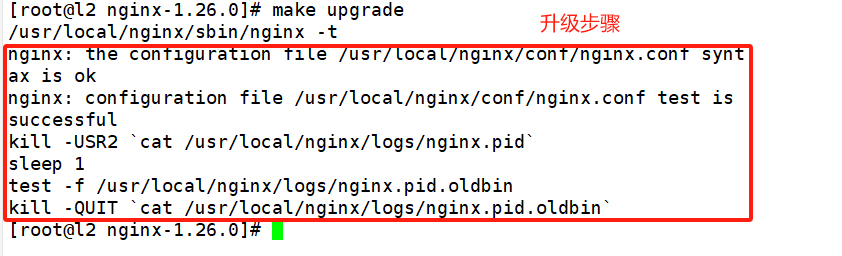
查看版本
bash
[root@l2 nginx-1.26.0]# nginx -v
nginx version: nginx/1.26.0

[root@l2 nginx-1.26.0]#

[root@l2 nginx-1.26.0]# nginx -V

nginx version: nginx/1.26.0

built by gcc 4.8.5 20150623 (Red Hat 4.8.5-44) (GCC)

built with OpenSSL 1.0.2k-fips 26 Jan 2017

TLS SNI support enabled

configure arguments: --prefix=/usr/local/nginx --user=nginx --group=nginx --with-http_stub_status_module --with-http_ssl_module

[root@l2 nginx-1.26.0]#
- 注:
- mv /usr/local/nginx/sbin/nginx /usr/local/nginx/sbin/nginx_old
- cp objs/nginx /usr/local/nginx/sbin/nginx
- make upgrade #要保证当前 nginx 进程是通过 /usr/local/nginx/sbin/nginx 启动的,而不是通过查找环境变量中那个 nginx 命令启动的
- #或者先 killall nginx ,再/usr/local/nginx/sbin/nginx