适用于vue项目的编程规范 -- 在多人开发时统一编程规范至关重要
1、代码检测 --Eslint
Eslint :一个插件化的 javascript 代码检测工具
在 .eslintrc.js 文件中进行配置
javascript
// ESLint 配置文件遵循 commonJS 的导出规则,所导出的对象就是 ESLint 的配置对象

// 但是Eslint的校验规则会使开发者头疼不已  借助代码格式话可以解决这个问题
// pettier官网  :  https://www.prettier.cn/

module.exports = {
  // 表示当前目录即为根目录,ESLint 规则将被限制到该目录下
  root: true,
  // env 表示启用 ESLint 检测的环境
  env: {
    // 在 node 环境下启动 ESLint 检测
    node: true
  },
  // ESLint 中基础配置需要继承的配置
  extends: ['plugin:vue/vue3-essential', '@vue/standard'],
  // 解析器
  parserOptions: {
    parser: '@babel/eslint-parser'
  },
  // 需要修改的启用规则及其各自的错误级别
  /**
   * 错误级别分为三种:
   * "off" 或 0 - 关闭规则
   * "warn" 或 1 - 开启规则,使用警告级别的错误:warn (不会导致程序退出)
   * "error" 或 2 - 开启规则,使用错误级别的错误:error (当被触发的时候,程序会退出)
   */
  rules: {
    'no-console': process.env.NODE_ENV === 'production' ? 'warn' : 'off',
    'no-debugger': process.env.NODE_ENV === 'production' ? 'warn' : 'off',
    'space-before-function-paren': 'off',
    'vue/multi-word-component-names': 'off'
  }
}
存在的问题:代码检测仅仅只做检测,遇到不符合规则的代码其只会报错不能修复;那么,就需要代码格式化工具 --- prettier
2、代码格式化 -- prettier
prettier :一个代码格式化工具;开箱即用;可直接集成到 VSCode 之中;保存代码时自动格式化
在 文件 .prettierrc 中对其进行配置(复制后删除注释)
json
{
  // 不尾随分号
  "semi": false,
  // 使用单引号
  "singleQuote": true,
  // 多行逗号分割的语法中,最后一行不加逗号
  "trailingComma": "none"
}
vscode的配置
设置------》 搜索:save ------》 勾选Format On Save
至此,在保存代码时自动格式化;
代码写完,格式约束完成,那么接下来呢就是代码的提交;
3、代码规范化提交 -- git
commitizen
一个git提交规范化工具
-
全局安装
Commitizenshellnpm install -g commitizen@4.2.4 -
安装并配置
cz-customizable插件-
使用
npm下载cz-customizableshellnpm i cz-customizable@6.3.0 --save-dev安装报错:
npm ERR! code ERESOLVE
npm ERR! ERESOLVE could not resolve
npm ERR!
npm ERR! While resolving: @vue/eslint-config-standard@6.1.0
npm ERR! Found: eslint-plugin-vue@8.7.1
npm ERR! node_modules/eslint-plugin-vue
npm ERR!   dev eslint-plugin-vue@"^8.0.3" from the root project
npm ERR!
npm ERR! node_modules/@vue/eslint-config-standard
npm ERR!   dev @vue/eslint-config-standard@"^6.1.0" from the root project
npm ERR!
npm ERR! Conflicting peer dependency: eslint-plugin-vue@7.20.0
npm ERR! node_modules/eslint-plugin-vue
npm ERR!   peer eslint-plugin-vue@"^7.0.0" from @vue/eslint-config-standard@6.1.0
npm ERR!   node_modules/@vue/eslint-config-standard
npm ERR!     dev @vue/eslint-config-standard@"^6.1.0" from the root project
npm ERR!
npm ERR! Fix the upstream dependency conflict, or retry
npm ERR! this command with --force, or --legacy-peer-deps
npm ERR! to accept an incorrect (and potentially broken) dependency resolution.
解决办法:在指令最后加**--force 或者 --legacy-peer-deps**
shellnpm i cz-customizable@6.3.0 --save-dev --legacy-peer-deps -
添加以下配置到
package.json中json... "config": { "commitizen": { "path": "node_modules/cz-customizable" } }
-
-
项目根目录下创建
.cz-config.js自定义提示文件javascriptmodule.exports = { // 可选类型 types: [ { value: 'feat', name: 'feat: 新功能' }, { value: 'fix', name: 'fix: 修复' }, { value: 'docs', name: 'docs: 文档变更' }, { value: 'style', name: 'style: 代码格式(不影响代码运行的变动)' }, { value: 'refactor', name: 'refactor: 重构(既不是增加feature,也不是修复bug)' }, { value: 'perf', name: 'perf: 性能优化' }, { value: 'test', name: 'test: 增加测试' }, { value: 'chore', name: 'chore: 构建过程或辅助工具的变动' }, { value: 'revert', name: 'revert: 回退' }, { value: 'build', name: 'build: 打包' } ], // 消息步骤 messages: { type: '请选择提交类型:', customScope: '请输入修改范围(可选):', subject: '请简要描述提交(必填):', body: '请输入详细描述(可选):', footer: '请输入要关闭的issue(可选):', confirmCommit: '确认使用以上信息提交?(y/n/e/h)' }, // 跳过问题 skipQuestions: ['body', 'footer'], // subject文字长度默认是72 subjectLimit: 72 } -
使用
git cz代替git commit使用
git cz代替git commit,即可看到提示内容
至此,可以使用git cz 代替 git commit 实现规范化提交,但存在一个问题,必须要通过 git cz 指令才可以完成规范化提交!
如果忘记了使用 git cz 指令,直接就提交了怎么办呢?那么有没有方式来限制这种错误的出现呢?答案是有的!
husky + commitlint
强制规范化的提交要求
使用 husky + commitlint 检查提交描述是否符合规范要求
commitlint
-
安装依赖:
shellnpm install --save-dev @commitlint/config-conventional@12.1.4 @commitlint/cli@12.1.4 or pnpm install --save-dev @commitlint/config-conventional@12.1.4 @commitlint/cli@12.1.4 -
创建
commitlint.config.js文件(终端命令行执行该命令)shellecho "module.exports = {extends: ['@commitlint/config-conventional']}" > commitlint.config.js -
打开
commitlint.config.js, 增加配置项( config-conventional 默认配置点击可查看 ):jsmodule.exports = { // 继承的规则 extends: ['@commitlint/config-conventional'], // 定义规则类型 rules: { // type 类型定义,表示 git 提交的 type 必须在以下类型范围内 'type-enum': [ 2, 'always', [ 'feat', // 新功能 feature 'fix', // 修复 bug 'docs', // 文档注释 'style', // 代码格式(不影响代码运行的变动) 'refactor', // 重构(既不增加新功能,也不是修复bug) 'perf', // 性能优化 'test', // 增加测试 'chore', // 构建过程或辅助工具的变动 'revert', // 回退 'build' // 打包 ] ], // subject 大小写不做校验 'subject-case': [0] } }
注意:确保保存为
UTF-8的编码格式(vscode的右下角切换即可),否则可能会报错
husky
-
安装依赖:
shellnpm install husky@7.0.1 --save-dev or pnpm install husky@7.0.1 --save-dev -
启动
hooks, 生成.husky文件夹 (终端中执行该命令)其会在根目录下生成.husky文件夹shellnpx husky install
-
在
package.json中生成prepare指令( 需要 npm > 7.0 版本 )shellnpm set-script prepare "husky install"如果命令行不生效,直接在packjson.json文件中手敲出来也是可以的

-
执行
prepare指令shellnpm run prepare执行成功提示:

-
添加
commitlint的hook到husky中,并指令在commit-msg的hooks下执行npx --no-install commitlint --edit "$1"指令shellnpx husky add .husky/commit-msg 'npx --no-install commitlint --edit "$1"'
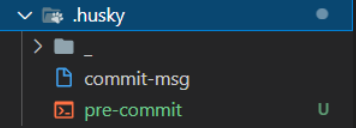
此时.husky文件结构

pre-commit
检测提交时代码规范
执行 npx husky add .husky/pre-commit "npx eslint --ext .js,.vue src"
添加 commit 时的 hook (npx eslint --ext .js,.vue src 会在执行到该 hook 时运行)
这里仅仅只是对提交时的代码做了一些检测,但是其和Eslint一样,只有检测不符合规范代码的作用,却无法修复
其会生成一个文件

lint-staged
提交时自动修复格式错误
需要借助一个插件:lint-staged
lint-staged 无需单独安装,我们生成项目时,vue-cli 已经帮助我们安装过了,所以我们直接使用就可以了
-
修改
package.json配置json"lint-staged": { "src/**/*.{js,vue}": [ "eslint --fix", "git add" ] } -
如上配置,每次它只会在你本地
commit之前,校验你提交的内容是否符合你本地配置的eslint规则(这个见文档 ESLint ),校验会出现两种结果:- 如果符合规则:则会提交成功。
- 如果不符合规则:它会自动执行
eslint --fix尝试帮你自动修复,如果修复成功则会帮你把修复好的代码提交,如果失败,则会提示你错误,让你修好这个错误之后才能允许你提交代码。
-
修改
.husky/pre-commit文件json#!/bin/sh . "$(dirname "$0")/_/husky.sh" npx lint-staged -
再次执行提交代码
-
发现 暂存区中 不符合
ESlint的内容,被自动修复
最终提交代码的命令为:
shell
git add .

git cz

git push
总结
编程格式规范的问题,整个规范大体可以分为两大类:
- 代码格式规范
git提交规范
代码格式规范:
对于 代码格式规范 而言,通过 ESLint + Prettier + VSCode 配置 配合进行了处理。
最终达到了在保存代码时,自动规范化代码格式的目的。
git 提交规范:
对于 git 提交规范 而言使用了 husky 来监测 Git hooks 钩子,并且通过以下插件完成了对应的配置:
- 约定式提交规范
- commitizen:git 提交规范化工具
- commitlint:用于检查提交信息
pre-commit:git hooks钩子- lint-staged:只检查本次修改更新的代码,并在出现错误的时候,自动修复并且推送
监测 Git hooks 钩子,并且通过以下插件完成了对应的配置:
- 约定式提交规范
- commitizen:git 提交规范化工具
- commitlint:用于检查提交信息
pre-commit:git hooks钩子- lint-staged:只检查本次修改更新的代码,并在出现错误的时候,自动修复并且推送