个人介绍
hello hello~ ,这里是 code袁~💖💖 ,欢迎大家点赞🥳🥳关注💥💥收藏🌹🌹🌹
🦁作者简介 :一名喜欢分享和记录学习的在校大学生
💥个人主页 :code袁
💥 个人QQ :2647996100
🐯 个人wechat:code8896
专栏导航
code袁系列专栏导航
1 .毕业设计与课程设计:本专栏分享一些毕业设计的源码以及项目成果。🥰🥰🥰
2. 微信小程序开发:本专栏从基础到入门的一系开发流程,并且分享了自己在开发中遇到的一系列问题。🤹🤹🤹
3. vue开发系列全程线路:本专栏分享自己的vue的学习历程。非常期待和您一起在这个小小的互联网世界里共同探索、学习和成长。💝💝💝 ✨✨ 欢迎订阅本专栏 ✨✨


图(Graph)的概念
图(Graph)是一种非线性数据结构,由节点(Vertex)和边(Edge)组成。节点表示图中的实体,边表示节点之间的关系。图可以是有向图(Directed Graph)或无向图(Undirected Graph)。
- 有向图(Directed Graph):图中的边有方向,即从一个节点到另一个节点的关系是单向的。
- 无向图(Undirected Graph):图中的边没有方向,即两个节点之间的关系是双向的。
图可以用来表示各种关系,如社交网络中的用户之间的关注关系、城市之间的道路连接关系等。
图的表示方式
图可以用不同的方式来表示其结构,常见的表示方式包括邻接矩阵(Adjacency Matrix)和邻接表(Adjacency List)。
1. 邻接矩阵(Adjacency Matrix)
邻接矩阵是使用二维数组来表示图中节点之间的连接关系。矩阵的行和列分别代表图中的节点,矩阵中的值表示节点之间是否有边相连,以及边的权重(如果有的话)。
示例:
    A  B  C
A   0  1  1
B   1  0  1
C   1  1  0
在上面的示例中,节点A与节点B、C相连,节点B与节点A、C相连,节点C与节点A、B相连。
2. 邻接表(Adjacency List)
邻接表是使用链表或数组来表示每个节点的邻居节点。对于每个节点,存储与之相连的所有邻居节点。
示例:
A -> B -> C
B -> A -> C
C -> A -> B
在上面的示例中,节点A的邻居节点是B和C,节点B的邻居节点是A和C,节点C的邻居节点是A和B。
图的遍历代码及应用
图的遍历
图的遍历是指访问图中所有节点和边的过程,常见的图遍历算法包括深度优先搜索(DFS)和广度优先搜索(BFS)。
1. 深度优先搜索(DFS)代码示例
深度优先搜索是一种递归的遍历算法,从起始节点开始,沿着一条路径一直走到底,然后回溯到上一个节点继续探索。
python
def dfs(graph, node, visited):
    if node not in visited:
        print(node)
        visited.add(node)
        for neighbor in graph[node]:
            dfs(graph, neighbor, visited)

# 示例应用:遍历图中所有节点
graph = {
    'A': ['B', 'C'],
    'B': ['A', 'C'],
    'C': ['A', 'B']
}
visited = set()
dfs(graph, 'A', visited)
2. 广度优先搜索(BFS)代码示例
广度优先搜索是一种逐层遍历的算法,从起始节点开始,先访问所有邻居节点,然后再依次访问邻居的邻居。
python
from collections import deque

def bfs(graph, start):
    visited = set()
    queue = deque([start])
    while queue:
        node = queue.popleft()
        if node not in visited:
            print(node)
            visited.add(node)
            for neighbor in graph[node]:
                if neighbor not in visited:
                    queue.append(neighbor)

# 示例应用:遍历图中所有节点
graph = {
    'A': ['B', 'C'],
    'B': ['A', 'C'],
    'C': ['A', 'B']
}
bfs(graph, 'A')
应用
图的遍历应用示例
应用一:社交网络中的关系链查找
在社交网络中,可以使用图的遍历算法来查找两个用户之间的关系链。假设有一个社交网络图,每个节点代表一个用户,边表示用户之间的关系(如好友关系)。我们可以使用深度优先搜索(DFS)或广度优先搜索(BFS)来查找两个用户之间的关系链。
python
def find_relationship(graph, start, end, path=[]):
    path = path + [start]
    if start == end:
        return path
    if start not in graph:
        return None
    for node in graph[start]:
        if node not in path:
            newpath = find_relationship(graph, node, end, path)
            if newpath:
                return newpath
    return None

# 示例应用:查找用户A到用户D的关系链
social_network = {
    'A': ['B', 'C'],
    'B': ['A', 'D'],
    'C': ['A', 'E'],
    'D': ['B', 'F'],
    'E': ['C'],
    'F': ['D']
}

result = find_relationship(social_network, 'A', 'D')
if result:
    print("关系链:", ' -> '.join(result))
else:
    print("未找到关系链")
应用二:地图应用中的最短路径查找
在地图应用中,可以使用图的遍历算法来查找两个地点之间的最短路径。假设有一个地图图,每个节点代表一个地点,边表示地点之间的道路连接关系(带有权重)。我们可以使用Dijkstra算法或广度优先搜索(BFS)来查找两个地点之间的最短路径。
python
from queue import PriorityQueue

def dijkstra(graph, start, end):
    queue = PriorityQueue()
    queue.put((0, start))
    distances = {node: float('infinity') for node in graph}
    distances[start] = 0

    while not queue.empty():
        current_distance, current_node = queue.get()

        if current_node == end:
            return distances[end]

        for neighbor, weight in graph[current_node].items():
            distance = current_distance + weight
            if distance < distances[neighbor]:
                distances[neighbor] = distance
                queue.put((distance, neighbor))

    return float('infinity')

# 示例应用:查找地点A到地点D的最短路径
road_map = {
    'A': {'B': 5, 'C': 3},
    'B': {'A': 5, 'D': 7},
    'C': {'A': 3, 'D': 4},
    'D': {'B': 7, 'C': 4}
}

shortest_distance = dijkstra(road_map, 'A', 'D')
print("最短路径距离:", shortest_distance)
图的算法、示例代码和示意图
创建图的示意图
在计算机科学中,图通常由节点(顶点)和边组成,节点表示实体,边表示节点之间的关系。下面是一个简单的示意图,展示了一个包含5个节点和6条边的无向图:
    A ----- B
    |       |
    |       |
    C ----- D
    |       |
    |       |
    E ----- F
创建图的示例代码
下面是一个使用邻接表表示的无向图的示例代码,包括节点的定义和边的连接:
python
class Graph:
    def __init__(self):
        self.graph = {}

    def add_edge(self, node1, node2):
        if node1 not in self.graph:
            self.graph[node1] = []
        if node2 not in self.graph:
            self.graph[node2] = []
        self.graph[node1].append(node2)
        self.graph[node2].append(node1)

    def print_graph(self):
        for node in self.graph:
            print(node, '->', ' -> '.join(self.graph[node]))

# 创建图并添加边
graph = Graph()
graph.add_edge('A', 'B')
graph.add_edge('A', 'C')
graph.add_edge('B', 'D')
graph.add_edge('C', 'D')
graph.add_edge('C', 'E')
graph.add_edge('D', 'F')
graph.add_edge('E', 'F')

# 打印图的邻接表
graph.print_graph()
图的算法
以下是几种常见图算法的具体代码示例:
1. 深度优先搜索(DFS)算法代码示例
python
def dfs(graph, node, visited):
    if node not in visited:
        print(node)
        visited.add(node)
        for neighbor in graph[node]:
            dfs(graph, neighbor, visited)

# 以邻接表形式表示的图
graph = {
    'A': ['B', 'C'],
    'B': ['A', 'D'],
    'C': ['A', 'E'],
    'D': ['B', 'F'],
    'E': ['C'],
    'F': ['D']
}

visited = set()
dfs(graph, 'A', visited)
2. 广度优先搜索(BFS)算法代码示例
python
from collections import deque

def bfs(graph, start):
    visited = set()
    queue = deque([start])
    visited.add(start)

    while queue:
        node = queue.popleft()
        print(node)
        for neighbor in graph[node]:
            if neighbor not in visited:
                queue.append(neighbor)
                visited.add(neighbor)

# 以邻接表形式表示的图
graph = {
    'A': ['B', 'C'],
    'B': ['A', 'D'],
    'C': ['A', 'E'],
    'D': ['B', 'F'],
    'E': ['C'],
    'F': ['D']
}

bfs(graph, 'A')
3. Dijkstra最短路径算法代码示例
python
import heapq

def dijkstra(graph, start):
    distances = {node: float('infinity') for node in graph}
    distances[start] = 0
    queue = [(0, start)]

    while queue:
        current_distance, current_node = heapq.heappop(queue)

        if current_distance > distances[current_node]:
            continue

        for neighbor, weight in graph[current_node].items():
            distance = current_distance + weight
            if distance < distances[neighbor]:
                distances[neighbor] = distance
                heapq.heappush(queue, (distance, neighbor))

    return distances

# 以邻接表形式表示的带权重图
graph = {
    'A': {'B': 5, 'C': 3},
    'B': {'A': 5, 'D': 7},
    'C': {'A': 3, 'D': 4},
    'D': {'B': 7, 'C': 4}
}

shortest_distances = dijkstra(graph, 'A')
print(shortest_distances)
拓扑排序算法代码示例
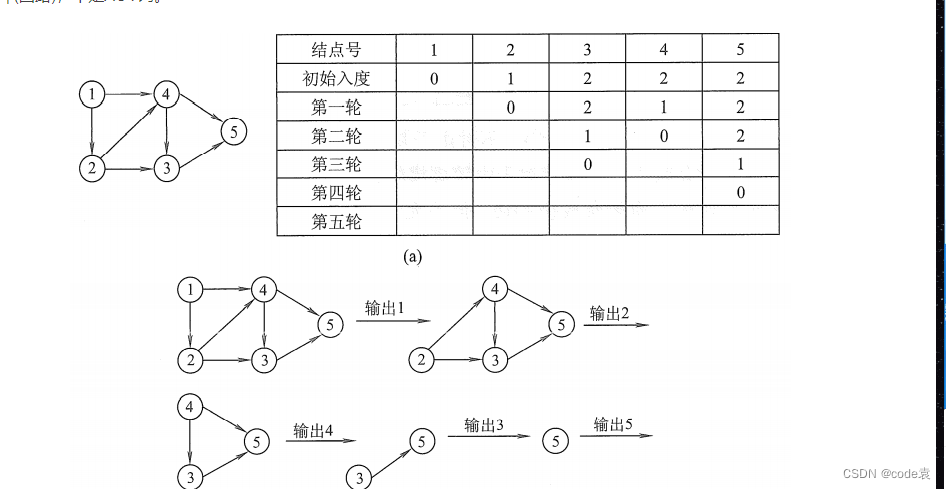
拓扑排序是对有向无环图(DAG)中节点的一种线性排序,使得对于图中的每一条有向边 (u, v),节点 u 在排序中都出现在节点 v 的前面。下面是拓扑排序的算法代码示例:

python
from collections import defaultdict

def topological_sort(graph):
    in_degree = defaultdict(int)
    for node in graph:
        for neighbor in graph[node]:
            in_degree[neighbor] += 1

    queue = [node for node in graph if in_degree[node] == 0]
    result = []

    while queue:
        node = queue.pop(0)
        result.append(node)
        for neighbor in graph[node]:
            in_degree[neighbor] -= 1
            if in_degree[neighbor] == 0:
                queue.append(neighbor)

    if len(result) == len(graph):
        return result
    else:
        return []

# 以邻接表形式表示的有向图
graph = {
    'A': ['B', 'C'],
    'B': ['D'],
    'C': ['D', 'E'],
    'D': ['F'],
    'E': ['F'],
    'F': []
}

sorted_nodes = topological_sort(graph)
if sorted_nodes:
    print("拓扑排序结果:", sorted_nodes)
else:
    print("图中存在环,无法进行拓扑排序。")
关键路径是指在一个项目的网络计划中,所有活动中耗时最长的路径,决定了整个项目的最短完成时间。关键路径方法是项目管理中用来确定项目中关键任务和关键路径的一种技术。
下面是关键路径方法的关键步骤和代码示例:
关键路径方法步骤:
-
确定活动及其持续时间:列出项目中所有的活动,并确定每个活动的持续时间。
-
绘制网络计划图:根据活动之间的依赖关系绘制网络计划图,通常使用箭头表示活动,节点表示事件。
-
计算最早开始时间(ES)和最迟开始时间(LS):从起始节点开始,计算每个活动的最早开始时间和最迟开始时间。
-
计算最早完成时间(EF)和最迟完成时间(LF):根据最早开始时间和持续时间计算每个活动的最早完成时间和最迟完成时间。
-
计算活动的总浮动时间:总浮动时间等于最迟开始时间减去最早开始时间,表示活动可以延迟的时间。
-
确定关键路径:关键路径是指总浮动时间为零的路径,即不能延迟的路径。

关键路径方法代码示例:
python
def critical_path(graph, durations):
    # 计算最早开始时间(ES)和最晚开始时间(LS)
    def calculate_early_late_times(node):
        if node in early_start_times:
            return

        early_start_times[node] = max([calculate_early_late_times(parent) + durations[(parent, node)] for parent in graph[node]], default=0)
        late_start_times[node] = early_start_times[node]

    # 计算最早完成时间(EF)和最晚完成时间(LF)
    def calculate_early_late_finish_times(node):
        if node in early_finish_times:
            return

        early_finish_times[node] = early_start_times[node] + durations[(node, node)]
        late_finish_times[node] = late_start_times[node]

    early_start_times = {}
    late_start_times = {}
    early_finish_times = {}
    late_finish_times = {}

    for node in graph:
        calculate_early_late_times(node)

    for node in reversed(list(graph.keys())):
        calculate_early_late_finish_times(node)

    critical_path = [node for node in graph if early_start_times[node] == late_start_times[node]]
    return critical_path

# 以邻接表形式表示的有向图和活动持续时间
graph = {
    'A': ['B', 'C'],
    'B': ['D'],
    'C': ['D', 'E'],
    'D': ['F'],
    'E': ['F'],
    'F': []
}

durations = {
    ('A', 'B'): 3,
    ('A', 'C'): 2,
    ('B', 'D'): 4,
    ('C', 'D'): 5,
    ('C', 'E'): 2,
    ('D', 'F'): 6,
    ('E', 'F'): 3
}

critical_path = critical_path(graph, durations)
print("关键路径:", critical_path)
🎉写在最后
🍻伙伴们,如果你已经看到了这里,觉得这篇文章有帮助到你的话不妨点赞👍或 Star ✨支持一下哦!手动码字,如有错误,欢迎加粗样式在评论区指正💬~
你的支持就是我更新的最大动力💪~

