note
- 多模态大模型训练前,图片数据处理的常见操作:分辨率调整、网格畸变、水平翻转、分辨率调整、随机crop、换颜色、多张图片拼接、相似图片检测并去重等
文章目录
一、分辨率调整
python
from PIL import Image
def resize_image(original_image_path, save_image_path, reduction_percentage):
    # 打开图片文件
    img = Image.open(original_image_path)

    # 获取原始图片的尺寸
    original_width, original_height = img.size

    # 计算新的尺寸,根据减少的百分比
    new_width = int(original_width * (1 - reduction_percentage / 100.0))
    new_height = int(original_height * (1 - reduction_percentage / 100.0))

    # 使用LANCZOS滤镜来保持图片质量
    img_resized = img.resize((new_width, new_height), Image.LANCZOS)

    # 如果图像有透明通道,转换为RGB模式
    if img_resized.mode == 'RGBA':
        img_resized = img_resized.convert('RGB')

    # 保存缩小后的图片
    img_resized.save(save_image_path)

# 示例:
# 降低90%的分辨率
resize_image(one_image_path, resize_save_path, 90)
二、适当裁剪图片
python
# 从中心裁剪图片(高分辨率)
from PIL import Image
def crop_image_by_percentage(crop_percentage, input_path, output_path):
    # 打开图片文件
    img = Image.open(input_path)

    # 获取图片的原始尺寸
    original_width, original_height = img.size

    # 计算裁剪区域的宽度和高度,即原始尺寸的(100-crop_percentage)%
    crop_width = int(original_width * (1 - crop_percentage / 100))
    crop_height = int(original_height * (1 - crop_percentage / 100))

    # 计算裁剪区域的起始坐标
    left = (original_width - crop_width) / 2
    top = (original_height - crop_height) / 2
    right = left + crop_width
    bottom = top + crop_height

    # 确保裁剪区域不超出图片边界
    left = max(0, left)
    top = max(0, top)
    right = min(original_width, right)
    bottom = min(original_height, bottom)

    # 裁剪图片
    cropped_img = img.crop((left, top, right, bottom))
    # 如果图像有透明通道,转换为RGB模式
    if cropped_img.mode == 'RGBA':
        cropped_img = cropped_img.convert('RGB')

    # 保存裁剪后的图片
    cropped_img.save(output_path)

    # 可以选择显示图片,如果需要的话
    # cropped_img.show()

# 裁剪掉40%
crop_image_by_percentage(40, resize_save_path, crop_save_path)
三、网格畸变、水平翻转、平移缩放、旋转
python
# 数据增强: 网格畸变、水平翻转、分辨率调整、随机crop、换颜色
import cv2
import albumentations as A
import matplotlib.pyplot as plt

# 读取图片
# image_path = "path/to/your/image.jpg"
image_path = "G9_7097.jpg"
image = cv2.imread(image_path)
image = cv2.cvtColor(image, cv2.COLOR_BGR2RGB)  # 转换为RGB

# 定义数据增强管道
transform = A.Compose([
    A.HorizontalFlip(p=1),            # 水平翻转
    # A.VerticalFlip(p=0.5),              # 垂直翻转
    # A.RandomRotate90(p=0.5),            # 随机旋转90度
    # A.Transpose(p=0.5),                 # 交换行列(会旋转90度)
    # A.ShiftScaleRotate(shift_limit=0.0625, scale_limit=0.1, rotate_limit=10, p=1),  # 平移、缩放、旋转
    A.OpticalDistortion(distort_limit=0.05, shift_limit=0.05, p=0.5),  # 光学畸变(颜色可能会改变)
    # A.GridDistortion(p=0.5),            # 网格畸变
    # A.ElasticTransform(alpha=1, sigma=50, alpha_affine=50, p=0.5)  # 弹性变换(会有拉伸效果)
])

# 应用数据增强
augmented = transform(image=image)
augmented_image = augmented['image']
# 转换回BGR格式以便保存
augmented_image = cv2.cvtColor(augmented_image, cv2.COLOR_RGB2BGR)
# 保存处理后的图片
save_path = = "save_G9_7097.jpg"
cv2.imwrite(save_path, augmented_image)

# 显示原图和增强后的图片
fig, ax = plt.subplots(1, 2, figsize=(12, 6))
ax[0].imshow(image)
ax[0].set_title('Original Image')
ax[0].axis('off')
ax[1].imshow(augmented_image)
ax[1].set_title('Augmented Image')
ax[1].axis('off')
save_path = "G9_7097_diff.jpg"
plt.savefig(save_path)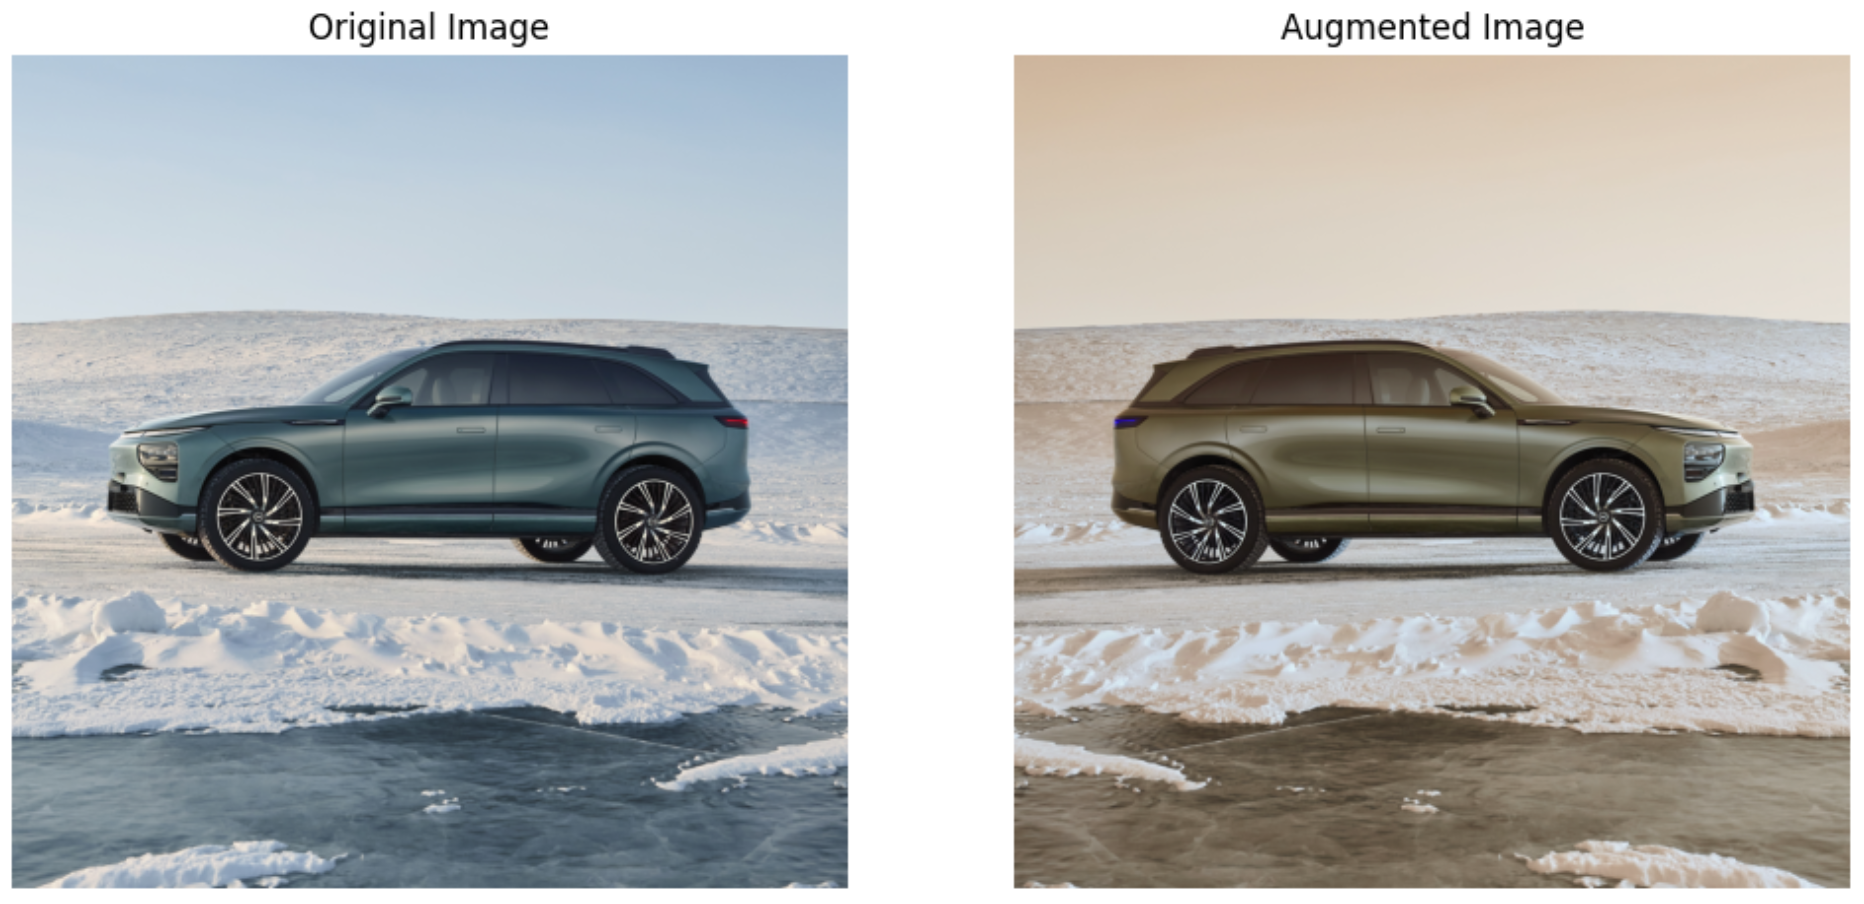
plt.show()我这里只是水平翻转,如果需要用其他的旋转等操作,可以修改albumentations.Compose里的参数。这里的水平翻转后的结果如下图:
如果只需要翻转:
python
def fanzhuan_func(image_path, save_path):
    import cv2
    import albumentations as A
    import matplotlib.pyplot as plt
    # 读取图片
    # image_path = "/Users/guomiansheng/Desktop/LLM/ChatGLM2-6B/a_data/a_xiaopeng/pic2nl/two_car/G9_7097.jpg"
    image = cv2.imread(image_path)
    image = cv2.cvtColor(image, cv2.COLOR_BGR2RGB)  # 转换为RGB
    # 定义数据增强管道
    transform = A.Compose([
        A.HorizontalFlip(p=1)  # 只进行水平翻转
    ])
    # 应用数据增强
    augmented = transform(image=image)
    augmented_image = augmented['image']
    # 转换回BGR格式以便保存或显示
    augmented_image_bgr = cv2.cvtColor(augmented_image, cv2.COLOR_RGB2BGR)
    # 保存处理后的图片
    cv2.imwrite(save_path, augmented_image_bgr)
四、改变图片的背景颜色
在上面的基础上修改transform即可:
python
# 自定义变换函数,改变背景颜色并使图像变淡
class LightenBackground(A.ImageOnlyTransform):
    def __init__(self, color=(255, 255, 255), alpha=0.5, always_apply=False, p=1.0):
        super().__init__(always_apply, p)
        self.color = color
        self.alpha = alpha

    def apply(self, img, **params):
        # 创建与图像相同大小的纯色图像
        background = np.full_like(img, self.color, dtype=np.uint8)
        # 混合图像和背景颜色
        return cv2.addWeighted(img, 1 - self.alpha, background, self.alpha, 0)

# 读取图片
image = cv2.imread(image_path)
image = cv2.cvtColor(image, cv2.COLOR_BGR2RGB)  # 转换为RGB

# 定义数据增强管道,包括自定义的背景颜色变换
transform = A.Compose([
    LightenBackground(color=(255, 255, 0), alpha=0.1, p=1),  # 淡黄色背景,透明度为0.1
])
关于颜色的相关设定:
python
1. 白色:
LightenBackground(color=(255, 255, 255), alpha=0.3, p=1)

2. 黑色:
LightenBackground(color=(0, 0, 0), alpha=0.3, p=1)

3. 红色:
LightenBackground(color=(255, 0, 0), alpha=0.3, p=1)

4. 绿色:
LightenBackground(color=(0, 255, 0), alpha=0.3, p=1)

5. 蓝色:
LightenBackground(color=(0, 0, 255), alpha=0.3, p=1)

6. 黄色:
LightenBackground(color=(255, 255, 0), alpha=0.3, p=1)

7. 青色:
LightenBackground(color=(0, 255, 255), alpha=0.3, p=1)

8. 品红色:
LightenBackground(color=(255, 0, 255), alpha=0.3, p=1)

9. 灰色:
LightenBackground(color=(128, 128, 128), alpha=0.3, p=1)

10. 橙色:
LightenBackground(color=(255, 165, 0), alpha=0.3, p=1)
五、图片相似度检测
ORB(Oriented FAST and Rotated BRIEF) 是一种计算机视觉中常用的特征检测算法,它将 FAST 关键点检测和 BRIEF 描述符生成结合起来,同时引入了方向性和尺度不变性。使用 ORB 进行特征检测可以有以下几个应用:
- 目标识别:在多幅图像中检测相同的ORB 特征点,并通过这些点的匹配确定目标物体的位置和方向
- 图像匹配:在两幅图像中检测 ORB 特征点,并通过这些点的匹配来确定它们之间的相似度,可以用于图像拼接、图像比较等任务
- 三维重建:在多幅图像中检测 ORB 特征点,并根据这些点的位置和方向计算出相机位姿,可以用于三维重建和增强现实等应用。
- 目标跟踪: 在视频中检测 ORB 特征点,并通过这些点的跟踪来确定目标的运动轨迹和速度。
python
import cv2

def compute_orb_similarity(imageA_path, imageB_path):
    # 读取图片
    imageA = cv2.imread(imageA_path)
    imageB = cv2.imread(imageB_path)

    # 初始化ORB检测器
    orb = cv2.ORB_create()

    # 寻找关键点和描述符
    keypointsA, descriptorsA = orb.detectAndCompute(imageA, None)
    keypointsB, descriptorsB = orb.detectAndCompute(imageB, None)

    # 初始化BFMatcher
    bf = cv2.BFMatcher(cv2.NORM_HAMMING, crossCheck=True)

    # 匹配描述符
    matches = bf.match(descriptorsA, descriptorsB)

    # 按照距离排序
    matches = sorted(matches, key=lambda x: x.distance)

    # 计算匹配关键点数量
    num_matches = len(matches)

    # 计算平均距离
    if num_matches > 0:
        avg_distance = sum(match.distance for match in matches) / num_matches
    else:
        avg_distance = float('inf')

    # 计算匹配的比例
    ratio_matches = num_matches / max(len(keypointsA), len(keypointsB))

    return num_matches, avg_distance, ratio_matches

# 示例使用
imageA_path = "奇瑞汽车_瑞虎8_SUV_蓝色_前方_苏LA006S_右前_32a.jpg"
imageB_path = "奇瑞汽车_瑞虎8_SUV_银色_前方_湘FCG315_左前_35a.jpg"
# imageB_path = "雷克萨斯_未知_SUV_白色_右边_鄂AS600T_右前_815.png"
# imageB_path = "奥迪_未知_轿车_白色_前方_未知_左后_1.jpg"
num_matches, avg_distance, ratio_matches = compute_orb_similarity(imageA_path, imageB_path)

# 评估: 匹配的关键点数量和匹配比例越高,平均距离越低,表示图片之间的相似度越高。
# 三个指标:计算匹配关键点数量、平均距离和匹配比例
print(f"Number of Matches: {num_matches}")
print(f"Average Distance: {avg_distance}")
print(f"Ratio of Matches: {ratio_matches:.2f}")
从上面结果可以验证还是有效的,同是奇瑞汽车时会这个匹配的关键点数量和匹配比例为0.29,如果是奇瑞和雷克萨斯则是0.26,说明图片越不相似。
六、图片复制
python
def copy_func(source_folder, destination_folder, now_image, target_image):
    import os
    import shutil
    # 定义源文件夹和目标文件夹
    # source_folder = 'path/to/a'
    # destination_folder = 'path/to/b'
    # 确保目标文件夹存在,如果不存在则创建
    os.makedirs(destination_folder, exist_ok=True)
    # 构建源文件路径和目标文件路径
    source_file = os.path.join(source_folder, now_image)
    destination_file = os.path.join(destination_folder, target_image)
    # 复制文件
    try:
        shutil.copy2(source_file, destination_file)
        print(f"Copied {source_file} to {destination_file}")
    except FileNotFoundError:
        print(f"File {source_file} not found.")
    except Exception as e:
        print(f"An error occurred: {e}")

    print("File copy operation completed.")
七、拼接多张图片
这里一般还有个要求,如果是横向水平拼接,一般将所有图片调整为所有图片中最小的高度(进行等比例缩放):
python
# 按照最小高度,对不同图片进行等比例缩放
from PIL import Image
import matplotlib.pyplot as plt
import os

def resize_images_to_same_height(image_paths, target_height):
    resized_images = []
    for image_path in image_paths:
        image = Image.open(image_path)
        # Calculate the new width to maintain the aspect ratio
        aspect_ratio = image.width / image.height
        new_width = int(target_height * aspect_ratio)
        # Resize the image
        resized_image = image.resize((new_width, target_height), Image.Resampling.LANCZOS)
        resized_images.append(resized_image)
    return resized_images

def concatenate_images_horizontally(images, output_path):
    # Find the total width of the final image
    total_width = sum(image.width for image in images)
    # Find the maximum height (all images have the same height after resizing)
    max_height = images[0].height

    # Create a new image with the appropriate size
    concatenated_image = Image.new('RGB', (total_width, max_height))

    # Paste each image into the new image
    current_x = 0
    for image in images:
        concatenated_image.paste(image, (current_x, 0))
        current_x += image.width

    # Display the concatenated image
    display(concatenated_image)
    # Save the concatenated image
    concatenated_image.save(output_path)

# 获取文件夹中的图片路径
folder_path = "/a_ex_all_pinpai_car/"
files = os.listdir(folder_path)
image_paths = [os.path.join(folder_path, file) for file in files if file.endswith(('jpg', 'jpeg', 'png'))]

# 动态确定目标高度(最小高度)
heights = [Image.open(image_path).height for image_path in image_paths]
target_height = min(heights)

# Resize images to the same height
resized_images = resize_images_to_same_height(image_paths, target_height)

# 输出路径
output_path = os.path.join(folder_path, 'concatenated_image.jpg')

# Concatenate images horizontally
concatenate_images_horizontally(resized_images, output_path)
这里拼接后的结果如下图:

备注:大模型的训练少不了算力资源,博主和一些平台有合作~
高性价比4090算力租用,注册就送20元代金券,更有内容激励活动,点击。
GPU云服务器租用,P40、4090、V100S多种显卡可选,点击。
Reference
1 计算两幅图像的相似度(PSNR、SSIM、MSE、余弦相似度、MD5、直方图、互信息、Hash)& 代码实现 与举例