- 操作系统:ubuntu22.04
- OpenCV版本:OpenCV4.9
- IDE:Visual Studio Code
- 编程语言:C++11
1.功能描述
opencv_contrib中有一个用于快速检测直线的类,叫FastLineDetector,下面介绍一下如何使用它,首先要用到一个cv::ximgproc::createFastLineDetector函数,然后会使用一个类EdgeDrawing,
2.类FastLineDetector
2.1 detect()函数
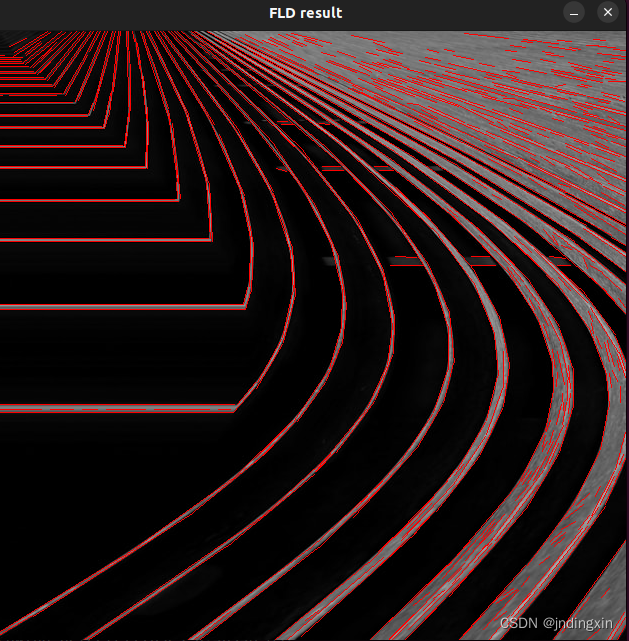
在输入图像中寻找线条。下图是采用算法默认参数进行处理后的输出结果。

2.1.1 原型
cpp
virtual void cv::ximgproc::FastLineDetector::detect	(
InputArray 	image,
OutputArray lines
)
2.1.2参数
-
参数image 一个灰度图像(CV_8UC1格式)作为输入。如果只需要选择图像中的某个感兴趣区域(ROI)进行检测,可以使用如下方法:fld_ptr->detect(image(roi), lines, ...); 然后将检测到的线条坐标加上ROI的偏移量,即 lines += Scalar(roi.x, roi.y, roi.x, roi.y)。这样处理后,得到的线条坐标会自动调整为相对于原图的正确位置。
-
参数lines 一个由Vec4f元素组成的向量,用于指定线条的起始点和结束点。其中,Vec4f表示为(x1, y1, x2, y2),点1是线条的起点,点2是线条的终点。返回的线条方向设定为使得较亮的一侧位于线条的左侧。
2.2 drawSegments函数
在给定的图像上绘制线段
2.2.1原型
cpp
virtual void cv::ximgproc::FastLineDetector::drawSegments	(
InputOutputArray 	image,
InputArray 	lines,
bool 	draw_arrow = false,
Scalar 	linecolor = Scalar(0, 0, 255),
int 	linethickness = 1
)
2.2.2参数
- 参数 image 用于绘制线段的图像。此图像应大于或等于找到线段的原始图像尺寸。
- 参数 lines 需要被绘制的线条的向量.
- 参数 draw_arrow 如果为真,将绘制箭头头部.
- 参数 linecolor 线的颜色.
- 参数 linethickness 线的厚度.
3 类EdgeDrawing
这个类实现了一系列边缘检测与特征提取算法,包括ED(EdgeDrawing)267、EDLines 4、EDPF 5 和 EDCircles 6。这些算法主要用于图像处理领域,旨在从图像中识别出边缘、线段、特定模式(如圆)以及可能的其他特征。EdgeDrawing专注于边缘的高效抽取,EDLines专门用于线段检测,EDPF可能是指在某些特定条件或优化下的边缘和线段检测,而EDCircles则是用于检测圆形结构。此类的实现能够为图像分析和计算机视觉任务提供强大的工具。
3.1函数 detectEdges (InputArray src)
该操作在灰度图像中检测边缘。
3.1.1原型
cpp
virtual void cv::ximgproc::EdgeDrawing::detectEdges ( InputArray src ) 3.2 函数detectLines
进行直线检测
3.2.1 原型
cpp
virtual void cv::ximgproc::EdgeDrawing::detectLines	(
OutputArray 	lines
)
3.3函数detectEllipses
检测圆形和椭圆
3.3.1原型
cpp
virtual void cv::ximgproc::EdgeDrawing::detectEllipses	(
OutputArray 	ellipses
)
3.4函数getSegments
返回检测到的边缘段组成的 std::vector<std::vector>,详情请参见 detectEdges() 函数
3.4.1原型
cpp
virtual std::vector<std::vector<Point> > cv::ximgproc::EdgeDrawing::getSegments ( ) 4 createFastLineDetector函数
这个函数是创建一个FastLineDetector的智能指针,并且对他进行初始化。
4.1函数原型
cpp
Ptr<FastLineDetector> cv::ximgproc::createFastLineDetector	(
int 	length_threshold = 10,
float 	distance_threshold = 1.414213562f,
double 	canny_th1 = 50.0,
double 	canny_th2 = 50.0,
int 	canny_aperture_size = 3,
bool 	do_merge = false
)
4.2参数描述
- 参数length_threshold 长度阈值,线段长度小于这个阈值就会被丢弃。
- 参数distance_threshold 距离阈值 如果一个点距离假设的线段超过此设定值,那么该点将被视为异常点
- 参数canny_th1 Canny算法中的第一个阈值用于执行滞后阈值过程
- 参数canny_th2 Canny算法中的第二个阈值用于执行滞后阈值过程
- 参数canny_aperture_size 在Canny()算法中用于Sobel算子的孔径尺寸。如果设为零,则不应用Canny算法,直接将输入图像作为边缘图像使用。.
- 参数 do_merge 如果为真,则将执行片段的增量合并。
5 示例代码
cpp
#include "opencv2/highgui.hpp"
#include "opencv2/imgcodecs.hpp"
#include "opencv2/imgproc.hpp"
#include "opencv2/ximgproc.hpp"
#include <iostream>

using namespace std;
using namespace cv;
using namespace cv::ximgproc;

int main( int argc, char** argv )
{
    // 读取图像并转换为灰度
    cv::Mat image = cv::imread( "/media/dingxin/data/study/OpenCV/sources/images/line.jpg", cv::IMREAD_GRAYSCALE );
    if ( image.empty() )
    {
        std::cerr << "Could not open or find the image" << std::endl;
        return -1;
    }

    imshow( "原灰度图", image );

    // Create FLD detector
    // Param Default value Description
    // length_threshold 10 - Segments shorter than this will be discarded
    // distance_threshold 1.41421356 - A point placed from a hypothesis line
    // segment farther than this will be
    // regarded as an outlier
    // canny_th1 50 - First threshold for
    // hysteresis procedure in Canny()
    // canny_th2 50 - Second threshold for
    // hysteresis procedure in Canny()
    // canny_aperture_size 3 - Aperturesize for the sobel operator in Canny().
    // If zero, Canny() is not applied and the input
    // image is taken as an edge image.
    // do_merge false - If true, incremental merging of segments
    // will be performed
    int length_threshold        = 10;
    float distance_threshold    = 1.41421356f;
    double canny_th1            = 50.0;
    double canny_th2            = 50.0;
    int canny_aperture_size     = 3;
    bool do_merge               = false;
    Ptr< FastLineDetector > fld = createFastLineDetector( length_threshold, distance_threshold, canny_th1, canny_th2, canny_aperture_size, do_merge );
    vector< Vec4f > lines;

    //由于某些CPU的电源管理策略,首次运行算法时似乎需要更长的时间。
	//因此,我们在这里对算法进行10次运行,以充分预热CPU性能后,了解算法的实际处理时间。

    for ( int run_count = 0; run_count < 5; run_count++ )
    {
        double freq = getTickFrequency();
        lines.clear();
        int64 start = getTickCount();
        // 使用FLD检测线段
        fld->detect( image, lines );
        double duration_ms = double( getTickCount() - start ) * 1000 / freq;
        cout << "Elapsed time for FLD " << duration_ms << " ms." << endl;
    }
    // 显示用FLD找到的线
    Mat line_image_fld( image );
    fld->drawSegments( line_image_fld, lines );
    imshow( "FLD result", line_image_fld );
    waitKey( 1 );
    Ptr< EdgeDrawing > ed             = createEdgeDrawing();
    ed->params.EdgeDetectionOperator  = EdgeDrawing::SOBEL;
    ed->params.GradientThresholdValue = 38;
    ed->params.AnchorThresholdValue   = 8;
    vector< Vec6d > ellipses;
    for ( int run_count = 0; run_count < 5; run_count++ )
    {
        double freq = getTickFrequency();
        lines.clear();
        int64 start = getTickCount();
        // Detect edges
        // you should call this before detectLines() and detectEllipses()
        ed->detectEdges( image );
        // Detect lines
        ed->detectLines( lines );
        double duration_ms = double( getTickCount() - start ) * 1000 / freq;
        cout << "Elapsed time for EdgeDrawing detectLines " << duration_ms << " ms." << endl;
        start = getTickCount();
        // Detect circles and ellipses
        ed->detectEllipses( ellipses );
        duration_ms = double( getTickCount() - start ) * 1000 / freq;
        cout << "Elapsed time for EdgeDrawing detectEllipses " << duration_ms << " ms." << endl;
    }
    Mat edge_image_ed                  = Mat::zeros( image.size(), CV_8UC3 );
    vector< vector< Point > > segments = ed->getSegments();
    for ( size_t i = 0; i < segments.size(); i++ )
    {
        const Point* pts = &segments[ i ][ 0 ];
        int n            = ( int )segments[ i ].size();
        polylines( edge_image_ed, &pts, &n, 1, false, Scalar( ( rand() & 255 ), ( rand() & 255 ), ( rand() & 255 ) ), 1 );
    }
    imshow( "EdgeDrawing detected edges", edge_image_ed );
    Mat line_image_ed( image );
    fld->drawSegments( line_image_ed, lines );
    // 画圆和椭圆
    for ( size_t i = 0; i < ellipses.size(); i++ )
    {
        Point center( ( int )ellipses[ i ][ 0 ], ( int )ellipses[ i ][ 1 ] );
        Size axes( ( int )ellipses[ i ][ 2 ] + ( int )ellipses[ i ][ 3 ], ( int )ellipses[ i ][ 2 ] + ( int )ellipses[ i ][ 4 ] );
        double angle( ellipses[ i ][ 5 ] );
        Scalar color = ellipses[ i ][ 2 ] == 0 ? Scalar( 255, 255, 0 ) : Scalar( 0, 255, 0 );
        ellipse( line_image_ed, center, axes, angle, 0, 360, color, 2, LINE_AA );
    }
    imshow( "EdgeDrawing result", line_image_ed );
    waitKey();
    // return 0;

    return 0;
}
6 结果
原图:

FLD结果图:
EdgeDrawing 检测结果(线段)

EdgeDrawing 结果(画圆和椭圆):
