1.2.3 手工发布
学习目标
这一节,我们从 基础知识、简单实践、小结 三个方面来学习
基础知识
简介
powershell
	为了合理的演示生产环境的项目代码发布,同时又兼顾实际实验环境的资源,我们这里将 B主机和C主机 用一台VM主机来实现,A主机单独实现。这两台主机的ip地址相关内容如下:
	A主机:10.0.0.12   B主机: 10.0.0.13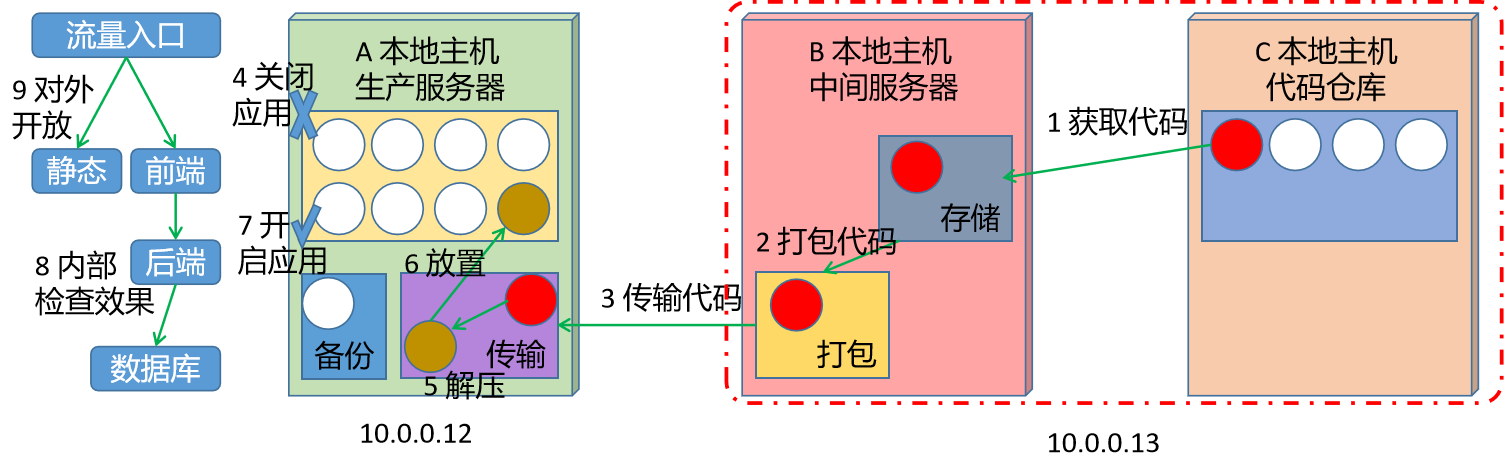
powershell
	为了体现整个实践操作的标准化,在这里进行所有目录的统一规划:
		代码存储目录: /data/codes/django
		打包文件目录: /data/codes
		脚本相关目录: /data/scripts
		备份文件目录: /data/backup/django
		项目代码目录: /data/server/web_site
简单实践
代码准备-10.0.0.13
powershell
准备待发布代码
[root@localhost ~]# mkdir /data/codes
[root@localhost ~]# cd /data/codes/
[root@localhost /data/codes]# mkdir django
[root@localhost /data/codes]# scp root@10.0.0.12:/data/server/web_site/app1/views.py django/
[root@localhost /data/codes]# cat django/views.py
from django.shortcuts import render
from django.http import HttpResponse

# Create your views here.
# 定制后端业务逻辑处理函数
def hello(request):
    return HttpResponse("web_site v0.1\n")
代码获取-10.0.0.13
powershell
我们借助于sed的方式模拟代码获取修改后的代码
[root@localhost /data/codes]# sed -i 's#0.1#0.2#' django/views.py
[root@localhost /data/codes]# grep web_site django/views.py
    return HttpResponse("web_site v0.2\n")
打包代码-10.0.0.13
powershell
打包文件
[root@localhost /data/codes]# tar zcf django.tar.gz django/
[root@localhost /data/codes]# ls
django  django.tar.gz

确认文件信息
[root@localhost /data/codes]# zcat  django.tar.gz
django/0000...026 5ustar  rootrootdjango/views.py000...12531 0ustar  rootrootfrom django.shortcuts import render
from django.http import HttpResponse

# Create your views here.
# 定制后端业务逻辑处理函数
def hello(request):
    return HttpResponse("web_site v0.2\n")
传输代码-10.0.0.12
powershell
在制定的目录下获取远程代码目录
[root@localhost ~]# mkdir /data/codes
[root@localhost ~]# cd /data/codes/
[root@localhost ~]# scp root@10.0.0.13:/data/codes/django.tar.gz ./
关闭应用-10.0.0.12
powershell
前端准备数据迁移配置
[root@localhost ~]# mkdir /etc/nginx/conf.d
[root@localhost ~]# cat /etc/nginx/conf.d/update.conf
server {
  listen 6666;
  location / {
    index index.html;
    root /usr/share/nginx/update/;
  }
}

准备数据迁移文件
[root@localhost ~]# mkdir /usr/share/nginx/update -p
[root@localhost ~]# echo '数据迁移中,请耐心等待,抱歉!!!' >> /usr/share/nginx/update/index.html
powershell
使用数据迁移配置
[root@localhost ~]# cat /etc/nginx/default.d/django.conf
location /hello/ {
  # proxy_pass http://localhost:8000;
  proxy_pass http://10.0.0.12:6666/;
}

重启nginx服务
[root@localhost ~]# /usr/sbin/nginx -t
nginx: the configuration file /etc/nginx/nginx.conf syntax is ok
nginx: configuration file /etc/nginx/nginx.conf test is successful
[root@localhost ~]# systemctl restart nginx
powershell
检查效果
[root@localhost ~]# netstat -tnulp |grep nginx
tcp        0      0 0.0.0.0:6666   0.0.0.0:*   LISTEN      92562/nginx: master
tcp        0      0 0.0.0.0:80     0.0.0.0:*   LISTEN      92562/nginx: master
tcp6       0      0 :::80          :::*        LISTEN      92562/nginx: master
[root@localhost ~]# curl www.superopsmsb.com/hello/
数据迁移中,请耐心等待,抱歉!!!
powershell
关闭后端的django服务
[root@localhost ~]# kill $(lsof -Pti :8000)
[root@localhost ~]# netstat -tnulp | grep 8000
[root@localhost ~]#
解压代码-10.0.0.12
powershell
[root@localhost ~]# cd /data/codes
[root@localhost /data/codes]# tar xf django.tar.gz
备份文件-10.0.0.12
powershell
备份老文件
[root@localhost /data/codes]# mkdir /data/backup/django -p
[root@localhost /data/codes]# mv /data/server/web_site/app1/views.py /data/backup/django/views.py-$(date +%Y%m%d%H%M%S)
[root@localhost /data/codes]# ls /data/server/web_site/app1/views.*
ls: 无法访问/data/server/web_site/app1/views.*: 没有那个文件或目录

放置新文件
[root@localhost /data/codes]# mv /data/codes/django/views.py /data/server/web_site/app1/
[root@localhost /data/codes]# ls /data/server/web_site/app1/views.*
/data/server/web_site/app1/views.py
[root@localhost /data/codes]# grep web_site /data/server/web_site/app1/views.py
    return HttpResponse("web_site v0.2\n")
开启应用-10.0.0.12
powershell
开启后端django服务
[root@localhost /data/codes]# source /data/virtual/venv/bin/activate
(venv) [root@localhost /data/codes]# cd /data/server/web_site/
(venv) [root@localhost /data/server/web_site]# python manage.py runserver >> /dev/null 2>&1 &
[1] 92774
(venv) [root@localhost /data/server/web_site]# deactivate
[root@localhost /data/server/web_site]#

检查效果
[root@localhost ~]# netstat -tnulp | grep 8000
tcp        0      0 127.0.0.1:8000  0.0.0.0:*    LISTEN      92776/python
powershell
修改前端nginx服务入口
[root@localhost ~]# cat /etc/nginx/default.d/django.conf
location /hello/ {
  proxy_pass http://localhost:8000;
  # proxy_pass http://10.0.0.12:6666/;
}

重启nginx服务
[root@localhost /data/server/web_site]# nginx -t
nginx: the configuration file /etc/nginx/nginx.conf syntax is ok
nginx: configuration file /etc/nginx/nginx.conf test is successful
[root@localhost /data/server/web_site]# systemctl restart nginx
内部检查-10.0.0.12
powershell
检查效果
[root@localhost /data/server/web_site]# curl www.superopsmsb.com
hello nginx
[root@localhost /data/server/web_site]# curl www.superopsmsb.com/hello/
web_site v0.2
对外开放
powershell
接收外部用户流量即可